An interesting mushroom-lamp. Making glowing decorative mushrooms Technical features of the LED lamp Magic mushrooms
A small piece of the amazing planet from the movie “Avatar” will fill the room with a magical soft light. This distant and fabulous world is inhabited by unusual animals and fantastic plants.
A small part of the fascinating forest, emitting various shades, can settle down in your home, dear readers.
Japanese designer and original designer Yukio Takano created this unique collection of LED lanterns.
Each element is made so naturally that it can be mistaken for a mushroom family that has settled on a piece of wood. The kits are packaged in beautiful boxes and will delight science fiction lovers.

Probably, if you look hard enough, you can find a similar composition for sale. But the unique thing is that it is quite easy to make it yourself at home. Such a work will be especially expensive.
Let's look at the manufacturing process together with the Design Museum website.
We will need: a wooden base, transparent and luminous polymer clay, wires, LEDs and imagination.
We go in search of suitable driftwood that does not have significant cracks, rot or insects. To make sure that there are no small animals, the piece of wood needs to be thoroughly washed under running water and then calcined in the oven for several hours at a temperature of 200 degrees.

To hide all the wiring, you need to hollow out the middle, but this is not always possible. Especially if it is a root fragment with many branches. Therefore, you can simply drill holes in the places where the mushrooms will be located, and then carefully bring the wires to the back side and secure them.
Mushroom caps and stems are made from a ceramic base. Pinch off a piece from each type and roll into thin sausages. Alternating them with each other, we collect them into a bundle and roll them again to compact them.
If you can’t immediately sculpt very thin flagella, then you can simplify this process a little: first, we put together two cylinders of the same color, roll them out, cut them crosswise into two or four parts, and roll them out again. We continue this way until we achieve the desired result.
The next stage is making the hats. We cut off a piece of the length we need from the bundle and carefully push the clay apart from the inside, forming walls that should be thinner at the edges. If you need a wide hat, then it is better to cut out the excess material.
For this process, you need to select several convenient devices and find an image of your chosen mushroom. This will make it easier to achieve maximum resemblance to the original.
To achieve a more natural look, we recommend slightly tinting some areas. The dry brush and paint technique is perfect for this. You can also pour a little sand or earth onto the surface of the finished hat. Place the products in the oven for 15 minutes at 275 degrees.

With the legs it’s a little easier: we roll out the clay thinly and wrap the wires in it, compacting it well and leaving a tail on top for attaching the LEDs. We pass the lower part into the prepared holes. We secure the lead-out wires and form slightly uneven columns.
Rechargeable batteries, batteries or solar panels can be used as batteries. They need to be hidden inside the base or on its back side. Add a little hot glue to each hat. Let it harden slightly. Then we press the resulting creation tightly against the leg with the LED.
That's it, ready! Although you can go further in the design, for example, cover the wood with a protective varnish or apply small spots of luminous paint on it. Imagine!


Hi all! In today's article we will talk about how do unusual night light their hands. In general, the project is quite simple and, if desired, anyone can repeat this homemade.
Step 1: Materials and Tools

Materials:
- Cardboard;
- LED strip kit;
- Wood glue/PVA;
- Aquarium gravel (pink and yellow);
- Plants for aquarium;
- Acrylic paint (white and red);
- Cotton wool;
- 2.5 m stranded wire;
- 1 m single-core wire;
- Heat shrink;
- 5 texture paper towel pieces.

Tools:
- Hot glue gun;
- Scissors;
- Typesetting scalpel;
- Ruler;
- Pencil;
- Artistic brush;
- Stipper (insulation stripping device);
- Wire cutters;
- Soldering iron and solder.

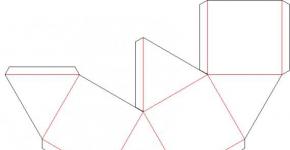
Step 2: Templates and blanks


Print and cut out the templates, and then trace them on cardboard.


Slightly round the workpieces using a ruler.


Step 3: Glue the pieces together


To begin, take two pieces of the leg and glue their lower parts from the inside. We will have to hold the workpiece in our hands. Let's wait until the glue dries, and then we'll move up little by little. We continue gluing the pieces together until we reach the sixth fragment (inclusive). We put the first one aside and start gluing the second half.


When both halves are ready, glue them together.


We repeat the same for the hat.


Step 4: Holes

Let's print out several templates and trace their holes on the mushroom cap. Let's cut them out with a scalpel.


Let's choose the best place for the power cord on the mushroom stem and cut a hole for it.


Step 5: Texture


Let's trace the template (fragment) of the hat on a paper towel and cut it out 12 times. Mix wood glue (PVA glue) with a small amount of water and apply a large amount of “composition” to the cap, and then secure the cut out fragments with a paper towel.


When all the pieces are in place, wait half an hour and then generously apply glue on top of the towel.


Let's repeat the same steps for the leg.


Apply glue to the inner surface of the leg and the outer cap. Make sure that the glue has soaked all the folds. This will make the cardboard quite hard and smooth.


Let the mushroom dry overnight.


Step 6: Painting


Let's start by painting the inside of the cap, and then move on to the stem. You will have to repeat this process two or three times.

When the paint dries, paint the outer surface of the cap red (2-3 times).


Cut out the previously taped holes.


Trace the frill on a paper towel, cut it out and attach it to the leg.


Step 7: Backlight


Let's fix the LED strip in the form of a spiral. Cut the strip with scissors at the nearest “cut point”. Be careful when bending the strip so as not to damage its conductors.


Let's cut the stranded wire into four pieces of 30-40 cm each and glue them together. We will strip/tin the ends of the wires and solder them to the LED strip. Apply hot melt glue to the connection. Let's mark the negative/positive conclusions with a marker. After this, apply hot glue to the LED strip for additional fixation on the cardboard.


Glue the power socket of the LED strip controller to the leg from the inside. Let's cut 4 pieces of single-core wire, solder them into the holes for the controller pins and insulate the soldering area. Let's cut out a small rectangular window for the controller's IR receiver and attach it to the inside of the case.


Let's pull the wires through the leg and glue it to the cap.


Step 8: Base


Trace the base on cardboard and cut it out. Glue both parts together and lay the template on top of the glued blank. Using a scalpel, trace the lines on the template and cut out grooves for the LED strip.

Let's attach LEDs around the base. We will cut grooves wherever necessary. From the remaining stranded wire, cut four more pieces of 10-15 cm each, stripping/tinning them, and solder them to the end of the strip. Apply glue to the soldering area and attach the remaining part of the wire to the base. Note the pinout of the wires.


We put heat shrink on the wires. We solder the wires coming from the controller to the wires of the base tape. I connected it in an arbitrary way, but the power goes to power! I wanted the lighting of the hat to be different from the lighting of the base. Slide the heat shrink over the joints and shrink it.


Let's turn on the night light and make sure that the base illumination is working. Solder the wires coming from the LED strip in the header to the LED strip of the base.


If everything works as it should, glue the leg to the base.


Step 9: Decor


We glue the pebbles to the base one by one, as close to each other as possible. Completely seal the surface and ends.


Let's trim the plants and cover the mushroom with them. Let's stick more stones in the places where they are attached to the base. Let's cut several plants into smaller pieces and glue them too.


Add a little water to the glue and mix well. Apply the “composition” to the holes in the cap and push pieces of cotton wool into them. In smaller holes it is easier to push cotton wool from the outside, and for larger holes it is easier to push cotton wool from the inside.


Cut the cotton wool into strips, apply glue to the end of the cap along the entire circumference and glue the cotton wool.


Step 10: Final


Low power LED strips should be used as backlighting. Strong heating in combination with cardboard and cotton wool will not do any good.


Step 11: Future Thoughts


I think that the night light would look even more impressive with a smoke machine and could very well be an interesting decoration for Halloween. I think there is something magical in this :)
I hope you liked the article 😉 Have a nice day everyone)
Hello everyone, DIY lovers!
This article will talk about an interesting lamp that will delight a child with its design, namely: the Magic Mushroom.
We will need:
- Cardboard;
- LED strip kit;
- Wood glue/PVA;
- Gravel for the aquarium (pink and yellow);
- Plants for the aquarium;
- Acrylic paint (white and red);
- Vata;
- 2.5 m of stranded wire;
- 1 m of single-core wire;
- Heat shrink;
- 5 textured pieces of paper towel;
- Hot glue gun;
- Scissors;
- Typesetting scalpel;
- Ruler;
- Pencil;
- Artistic brush;
- Wire cutters;
- Soldering iron and solder.


Stage 1. Templates and blanks.
First, the author prints and cuts out the templates, and then cuts them out on cardboard.


Next, I rounded the edges using a ruler.


And he did the same with other parts.

The template can be downloaded:
(downloads: 52)
Stage 2. Gluing parts into one shape.
To begin with, the author took two pieces of legs from the blanks and glued their lower parts from the inside. I waited until the glue dried, and then continued gluing little by little until I reached the sixth fragment (inclusive). He then set the first half aside and began gluing the second half together.


When both halves were ready, the author glued them together.


Later the author repeated the same thing for the hat.


Stage 3. Holes
First, the author printed out several templates and traced their holes on the mushroom cap, and cut them out with a scalpel.


Then I chose a place for the power cord on the mushroom stem and cut a hole for it.

Stage 4. Texture
The author traced the hat template on a paper towel and cut it out 12 times. Then I mixed wood glue with a small amount of water and applied a large amount of this “composition” to the cap, and then secured the cut out fragments with a paper towel.


Once all the pieces were in place, I waited half an hour and then applied a generous amount of glue over the towel.

Then the author repeated the same steps for the leg.


Later, the author applied glue to the inner surface of the leg and the outer cap. I made sure that the glue soaked through all the folds.


Afterwards, the author left the mushroom to dry overnight.


When the paint had dried, the author painted the outer surface of the cap red (2-3 times).


Then I cut out the previously taped holes.


I traced the frill on a paper towel, cut it out and attached it to the leg.


Stage 6. Backlight
First, the author secured the LED strip in the form of a spiral. I cut the strip with scissors at the nearest “cut point”.
Attention: Be careful when bending the strip so as not to damage its conductors.


Then I cut the stranded wire into four pieces of 30-40 cm each and glued them together. I stripped and tinned the ends of the wires and soldered them to the LED strip. Then I applied hot melt glue to the joint. Marked negative and positive findings with a marker. After that, I applied hot glue to the LED strip for additional fixation on the cardboard.


Next, I glued the power socket of the LED strip controller to the leg from the inside. I cut 4 pieces of single-core wire, soldered them into the holes for the controller pins and insulated the soldering area. I cut out a small rectangular window for the controller's IR receiver and attached it to the inside of the case.


Let's pull the wires through the leg and glue it to the cap.


Stage 7. Base
Then I traced the base on cardboard and cut it out. I glued both parts together and laid the template on top of the glued blank. Using a scalpel, I traced the lines on the template and cut out grooves for the LED strip.


I attached LEDs around the base. I cut grooves wherever necessary. From the remaining stranded wire, I cut four more pieces of 10-15 cm each, stripping/tinning them, and soldered them to the end of the strip. I applied glue to the soldering area and attached the remaining part of the wire to the base. I noted the pinout of the wires.


I put heat shrink on the wires. I soldered the wires coming from the controller to the wires of the base tape. I connected it in an arbitrary way, but the power goes to power! The author wanted the lighting of the hat to be different from the lighting of the base. Slided the heat shrink over the joints and settled it.
I turned on the night light and made sure that the base illumination was working. I soldered the wires coming from the LED strip in the header to the LED strip of the base.
After everything worked as it should, the author glued the leg to the base.


Stage 8. Decoration
I glued the pebbles to the base one by one, as close to each other as possible. Completely sealed the surface and ends.


I trimmed the plants and pasted them over the mushroom. I glued more stones where they were attached to the base. I cut some plants into smaller pieces and glued them on as well.
Inspired by the beauty of autumn, we also decided to post a master class on autumn themes. True, we didn’t calculate the time to create it, but better late than never :)
We present to your attention a master class on creating a composition with magic mushrooms! They seem to be ordinary toadstools, but as soon as the autumn twilight falls, they begin to glow invitingly in the dark. This is good magic, which is designed to give warmth and a smile. But the main thing is not to try to eat them :)

What do we need to create.
Basic materials and tools:
- cold porcelain;
- oil paints;
- floral wire;
- stacks for modeling;
- wooden egg for shaping the caps;
- natural moss and bark.

Electronic components and glow tools:
- battery compartment for 4 batteries;
- fine wires;
- resistors;
- switch;
- soldering iron;
- auxiliary tools (electrical tape, wire cutters, tweezers, pliers, etc.).

Accessories:
- glue (PVA, epoxy);
- glue gun;
- drill or screwdriver;
- cling film;
- scissors;
- threads;
- cream.
Let's get started. First, you need to stock up on inspiration and decide what kind of mushrooms you want to create. For some reason I was drawn to toadstools :) I like their sophistication, translucency and the ability to create mass appeal.


We've chosen an approximate look and begin sculpting.
First of all, you can prepare the caps, since the legs will not be easy - you will need to mount the “electronics” in them. And with the hats everything is clear :) Take a small piece of cold porcelain and mix oil paint of a suitable color into it. In my case it's burnt umber. We must not forget that after drying the shade will be darker. Therefore, it is better to mix a little less than you want - in any case, then we will tint on top, and we can achieve the desired shade.


We form a fairly thin pancake with our fingers and give it a convex shape using a wooden egg. I think you can find some other suitable shape - I first walked around the apartment looking for it and came to the conclusion that an egg is most suitable for me. We gave the layer a convex shape, thinned it a little more, and you can carefully remove it from the egg.


Now we take a stack with two round pieces at the ends. Using it, you can push through the convex center of the mushroom, characteristic of toadstools.


Next, take a stack suitable for creating plates on the inside of the cap. We pass it along the entire perimeter, creating uneven, naturalistic plates. They may be slightly visible from the outside - this can often be observed in toadstools. And when we are satisfied with the result, we set the hat aside to dry.


The hat is dry.


Now we need to “revive” it - tint it a little with oil paint. I used two colors - natural umber to darken the middle and edges, and lemon yellow to give a slight tint to the middle part. I applied the paint with cotton swabs, blurring the edges of the application.


This picture shows the difference between the original hat and the “revived” one.

Some mushrooms can be deliberately flawed; nothing is perfect in nature.

The set of hats is ready, let's move on to the legs. All the electronics will be hidden in them, so first an introductory note on how to create the magic :)
Let's take a closer look at the components. For me, for example, this part of the work is the most difficult, because I don’t understand anything about it. Therefore, there are two options - either figure it out properly, or ask someone who knows how. If you manage to ask, skip the next few paragraphs. If the second option didn’t work out, then read on :)
LEDs. What to look for when choosing.
1. Firstly, it is the color and temperature of the light. You can choose green or blue for an interesting effect. And if the choice fell on simply white, then it is characterized by 3 main gradations on the Kelvin temperature scale:
- from 2700 to 3500 K - warm white;
- from 3500 to 5000 K - neutral white or natural;
- from 5000 to 7000 K - cold white or daylight white.

In our case, cold light is used, but it will pass through the cap and in any case “warm up”.
2. Secondly, luminous intensity, which is measured in Candelas (Cd). For LEDs, the gradation is approximately 2000-10,000. Accordingly, the more, the brighter it is. We have 10,000 Kd.
4. Well, and finally the size. In our case, 3 mm is small enough to fit under the cap. And there are 4, 5, 10 mm...
The LED legs have different lengths - this is necessary to immediately understand where the anode and cathode are. The longer leg and small “piece of hardware” inside the LED (in case you’ve already bitten off the legs) are the anode, the shorter leg and larger “piece of hardware” are the cathode.

Battery compartment. Everything is simple here - some are open, some are closed with a switch. You can take 2,3,4, etc. batteries (depending on the operating voltage of the LEDs). We have an open one for 4 batteries.
Switch. You can choose according to your taste. There are different types: toggle switches, push-button, slide. We have an engine one.
Resistors (resistance). Here we need to do a little math.
The resistor reduces the amount of current that comes from the power supply (the LED has almost no resistance, so if there is no resistor, the current will be too high).
R = (Vs - VL) / I
R denotes the resistance of the resistor, Vs the voltage value of the power supply (6 V in our case with 4 batteries) and VL- LED supply voltage value. Finally, I LED supply current.
Our LED operates from 2.8 to 3.2 V (see the Forward Voltage technical documentation) and consumes 20 mA.
Thus, Vs=6, VL=3 (take the average) and I=0.02
- R = (6 - 3)/0.02;
- R = 3/0.02;
- R = 150.
Therefore, a 150 Ohm resistor is needed. When purchasing, do not forget to look at the size of the resistor: the resistance may be the same, but the dimensions may be different. The smallest ones are made of metal film.
Wires. For such miniature work, we take thin acoustic cables 2x0.25 mm2.
Everything is collected! We take out another soldering iron with solder and get started.
First, let's prepare everything for work: cut off the excess length of the LED legs, expose the wires, select a suitable surface for work, and heat up the soldering iron. Let's start collecting. First you need to attach a resistor to the red wire and solder the connection.

We suggest you get a new indoor plant. Moreover, it does not require any maintenance at all, but it looks fabulous. It’s like something straight out of the screen, from the movie “Avatar.” Remember there were glowing mushrooms in the forest? So in the Mister Geek store there is such a miracle: Night Light Magic Mushrooms.
This is an LED lamp designed like a pot of plants and mushrooms. Or rather, you can decorate it yourself. “Plant” the plants however you like by placing them on artificial moss. Bend the mushrooms - they have flexible legs. It turns out very believable, as if this is all a real piece of forest. But the main magic happens later.
If the night light is plugged in, nothing will happen at first. But if you turn off the light, the mushrooms will light up. The two palest ones will shine evenly, and the pink one, with a wide cap, consistently changes color illumination. And just like that, it really is a fantastic sight. And an amazing gift that can be given, for example, to a woman on February 14th.
Technical Features of LED Magic Mushroom Lamp
The wire that needs to be connected to the network comes out directly from the ceramic pot, closer to its bottom. And just above is the light sensor. Accordingly, if you cover or seal it with something, the lamp will turn on immediately when connected to the outlet. You can check the performance of the night light this way: just cover the sensor with your finger, and the mushrooms should start to glow. Even if it's a bright sunny day. But in the dark they still look completely special.
Initially, you receive a pot of mushrooms, and artificial plants are included with it. They need to be stuck into the moss, and you will have to use additional tools - a suitable sharp object. You can distribute the plants as you wish, creating the illusion of their natural growth. And among them are beautifully curved mushrooms on thin stalks.
For the lamp to work, it must be connected to the network. The night light has a flat American plug, but the kit includes an adapter. Insert the plug into it, and then calmly use any European socket.
But if you want to have real, edible mushrooms on your table, then you will be interested in the Mushroom Growing Kit Mushroom Box.
Video
Characteristics
- 2 monochromatic mushrooms, the third one changes color;
- works in the dark (there is a light sensor);
- power supply: 230 V mains, American flat socket, included adapter for a standard European socket;
- material: ceramics, plastic, silicone;
- color: white pot, green moss and plants, porcini and pink mushrooms;
- placement: desktop;
- size (L*W*H): 10*10*19 cm;
- weight: 400 g;
- packaging: cardboard box;
- package size (L*W*H): 12*12*15 cm;
- brand: Love Your Life.