Do-it-yourself veneer cutting knife. Stages of production of interior veneer doors
I have at least one professional shift - I’m always looking for ways to do the same thing, only faster and cheaper. And preferably from improvised means. No, of course, I know one person whose hobby is cars. Such pure and selfless love... So he bought himself a car plant. But my hobbies cost me much less so far.
Judging by the forum, DIYers have a problem cutting veneer. Therefore, I am writing for do-it-yourselfers who have no other opportunity (or desire) than to cut veneer themselves. Perhaps there are much simpler ways to get even slats - for example, buy them in a store. I don’t argue with this...
Previously, part of each sheet of veneer was not used due to all sorts of problems with the fiber, but now 99% goes into use.
I take plywood. I put double-sided tape on it every ten centimeters.
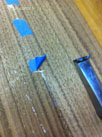
I'm applying veneer. Length 80-90 centimeters. Please note: I specifically chose veneer with a bias layer and slightly warped to demonstrate the capabilities of the method.

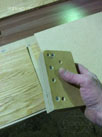
A year ago I made one adaptation. I did it to test the idea, I thought I’d remake it better later, but since it cuts without problems, I left it that way. So excuse me for looking simple. Materials: plywood, utility knife blades and two nails.

I just started squeezing it all with a clamp. It also works well as a pen. I set the cheek along the edge of the veneer and went to cut.

If necessary, you can do it several times to cut through. The knives follow the previous cut absolutely exactly. Notice below how easy it is to cut the bias cut.

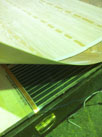
All that remains is to remove the cut strips from the tape. This is easily done with a knife, which is slipped under the veneer between strips of tape.
Just take your time and tear it off carefully. Then even the terrible crosshair remains intact.

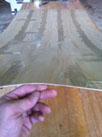
We get a bunch of planks that require almost no finishing. In this case, the planks are straight, just as I said: the veneer sheet was specially taken from the most neglected - warped. So the planks are slightly warped. But cut straight.

Scotch tape is enough for 5-7 times. The blades make enough cuts for 30. Then you feel that they have become dull. You can break off the ends and continue cutting with new tips.
When cutting with 5-6 blades at the same time, in 10 minutes of work you can cut veneer into a model of decent size.
Laying plywood of different thicknesses between the blades, I cut strips from 3 to 10 mm wide. It’s hard to pull more than 6-7 blades (but it depends on who). I didn’t cut veneer thicker than 1 mm (I just don’t have it). But since the blades absolutely follow the old paths, I think that 1.5 mm will not be a problem. There was an idea to use circular knives. I saw it in a stationery store, but decided that such a tool would be enough for me. But whoever is not too lazy can try.
And now a little technological mystery. It seems like a lot of people have problems with bending slats? I came across this effect by accident. Guess how it's done?
Take the rack. In this case, oak. Section approximately 10x10 mm.

And after two minutes it looks like this:

Let me note: the rail remained absolutely dry before and after. Damn, I wanted to bend it 90 degrees “to show off.” But I hurried and it turned out somewhere around 60-70. But if I had tinkered for three minutes, it would definitely have been 90! Write your answers in the forum.
I started this section to avoid repetition in different articles. I veneer various products quite often, and instead of describing the veneering process in each master class, I will simply provide a link to this article. The section will be updated and supplemented as photos (and possibly video) of material become available. And of course, as you use other methods of veneering and working with veneer.
Veneer can be sawn or peeled. Sawn veneer, as a rule, has a thickness of 3 mm. Peeled veneer - less than 1 mm. I’ll talk about rotary-cut veneer for now, partly because I use it more often, and veneering with rotary-cut veneer is more common. I’ll return to the conversation about sawn veneer a little later, when I have enough material for publication and work experience.
Typically, natural peeled veneer is not very wide - only 100-140 mm, with rare exceptions it is slightly wider. The length of the knoli (pack) of veneer can be different. From one and a half to three meters.
I’ll start my story with simple operations - veneering a workpiece (plane) with natural peeled veneer 0.6 mm thick.
In order to veneer (cover) a workpiece of larger width with such veneer, strips of veneer must be “jacketed” (joined together). Since the strips themselves do not have an ideal edge when purchased, you first need to trim this edge. Otherwise, after assembling (connecting) the strips together, there will be a gap between them. There are many ways to straighten the edges of veneer, one of which is to joint the edges.
Edge jointing.
 To start, I usually make two blocks of pine needles. The bars must be smooth in all planes and have an angle of 90 degrees. Between these blocks I crimp the veneer strips using lever clamps, if the width of the veneer strips allows for installation. In the case of jointing wide strips, you can use a beam with a strong curvature and turn it so as to increase the pressure on the middle.

 Then I fugue the veneer strips, along with the bars. If you look at the surface during the jointing process, you will see that the edge of the veneer is aligned with other, tightly pressed sheets.
You need to strive for almost complete surface uniformity. At the same time, it is important not to overdo it, because if we joint for too long, we can “fill up” the corner, which will again lead to unnecessary cracks, or disrupt the intended design.

 Next, we lay out the veneer, turning the strips over and matching the “native” sides. We check the quality of the edges by folding and pulling the strips together. The method of making a veneer shirt can be absolutely any. Traditionally, veneer is assembled using a “book”, that is, the “native” sides of the strips are combined—in a mirror image.
Another way to process veneer edges before setting them into a “shirt” is to trim with a razor.
Cutting veneer with a razor.

 Trimming is done with a very simple device. Essentially, this is a homemade cutter for cutting veneer. A simple razor pressed together with two pieces of any slab material or wood. In my case, these are two pieces of MDF 16 or 19 mm. The cutting edge of the razor protrudes slightly, literally by 1mm. , that is, it does not significantly exceed the thickness of the veneer used in the work.As for the razor itself, it can be any simple razor, the only thing that I liked more than domestically produced razors. "Sputnik" or "Neva". In my opinion, imported razors are a little thinner, last less time and the cut itself is not always good. Before assembling the two halves of the body of our veneer cutter, it is better to secure the razor to one of the halves with simple masking tape. This will greatly simplify the further cutting process.
 First I cut the veneer to the required length. Usually, I make the “shirt” longer and wider than the workpiece by about 10 mm. (5 mm on each side). “Overhangs” (protruding veneer) larger than 5 mm will be difficult to remove accurately. I described in more detail the cutting of “overhangs” and a device for working with edges after veneering in the articleAs a working surface, I usually use a strip of MDF. On it, if there are a lot of blanks, I make markings and cut the veneer to the required size. Many of my colleagues like to use plywood in the same way - the razor will be less dull. At the same time, I use a piece of MDF with an angle of 90 degrees as a stop for the cutter. The cut is made on both sides so as not to damage the veneer at the exit. Pressing the fence tightly against the surface of the veneer, I make a cut on one side, and then, turning the cutter over, I cut through the entire strip. For this operation, you can use a simple office cutter. If there are a lot of blanks of the same length, you can press many strips of veneer at once between two sheets of board material and trim them using a miter saw or a hand router.

 Next, using the same MDF as a base, we place a second strip of MDF on top, securing it with clamps at the end. We mark the intended cut. In the future, placing a strip of veneer between strips of MDF, we use the top strip as a stop. Pressing it with one hand, we cut the veneer along its entire length. If the veneer strip “walks” a little and moves during the cutting process, you can stick pieces of abrasive onto the top strip from the inside. In rare cases when this is necessary, I glue the abrasive onto double-sided tape - this makes it easier to remove later. The abrasive tightly fixes the veneer strip, does not allow it to move, and the seam between the strips when the veneer is assembled into a “shirt” turns out to be impeccable.
It is important that the MDF strip used as a stop is wide and even. Otherwise, it will be difficult to join two strips of veneer, three will be extremely difficult, and further installation will require subsequent trimming of the outer curved edges.
When cutting through the veneer, the razor leaves a cut on the base (bottom strip) and becomes a little dull. The subsequent cut follows exactly the “knurled track” and does not cause serious changes in the blade of the razor. The razor gets dull quite quickly just on the veneer, because as soon as the cut becomes less than perfect and the hand begins to feel how the razor is cutting through the fibers of the veneer texture, it is turned over. Thus, each razor can be turned over 4 times.
Set of shirts for Gumirka.
 One of the ways to glue veneer when “setting shirts” is to use gummed tape (“Gumirka”). It is usually sold in the same stores as veneer. For work, we also need a sponge (or a piece of foam rubber), slightly moistened with water and a plastic card. A credit card or discount card will do just fine... unless, of course, you don’t mind it. I cut the tape into small pieces, about 40-50 mm long, although it is more convenient for others.


 Pieces of humirka are dipped in a sponge with water and laid out side by side on the table to dry. A lipstick moistened with water has adhesive properties - it sticks. Next, we place the drying lipstick on the seam, pulling up the edges and rubbing it in with plastic. It is important to apply Gumirka exactly at the moment when it is still sticky, but not very wet, otherwise it sticks worse and wets the veneer a little more with water, which is also not very good. It is not very difficult, it is easy to master by selecting it experimentally.
 Well, that’s all, our “shirt” is complete. There is an opinion that when Gumirka dries, it slightly tightens the veneer strips towards each other and the seam becomes better. But either I’m just unlucky, or I come across some kind of humirka that’s not quite right... In a word, no matter how hard I tried, I didn’t notice such an effect. Gumirka is excellent and almost irreplaceable when it comes to marquetry. Thanks to the reverse effect (it can be slightly moistened and carefully removed from the surface), marketers create amazing works. But if your set is a simple “shirt” in one direction, then it will be easier for you to work with masking tape.
Set of shirts on tape.
You can splice veneer strips not only by using gummed tape.
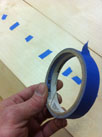
 You can use special tape or simple masking tape to splice veneer. In one of the workshops where I was lucky enough to work, I came across a similar method. Scotch tape is a blue or light brown tape, not very sticky, but quite enough for gluing veneer. The sticker principle is exactly the same as when using a lipstick. Apply it to the seam in small sections, pulling the veneer strips together with your other hand. Some people lightly “grab” the strips with sparse pieces of tape, then glue the entire seam. Some people don't glue the seam. I usually stick tape with a slight overlap on the previous section. This makes it easier for me to remove the tape from the workpiece after veneering.
 Using tape, of course, allows you to increase the speed of typing shirts, but this technique has one significant drawback. I was strongly advised not to try to sand the tape after veneering with a sanding machine, explaining that traces of the tape (glue) may remain and appear after varnishing.
The adhesive tape must be removed, and the glue comes off along with the tape, leaving almost no traces on the workpiece. I tried using simple masking tape for the same purposes, it seemed stickier to me. When removing it from the workpiece, it strives to tear out the veneer fibers from the junction of the strips. In the case of colored tape, this effect was also present, but in a much less pronounced form.
 Thus, the process of setting the veneer into a shirt took me approximately the same time as when using the gumirka, only I glued the gumirka longer, and when using adhesive tape I spent time removing it. A simple iron will help you avoid spending a lot of time removing the tape. If you heat it up to a temperature that is warm, but not hot - when your hand does not burn, I place it directly on the veneered workpiece and, moving it, remove the tape. In this case, you can pick it up with a scraper or a blunt chisel and pull. With stronger heating, you can get by with one cycle, but stronger heating is not desirable for the workpiece, and besides, you can overheat the tape, then the effect will be the opposite.
Joining veneer with a manual machine.
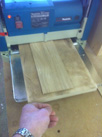
There is another way to splice veneer when “setting in a shirt” - use a manual veneer splicing machine. We resort to it when there is a larger volume of workpieces or when the operation needs to be done quickly. Separately, I would like to note that I still like working with gummer or adhesive tape more and it turns out better. The machine, of course, gives greater speed, but if you get better at it, I think the quality won’t be much different.

 So, the machine is a spool of special threads coated with glue (it is a consumable material), placed on top of a simple structure that runs on mains power. The thread is passed through a heating element and becomes sticky. The heating “proboscis”, through which the thread is passed, makes a zigzag movement when the machine moves, applying the thread to the surface of the veneer. And the roller, which is also one of the wheels of the machine, tightly rolls the heated thread, pressing it to the surface.


 The principle of operation is the same as with Gumirka. Pressing the edges of the veneer tightly with one hand, carefully move the machine along the seam with the other.It seemed to me that working with the machine is not very difficult, but it will still require some skill. In addition, the cost of the machine and, most importantly, the consumables may seem inhumane to you. The shirt is sealed with the glue thread down.
There are also a great variety of machines for splicing veneer strips, the purchase of which may make sense for large volumes of veneering. I don’t have much experience working with such equipment, or even with a manual machine for splicing veneer, and, in general, I don’t have any desire to purchase them. For my tasks, the “shirt set” with masking tape is what suits me best so far.
Gluing the workpiece with clamps.
Since not every workshop has a heavy press, I will describe one of the gluing methods - veneering with clamps. A pre-prepared beam (45x140x600mm), in the amount of 4-5 pieces, is placed on the work table, on which a sheet of slab material is placed, in our case it is a sheet of chipboard (40x620x1800mm.) The bars (45x70x600mm.) are prepared in the amount of 10-12 pieces. I usually lay newspaper or other paper over a sheet of chipboard. I try to avoid using a lot of paper, one or two layers is enough. The paper is needed to prevent excess glue from getting onto the surface of our improvised press and sticking the workpiece to it. The paper also absorbs excess moisture and allows the workpieces to seal a little faster than in the case of linoleum or film.
 So, evenly apply glue (in our case it’s regular PVA) onto the surface of the workpiece using a roller. There is no need to pour a lot of glue, this can have a bad effect on the quality of gluing or, if the glue is too runny, it can simply “break through the veneer” - the glue can come out on the front sides of the veneer surface, penetrating through the pores of the wood. The workpiece, if it is lined on both sides, can be placed on a special device. This will allow you to apply glue to both sides of the workpiece before placing it in the press. It is important that the time between applying the glue and placing the workpiece under pressure is as short as possible. Otherwise, if water-based glue is used, it will weather and lose its adhesive properties.

 Next, on a previously spread layer of paper, we spread the “shirt” with Gumirka or threads in the direction opposite to the one being glued. That is, out. Thus, the adhesive thread or gummed tape ends up on the front sides of the product. We place our blank coated with glue on the veneer, cover it with another “shirt”, lay down a layer of paper and place another sheet of slab material on top. Next, we crimp both sheets, with the inserted workpiece, using bars and quick-clamping clamps. In this case, the bars act as a distribution of compression over the entire surface of the sheet, and not just along the edges. The remaining free space between the bars can be compressed with whatever is at hand, but there is no particular need for this.
The workpiece is usually under pressure for at least 25 minutes, and is usually left for 30-40 minutes. If an industrial press is used, the drying time can be significantly shorter. This method is quite cheap, but very long. It is only suitable for you if you need to veneer several pieces, and if it is not possible to use a vacuum, pneumatic or hydraulic press.
Veneering in the press.

 It happens in exactly the same way as when veneering with clamps, only much faster and with less labor. In the workshop where fate brought this cold, homemade pneumatic press. The press was described in detail in the article - Linoleum is spread on the surface of the press, then polyethylene - so as not to spoil the linoleum and not to spend a lot of time cleaning it from glue. When using polyurethane adhesives, polyethylene is required; removing drops of glue from linoleum is extremely difficult. Next, the blanks are covered with another sheet of polyethylene and linoleum.
The holding time in the blank press can be reduced if a heating film is used. I can’t say exactly the heating temperature, I haven’t measured it... warm, but not hot. The film came to the rescue when the low temperature in the workshop did not allow veneering at all. The glue was heated with warm air and this film was used for veneering.
 For veneering I most often use kleiberit 303.0 glue and usually d3. If you didn’t have time to veneer all the blanks, and some of the work is left for tomorrow, and you’re too lazy to dry the roller in the morning, you can simply wrap it in stretch. This way, the glue will not dry out overnight and the roller will not be damaged. In addition, 300-400 grams of glue always disappear on the roller, which is also not very pleasant.
Finishing the surface of the workpiece with “Deck”
As promised, I will continue to edit and add to the section.
I often come across the fact that covering the surface of a product with “Deck” (solid strips, more than 2-3mm thick) is often equated to working with veneer. Experienced craftsmen and carpenters often correct me when I call material 2-3mm thick “deck”. and insist that it is just thick veneer. I won't argue, but I'm used to it. Both in this article and in other articles on this Internet resource, I call a deck a strip of thick veneer from 2.5 mm, usually sawn veneer.
Selection of material.
I believe that the main advantage of “deck” cladding is the ability to select exactly the material that the artisan considers appropriate for his product. That is, this method gives more opportunities, but one cannot ignore that labor costs, the amount of material, and therefore the cost of the product will be significantly higher than when working with thin (peeled) veneer.
The second significant advantage is the finishing of the product. When tinting, thin, peeled veneer and solid wood give different shades. With a “dull” enamel color, this does not matter, but when working with stains or tinting, the difference is quite noticeable, and can greatly ruin the appearance of the product.
Another compelling argument in favor of a deck or thick veneer is wear resistance and the possibility of further restoration. Deck is often used on stair treads, chair seats, tabletops, window sill surfaces and shelves. In general, anywhere where the surface may experience heavy loads or wear.
To count the material before selection, you need to determine the width of the strips. I was guided by my capabilities. The maximum possible cut of my circular saw, with a disk in stock, is 60mm. That is, if you cut in two passes, turning the workpiece over - approximately 118-120mm. Thus, I took the width of the tabletop - 500mm, with a small allowance - 520mm. and divided by 120mm. It turns out 4.3 stripes, that is, five. But since the workpiece has two sides (and I wanted to be sure that after pressing the workpiece would remain flat and not warp), I decided to cover both sides with a deck of the same thickness - 10 strips.
I decided to play it safe in case I couldn’t match the color perfectly and use stripes with a width that is a multiple of the width of the tabletop. Otherwise, if a difference in color appears after sanding, stripes of different widths on the tabletop will not look beautiful. That is, the width of our stripes, after all calculations, will be 110mm. (520mm. Divide by 5 = 104mm. and give a small allowance for jointing.
And so, we get the most convenient deck width for this product - 110mm. On average, I get 4-5 deck strips from one piece of board. I don’t like to depend on chance, and again I calmly give the quantity in reserve and cut 3 pieces of board. This is approximately 12-15 deck strips. The stock makes it possible to select more beautiful stripes and avoid accidents during further processing. Considering the length of the table top is 1000 mm, I had to use more than one board, because with a finished size of 1000 mm, I need a deck approximately 1150 mm long. In further processing (reimus), I will need a margin for the cut. My thickness planer makes a “step” as it enters and exits the workpiece.


 Board 30mm thick. I spent quite some time choosing the one for the dresser top. There was quite a lot of material and it was an unedged board, with knots, sapwood and wane.Finding a decent board and understanding that this particular board will suit is quite difficult - on a dirty board, the fibers are almost invisible and the color is unclear. In order to select one board, I had to take several boards into work, namely 4 boards. The first selection is not done by chance. Large twist, very strong curvature of the board, large knots are rejected at the initial stage, the rest can be rejected after jointing.
Making a “deck”
 After cutting and jointing on both sides, it becomes clear whether the board is suitable for this product or not. At this stage, you can cull based on color. If the job may require more than one board, it may be important that all stripes are similar in color. I sawed off the wane from the boards and the sapwood.In this case, the selected board was sawn to a size of approximately 120 mm. After jointing, I selected the best board, and set aside the remaining boards for other elements and products. So, after cleaning the board and rejecting it, we are left with three pieces of board measuring approximately 28x120x1150 mm, which we joint on all four sides and saw to a size of 110 mm.


Next, the prepared bars “bloom” into strips. If the final thickness of our “deck” is, for example, 3 mm, then the thickness of the strips that we saw should be approximately 3.5-4 mm.I make a cut to the middle of the workpiece, turn it over, and cut again. The same thing happens on the other side of our workpiece. This way we get two sawn strips of 3.5-4 mm. and the remainder, which is jointed again. If we want to get 5 stripes from a 30 mm board. it is necessary to joint only partially and the thickness of the strips at the exit from the sawing machine is 3-3.5 mm.
The operation is quite traumatic and dangerous. You need to work carefully, using a pusher and glasses. If you do not have basic experience using power tools and a table saw, this method can easily disable you. During work, the workpiece must be limited on all sides by stops, combs and clamps.

 For further work I used a simple device. A piece of board material, in my case plywood. The block on the front side is needed to prevent the device from being pulled into the machine along with the workpiece. This device is needed in order to be able to process workpieces of smaller thickness than the design of the thickness planer provides.
Our strips are processed in a thicknesser on both sides. I paid attention to how I fed the workpiece into the machine and tried to feed it “along the grain” and not “against the grain” so that there would be fewer chips. If chips cannot be completely avoided, strips with large chips are rejected, and the remaining chips are eliminated by grinding and putty.
The sharpening angle of the knives of a thickness planer has a great effect on the quality of gouging. The sharper the sharpening angle, the more explosions and chips there will be. This is purely my observation; many may disagree with it.
At the exit from the thickness planer, a “step” remains on the workpieces, approximately 60-65mm. from the edge of the workpiece. This is due to poor adjustment of the machine's pressure rollers. I just make the blanks 150-160mm longer. and I cut off this “tail” by trimming.


 The strips are crimped with bars and jointed in a “package” until complete homogeneity is obtained. Afterwards the entire stack is turned over, crimped again and the second edge of the strips is jointed. During the work, it is necessary to take into account that the bars slightly lose the correct angle of 90 degrees and they need to be corrected. Also pay special attention to the position of the clamps, otherwise both the clamps and the knives of the jointing machine may be damaged.

 A set of decks “with a jacket” is similar to a set of “shirts” using simple (peeled) veneer. Only if earlier in our work we used masking tape or gummer, now, when working with the “deck” we use simple tape. The strips are pressed tightly against each other, pulled together with tape, with a slight stretch. The tape tightly pulls the strips together, eliminating any major curvature, if any. Next, I glue the entire seam lengthwise. It is better to remove the adhesive tape immediately after pressing. I've heard that many woodworkers glue strips together. I don’t do this, it seems that so far everything is not bad.
Pressing the workpiece with a “deck”

 For pressing, you can use clamps or a press, if possible. But in any case, it must be taken into account that lining the workpiece with a “deck” will require significantly more pressure than veneering.I have recently had experience with a vacuum press, and find this option to be the most convenient for beginners.

 After pressing, excess deck (overhangs) protruding beyond the workpiece are removed with a milling cutter with a bearing or cut off. It is better to remove the adhesive tape immediately, as it will be more difficult to remove later. Glue and tape residues are removed by scraping and sanding.
It is possible to make a deck yourself, but you must take into account that it takes a very long time, much longer than it is done in production conditions. This only makes sense if the amount of work is not large. If you need to make a tabletop for a chest of drawers, a table or a seat for stools. For a large volume of work, sawing a deck yourself is not profitable and takes a very long time; of course, I would prefer to purchase a ready-made one.
To clarify the above, we made a short video about the veneering process. “Set of shirts” and gluing of blanks in a vacuum press. Also a little about how best to remove masking tape after veneering.
OK it's all over Now. I will supplement and update the section with new photos and video material. Thank you for your attention. I hope it was interesting.
It is known that veneering, a complex process that requires as much artistry as technical skill, was used by the ancient Egyptians. In Europe, veneer furniture production reached its peak of ingenuity and elegance in the 18th century, and during the Victorian era it gained popularity as a replacement for solid wood furniture.
Laying veneer can be as simple as gluing a single sheet of wood, or it can be a complex process of cutting and fitting different veneers to create intricate patterns. A basic woodworker's set contains many tools used in working with veneer, including measuring and marking tools, a jigsaw, a workbench, a face and shoulder plane, chisels and chisels, cycles and grinding equipment.

If you are going to specialize in veneer work, you will need additional specialized tools. Most of the tools you may need can be purchased from good tool stores or veneer suppliers. You will also have to make some of your own equipment, such as a roughing and bench board with a sawing ledge or a simple template for mosaic work.
Measuring and verification rulers
Along with a steel measuring ruler, a so-called “safety” ruler will also be useful. This 300mm long graduated ruler is designed to hug the workpiece to prevent it from slipping when used as a guide. Additionally, the ruler is wide enough to keep your fingers from getting dangerously close to the knife. Use a metal straight edge to cut long veneers.
Cutting backing
Use plywood or other artificial materials with a smooth surface. Even better - especially for fine knife work - is to use special mats made of a self-sealing polymer material similar to rubber, which allows you to cut through the surface without leaving cuts. In this case, the knife blade does not become dull.
Veneer file
A veneer saw can be used to cut veneers of any thickness using a straight edge. It gives a rectangular cut, allowing you to neatly join veneers, and has a double-sided reversible blade with fine teeth without streaking.
Electric iron
An old household iron can be used to soften animal glues applied to the base and veneer, both in the traditional method of veneering with “forging” - we beat it with a hammer, and to activate the self-adhesive layer.
Knives
Use a surgical scalpel or cutting knife with interchangeable blades that have a sharp tip for curved cutting and a curved cutting edge for straight cutting, especially when more force is required.
Such blades are sharpened on both sides and give a V-shaped cut. If you absolutely need the edge of the veneer cut to be square, tilt the knife away from the straight edge.
Veneer punches
Available in eight sizes and used to correct defects in veneer. Each punch has an irregularly shaped blade that cuts out both the damaged area and an identical patch from a matching veneer. A spring-loaded ejector pushes the cut veneer out of the tool.
Veneer trimming device
Used to remove excess veneer along the edges of the panel. Consists of a short adjustable knife mounted on a wooden handle. The tool is simply moved along the edge of the panel, and it cuts the veneer evenly both along and across the grain.
Zinubel
Used for “notching” - preparing the surface for gluing. It differs from conventional planes in the almost vertical position of the knife. The front side of the knife blade has a thin vertical notch, and the sharpening bevel is on the back side. This forms a row of teeth on the cutting edge, like a saw. The knife is sharpened by straightening the sharpening bevel.
 Traditional veneering uses hot animal glue, which is prepared in a special glue cooker, which is a double tank. The inner part contains glue, and the outer part contains water, which is heated to ensure the operating temperature of the glue and prevent it from burning. Initially, glue pots were made of cast iron, but modern ones are usually made of aluminum. Heated by any suitable heater running on gas or electricity. You can also use special electric glue cookers with a thermostat.
To prepare animal glue, fill the inner pot a quarter full with granules and add the same amount of water. Allow the granules to soak, then fill the outer pot halfway and heat. Stir the glue until its consistency becomes uniform, adding water if necessary. Do not let the glue boil or run out of water in the outer pot.
Adhesive tape for veneer
A 25mm wide adhesive-coated paper tape is used to hold them in place and prevent them from opening due to shrinkage. After the glue hardens, the tape is soaked and scraped off.
Buttons for veneer
Thin short buttons with large and plastic heads are used for temporary fixation before securing the connections with adhesive tape.
Hammers for veneering
Veneer, or lapping, hammers are used to manually lay veneer. The wooden hammer has a rounded brass blade set into the edge of a hardwood hammer mounted on a wooden handle. The metal one is similar to a regular hammer, but the hammer has a blade. The blade is drawn in a zigzag pattern across the surface of the panel, applying significant pressure to remove air bubbles and excess glue and press the veneer tightly to the base.
Veneer is a sheet wood material used for cladding the surface of products and for the manufacture of glued and bent-glued parts. As an independent product, veneer is used extremely rarely; as a rule, we are faced with blanks already prepared for use, created by the method of veining or veneering, i.e. with panels already glued with thin layers of natural veneer. Despite the fact that veneers from the rarest types of wood have been used in the manufacture of true masterpieces of furniture production, some still consider veneering to be a secondary method of working with wood in comparison with solid wood.
However, few would deny that veneer and veneered plywood add uniqueness to furniture and other wood products, whether through their natural pattern or when inlaid with them in a decorative or geometric pattern.
Today, with the widespread use of modern adhesives and engineered boards and panels, veneered or veneered products are superior to solid wood in certain situations. In an environment where natural resources of valuable wood are gradually disappearing, veneer and plywood allow us to economically use scarce material so that we can continue to admire and enjoy this natural miracle.
How veneer is made.
Veneer production requires special knowledge and great skill. It starts with the purchase of logs. The customer determines the quality of raw materials necessary for the commercial feasibility of manufacturing veneer from it. Using your experience and qualifications, when purchasing, you should evaluate the internal condition of the wood solely by the appearance of the log.
By examining the end of the log, you need to determine the quality of the wood, the potential veneer pattern, the color and the ratio of sapwood to heartwood. It is necessary to simultaneously take into account other factors that influence the value of the log, including the presence and extent of side stains and some imperfections and defects, such as cracks, ingrown bark, excessive knots, resin ducts or pockets. Most of these defects are discovered the first time the log is cut along its length, but the purchaser must purchase the log before it is cut.
Once the log is purchased and delivered to the sawmill, it is all up to the skill of the veneer cutter to determine the best way to process the raw material to produce the greatest number of sheets of high quality material.
Sorting.
When cutting decorative veneer, its sheets are folded one by one into a pile. Before sorting, the veneer is dried.
Veneer from most types of wood is cut to standard sizes using a “guillotine” - a cutting machine. Others - for example, yew or burl - are left in the same sheets as they were cut.
The price of veneer depends on the size and quality. It is assessed according to natural or acquired defects during wood processing, such as thickness, type of pattern and color, and is assigned to the appropriate group. One log can produce veneer of varying quality. Higher-quality veneers are classified as facing grades and are valued higher than second-grade (narrower or worse) veneers for covering the back parts of products.
Veneer is stored in packs with the number of sheets divisible by four (16,24,28 or 32 pieces) in order to match the pattern on the sheets. The bundles are stacked in order, and, like a log reassembled from sheets, they are stored in a warehouse in cool conditions, ready for sale.
Veneer cutting.
Plywood logs are cut from the main tree trunk between the butt and the first branch. The bark is removed and the tree is checked for foreign bodies such as nails and other foreign bodies.
Before the logs are processed into veneer, they are softened by immersion in hot water or steaming. Such processing can be carried out either on a whole log, or on blanks cut from it with a huge band saw, suitable for one or another method of obtaining veneer. The conditions for this treatment are set in accordance with the type and hardness of the wood and the required veneer thickness. The period can range from several days to several weeks. Light-colored woods such as maple do not undergo this treatment because the process will discolor the veneer. There are three main ways to obtain veneer: plywood sawing, peeling and planing.

Before the invention of veneer cutting machines in the early 18th century, all veneer was produced first with hand saws and then with power saws. Such veneers were relatively thick - sometimes up to 3 mm. Sawn veneer, although very material-intensive, is still produced using special circular saws, but only for rare or difficult-to-cut varieties, such as twisted wood, or in special cases if it is economically advantageous. Its thickness is usually 1-1.2 mm.
To cut sheets of veneer for lamination, you can use a band saw or table saw in your home workshop, especially if this proves to be more economical or gives you a better material than commercially available veneer.
Peeling.
Ornamental veneer from soft and some hard woods is cut using the peeling method. The entire log is placed into a large peeler, which cuts off an “endless” sheet of veneer. The ridge, rotating, is pressed against the knife and the pressure bar along the entire length of the machine. The knife is installed directly under the bar and in front of the thickness of the veneer. The location of the knife and rod in relation to the log is very important to prevent surface defects - cracks, the so-called notches. For each revolution of the ridge, the knife automatically moves forward by the thickness of the sheet.
Veneer produced by this method can be identified by the distinct "water" pattern created when a knife is passed through the growth rings. Peeling is especially effective in obtaining veneer for the production of artificial wood materials, since the width of the sheet is practically unlimited. Although this method was originally used for cutting ornamental veneers, it can also be used for making decorative grades of veneer, such as birdseye maple.
Eccentric peeling (with an offset center).
The peeler can also be used to produce wide decorative veneers with sapwood at each end to produce a pattern similar to the beautiful pattern of another cutting method. This is achieved by shifting the axis of the log relative to the clamps of the machine, which leads to eccentric cutting of the log. This method can be implemented using special holders in which the ridge is fixed either entirely or in a “half” semicircular form. In this case, the veneer is cut at a smaller angle than with a log eccentrically installed in the machine, but the width is not so wide.
Planing.
The planing method is used to produce finishing veneer from hardwood. How a log should be planed depends on the natural characteristics of the tree. First, the log is sawed lengthwise into two parts and the structure is assessed to determine the possible pattern. The ridge can be cut further in such a way as to obtain the desired pattern. It is how the log is cut and installed in the machine that determines the pattern. The width of the sheet with this method depends on the size of the workpiece.
A half or “quarter” of a log is mounted on a movable frame that moves up and down. The pressure bar and knife are mounted horizontally in front of the workpiece, and with each downward stroke of the frame, a sheet of veneer is cut. After each cut, the knife or workpiece is fed forward to the required veneer thickness. By planing a half-log in this way, a decorative veneer is obtained, usually used in the manufacture of cabinets, sideboards, chests of drawers, etc. It has the same beautiful pattern as tangentially cut boards.
Wood varieties that give a beautiful pattern when cross-laminated are cut into blanks using a radial method. The workpieces are placed in the machine so that the beams go in the direction as close as possible to the cutting direction. Quarter logs can also be used to produce longitudinally layered veneer using the tangential cutting method; the pattern is very beautiful.
Cracking.
Machines for producing veneer are like huge planes, and veneer is the “chips” from them. But in this case, it is important that the chips are smooth and strictly maintained in size. The quality of cutting is regulated by the pressure force of the clamping rod and the position of the knife. Thin cracks (chipping) can form on the back side of the veneer, especially with the peeling method. This side is called "open" or "loose" and the other side is called "closed" or "tight." They can be determined by bending the veneer: it will bend more if the open side of the veneer is convex.
Always try to lay veneer with the closed side facing out, as a rougher surface (the open side) will be harder to finish.
2. Veneer cutting
Veneer is cut using two methods - manual or mechanical guillotine shears, depending on the volume, goals and objectives of each specific enterprise.
Veneer cutting on a guillotine
How to mark and cut veneer?
When marking veneer blanks for the face, it is necessary to provide a small allowance in size, approximately 3 - 5 mm, in case of shift or skew during gluing, as well as for adjusting the joints.
Strips for gluing edges can be marked without an allowance in width due to their small size. The width of the strip can be taken exactly equal to the thickness of the edge being pasted. And if the edge is pasted over after the face, the thickness of the veneer glued to the face must be added to the width of the strip.
You can cut veneer using an ordinary well-sharpened folding knife. Just don't rush. Do not try to cut veneer with one stroke. You may damage it. Holding the ruler, first draw the knife with very light pressure, as if marking a mark. Then gradually increase the pressure each time. After 4 – 5 passes of the knife, the cut part of the veneer will easily separate.
When cutting veneer along the grain, never move the knife towards the growth layers. This can cause the veneer to split obliquely between layers. Cut only in the direction of the growth layers. When cutting veneer across the grain or at an oblique angle, first use scissors to make a counter cut 15–20 mm long at the end of the cutting line. Otherwise, the veneer may tear in this place under the pressure of the knife.

a - cutting veneer along the grain, b - cutting veneer across the grain,
c - cutting veneer along a curved line
In those places where veneer has to be cut not in a straight line, but along a curved line, for example, for the edge of a curved door, you need to use ordinary scissors rather than a knife. But in these cases, the cut line should be marked not with separate dot marks, but with a solid pencil mark, using the part itself as a template. Scissors can also be used to cut narrow straight strips of veneer at the ends for gluing any edges.
You just need to cut carefully, according to preliminary pencil markings and in such a way that a tight (without gaps) connection between the end of one strip and the end of another is ensured. Having cut all the veneer blanks, place them one by one on each surface to be glued and check the correctness of the set of patterns and the accuracy of the joining. In order not to confuse the blanks when gluing, number them with a pencil on the reverse side and put the same numbers on the corresponding places of the surfaces to be pasted, and where the blanks will be joined, draw boundary lines.
3. Set of shirts
A set of veneer shirts is made manually using a rubberized tape (gumirovka), or on a machine for splicing using hot-melt thread. 
a - a set of shirts using a lipstick

b - making a shirt using a machine with hot-melt thread
4. Making a shield
A blank made from a solid pine board is glued along the face and calibrated on a grinding and calibrating machine with a coarse calibration shaft. 
grinding and calibration machine
4 mm MDF is glued onto the shield on both sides and calibrated with two shafts. 1 coarse calibration shaft - 80 grit, 2 fine calibration shaft - 120 grit.
5. Veneer sticker
On a pre-prepared veneer shirt (the material must be dry, free of dust, fats and oils. Humidity should be 8-12%. At a humidity of more than 15%, sufficient adhesive strength is not ensured) glue is applied with a spray gun or spatula.There are several options for gluing veneer to a base using PVA emulsion, for example:
1) “Cold” method using a vacuum system or mechanical screw presses. The result: by gradually increasing pressure to remove air between the veneer and the base, a very strong joint is obtained.
2) “Hot” method in a small workshop: glue is applied to the base and dried for 5 - 10 minutes until it becomes a translucent film.
Next, a sheet of veneer is applied, paper is placed on top and smoothed with an iron - gluing occurs instantly.
The method is ideal for soft wood species that are prone to severe warping when exposed to moisture, as well as for applying veneer to the edge.
Applying too little PVA glue will result in a weak bond, as will too much glue.

membrane press
Adhesive based on urea-formaldehyde resin completely different from PVA glues. It belongs to a chemical group that has a number of unique characteristics.
First of all, its open time is about 30 minutes at 20C.
After complete polymerization (4-6 hours at 20C), it reaches a “stone” state and can even be polished. In addition, after drying, nothing can soften it - neither heat, nor cold, nor solvents, which makes it indispensable for curved veneered products.
The product is available in powder and liquid forms. But liquid glue has a short shelf life and requires the addition of a catalyst (an acid that is dangerous to transport). The powder already contains the catalyst (in the form of a powder additive - and is not an acid). The powder is mixed with water until it reaches the consistency of PVA glue. The resulting working portion can be used for 45 minutes at 20C.
It should be noted that both PVA and urea-formaldehyde resin-based adhesive must be used at a temperature not lower than 15C. Otherwise, the adhesive properties will be worse and the strength of the joints will suffer. It is better to glue at higher temperatures.
Contact glue. When using traditional contact adhesive, you do not need the pressure devices that are required when using other adhesives. But, since it “sets” almost instantly, the veneer must be laid the first time - correction of the position is impossible.
Currently, “soft” varieties of contact adhesive are used for gluing veneer. Such modified versions of adhesive compositions allow short-term adjustment of the position of the connection elements
You can only work with contact adhesives in a well-ventilated area, as the odor released is unpleasant and toxic. In the furniture industry, a short-term pressing cycle is provided.
In workshop settings, when working with contact adhesives, stitching rollers or wooden lapping devices are widely used to press and remove air bubbles.
Polyurethane based adhesive. Polyurethane adhesive does not shrink and is used even under heavy loads on the surfaces to be bonded. It contains no solvents (it consists almost entirely of solid synthetic resins), and the gradual curing provides high bonding strength and the ability to correct errors before complete hardening.
The advantages of this type of glue include the ability to glue porous surfaces - the glue tends to foam a little during the hardening process and fill in irregularities.
Often used when gluing oily wood. For example, olive wood parquet is glued with PUR glue onto a base that can withstand loads.
Sets faster in a humid environment.
Protein (bone) glue(“cold”) is a traditional wood glue. It is still made from animal skins and bones, the protein of which gives this type its adhesive properties. This glue was once the main glue in woodworking. It was produced in the form of granules, which had to be filled with water and steamed in a glue boiler.
Its main application is in the restoration of antique furniture, reversibly gluing joints that can be disassembled with water or alcohol. When working with this glue, you have a few minutes to correct the position of the parts and install the clamps. Before gluing, you can tint it with aniline dyes to match the color of the wood.
| Adhesive composition | Purpose | Open time (average values) | Pros/Cons |
| PVA glue | Most often used for gluing veneer to a base. | 15-20 minutes at 20C | Pros: Cons: - when it “bleeds through” onto the veneer, it leaves a noticeable stain during finishing |
| Urea-formaldehyde glue | It is used to create bent plywood products, less often for gluing veneer. | 30 minutes at 20C | Pros: Possibility of mixing dark and white to tint the adhesive joint Disadvantages: you need to prepare glue yourself from the powder composition. |
| Contact glue | Quick drying mixture. It is widely used in the production of kitchen furniture. Glues veneer (plywood) perfectly. | On average 30 minutes | Pros: Minuses: |
| Polyurethane glue | Used on problematic substrates (which are subject to deformation), as well as when working with porous and oily wood | 20-30 minutes (shortened at high temperature or water supply) | Pros: Minuses: |
| Protein glue | Its main application is in the restoration of antique furniture, reversibly gluing joints that can be disassembled with water or alcohol. | 20-30 minutes at 20C | Pros: ability to disassemble mating parts. Minuses: |
6. Formatting.

The door leaf is formatted to size
7. Edge banding
Edge banding is done either manually with an iron or on an edge banding machine, in the first case PVA glue is used, in the second, specialized granular glue (melt glue) is used.