How to paste wallpaper. We glue paper wallpapers correctly - advice from a real professional
We will send the material to you by e-mail
It is rare that an apartment renovation is complete without wallpapering. This universal type of decorative coating is suitable for any interior, it is loved for its ease of installation and perfect look.
Wallpaper - a coating that is found in every second modern apartment
With your own hands - the task is not difficult, especially if you have all the necessary tools. Experienced people get by with a brush and roller, but other devices may come in handy for a beginner:
- paint bath and roller for applying glue. It is better to choose a roller with a pile of medium length, and the dimensions of the bath should correspond to the roller. You can replace it with a wide brush with a comfortable handle. In addition, keep a small brush handy for gluing seams;
- rubber roller for smoothing streaks on the wall and removing air bubbles on thin wallpaper. For thick ones, instead of a roller, you can use;
- a roller with a roller for pressing the web in the inner corners;
- container for dilution of glue: it is better to use a large pot or bucket with a lid. Airtight dishes will allow you to keep ready-to-use glue for several days;
- drill or construction mixer for mixing glue. If we are talking about a small amount of work, you can do it manually;
- pencil, long ruler, tape measure and scissors for marking and cutting canvases. For cutting, you can use a construction knife - the edges are smoother;
- a plumb line or building level for marking the vertical line from which you will glue the wallpaper;
- a sponge to remove excess glue and a dry rag for cleaning up debris.
In addition, in fact, the wallpaper itself, you need to prepare the glue. The composition is selected in accordance with the type of coating. You can buy glue at the store and dilute it according to the instructions.
Note! Instructions for the preparation of glue is placed on the package. It indicates the proportions of water and powder, the consumption of glue per square meter of surface and the specifics of the application.

The preparatory stage before sticking wallpaper on the wall with your own hands
Do not rush to immediately start wallpapering. It is not enough just to purchase tools and materials, you still need to carry out preparatory work. Examine the condition of the walls, remove the old coating and carefully prime the surface.
How to remove the old coating from the walls
If previously the walls were already decorated with wallpaper, they must be removed. In most cases, the material is easily torn off, but if you have pieces or whole strips that cannot be torn off, you will have to use special tools. Compositions for removing old wallpaper can be bought at the store, but it is cheaper and easier to make such a mixture yourself. The recipe is simple: add dishwashing detergent and a little wallpaper paste to warm water. Using a sponge, the agent is applied to the wallpaper and left for half an hour until the coating softens.
Ask a Question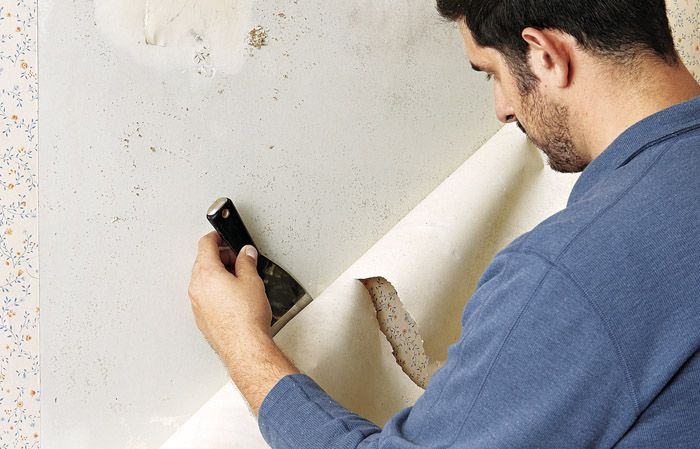
“Any alignment of the walls is accompanied by the formation of a large amount of debris and dust. Remember to use a respirator to protect your respiratory tract and close the doors to other rooms."
Wall primer
Do not neglect the primer of the walls. If you skip this stage of preparation, you risk getting an extremely unpleasant result - the wallpaper will simply peel off. In addition, the primer will even out the color of the wall, and the gray concrete will not show through under a thin coating. The primer mixture will fill the voids in the porous surface, you spend less glue.

For walls made of, concrete and wood, a universal acrylic primer is used. It is easy to apply, diluted with plain water and dries fairly quickly.
Note! Unscrupulous sellers can offer you, instead of acrylic primer, a solution of PVA glue. Be careful, outwardly the compositions are very similar, but the glue has a specific smell.
For walls made of wood, plywood or alkyd primer can be used. It dries for a long time - almost a day, but provides excellent adhesion even for heavy wallpaper. Metal walls are treated with a glyptal primer similar to enamel. Only she guarantees you high-quality coverage. The same primer can be used for plastic. This coating will dry overnight. Another option for a mixture for metal is perchlorovinyl primer, but it is not recommended for use in residential areas due to its high toxicity.

How to glue wallpaper - basic techniques
After you have prepared the walls well before the main stage of work, you need to solve several important questions: where to start gluing, how to properly cut the wallpaper and paste it in difficult and hard-to-reach places.
Related article:
interesting solutions for the living room, bedroom, children's room, kitchen and corridor. The basic rules for selecting canvases and recommendations from designers - read in our review.
Where to start gluing wallpaper and how to fit the pattern
Wise with their own experience, older relatives will tell you that you need to glue the wallpaper from the window. Indeed, the old paper panels were glued just like that for one simple reason: the joints were overlapped, and so that in natural light the seams were not conspicuous, they had to be directed away from the window. Modern manufacturers offer panels that are glued end-to-end. Such seams are less noticeable, but they require a perfectly even base. So the question of where to start work becomes less relevant: start from any side on which it is convenient for you to draw a vertical, and glue in a circle.

Pay attention to several important nuances:
- how the wallpaper will look in the opening between the windows. It is not always good if a seam is placed in a narrow opening;
- where the furniture will be. If you plan to put and do not place wallpaper behind it in order to save money, you need to decide on a starting point;
- if you plan to place it on one of the walls, you need to evenly measure the location of the pattern and continue pasting from this place.
The first canvas is the most difficult task. It is important to place it strictly vertically so that the slightest skew does not spoil all the work later.

Expert point of view
Dmitry Kholodok
Technical director of the repair and construction company "ILASSTROY"
Ask a Question“If you use a plumb line, rub the rope with chalk or paint. Fasten the top end of the plumb line and pull the bottom lightly - the paint will remain on the wall and mark the desired line.
Most often, rooms in apartments have imperfect corners. Therefore, it is better to mark the vertical on each wall. Wallpapering technology requires pattern fitting. Fashionable finishes are distinguished by complex ornaments and bright images. You should be aware that on the wallpaper packaging, manufacturers indicate the offset distance to fit the pattern. But in practice, it is easier to do the adjustment manually, visually combining the pattern. And this should be done not only at the stage of cutting the canvases, but also in the process of gluing them.
Video: wallpapering with a large pattern
Glue on the wallpaper or on the wall - how to apply it correctly
The answer to this question depends on what type of wallpaper you have chosen for your renovation. If you have paper wallpapers at your disposal, the glue is applied directly to the canvas. For reliable gluing of thick vinyl or non-woven coatings, the adhesive composition is applied to both the wallpaper and the wall. Non-woven wallpaper can be glued without applying the composition to the canvas, limited only to the processing of the wall.
How to glue wallpaper in the corners of a room
Most often in the process of work you have to deal with internal corners. Here you should make sure that the strip covers the corner and a few centimeters behind it. Even if the canvases are glued end-to-end, you need to overlap in the corners. Only in this way will you get an even angle. Use a level or plumb line as a guide. So that the overlap is not noticeable on thick wallpaper, after gluing, cut both layers along the ruler with a sharp knife, and until the wallpaper is dry, remove excess stripes from one side and the other. If necessary, add glue with a small brush.

You will also have to tinker with the outer corners. They are rarely perfectly even, so here you also need to use an overlap of 3 centimeters. After the first canvas has been glued, you need to cut it off, leaving a thin edge at the corner. The second strip is aligned vertically on the other wall and fixed so that there is a minimal overlap on the first panel. How to glue wallpaper in the corners in a short video course.
How to glue wallpaper near windows, doors and behind the battery
So, you glue the wallpaper with your own hands, and you have reached. Feel free to fasten the new canvas so that an entrance to the window is formed. If you need to seal the slopes, make two horizontal cuts and bend the panel. If it does not reach the frame, you will have to make another cut, it is advisable to join it at the corner (see the technology for gluing external corners described above).

is a serious obstacle. You can’t place wallpaper behind them, so you have to cut them off. This must be done so that it is not noticeable that there is a bare wall behind the battery. To do this, leave a part of the canvas so that it goes 10 centimeters onto the radiator, and then tuck it behind the device, pressing and smoothing it with a spatula. How to glue the wallpaper yourself behind the battery in the video.
How to make seams invisible
Why can the seams between panels remain visible? There are several reasons for this effect:
- defective coloring of the edge of the wallpaper. A minimum strip of tenths of a millimeter without paint can cause the seams to be visible;
- an error in gluing the canvas - a skew in one direction leads to minimal overlap or a gap;
- loose adhesion of the material to the base, part of the strip may lag behind due to an air bubble.

It happens that you noticed the marriage too late, what to do? There are several ways to mask the seam so that it becomes invisible. If you get an unplanned overlap, you just need to cut through both canvases as you would when working with internal corners, and remove excess strips.
Important! In order for the edges of the wallpaper to adhere tightly to the base, additionally coat them with glue and roll them with a rubber roller.
Notice the uneven coloring of the edge? It is best to return such wallpapers to the store, this is a defective product. If for some reason this is not possible, for example, you bought the material in another city, then try cutting off the unpainted edge. This is difficult, and new joint problems will inevitably arise. It is best to do this during the gluing process, specifically overlapping and cutting off the edge already on the wall. As an alternative to this method - the use of a suitable color paint. It is better to take the color half a tone darker.
How to stick wallpaper of different types
A wide range of wallpapers in modern stores includes products not only for every taste, but also for every budget. You can limit yourself to buying cheap paper-based wallpaper or purchase more expensive non-woven or vinyl options. Is there a difference in sticking different types of wallpaper?
How to glue paper wallpaper
Paper is an inexpensive and environmentally friendly coating. Experts advise when gluing paper finishes to apply glue to the panels. Keep in mind: the paper quickly absorbs the glue, so you have to work very quickly, otherwise the strip will get wet and will tear when glued.

Do not be alarmed if, even after careful leveling, irregularities appear on the surface after a few minutes - after drying, the canvases will “pull up” and be even again.
How to glue vinyl wallpaper
For vinyl wallpaper, you definitely need to purchase a special glue. This material is thick, and should only be placed end-to-end. On the packaging of vinyl wallpaper, they usually write what glue should be applied to: on the panel or on the wall. Unlike paper, vinyl strips should soak with glue within 10-15 minutes. The video below gives recommendations on how to glue vinyl wallpaper with your own hands:
Article
Greetings, dear readers of our blog "Do with us with your own hands."
In continuation of the topic of overhauling an apartment, today I want to describe in detail the process of how to properly glue wallpaper on the walls with my own hands. What do you need to start with? What are the nuances and features to consider in the work? What issues should you pay special attention to? It would seem that the question is not very complicated, but how many misunderstandings, disputes and disagreements arise when we start the process itself.
Wall preparation
First, let me congratulate you! How about what? With the fact that if you are interested in the issue of wallpapering, then the dirtiest, hardest work in the repair has already been completed. And you made it!!! Hundreds of kilometers wound up in shopping trips, in search of wallpaper, are already behind us. And here they are, the most beautiful in the world, wound in tight rolls, lying neatly against the wall!
But do not rush, you have everything ready, and someone only needs to re-paste the wallpaper without affecting everything else. Therefore, we begin the process by removing all the old wallpaper. To do this, carefully tear them off the wall, if the glue on which they stick is weak, the work will go like clockwork, but if the wallpaper is glued well, you will have to work hard.
Correct wallpapering - scheme
If old ordinary paper wallpapers are poorly removed, then we wet them with water, simply rolling them with a wet roller or brush. Leave for 10-15 minutes and then carefully remove. Well, the most difficult case is when the wallpaper is covered with a waterproof film on top, the so-called "washable" wallpaper. Only a mechanical method of removal will help here - with a spatula. We remove them by prying with a spatula, trying to touch the wall as little as possible.
The wallpaper is removed, it is necessary to remove all the plaster, which does not hold well and practically falls out by itself, to cut cracked and falling out seams. All the places of depressions, depressions and irregularities that have appeared must be puttied and subsequently primed after stripping.
If you decide to level your walls, then after applying the finish layer, do not forget to prime it. It is very important! Otherwise, when wallpapering, the walls will dust and crumble, which will lead to poor adhesion of the wallpaper to the wall. And worse, when applying glue to the wall, the plaster may begin to roll. Use for this special mixtures sold in stores. And if you want to save money, you can use simple PVA glue, 2 cups of glue per bucket of water (from personal experience, it primes perfectly).
The whole point of preparation is to make the walls as smooth and even as possible. Don't be lazy, check your walls. Remove all adhering motes and other small debris, as after wallpapering they will appear and will be ugly. You should be especially careful in this regard when sticking thin wallpapers.
Walls must be strong, clean and dry.
We dilute the glue in accordance with the instructions located on the package. I used Quelyd "Special Vinyl" glue for vinyl and textile wallpapers.

It is diluted: 1 pack per 4-4.5 liters of water and is designed for 6 rolls. For dilution, we use a suitable container, measure the required amount of liquid into it and, stirring constantly, introduce dry glue.

We give it a little disperse, for 15 minutes, then mix it well again and you can glue the wallpaper.
Beautifully stick wallpaperalong a straight wall in any room of the apartment
Step 1. Close all windows and doors to prevent drafts.
Step 2. We calculate how many vertical stripes we can fit on one wall. To do this, measure the length of the wall and divide the resulting size by the width of the wallpaper.
My wall length was 3.7 m. (3700 mm.), And the width of the wallpaper was 0.54 m. (540 mm.) Total 3700/540 = 6.85. Thus, 6 whole strips and one with an undercut went crazy on my wall.
We cut 7 strips according to the height of the room plus 50 mm. cut at the top and bottom.

Similar calculations can be made for the other three walls and cut the wallpaper for the whole room at once.
Step 3. We mark the line of verticality for the correct orientation of the first strip.

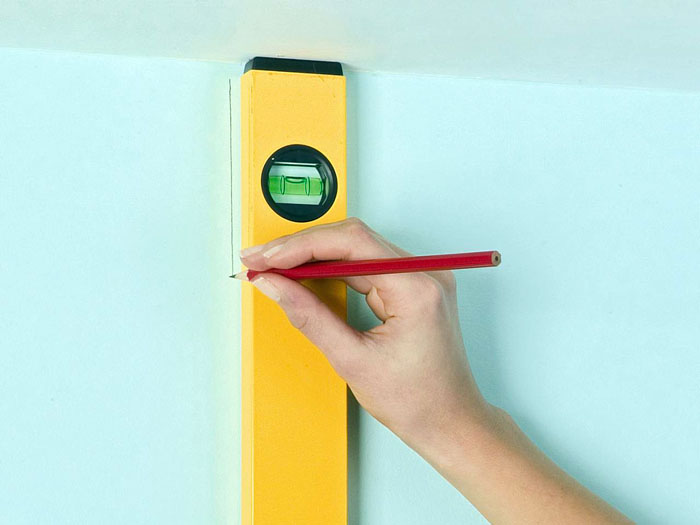
We retreat from the edge of the wall (I walked from the aisle, you may have from the corner) 500 mm (the distance is slightly less than the width of the strip, so that later, if the corner of the room is a little “littered”, you can correct it by trimming the first strip) and put a mark. To mark the line of verticality of the strip sticker, we use a plumb line (you can use just a thread with a load tied to it) or a building level.

We apply a plumb line to the wall and combine it with our mark made earlier. We mark a vertical line and connect the points with a straight line. Thus, we got a line from which we will begin to glue the second strip. We do not touch the first strip (at the aisles or in the corners), we leave the extreme strips of one wall for last. I used the same markup technology with .
Step 4. We apply glue on the wall to the width of the strip and on the strip of wallpaper, evenly distributing it over the surface with a brush or roller.

Step 5. We paste 1 strip (or rather, from the edge of the wall or corner, we will have the second one, but we do not glue the first one yet). To do this, starting from the top, carefully apply the strip to the wall. We combine the edge of the strip with the drawn line of verticality and, using a wide roller, gently roll the strip against the wall, squeezing out the air trapped between the wall and the strip.

Step 6. We note the extra length of the strip.

We tear off a strip from the wall a little and carefully cut off the excess.

This operation can be done without tearing off the strip, but using a clerical knife, cut off the excess. In the end, we get this picture.

In the future, the joint between the wall and the floor will be closed with a plinth. You can read in detail how to install a plastic plinth with your own hands.
Step 7. We repeat all the procedures for applying glue to the wallpaper and the wall, and glue the second strip. Only now we join the edge of the strip to the already glued first strip.

Sometimes there are situations that the ceiling is not displayed perfectly evenly, you have to cut the top of the strip a little. To do this, we release the glued strip slightly up, creating an overlap on the ceiling.

With the help of a roller, we roll the strip, and with the help of a clerical knife or scissors we cut off the excess wallpaper so that the upper edge of the strip exactly hits the corner.

We cut off the excess at the bottom, finally roll the glued strip, rolling it with a wide roller from top to bottom and towards the edge of the strip, as if drawing a Christmas tree with a trunk in the middle of the strip. Using a narrow roller, we roll the seam between the strips and the upper and lower parts of the strip adjacent to the ceiling and floor.

We get this picture.

Step 8. Similarly, we glue all the whole strips to the end of the wall.
Sincerely, Ponomarev Vladislav.
Wall decoration in residential premises is most often carried out using wallpaper. Rolled products are quite simple to use, allow you to completely transform the interior in a short time. To perform such work, it is not necessary to hire craftsmen, since any housewife will cope with this task. However, before proceeding with the repair, it is worth reading the instructions on how to glue the wallpaper alone, and what is needed for this.
Where to start?
Any repair work begins with the calculation of the required amount of material and its acquisition. To determine how much wallpaper you need, measure the width of the walls in the room. The height of the ceilings in the apartment is also important. Knowing these parameters, you will be able to understand how many rolls you need.
Please note that modern canvases may have different widths. If the old-style rolls had parameters of 70 cm, then the standard indicators of modern products are 53 cm. Products with a width of 106 cm are also on sale. The length of each roll is 10 meters.
To understand how much material you need, conditionally divide the wall into strips. Knowing the height of the ceilings in the apartment, you can count how many strips you get from 1 roll. With a standard indicator of 2.5 meters, you will get 4 strips from one roll.
If the pattern on the wallpaper suggests matching, the number of strips per roll will be reduced to 3 pieces. Divide the figure you need (the number of strips in the entire room) by 4 (or 3) and you will find out how many rolls you need to purchase.
How to choose wallpaper?
When the hostess needs to glue wallpaper alone (both narrow and wide), plain canvases will be the best choice. They are the easiest to work with, since you do not need to select an ornament. However, such options are only suitable in cases where a strict and discreet design is created.
Wallpapers with patterns look much more interesting, but working with them is much more complicated. During the installation process, you will have to carefully join the strips so that the pattern does not diverge and the walls look presentable.

When choosing finishes with patterns, pay attention to the fact that the type of pattern should be selected according to the parameters of the room. If we are talking about a small space, it is better to give preference to products with small patterns. Wallpaper with a large pattern visually fills the space, so they are best used in spacious rooms.
Experienced craftsmen say that the basis of the wallpaper is very important. So, paper products tend to soak quickly, but they are cheaper and more suitable for those who do the work for the first time.
Non-woven and vinyl varieties are much more difficult to glue. First, when glue is applied, they stretch and become heavy. Sticking wallpaper alone, as you might guess, will be very difficult.

Secondly, after drying, the canvas shrinks again, which affects the appearance of the walls in different ways. Often there is a divergence of the seams, often the pattern moves out. For this reason, experts do not recommend choosing expensive options for self-pasting walls, since there is a high probability of defects.
Which glue to choose?
There is a wide variety of adhesives on the construction market, but they are all made on the basis of one main component - starch. Based on this, it makes no sense to purchase expensive options, since they practically do not differ from the simplest analogues.
Pay attention to the information icons of the wallpaper manufacturer. Each roll contains data on the footage of the product, the preferred conditions for its use and recommendations for choosing an adhesive. Pick up any composition you like, study its consumption per m 2 and purchase the amount you need (based on the area of \u200b\u200bthe walls of your room).
How to glue wallpaper alone: preparing the surface for work
Before you start gluing wallpaper, you should prepare the walls. First, the old coating is removed. To do this, you will need a small spatula. Pry the strip in a place convenient for you and tear it off the wall. If the wallpaper is too firmly attached to the base, wet the old canvases. Wet paper is easier to remove from the surface, and work is completed faster.

If the walls were previously painted, they must be cleaned of the old finish. Water-based paint can simply be washed out with water, and oil compositions are well cleaned with special washes.
Before you glue the wallpaper yourself, evaluate the condition of the base. If there are weakly fixed areas of plaster and sagging on the wall, the surface must be completely cleaned of defects. Please note that small debris and minor irregularities will definitely be visible through the wallpaper. Therefore, the walls under the wallpaper should be leveled.
Wall preparation methods
If the differences on the surface of the walls are insignificant, you can smooth the base with a finishing putty. Dilute the selected composition and apply to the walls with a wide spatula. This method can be used in cases where the depth of irregularities does not exceed 5 mm.

If the wall is characterized by numerous and deep defects, you will not be able to quickly paste the wallpaper (both on your own and with the help of specialists). In such situations, alignment is carried out using plaster on beacons. The composition applied to the walls should dry well (from 2 to 7 days), after which it will be possible to prime the walls.
Porous surfaces are primed 2-3 times. If you are dealing with a concrete wall, a single treatment will be sufficient.
How to quickly paste wallpaper: rules for kneading glue
The process of transforming the room should begin with the preparation of glue. Study the manufacturer's recommendations for the amount of water and dry mix, and then get to work. Instructions for kneading glue are as follows:
- Pour the required amount of water into the prepared container. To make dry powder dissolve faster, use warm liquid.
- Take a brush with a long handle (or a regular stick) and start stirring the water in a circle until a funnel forms in the center.
- Without ceasing to interfere, pour along the edge of the funnel.
- Let the mixture brew (the required time is indicated on the packaging of the composition). Re-mix the composition.
When mixing glue, pour the dry mixture into water, in no case not vice versa! Don't use too hot water, as it kills all the anti-fungal additives found in modern formulations and promotes clump formation.

If you have chosen heavy varieties of canvases, add a little PVA to the finished glue. This will make the fixation more secure.
Preparing and cutting wallpaper
Before starting work, close all windows and doors in the room. The presence of the slightest draft will cause the canvases to swell and fall off. Then thoroughly wash the floor in the room. On it you will cut the canvas, so the surface must be absolutely clean.
Print a roll, lay a strip of old wallpaper or paper on the floor. Position the canvas on the base and measure the length of the required size. Cut off the wallpaper not strictly according to the height of the ceiling, but make a margin of a couple of centimeters.

If you glue wallpaper without selection, you can immediately cut the rolls into segments of the desired length. Wallpaper with a large pattern, requiring the joining of the stripes, so it will not be possible to cut it. First, measure one strip, turn it right side up, place the second strip next to it and move it until the pattern matches. Cut off the excess parts.
Where to apply glue?
When using the simplest paper sheets, the glue was always applied to the wrong side of the wallpaper. However, in recent years, applying wallpaper paste to the wall has been practiced. This is due to the fact that many varieties of canvases have appeared, which, when wet, lose their density and original dimensions. They are best used dry.
In addition, when applying glue to the surface, you save yourself from smudges on the floor and clothes. The work goes faster, the process becomes cleaner.
Coat the surface with adhesive using a paint roller. In hard-to-reach places and corners, it is better to use a wide brush for this purpose. The wall is smeared to the width of one strip with a small margin. The rest of the surface is processed immediately before gluing the canvas.
From which section of the wall to start work?
The question of where to start gluing wallpaper does not have a definite answer. Some masters recommend first of all pasting over even walls that do not cause difficulties, while others recommend starting work from a corner.

Since in most apartments the corners are uneven, it is better to start finishing with them. At the same time, you can start from absolutely any angle. The process looks like this:
- Step back from the corner a distance equal to the width of your roll. Use a plumb line to draw a vertical line on the wall.
- Position the first strip parallel to the markup. In this case, the edge of the canvas should slightly go into the corner. With further gluing, you will cover it with a whole strip, which will allow you to accurately draw up the problem area.
- First attach the upper edge of the canvas to the wall, align the strip along the line and press the entire piece of wallpaper to the base. The upper border of the canvas should adjoin the ceiling.
- When the canvas is already fixed on the wall, air bubbles should be squeezed out from under it. To do this, you can use a clean sponge or a special wallpaper roller with a rubberized surface.
Thus paste over all the walls. Align subsequent strips no longer along the line, but along the previous canvas. First, press only the top edge, align the entire strip and fix it to the wall.
The average drying time of canvases and glue is 24-72 hours (depending on the type of wallpaper). During the specified period, windows and doors in the room cannot be opened.
How to make seams correctly?
If you have a question about how to properly glue the wallpaper: end-to-end or overlap, then choose the option of even joining adjacent strips. However, there are cases when the edges of the roll are not cut evenly enough, which is why a beautiful docking is simply impossible.

In this case, you will have to overlap the wallpaper. To prevent compacted stripes from appearing on the walls, the edges of the canvases should be cut with a clerical knife. This work requires special care, a margin of time and a sharp enough knife.
To make the seam beautiful, position the edge of the new strip so that it extends a few millimeters onto the previous canvas. Fix the strip on the wall, squeeze out excess air from under it and proceed to trim the excess. Take a long rule or ruler, attach it to the canvas and cut through two layers of wallpaper. After removing the trimmed strip, you will have an even and smooth seam. Go over it several times with a wallpaper roller.
Designing complex areas
Since the wallpapering job is considered quite wet, it is better to de-energize electrical outlets and switches. In order not to suffer with cutting holes for these elements, first remove their plastic parts from the walls. In the process of work, simply glue the strip evenly, and after it dries, cut a hole for the exit of electrical wires. Then reinstall the switches and sockets, hiding the edges of the wallpaper under them.
When you need to paste the wallpaper behind the battery, it is better to remove it. If this is not possible, cut out the required number of holes for pipes in the canvas and fix the wallpaper behind the radiator.

Door and window openings are made according to a similar principle. If your wallpaper is purchased with a margin, use the whole strip. Glue it to the edge of the wall, and cut off the excess part above the opening with a knife. This will give you the most even cut possible.
If the amount of wallpaper does not allow you to do the work in this way, you will have to transfer the opening parameters to the wrong side of the canvas and cut out the segment, taking into account all the irregularities of the wall.
Do not try to decorate the corner sections with one strip, as folds and air bubbles are sure to form in these places. The ideal option is when two canvases are joined in the corner, while one of them goes behind the other.
Summing up
Anyone can hang wallpaper on their own. The result of the work done will depend on compliance with the above recommendations. Particular attention is paid to the seams. If you join the canvases, then there is no difference where to start gluing the wallpaper. When working with an overlap, it is better to start from the window. So the seams will be less noticeable.
Despite the abundance of finishing materials, wallpapering the walls remains the most common way of decorating. By pasting the wallpaper, you can very quickly transform the room: make the room bright, “revive” the interior or place style accents.
To get the desired result, you must choose the right wallpaper and follow all the rules for repair work.
The choice of finishing material: features of different types of wallpaper
The process of finishing the walls begins with the choice of facing material. If the choice is made in favor of traditional wallpaper, you need to decide on the best option. All types of wallpaper presented on the construction market have certain characteristics. Based on the qualities of the material, the conditions of their operation and personal preferences, you need to make a choice.

paper wallpaper- the most popular type of wallpaper in the world. Cloths have many advantages, but when using them, some disadvantages also appear. The main advantages include:
- loyal pricing policy allows you to frequently update the interior of the room;
- a wide selection of colors and patterns;
- environmental friendliness and hypoallergenicity of the material - wallpapers are ideal for children's rooms;
- The material is highly breathable, thus preventing the formation of mold.
Disadvantages of paper products:
- wallpapers quickly lose their original appearance - they fade in the sun, wear out and wear out;
- most paper wallpapers cannot be washed;
- such material is not suitable for use in "wet" rooms.

Advice. When planning paper wallpaper for walls, it is better to choose modern duplex (two-layer) canvases. They are stronger and less prone to contamination. Some duplex wallpapers can be washed.
Vinyl wallpapers. The main advantages of the finishing material: moisture resistance and beautiful appearance. The basis of such wallpaper is interlining or paper, the top layer is treated with polyvinyl chloride. Vinyl wallpapers are produced in a wide range of patterns and textures (embossed).
The vinyl coating protects the decorative trim from sunlight, moisture and reduces the attraction of dust. These wallpapers are best suited for the corridor, bathroom and kitchen. Most PVC sheets are paintable.
The disadvantage of vinyl wallpaper is poor permeability. PVC film does not let air through, the walls do not breathe. As a result, the microclimate worsens in the room, the room must be ventilated more often.
Important! Some manufacturers use innovative technologies and produce vinyl-coated wallpapers with a porous structure. This allows the material to pass air in sufficient volume.
Vinyl wallpapers are not cheap, but their high cost fully pays off with a long service life - the coating retains its decorative effect for up to 10 years.
Today, several types of vinyl wallpaper are used:

- hard vinyl coating - a solid base is applied to the base that can withstand significant mechanical damage;
- smooth vinyl coating - forms a smooth, even surface that is more susceptible to damage;
- silk screen printing is one of the most spectacular types of wallpaper; hot stamping technology creates the impression that the wallpaper contains natural silk threads;
- foamed vinyl - is considered the most durable and dense, due to the deep relief structure.
Non-woven wallpaper are made on the basis of cellulose and consist of 2 layers: interlining and polymer coating. The combination of the two layers resulted in the following characteristics:
- high strength - non-woven wallpaper is stronger than textile and paper;
- the ability to hide wall irregularities and microcracks;
- wallpaper is easy to stick - if the technology is followed, the material does not deform or bubble;
- air passage;
- choice of wallpaper texture - embossed or smooth;
- wallpaper well "lay down" on plaster, wood, cement, slabs and other materials.
Important! A distinctive feature of pasting with non-woven wallpaper is fastening to a wall covered with glue.
Textile wallpapers produced on the basis of fleece and paper. From above, the base layer is covered with textiles (jute, polyester, linen, cotton, etc.). It is the top layer that largely determines the final cost of the finishing material. Fabric wallpapers perform not only a decorative role, they have noise and heat insulation properties.

With the help of such wallpapers it will be possible to create an original interior. However, they also have negative sides:
- exactingness when gluing - it will be difficult for an inexperienced master to do the work;
- intolerance to wet cleaning limits the scope of the use of textile wallpaper.
Glass cloth wallpaper- a wall covering made of glass fibers of different thicknesses with subsequent impregnation. Glass fiber is a unique finishing material with a number of undeniable advantages:
- fire-fighting properties;
- naturalness and safety of use;
- high strength and resistance to any damage;
- durability - service life of about 30 years;
- repel dust and easy to clean;
- Due to the woven structure, air is passed through.

How to glue non-woven wallpaper correctly: step by step instructions
Foundation preparation
The process of pasting any wallpaper, including non-woven, begins with a thorough preparation of the walls. This stage takes a lot of time, but the final result largely depends on the quality of its implementation. What activities are mandatory? The previous coating from the walls must be removed and the surface leveled.
Removing old wallpaper. To soften the coating, you can use a normal soap solution. To improve the effect, it is desirable to add a little wallpaper glue. Washable old wallpaper or very dense, you first need to trim a little, apply notches, and then moisten with soapy water. After such processing, leave the wallpaper for a while - the coating will swell and it can be easily removed with a spatula.
Sometimes the procedure has to be repeated several times. To facilitate the removal of wallpaper, you can purchase a special tool designed for this purpose - the solution is well absorbed and "softens" the material.
Removal of enamel and old paint. In the "Khrushchev", "Stalinka" and apartments of the Brezhnev era, walls covered with paint are often found. If the coating peels off well, then it is cleaned with a spatula. However, in the vast majority, it takes a lot of effort to remove old paint. The enamel is tapped with a hatchet and scraped off with a flat cutter or chisel.

Removing whitewash. Water-based paint or whitewash is pre-wetted with soap and water and then removed with a spatula. A thin layer of old whitewash can be easily washed off with hot water.
The next step is to level the walls. All irregularities, cracks and other defects must be plastered or puttied. If the surface crumbles and crumbles, it is advisable to treat it with a bonding primer.
Required Tools
To complete the work you will need:
- roulette;
- laser level or vertical plumb line with a cord;
- roller with a long pile;
- brush for smoothing wallpaper;
- plastic spatula with a soft edge for rolling wallpaper;
- construction knife for cutting wallpaper;
- metal spatula (narrow);
- foam sponge;
- glue tray;
- pencil;
- ladder.

Material calculation and wall marking.
To calculate the required amount of wallpaper, you should know the dimensions of the room. As a rule, the height of the ceilings ranges from 2.5-2.8 m, the length of the roll is 10 m. That is, one roll should be enough for three strips. Knowing the width of the roll and the perimeter of the room, you can easily calculate the total number of strips.
Most non-woven wallpaper has smooth, high-quality edges. Therefore, they are glued end-to-end. At the same time, the connection of the panels looks like a single solid surface. To facilitate further work, it is desirable to apply markup.

From the corner of the room at a distance equal to the width of the roll (0.5 - 1.2 m), draw a vertical line. Use a level to check for evenness. The lines are applied all over the wall.
Wallpapering steps
Important! Before cutting off the next canvas, you should measure the height of the walls in different places, for example, every 30-40 cm. Very often the walls have drops and the length of different cuts can differ significantly from each other.
If the wallpaper has a large pattern, then it must be selected. You can find out the size of the fit from the pictogram on the label. When marking and cutting, it is important to control that the image matches and that you do not have to glue a piece of canvas from below or from above.
For example, if the required fit size is 48 cm and the ceiling height is 2.5 m, then the length of each piece will be 2.88 m. 48 cm, but not less than the height of the room.

After the calculation, you can start cutting. Cover the floor with plastic wrap and roll out the roll face down. Measure the length of the cut (in our example, 2.88 m) and make a notch with a knife. Using a long ruler, bend the wallpaper at the serif level, check the evenness of the fold and cut off the sheet.
Spread the next sheet and check the fit of the patterns of the two canvases. If the workpieces fit well, then you can cut.
Glue preparation. For wallpapering, you need to choose an adhesive composition that matches the type of material: paper, vinyl, flesilin, textiles or fiberglass. Before mixing glue, read the instructions.
The general procedure for preparing glue:
- Pour the dry mixture into a mixing container.
- Gently pour water into the powder in a thin stream, stirring with a whisk.
- Leave the mixture to infuse and mix again, removing lumps.

Wallpapering. Direct pasting of walls is carried out in the following sequence:

How to glue wallpaper: video
How to glue vinyl wallpaper correctly: the nuances of doing the job
The procedure for gluing a vinyl sheet is not much different from pasting with non-woven wallpaper. However, there are several nuances:
- The choice of glue must be approached responsibly. Vinyl wallpaper has the ability to stretch when the adhesive is applied and shrink after it dries. Poor-quality adhesive composition may not be able to cope with such a load and the seams will simply disperse.
- When pasting, a moderate amount of glue is applied to the walls to prevent excessive stretching of the canvas.
- In some cases, it is allowed to apply glue not only to the surface of the wall, but also to the canvas itself.
- Particular attention is paid to the seams. They must be carefully rolled out with a roller so that they do not disperse.
How to glue wallpaper correctly: photo of joining canvases

How to glue paper wallpaper correctly: features of cutting and gluing
The technology of pasting walls with paper wallpaper depends on their variety: simplex or duplex. Simplex single-layer wallpaper is applicable only for perfectly flat walls - the canvas is very thin and all cracks and pits will be visible through it. Laying such wallpaper is overlapped. Duplex are glued only end-to-end.
The main requirement that must be met when working with paper wallpaper: after applying the glue to the sheet, it must be left to “ripen” for 2-7 minutes (the time depends on the density of the material).

When cutting wallpaper, pay attention to the presence of an edge. Some foreign manufacturers produce wallpaper with an edge on only one edge, domestic - on both. For dense canvases that are glued end-to-end, the border is cut off on both sides, for thin wallpapers - on one side. It is convenient to cut the border on a chair - the unnecessary edge is removed, and the wallpaper rolls back into a roll.
Another nuance when working with classic wallpaper is decorating the walls with borders. You can glue the decor only after the wallpaper has completely dried. It usually takes 12-32 hours for the paper to dry. This period depends on the amount of glue spread, the density of the material and the conditions in the room.
How to glue the corners with wallpaper
Outer corner wrap:
- Measure the distance from the last pasted strip of wallpaper to the corner.
- Cut off a sheet of wallpaper whose width is 2.5 cm more than the measured distance.
- Glue the strip, bending the excess wallpaper to the opposite corner.
- At a right angle, the remainder is glued end-to-end, in other cases - overlapped along the vertical markings.
- With a sharp knife, go along the corner, attaching a ruler. At the same time, you need to press the edges. Remove cuts.

Interior corner finish:
The main rule: you should never lay a single piece of wallpaper on the corner. If this condition is neglected, then folds and bulges are formed.
- Measure the distance from the corner to the last strip of wallpaper and add 2 cm.
- Cut off the desired piece of wallpaper and stick it on the wall, capturing the corner.
- Press the paper firmly against the wall by running a blunt object over it.
- Glue the remaining piece with a cut with a slight overlap on the adjacent wall.
- Attach a ruler to the junction of the walls and hold with a knife, removing excess material.
How to glue wallpaper end-to-end in the corners: video
How to glue fiberglass wallpaper
When pasting with glass wallpaper, it is important to follow some rules:
- Glue is applied to the wall, not to the canvas.
- For work it is necessary to use glue for heavy types of wallpaper.
- At first glance, fiberglass wallpapers have equivalent surfaces, but this is not so. The front side, according to international standards, is turned inside in a roll. The wrong side of some manufacturers is marked with a blue or gray stripe.
- Time of full drying of cullets - 24 hours.
- After drying, the wallpaper can be decorated and painted. It is desirable to pre-prime the surface - this contributes to the economical use of decorative material and paint.

- Before pasting walls or ceilings with wallpaper in wet rooms, the surface must be treated with a fungicidal mixture - this will protect the coating from the appearance of fungus.
- The readiness of the walls before gluing can be checked experimentally:
- stick a piece of polyethylene with adhesive tape to the wall;
- leave the cellophane for a day;
- if after 24 hours perspiration appeared inside the film, it means it is too early to start pasting; if the cellophane remains dry, then the wall is completely dry and ready for further finishing.
- To avoid the appearance of wrinkles and bubbles, pasting must be carried out under the following conditions:
- it is desirable to perform work at a temperature of 23-25 ° C;
- walls that have just been pasted over with wallpaper must be protected from drafts until the coating is completely dry;
- it is highly undesirable to get sunlight on the wallpaper.
How to glue the ceiling with wallpaper: video
The process of wallpapering is simple, if you follow the advice of professionals. Sooner or later, in any apartment or house, you can paste wallpaper, as the walls lose their proper appearance. What to do if you have to work in winter or use a canvas such as fiberglass and at the same time uneven walls? It is necessary to carefully study the entire process of updating the wall covering in order to prevent oversights and defects.
How to glue meter wallpaper
The most popular are meter-long wallpapers, the sticker of which can be carried out by one person, and whitewash with color can be applied on top of them.

An obligatory step in wallpapering is the process of removing air using a roller.
In order for the gluing to take place correctly, it is worth following a few rules and recommendations:
- The wall is covered with glue, which is pre-prepared.
- The first sheet of wallpaper is adjusted in height, but there should be a hem on top, which will be cut off after drying. The lower part of the canvas is also folded and removed.
- Next, smoothing the wallpaper is required in order to remove air accumulations using a wallpaper roller or a rubber spatula.
- While smoothing occurs and the canvas dries out a little, you can cut off the unnecessary part with a clerical knife.
- If the cut line begins to fray, then it is worth postponing this moment for later and continuing pasting.
- If voids are found when probing the canvas, then you need to disconnect the sheet from the wall to this place, coat the wall with glue and repeat the entire process described above.
At what temperature can wallpaper be glued
There are many opinions about the temperature at which wallpaper can be properly glued without the formation of defects. Any repairman will tell you that you need to paste over concrete walls subject to certain recommendations, and then the weather outside the window will not affect the final result.

If you plan to wallpaper in the winter, close all windows carefully to avoid drafts.
- Regardless of where wallpapering takes place in an apartment or house, the temperature level must be at least 10 and not more than 25 ° C. It is this temperature that is enough for the canvas to dry and stick tightly.
- The humidity level in the room should not exceed 60%. If the humidity is higher, then the glue will begin to be saturated with it and the properties of the composition will be significantly reduced.
- Sticking wallpaper over the battery or opposite the window, when direct ultraviolet rays hit the wall, is as carefully as possible. It is advisable to turn off the batteries before the room is completely dry, and curtain the window, otherwise the glue will dry too quickly and the wallpaper will get crusty, which will ruin the proper look of the room.
- The room must absolutely not be opened until the glued canvases are dry. Any draft can cause repeated finishing work.
Related article: Cable wiring
What do you need for wallpapering
What tools are needed for wallpapering? It is worth paying attention to the inventory list before starting work so that everything is at hand.

All the necessary tools for wallpapering can be bought at any hardware store.
To paste over the walls, you will need a tool:
- Bucket;
- Stairs;
- roller;
- Brush;
- Ruler or level;
- Stationery knife;
- Pencil or crayon;
- Wallpaper brush;
- Roulette;
- Roller for alignment of joints;
- Screwdriver and electrical tape;
- Sponge.
Sticking simple wallpaper is easy, but with a picture it is not easy for non-professionals. Fitting a picture to a person without work experience is far from easy, and even more so alone. It is worth noting that when using material with a print, you need to immediately prepare for the fact that more expenses will be required, and trimmings will remain.
The step between the repetition of the pattern can be very different, and, as a rule, you can familiarize yourself with it on the label of the canvas.
To finish the hall or bedroom, you will need to purchase 3 rolls more than expected per square meter. You should not think that if gluing is carried out behind cabinets and sofas without a selection, then so much material will not be required, since the essence will remain the same.

It should be borne in mind that when wallpapering with a pattern, more scraps will remain than when wallpapering without a pattern.
In addition, the selection of a pattern should be done on three rolls at once, which will reduce both time and excessive costs and leftovers. When buying, you should pay attention to the batch, as different numbers can bring a lot of problems during repairs. Maybe the difference is in shade or even in the width of the pattern.
Before gluing the canvas, it must be cut with an allowance, which will then allow you to cut the upper and lower borders clearly along the level. Naturally, it is better to adjust the print on the floor and on dry canvases, which is much more convenient and hassle-free. Professional technology for high-quality pasting of canvases begins with a traced mark on a sheer wall. In this way, too large an error can be avoided. In addition, it is extremely inconvenient to pull a wet canvas along the walls in order to achieve a normal slope.
Not uncommon in apartments - these are uneven walls, which can sometimes be visually hidden with wallpaper, and sometimes not. In this case, if you want to make a quality repair, you must first take care of leveling the surface. This can be done using a material such as a rotband, but this is with minimal bulges. For larger problems, plywood, OSB, chipboard, MDF, and PVC plastic panels can be used. With their help, it is much easier and faster to finish the room.
PVC panels are considered a practical material, but they do not tolerate mechanical stress, since their surface is very fragile.
Which wallpaper is easier to glue for non-professionals
Experts believe that professionals should do the repair work, but if you still have a desire to make repairs yourself, and you don’t have special skills, then it’s much better to choose those materials that are easier to handle. It is not advisable to work with wallpaper for pregnant women, as this can cause premature birth. The increased temperature in the air and physical labor are not desirable for such representatives of the fair sex.
Related article: Brick barbecue oven

To glue the wallpaper joint to joint, you need to take measurements with a tape measure
Non-professionals should not use such additional materials as:
- Newspapers;
- Baguettes;
- Tiles.
Moreover, you do not need to try to write patterns on wide whitewashed wallpapers yourself, as this may not look as expected. A room covered with wallpaper with a single pattern and one color is not at all boring if you choose the right shade, as well as textiles and furniture for it. Beginners believe that it is easier to work with narrow wallpaper, but meter-long non-woven fabrics are in no way inferior to them. If the repair is carried out by two people, then preference should be given to wide wallpapers.
Since they are more:
- quality;
- sustainable;
- durable;
- Durable.
The peculiarity of wide wallpapers is that they allow you to hide the unevenness of the walls and the joints themselves by texture. Accordingly, it is possible to create an unrealistically beautiful view of the living room and an impression of integrity and elegance will be created. However, meter-wide wallpaper is not so easy to apply to a small room. For example, a kitchen or a corridor. Considering how many bends there are, sometimes there is a desire to completely wipe the walls with decorative plaster and simply subsequently paint it in the desired color, which can be accessible to beginners. Working with the material is not difficult and does not require special skills, provided that the plaster is of the highest quality.
Low-grade materials will begin to crumble even during installation, which will significantly spoil the final result.
Wallpapering technology
The wallpapering technique is generally the same, since the canvas is applied exclusively vertically, and not horizontally, with the exception of the ceiling finish, which is quite rare. Before work, you need to cut the canvases and fold them with the reverse side to the top. This will make it easier to apply the adhesive. Coating of canvases is carried out using a special wallpaper brush. As a rule, after the glue is applied, the wallpaper can curl, and therefore you need to press down the edges of the canvas with heavy objects. In order for the glue to impregnate the wallpaper, it takes from 1-3 minutes, depending on the canvas.

It is best to apply glue in the corners with a small brush.
Modern designers began to come up with a variety of ways to wallpaper pasting, for example:
- obliquely;
- Circular;
- Horizontal;
- Patchwork.