Secrets of installing a toilet. Proper installation of a toilet bowl in a private house with your own hands: step by step instructions
Work on the installation of new plumbing for many novice craftsmen causes concern. A variety of design solutions for plumbing fixtures and how to connect them requires the contractor to know the intricacies of the process.
We will try to uncover and analyze the main ones of them, how to properly install the toilet bowl with your own hands without the help of plumbers.
The range of sanitary ware on the market is diverse. Any owner has the opportunity to choose presentable and functional equipment to his own taste and budget.
In addition to traditional floor models, manufacturers offer a wide selection of suspended and built-in devices. The drain tank in them can be attached to the wall or connected to the base of the plumbing.
The version of the bowl of floor and hanging models can be any, for example, dish-shaped, funnel-shaped or even a visor modification
The latest models of toilet bowls also differ in the design of key components.
The output drain happens:
- horizontal;
- vertical;
- oblique.
The type of outlet drain should be considered when choosing a model. If your plans do not include alteration of the sewer pipe supply, then in the installed model the drain should be arranged according to the same principle as in the dismantled one.
Drains and plumbing supplies that do not match each other, provided that this is not a toilet bowl with a release, it is almost impossible to combine it as tightly and efficiently as possible.
Fixing plumbing to the floor is carried out by means of specially made two or four attachment points. But you can also find models in which the corners that come with the product are used for fastening to the floor.
A new plumbing fixture can be put in place of the old one, or you can choose another “corner” for it by making a small redevelopment in the bathroom.
Preparation of tools and materials
To connect the tank to the water supply you will need a flexible hose. It usually comes with a kit. For connection to the sewerage - a rigid or bending corrugated cuff.

It is impossible to qualitatively install a toilet bowl with your own hands without a minimum set of necessary tools that any owner has in the house
To assemble the structure and connect to communications, you will need:
- perforator or impact drill;
- a set of screwdrivers with a flat and cross-shaped "sting";
- set of wrenches;
- building level;
- a simple pencil or marker;
- stationery knife;
- roulette;
- chisel;
- hammer.
If the installation of plumbing will be carried out on a tile, then it is also necessary to prepare a “ballerina” or a spear-shaped drill for tiling. To make holes for the installation of fasteners, you will also need an 8 or 10 mm drill.

From the auxiliary materials you will also need:
- metallized tape;
- silicone sealant;
- FUM tape;
- polyethylene film;
- moisture-absorbing piece of fabric;
- container for collecting liquid.
Depending on the type of model connected and the method of installation, grout may also be required.
Removing an old toilet
Removing an old toilet is one of the most time-consuming operations.
The work is carried out in several stages:
- Shut off the faucet.
- Disconnect the hose going to the tank from the water supply, drain the water from it.
- The empty tank is removed from the mounts.
- Unscrew the nuts located on the back of the toilet and disconnect it from the sewer. To loosen the drain, the toilet must be shaken from side to side.
- Drain the remaining water from the toilet by tilting the bowl forward.
- The sewer hole closer to paradise is cleaned of dirt and temporarily clogged with a rag gag or a wooden plug of a suitable diameter.
The easiest way to break the bolts is to hold the head with an open-end wrench and unscrew the nut with an adjustable wrench. If threaded connections are heavily slagged with salt deposits or rusted.
To facilitate the task will help the use of universal grease "WD-40", which in a matter of minutes is able to loosen deposits. In the absence of such, you can use vinegar or kerosene.

The sewer hole must be closed without fail so that toxic hot gases do not spread outside the pipeline
If rotten taffeta or any other support is found under the dismantled toilet, it must be removed. This can be done with a puncher, a nail puller or a chisel.
In old houses, drains on sewer pipes are often fixed with cement plaster. It is easiest to knock down the dried solution with a chisel, puncturing it in several places. Read detailed instructions for dismantling the old toilet.
Image gallery
Option #2 - with horizontal outlet
Plumbing fixtures with horizontal outlet have become one of the most popular in our country. The relevance of the installation of such equipment is explained by the specifics of the wiring in Russian apartments of the sewerage system.

The main feature of toilet bowls with a straight horizontal outlet is that a strictly fixed point of connection to communications is required for proper installation.
The horizontal outlet is located at the back of the bowl or base and points back. Models with this design are installed end-to-end with the wall, connecting to any type of sewer riser location.
The connection is made using fittings of the appropriate size. The joint is sealed by placing a sealing gum inside the pipe.
Direct connection is performed only if the sewer system is made of plastic. To connect to cast-iron pipes, the circumference of which rarely has an ideal shape, cuffs and eccentrics are used.
Option # 3 - with an oblique outlet
The flare in models with an oblique outlet is located at an angle of 45 ° relative to the floor surface. Models with an inclined outlet win against their counterparts in that they are less likely to become clogged, since this design allows you to create less resistance when moving solid impurities.

Vulnerable points of devices with oblique outlet are the articulation points of the product with the sewer pipe, which, if not properly installed, can be covered with cracks
Connecting a device with an oblique outlet to the sewer system can be done in one of three ways:
- By direct connection through the socket of the sewer branch. They choose when there is no need to move the plumbing fixture, and the direction of all elements clearly coincides. The outlet of the toilet bowl is treated with soapy water and deepened into a socket equipped with a cuff.
- Accession by means of an eccentric. A socket with a 5 cm offset center, equipped with a sealing gasket, is mounted in the sewer outlet and, by rotation, the toilet bowl is shifted to the right or left side.
- By installing a corrugated outlet. The use of corrugations makes it possible to deploy the device for a relative oblique sewer outlet even at an angle of 90 °.
Flexible outlet - although convenient, it is far from the best way to connect toilets with an oblique outlet. It should be used only in extreme cases, when it is not possible to use other methods.
To find out in more detail how to install a toilet with an oblique outlet, go to.
Image gallery
The easiest way to connect a toilet with an oblique outlet is to use corrugations, which provide perfect tightness
If with the help of corrugations not a temporary, but a long-term connection is made, then you need to use a reinforced version of the corrugated pipe
Using the corrugation, the slanted outlet toilet can be connected to a floor or wall drain
If it is possible to reduce the distance between the toilet bowl and the sewer system, instead of corrugations, it is recommended to use a sealed cuff and a plastic outlet
The use of corrugations in connecting to the sewer
Reinforced corrugation for reliable performance
Side outlet toilet connection
Cuff in the sewer connection
Features of mounting compact models
The technology for the correct installation of floor-standing toilet bowls of compact models includes seven main steps:
- The toilet is pushed as tightly as possible to the drain hole and check whether the outlet coincides with the sewer socket.
- In the presence of small displacements, the device is connected to the sewerage outlet using a corrugated pipe.
- A plumbing fixture with a connected corrugated pipe is moved to the wall, making sure that strong creases and bends do not form on the pipe.
- The ends of the connecting element are covered with a thin layer of silicone sealant.
- Having adjusted the position of the device, with a pencil outline the contour of the borders of the sole of the device and the points where it is planned to drill holes for deepening the dowels.
- The toilet is pushed aside. At the marked points, holes are made with a diamond drill with a diameter equal to the size of the dowels used.
- Plastic plugs are inserted into the holes. The toilet is "hoisted" to its original place. Bolts are screwed into the prepared holes.
Tip: to facilitate putting on the corrugated pipe to the outlet, its end must be smeared on the inner walls with liquid soap.
If holes have to be made in tiles, to minimize damage to the surface, first manually slowly drill the top layer, and only then turn on the hammer drill with an impact drill
In order to ensure the closest possible fit of the toilet sole to the floor covering, silicone is applied according to the intended counter of the installation of the device. The toilet itself is then put in its original place, guided by the intended contour.
To fix the plumbing fixture, the washers and screws threaded through the holes in the heel are twisted extremely carefully. Under no circumstances should they be killed!
Photo guide for assembly and installation of the compact
Consider the process of installing a toilet bowl using the example of assembling and fixing Chinese PORTA plumbing. An excellent product with a 25-year manufacturer's warranty and a very attractive price.
Image gallery
Before installing a new toilet bowl, we dismantle the old plumbing, clean the floor under it, repair it and fill it with a semi-dry cement mortar
We install a new plastic adapter in the sewer outlet, to which we will connect either a corrugation or a rigid plastic elbow
If necessary, we change the cold water supply pipes in the area behind the toilet. Most often this has to be done so as not to change the pipeline a year or two after the installation of new plumbing
According to the completed connection from the toilet to the sewer, we expose the plumbing for fitting in order to mark the attachment points and outline the leg
Step 1: Preparing the floor for the new toilet
Step 2: Replacing pipes and fittings connecting to the sewer
During the overhaul of the apartment, we are faced with the need to replace the old toilet bowl with a new one. A professional plumber is often called in to perform this work. However, installing a toilet bowl with your own hands is not such a difficult task as it might seem at first. If you are limited in funds or want to save on the services of workers, then this article is for you. Below we will tell you how to choose the right toilet, prepare the room, assemble and install a new plumbing fixture.
Choosing a toilet
When choosing new plumbing, you should consider some features of the toilet and bathroom. Namely:
- Room area;
- The presence or absence of an external water supply pipe, its diameter and distance from the intended tank;
- The location of the sewer pipe;

- Release angle. The best option is to install a toilet with an oblique outlet. You can measure the outlet height from the floor with your own hands, and with a slight mismatch, install an adapter - a drain corrugation.

All toilets have their own design and fastening features. First of all, you need to divide them into suspended and floor. Installing a wall-hung toilet has aesthetic advantages, in addition, it takes up much less space. Whereas the floor toilet is more practical, convenient and reliable.
Flush classification
There are two main types of flush - straight and circular.
- Direct (or horizontal) is more common in simple budget models of plumbing equipment. Water from the tank flows down the back wall of the toilet bowl, which does not allow you to remove dirt under the rim. During the collection and discharge of water, such a toilet creates a lot of noise.
- Circular flush effectively cleans the entire surface of the bowl due to the ring device. However, toilets with this type of flush are significantly more expensive.
Removing an old toilet
Dismantling and installation of the toilet follow each other in the event that you need to replace the old plumbing with a new one. This happens during the overhaul of an apartment or a bathroom.
All actions must be carried out in a strictly defined order:
- Put on safety goggles and work clothes;
- Turn off the cold water, and then drain the water from the tank;
- Disconnect the water pipe and remove the tank;
- Unscrew the floor-mounted toilet from the floor;
- To detach the toilet bowl from the sewer pipe, use a sledgehammer or hammer. Gently tap on the cement or adhesive covering the joint. Make sure that the fragments do not fall into the pipe and do not clog the drain;
- Shaking the toilet, remove the remnants of the sealant and remove it from its place;
- Now you can clean the bathroom, clearing the place for a new plumbing fixture. Clean the sewer and water pipes from rust and plaque, and then treat with a lubricant that prevents metal corrosion.

Building a new toilet
Installing a bidet and toilet is not an easy task, but doable. Any floor-standing toilet bowl consists of two main parts - a bowl and a drain tank. Our first task is to connect these two parts into a complete plumbing fixture using screws, nuts and various gaskets.

The assembly of the toilet bowl begins with a drain tank. First you need to mount the drain mechanism, and then the float. The drain mechanism, which is usually attached assembled, is not difficult to install. Insert it into a special hole on the bottom and secure with a plastic nut, on which then put on a rubber seal.
Important: Don't forget the rubber pads! All toilet connections are made using them.
The toilet assembly instructions do not end there. Before proceeding with the installation, you need to connect the drain tank to the bowl. To do this, you will need metal studs. Install the tank on the bowl and secure it tightly by putting a special washer on the stud, a rubber gasket and securing it with a nut. Repeat all this with the second hole.

Toilet installation
Floorstanding toilet installation instructions
Installing a toilet bowl in a private house with your own hands or in an apartment with the help of a professional - all this does not matter. If your choice fell on a floor toilet, then in any case its installation will have to be carried out according to the scheme described below.

- Before installing plumbing, it is necessary to complete all finishing work.
- Installing a toilet bowl on a cement or tiled floor has its own characteristics. The floor must be perfectly flat, otherwise, when tightening the fasteners, the toilet itself or the tile may suffer.
- Insert the dowels into the holes and screw the plumbing fixture to the floor, but not completely.

- If you are mounting the toilet at some distance from the wall, then it's time to start installing the corrugated pipe and finally fixing the toilet, checking its strength and immobility. In this case, the pipes are connected using rubber seals and sealant.
- When the installation of the bowl is over, it's time to connect the water to the drain barrel and check the operation of the entire device. To supply water, use a corrugated metal hose, tow and nuts of the right size.
Do-it-yourself wall-mounted toilet installation
Installing a toilet with an installation is not much different from installing a hidden toilet. In both cases, a hanging-type bowl is most often used, which obliges us to mount not only a drain tank, but also a metal frame into the wall with our own hands.

Important: Make sure your wall is strong. It is better if this parameter is evaluated by a specialist.
Steel fasteners are mounted with dowels to a concrete and reinforced concrete wall (rarely to a brick wall). The installation height of the toilet bowl is determined independently at this stage.
Attach the toilet bowl and install the cistern following the instructions. Connect them with a flexible hose and connect to the water supply and sewerage system.
Remember: The tightness of the joints in this case is ensured in the same way as in the case of a floor-standing toilet.
Video
Do-it-yourself toilet installation with a competent approach and a thorough study of the issue is unlikely to cause you any difficulties. Below you can find video clips that will make the installation process simple and understandable. Happy viewing!
If it is necessary to replace the old or install a new toilet, some people immediately rush to seek the help of a specialist. Do not make hasty decisions, because it is not difficult to do this work on your own. It is enough to study in detail the instructions of the purchased product, deal with the nuances of installation and do it yourself. Modern connecting elements allow you to quickly and efficiently connect the toilet to the sewer. By spending a little time, you will save significant money, because the cost of an experienced plumber is almost equal to the cost of the purchased toilet.
Toilet classification
Many people think that the toilet is a modern invention, but it is not. Already at the end of the 16th century, it was invented for the Queen of England, but due to the lack of centralized water supply and sewerage, it was not widely used.
Modern toilet bowls are available in different versions and differ in the shape of the bowl, the method of installation and the type of drain system. To make the right choice of such a device, you first need to familiarize yourself with the existing offer and decide on the parameters of the toilet that you need.
According to the method of fastening
There is a classification of toilet bowls according to the method of attachment:
- floor. They are the most budgetary and are best suited for spacious toilet rooms. Installation of such a product is carried out on anchor bolts, which allows, if necessary, to dismantle it without damaging the floor covering;
Floor models are mounted on anchor bolts and, if necessary, can be easily dismantled
- wall-mounted. This is one of the varieties of the floor version, designed for installation in small bathrooms. According to the design of the flush system, such toilets are practically in no way inferior to hanging ones. There are corner models of wall-mounted devices that are great for installation in small toilet rooms;
A wall-mounted toilet differs from a floor-standing one only in that it is installed close to the wall.
- suspended. Also designed for installation in small areas. Although outwardly such models seem very elegant and fragile, they are designed for weights up to 400 kg. and therefore are very durable and reliable. Installing a suspended structure makes it easier to clean the bathroom, and also frees up some of the free space. Such a toilet bowl is attached in a frame or block way.
Wall hung toilet saves space
By release design
According to the type of descent of water into the sewer system, there are toilet bowls:
- with vertical outlet. Such a solution is rare in our country, but, for example, in America it is very popular. This is due to the fact that in this country communications are often not attached to the wall, but carried out under the floor, so the toilet can be installed anywhere;
A toilet with a vertical outlet can be installed in any required place, for this it is enough to bring sewer pipes there
- with horizontal outlet. The descent of the toilet bowl and the sewer hole are located on the same line. Most modern models have this design;
A toilet with a horizontal outlet is designed for cases where the sewer hole is located in the wall
- with oblique release. The tilt angle of the toilet bowl is 40-45°. Such models were popular in the 80s of the last century, they were installed in apartment buildings.
Oblique outlet toilets are placed when communications fit along the bottom of the wall
By tank mounting type
If we talk about the type of fastening of the tank, then the toilet bowls can be of the following types:
- with separate tank. In this case, the tank is mounted under the ceiling, and it is connected to the bowl using a pipeline. This allows you to get a high flush rate, but the appearance of this design is not very attractive;
The tank is located at some distance from the toilet bowl and is connected to it by a pipeline
- with a joint tank, which is attached directly to the toilet bowl. The design can be detachable, bolted or monolithic;
In most toilet models, the tank is installed directly on the bowl
- with hidden tank. This solution allows you to implement a variety of design ideas. The hidden tank is fixed using the frame method;
Only the bowl remains in sight, and the tank is hidden inside the toilet
- without tank. Typically, such models are installed in public toilets, but can also be used in everyday life. In this case, the pressure in the bowl is supplied directly from the water supply, and the water flow is controlled using an electronic or mechanical valve.
In a toilet without a tank, water is supplied into the bowl directly from the main
By flush type
There are differences between toilet bowls and in the direction of the flow of water during flushing:

Most modern toilets have two flush modes - full and economical, which allows you to almost halve the water consumption.
On the modern market there is a wide selection of both domestic and foreign toilet bowls. Our models are cheaper because the price does not include shipping costs and customs duties. The main parameters to consider when choosing are:
- The quality of the bowl. In order for the toilet to be comfortable to use, it must have a good flush. And for this, the bowl must be covered with high-quality glaze - if it is porous, then dirt will constantly accumulate and you will have to use a brush more often.
- Tank filling speed. The toilet bowl should have modern shut-off valves, then if several people live in the house, it will not be necessary to wait long for the drain to recover after visiting the toilet by other people.
- Economy mode available. Since now almost all apartments are equipped with water meters, in order to reduce its consumption, it is necessary to purchase models with a double button. In this case, it is possible to perform a full or economical drain.
Economy flush mode uses half the water
- Bowl shape. It can be different: round, oval, square, so if possible, it is better to sit on the toilet and practically evaluate its comfort.
- Material type. Usually, porcelain or faience is used to make toilet bowls. Porcelain products are of higher quality, but their price is higher. Outwardly, it is almost impossible to distinguish porcelain from faience, so it is necessary to study the product documentation. Now you can buy metal, glass models, toilet bowls made of reinforced plastic, natural or artificial stone.
Toilets are made not only from traditional porcelain and faience, but also from natural stone, such as marble
- Cover quality. It should be rigid, made of Duroplast and have an antibacterial coating. You should not buy a foam cover, as it will be a breeding ground for germs. It is convenient when the lid is equipped with a microlift. It ensures its smooth closing, which occurs without noise and impact.
It is best to purchase toilets with a Duroplast lid with a built-in microlift
- Additional functions. Now many manufacturers equip their products with various options, but keep in mind that this increases the cost of the device. Before purchasing such a model, consider whether you need lighting, music from the toilet, or seat heating.
When choosing a toilet bowl, you need to optimally combine your desires and financial capabilities. You can either sacrifice some items and choose a more budget model, or buy a device with additional features.
Video: choosing a toilet
Preparing for installation
If you decide to install the toilet yourself, then before that you need to perform certain preparatory work. First you need to determine which model will be optimal in your case and only then purchase it.
Typically, the installation of the toilet is performed during repairs in the bathroom. If it became necessary to replace it in another case, then first you need to remove objects from the room that will interfere with the work, turn off the water supply and prepare all the necessary tools.
Necessary tools and materials
In order to install a toilet, you may need the following tools and materials:

If you are replacing the toilet, you must first dismantle the old device. The work process will be as follows:
- Removing the tank. First you need to disconnect the water hose, and then drain the water from it. Then open the lid, unscrew the fasteners and remove the tank.
- Removing the toilet. Unscrew the toilet bowl to the floor and disconnect it from the sewer pipe. If this does not work right away, you need to shake the bowl a little. For convenience, you can first cut off the toilet (if it will no longer be used), and then proceed to dismantle the fasteners.
First remove the tank, and then dismantle the bowl
- Cleaning the sewer hole. It is necessary to clean the entrance to the sewer hole, and then close it with a rag so that foreign objects do not get there, and toxic fumes do not enter the apartment.
The hole of the sewer pipe is cleaned of dirt and deposits
Surface preparation for installation
The choice of how to prepare the floor surface will depend on how the old toilet was installed. Previously, for the installation of a toilet bowl, a board (taffeta) was embedded in the floor, after which the bowl was attached to it with screws. If the taffeta is in good condition, then it can be left. If you decide to remove the board, then the resulting place must be filled with mortar and covered with tiles.
The surface for the installation of the toilet must be cleaned and leveled
If the toilet was installed on a tile, it is enough just to unscrew it, since the floor covering is not damaged. After that, you can mark the places for installing a new toilet bowl.
Toilet Assembly
To ensure the integrity of the plumbing equipment and save space during transportation to the store, it arrives disassembled. Do not be afraid of this, since each product comes with detailed assembly instructions, following which it will not be difficult to cope with this task.
How to connect a toilet to a cistern
The main attention should be paid to the correct installation of the float, since it is he who regulates the filling of the tank with water. The toilet assembly process itself consists of the following steps:
- Installation of the drain mechanism. The valves usually come already assembled, so you just have to install it in the tank. Pay special attention to mating surfaces and see that there are no burrs. First, a sealing gum is installed, then a drain device and fixed with a nut.
The drain assembly assembly is mounted on a rubber seal that protects the water drain from leakage
- Connection of a tank with a shelf. The assembled tank is applied to the shelf on the toilet bowl and connected using the bolts and nuts included in the kit. Do not forget to install rubber washers to ensure the tightness of the connection.
The rubber washer ensures a tight connection between the tank and the bowl
During installation of valves in the tank, all nuts are tightened by hand, without applying much effort.
Install the toilet in the place where it will stand, and align with plastic or rubber gaskets. Then mark the attachment points, make holes in the floor and fix the toilet bowl with dowels.
Sewer connection
After installing the toilet, you need to connect it to the sewer system. There are some features when connecting models with a vertical, horizontal or oblique drain.
Installing a vertical outlet toilet
Connection to the sewerage of a toilet bowl with a vertical outlet is carried out simultaneously with its installation:

Installation of a toilet bowl with a horizontal branch pipe
In this case, the outlet is directed backwards and a special cuff is used to connect it to the sewer pipe. Its shape depends on the location of the exit from the riser. If it is made horizontally, a straight adapter pipe of the appropriate diameter is used. If the drain pipe exits at an angle, an appropriate design is made of swivel elbows or a corrugated hose.
To connect a toilet bowl with a horizontal outlet to the sewerage system, a transitional structure of swivel knees or flexible corrugations is used
Installing a toilet with an oblique outlet
Very often, the oblique outlet of the toilet is located above or below the sewer pipe. There are two ways to mount such models:

Switching from cast iron pipes to plastic products
There are still cast-iron sewer pipes in the houses of the old building, and if they are in good condition, then it is not necessary to change them, since you can connect them with new plastic products.
There are several mounting methods:
- With rubber gasket. This option is good to use if the cast iron socket has a smooth edge. The cuff is lubricated with sealant and inserted into the socket, after which a plastic pipe or adapter is inserted into it. A plastic one is inserted into a cast-iron pipe by 3-8 cm - if everything is done correctly, then such a connection will reliably serve for 6-8 years.
Sealing of plastic and cast iron pipes can be done using a rubber cuff
- With the use of linen winding. If there is no sealant, you can use linen winding. This is a time-tested method: a plastic pipe is wrapped with linen winding, after which it is inserted into a cast-iron socket, and the winding is carefully tucked with a narrow spatula. Then the seam is smeared with a solution of PVA glue and dries throughout the day.
The gap between the plastic and cast-iron pipes is sealed with tow and filled with mortar.
- Combined method. To obtain the most tight connection, when the gap between the pipes to be connected is large, a combined installation method is used. At the same time, caulking is performed using winding and a rubber gasket is installed, after which the joint is coated with silicone sealant.
- With a press fitting. This is a special element, which on the one hand has a thread for a cast-iron pipe, and on the other - a socket for a plastic element. In this case, the edge of the old pipeline is cut off, after which it is lubricated with grease and threaded. Then the tow or FUM tape is wound, lubricated with sealant and the press fitting is screwed on. A plastic pipe is inserted into the socket.
Using a press fitting, you can reliably connect a plastic pipe with a cast iron
When docking a cast-iron and plastic sewer system, it is important to follow the specified rules for performing work, only in this way it will be possible to obtain a high-quality and tight connection.
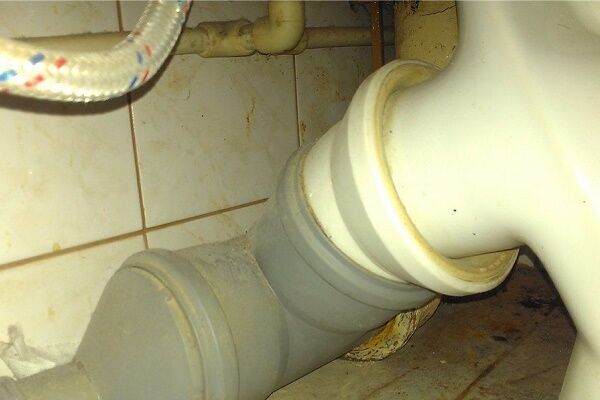
Connecting with a corrugation
One of the most common ways to connect a toilet to a sewer is to use a plastic corrugation. First you need to decide on the required size of this product. It is best to buy corrugation reinforced with wire or mesh - it is more durable and will last longer.
The procedure for connecting the toilet:

You can connect using plastic elbows, but unlike corrugations, they are not flexible. This solution is convenient to use in the case when the sewer system was planned for a specific toilet model.
Rigid bends are more durable and durable, but when replacing the toilet or needing to move it a little, you will have to change the adapters or use a corrugation or an eccentric.
To connect the toilet to the sewer, you can use a direct adapter or an element with an eccentric
Installation is carried out in the same way as in the case of corrugation, but horizontal adapters and right angles must be avoided. Gray adapters are cheaper, but they look ugly with a white toilet.
Video: toilet installation
Water connection
There are several ways to connect the toilet cistern to the water supply:

To connect to the water supply can be used:

The connection order will be the same regardless of the eyeliner:

Video: connecting the toilet to the water supply
Features of connecting models "monoblock" and "compact"
The difference between the toilet bowls "compact" and "monoblock" is the type of connection of the drain tank. If in the first case the tank is attached directly to the shelf located on the bowl, then in the second case - the bowl and the tank are made in a single body.
In the "monoblock" toilet bowl, the bowl and the tank are made in a single body
Both types of toilets are mounted on the floor, and the way they are connected to the sewer will depend on the type of descent. Installation is carried out in the same way as shown above. The only difference is that for the “compact” it is necessary to independently install and adjust the shut-off valves, while for the “monoblock” it is already assembled and adjusted by the manufacturer.
Hanging toilet: installation features
If the area of \u200b\u200bthe toilet is small and you want to save free space, experts recommend installing a wall-mounted toilet model. Installation of such a device is carried out on the installation - a special support frame.
The installation technology of a suspended toilet bowl includes the following steps:
- Installation selection. Usually it comes with a cistern, flush button, necessary pipes and adapters. The bowl can also be included in the kit or you have to buy it separately.
The installation usually includes a tank, adapters and nozzles
- Determination of seat height. Installation of the installation is possible only on a main wall, which can withstand a weight of about 400 kg, so it cannot be installed on a plasterboard structure. The toilet seat is usually set at a height of 40-48 cm, it all depends on the height of the users - you need to make sure that everyone is comfortable.
- Markup. Mark the central axis of the installation and determine its distance from the adjacent wall. It should provide a convenient connection to the water supply and sewage system, therefore it is usually at least 14 cm. The tank is placed at a height of 1 meter from the floor.
The height of the wall-hung toilet bowl above the floor level should be 40–48 cm
- Drilling holes. In the marked places, holes are made into which dowels are inserted.
- Installation of the installation case with a plastic tank. It must be set in a vertical and horizontal plane, so be sure to use the building level. Adjustment is performed by changing the height of the legs.
With the help of adjustable legs, the installation is leveled
- Drain button installation. It can be mechanical or pneumatic.
- Line of communications. Plumbing is usually carried out using rigid pipes, as they are more durable and reliable. The pipes of the tank are fixed with clamps and the sewer outlet is mounted at an angle of 45 o.
- Bowl installation. It is attached to the studs using a shock-absorbing pad. Connect the bowl and the nozzles of the tank. Check the operation of the toilet.

The installation construct is most often finished with moisture-resistant drywall
Video: installation of a hanging toilet installation
System health check
Regardless of what type of toilet you installed, before you start using it, you need to check the system's performance. This is easy to do: you need to turn on the water and wait until the tank is full. After that, the water is drained and all the junctions of the toilet bowl with the water supply and sewerage are inspected.
If there are no leaks, then everything is fine. If leaks were found in some connections, it is necessary to check and correct the seals and again perform a control drain of water. It is also necessary to check the reliability of fixing the toilet bowl, it must be fixed firmly.
Common Errors and How to Fix Them
When performing self-installation of the toilet bowl, home craftsmen can make typical mistakes, which you can also eliminate with your own hands:

If you loosely fasten the toilet, then this can soon lead to a violation of the tightness of the joints, as well as damage to it.
Video: editing errors
Almost any home master can install a toilet bowl on his own. To do this, you need to choose the right type of toilet bowl and, in accordance with this, perform its installation. If you strictly follow the instructions and recommendations of specialists, then a self-installed toilet bowl will perform the necessary functions for a long time and reliably.
Installation of plumbing equipment is carried out in strict accordance with building rules and regulations. Home craftsmen often experience fear of such work. This is used by service companies that request very decent money for performing fairly simple operations. Meanwhile, fixing the toilet bowl to the floor is an activity that is quite affordable for independent implementation. It is only important to carefully read the existing work technologies, choose the most suitable one, and follow all the instructions exactly.
Regardless of the chosen method of attaching the toilet bowl, installation work begins with the assembly of the cistern. The device is assembled in accordance with the instructions and fixed in place intended for it. Also, before installing the toilet, the units for supplying and discharging water must be prepared. There are several methods for attaching devices. The main selection criterion is the floor material on which the equipment will be installed. Let's take a closer look at the most common methods.
Method number 1: installation on dowels
The most practical method that allows you to install the device with the least effort and time. It is optimal for use on a flat, smooth surface, since the slightest height difference adversely affects the quality of the flush. It is preferable to use this method of fastening for lightweight compact structures, since the fixation may not be entirely reliable. Plumbers advise installing equipment on a special gasket, which you can easily make yourself from old linoleum or a sheet of thin rubber. The toilet bowl is installed on the workpiece, circled around the contour with a marker. After that, with a sharp knife or just scissors, the gasket of the desired shape is cut out.
The device is fixed to the floor with dowels or special plumbing fasteners. Fasteners usually come with new equipment. It can also be purchased from specialized stores.
Now we need to markup. We “try on” the toilet bowl on the place prepared for the equipment and draw it around the contour. We remove the device. We apply a thin layer of sealant and glue the gasket on it. This design will be the most reliable, although some masters prefer to do without a substrate at all. You can start drilling holes for fasteners. As practice shows, if you stick the gasket with high quality and choose the diameter of the drill so that the holes for the fasteners are slightly larger than it, then further installation will be much easier. This is due to the fact that the rubber backing acts as a kind of "contact spot" for the floor and the device.
It happens that it is required not only to fix the toilet bowl to the floor, but also to raise it a little. This is true if there are several devices in the apartment. Then the last one in the system needs to be raised by about 3-4 cm. In this case, a piece of a two-inch board is used, which is used as a stand. It is cut exactly along the contour of the toilet and placed on the floor, a rubber substrate is placed on top of it. All this is sealed with a sealant and forms a reliable and durable structure. Holes for fasteners are drilled directly on the gasket.

Tighten the mount on the base of the toilet very carefully. Excessive force can damage the ceramics from which the device is made.
As fasteners, you can use long metal dowels or special plumbing fixtures. The latter usually come with new equipment. The quality of fixing they have is about the same, so you can use both options. We drive dowels into the holes prepared in the floor. We install the toilet and carefully screw it. It must be remembered that excessively strong tightening of the ceramic from which the device is made can be damaged.
Now you need to connect the device to the sewer. At this stage, we pay special attention to the corrugation. We generously lubricate both its edges with silicone. We insert one of them into the sewer socket, and put the second on the toilet outlet. All parts of the connection should be carefully pressed with your fingers so that the sealing is of high quality. As an additional measure, you can use metallized tape, which can be used to seal the joints. We connect the water supply and the device is ready for operation. There is a similar mounting method, which is presented in detail in the video.
Method number 2: mounting on glue
Of all the methods for fixing a toilet to the floor, this one is the easiest, but also the most time consuming. For the curing of the epoxy mixture, which is used as an adhesive, it takes about 12-15 hours. This method can only be used on a smooth surface. Most often it is used to fix equipment on floor tiles. The method is very easy to perform. First, both surfaces to be bonded must be well cleaned of dust and debris. Floor tiles can be sanded to make them rougher. This will improve the adhesion of the material. Surfaces are degreased with any solvent or acetone.
Preparing glue. You can buy ready-made epoxy or make your own. To do this, you need to take 100 parts of epoxy resin ED-6, 200 parts of cement, 20 parts of solvent or plasticizer and 35 parts of hardener. The order in which the components are added to the solution is important. First, the resin is heated to 50C, a solvent is added to it, then a hardener, and at the very end - cement. The composition must be constantly stirred to form a plastic, homogeneous mass.

In order for the toilet to be securely fixed in place, the floor covering is prepared: cleaned for better adhesion and lubricated with a small layer of glue. Excess composition, speaking under the weight of the equipment, is immediately removed with a damp cloth.
Properly prepared adhesive mixture can be used within one and a half hours. We apply it to the base of the toilet bowl so that the solution covers an area of at least 20 square meters. cm, and the layer thickness was at least 4 mm. We install the prepared equipment in the right place, combining the sewer socket with the outlet, and press it to the floor with force. After that, the device is left for at least 12 hours. This period is necessary for the curing of the adhesive composition. During this time, it is not recommended to even touch the toilet. Then we connect the equipment to the water supply and sewerage.
Method number 3: taffeta mount
Most often, this method is used to install toilets on a wooden floor. Taffeta is a pad of durable wood to which equipment is attached. The thickness of the board from which the element is cut, corresponding to the shape of the toilet support rack, should be 28-32 mm. To protect the part from dampness, it must be carefully treated with drying oil. For reliable fixing to the floor from the bottom of the taffeta, an anchor is mounted. The simplest option is nails driven in a checkerboard pattern, which should protrude 2-3 cm from the part. The recess prepared for installing the toilet bowl is filled with cement mortar. Taffeta is sunk down into it with anchors. As a result, it should be flush with the floor.
After approximately 12 hours, during which the mortar is completely dry, you can proceed to fixing the equipment. The device is fixed with screws. Rubber washers must be placed under their heads, which will prevent possible damage to the toilet frame when tightened. Experts advise lubricating the screws with grease or graphite before work, so that later, if necessary, they can be easily unscrewed. Wood taffeta can be replaced with a rubber backing. It is cut out of sheet material with a thickness of 5 to 15 mm, possibly even from an old rubber mat. Such a substrate should be 1-2 cm smaller than the toilet support column.

Mounting the toilet on taffeta involves the use of a special wooden insert. The diagram shows all the elements of such a mount.
There are various ways to attach a standard toilet bowl to the floor. They differ significantly in complexity and time spent on installation work. It is important to choose the right fastening method. It depends on the material from which the floor is made in the room. Installation work can be carried out independently, but if there is no experience or desire, it is better to turn to professionals. They will quickly and competently carry out all the work, guaranteeing a long and flawless service of the new equipment.
To properly install the toilet on the tile, follow our step-by-step instructions, provided with photos and videos.
Working time: ~ 1 hour.
Total time: ~ 24 hours.
Preparing a room for a toilet
It is better to install the toilet bowl in a completely renovated room so as not to damage the plumbing. You should have a hole ready for the outgoing sewer pipe, as well as a water outlet for the drain tank.

Tools and materials required for proper installation
To install the toilet, we need the following tools and materials:
- Adjustable wrench
- flexible hose
- fum tape
- Pencil or marker
- Yardstick
- Hammer
- Dowels and bolts (should come with the toilet)
- Sanitary lubricant
- liquid silicone
- rubber spatula

How to properly install a toilet bowl with your own hands
Step 1. Eyeliner to the drain tank
Shut off water access to the system. Unscrew the plug on the water outlet using an adjustable wrench. A crane must be connected here. An angled or straight faucet of your choice can be used. Seal the threads on the faucet with fum tape and screw the faucet into a water outlet. If using a corner tap, screw it in so that it points down. Shut off the faucet valve.

Screw the flexible hose to the faucet outlet. It is not necessary to use a fum-tape, since a sealing gum is provided in the design of the flexible hose.
Step 2. Marking the toilet installation guide
To install the toilet exactly in the middle of the toilet, measure the width of the room against the wall and mark the middle with a pencil. Do the same in the middle of the room and draw a line along the two marks. This line will be our guide, determining the direction of the correct installation of the toilet.

Step 3. Assembling the sewer drain
If necessary, supplement the sewer drain with an angled pipe (45-90 degrees) so that its opening looks towards the outlet pipe of the toilet bowl at a smoother angle.

Advice: To make it easier to connect two pipes, use plumbing grease. Apply it to the inside of the drain hole (lubricate the rubber o-ring) and to the outside of the elbow pipe that will fit into the hole.
The sewer drain can be connected to the outlet of the toilet in two ways:
- hard plastic adapter;
- flexible corrugation.

In both cases, when inserting the connector, use plumbing grease as above.
Step 4. Preparing the base of the toilet and marking it on the tiled floor
Advice: Do not pre-connect the tank to the toilet. When and how to connect the tank to the toilet, you will learn later in the article.
Take the base of the toilet and turn it upside down. The edge of the supporting part of the toilet must be smooth, without defects. Clean it up if necessary with a sharp knife.
Place the toilet base on the floor at the installation location. Follow the line you drew earlier (see step 2) to position the toilet correctly and exactly in the center of the toilet. Additionally, check the correct installation by measuring the distance from the toilet to the left and right walls with a tape measure.
Connect the toilet pipe to the drain system adapter and outline the perimeter of the toilet base with a pencil or felt-tip pen - this will help you install it in the future without additional measurements. Also, on both sides, mark the locations of the holes for fasteners.

Step 5. Fixing the toilet to the tile floor
Set the toilet aside and drill holes in the tile for fasteners. Use a special tile drill. The depth of the holes should be equal to the length of the dowels that come with the toilet. Hammer plastic dowels into the holes drilled in the tile.

Put the toilet back in place along the drawn lines and connect it to the sewer drain. Screw the metal screws with washers that come with the toilet into both mounting holes, but only halfway.
Step 6. Additional fixing of the toilet bowl with liquid silicone
Raise the toilet bowl by 0.5-1 cm, place any supports in two or three places (use what you have at hand - plastic, pieces of tiles, etc.). Very carefully inject white liquid silicone into the gap between the base of the toilet bowl and the floor tiles. Do this around the entire perimeter of the base of the toilet. Raise the sides of the toilet bowl with your hands and, taking out the stands, add silicone. Silicone should be evenly distributed around the entire perimeter of the base of the toilet and create a plentiful "cushion".


Lower the toilet and tighten the fixing screws all the way by hand (without excessive force). Remove excess silicone that is outside with a plastic spatula moistened with soapy water. Form a beautiful edging around the entire perimeter of the base.

It is necessary to wait a few hours (see the curing time of the silicone on the packaging), and only then proceed with the installation of the toilet.
How to install a toilet flush mechanism
Put a gasket on the threads of the main drain and insert it into the technological opening of the drain tank. On the reverse side, tighten the wide nut with your own hands - do not use tools to avoid splitting the tank.


Advice: We recommend installing a locking device that controls the flow of water into the flush tank after installing the flush tank on the toilet bowl. This will make tightening the mounting screws more convenient - you will not be disturbed by an extra mechanism inside the tank.
When installing the locking device, check for burrs on the bottom of the device where the hose is put on. Remove bumps so that the further connection is tight. Insert the locking device into the hole in the tank intended for it and tighten it from the back with a plastic nut. Again, do not use any tools, tighten the nut by hand.
How to install a cistern on a toilet
After the silicone has completely hardened and the cistern drain mechanism is assembled, you can proceed to install it on the toilet.
Between the drain tank and the base of the toilet bowl, it is necessary to lay a soft gasket in the form of a ring (comes with the toilet bowl). Then slide the cistern onto the toilet so that the holes for the tie screws on the toilet align with the holes on the cistern. The connecting screws must have a plastic flat washer and a rubber cone. Insert the fixing screws into the holes of the drain tank and twist them on the other side with plastic nuts (horns). When tightening the screws, make sure that the tank is horizontal.

Screw the flexible hose that supplies water to the fitting at the drain tank. This connection does not require the use of a fum tape, since the connection will occur through a rubber gasket.
The installation of the cistern on the toilet is completed, you can open the faucet and check the flow of water, as well as see and eliminate possible leaks in the system.
Put the lid on the drain tank so that all the elements of the trigger mechanism enter the hole. Screw the release button into the hole. Check the functionality of the button. At this stage, the installation of the toilet cistern is completed.
How to install a seat and lid on a toilet
The simplest remains. Attach the seat to the toilet and thread the mounting screws through the holes. Without much effort, tighten the screws on the back of the toilet with nuts. Toilet seat installed.

Video lesson: How to properly install the toilet on the tiled floor in the toilet
Work completed. You installed the toilet with your own hands and, rest assured, you did it right!

