Frame carcase for water with your own hands. Stretch film hike
Not at each dacha, it is possible to connect to the water supply or to equip your own well in the form of a well or well - the only option that allows you to ensure yourself with a precious liquid in such a situation, it is the creation of your own "reservoir". Capacity for water in the country will allow not only to establish watering plants, but also create a full-fledged water supply. On how to choose, install or make your own hands a cumulative tank for giving, a conversation will go in this article - along with the Moyadacha.org website we will deal with various options for solving this issue.
Plastic water tanks for the cottage photo
Capacity for water to the country: varieties and their features
The first thing you need to know, approaching the selection of water storage capacitance in the country, is that they can be made either from metal or from modern plastic polymers, which for all its technical characteristics far exceed metal. Compare these two types of containers and see what of them is better.

To see about what plastic containers for the cottage can be in this video.
In general, the benefits of polymers over the steel is evident, and long to suffer with the choice between the same product do not have to - in all respects, light and durable plastic tanks are much better. Also in favor of the tanks of this type, there is also a simple technology of their installation, which you can easily produce with your own hands. We will talk about this a little later, but still we will deal with other options for the classification of water storage tanks in the country.
Capacities for drinking water for giving: underground or ground installation
Additionally, all existing containers and dacha tanks can be divided by the type of installation - in this respect they can be underground and ground. Each of these containers has its advantages and disadvantages, which should be aware of, asking how much the accumulative water capacity for the country is better?

In general, the choice is yours - what capacity for the cottage to purchase, your business. If it allows the area of \u200b\u200bthe site or the strength of overlaps in the house, then why not take advantage of a simpler superficial option?
How to install water tank for cottage: installation features
Installing the containers of the ground and underground dislocation is made in various ways - this is understandable to everyone, it is not clear just how exactly it is done. And this is done as follows.

The process of installing the tank, in principle, the time-consuming, but quite simple - the subtleties there are not practically no. So for an independent installation you can get boldly. Unless, of course, this is not high-rise installation, which is associated with the manufacture of serious supporting structures (since they should be calculated).
In conclusion, only a few words about cone tanks, which are an excellent solution for creating an open-type reservoir remain saying about the water tank. So to speak, the technical reservoir from which watering can be carried out.
moyadacha.org.
Stock ... Water
 Any garden or household plot, as a rule, gives the return and delights the owner with sufficient quantities ... water. If nearby is a natural source or central water supply, then the problem of watering is simplified, but in most cases it is not even for the source it is impossible. In the hot summer, when rains rarely go, the consumption of water, and wells and wells will no longer cope with the increased load. In such cases, there is a need to have a supply of water on the site. And here the question arises: what to keep it?
If there is an opportunity, you can purchase a medium-sized tank truck or something like that, but still it is not out of position. In addition, with time, metal rust, polluting water. Much more practical and more affordable to make a tank made of concrete, and to make it underground so as not to occupy the place on the site.
Where to start construction? First, it is necessary to determine the location and dimensions of the future storage. Given that the construction is quite laborious, you should not put very large sizes. Practice shows that the most optimal volume is 3.5 ... 4 m3.
So, when the place is chosen and the contours of the pit are drawn on the surface of the Earth, proceed to his digging. At the same time, it is necessary to periodically monitor the verticality of the walls and the correctness of the form in the plan. After performing earthworks, the boiler is prepared for concreting. This work is simple; True, there are some features in the formwork. It is more correct to use a formwork from several parts, and not to install it immediately for the entire height, since in this case the concrete mass and the formation of voids are possible. From this it follows that the height of the formwork must be chosen by this, in which it is possible to manually compact concrete. This is usually 500 ... 600 mm. Simplified formwork can be performed by driven by the walls in the bottom of the necklace, for which iron sheets are breed.
The thickness of the concrete wall is determined from the strength condition:
where σr is the calculated voltage, kg / cm2; σ - allowable voltage, kg / cm2;
Σr \u003d (D * ɣ * H) / (2 * T),
where D is the diameter of the reservoir, see; ɣ - the proportion of water, kg / cm3; h - the internal height of the reservoir, see; T - wall thickness, see
For example, we take the reservoir with a diameter of 1.6 m and an internal height of 2 m (volume 4.35 m3), σr \u003d 5 kg / cm2, then:
t \u003d (160 * 0.001 * 200) / (2 * 5) \u003d 3.2 cm.

Underground tank:
1 - Ring (Steel), 2 - "Glass" (reinforced concrete), 3 - sand, 4-scene (concrete).
With a triple margin of strength, the wall thickness is 10 cm. This little excursion to the theory was not accounted for by chance. The fact is that there are often the containers obtained by simple shuttering of the walls of the cap concrete. They serve very long, if they do not fail at the first filling with water. Typical destroyers: bottom walls, bottom or shelves with overlapping. In the latter case, the reason in the improper design of the overlap: the scene, protruding the reservoir contour, serves its support for the soil. When filled with water under its weight, the tank is lying, and the upper part hangs on the breakfast, as on the support plate, after which it takes place. From here it follows that the breakfast must be performed, as shown in the figure - without communication with the "glass".
After installing the formwork in the resulting space between her and the ground, fittings are placed (you can use any scrap metal) and concrete is poured.
The bounted concrete mix is \u200b\u200bhardening per day, two; Then the formwork is rearranged.
After the construction of the walls of the "glass", the formwork is cleaned and the fill of the bottom is carried out. The final stage in the processing of the internal surfaces of the tank is the so-called iron. It consists in plastering cement, diluted with water to consistency sour cream. Apply such a solution can be brushed. The thickness of the layer in 2 ... 3 mm will protect the container from water filtering.
The overlap is performed taking into account the above recommendations. Formwork for this operation is made suspended.
The dimensions of the above-ground part of the storage are selected in the range of 600 ... 700 mm in height and 500 ... 550 mm in diameter. It can be conserved under the well of the appropriate style, then the entire structure will become an architectural supplement and decoration of the garden.
When operating underground capacity, it is necessary to periodically completely free from water and clean - otherwise, as with any reservoir, it will become polluted.
L. Kallekyas, p. Turns, Nikolaev region.
Noticed a mistake? Highlight it and press Ctrl + Enter to tell us.
modelist-konstruktor.com.
Water tanks: plastic, reinforced concrete, metal, what to choose whether it is possible to make with your own hands
 Water is a source of life, and without water a person cannot exist. In addition to drinking, water is used in everyday life, and for a full-fledged comfortable life, the owner must be taken care of the source in its plot. The water supply is far from each local village, but there is a lot of options, how to install a storage capacity near your home.
What kind of varieties are
Depending on the purpose of using water, the tanks are several species:
- metal;
- plastic;
- reinforced concrete xenons;
- homemade tanks;
 If water is used for drinking and cooking, the reservoir is made from high-quality stainless steel that meets all standards. For air exchange in such containers, holes covered with grids and precipitation protected from atmospheric precipitation are provided. Two pipes are connected to the tank: applying and discharged water on which water taps are installed. Such tanks 2 times a year need to be cleaned and disinfect, for which a special hatch is provided, through which a person penetrates inside. The main drawback of such a tank is a high price and the high probability that the metal capacity can be stealing if you leave it for a while without supervision.
There are also rainwater tanks. They are made of lowest quality metal than drinking water tanks. But it is not always bad. As statistics show, in summer, a person uses 100 liters of liquid every day, of which most of which goes to watering the garden and other household needs. In order not to spend big money on use on the domestic needs of drinking or tap water, there are special tanks for the accumulation of rainwater. It consists of a working part where liquid flows in the form of precipitation, and the room for equipment where filters are located.
There is such a reservoir under the roof of the house where the drain roofing system collects water and on special gutters directs it to the tank. But this is a fairly expensive system, so the usual gathering to put it in itself is inappropriate. Rainwater can be used for washing up soft water, watering plants, etc. At the same time, if the house is large enough, and it is located in a zone where summer is often rainy, significant savings will be noticeable.
The easiest option is to install a conventional metal barrel at least 5 cubic meters. l. and wall thickness 5 mm. The main advantage is the ability to leave water for the winter. Then in the spring it will not be necessary to worry where to take water for household needs. Among the minuses of the metal barrel can be noted:
- the need to paint the surface so that it is not covered with rust;
- hard to transport;
- if it is made of valuable metal (aluminum, galvanized), barrel can steal.
Plastic
The most popular are plastic water tanks for cottages. This is due to the main advantage of plastic - low weight and possibility of transportation. In addition, the advantages of plastic tanks can be attributed to:

On the market you can find the plastic capacity of any shape and size. Thanks to the hygienicness of the material, the suppliers of drinking water to order are precisely plastic containers, such as the Eurocup of any sizes.
Table: Types of water storage tanks
Reinforced concrete
 This is a special type of accumulative water tanks. It is a reinforced concrete monolithic structure in which a large amount of water can be stored. Only professionals should be engaged in installation and installation of xenon, because poor-quality compound of plastic waterproofer sheets can disrupt the tank tank, and water in it will quickly deteriate. However, the cost of such a structure is very large, so it makes no sense to establish such a monumental design if it has no farm in 300 cattle heads and a huge plot of 20 hectares.
In the event that there is no money for the drive for water for the factory-made water, or other circumstances are hampered by this, you can take advantage of undergraduate tools and build a drive from what is at hand.
How to make a cumulative water capacity with your own hands
The best for such purposes will be tractor tires, namely, tires from the diesel tractor T-150. Or you can at any enterprise or in a fleet to buy a used tire from a cargo machine. It is necessary to immediately say that water from such a tank cannot be used for drinking or cooking. Only for household needs! And such a tank becomes simultaneously with a rainwater storage device that does not contain chlorine. Unlike plastic, the tire capacity cannot be pierced or scratched. The tire does not rot and does not let water. 
Stages of tank manufacturing tank:
Capacity will be very by the way in the country. Water can also be used for irrigation, and for other household needs.
septik.guru
Water supply of cottages: Build water tank
The lack of water in the country area is the most unfavorable moment with which residents of country houses may face. Even in the presence of water supply, the problem of lack of water may occur: problems in the system, wastewater pollution, casing, any difficulties associated with the provision of constant and uninterrupted flow of pure water. In this case, the daccias have provided water storage about stock in various containers.
 Water container for the cottage from plastic different litters
 The most common water storage tank is plastic containers of various shapes and volumes. Today it is the most affordable container that is not difficult to find in the supermarket. In such vessels, it is possible to bring water even the machine if the well or well is not observed in proximity.
Capacity from plastic is manufactured taking into account the most modern technologies, they can easily store drinking water. Quite often on the summer house, the preservation of vegetables and fruits is covered. Such plastic barrels are just perfectly suitable for salting cucumbers, tomatoes, cabbage, for salty apples. Almost for everything that grows in the garden and in the garden. And if the country area is also replete with grapes, without making homemade wine in such capacles, then you will bore yourself for a missed time. Plastic barrels do not affect the fermentation process, it can be easily adjusted to adapt gas pipes. The delicious and very fragrant wine from the home grapes, cooked personally, will turn a great reason to boast of neighbors and friends, especially since the taste of wine plastic containers do not affect.
Why it is worth using plastic containers:
- a large assortment of litter;
- weightlessness;
- heat and moisture resistance;
- not subject to rotting, corrosion, various kinds of damage;
- they do not affect the lumps, solvents, acids;
- hold a large temperature range: from - 30 to + 60 ℃;
- do not have seams and due to this is quite sealed;
- do not deliver hassle when washing and cleaning;
- durable;
- do not absorb smells;
- do not change the main taste characteristics of the products that are stored in them;
- resistant to ultraviolet and sun rays;
- if you follow the elementary rules of care for such a container, they are ready to serve at least 50 years.
Plastic water tanks in the country are needed like air. There are often situations where even in winter there is no water. By purchasing such vessels with any litter, you can not worry that there will be no water for watering your favorite plants, for the brewing of coffee tea, for the shower. Water on the site should always be, and as they use, constantly replenish. Before acquiring a plastic storage bar, for example, water, it is necessary to understand what consumption and for what period should be spent. If the consumption is small, then the barrels of 3000 l, 5000 liters will be very cumbersome, and they are not the lowest price.
How to make water capacity to the cottage for the soul
 Water tank for summer soul in the country
 Water treatments in the country, especially in a hot years, are simply necessary. Most often, the cottage is not only a place of recreation, but also a place of work. In this case, the summer souls are indispensable. It will contribute to the charge of a cheerful after working in the garden, walks in the forest, sitting at the fire with friends. The most important detail that will be needed to build such a useful device is a container for the shower water. It can be bought and finished in the store, especially since their choice is very huge, and you can do with the minimum cost yourself.
See also: How to build a brazier.
Capacity for water should be:
- roomy;
- hermetic.
Under such conditions, the tank for water from galvanized steel is perfectly suitable, which is widely used for the shower tank. Light coating zinc helps to hold corrosion, but over time it can still arise. Such barrels should be carefully planted. For one person, there will be a capacity of 40 liters, and the whole family will suit the barrel with a two-toll volume. Such containers are quite durable. With proper operation, 10 years or more can be served. As a rule, such barrels in the upper part have a hole for filling with water, the so-called hatch, the lower part has a ball valve and a "watering can", if desired, install both fittings under the hose.
Many dackets dream of acquiring a stainless steel shower capacity. Chrome coating protects steel from possible corrosion. This container does not need to be additionally handled by various anti-corrosion materials. Even paint will not need. This material is very reliable, even with a minimum wall thickness of 1mm, the design will not give up for strength and other qualities. It is worth such a container somewhat more expensive than its "fellow", it can be made of it yourself with the presence of the necessary material and tools. Very important point: Water in such a capacity does not acquire the "iron" smell, not "blooming", always remains fresh. At the same time, the service life of such a capacity is at least 20 years.
Plastic water tanks for the soul occupy the peak of popularity in this list. Let's start with the fact that it is possible to exploit such a tank for more than 40 years! These containers are designed for long-term water storage. Water in them does not have extraneous smells, always remains fresh. Unlike metal containers, propylene tanks are resistant to corrosion, they are environmentally safe, resistant to ultraviolet. Having a small weight, they are easily transported, quickly installed. From plastic container, even used, you can make the water tank for the shower yourself. To do this, you need to make a tap with a carvings and a crane with a nozzle for the future soul.
Having done this procedure, you can fill in water with water. It can be pouring into a hatch manually or with the help of a pump and metal-plastic pipe. Capacity for the shower should be firmly fixed on a special design. As a result, we get a wonderful full-fledged shower, but made by your own hands. This will require a minimum cost, and will serve such a shower for many more years. The diversity of containers from a variety of materials can be adapted to the water tank for the shower. What material to pick up is the case of each dacket. But it is necessary to make an emphasis that it is a pretty simple design and make it yourself very simple and inexpensive.
Remote summer cottages are often cut off from the central water supply system, which greatly complicates the care of grown cultures. During the season, the plants require abundant irrigation, especially in hot and arid weather. If you build a well on the site quite problematic, you can create your own storage, where water will accumulate and flee.
Install the watering tank on the site can afford each. With it, it is organized by timely irrigation, and the prototype of the water supply system is created, which allows the use of liquid for various purposes.
What materials make storage tanks
Capacities for storing and supplying water are presented on the market in various versions and are produced from metal or durable plastic. Buying a capacity for watering for a long time, should be taken into account, from which material it is made. Modern polymers make it possible to create very durable products with high technical characteristics. In quality and strength, they can exceed metal counterparts.
Metal

The reservoir from this material is a classic option familiar to most dachens. Iron products are used for fluid accumulation for many years. All who work in the country and uses an artificial drive from metal, know about all its disadvantages:
- corrosion exposure;
- fast pollutability;
- non-easy care.
Eliminate the metal tank from the destructive corrosion is quite difficult. To preserve its holistic appearance outside, it is enough to paint the surface of the paint. But inside the water will create a constant impact that destroys the metal. After a couple of months, a precipitate is formed at the bottom of these tanks. Internal cleaning - the occupation is complex. The positive side is a good heating of the barrel and its content under the rays of the sun.
An alternative solution will be the acquisition of a stainless steel product that does not have such drawbacks. It also applies to an option with high financial costs.
Video: Watering Barrel, Stand Maintenance
Durable plastic
Purchase a 500 liter watering tank and a more reasonable decision, based on the fact that they do not have the disadvantages of metal structures. Such products are made of high-tech plastic, which allows you to withstand heavy loads. Unlike cheap plastic, they are not afraid of temperature differences. Also preserves integrity under the influence of large water pressure.
.jpg)
One of the main advantages of plastic tanks is their light weight. They are easy to transport and install in the desired place. Installing the plastic design can be independently without special equipment.
In order for the winter tank to be broken when the water freezing is freezing, it is either completely descended, or throw into a large log or plastic 5-liter bottles that completely closed the surface.
To make a container for watering to a large volume, it is additionally strengthened by special metal rings. This design gives the final product to the pressure to be created by water. The next advantage of products made of plastic is the price. It is more accessible from metal analogues. The manufacturing technology of plastic containers allows the buyer to buy tanks of various forms:
- cylindrical;
- rectangular;
- square.
The form of the container does not affect the quality of irrigation. The main thing is that it concisely fits into the surrounding landscape and was convenient for installation.
Eurocub

Eurocube has a cubic form design that is reinforced from the outer side with a durable metal grid. Capacity is installed on a special pallet. This is a great option for organizing a drip irrigation system with a fertilizer additive. It is designed for one cube of water. The design involves the presence of a twisting cover and a crane for a liquid drain located downstairs. To protect against rupture, the same technology is used as described above.
How to calculate the volume of the tank for watering
If in the manufacture of metal capacity you can independently determine the volume - from 1 to 10 cubes (more volume may not withstand the supports), then the plastic buy ready. In general, the drive depends on the area of \u200b\u200bthe irrigated area. On average, 1 square takes about 30 liters of water for one watering. Thus, if the area of \u200b\u200bthe neck or section is 50 sq.m., then the minimum volume of the tank will be 1.5 cube (1,500 liters), and the water supply must be made.
Gardeners on sections of 6 acres usually set 3-cubic containers, which is sufficient for the weekly irrigation.
Installation of containers for watering
All positive characteristics of reservoirs for storing and supplying water for irrigation of plants are leveled with poor quality installation and location. Therefore, it is important to properly place and set the container for watering on the site. The drive must be at the site of the rainwater. This is the easiest way without any effort to replenish the stocks of this resource. Rainwater is the most useful for plants.

It is necessary to determine where the barrel will stand:
- underground;
- on a surface;
- on a special platform.
Installation of the product in a suspended condition allows you to set the crane, and by connecting the hose to it, to obtain the pressure from the own weight of the water. Otherwise, the pump feeds from the barrel is installed.
For reference! To create the optimal waterpover pressure for the necessary pressure, you need to raise the tank to a height of two meters. So it turns out the pressure of 0.2 atmosphere. It is advisable to make it higher, but at the same time you need to think well how to make a stable pedestal and how to give it the optimal rigidity.
Technical advantages of using a vegetable irrigation tank
The use of the pump to raise water from the well is quite enough to provide household needs. However, their power may not be enough to supply fluid to the planted area. Inexpensive pumps are not able to work under pressure in 3-4 bar. The pump will work on marginal capabilities, but will not create optimal conditions for irrigation.
If a watering tank is installed on the site, this problem will be solved. Gradually, the pump will be pushed the required amount of fluid for the abundant irrigation of all plants. So that the water from the barrel came and flowed through the hoses, there is no need to create high pressure. Automatic protection installed on the equipment will turn off the pump at the end of the water.
To protect the pump from a constant shutdown or possible breakage, it is necessary to set the level, declining to which the water will re-enter the tank. It is possible to protect yourself from overflow using a float crane.
If we take water at the cottage directly from the well, then it will come to plants in the cold form. It adversely affects their condition and causes the development of various diseases. The liquid passing through the accumulative container is heated to the ambient temperature, which is optimal for garden crops.
The well may contain various particles that will be in water in suspension. Their getting on the plants is not desirable. After a few hours in the reservoir water will give a precipitate on the bottom with all harmful impurities.
Modern solutions for the manufacture of watering containers
Those who do not want to connect hoses, valves and other equipment for the improvement system of irrigation, should acquire a capacity for watering based on the installation inside the tank of a special equipment system. This is the water supply station under pressure, which is configured to automatically irrigate landings.

Such a set of equipment consists of:
- durable plastic tank;
- powerful submersible pump;
- filters;
- locking valve;
- valves;
- automatic water level control systems;
- lower drain.
Such systems for irrigation of the site have a number of key benefits:
- function in silent mode of operation;
- provide maximum pressure;
- filtered and warm water;
- control the level of fluid in the tank.
With the proper installation of a barrel used for everyday irrigation, the land plot will be fully provided with the resource necessary for the care of garden plants. The main thing is to correctly determine the volume of the container required for your needs. It must correspond to water flow on your site with a small margin.
Video: Capacity for watering and outlook
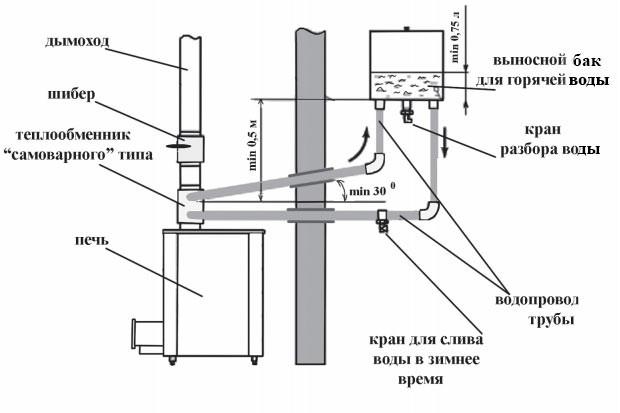
Installing water tank in the bath opens up a number of amenities and advantages over the owner. First, it is possible to prepare hot water in the furnace furnace process, which allows saving energy resources and consumes them as appropriate as possible. Secondly, the use of such an aggregate in most cases makes it possible to abandon the installation of an electric water heater, which also benefits the budget dedicated to the construction of the bath.
Several main requirements are presented to the tanks for water: they must be spacious, durable, warm up for the shortest possible time and retain heat for so long, as they dictate the needs of visitors to the steam. Among the options available to the ordinary user, the most listed criteria correspond to products made of stainless steel.


Scheme - An example of installing a remote water tank
The modern market offers a wide range of water tanks manufactured from cast iron, stainless steel and enameled material. As practice shows, it is the most popular among the owners of the bath that is precisely stainless steel, which is due to the competent and acceptable ratio of operational and technical characteristics and cost indicators.
The stainless steel is characterized by excellent thermal conductivity indicators, it normally transfers temperature jumps and serves as one more than different ferrous metals.


A natural question arises: which of the existing stainless steel stamps is better suitable for the manufacture of the capacitance under consideration intended for operation in a bath basis? First, it is Brand 08x17 (430), secondly, 8-12x18n10 (304). The materials mentioned, among other things, are used for the production of dishes and are characterized by high resistance to high temperatures, are completely hygienic, not rust and not deformed during use. In addition, such materials are unpretentious and extremely simple in care.

Situating the foregoing, you can highlight 3 main advantages of water tanks made of stainless steel:
- products do not require the arrangement of additional protection against high humidity and normally transfer operation in conditions characteristic of a bathing room;
- the stainless steel is distinguished by high thermal conductivity indicators, which makes it possible to get hot water in the shortest possible time;
- stainless steel tanks are not deformed due to sudden temperature drops or these deformations are insignificant.
Stainless Steel Sheet Prices
stainless steel sheets
Water tank design options for bath
Water tanks designed to use in a bath can have a different design. Basic options 3: Built-in tank, remote tank and unit installed on a pipe. You can familiarize yourself with the features of each design type in the following table.
Table. Stainless steel water tank designs
| Type of construction | Description |
|---|---|
| The installation of representatives of this category is carried out in the process of building a bath furnace, as a result of which the stove and tank become a single design. Water heating in a built-in stainless steel tank is carried out by fire, thanks to which the efficiency of directly water tank is held at a rather impressive level. A key disadvantage of such a design is the fact that a substantial part of the heat is leaving the water in the container, as a result of which the heat transfer directly falls noticeably. Useful remark! Much easier in manufacturing and use is a tank / mounted tank, installed on top of the heater. |
|
| More convenient and practical compared to the previous model version, especially if the tank is constructed and sets for permanent use. If desired, the finished tank for water from a stainless steel can be installed in the wash room of the bath, connecting it with a pipe system with a furnace heat exchanger. The optimal material manufacturing material is copper or brass. The only significant lack of a remote water tank is reduced to the likelihood of obtaining a burn in case of careless circulation - the position in particular is relevant if children will go to the bath. |
|
| A covered tank for water can be installed either directly above the bath furnace, or in the integrity space. In such structures, water heats up in the shortest possible time. At the same time, the indicators of the heat transfer of the furnace unit are not reduced. The undoubted advantage of installing the water tank in the attic room is the ability to "unload" the steam room, eliminating the capacity from its setting and ensuring more free space. |
The table does not include another possible option of installing the tank - on the side of the stove.

 Oven with side tank - Photo
The way is deprived of attention for the simple reason that is the worst. Water in such a tank will very quickly throw. If the process of steaming is delayed, due to the constantly boiling water, the atmosphere in the room of the steam room will be simply unbearable. Yes, and with the maintenance of such a tank, solid inconvenience: in order to save space, the capacity is made high, but very narrow.
Having understood with the peculiarities of water tanks from a stainless steel and choosing the most acceptable design option, it remains only to determine the optimal capacity of the tank, after which you can move directly to the stage of its manufacture.
When choosing the required volume of water tank from a stainless steel, you must, first of all, focus on the planned number of visitors who will simultaneously go to the bath. For example, if the steam room is not capable of its physical dimensions to accommodate more than 2-3 people, you can safely put the tank at 50-80 liters, at the rate of 25-30 liters of water for each bunch.

Tanks are of different sizes - choose the appropriate
Operating the above recommendation, you can calculate the required volume of water tank, taking into account the attendance of the bathing bath. For more convenience, it is recommended to add an estimated value at least 10-20 l - the needs and ideas about comfortable washing every person different.

Production of a tank for water from a stainless steel with their own hands
Most factory models of water tanks are made of stainless steel with a thickness of 1 mm. For independent manufacture, it is recommended to use thicker sheets - about 1.2-1.8 mm (the specific indicator is selected according to the capacity of the container). The cost of making a design in this case will be higher, but for many years you will not have to think about the need for repair, painting, covering various special compositions and other tank maintenance.
As an example, you can use the following drawing - it is the easiest for self-assembly and one of the most popular design options.

Dimensions can be proportionally changed in accordance with the required capacity of the container. The amount of volume is calculated according to the standard formula, i.e. Indicators of length, widths and heights of the product are sequentially multiplied. For example, the volume of the container represented as an example will be about 25 liters.
Helpful advice! An even simpler version of the water tank is a product made of seamless stainless pipe segment. By giving advantage of such a decision, you get a number of advantages. First, you do not have to spend time and strength on the cutting sheet metal, calculating points, stocks and other points, i.e. The likelihood of errors is reduced to a minimum. Secondly, the manufacture of water tank for water from the pipe requires the use of welding in minimal quantity.
The sale pipes made of stainless steel with a diameter of up to 1020 mm are available and even more, which allows without any problems to acquire a product for the manufacture of the capacity of the required volume. To determine the volume of the cylinder (namely, this form will have a cumulative tank), use the following formula.

Useful remark! If desired, no one will forbid you to make a tank made of profiled stainless pipe, and then the container will have a rectangular shape.
The further order of independent manufacture of water tank will be considered precisely on the example of using a pipe segment as a workpiece.

Pipe - Procurement
Important! If the installation of a bubbling water tank is planned, it is better to use a shorter to its manufacture, but a wide workpiece so that the chimney pipe can be skipped through the inner cavity of the tank. It will look like this as follows.


The procedure for manufacturing a water tank from the pipe is presented in the following table.
Table. Water tank manufacturing for bath
| Stage of work | Description |
|---|---|
| The formula was previously brought to calculate the volume of the cylinder. With it, we find the required height of the water tank. For example, we want to obtain a capacity of 30 liters and use a pipe with a diameter of 1020 mm for its manufacture. By simple arithmetic manipulations at the level of class 5, we convert the formula in the following form: H \u003d 30 / (3.14 * 0,512) \u003d 37 cm - precisely such a length should have a cut of a pipe to obtain a water tank of the specified volume. To cut off a piece of pipes, use the grinder. To work with stainless steel, discs with a thickness of 1 mm and a diameter of 11.5 or 12.5 cm. |
|
| In order for the finished water tank to have a beautiful view, you need to handle the cutting zones accordingly. In the future, similar actions will be performed in reassuring holes for connecting nozzles with cranes. The most convenient tool that allows you to quickly and effectively cope with the decision of the mentioned tasks, is a manual borver. Such adaptations are equipped with a plurality of various abrasive nozzles, allowing to achieve maximum quality of the processing of a particular material. In the absence of a handmade borders of the seams will have to be put in order to underloaded means: a file, emery paper, etc., which is definitely a longer and time-consuming event. |
|
| At this stage, we will need a sheet of stainless steel. The lid and especially the bottom is recommended to do from a material having a more impressive thickness compared to the pipe walls selected for the manufacture of the case. Work is performed in several stages: - On the stainless steel sheet, the circle is drawn along the diameter of the holes that it will close. You can simply put the pipe on a metal sheet and draw the circle, circled product along the contour; - In accordance with the markup, 2 billets are cut. For cutting and subsequent grinding of edges, you can use the previously mentioned Bulgarian and manual bormer. If a hubing method of installing a water tank is assumed, at the same stage in the bottom and lid, you can prepare holes for the diameter of the chimney pipe (better by 1 mm more so that the chimney can pass through them, in the future the gap will be leveled by welding). Also at this stage you can prepare holes for the further connection of the tights with the cranes, if they are mounted in the bottom (relevant for remote structures installed aside from the furnace, in the case of the exhaust / built-in and hubbackers, pipes are more advantageous to cut into the wall of the body of the tank). In more detail, the nuances of drilling and welding of the stainless steel will be considered in the appropriate sections of the instruction. |
|
| The photo demonstrated a profiled tube, but the welding process for this case and working with a round blank remains the same. Products from the material under consideration can be connected in different ways: - with the help of soldering using selfless or high-temperature solders; - manual or automatic welding (in the case of stainless steel, work is carried out exclusively in the environment of protective gases). The most preferred is the second option, the simplest in the development - manual arc welding. Argon is used as a protective gas. Welding is carried out using a non-melting electrode to work with a stainless steel. In the international classification, devices intended for such welding are marked with TIG abbreviation. Buying or renting a welding machine, do not forget to purchase / rent a balloon with argon and gearbox. The function of the latter is reduced to a decrease in the pressure of the protective gas at the output. Seams should be as neat as possible and homogeneous. After executing them, it is recommended to clean it. Recommendations for the appropriate tool have been brought earlier. Helpful advice! If desired, the tank cover can be not welded, but to attach with the help of bolts and ears or simply make it removable. The option is relevant for cases when the water will be added by the user manually, and not supplied by water supply. Capacity is ready. We proceed to the preparation of holes for the further cutting of the nozzles. |
|
| The designs under consideration are equipped with two tights with cranes. Cold water is traditionally supplied through the upper pipe into the container, and through the lower adjustable liquid goes to the consumer. The diameters of plumbing pipes correspond to the diameters of the water pipes used in the complex with them. Most often, pipes with a diameter of ½ or 1 inches are used. An ordinary electric drill is suitable for drilling a stainless steel. The main thing is that the work is performed on low revs - no more than 100 rpm. In a drill with an electronic regulator, the installation of the required mode is not a problem. If there is no such regulator, it is necessary to simply activate the start button with short presss - for a second, the tool will not have time to accelerate to operating power. The holes are best to make the R18 brand drill. An even more convenient option is a special stepped drill (shown in the image). Such a tool does not break the edges of the opening, so that it gets perfectly round shape. Along with this, for drilling holes with a diameter of more than 14 mm more convenient to use special nozzles - so-called. "Crowns". |
|
| The diameters of such crowns correspond to both inches and metric gradation of sanitary pipes. With the help of the appropriate crowns, you can also prepare holes in the bottom and lid of the tank if it is supposed to be covered. |
|
| Nozzles with cranes are available for overlapping water overlap. In the complex with a stainless steel tank, it is preferable to apply components made of the same material. In order not to spend too much time on the arrangement of the thread, the nozzles are simply welded to the holes prepared earlier. Recommendations for tools and welding regimens remain the same. After installing the water tank, in accordance with the selected scheme (will be considered below), plumbing pipes are connected to the nozzles (it was previously noted that it is best to use products from copper or brass) of a suitable diameter. The connection of the pipe with the pipe is performed by any suitable method, for example, using a threaded adapter. |
So, the water tank is ready, and even the pipes for the cutting pipes are already mounted. It remains only to connect the finished device for its subsequent use.
Connection of a tank for water from stainless steel
Important comments before starting work
Previously, it was noted that the following versions of the tank mounting are most common: inside the furnace, aside from it and in the chimney pipe. We offer the first option to be replaced by the method at which the installation of the tank is carried out above the chimney. This method is simpler in the implementation, while it can be resorted to its use, even if the furnace is already built - suddenly you thought that you would not need a similar heater, and after studying the material stated, all the advantages of using it and wanted to install in our bath .
Important! It will be possible to implement the mentioned replacement only in the case of collapsible chimney. The proposed method involves the combined installation of the tank - it will simultaneously be placed over the stones and around the chimney pipe, which will make the effectiveness of water heating as high as possible. Otherwise, you will have to either give preference to the built-in tank model (if the oven is only built), or install the unit at a distance from the stove.
If the furnace is brick, the preparation of the place for the tank and its immediate installation is performed during the masonry process (the specific stage depends on the selected furnace design and the sizes of the furnace, most often it is 10 row). When laying a number, leave the opening for the placement of the tank. The size of the opening must be several millimeters to exceed the dimensions of the installed design to compensate for temperature extensions.

On the diagram - the opening of the tank
Note! In the intervals between the marked quarters of the brick, the pipes are laid, the presence of which will help increase the efficiency of heating - such are the structural features of a particular furnace unit, in the project you selected the pipes may be absent.
The furnace with the installed tank looks like this.

The sanitary faucet is embedded in the tank wall. It is assumed that the user will gain hot water right in the steam room. If desired, the design can be enhanced by having embedded instead of the crane mentioned earlier nozzle by connecting the water pipe and removing it into the oil.
When the masonry is brought to the top of the tank, 2 metal strips are stacked on it, the presence of which will ensure safely overlapping the accumulative tank with bricks.


In the case of metal baths, the water tank is welded above the furnace (recommendations for welding were brought earlier). As a result, the heating of the capacity is carried out by the forces of the flame, which ensures the most rapid preparation of water. The design looks approximately so.

Important! If preference is given to the built-in tank design, it is necessary to use a metal with a thickness of more than 1 mm and, at the same time, to ensure that the quality of the welds is as high as possible. Otherwise, the tank either quickly prohibit or gives to flow through poor-quality seams.
Helpful advice! In the case of a brick stove, you can go easier by placing a water tank on the furnace body above the furnace. The design looks like this.

Installing a tank for water over Kamenka
This method, as noted, involves combining the options for installing the tank over the heater and on the chimney pipe. The distance between the Kamenka and the bottom of the tank is usually maintained in the range of 20-35 cm with the ability to change in both directions: the smaller this indicator, the faster the water is heated, but the tank will last less, and vice versa.
It does not make sense to give a detailed step-by-step instruction - you already own all the necessary knowledge. Previously, it was told how to prepare holes in the bottom and a tank cap for passing through them the chimney pipe. Do it.
Next, you need to hold an element of the smoke system through the internal cavity of the tank and connect the pipe with the tank in the entrance and exit places (in the bottom and lid) using welding. How to do you also know.
Water tanks made of stainless steel have a relatively small weight (for example, the cast iron is much more severe and the tank will require fixation to the ceiling with a chain or another suitable way) and the additional attachment do not require. Further installation of the chimney is performed according to the standard diagram, depending on the type of construction selected.
Ideally, the finished system will have the following form.


On the image presented as an example, nozzles and cranes are not visible. The next design is not so beautiful externally, but the connection of the output of water here is clearly demonstrated but.

As for the supply of cold water, it can be organized in several ways, depending on the characteristics of a particular situation:
- tank filling is carried out manually;
- water is supplied from well / well;
- water supply is carried out from the centralized water supply system.
We will not consider in detail each of the listed options, because These are themes for individual volumetric instructions.
Installation of remote water tank
The arrangement of such a system is also not distinguished by excessive complexity. The only scheme is complemented by a new device - heat exchanger. It can be embedded or external. For self-making, it is better to choose the second option - it is more convenient and easy to implement.
System of the system with remote water tank is presented in the following image.
Here we see that the external heat exchanger is installed on the chimney pipe. The water in the heat exchanger is heated due to the heat of the flue gases transmitted through the walls of the pipe. If an open heating is located under the heat exchanger, additionally heating will be carried out by heat with hot stones.
Heating in the heat exchanger, water goes to the outer tank, from there, cooling, back to the heat exchanger. Water circulation will be provided by the created slopes and pressure differences in the container with hot and cooled liquid.


Washing tank with hot water 60 l
The heat exchanger you can do yourself. In fact, it is the same tank for water, the instructions for the manufacture of which you have already studied, only smaller volume (usually up to 5 liters). The installation of the heat exchanger is done as well as the tank in the previous instruction (on the chimney of the pipe).


Register - heat exchanger for bath stoves

Prices for heat exchangers
heat Exchanger
How to make the necessary holes, install nozzles, cranes and pipes you already know. Where to do - look in the scheme. It remains only to prepare all the required elements and assemble them into a single system, withsting the necessary distances and biases in accordance with the above scheme.
In this example, the remote tank for water is installed in the waters and is equipped with a standard plumbing crane for water drain. Pipes, like the said tap, are embedded in the bottom of the tank. Holes for laying pipes through the partition can be performed using a suitable tool, for example, a perforator.
In accordance with the current provisions of the current standards, the cold and hot water pipelines, in the case of their laying through the partition, must be laid through the sleeve. The latter diameter is selected so that 0.5-1 cm exceed the outer diameter of the pipe mounted. For the sealing of the gap between the sleeve and the pipe, a non-controlled soft material is used so that the ability to move the pipe along the longitudinal axis in the case of temperature extensions. Schematically, this is shown in the following image.

The gaps in the partition can be masked by any suitable method, for example, filling out the said soft non-heat material and closed the outer decoration element (lining, etc.).
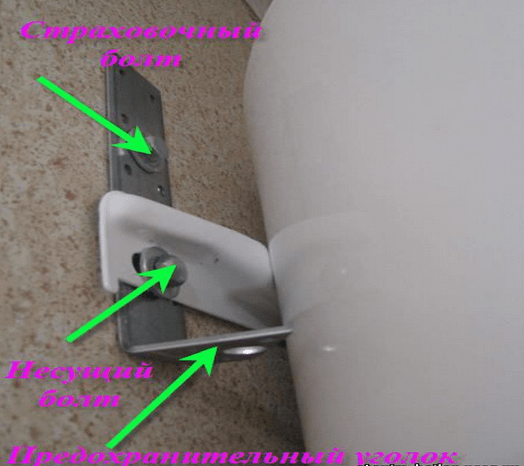
It remains only to figure out how to fix the water tank on the wall. The easiest option is to install on metal corners, the power of which would be enough to withstand the weight of the tank with water.
The mount is carried out as follows. Applying corners to the wall, you put on the surface of the tag, drill the holes on the labels and mount the dowel in them. Next, screw the corners to the wall using a bolt of 8-10 cm long and a diameter of 1-1.2 cm.

On corners can install your water tank. The method is extremely simple in the implementation, but not the most reliable (made a mistake when choosing a corner - they rushed - the tank fell), and it is suitable only for rectangular structures of a small volume. The fastening method used during the installation of household water heaters is more reliable. To implement it, you will have to work with the welding machine again. You already own all the necessary knowledge, so no additional explanation is required. Procedure Next:
- the metal strip is cut (the same stainless steel is suitable) with a thickness of 1.5-2 mm, 5-10 cm wide and long to perform for the lateral walls of the heater for several centimeters on each side;
- the holes in the diameter of the fastening bolts are drilled in the strip (you will understand when looking at the image presented below);
- the finished mounting plate is welded to the rear wall of the tank.
Further actions are similar to the previous instruction, with the only difference that the water tank is not installed on the corner, and is attached to the wall through them by means of a welded strip. It looks like this.
Tank is installed. It can be tested and, if everything is fine (there are no leaks, excessive heating and other adverse events) to take construction into continuous operation.
If desired, the system can be improved almost indefinitely, making a variety of automatic, measuring tools, etc. It is not excluded and the possibility of installing an additional layout in order to connect the tank to the shower cabin in the wave - this will allow you to wash with maximum comfort. An example of implementation of this idea is presented in the following image.

Helpful advice! The tank is installed in such a way that it is minimally distinguished from both a bath in the furnace and from the place of hot water.
Just mastering the art of welding a stainless steel, if you wish, you can make a tank not from the pipe, and from the sheet material is more responsible compared to the work considered. An example of its execution is highlighted in detail in the applied video.
Good job!
Video - How to make a tank for water from a stainless steel for a bath
It makes no sense to prove the need to have a supply of water for watering on the site. It happens that with the irrigation system, and your flowers and vegetables on the days of the July heat will turn into the hay. When my old steel tank was taped, there was an urgent to find him a replacement. Assessing a harsh reality, I decided to make a design that would decorate the site, was durable, inexpensive, did not attract "guests". After passing different options, I chose how it seems to me, the most successful: to make the base of the tank made of galvanized steel sheets, "Od Shop" in concrete.
Sheets steel with a size of 1000 x 2000 mm connected with each other ring. So that the container had a volume of 1 m3, made a ring of 2 sheets. Seam in front of the "Pressovka" processed the sealant for plumbing works, like all subsequent seams. It turned out a spring flexible ring, which can be given any shape.
For capacity 1 m3, it is enough to make a foundation with a thickness of 120-150 mm, putting it on a pillow of rubble. The area of \u200b\u200bthe foundation must be greater than the area of \u200b\u200bthe container. After choosing a place, it took out the ground to a depth of 200 mm, fell asleep with a pit with sand with sand, rambling, shed abundantly, prepared concrete. Half him posted on crushed stone, on it - fittings made of steel rods and pipes and flooded the rest of the concrete on these structures. Water to concrete should be added so much so that it does not grow up, and resembled a gingerbread dough. It does not require a formwork, and the edge of the foundation will be similar to the stone "influx". Concrete does not fall into place, but stacked with a shovel and tamper, can be wooden in China.
Next operation - installation of a metal base. The laid concrete is thoroughly aligned. To do this, the foundation poured the cement-sand mixture (1: 3) of the consistency of the liquid sour cream and dispersed with it with a flat rack. With an aligning layer to dry out (losing fluidity), laid a galvanized steel sheet on it and pressed it with bricks. This is a bottomable future capacity. Pre-sheet cut off so that it corresponds to the configuration of the container and performed around the perimeter by 20 ~ 30 mm. In this state, the foundation left for a day to dry.
After a day, the bottom-made ring made of galvanized steel installed, after making 2 holes in it: one below at the very edge of the drain tube, another 300-400 mm above the edge for selection of clean water. If the entire previous work was performed carefully, then there are no more than 5 mm between the wall and bottom of the bottom, it will not affect the quality of the tank. Having installed the wall and fixing it with bricks, laid out the interface between the wall and the bottom steep, but plastic "test" from the cement and sand mixture (1: 1) with the addition of PVA glue (1 tbsp. Spoon of glue by 0.5 liters of water). Seeing the "dough" of the day, removed the bricks and completed the sealing of the joint in the places involved in bricks. After completing the junction seal, installed in the hole of the wall at the bottom tube (aluminum, stainless steel, plastic), carefully placed it with a cement mortar. Next proceeded to the construction of a concrete wall.
Concrete for the wall is preparing the same as for the foundation. The work performed like this: Kelma took a portion of concrete, put to the steel wall (it performed the role of one-sided formwork), slightly tumped up so that the concrete would break and tightly pressed against the wall. And so around the perimeter. By placing concrete, it is necessary to strive to ensure that the wall thickness is not the same. Then the surface is formed, resembling the natural texture of the stone. At the same time, you can show my abilities of the sculptor, guided by the feeling of beauty and harmony.
Building the wall, do not forget that the bottom of the bottom should leave the drain pipe, and at an altitude of 200-300 mm from the bottom to the wall it is necessary to build another handset with a carve for the valve to select clean water. In order to in the process of masonry, the steel base is not deformed, it is advisable inside the capacity to be folded from bricks-backup columns that do not allow the wall to "leave" under the pressure of concrete.
Completing the masonry, you need to make a small influx inside the tank to the edge of the steel base so that it does not be peeled from concrete.
The last stage is finishing. Different options are possible using ceramics, bottle glass, natural stone, etc. I chose a simple variant: the entire surface of the container was missed by cement-sandy solution (1: 1) and was treated with a wet broom. Gray cement looks good in the green greenery.
There is a lot of advantages in such a container, it is rather cheap, the lack of one: it cannot be moved. Therefore, the place must be chosen carefully, remembering that the capital structure is being built.
Solve problems with the water drive for the shower can be in two ways: to buy finished products in the store or make them with your own hands. The second option is much more preferable for several reasons:
- there is an opportunity to choose the volume of capacity for your own needs. Depending on the design of the shower and the number of family members, it is possible to establish a container with different volumes;
- if you wish, you can install additional automation systems. If there are minimal experience in performing plumbing work without big problems, you can make automatic tank filling, water fence only from the upper warmed layer, electric heating, etc.;
- low cost. All structural elements can be used, nothing needs to buy. If you have to go to the store, then only for cheap quantities;
- pleasure from independently done work. This is an important factor, in many cases all the others outweighs.
The article will give a detailed step-by-step instruction of the manufacture of several versions of the tanks for the shower, each has both strengths and weaknesses.
The shower tank can be metallic from galvanized sheet steel, stainless steel or carbon (black) iron and plastic. In order to consciously choose optimal options, you should familiarize yourself with the real comparative table of manufacturing materials.
| Material of manufacture | Benefits | disadvantages |
|---|---|---|
| Almost unlimited service life. But it is unlikely that this advantage is critical for shower buildings in country areas. | Technological complexity of manufacturing. Professional instruments are required, the ability to keep welding with stainless steel. Another very unpleasant drawback is a high price. | |
| Lifetime for up to fifty years. Easy of the tank, the ability to install even in fragile supporting structures. | The complexity of manufacture, you need to have special tools and skills for soldering. At cost, the average positions occupy. | |
| For most cases, the optimal option for both the price and the operational indicators. | Require a periodic cleaning of the inner surface, the painting layer should be restored on the external one. | |
| Cheap stand, there are no problems with the search. | Fenced with negative temperatures and rigid ultraviolet radiation. | |
| The service life is several decades. | For the price arrange not all users. |
Experienced practices are advised to make a tank for a soul from b / in plastic or metal containers. Such a container is easy to find, in most cases nothing will have to pay.
For one wash, it is quite enough to 40 liters, depending on the number of family members, you can calculate the optimal dimensions. For information it is worth saying that industrial companies during the manufacture of tanks for the shower proceed at the rate of approximately 20 liters per person, 40 liters allow not only to take a shower, but also fully disappeared without the need to save water.
Plastic barrels
A very common version of the manufacturer of the tank for the shower, differ in good indicators of physical strength. It is allowed to apply both new and use former in use. The volume may be different, from 50 to 1000 liters. For the soul there is no need to use large tanks, it is enough to have a volume within 50-200 liters.
For all plastic containers there are two general requirements:
- material of manufacture - resistant to ultraviolet rays plastic. It is quite difficult to find such containers, and they are not suiced;
- must have a dark color, and preferably black. Plastic should be painted with mineral paints during pressing polyethylene. Most plastic barrels of blue or white. Why is it recommended to have a container made by their painted plastic? Because the paints on the surface of the plastic can not be held for a long time, during one summer they will be twisted. The reason is not only in the low adhesion coefficient, but also in large values \u200b\u200bof temperature extensions. And all dyes negatively react to changing the linear size of the painted surface.
Step-by-step instructions for the manufacture of plastic tank
If you have an old plastic barrel, then it needs to be carefully flushed. Capacity can be considered clean only when different odors completely disappear. For installation in a vertical position, a frame should be made and the base, the emphasis is located across the entire bottom area. To reduce wind loads, it is better to put a barrel of the side of the side, but then problems arise with the sealing of the lid.
How to seal the cover
Step 1. Thoroughly rinse the connection site with a barrel, remove the oily spots, dust and dirt.
Step 2. Scroll through the cover, check whether it fits tightly across the circumference. If necessary, align the lid. For this, deformed spaces heat the construction hairdryer, install the cover in your place on the barrel and hurt much. In this position, the cover is held until complete cooling. Work in mittens, observe security measures.
Step 3. Re-degrease the surface and gently lubricate with special glue. If you have an apparatus for welding plastics - excellent, such a seam has a strength of not lower than 90% of the strength of the base material. If there is no device - use glue.
Step 4. Wait until the adhesive composition is completely dry. Time depends on the brand of glue and drying conditions.
Step 5. Re-apply glue in the places of fitting the lid to the barrel and again let it dry. Do not rush, do not allow skips.
Step 6. To increase the strength of the connection, once again lubricate the place of the joint and tightly wrap it with a clean polyethylene film. Top of film torn soft wire.
Instead of wire, it is permissible to use the clamp
If you have little experience of such work, then do not rush to install a barrel on the shower room, first check it on strength and tightness. Everything is fine - cut into the top of a small hole, connect the reinforcement and shower. Loves leakage and eliminate them fail - put a barrel in a vertical position.
How to make a cut in plastic barrels
Not such a simple question as it may seem. The fact is that it is precisely about the inserts that the points of increased tension of the material are formed, and the microcracks appear over the time, which increase until complete destruction. As a result, there are a barrel to change completely, repairing such leaks is very difficult. Yes, and after repair, no one can give a guarantee that in the same place or next to it after a few weeks, the problems are again not detected.
For high-quality sink, you will need a drill with a set of drills of the corresponding diameters, rubber gaskets, bolts and metal plates. The sink is made not only under the watering can, but also for the flow of water and draining surplus.
Practical advice. For all connections, use a silicone hose. It is not afraid of frost, resistant to UV rays and which is very important for plastic barrels, soft and does not create additional loads on the connections node.
Step 1. Buy the inserts for the tank. They consist of washers, rubber seals, fittings and nuts.
The number of pins depends on the number of pipelines connected to the barrel, and the diameter is selected taking into account the size of the conditional passage of the hose. Additionally, you will need a clutch for the crane, a crane, a shower, a float from the old drain tank. If you plan to install additional automation reinforcement, then simultaneously buy elements for fixing it to a plastic barrel. It is desirable to connect / disconnect the hose to use quick-dispersion, they make it much easier to care for the dacha tank.
Step 2. Prepare two metal plates on each insert size of about 5 × 10 cm, a thickness of at least one millimeter. It is at the expense of them that the site that perceives static loads from the connected plumbing fittings and dynamic efforts arising during the inclusion / shutdown of the watering can or the water supply valves can be significantly expanded. Be sure to remove sharp corners on all sides of the plates with a disc closure machine on all sides of the plates.
Step 3. In the center of the plate, drill a hole under the insert, for two plates you will need two holes, pass the sharp corners and bursavar after the drill.
Step 4. In barrel, drill the hole, the location must meet the requirements for the placement of the insertion and its specific purpose. In a round plastic barrel, it is quite difficult to drill a hole, the drill constantly "runs away", the greater diameter.
Practical advice. Drill holes will be much easier if you use simple recommendations.
Clamp in the passats of a small carnation and heat it with a lighter until a red glow appears.
Without giving time to the metal to cool, very quickly in advance marked place to register with a hot carnation in a plastic barrel a small hole, you can also have a non-separation.
Take the drill with a diameter of approximately 2 mm, drill through the hole. The label made will hold the drill in the desired position. It will be the center, then you can continue to work with a reduction drill.
Step 5. Entridly remove all burstles around the perimeter of the hole, they should not interfere with hermetically installed metal strips.
Step 6. Bend the metal plates along the radius of the barrel. Use for this by any pricks. There is nothing terrible if it is not possible to be perfectly bend the plate, but it is desirable to strive for such a result. The more accurate the radii, the larger the area of \u200b\u200bcontact, the smaller the load per unit area, the more efficient the device is valid.
Step 6. For a complete guarantee of the exception of leaks, lubricate the surface of the plates by any glue or sealant, you can make the same operations with the inserts.
Step 7. Install all elements in place, metal plates must be from two sides of the tank. For fixing the nut, the assistant will need, one is difficult to do it. But it all depends on the size of the container. Remember that standard rings have nuts with left-thread, screw them counterclockwise.
Constantly control the position of the plates, do not allow them to turn and change the initial proper position.
By the same algorithm strengthened holes for all sings. Do not be lazy to make a strengthen, it increases much of the time of operation of the tank for the country soul. Next to the thread, a crane, hose, fast connector or other equipment for the tank is fixed.
Video - installation of removal on plastic barrel
Metallic shower tank
We will not consider rather "exotic", in our opinion, options for the manufacture of stainless steel tanks. Let us dwell on the two most successful - from the finished barrel or welded steel of ordinary quality.
1. Metal tank of finished barrel
Initially, it is necessary to talk about the types of barrels, their advantages and disadvantages.
| View of barrel | Benefits | disadvantages |
|---|---|---|
| Low price and availability. Currently, such a container is used to store the majority of liquid and bulk products, they can always be bought in the store or find the ex-in use. Have low weight, easy mounted on simplified frames. | Difficulties are arisen with the fastening of the insertion and plumbing reinforcement, the service life rarely exceeds ten years. | |
| Mesh thickness up to 1 mm, which allows you to reliably fix the additional elements of the tank. Lifetime fifty and more years. | Currently, it is difficult to meet thick-walled barrels, at cost, they are much superior to thin-walled. A little more weight, a volume of at least 200 liters. Such operational parameters can narrow the spheres of possible use. |
Metal barrel manufacturer
In the bottom of the barrel is made a hole for the soul watering. If the barrel is thinned, then it is recommended to install metal plates to enhance the connection location. How this is done - described above on the example of a plastic barrel. For water supply, the hole should be made in the upper part of the tank. During the manufacture of a frame for a tank, be sure to take into account the weight of the filled container, the fixation must be reliable and safe.
2. Production of leaf steel tank
The optimal option for many cases has a number of advantages.
- Ability to manufacture a tank of any capacity. This allows you to maximize the needs of users.
- The shower tank at the same time can serve its roof. For this, the size in length and width must respond to the shower parameters, the framework of the structure simultaneously serves as a frame for the tank. In step-by-step instructions, we will consider this option.
- The tank is allowed to install all systems for automation of pouring and additional artificial water heating.
Step-by-step instructions for the manufacture of metal tank
For the manufacture, it is necessary to prepare sheet iron with a thickness of about 1 mm, the size of the sheets depend on the length and width of the shower cabin. For most cases, 1.2 m × 1.2 m is enough.
Step 1. Draw a sketch of blanks and calculate the volume of the tank. For example, we will take a volume of 100 liters. With a length of 1.2 m and width of 1.2 m, the height should be: H \u003d 100000 cm3 (100 liters): (120 cm × 120 cm) \u003d 6.9 cm. Round up to 7 cm. For the tank you need to prepare two plates size 120 cm × 120 cm for top and bottom. And four plates of 120 cm × 7 cm for sidewalls.
Step 2. Transfer sketches of metal blanks. Clean its surface from rust and dirt, accurately draw the contour of the workpiece. Dimensions need to be transferred only for one sidewall and tops, these items will continue to be used as templates for the rest.
Step 3. With a circular fluffy machine with a disk for metal cutting, cut the blanks. Check that the dimensions are fully the same.
Important. While working with the Bulgarian, follow the safety regulations. By trauma, this tool takes the first positions. The disk should rotate the operator, it is extremely important. Newbies are trying to change the direction of rotation, they do not like that sparks fly towards the worker. It is very dangerous, in this position, the Bulgarian can snatch, injuries from her complex and heavy.
Step 4.. Conduct sections of cuts, try to achieve the most flat line. The gaps of no more than two millimeters are allowed. Try to pre-fold all the items and check their quality.
Step 5.. Start welding individual items. Adjust the current strength of the welding machine and the diameter of the electrode. Metal should not be abrupt, this condition significantly reduces the strength of the seam. In addition, the strong current burns thin sheets through, close the holes are then difficult and long. Keep in mind that the weld during the cooling "pulls", the value of the corners changes. To avoid mistakes first grab two elements in several places and let them cool. After that, check the corners and, when detecting deviations, correct them. Only after such preparation can be applied to solid seams.
Step 6.. Take off the flux along the entire length of the seam, check its integrity. There are skipping - impose a re-seam. If the experience of the production of welding works is not enough, then professionals are recommended at the bottom of the shower tank to apply seams from the inner and outer side. The lid is welded only on the outside.
Step 7. Seat the location of the water input and canoe watering sites. Taking into account the diameters, drill holes, to the grinder to subduct burstages. We do not recommend you to boost the fitting with a carvings, much easier to purchase special cuts in stores. They have a set of washers and rubber pads, quickly installed in place, do not require special knowledge. Pretty adapters are quite difficult, newcomers will definitely be leaks.
Step 8. Repeat all the weld seams from the flux, pour water into the tank and check the tightness of the container. There is no leakage - pour water, clean the surface and paint the outer walls. Paint, of course, should be black and for external work.
The finished shower tank can be mounted above the shower. If you have a desire to make it from a stainless steel, then the technology is almost no different. Except for changing the welding and brands of electrodes.
You can find options for manufacturing a tank for a shower of galvanized sheet steel. Do not consider this option successful for several reasons:
- very thin walls require additional special measures to strengthen them;
- zinc has low adhesion with most coatings, paint will quickly suck. And use special expensive paints is economically inexpedient;
- for the manufacture of the tank, the elements used in the connection places are bend, and then searched. It is very long, you need to have or specially do bending devices;
- without a solid experience, the soldering of galvanized sheet gland is not necessary to hope for a positive result of its work.
How can you improve tanks for the country soul
Each owner of the country area, taking into account his needs and opportunities, can independently improve the tank, establish the simplest mechanisms that allow not only to increase the comfort of water procedures, but also reduce the cost of its service and preparation. We will not concern complex automation, consider only the most "budget" options. Although they are low-cost, but in terms of efficiency, safety and durability of use, there is no expensive analogues of industrial production.
Water temperature
For those who already use the simplest shower in the country area, it is no secret that the water temperature changes during washing. Sometimes the temperature difference can cause significant discomfort. It is impossible to completely eliminate such a phenomenon, but there are several ways to minimize the difference and increase the water temperature in the tank? We will not consider factors depending on the location and color of the surface, we will focus on purely technical solutions.
- Make water fence on top of a tank. The easiest way, but very effective. To do this, you need to attach a flexible hose Ø 15-20 mm to the inlet opening. The main thing is not the size, namely flexibility, the hose can be made from various materials, the wall thickness does not have. The shower water moves by gravity, there is no increased pressure, on the contrary, it is somewhat lower than in the container due to physical phenomena arising during fluid movement. The length of the hose connected must be about 20-25 cm more than the maximum height of the barrel. Specific values \u200b\u200bare determined taking into account the features of the hose. The main requirement - it should not be completely blocked while working and not disturbing the flow rate of water. The upper end of the hose is fixed to any float (it is better to take a piece of foam) from the bottom. As they fill or empty the barrel, the float will move up / down, and the intake end of the hose always takes water from the warm top of the top layer.
- Install the simplest electric heater. Now in the implementation there is a huge number of devices that differ in power, price and method of fixation. Choose for yourself the most optimal taking into account the maximum number of different factors. You can not focus on the power. In addition to the additional heating of water, the heater will perform another task - to constantly mix it in the tank. Mount it at the bottom, warm water will climb up, and cold go down. Due to the continuous mixing, the temperature of the water in the entire volume will become the same. If you wish, you can additionally install a temperature sensor or time, but it is already quite complex work. Yes, and the presence in the tank with water conductive elements has a negative impact on the safety of using the shower.
Filling a tank
There are two most frequently used tank filling methods: manually bucket or using a valve valve. Both methods are often used and have the right to life, but we advise you to make the third option, in our opinion very successful. In addition, almost no additional costs will be required, and all works will take no more than an hour of time.
Step 1. Prepare details. You will need a hose and an ordinary float mechanism from the drain tank toilet bowl. As a rule, they very rarely fail, such elements can be found and used for a tank during the replacement of plumbing equipment. If there are no old - buy in a specialized store, the price of devices is available to all consumers.
Step 2. Drive the hole in the container, do not forget to install additional plates to strengthen the scene.
Step 3. Install the float, use the sealants to exclude leaks.
Important. If for all cases described above, small leaks are considered an unpleasant phenomenon, but not critical, then with a float compounds should be hermetic. Otherwise, a large amount of water flowing can cause very unpleasant consequences.
Step 4. Adjust the position of the float with such a calculation so that the barrel is always filled with the desired volume. If there is a desire, you can make a drainage insured hole, insert the tube into it and bring out to a safe place. The tube will give the opportunity to notice the malfunction of the work of the float and minimize the consequences of the "Flood". But you can not do this, the shower at the cottage is not that room, to especially take care of the leaks, the main thing is that not all the water leaves. Of course, at the time of a long lack you need to not forget to completely turn off the water supply.
Heated heated, heat insulated shower, sensors and pump
Country souls
The version of the tank for the shower should always be thought out before the start of construction, and not the opposite. If you have temporary shower, then you should not lose a lot of effort and tank makers. You can meet options for use for these goals of fuel tanks from passenger and trucks, large canisters, dairy bids, etc. Professionals recommend paying attention to efficiency and, of course, the designer view of the soul. The tank should not be brought into the eyes, and fulfill its tasks "imperceptibly."
And last. In everything you need to observe the optimal ratio of value and quality. You have a landline shower that is planned to be used in cool autumn days - think not only about the electric water water in the tank, but also about thermal insulation. It should be removable and installed only in cases where the sun's rays are already not enough to heat the water to the desired temperature. It is best to use foam plates, they are quickly installed and removed, several seasons can be used. For the price arrange all consumers.
Video - shower tank with your own hands