DIY decorations for the home. How to transform the interior of your home with DIY decoration without extra expenses
Everyone wants to make the interior of their apartment or house cozy and beautiful. To stylishly decorate a living space, it is not at all necessary to buy expensive interior items.
You can easily create a lot of home accessories with your own hands, besides, handmade little things are now in fashion. If you decide to decorate rooms with your own hands, you can choose exactly the colors and shapes that best fit into your interior. In addition, you will receive not only stylish interesting accessories, but also the pleasure of the creative process.

Fashion for homemade accents
DIY accessories for decor will give the room a unique personality, originality and comfort. You can do a variety of creative things - perhaps you already know how to do something with your own hands or want to learn new techniques. Interior items in the style of hand made look bright and relevant.
Now small handmade details are in vogue for a variety of types of interiors. With your own hands, you can create the following fashionable decor elements in the interior:
- Various textile elements - pillows, curtains, blankets and rugs. All this can be sewn on a sewing machine or even by hand. The patchwork technique is now considered especially fashionable - from scraps of old clothes you can easily sew an interesting piece of furniture. Patchwork items are loved by many for their cost-effectiveness, ease of execution and unusual appearance.


- If you know how to knit, you can also create a lot of interesting things for your home. For example, you can crochet openwork napkins and tablecloths. If you knit with needles, you can make an excellent coarse knit blanket or bags for storing things in closets.
- Many interesting details can be created from polymer clay. It is an easy-to-use material from which you can easily sculpt any thing, burn it in the oven at a sufficiently low temperature, and you will get a product that resembles plastic. Polymer clay makes excellent pots and vases.


- There are many simpler ways to create decor with your own hands - you can do basket weaving, make curtains from ribbons, make a decorative panel or make a photo frame with your own hands. Many types of creativity do not require special skills - only perseverance and accuracy are needed. Even if you have never done needlework before, if you wish, you can create a lot of interesting little things for your home.
- The easiest way is not to create a new product, but to decorate an existing one. So, from simple boring things you can make original designer accessories. You can arrange simple boxes for things using decoupage technique, you can paint a simple glass vase with stained glass paints, it is interesting to decorate a flower stand or decorate ordinary pillows with embroidery. All these little things will allow you to create a truly interesting interior.


What to equip?
To select materials, you need to decide what exactly you want to do. Sometimes for creativity you can buy special paints, threads and tools. However, if you are on a budget, there are many stylish things you can create from scrap materials. Consider the following interesting options:
- You can sew a blanket or pillows using the patchwork technique from old unnecessary things. Sweaters can work if you're looking for texture, or blouses, t-shirts, and trousers if you're looking for a lightweight piece. When you have the right materials, simply calculate the amount of fabric you need and cut that fabric into even squares, then sew them all together. You will get very interesting and bright products.


- Wicker baskets for laundry or for storing small items in closets can be made from simple tree branches - you will need flexible willow twigs and a few denser branches for the frame. You can decorate such baskets with cones and dried flowers.


- The simplest crafts for the home can be made from paper. Colored paper and foil can decorate photo frames and photo album covers. You can also make stylish panels and collages for decoration from beautiful paper and magazine clippings.
- If you have unnecessary laces and ribbons at home, they can also be of great use. For example, you can weave a basket out of them, make curtains, or simply wrap them around a planter or vase.


You can also purchase special supplies for needlework. In most hobby and art stores, you can find the following items:
- Decals for decoupage will allow you to interestingly decorate any item in the house. Using them is very easy - you just need to print the image on the surface of any interior item, and then cover the surface with a thin layer of varnish.


- Stained glass paints will help you decorate all the glass objects in the house in an interesting way. You need to purchase a special outline with which you will draw - it can be black, white, colored or with a metallic tint. You also need to purchase transparent paints of the colors you need, with which you can paint over large surfaces on glass.
- Simple acrylic paints and acrylic varnish will allow you to paint any surface in an interesting way - you can decorate boxes, drawers, baskets, photo frames, vases and flower pots. Working with acrylic paints is very easy - you can apply interesting abstract prints or make complex drawings using stencils.


Detailed master classes
If you do not have much experience in needlework, you should start with simple options, following detailed master classes. You can make simple pillows and blankets using the patchwork technique, decorate your home with dry flowers and autumn leaves, paint various ready-made items, and create decorative items from polymer clay or textiles. With due care and creativity, you can stylishly and interestingly decorate the house in a variety of ways.
When you understand the technology of this or that type of creativity, you will be able to experiment more and create interior decorations without instructions.

Decorations
We all decorate our home: accessories make the space habitable and cozy, help to set the right accents and express your individuality. In addition, it is with the help of small interesting decorations that you can radically change the interior: even the most simple and boring apartment decor will become bright and original with the right accessories.

Patchwork pillows and blankets are among the most popular ideas for the home today. These are unusual things that do not require financial investments at all if you have old unnecessary clothes at home. Such interesting textile elements for country style, Provence and eclecticism are suitable. Take old clothes, cotton wool, threads, a sewing machine and start creating a pillow using the patchwork technique:
- Decide on the shape and size of the pillow. For starters, it is better to take a rectangular or square version. Draw a pattern on paper, divide the space into several small equal squares.
- Cut out squares of the right size from your old clothes. Don't forget to allow for seam allowances.
- From the squares, assemble one side of the pillow, fasten them with light seams or pins, and then carefully sew on a sewing machine to make a single piece.
- In the same way, assemble the second half of the pillow.


- Now sew the fabrics on three sides together so that it looks like a pillowcase.
- Start sewing up the fourth side, leaving a few inches of seams at the end.
- Turn the pillowcase right side out.
- Fill it with cotton wool through the resulting hole.
- Sew up the pillow carefully by hand.
- Over time, you can move on to more complex design options. For example, using the patchwork technique, you can create a creative blanket - the technology is the same, but you will need to make a few more seams across so that the cotton wool does not stray at different ends.
You can also make pillows of a more complex shape - for example, heart-shaped or animal-shaped options are perfect for decorating a child's room.


If you want to decorate glass objects in your home, there are many different ways to do it. Consider the following unusual options for decorating an old vase, glass dish or ordinary glass:
- For the first method, you will need a glass outline and stained glass paints. You need to draw the desired image on paper, then fix it on the back of the glass and outline it. For starters, it will be easier to do this on a platter. Wait for the contour to dry and paint the dish with paints according to the instructions. Such a glass product will perfectly decorate the interior of the kitchen.


- From an unnecessary glass you can make an unusual candle. To do this, you will need ordinary wax crayons and a thick cotton thread - you need to immediately lower it into a glass. Choose several colors of crayons, take one of them and melt it with a lighter into a glass with a thread. Then do the same with the wax crayon of a different color - so you get a beautiful multi-colored candle.
- The vase can be decorated by filling it with various decorations. Anything can come up - beautiful shells, beads, stones, dried branches and flowers. Arrange them beautifully inside a vase and enjoy the original decorations - such a vase will fit perfectly into the bathroom or bedroom.
If you fill it tightly with beads from top to half, you can use such a vase to store cotton swabs, razors, toothbrushes or makeup brushes.


Photos in beautiful frames significantly transform the interior of any living room or bedroom. You can decorate a ready-made wooden frame or make it yourself from start to finish. To do this, you just need to cut it to the size of the photo from thick cardboard or plywood, and attach the hook to the glue. You can decorate this base for a frame or a purchased wooden frame as follows:
- The easiest way is to wrap the frame with a beautiful satin ribbon. The tip of such a tape should be glued to the back of the frame, and then wrap the flight frame tightly obliquely. Pay special attention to the corners - in the place of the corners, you should carefully tuck the tape and also fix it with glue from the wrong side.
- If you have a finished wooden frame with smooth edges, you can simply paint it with acrylic paint and varnish it. You can make some interesting patterns using paper stencils or just create a solid color finish.


- You can buy beads and acrylic glue to decorate your frame. It is necessary to consistently coat each side with glue and dip it in a container with beads. Make sure that the layer of beads is uniform and dense. Colored beads are suitable for children's photos, and for a fashionable living room interior, you can choose black beads or with a metallic sheen.
- A wide frame can be decorated with autumn leaves. Lightly soak them in water and carefully glue them onto the flat surface of the frame. Do this around the entire perimeter, and then just varnish the frame.
- Once you've made some base coat for the frame, you can move on to the additional embellishments. For example, to create a Provencal style, you can glue fabric flowers to the frame. For a child's room, you can decorate the frame with ribbon bows. Finally, multiple frames can be glued together in a circle or zigzag to create an interesting shape.


Storage
With your own hands for the interior of the house, you can create not only very beautiful, but also useful things. First of all, these are various containers, designer boxes and baskets for storing things. Even the simplest furniture with such interesting accessories will look unusual. Now there are a variety of bags, boxes and baskets for storage - knitted, glued or assembled, made of wood, plastic rods or fabric.

One of the easiest and most interesting ways to create a storage container is to weave a basket. This will require strong tree branches for the frame, as well as flexible wicker and glue. If desired, a fabric bag can be sewn under such a basket - this is relevant, for example, for a laundry basket - the bag will not allow the rods to tear folded clothes. To create a stylish basket for the interior, use the following step-by-step instructions:
- You should start with the frame. Take three branches of a tree, approximately the same in length and thickness. Fold them crosswise in a circle and secure in this position with glue. Then select six more approximately identical branches and fix them with glue vertically on the sides. Your frame is ready.
- Start braiding the frame with willow twigs from below, gradually rising higher. Fasten the ends of the rods from the wrong side. After complete braiding, you can add handles to the basket - they are woven completely from willow branches: first you need to make the frame of the handle from one branch, and then braid it in a circle.
- If you want to sew a bag to fit your basket, try measuring the circumference and height of the basket. Cut your cotton or silk fabric according to these measurements, adding seam allowances. The simplest option is done with only two seams. Then overcast the edge and place the bag in the basket.


You can also interestingly decorate ready-made containers made of wood and plastic. In addition, design decoration can be done on a regular box. The options can be very different: you can glue it with foil, wrap it with satin ribbons or a beautiful fabric.
Choose the design that best complements the interior of your apartment.

Useful little things
You can independently create a lot of other practical and beautiful details that will allow you to refresh the look of the living space without major repairs. It can be not only accessories, but also other interior elements. For example, you can decorate the walls as follows:
- If you have a country-style interior, you can easily lay out one wall with clapboard on your own - this is a stylish solution for both an apartment and a summer house. To create a Provencal style, the lined wall can be painted with white paint - this option will look stylish and will perfectly help to refresh the interior.


Someone will certainly take a look at this collection of ideas and say that it is easier to buy new furniture or decor. But this article is not for them, but only for true connoisseurs of the unique style and handicrafts. Here you will find the 10 most beautiful interior items that you can do for your home without spending extra money.
The best crafts for the home with your own hands from improvised materials for 2018!
1. Decoupage and other do-it-yourself furniture repair ideas
Restoration of old chests of drawers and sideboards is perhaps one of the main trends of our time. Many pieces of furniture fail over time: tables and chairs loosen their bodies, upholstered furniture is pressed through and requires a new “stuffing”. But chests of drawers and sideboards can stand for themselves for many years and annoy you with their outdated appearance.
Home needleworkers and decoupage masters have not only found a way to update the design of old furniture, but have also created a fashion for the use of vintage “grandmother's” chests of drawers in the interior. You will find detailed instructions for painting and decoupage in our article. .
Below are some photos of amazing home projects to inspire you.

Restoration of an old chest of drawers with replacement handles and hand painting: 
 Painting and finishing an old cabinet with metal buttons:
  As a result, the furniture acquired an original Moroccan-style decor effect. Simple, like all ingenious:
By the way, in this way you can create more sophisticated things for the home:

Decoupage and painting amazingly transform old furniture facades, but not every person has enough time and patience for this painstaking task. Therefore, the best DIY home ideas also include refurbishing furniture with duct tape in marble, gold, and other unusual finishes. A minimum of effort - and the most ordinary piece of furniture will turn into the main decoration of your interior.


2. Beautiful things for the home with your own hands: carpets
Perhaps the most pleasant thing about creating things for the home with your own hands is when one of the guests asks: where did you get such beauty? A stylish rug with a zebra print (or other motif of your choice) will certainly deserve such a compliment. And not once.

The fabric can be any. The main thing is that it should not be too demanding in care: it is not afraid of moisture and is easy to clean. In this case, the master chose the vinyl fabric. It is heavy and strong enough to look like a true carpet. What's more, the quality of vinyl these days is very impressive, and it's available in a wide variety of colors and interesting textures.
All necessary materials and tools:
- Thick paper;
- Vinyl upholstery;
- Scissors;
- 2 Krylon pens or regular fabric paint.
Procedure:
- Create a paper stencil. Draw and cut out the outline of the zebra skin, then the drawing itself on it. Do not worry about your artistic talent - the skin of a zebra and should not look uniform or symmetrical. In extreme cases, the pattern can be copied from a picture on the Internet or even printed out to cut out.
- Attach the stencil to the vinyl fabric and outline the stripes with Krylon pens (spray or brush). After that, the stencil can be removed and continue to paint the areas inside the contours.
- Let the paint dry and you're done! To be sure the pattern will hold, you can "seal" the carpet by spraying a clear coat of acrylic spray paint over it.

Krylon handles create a stunning gold leaf effect on the surface of the fabric. In addition, the paint in them dries quickly and is very securely held. If you can’t buy them in your city, then use regular fabric or wall paint. As the next hero of our article.

He took a cheap white rug as a basis and decided to give it an interesting look with his own hands using a chevron pattern. All he needed was thin duct tape, scissors, a thick brush, and two different shades of latex paint.

Finally, another inspiring example where a makeshift stamp is used instead of a stencil. The craftsman had a rubber bath mat, leftover wall paint (thinned a bit with water for a vintage effect), a roller, and an old IKEA wool rug. We look at the photo that he managed to cook from these ingredients.


3. Unusual "marble" DIY crafts (photo)

7. Turn photos into wall decor
This is much cooler than just hanging photos in frames! Your personal photos or any images you like from the internet can turn into beautiful wall art for any room. To make such a decor with your own hands, you can use any of the following methods.
- Find or buy a substrate. A thick sheet of polystyrene foam or polystyrene foam (as in this case), a board and other improvised materials can act as it.
- Print the photo, having previously edited its dimensions so that they are about 5 cm larger than the substrate. These "extra" centimeters will go to the folds.
- Cut the photo and backing into pieces if you want a modular set rather than the whole picture. Otherwise, skip this item.
- Overlay the photo on the substrate and wrap the ends. The author of this product used double-sided adhesive tape to secure the photos. You can mount with ordinary glue or other available means. The very surface of the photographs can also be treated with glue or gloss paste.

- Print the image and prepare the canvas to which it will be transferred.
- Pull the canvas over the frame and apply a thick layer of medium gel on it. These gels are widely available and today you can buy them in any store of finishing materials.
- Place the photo on the oiled canvas and press down. Leave it like this for several hours, but periodically sprinkle with water from a spray bottle.
- Carefully, use your fingertips to start erasing the back of the image from the canvas. Remove all paper in this way.

As a result, you will get a beautiful one with scuffs that will only give it a touch of vintage style. It remains only to apply the last layer of medium gel on it as a protective coating.

For inspiration, here are a couple more ways to decorate your interior with a photo.
 We use an old window frame as a photo frame. How do you like the idea?
8. Creative homemade lampshades for lamps
Homemade lampshades made of fabric, paper, thread and other improvised means will not only decorate your home, but also bring an unusual atmosphere into it every dark time of the day.

Look for the best ideas for your taste in our article . The next photo shows a popular creative thread lampshade.

9. Succulents - do-it-yourself living home decor
A succulent living wall is perhaps the most amazing DIY craft you can make for your home. Agree: if you saw it in someone's design of a living room or another room, you would not be able to remain indifferent!

Dekorin will tell you how to get such an impressive and sustainable decor:
- You will need a shallow wooden container for planting and a metal mesh.
- To fix the mesh on the container, use an impromptu wooden frame, which can be made from small boards or chips. Attach to staples or nails.
- Prepare any for composition. They easily take root in the most difficult conditions and look best when you combine different shades and shapes of leaves. Common examples of succulents: aloe, various cacti, young or stone rose (Sempervivum), stonecrop (Sedum), mountain grate (Orostachys), etc.
- Fill the container with soil and plant your chosen plants in it. Use any cactus mix for drainage.

Here are examples of crafts for the home that you can do with your own hands using the above method.


10. Crafts for the house with your own hands from glass containers
Glass bottles and jars often accumulate on balconies and in pantries. What they just don’t turn into today: lamps, candlesticks, vases, table decor ... It’s amazing how easily they become part of a stylish interior, you just need to use a little ingenuity, as well as paints, fabrics, threads, paper and other improvised means. Last batch of photos for today. Also read:
10 best DIY ideas for your home updated: March 21, 2018 by: Margarita Glushko
DIY decor ideas allow you to decorate the interior of your home and get aesthetic pleasure. Consider simple and interesting options.
Every housewife wants to fill her home with comfort and warmth. Such simple tricks as thick curtains on the windows, carpets and various pleasant little things that relate to the decor will help to do this.
However, you must admit that these little things are much more pleasant to do with your own hands - filled with your loving and positive energy, they will surely bring good luck and happiness to your home.
So, how to decorate the interior inexpensively and beautifully? We have collected the simplest and most interesting instructions - it will not be difficult even for a beginner to make them.
Decorating furniture with your own hands
If your old furniture requires an external update, it is not at all necessary to spend a lot of money on buying a new one - it is enough to slightly change the design you are used to. This can be done in several ways.
Furniture decoupage
The method is an application-like method. If you are using decoupage paper, simply cut out your drawing with scissors and attach it to the surface to be decorated (it must be perfectly flat, so it is recommended to prepare the furniture in advance), fixing it with glue from the outside.
At the same time, glue must be applied generously so that the paper is completely saturated with it. When the drawing dries, it is additionally fixed with furniture varnish.

Furniture painting
If you are good at drawing, painting will breathe new life into your aged furniture and update the interior.
You can draw any image or composition - it all depends on your desire and the surrounding interior. For example, flowers look great on a closet, and a chest of drawers can be decorated with an image of an animal.
Acrylic paints are often used. Unfortunately, not each of us has the heat of painting - in this case, you can use stencils.

Acrylic paints adhere well to wood and laminated surfaces, but do not adhere well to varnished surfaces, so they require several layers.

Decoration with rhinestones
You can decorate the elements of a table, chair or other furniture using the same acrylic paint and rhinestones that are sold in specialized stores with sewing accessories.
Furniture, if desired, paint with acrylic paint, and on certain elements of it, make a bead ornament. They should be fixed with varnish when the glue is completely dry.

Decorating furniture with your own hands is a process that allows you to create something truly beautiful, filled with your energy, for the benefit of business and soul. In addition, decorating makes it possible to significantly save money on the purchase of new furniture.
Mirror - a special element of the interior
It's no secret that mirrors can make a room appear larger and brighter. It is she who makes it possible for the rich imagination of the designer to roam - there are many ideas for its design and decoration! Let's consider the simplest ones.

mirror corridor
You will need 5 mirrors, you can have different shapes and sizes. Hang them in ascending order on the wall. Such a composition above the stairs will look great.

The mirror in shells will be a great decoration for the bathroom

You will need:
- Glue.
- Tassel.
- Mirror without frame.
- Shells.
- Varnish or spray paint.
On the wall, lay out a frame of shells around the mirror. Glue the shells to the mirror, first applying glue with a brush.
Do this carefully - the glue should not fall on the mirror surface. Before varnishing or spray painting shells, cover the surface of the mirror with newspaper so as not to splatter it.
Mirror in rhinestones

You will need a small round or oval unframed mirror. Cut out a ball of thick cardboard in a circle in the shape of a mirror, but a few centimeters wider, as well as many thin strips that need to be glued into circles of the same size - make 3-4 rows of them, which will create your frame.
Glue these circles to the edges of the cardboard ball and fix with glue. Then glue a mirror to the cardboard and start wrapping circles with rhinestones. Thus, you will get a stunningly beautiful frame.
Beaded mirror frame

You will need multi-colored or solid color beads. You can purchase models of different diameters and shades. Apply glue to the edges of the mirror and glue beads (or rhinestones).
Do not apply glue around the entire perimeter of the mirror at once, so that it does not dry out and disturb the accuracy of the composition.
DIY home decor using a mirror is one of the win-win options. Feel free to experiment with different options for decorating mirrors.
Ball of lace
Such a ball will look great in the bedroom of a romantic and delicate nature.

It can be hung in almost any part of the room as an elegant and simple decoration. So, you will need:
- Balloon.
- PVA glue.
- Lace, preferably white, but it all depends on your taste.
- Scissors.
Step 1. Inflate the balloon.
Step 2. Cut out a circle of lace fabric that matches the diameter of the ball.
Step 3 Apply glue to the lace.
Step 4. Glue the lace onto the ball.
Step 5. When the glue dries, pierce the balls and carefully remove it through the lace hole. Then thread a string through the ball and hang it indoors.
Glass candlesticks
DIY decor ideas using items that are no longer needed are not only practical, but also practical. If you have a few unnecessary glasses, it's time to use them to create a unique composition that will be a great decoration for a table, dresser or slide.

Take:
- 3 crystal glasses.
- 3 small scented candles
- 3 artificial flowers or twigs of small size.
Step 1. Turn the glasses upside down.
Step 2. Place candles on the "legs".
Step 3 Place a branch or flower inside the wide part of the glass. If necessary, cut off the stem so that it fits perfectly inside.
A swarm of paper butterflies in your bedroom
You can place such an original composition on the wall by the bed, especially if it is a children's room. Butterflies will create a great spring mood for you in the morning, even if it's cold winter outside.

So stock up:
- Lots of thick paper. It can be white, but in this case, your butterflies will have to be painted.
- Scissors.
- Paints.
- Glue.
Step 1 Draw freehand butterflies on paper and cut them out. Bend the figurine slightly in half to create the illusion of a flying butterfly.
Step 2. Paint them with multi-colored paints.
Step 3 Carefully place the butterflies on the wall, starting from the bottom of the wall. First stick a few figures, but gradually increase their number. An uneven column of butterflies looks better in a somewhat chaotic manner.
Butterflies can be replaced with squares of multi-colored bright paper. Cut out even rectangles that are slightly different from each other and stick them on part of the wall from top to bottom, gradually changing shades from one to another.
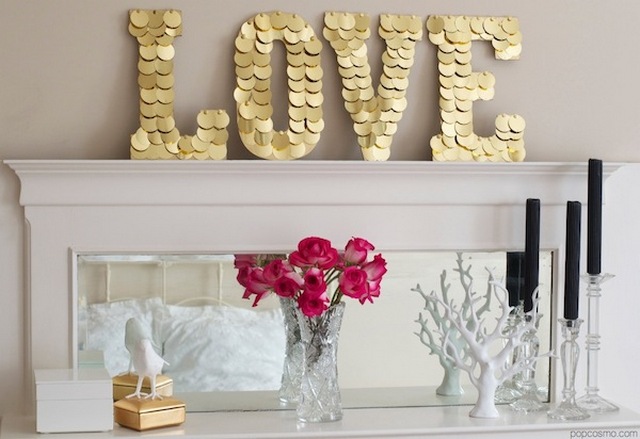
DIY home decor - paper roses
Such roses will be an excellent decoration for the living room, bedroom or even the kitchen.

You can choose either white or colored paper or sheets from color magazines. For this:
Step 1. Cut out a square from paper.
Step 2 Draw a spiral on it.
Step 3. Cut this spiral with scissors.
Start twisting it, and when you're done, secure it with glue. You will get a real rose. Such roses can decorate a variety of interior items and even put in a vase if you provide them with stems.
Christmas chandelier
This idea is suitable for owners of "strict" and fairly large chandeliers, devoid of all kinds of decorations.

Take:
- Thin rope.
- Scissors.
- Small unbreakable Christmas balls.
Step 1. Cut the skein of thread into many pieces about a meter long.
Step 2. Fix them on the chandelier at about the same distance from each other.
Step 3. Attach the Christmas balls to the ropes and enjoy the beauty!
Such a wonderful idea is relevant not only in winter, but also in other seasons.
Doorknobs and family album
If you have a lot of framed photos on your wall, you can diversify them with ordinary door handles that you no longer need.

For this you need to take:
- A few unnecessary door handles.
- Strong super glue.
- Thin rope.
Step 1 Fix the door handles to the wall with glue.
Step 2. Attach the rope to the back of the photo frame.
Step 3. Hang the rope on the previously fixed handles.
DIY interior decor ideas using adhesive tape
You will need lots of colored tape and scissors. It is very easy to create various compositions with it - just cut off parts of the desired size and shape and stick them to a variety of objects - mirror frames, chairs or tables, and even to the wall.

DIY hanging shelf
Since book shelves are not cheap nowadays, we suggest you design them yourself.

For this you will need:
- A wooden board of a suitable size (it all depends on your desire).
- Sandpaper.
- Belts (textile or leather).
- Screws.
- Drill.
- Screwdriver.
- Paint (optional).
Step 1. Cut the board to the desired length and process its surfaces and edges with pre-stocked sandpaper. If you wish, paint it in a suitable color.
Step 2. Prepare 2 strong belts by cleaning them of buckles and metal plaques.
Step 3 Using screws and a drill, hang the straps on the wall, after making holes in them to fold them in half like a loop.
Step 4 Place the plank in the hinges and align it - it should be horizontal.
Conclusion
When choosing decor ideas with your own hands, be sure to pay attention to the design of your room and try to choose the option that harmoniously merges with the overall style.

Everyone strives to make their home more comfortable. Wanting to transform the design of your house or apartment unique, you can create interior items with your own hands. So the room will acquire a unique design. It is not always necessary to create some special skills and materials to create decorative elements. Sometimes jewelry is made simply and from improvised means. Next, we will look at the most affordable ways to create designer things.
You can decorate the interior with the help of improvised means

You don't need to have any skills to make jewelry.

Items for decorating the interior can be created independently
Consider several options for creating interior items with your own hands. This will require a minimum set of materials and tools and a good mood.
original tea table
The designer table will become a chic decoration of the living room, winter garden, dining room. To create it, you need to prepare the following items:
- remnants of wallpaper, preferably washable;
- a wooden frame of the size of the proposed table;
- PVA glue;
- acrylic varnish for fixing the coating;
- caps from plastic bottles;
- gold acrylic paint;
- dark brown acrylic paint.

The table can be made from old wooden boxes

Designer table will perfectly decorate the interior of the room
The manufacturing process includes several main stages, each of which requires special attention.
- A piece is cut out of fiberboard (more precisely, it is cut out) to the size of the acquired wooden frame.
- A part with the desired pattern is cut out of the wallpaper and glued to the fiberboard. You can use decoupage technique. Further it will be considered in detail.
- The frame, the upper surface of the bottle caps is painted with dark brown paint.
- After complete drying, in some places strokes are made in gold color and rubbed with a dry flat brush to create a cobweb effect. The same should be done with lids.
- All remaining parts are covered with acrylic varnish.
- The legs are securely glued to the bottom of the table.
The original do-it-yourself piece of furniture is ready and can take pride of place in the room.

It is not difficult to make such a table yourself.

The tea table will perfectly decorate the interior of the room

The process of creating a table includes several stages.
Shelving, kitchen and bookshelves
Various racks and shelves can become a useful and important element of design decoration. The ways to create them are only limited by your imagination. As a rule, old boxes, pallets, barrels and other parts of old furniture are used. Sometimes even from the most useless things in the household it is really possible to create a real miracle.
Most often, people are engaged in the alteration of old objects into new ones. This is explained by the fact that it is a pity to throw it away, and the quality of products manufactured decades ago is sometimes much higher than modern products.
Now let's take a closer look: how can you use old wooden boxes? Furniture made of such elements certainly deserves special attention. With all the budget cost, it helps to place the right accents in the interior. The photo shows several options for such designer furniture.

You can make shelves from old things, giving them a new life

Racks and shelves will perfectly decorate the design of the room
Variety of handmade tables
Not a single room in the house is complete without a table. This is a versatile piece of furniture. They are:
- kitchen;
- written;
- computer;
- dining;
- coffee;
- magazine;
- bedside;
- children's.

There are special techniques for decorating tables

The table is a versatile piece of furniture

No room is complete without a table
Modern decorators distinguish 12 basic techniques for decorating various tables. Their detailed description is given in the table below.
|
Description |
materials |
|
|
Painting |
The most simple and affordable method of transformation. The main step in this case is surface preparation. The quality of staining depends on this. If there is rust on the metal elements, then it is removed (Coca-Cola can help) |
Acrylic putty, enamel, varnishes, paints, aerosols, brushes, rollers, sponges, sprayers. Stencils and masking tape may be required for designer staining. |
|
The painting will help to diversify the ordinary monochromatic coating. If there is no artistic skill, then do not be upset. Stencils and templates will come to the rescue. |
Stencils, acrylic paints, thin brushes. |
|
|
The desired images are cut out or carefully torn off. Using a brush and glue, stick evenly on a smooth surface. After complete drying, varnish. |
Soft brushes, special napkins or any drawings on paper, PVA, transparent fixative varnish. |
|
|
Craquelure |
This type of varnish is able to give the product a cracked, aged look. Craquelure can be of different types, it should be used in accordance with the attached instructions. |
Craquelure lacquer, brushes, vein pigment. |
|
The tile remaining after the repair can always be used to decorate surfaces. The technology used is the same as for laying on walls or floors. This method is perfect for a table located on the veranda or in the garden. |
Ceramic tile |
|
|
Compositions from the smallest fragments always look elegant. There is a lot of room for imagination here. The main thing is to firmly fix all the components. |
Mosaic elements, broken tiles, colored glass, old CDs, pebbles, shells |
|
|
Self-adhesive film |
One of the fastest and easiest ways. |
|
|
Decorative tape |
This type of material can be purchased at any office supply store. Decorating the surface will take just a few minutes. The main thing is to stick sticky strips evenly and accurately. If necessary, the adhesive tape is also quickly removed, and the sticky layer is removed with acetone. |
Scissors, decorative tape. |
|
Epoxy resin |
This is the name of a liquid substance that quickly hardens in the open air. It looks like plastic on the outside. Great for filling cracks in old wood. Pigments can be added to the composition. |
Epoxy resin, brushes, pigments. |
|
Decor under glass |
An original coffee or coffee table can be created by making a small indentation in the tabletop. Various decorative elements are laid out in it, and everything is covered with glass from above. |
Sand, shells, beautiful stones, dry flowers, beads, miniature toys, glass. |
|
Coloring through tulle |
Initially, the base color of the paint is applied. After drying, the tulle is tightly attached so that there is no slipping and smearing. Contrasting paint is applied on top. For accuracy of work, it is recommended to use a spray gun. |
Base paint, pigment, tulle, brushes, spray. |
|
Gilding |
Gold elements perfectly complement the interior in a classic style. You can use ordinary gold-colored acrylic paint, but the result will be much more effective when applying potali. This is called ultra-thin foil. |
Potal, fixing varnish, brushes. |
When creating a table, it is not necessary to use any one design method. It is quite possible to combine them. These decoration methods are perfect for transforming shelves, cabinets, chests of drawers, bar counters.

On the table you can stick a photo of nature or something else.

A table covered with mosaic will look elegant and beautiful.
We create designer decor
It is not necessary to create exactly pieces of furniture with your own hands. Sometimes, in order to make the interior unique, a few decorative elements are left. Let's take a look at some of the available options.
flower pot from teapot
Such a little thing will become a chic decoration, kitchen, dining room, living room, veranda. For manufacturing you will need the following:
- acrylic paints;
- unnecessary kettle;
- sponge;
- small flower bowl;
- shungite.

It is better to paint the teapot with acrylic paints

This item would be a great decoration for any room.

You can decorate an old teapot and make a flower vase out of it.
Making a pot with your own hands includes the following steps.
- Painting an old teapot with acrylic paint. The surface must first be cleaned. After the product should dry well and apply a second coat of paint so that the color is even.
- The bowl should fit into the kettle in size. It is first necessary to plant a flower in it and only then put it in a teapot. To absorb moisture, shungite is poured onto the bottom.
- If desired, the teapot can not only be painted in one tone, but also drunk. For painting it is really possible to use stencils.

If the appearance of the original appearance of the kettle suits you, you can leave everything as it is

The teapot is best painted with acrylic paint first.
Handmade candles
Candles always create a special atmosphere in the room. Especially if they are made with soul with their own hands. The manufacturing process is not as complicated as it might seem at first glance. For work, you will have to prepare the following materials and tools:
- a container for melting wax;
- a saucepan or a metal bowl for a water bath;
- form for creating a candle;
- a pair of strong sticks (for stirring the wax, for attaching the wick);
- wax crayons;
- remnants of old candles;
- natural cotton threads.

To create candles you need a small set

The process of making candles is not difficult.

Candles can create a special atmosphere in a room.
If everything is ready, then you can proceed to the most interesting: creating a candle with your own hands. The process consists of several interrelated steps.
- Wick manufacturing. For this, cotton thread is useful. Material with synthetic additives will not work. A candle with a colored wick will look original. Its thickness will depend on the size of the candle itself and the materials from which it is made. The thread can be twisted into a bundle, crocheted or braided. The wick must first be impregnated with liquid wax.
- Candle formation. The mold can be made of plastic or metal alloys, juice boxes, yogurt, biscuits can be suitable. For the first experiment, you can use simple smooth containers, and then any curly ones. A hole is made in the middle of two and a wick prepared in advance is inserted into it, it is better to tie a knot outside for reliability. The knot is the top of the candle. A stick is laid across the form, on which the other end of the cotton thread is tied. After that, pieces of wax are added to the container. Then you can start melting in a water bath.
- Product coloring. A candle in color looks much better than a standard gray or cream color. The easiest way to paint it is with ordinary children's wax crayons. They are crushed into crumbs and poured into a container along with pieces of wax. You can also purchase special pigments in the form of tablets.
Finally, the candle is cooled. The main thing is not to forget to leave a “tail” at the wick for subsequent arson. To get a scented candle, you can add a few drops of your favorite scented oil to the wax.

You can add a few drops of scented oil to the candle for scent.

The finished candle can be painted in the desired colors
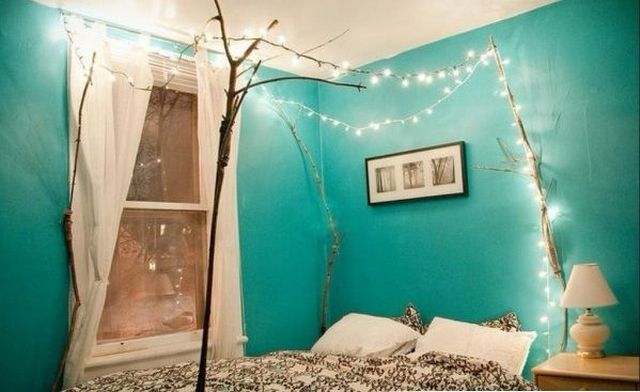
Bedroom Decor
Most of the time people tend to spend in the bedroom. Naturally, this room should be as cozy and comfortable as possible. Comfort is often created with the help of charming decor elements. The following items are most commonly used.
- Family photos in homemade frames. They can be made using stained glass, shells, polymer clay, durable cardboard. You can also make them with your kids.
- Artificial flowers created from corrugated paper, fabric, hardening plastic.
- Designer textiles, which include beautiful pastel linen, bedspreads, handmade pillows, creative lampshades. To make such a decor will turn out, even if you have an elementary sewing skill.


Nothing decorates our home like things that are dear to the heart, created by oneself. Interesting details, pleasant little things always fill the home with warmth and illuminate any family nest with grace. The portal will always have a lot of interesting things for you. Today we have prepared for you the best DIY decor ideas. Let's get inspired together!


DIY decor ideas: creative entrance hall
In search of successful solutions, we invite you to walk through the rooms with the best Dekorin designers and find the best DIY decor ideas, taking into account the specifics of each room. Let's start with the hallway.
The hallway is the calling card of the house. In order for home comfort to envelop the person entering right from the doorstep, we recommend that you equip this room in the best traditions of modern hand-made. Go!


- Key holder for the hallway
A small, at first glance, insignificant detail is still capable of not only decorating your hallway, but also becoming an indispensable device for every day. Just look how beautiful and easy it is to decorate your home with a homemade key holder!

At the same time, you do not need special skills to create it. Only creativity, only your own skillful hands and a bit of imagination!


- Do-it-yourself rug in the hallway
Look what a beauty!

The rug in the hallway can be made from waste material and not worry that it will deteriorate or get dirty.

Plus, such a homemade creative will not cost you a penny. Wonderful, right?

- Do-it-yourself hanger in the hallway
And this is a really great option! See how easy it is to create beauty and convenience with your own hands, without spending a dime!

All you need is a wooden frame, small logs or twigs, and stain or wood varnish. Take health advice!


Bedroom: do-it-yourself decor elements
The bedroom is the main room in the apartment, because it is here that we relax and gain strength before the coming day. Do-it-yourself decor elements in the bedroom should be very cozy, appropriate and exclude fussiness as much as possible.
- DIY headboard
Here you can show all your creativity and resourcefulness. The head of the bed can be decorated in the now fashionable loft, eco and country style.
Take a closer look, and suddenly this is your option?


- Lamp or night light in the bedroom
DIY bedroom lamp looks very pretty, doesn't it?

It can be sculpted from empty cans, bottles, and even from ordinary lacquered driftwood. Nothing complicated!


- Mirror in the bedroom
A sacred place for any lady is a mirror in the bedroom. Here you can preen and spend the time allotted for yourself beloved. Let's make it cozy! Here are some ideas for you:


Children's room: do-it-yourself decor ideas
Creative and do-it-yourself decor elements for a children's room are a great solution. These cute, pleasant little things will not only decorate the child's room, their creation is a wonderful entertainment for adults and children to spend time together. Catch ideas!


- Panel on the wall of the nursery
Trees, butterflies and other various installations will enliven the room and make it truly unique. When choosing elements and style, be guided by the personality and preferences of your child, consult with him. Then everyone will be happy with the result.


- Baby crib mobile
In order for your baby's dreams to be colorful and the days to be interesting, it is not necessary to buy expensive store mobiles. Just take the base of the old and create beauty over the baby's bed with your own hands!


DIY living room decor
DIY living room decor ideas, one way or another, revolve around the main thing - family values. Let's see how to create such beauty.


- Photo frame on the wall
An interesting solution, especially since it is not at all expensive. Just hang the photo frames in random order, and then just draw on the tree.

Such an exposition will protect your home, fill it with light, comfort and warmth.

- Panel above the sofa
Here, be as creative as you like. Best of all, this design will look at the head of the sofa in the living room. This technique perfectly focuses on the right areas, and complements the interior of your living room.


Another plus: panels can be made from anything and adjusted to your chosen design style.
DIY bathroom decor
What can you do for the bathroom with your own hands? Decorating this room, shells and souvenirs brought from the seas will come to your aid. Let's get a look!
- mirror frame
The accent in the bathroom can be made on the mirror. Decide on the style and concept and decorate, decorate, decorate!

Idea: To give an interesting effect (suitable for a loft style), you can artificially age the mirror. To do this, you will need sandpaper of medium hardness. Just rub the mirror on the back. Look how beautiful it turned out!


- DIY bathroom rug
Bath mats can be made from a variety of materials. Harness, old towels, yarn and even old socks!


Well, how do you like the idea, inspiring?
- Ergonomic decor
This life hack will help you make your bathroom not only beautiful, but also comfortable!

See how easy and beautiful you can arrange the cells for towels, while not spending a lot of money and effort.


Start from the style of the bathroom, think creatively, and sculpt the beauty with your own hands!
DIY decor ideas for the kitchen
The kitchen in the apartment is, first of all, convenience. Each of us needs comfort, especially in the kitchen. Is it possible to unite beauty and convenience? Of course you can! Let's watch!
- Clock in the kitchen
See what beautiful, stylized watches can be made from improvised materials. It turns out that the remains of cereals and pasta can serve not only for their intended purpose.


- Shelves for devices
Comfortable, beautiful and functional shelves can be created very easily with your own hands. See how beautiful they look. And if you put all bulk products in beautiful jars and decoupage bottles, it will be absolutely great!


- Cute vases
Do you see how easy it is to create beautiful hanging flowerpots from waste material? All you need is old bottles, a tourniquet and a wooden structure.


Beauty, isn't it?
Phew! Here are all the cards revealed. We hope that the tips will come to your aid more than once. DIY decor ideas are a bottomless treasure trove of hacks that you can draw inspiration from every day!
Remember that things created with your own hands have a special energy. Surround yourself with beauty, be inventive and creative! Only in this case your house will be filled with warmth, love and unique comfort!
DIY Decor Ideas: 16 Incredible Home Ideas in 85 Photos updated: October 29, 2018 by: dekomin

