Add to the house options. What to make an extension to a private wooden house? Extension to a brick house - differences from previous options
Today we have not an ordinary homemade product, but a very complex project: we will tell you how you can make an extension to the house yourself with the help of straight hands!
First of all, construction begins with a floor plan. Having calculated the required area, I marked the ground with a size of 3 m by 5 m and dug a trench for a strip foundation 50 cm deep and 40 cm wide.Then I laid a bunch of reinforcing rods and welded brackets to the rods. Further in the article there will be a description and photos for what I made these brackets. The process of manual mixing of concrete with a shovel and pouring it does not want to even remember)) I can only say one thing: it would be better if I called a mixer with ready-made concrete and filled it in))). Having exposed the formwork from the boards, I brought the foundation 20 cm above the ground level and leveled it. Cement grade M-400 was mixed with sand screening in a ratio of 1 to 3. The result of strength was impressive.  After the concrete hardened, he proceeded to pour the podium out of concrete to install a gas boiler 1m by 1m in size, laying it in two places with a grid and exposing the formwork.
Filling the staples sticking out of the foundation with concrete, I got pillows for laying floor beams (lag) on \u200b\u200bthem. I needed the braces to prevent the pillows from sinking into the ground and, as a result, from the skewed floors. I arranged them in accordance with the recommendations for floor installation. That is, at a certain distance from each other and strictly in level. 
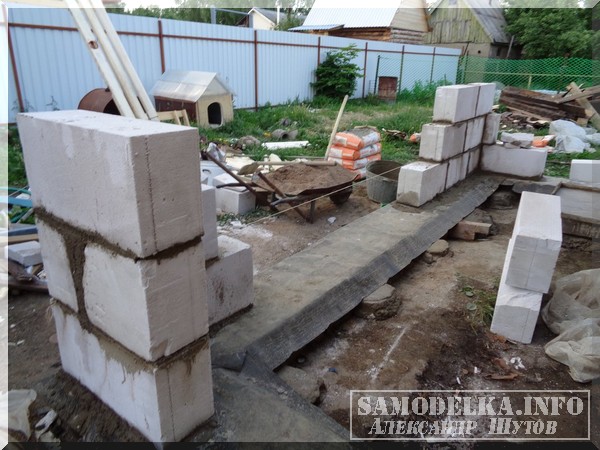
 At this, the foundation work was completed. Then he proceeded to the construction of the walls. First of all, I made the waterproofing of the wall material from the foundation by spreading roofing material over the entire area. After all, concrete conducts moisture very well and if moisture insulation is not made, then mold may appear on the walls, the walls themselves may crack.
  My next step was to mark the wall itself. The distances of the sides from the wall to the opposite wall did not differ and the diagonals of the corners were the same. Having outlined the corners, I started laying foam blocks measuring 20x40x60 cm.
 The plans were for the exterior wall decoration with siding, therefore, with a lighthouse rail and a corner from the siding, I set the block in such a way that after finishing the siding of the extension would not "dance" from the siding of the house. To bond the blocks together, a mixture of cement and sand was used in a ratio of 1 to 3. Special mixes and glue are also sold. Before placing on the mortar, the blocks were soaked in water. This greatly facilitates the masonry process. The blocks were squeezed into place with a rubber hammer.
 Any masonry is erected from the corners, so I was no exception and did exactly the recommendations, adjusted for doorways. To obtain blocks of shorter length, an old hacksaw was used) She did her job perfectly. But there are special saws on sale a.

 To connect the walls with the main house, I made T-shaped brackets from reinforcement and drilled them into the wall with the expectation of hitting the seam between the blocks.
 He erected the walls taking into account the window and door openings using a building level one and a half meters long and a plumb line. Those. the blocks were stacked strictly vertically and horizontally. This is especially important for door and window openings. The thickness of the seam can be used to adjust the height of the blocks relative to each other.

 When the height of the walls reached the required level, U-shaped channels were made from a metal corner measuring 5 cm by 10 cm for stacking blocks over door and window openings. The length of each was the sum of the opening plus 40 or 60 cm for wall mounting. To do this, I put the corners on the block with the long side facing each other and welded them together using a welding machine and fittings to obtain a gap between them. The gap is needed to screw the screws into the blocks during the installation of doors and windows.


 Then he simply put the channels on the blocks and screwed them with self-tapping screws for full fixation. It would be possible to turn them over in a different way and put blocks on top, but I put a board in them from below to fix window frames and doors.

 Having laid the foam blocks on top of the channels, I sawed a 100x150 cm beam and laid it out on top. With 200 mm self-tapping screws, I screwed it to the foam blocks and fastened the bar together with reinforced corners. It is required for ceiling beams and truss systems.


 Having screwed a block of 50x75 mm to the wall of the house. I got support for the ceiling beams. Important!!! For each roof, the thickness of the roof beams and rafters, as well as the distance between them, are calculated individually. Beams 50x75 mm. screwed to the timber with corners.

 Since the height of the extension was the same as the level of the house, after installing the beams, I had to remove part of the slate above the house to obtain a roof slope above the extension. After that, the rafters were assembled. To fasten the rafters, 250 mm nails were used.
 I laid a crate of boards 25 mm by 150 mm in size on the rafters, put heat and vapor insulation on the rafters and proceeded to lay the metal tile.
 The metal tile was bought practically from the factory and had the length I needed. It did not even have to be cut or adjusted to each other in length. Having laid out the sheets on the roof and slipping them under the old slate, I aligned them with each other and the walls. After fastening, I cut off the excess parts of the crate.
 I laid the logs on the pillows, laid the floors from 40 mm thick boards.
 Further doors were installed and
Most projects of individual houses provide only a residential part without additional outbuildings. Over time, residents, in the presence of free space near the house, often need to expand the construct with their own hands or with the involvement of qualified specialists. This can be due to a variety of reasons, for example, an increase in the number of residents living, the purchase of a car, which requires a garage, and other circumstances. An annex is an auxiliary part of a building that adjoins its main walls from one or several sides.
Varieties of attached buildings
The structure can be:
- Open, in the form of a canopy adjacent to the main wall, a summer veranda, a porch or a terrace.
- Closed:
- living room with panoramic windows;
- several additional living rooms;
- kitchen with barbecue and dining room;
- a separate recreation area, a children's play complex or a sports gym;
- insulated garage;
- workshop with pantries;
- sanitary unit with a pool or bath;
- russian baths or saunas, made mainly from wooden logs or beams as an extension to wooden houses;
- greenhouses for year-round growing of vegetables, a greenhouse or a winter garden;
- for placing boiler equipment for heating.
- Superstructure in the form of an attic, provided that the bearing capacity of the existing foundation allows such an increase in load.
Depending on the purpose, a heated, warm extension or without heating is arranged.
Necessary approvals
The project of an extension to a private house can be ordered from specialized design organizations or developed independently. To change the structure of the building, it is imperative to obtain a building permit from the local administrative authorities, which is necessary, as well as for the construction of the main house. The project must be approved by the authorities and fire supervision, communal department. If the distances from the border with neighboring areas, regulated by building codes, are not observed, a written agreement from the neighbors is required, preferably notarized. The illegality of the construction of an extension is also recognized in the absence of the written consent of all co-owners of the building to carry out the work.
It should be borne in mind that a work permit is issued only with the existing registration of rights to own a land plot and a house in Rosreestr, taking into account the state cadastre. In the absence of the necessary approvals, the building may be declared illegal and subject to demolition. It is not necessary to obtain permission to build a simple awning or porch.
Structures and materials for the construction of the superstructure of buildings

The added part should harmoniously fit into the overall interior of the house. A two-story extension to a one-story building will look ridiculous, which will also significantly complicate construction. It is recommended to use for the construction of walls the same materials from which the main structure was built. For an extension to a wooden house, use a tree, and a brick brick. You can use foam or aerated concrete blocks, and for a harmonious combination with the structure of the house, revet them under a tree or brick. A high porch or with a turn, as well as open verandas and terraces, are necessarily framed by a railings.
It is advisable to build the foundation of a major extension to the old house of the same type as the existing one under the main building. Of course, there is no need for a strong foundation to build a simple canopy, porch or open veranda. In most cases, a columnar foundation with a shallow depth of laying or screw piles is sufficient.
For capital buildings and garages, reliable and durable foundation structures are needed. Mostly prefabricated and monolithic tapes or monolithic slab. When using pillars and screw piles, it is imperative that the grillage is strapped, and to protect the space under the floor, it is taken from the cladding with basement siding with basalt mineral wool insulation or other similar heaters. At the top of the foundation, horizontal waterproofing is required from roll-up waterproofing agents (glass insulating, waterproofing, rubemast or roofing material).
A good option is a frame extension to the house. The frame is constructed of wooden blocks filled with insulation (for example, mineral wool boards) and cladding with thick moisture-resistant plywood, OSB boards or other materials. The attached building can be made with window openings. The doorway is more convenient than the internal one, which allows passage into the attached part without going outside. But the device of an entrance directly from the street is also permissible.
The roof is most often arranged with a pitched roof. It is important to ensure that snow does not accumulate at the abutment point, therefore the roof is made with an inclination angle of ≥ 25 degrees. The canopy is most often covered with sheets of monolithic polycarbonate or ondulin.
The floor, depending on the purpose of the room, can be concrete (mainly in garages, workshops and storerooms), wooden, faced with porcelain stoneware or tiles. Warm floors are often arranged.
It is recommended to build the walls of the garage from non-combustible products (brick, concrete or lightweight concrete blocks) with overlapping reinforced concrete slabs or corrugated board. It is imperative to provide a number of ventilation holes.
How to make an extension to a house

Connecting an existing building with an extension is one of the most critical moments in construction. Failure to comply with construction technologies in the abutments will inevitably form cracks with opening to large cracks. This is caused by the difference in the existing loads and the complete absence or slowdown of the settlement of the foundation of the old house.
The attachment of the attached part is performed in the following two variants:
- With an expansion joint without direct contact between foundations, walls and roofs. Recommended for problematic soils (peaty or clayey). A gap is provided between the structures, which is later filled with elastic heat and waterproof materials. It is permissible to lay a board treated with several layers of bituminous mastic. The resulting seam is closed with decorative inserts. It is imperative to eliminate the possibility of the formation of "snow bags" on the roof at the interface.
- Inclusion of all constructs in joint work. The new foundation is being built at the same depth as the existing one. It is used with bases made of soils that are not subject to heaving. The contacting surface of the old one is cleaned of soil, a layer of waterproofing and a notch is made using a perforator. Reinforcing bars are tightly driven into the drilled holes and the holes are sealed. The resulting embedments are connected by welding to the reinforcement cage of the annex foundation, and concreting is performed with careful compaction of the mixture using a deep vibrator. Brick walls are connected in the same way. The rods are positioned every two rows in the seams of the new masonry. Wooden structures are pulled together with steel bolts or studs with double-sided threads, complete with wide washers, nuts and locknuts. To mate the roof, it will be necessary to remove part of the roofing and joint fastening of the rafters and beams of the house and the extension with the addition of new additional nodes and racks. In some cases, it may be necessary to erect a common rafter system or replace it with longer elements.
The second option is more complex, laborious and costly, although it cannot be guaranteed that the joint of the connections will not disperse over time.
Depending on the design, materials of the existing house and the purpose of the attached premises, the foundation type, material and wall thickness, rafter system and roofing materials for the new building are selected.
Before making a decision on how to build an extension, it is necessary to foresee all possible nuances of future construction and to ensure that you are protected from possible administrative sanctions.
Advantages of an annex compared to a detached building
- Reducing the volume of work on the supply of engineering communications (electricity, water supply, heating, sewerage, ventilation).
- Less material consumption and construction cost, since at least one already existing wall is used.
- Rational use of the territory without cluttering up with additional buildings.
- Additional insulation that prevents cold air from entering directly into the house with a decrease in heat losses.
Many owners of country houses and summer cottages from time to time carry out redevelopment of sites with their own hands. But sometimes you have to touch the house. If it needs expansion, then an extension is an ideal option to increase the usable area. Moreover, it can perform completely different functions and be located not only at the main entrance. Extension projects are developed taking into account the peculiarities of their operation.
Types of buildings
Before choosing an extension project with your own hands, you should decide on its functional purpose. Usually the following types of buildings are attached to the house:
For each type of extension, it is necessary to calculate the amount of materials and draw up a plan.
Types of construction of residential outbuildings
There are several basic options for do-it-yourself extensions to the house:

The first option is considered not only the easiest from a technical point of view, but also the most budgetary. He assumes that the roof of the main building remains in place, only slightly lengthening by the size of the extension to the house. The main building is being completed on one side or two. Then a passage is made between them so that the total area of \u200b\u200bthe building increases by the size of the new building.
A mansard-type room will be more expensive, since it is supposed to complete the superstructure.
The third option for an extension to the house with your own hands involves your own roof. The rest of the structure resembles a side structure. A separate roof increases material consumption, so the extension will cost more and take a little longer to build.
The extension of the second floor is carried out only if the foundation of the house allows it. If initially the building was not planned to be multi-storey, then problems with its completion are possible. The foundation may simply not be able to withstand the additional load. In some cases, it can be strengthened.
Designing a new room
By law, any functional room is considered an extension to a house with your own hands. Balcony, loggia, winter garden or an additional bedroom - all this will be considered an extension. Mandatory elements of its design are:
- foundation;
- walls.
Unlike the main building, there may be no overlap. DIY constructive solutions for the roof of the extension are as follows:

It is recommended to erect the foundation of the building separately, since the structures are operated under different loads.
At the design stage, it is very important to consider the compatibility of the new building with the old one. The do-it-yourself extension should not create obstacles on the way to communications that pass through the site. If you plan to make multi-level buildings, then you need to take into account that this will trap snow masses. Therefore, you should additionally strengthen them in order to avoid subsidence of the foundation.
Foundation design
With an increase in the usable area of \u200b\u200bthe existing building in the horizontal direction, it is unprofitable to build a slab or strip deepened foundation. The most economical base designs are:

If preference is given to a pile or columnar base, then additional protection of the lower part of the structure from freezing must be performed. For this purpose, you can use basement siding with an inner layer of insulation in the form of basalt wool or expanded polystyrene.
Wall design
When drawing up an extension project, you should decide in advance on the material for the walls. For a frame or panel construction, a sandwich is used:
- oSB sheets with a layer of expanded polystyrene or stone wool;
- inner membrane for vapor barrier;
- outer membrane for waterproofing.
The laying of lightweight blocks - aerated concrete or foam blocks - will cost a little more. If the latter is preferred, it should be borne in mind that even walls of the highest quality foam concrete are often covered with a network of cracks. Therefore, the facade will need to be plastered on a reinforcing mesh with a special compound.
Roof design
When designing an extension to a house with your own hands, you need to calculate the reliability of the elements of the rafter system, their configuration and choose a step for placing them. If the height of the walls is the same, then the supports can be based on existing load-bearing structures. The rafters of the lower extension to the two-story building should be supported by columns near the walls of the main building.
Most often, the roof slope closest to the extension is dismantled. The elements of the rafter system are replaced with new ones, which have a large length.
Alternatively, you can disassemble the roofing cake, but not dismantle the rafters. For a new building, a pitched roof is being erected. You can strengthen the rafter system with racks.

- IF IT'S LOW SPACE -
The construction of the house has long been completed, and the need to increase the living space has arisen now. Many owners of country houses face such a problem. An extension to a wooden house will help solve this problem without much difficulty.
Our team of builders is engaged not only in the construction of houses, but also warm extensions to the house, as well as a veranda or terrace.
Construction of an extension to the house
The construction of an extension to the house is no less troublesome, as is the construction of the house itself, especially if it is an extension to an old country house or a village log house. Sometimes this entails quite large changes in the design and layout of the house itself. This can be an annex of a veranda, a terrace or a warm living room for any purpose: a bedroom or living room, kitchen, bathroom or toilet. These can be technical rooms - a boiler room or a garage.
Photos of outbuildings to the house that our team built


Terrace extension.
The addition of a terrace to the house does not create big problems and costs. A terrace is an open area - a wooden flooring on a specially prepared base, with or without railings. Free-standing or attached to the main building and serves for outdoor recreation. Maybe under a roof, the main function of which is to protect from rain and direct sunlight.
Veranda extension.
Attaching a veranda to the house is a little more complicated and expensive, since it is meant to be fully or partially glazed, but it also remains cold. The device of the veranda provides additional advantages - protection from wind and rain from all directions. It can serve as a summer kitchen, living room, game room. Usually not heated.
Construction of a warm extension to the house.
The construction of an extension to the house with insulation, for a full-fledged living, is a more difficult costly event. Most often, we have to deal with the construction of an extension to wooden houses. In the process of attaching to a house from a bar or log, when docking to the house, sometimes some difficulties arise that must be taken into account. For the extension itself, the most optimal solution is to opt for a frame wooden wall structure! Possibility of year-round use as part of the main house, heated.
The correct extension to a wooden house is a frame extension.
A frame wooden extension, in comparison with an extension made of a bar or a log, does not give vertical draft of the walls and therefore it can be immediately rigidly attached to the main structure. Frame walls, floor and ceiling are insulated with mineral wool. This design will be the warmest, lightest and most reliable in comparison with other options. And also the cheapest and most practical. Possibility to make an extension immediately on a turnkey basis. Versatility - the ability to attach to any house: wood, brick or blocks. Appointment - any: bedrooms, kitchen, living room, bathroom, boiler room, garage.
The foundation for the extension is another "thin" place. For such an extension to the house, a foundation is required that is more reliable and a pile-screw foundation is best suited for this. In some cases, it can be a shallow strip monolithic foundation.
The cost of building an extension without material, only work!
Estimated - the approximate cost of a frame extension (600x300x250) with turnkey finishing.
- Open terrace from 100 thousand rubles.
- Glazed veranda cold from 150 thousand rubles.
- Residential extension with insulation (100-150-200 mm) from 200 thousand rubles.
The construction of a frame extension to the house is possible at any time of the year!
Our construction team is not only engaged in the construction of wooden extensions to houses, but can carry out a complete renovation and reconstruction of the entire house.
Who doesn't dream of a spacious home? Even the owners of large houses often wish to have even larger properties, let alone the inhabitants of small dwellings, which really do not have enough space. Construction of an extension to an already operated house perfectly solves this problem. The fastest and most budgetary option is wooden frame-based extensions. They are appreciated for the efficiency of construction, as well as for convenience and comfort.
They are especially suitable for houses built from various types of wood or. Such structures are successfully combined with any type of dwelling. Thanks to uncomplicated and original technology, you can expand your home. Such actions are usually taken to equip another room, utility room, to expand or a large comfortable bathroom. Or maybe it will be a wonderful roomy place where the whole family can gather so comfortably?
Simple lintels and posts are made from ordinary planks. They are also used to outline the future and annex. The thickness of the posts and the layer must be equal. The step width between the individual posts depends on the width of the insulation.
For example, if we are making an extension to a wooden house in the north of the country, it is recommended not thinner than 15 cm.This means that the estimated size of lumber should be 0.15 m by 0.15 or 0.10 m.The step is approximately 0.6 m, so as an insulation slab has a thickness of 0.6 m.
Appointment of extensions
Living room
An extension to a house made of a bar of a living room resembles the actual construction of a typical residential building, only of reduced size. This is due to the fact that in the course of work, reliable insulation and high quality of all walls and surfaces of the room will also be required. This applies to floors and walls. The foundation must also be solid to prevent dampness from appearing in the new room.
Particular care must be taken to ensure proper waterproofing and quality. The choice of the foundation should also be approached with all responsibility.
Step-by-step instruction
Strip foundation
Frame walls
Consider the production technology of frame-type walls. This will require:
- floor beams 0.10x0.15 m;
- wooden beams 0.15x0.15 m;
- anchor bolts, self-tapping screws;
- adhesive sealant for wood products.
There are different technologies for equipping roofs. Those who want to make a frame extension often prefer the version of a pitched roof. A similar structure is made of rafters, while it is important to choose the right angle slope correctly.
The slope of the corner can be 25-300: having marked it, a horizontal line is drawn on the surface of the main wall.
A bar is fixed along this line, which will become the support of the upper part of the rafter. And the end of the wall, or beams from an already made frame ceiling, will become the lower support of the rafter. It should protrude about 30 cm beyond the lower support - this will not allow precipitation to fall on the walls of the building. For the installation of rafters, galvanized steel corners are used.
 A more complex version of attaching the frame extension by hand is possible: on the video you can find an option in which the roof slope of the main house is directed towards the erected extension. In this case, the extension beam will simply have nothing to fix it on. We'll have to remove part of the roof from the lower roof row, and only after that use the bare beams in the work.
If you have chosen to cover the roof of a new structure, sheets or frequent lathing are completely laid on the rafter. Needed as well. If the selected roof is large sheets, then the actual rafter system is suitable for them. Waterproofing is mounted on it, then the roofing sheets themselves are overlapped (and fixed with fasteners).
Then they begin to insulate the walls and floor inside the extension itself. Very good for isolation. It fits inside the frame structure, between the beams. On top of it, with brackets, a special vapor barrier film is mounted on the bars.
In conclusion
When erecting a frame extension with our step-by-step instructions, it clearly shows the sequence of actions. At the final stage, at the very end of the work, the walls are finished with slabs, plywood or. If you follow all the technology, use the right materials, then a self-made frame extension will faithfully serve the owner for many years.