We figure out how to make a drywall ceiling with your own hands: tools and installation. How to make a gypsum ceiling yourself Do it yourself gypsum ceiling
Drywall is one of the most convenient and versatile building and decoration materials. It is widely used in the arrangement of walls, various openings, partitions and, of course, ceilings. Among the undoubted advantages of drywall should be attributed to the fact that work with its use does not require the use of any hard-to-reach and complex tools. You can do with a screwdriver, an electric drill and various small devices in the form of a hammer, screwdrivers, etc.
Despite the simplicity and high speed of installation, structures of the most diverse complexity can be assembled from this material. Making a quality plasterboard ceiling on your own is easy. It is enough to understand in detail at each stage of the work and you can save a significant amount on the services of third-party repairmen.

Regardless of the complexity of the future ceiling design, the work can be performed exclusively in warm and relatively dry conditions. Installation of sheets is recommended to be carried out before the finish flooring device is completed.
You should first prepare a detailed sketch of the future interior of the room, considering the features of the furniture and the location of the lighting fixtures, so that the finished lighting is as efficient and economical as possible.

Select the appropriate type of drywall sheet. They are ordinary and moisture resistant. It is recommended to pay attention to moisture-resistant sheets to residents of apartment buildings. If flooding occurs due to the negligence of the neighbors living above, the repair of the ceiling from moisture-proof drywall will be reduced to a relatively small restoration.

In the case of material unstable to water, repairs will have to be performed anew. In private houses, where there is no threat of flooding, an ordinary drywall will be quite enough. It costs significantly less than its moisture-resistant counterpart and significantly reduces the cost of repairs.

Among the advantages of drywall must include the ability of this material to hide even the largest defects of the base. That is, before the construction device does not have to be pre-primed, painted, putty and generally perform any preparation of the draft ceiling with the exception of marking.
What is needed for the installation of drywall?
Prepare everything you need for work in advance so as not to be distracted by this in the future. In the process of preparation, pay attention to such indicators as the volume and complexity of the upcoming work, as well as the available funds. For example, if ordinary home repairs are planned that are carried out at intervals of 5-10 years, there will be no point in buying expensive professional-grade devices. In general, focus on personal requests and affordable money.
Drywall Installation Tools

Preparation of marking for ceiling installation
Correctly performed marking is a guarantee of a smooth and correct gypsum plasterboard ceiling in all respects. It is better to spend more time preparing than spending it in the future on fixing defects. First, a plan for placing profiles, directly sheets and fixtures is drawn up on paper or in a special computer program, and then simply transferred to the base.

Determine the distance between the existing ceiling and the drywall under construction in advance. If only fixtures will be installed, a distance of 80-100 mm will suffice. If, with the help of drywall, ventilation ducts and other communications are hidden, the height should be increased to 200 mm or even more. Focus specifically on your conditions.
The problem of “native” ceilings is that they are almost never even. And in order that the future drywall construction does not have distortions and differences, special attention should be paid to the layout.
Measure the selected distance from anywhere in the base down the wall. Arm yourself with the building level and, focusing on the deferred point, put the same marks on the other walls of the room. It is important that they are located exactly at the same level. Then you just have to connect the marks with a solid line. For this it is convenient to use a rail or any other suitable device.
Also, marking involves drawing straight parallel lines. They need to be drawn along the width and length of the base. These marks will be used to mount suspensions and metal profiles. The traditional width of drywall is 1200 mm. Thus, parallel lines are drawn at a distance of 400 or 600 mm from each other. The marking should be such that the joints of adjacent sheets fall precisely on the metal profile. This will ensure the most reliable fixation of the material.
Ceiling Frame Assembly Guide
The frame is assembled using a number of special materials and devices.
Materials for mounting the frame

First, guides are fixed on the base. Mount these profiles according to the markup created in the previous step. Fixing is done with dowels. It is necessary to fasten every 50-70 cm. Do not forget to control the horizontal installation of the rails using the building level.
Fix the hangers for the main CD profiles. In the case of fastening to a concrete ceiling, use dowels. If the base is made of wood, fixing is performed using self-tapping screws. It is necessary to fasten every 95-100 cm.
Take a strong thread and pull it along the marking flush with the guides. On a stretched thread fasten the main profiles with the guides. For this, screws are used. Ensure horizontal installation with the help of a building level you already know.
In the event that the wall of the room has a length exceeding the length of one main profile, it will be necessary to pair the two products. For this, special connectors are designed. They can be bought at a hardware or hardware store. Transverse metal profiles are connected with longitudinal ones using the so-called "Crabs" and screws every 40-50 cm.

After assembling the frame, be sure to check for evenness and rigidity.. In case of insufficient stiffness, tighten the fasteners more tightly. At the same stage, lay the wiring and install the fixtures for the lighting fixtures. Wires must not be laid in the mounting profiles, they can pass exclusively over the structure.
Sheet Mount Guide
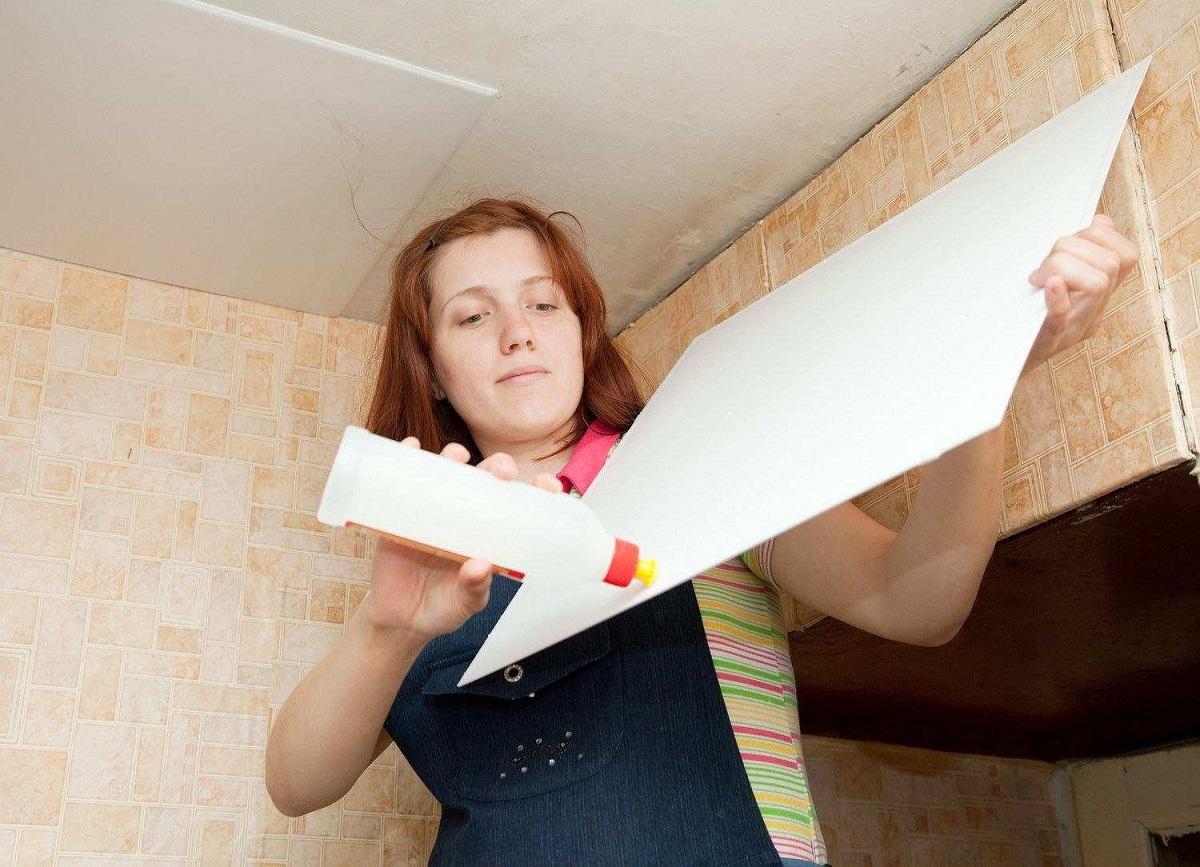
To complete this stage of the work, you will need directly sheets of material, special fasteners in the form of gypsum self-tapping screws with threads up to 25 mm, as well as at least one assistant. The material has a sufficiently large weight, so it will be very inconvenient to hold it only at the expense of its efforts.

Take a sharp knife, or better yet an end planer, and remove from the end of the drywall sheet a chamfer of approximately 2/3 of its thickness. Special care is not required here. You do not need perfect joints, because in the future, the surface will still be putty and all the irregularities will hide.
To fasten drywall to the main profiles, use self-tapping screws. The fastener heads should be slightly buried in the material. The long sides of the individual sheets should converge in the middle of the profiles installed in the longitudinal direction. The technology prohibits the creation of such fasteners in which the joints of the ends will sag. Therefore, under such joints, parts of the transverse mounting profile that are suitable for the length are necessarily fixed.

Drywall must be laid so that on the longitudinal sides they dock with a certain offset. The specific value of such a displacement is not established, the main thing is that there should not be places of convergence of 4 corners on the ceiling at one point.
Installation procedure for the second and subsequent ceiling levels

Arrangement of the second level of plasterboard ceiling can be performed in different ways. This material is versatile and easy to process. With it, you can create the most diverse designs and design options.
Preliminary prepare the scheme future designs on computer or paper. After making all required edits transfer the finished sketch to the main ceiling level. Fix the main profiles according to the previous marking. Do this so that the main part of the second level is connected to the main profiles of the previous level.

Route the wires to the luminaire placement points Open the material according to the desired drawing and attach patterns to profiles using gypsum screws. Use a strip of material of suitable width to close the protruding sections of the part profile. Simply moisten the drywall with water. It will soften and soften, after which you can create the required curved pattern and freely attach it to the profile.
Take a rasp and work on the edges of the structure. Seams must be putty with the mandatory use of reinforcing tape. Otherwise, the joints of the sheets may become cracked. In the same order, the drywall is laid to further levels provided for by your design.
How is an oval plasterboard ceiling mounted?

If there is such a desire, it is possible to easily assemble a plasterboard ceiling with a neat oval shape. The device of such a system is carried out according to a technology already familiar to you, but there are a number of certain differences that must be taken into account.
It all starts with markup. The ceiling oval can be right and wrong. First you need to draw a shape. You can prepare a template for this. In the absence of a ready-made template, you will have to spend a little more time. First you should draw two intersecting circles on the base. The size of the future oval directly depends on the area of \u200b\u200btheir intersection. So, the larger the given intersection area, the smaller the oval you will get.
Mark the center of the base. If you want the oval to be located at some offset from the center, back off the desired distance from the plotted point. A certain distance in the required directions must be retreated from the central mark and the midpoints of future intersecting circles should be noted.
For drawing circles, you can use a homemade compass. To do this, it is enough to take a self-tapping screw, fix it in the center of the future figure, attach a wire to it, the length of which would correspond to the diameter of the circle, attach a pencil or chalk to the second end of the wire and draw a figure. Draw both circles and connect their side parts with straight lines. As a result, you get a finished oval.

At the last stage, the plasterboard ceiling is putty and the finish is arranged at the choice of the owner. Thus, there is nothing complicated in the independent creation of a ceiling structure made of drywall. It is enough to follow the instructions in everything, not to deviate from the recommendations received and no problems will arise.
Have a good work!
Video - How to make a plasterboard ceiling
Drywall is a material that is used in repairs more than often. This is a natural material, strong enough, convenient for various manipulations, suitable for any finish. Plasterboard ceilings you can do yourself, without the involvement of craftsmen.
First you need to think about exactly what the ceiling will be in the room - a diagram, sketch or drawing is required. Then you need to collect all the materials and tools that are useful in the work. And then do the installation of the ceiling.

What you need:
- Guide profiles;
- Ceiling profiles;
- Direct suspensions;
- Crack Connectors;
- Wedge anchor;
- Scissors for metal;
- Self-adhesive sealing tape;
- Dowel nails;
- Water level;
- Painting thread;
- Bubble level;
- Drywall sheets.
In addition, you will need putty for joints, a screwdriver, puncher, self-tapping screws (exactly those with a press washer), acrylic primer, putty knives, tape measure, knife and hammer. Extenders for profiles, heat and sound insulation may be needed.
False Ceiling Installation Technology
First of all, you need to make markings - for this, find the lowest angle in the room. Measure each corner with a tape measure, measure the center of the room with a tape measure too. Make a mark in the lowest corner at a five-centimeter distance from the ceiling. If there are lamps, then step back 8 cm. At the water level, make marks at the same level as the first point on each corner.
After that, make a beating so that all points are evenly connected by a horizontal line. Then try pulling the masking cord between these marks and sharply lower it so that it can hit the wall - then the paint on the cord will leave an even print. Make such lines around the entire perimeter of the room.
Then on the walls you need to fasten the guide profiles:
- Attach one guide to the line, make marks on the wall through the finished holes on this profile. There should be holes along the edges of this profile, and if they are not there, you need to step back 10 cm and make holes yourself. Drill them by marks.
- Glue the sealing tape on the profile, fix the dowels to the wall. Fasten at least three dowels.
- Then mark the ceiling profiles. Due to the fact that the sheet width is 120 cm, profiles are placed at a distance of 400 mm from each other to fix the sheet at the edges and in the middle. Make lines on the ceiling with an interval of 40 cm.
- Since the step of the ceiling profiles is small, jumpers are needed exclusively on the transverse joints of the sheets, exactly every two and a half meters. Suspension pitch for PP should be less than an integer number of times, the best option is 500 mm. But the first row of suspensions from the wall will be two times closer, which means 50 must be divided by 2, which means 25 cm. Well, the second row is 25 plus 50, that is 75 cm. And then a step of 50 cm is observed.
For marking at the right points, a suspension is applied, two marks are made for each suspension under the anchors. Protect your face and eyes from dust that will be during drilling.
Frame: installation of suspended plasterboard ceilings
Suspensions are fastened with anchors. Attach the sealing tape to the suspensions, when you fix the suspension, bend its ends well so that they bend. In the next fastening, they should not bend anymore, otherwise the profiles will fix unevenly.

- Ceiling profiles to suspensions begin to be attached from the corners of the room (to four self-tapping screws with a press washer);
- Profiles are attached to the guides, and so that they do not hang out, take screws that are without a drill;
- After fixing the corners, the center of the ceiling profiles is fixed to the suspensions - check the evenness for a long level, after fixing the suspensions, bend the excess length up;
- The second profile is also fastened, then fasten the profiles on the opposite wall, then go to the center and fasten the remaining profiles;
- Then the jumpers are fixed, they are attached by crabs.
If you are going to make soundproofing, use mineral wool. Vata absorbs sound well, but interacting with it should use gloves and a respirator.
Casing: do-it-yourself suspended ceiling made of drywall
Give the gypsum plasterboard sheets a couple of days to rest, it can only be stored in a horizontal position. Before fastening, it is necessary to chamfer the sheets. Cut the edge with a knife at an angle, this is necessary so that the putty penetrates perfectly into the gap. The chamfer is already on the glued ends.

The fastening of the sheet starts from the corner, the interval between the screws is 200 mm, back off from the edges 15 mm. On the adjacent sheets, screw the screws at different levels, their caps should be recessed. Fasten the sheets to each other in a run, shifting them by at least one cell. They should not be joined closely, a gap should remain around the perimeter of 2 mm. A sheet of drywall is fixed around the perimeter.
If you have external corners in the room, docking the sheet near the corner is unacceptable. If you don’t make a joint at least 10 centimeters from the corner, expect quick cracks. Well, then you can start finishing.
Instructions: how to make a false ceiling from drywall do it yourself (video)
Installing a beautiful suspended ceiling on your own, of course, requires some skills, but it is not particularly difficult. Work with a partner, always have at least 5% of the material in stock, do not violate the instructions, and everything will work out.
Good results!
In the process of creating a functional modern interior, the installation of a plasterboard ceiling plays a special role. A simple, but at the same time aesthetic and practical design, can significantly reduce the time of work, mask surface defects, hide communications. You can install the ceiling with your own hands, observing the installation technology.
The basis of the drywall design - what is included?
Before you begin installing drywall ceiling, you need to prepare the basic materials.
Given that the design consists of a frame trimmed with plasterboard sheets, for its device you will need:
- metal profiles;
- fasteners;
- drywall boards;
- finishing materials.
Metal profiles are the basis of the design. These should be high-quality galvanized metal elements in two versions: guides and ceiling carriers. To connect profiles, use a direct U-shaped suspension, two types of connectors: straight and cross-shaped. In addition, to assemble the ceiling from gypsum board with your own hands, you will need connecting galvanized self-tapping screws and dowels.

The frame is finished using plasterboard ceiling sheets with optimal parameters: length - 2.5 meters and width - 1.2 meters. The thickness of the sheets is from 8 to 9.5 mm.
The classic ceiling drywall is painted gray. In color and thickness it can be distinguished from wall sheets, which are usually thicker. In rooms with increased moisture or risk of ignition, special sheets of drywall are used marked “moisture resistant” or “fireproof”.
Calculation of materials for the ceiling - how to
In order for the installation of drywall on the ceiling to go as smoothly and without interruptions in the process, it is important to correctly calculate the amount of material for the expense of creating the structure. To do this, first of all, the ceiling area is calculated in a standard way - multiplying the width by the length of the room (measured with a tape measure).
To calculate the required amount of the guide profile, you need to find the perimeter of the room. To do this, add the lengths of the walls. At this stage, it is important to measure each of the walls individually in order to exclude possible errors in the process of calculating the desired amount of profile, since the lengths are not always the same.
In order to calculate how much material the mounting of the profile of the carrier type will require, it is enough to remember that the first and last elements are mounted at a distance of 30 cm from the wall, when the distances between the other profiles are no more than 60 cm. The number of the carrier profile is found by multiplying the number of rows by the length the ceiling.

The supporting profile is fastened with U-shaped direct suspensions in increments of one meter. Determining the required number of suspensions is simple if you divide the total length of the profile by one meter.
To increase the rigidity of the frame between the guides and the bearing profiles, special jumpers with a step of 60 cm will be required. The number of crosswise connectors for the jumpers is found by dividing the length of the bearing profile by the mounting step. As for the second type of connectors - straight lines, their number is calculated taking into account the length of the room, since the elements are fixed along the length of the profiles.
The last step - fixing plasterboard sheets also requires accurate preliminary calculations. To finish the frame of the ceiling structure, you will need exactly such a number of plates that is equal to the area of \u200b\u200bthe ceiling. The compensation expense is also taken into account, adding from 3% to 5% of the material to the total quantity.
Marking - responsible start of work
Regardless of the complexity of the design, the initial stage is always marking. Only with the markup can we assume that the technology for installing drywall on a pre-arranged frame is fully observed.

Start by determining the lowest point of the horizontal surface of the ceiling. The easiest way to do this is with the laser level or in the absence of it - ordinary water. In a certain place they put a mark - this will be the height of the plasterboard ceiling. It is important that it is not less than 3 centimeters lower than the lowest side of the base. This will be the bottom of the guide profile. In the case of the planned backlit ceiling, the line is lowered a few centimeters below.
Do the same with the rest of the walls. On each of them put an appropriate mark, again, for reliability, using the level. It is important to ensure that there are no air bubbles inside the level during measurements.
The final stage of the marking is the connection of the intended points with the help of a chopping thread into a solid line and the marking of the lines of attachment of the suspensions on the ceiling surface with a step of 0.6 m
The main stage of the process is the assembly of the frame
There is nothing difficult in assembling the frame with your own hands, if you follow the step-by-step instructions.
Start with the installation of the guide profile along the intended line around the perimeter of the room. U-shaped suspensions are fixed on the ceiling surface. Bearing profiles are cut (1 cm shorter), according to the marking they are fixed in the guides, further strengthening the structure with self-tapping screws.

At the next stage, the suspensions are bent and fixed to the profile, pulling the thread to avoid sagging load-bearing elements.
As soon as the longitudinal elements are finally fixed, cross beams are cut with fixing them with crabs.
The classic profile mounting scheme implies hl joints getting into the middle of the profile, which is possible only if there are a number of crossbars at a distance of 2.5 meters from the wall, which acts as a starting point for installing hl.
Drywall finishing - final step
Drywall sheets are attached to the finished frame with self-tapping screws. It is more convenient to fasten sheets without preliminary cutting, thus reducing the number of joints and seams. In order to properly mount drywall, it is necessary to measure its amount in advance, to prepare sheets on a horizontal surface. The more accurately the installation is performed with the heads of the self-tapping screws drowned in the surface of the hl, the smoother the finished ceiling will turn out. 
An important stage is the filling of joints and seams between the sheets. A responsible approach at this stage will prevent the appearance of cracks in the ceiling during operation. For reliable fixation of the joints, a reinforcing tape is used, over which a layer of putty mixture with a leveling property is applied. As soon as the surface dries, it is additionally smoothed with sandpaper.
In places of contact with the wall, the installation of the hl is carried out using a sealing tape. Fix it before the sheets are fixed. The tape is removed only after filling the gaps with putty mixture. The finished ceiling is primed, treated with putty, sanded, re-primed and only then painted with paint. 
How to install a curved ceiling
The classic installation of ceiling gypsum plasterboard on a frame under a curved ceiling is somewhat different from the previous installation. In order to establish a custom design, follow this algorithm:
- Mount the first tier of the frame in the traditional way, as required by the instructions above.
- Mark the guide profiles around the perimeter of the room.
- On the marking line, profiles ПНх28 × 27 are installed, fixing them with self-tapping screws and dowels.
- The carriers are fixed in pre-installed profiles with suspensions and in increments of 600 mm.
- In areas where a curved profile passes, the pitch is reduced to 400 mm.
- Drywall sheets are mounted on the finished frame so that they extend 10 cm to the curved line of the ceiling bend.
- Sheets are fastened in increments of not more than 250 mm.
- After finishing the first level, a wave line is drawn.
- At a distance equal to the thickness of the sheets from the mark, a curved profile is attached (use scissors for metal to cut the sides).
- Draw the profile through hl to the main frame.
- Any technology from the manufacturer further involves the manufacture of a second-level frame. The more levels are planned, the smaller should be the step of fixing hl.
- The finished frame is hemmed with GKL with a margin of a centimeter for further work with bending.
- Given the direction of the bend, a lower profile is fastened corresponding to the location of the upper line.
- The upper and lower parts of the curved frame are tied with profile stands, trimmed with drywall in a vertical plane. On curved areas, a sheet with a thickness of 6.5 mm is suitable.

The final stage of the installation of drywall sheets is supplemented with plastic corners designed to mask the protruding outer corners of the arcs. The joints are treated with reinforcing tape, putty. The surface of the finished ceiling, as in the case of its classic version, is primed, treated with putty, sanded and painted.
Features of installation of a curved ceiling: what is useful to know
Given that this is not a completely standard solution for a plasterboard ceiling, several important points to consider.
Firstly, a higher level is attached to the frame, subsequently acting as a supporting base for curved profiles of the next level frame.
Secondly, the curved element is fixed through the already sewn drywall sheet to the underlying base frame. If there is no profile in the zone of fixation of the metal arc behind the sheet, then you will need to additionally place a gasket under it to screw fasteners, otherwise the sheet may not withstand the load. Fibreboard, profile or plywood trim is suitable for laying.
Thirdly, there are two ways to bend a profile: wet and dry. The first option is suitable for small bending radii, the second will allow to realize smooth transitions. 
Fourthly, the type of drywall sheets is of great importance. You need to understand that the installation of gvl, suitable for the installation of the ceiling in public places with increased load, is not suitable for the installation of a curved ceiling. To achieve the correct bending of the material, it is better to use sheets with a minimum thickness, additionally piercing the surface with a needle roller.
The easiest way to level the ceiling is to make a drywall hem. Moreover, it is not necessary to build a complex multi-level system, it is enough to make a single-level GKL coating on a metal frame. If you follow the instructions exactly, a one-level ceiling made of drywall with your own hands can be done in a couple of days. It is important to choose and calculate the amount of material correctly, and at the end of the installation, prepare the surface for processing with the selected finishing material. The article will describe: installation technology, pricing for work carried out by professional craftsmen.
If you decide to make a suspended ceiling from gypsum cardboard with your own hands, then first decide on the type of gypsum board and calculate the required amount of material.
Depending on the purpose and features of the processes taking place in it, use one of the following types of gypsum boards:
- moisture resistant products have a characteristic greenish surface and are suitable for installation in a humid room of a bathroom, kitchen, bathroom or pool;
- fire-resistant GCR is used in places with increased fire safety requirements (on stairwells, escape routes, in corridors of public institutions, etc.);
- standard plates have a gray surface and are suitable for installation in residential premises with normal humidity, for example, in a bedroom, living room, study, children's room, hallway or corridor;
- also happens wall and ceiling drywall, the latter has a smaller thickness and weight, so it is more suitable for installation on the ceiling;
- arch GKL is the thinnest, it is used for the manufacture of curved surfaces (when using single-level coatings it is not used).
Important! To calculate the required number of gypsum boards, you need to find out the area of \u200b\u200bthe ceiling. The resulting value is divided by the area of \u200b\u200bone drywall sheet and rounded up to the whole product.
Tools and materials necessary for work
Before you make a ceiling from drywall, you need to prepare the necessary materials:
- gypsum boards;
- metal profiles for the assembly of the frame;
- primer;
- putty;
- screws and dowels;
- necessary components (suspensions, connectors);
- seryanka;
- dowel nails for mounting perforated suspensions;
- self-tapping screws for metal work;
- finishing finishing material (wallpaper, paint, etc.).

Of the tools you will need the following:
- hammer drill;
- drill;
- hammer;
- screwdriver;
- spatulas;
- rollers and brushes;
- primer tray;
- paint grater;
- construction and laser level;
- chopping cord;
- pencil;
- roulette;
- ladder;
- ruler;
- scissors for metal.
Selection of profiles for the ceiling
If you will make a ceiling of drywall with your own hands, it is important to choose the right profiles for the assembly of the supporting frame:
- For the assembly of guide rails on the walls, PN profiles with a section of 27x28 mm and a length of up to 4 m will be needed.
- The main frame is assembled from ceiling PP profiles with a section of 60x27 mm and a length of 300-400 cm.
- In addition to profile elements, direct perforated suspensions, as well as single-level crab type connectors, will be needed.
Surface preparation before installation of gypsum plasterboard
If you decide to make a ceiling of drywall with your own hands, then the step-by-step instructions from our article will help you. Since the surface of the suspended ceiling completely hides any defects and unevenness of the base, it does not need special preparation.

If there is an old coating that does not adhere well to the base, then it is better to dismantle it. Places with mold are cleaned to the base ceiling and treated with an antiseptic compound so that the fungus does not appear again in the future.
At the preparatory stage, engineering communications are laid - ventilation ducts and wiring to the places where the fixtures are installed. In addition, mark the installation locations of the frame elements.
To do this, do the following:
- Find the lowest angle in the room using a laser measuring device.
- A value equal to the height of the lowering of the new ceiling surface is laid down from this angle. The distance can be calculated taking into account the thickness of the frame, the laid communications and the height of the recessed fixtures.
- Using the laser level, the resulting mark is transferred to the remaining corners of the room.
- We connect all the points in the corners with longitudinal lines on the walls using a chop cord.
- On the ceiling surface we mark the installation sites of the PP profiles. Usually they are mounted in increments of 40 cm. We put dots on these lines in increments of 60 cm. These will be the suspension installation sites.
Rail mounting
First you need to assemble the structure of the guide rails on the walls of the room. To do this, drill holes in the PN profile with a pitch of 50 cm. We make extreme holes at a distance of no more than 5 cm from the end of the profile. Then we apply the product to the markings on the wall surface and mark the holes.
We drill holes in the wall using a hammer drill. Then we hammer in the dowel holes and fasten the profile with screws. Similarly, we mount guide profiles on all walls in the room.
Important! After assembling the frame from the guides, the installation of perforated suspensions on the ceiling is carried out according to a pre-applied marking. Each part is attached to two dowel-nails.
Installation of the ceiling profile
We cut the longitudinal ceiling profiles to the width of the room. The ends of one rail are placed in a groove of guides on the wall. In the central part, we fasten the rail to the base ceiling surface on perforated suspensions. We screw the screws into the side shelves, and bend the extra part of the suspension ears up so that they do not interfere with the installation of drywall.

We mount the next profile similarly at a distance of 40 cm from the previous product. Thus, each gypsum sheet will be attached to 4 profiles, which increases the reliability of the entire structure.
On a small area, transverse short ceiling profiles can be omitted. In a large room, they are cut in length and installed in increments of 60 cm between the longitudinal rails. To fasten these parts with the frame, single-level connectors are used. Short rails do not attach to perforated suspensions.
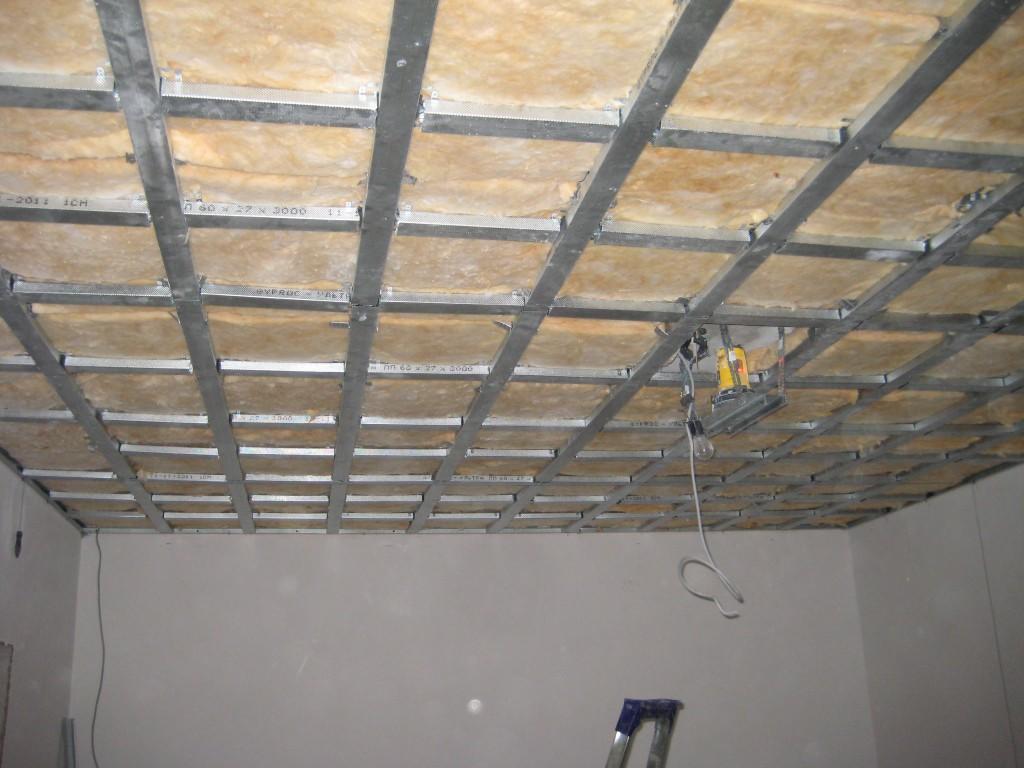
Thermal insulation
If the installation of the ceiling from drywall is carried out with additional insulation of the room, then the installation of heat-insulating materials is performed at this stage. Usually use soft insulators, such as mineral wool. Insulation plates are cut along the width of the step with which the longitudinal elements of the frame are installed, plus 1-2 cm for a tight fit.
The material is laid between the rails so that it is held in place. The ends of the insulation plates are positioned as close to each other as possible so that there are no gaps. To protect the mineral wool from moisture absorption, a vapor barrier membrane is hemmed to the bottom of the frame. The material is laid in strips with an overlap of 15 cm and is mounted on double-sided tape.
Important! A vapor barrier can be attached to a wooden crate with a stapler.
GKL installation
Drywall installation begins to lead from one of the corners of the room. The plate is laid lengthwise on the longitudinal profiles of the frame. Moreover, each sheet should be attached to four PP rails. The product is screwed on with self-tapping screws, which are mounted in increments of 25 cm. The extreme fasteners are placed at least 2.5 cm from the edge of the sheet.

Similarly mount the next sheet, which is laid close to the previous one. The longitudinal joint of the slabs should be in the middle of the ceiling profile. The sheets in the row are cut in width.
Final surface treatment
Plasterboard ceiling decoration needs a finishing decorative coating. Different finishes are possible - painting with interior paint, whitewashing, wallpapering or film.
In any case, the surface of the drywall ceiling must be prepared:
- All seams between the plates must be putty using a sickle. A thin layer of the solution is applied to the seam, the sickle is pressed in and covered with a second layer of putty. The surface is well leveled.
- Places for installing screws are putty.
- After the putty mixture dries, the treated areas are sanded with a fine grain sandpaper.
- The surface is removed from dust and treated with a primer. After the first layer has dried, the second one is applied. Such preparation is sufficient for wallpapering the ceiling.
- If painting will be carried out, then the entire surface is puttyed with a finishing composition, and after it is dried, it is ground. Then the ceiling is once again treated with deep penetration soil. Now the surface is ready for painting.
If the ceiling surface is relatively flat, and you do not plan to install built-in lights and lay engineering communications in the ceiling space, then the installation of gypsum plaster on the ceiling can be performed using frameless technology. In this case, you will not need to assemble the crate from metal profiles or wooden bars, because gypsum boards simply stick to the ceiling with special glue. This installation method can significantly save and speed up work.
Now you know how to make a ceiling of drywall with your own hands. It is much more profitable to install the gypsum board yourself, since the price per m2 of professional installation of drywall on the ceiling is $ 10. If you consider how much the materials and finish are, the total cost can go up to $ 20 per square. That is why installation is best done on your own, and the instructions in our article will help you do everything right.
Really great success nowadays is suspended plasterboard ceilings. Partly due to the fact that the manufacture of such a ceiling is not expensive and relatively easy, so even beginners should not have problems with fasteners and installation of such a device. Installation of a suspended ceiling made of drywall is carried out according to a certain general scheme, which makes its installation even more affordable. GKL construction can be installed in the bedroom, in the children's room and even in the kitchen. In addition, many craftsmen install a false ceiling with their own hands and in garages.
Plasterboard sheets are quite versatile. You can often find not only a suspended plasterboard ceiling, but also plasterboard wall cladding. In order to learn how to make a suspended ceiling from drywall, a step-by-step instruction will suffice.
What is this article about
False Ceiling Installation
False plasterboard ceiling is a structure composed of a single-level or multi-level frame made up of metal profiles that are attached to the ceiling and the walls of the house, as well as of gypsum plasterboards that sheathe this frame. All lamps, chandeliers, light fixtures and other lighting fixtures are built into the structure.
In order to create the frame of the plasterboard ceiling, two types of metal profiles are used. Between themselves they are connected by special metal screws and crabs. If you are creating a two-level ceiling, you will need a special connection.
Surface preparation
Plasterboard suspended ceilings require special preparation of the surface on which they will be installed. You need to remove all the old trim from the ceiling. When the finish is removed, check it for cracks and exfoliated plaster. After the ceiling is put in order, you can putty it and proceed with the installation of the structure.
Project
It is very important to make a project. Plasterboard suspended ceilings - not such a lightweight construction, although an amateur can handle it. The main part of the project is the design scheme. Make a detailed drawing on which all places of fastenings of metal profiles, their sizes, device will be marked. You should get on paper as detailed a scheme as possible in order to have a clear image of what and how you need to do before your eyes. It is impossible to draw up the same scheme for all ceilings, because the situations are different and all the nuances must be taken into account when drawing up a drawing.
The drawing will also help you calculate the final cost of the false ceiling. In the drawing you can see how many profiles will be needed and what size, you can calculate the costs of drywall sheets, and with them the amount of putty for finishing the structure.

Another element of the project, which is also important, but can wait until the structure is mounted. This is a sketch, a sketch that reflects the design of the ceiling. On it you need to depict all the additional drywall pieces that will be mounted on the ceiling, as well as, if necessary, finishing. This will allow you to immediately appreciate how successful the design you have chosen for the ceiling, and whether it fits the design of the rest of the room.
Component Consumption
*Attention! All results are exemplary - accuracy depends on the material of the walls, condition and shape of the room
Markup
In addition to the diagram on a paper sheet, you also need to put an indicative marking of the wall and ceiling. It is necessary to note the length of the frame from the ceiling and put a few notes on the walls. Using the masking thread, you need to connect all the marked points in a line. This line is needed in order to establish guide profiles that will become the foundation of the future frame.
Next, you need to put markings on the ceiling, which will mark the place for attaching the main metal profiles of the frame. Again, using a masking thread, marks the ceiling line. The distance between the lines should always be sixty centimeters, because profiles should be attached at this distance.
Wireframing

We start by installing guide profiles. For this, first of all, it is necessary to drill holes for dowels along the line drawn in advance. Similar holes need to be drilled on the profile itself. In these holes, you need to drive in the dowels and thus fix the guide elements of the frame on the walls.
Next, you need to fix the suspensions. We install them on the planned lines and begin to drill holes through the suspensions into the ceiling. Then we hammer the dowels into the drilled holes, and in this way we fix forty suspensions on the ceiling.

After that, the main frame is attached. The antennae of the suspensions must be bent so that a profile can pass through them. We start a profile in them and fix with metal screws. It remains only to fix the structure with crabs. From whole metal profiles, we cut jumpers of suitable sizes and with the help of crabs we fix them in the frame.
Gypsum plasterboard
Our next step will be covering the ceiling with plasterboard sheets. In order to choose the right material, we recommend that you familiarize yourself with the varieties of drywall sheets. The first type is ordinary drywall sheets, which are gray in color and are used most often. The second type is green moisture-resistant plasterboard sheets. They have a high resistance to moisture and are great for installation in bathrooms and other rooms containing high levels of humidity in the air. The third type is refractory pink plasterboard sheets. They have increased resistance to fire and are suitable for those who want to protect their home from fires or just often work with flammable objects in the room.

We fix the drywall sheets on the frame so that two adjacent sheets are on the same profile, and each sheet is fixed by three profiles. Plasterboard sheets are attached using metal screws. There is one caveat. They need to be screwed so that the head of the self-tapping screw fully enters the plasterboard sheet and deepens in it. If necessary, drywall sheets need to be cut. Fortunately, they are cut very easily, although at the same time a large amount of dust occurs.