Sliding door drawings. Detailed instructions for installing sliding doors for thrifty hosts
In small rooms, every meter of usable area counts. That is why many homeowners are replacing swing doors with sliding doors. Installing sliding doors with your own hands is quite simple. However, the mechanism for such a design costs almost as much as the canvas. Such expenses are justified if it takes up too much space, in other cases it is better to install a swing model.
Sliding compartment doors have very low sound insulation, as they do not fit snugly against the wall. Much better hide the noise of the structure, installed in the pencil case. However, they do not reach the soundproofing of the swing door.
Types of sliding doors
Retractable structures differ in the type of movable mechanism. On this basis, they are divided into rail and suspended. Each model has its pros and cons.
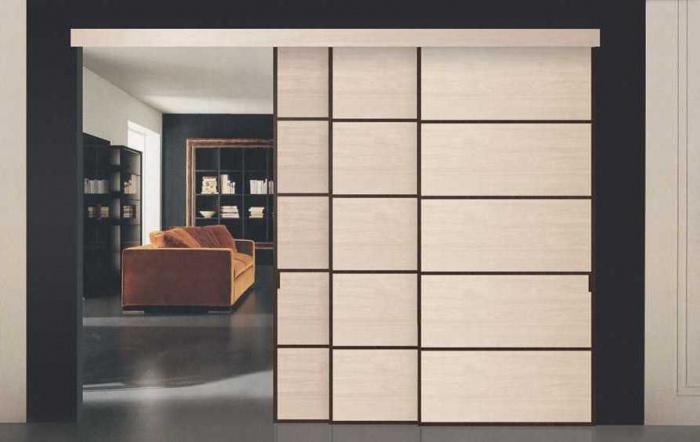
Hanging type model on the top rail
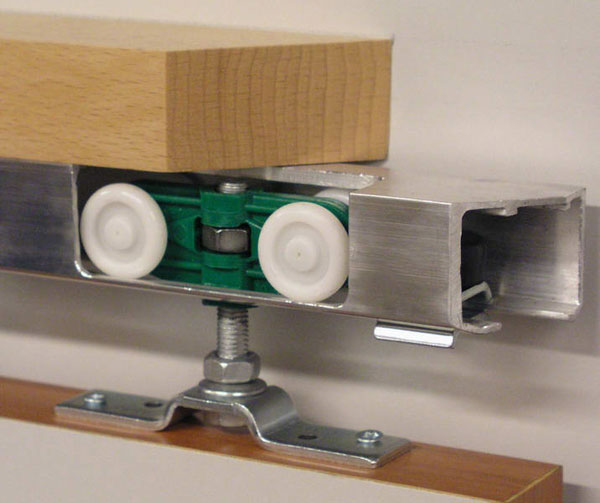
The suspension mechanism consists of a square profile with a groove inside which there are two curved bars. The rollers attached to the product ride along these slats. The guide is made of metal, like the rollers. But they have rubber or plastic pads that provide a soft and quiet ride.

When mounting a sliding interior door on a rail, no fixtures and mechanisms are installed on the floor. All fasteners that are on the canvas are two rollers on top. They move along the groove due to special wheels. Such doors are considered one of the easiest to install. Installing a sliding door includes the following steps:
- installation of a profile rail;
- installation of rollers to the top of the door;
- inserting the product into the groove of the rail;
- installation of valves to limit the movement of rails;
- inserting the lower roller into the groove and installing the door;
- installation of a decorative overlay on accessories.
The door fastener itself is very simple, in addition to the rollers themselves and the rails, the kit includes plugs and fasteners. The product with the top rail has extremely low sound insulation performance. Therefore, it is not recommended to use such structures in living rooms.
Sliding rail structures
There are two mounting rails on the sliding doors. Movable rollers are mounted from above and below. This method of fastening makes the product very stable, so it can be shaken.
Note! Dust and debris are constantly clogged into the metal profile of the fastener, which complicates cleaning in the house.
Mounting options
Regardless of the type of fasteners, the installation of sliding interior doors can be:
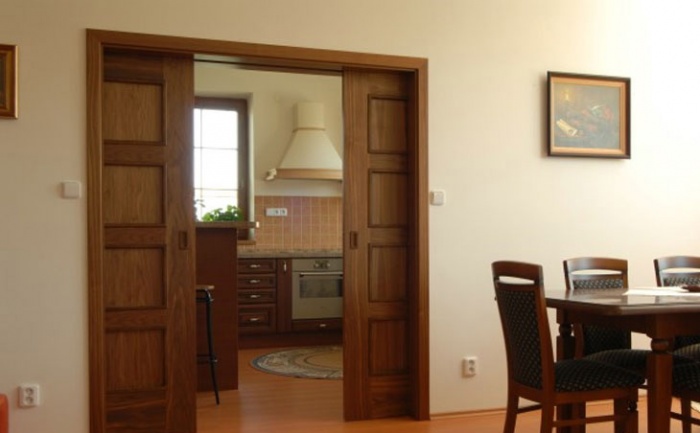
- Kupeynaya. The rollers are installed above the door leaf in the opening. The guides must fit snugly into the groove.
- Cassette. This option is considered the most time-consuming and costly. For the product, a niche is equipped in the wall in which the guide is located. When opening, the canvas is pushed into the wall. Such designs most effectively save space.
- Cascading. Similar designs are very popular in Asian countries. The model consists of 2-3 canvases. One is motionless, while the others ride on the rails and clean up behind it.
If you plan to install sliding doors with your own hands - choose a compartment design. Models have easy assembly and high maintainability. The main feature that is necessary for the installation of an interior door with your own hands is a smooth opening.
You can’t put anything near the wall to which the base of the sliding door is retracted, otherwise the movement of the canvas will be disturbed. A significant disadvantage of the models is their low sound insulation. This is due to the fact that sliding doors are installed with a gap. Without it, the canvas will scratch against the wall.

Cassette structures provide the best access to the space of the room. Inside the niche, you can install soundproof materials that will hide the noise. However, the installation of such a model is possible only at the stage of repair or construction. In addition, a decorative wall is assembled for the rail, and this deprives the rooms of useful space.
Cascading products are a modification of compartment structures. The main difference is the greater number of guide rails. Installing such products is the most difficult, as high accuracy is required. Cascading structures are categorized as premium for their complexity and aesthetics.
Installation Features
You can install sliding interior doors with your own hands even in the absence of specific skills. Installation instructions are included with each product. Following it, you can do all the work yourself. Below, the assembly process is described in more detail than in the standard instructions.

Do-it-yourself sliding door installation
The opening, regardless of the fastener design, the place for the structure must comply with the following characteristics:
- Smooth surface of all planes. The walls of the opening should not have serious drops and flaws.
- High bearing capacity.
- Both the walls and the opening must be pre-finished with a leveling compound and a decorative coating.
After leveling the opening, you can proceed with the installation. The first step is to attach the rollers. Depending on the manufacturer and model, fasteners may have their own characteristics. To assemble some products, you need to step back 15-20 cm from the edge, but most often the rollers are mounted right at the edge.
To begin with, markings are made on the canvas for fasteners.
Important! Make sure that the distance from the edge to the roller is the same on both sides.
At the marking site with a drill, holes are drilled 1 mm smaller than the diameter of the fastener. After the grooves are ready, fix the plates. Self-tapping screws are used as fasteners, their length must be at least 75 mm. The greater the weight of the canvas - the longer the fasteners. Special support holders are mounted in the plates, into which the rollers are inserted. On the sides of the canvas, fasteners must be fixed with plugs.

Pins are included with the rollers. The movable elements themselves are wound on them. If the model is not equipped with handles, they are purchased separately. It is recommended to mount the handles before installing the product in the opening. In a model without a groove, markup is made with a pencil and a carpentry tool removes material along the contour. Fittings are attached to the hole formed.
Note! For sliding doors, only immersion fittings are suitable.

When the canvas is ready, the rail is fixed. The easiest way is to screw the guide to the bar, and not directly into the opening. To do this, take a wooden plank of square or rectangular section with a side of 60 cm or more. The length of the bar should be twice the length of the door itself and a margin of 5-10 cm. A rail is cut along the length of the bar.
The guide is screwed to the bar with self-tapping screws from 85 mm. The minimum number of fasteners is 4, the more often the better. The recommended step between the screws is 10 cm, the same distance is made from the edge of the canvas to the first fastener.
Next, you need to measure the height of the bar. The rail is strung on the canvas rollers and the height is measured. According to this value, holes are made on the wall for mounting the guide rail. The canvas should not stand on the floor. From the floor to the structure itself, a distance of 8-10 mm is left. If there are no coatings on the floor, the thickness of the floor finish is added to the value.
The level adjusts the mark for mounting the bar. For this, fasteners from 12 cm are used, but anchor bolts are more reliable fasteners. Dowels are used in concrete walls.
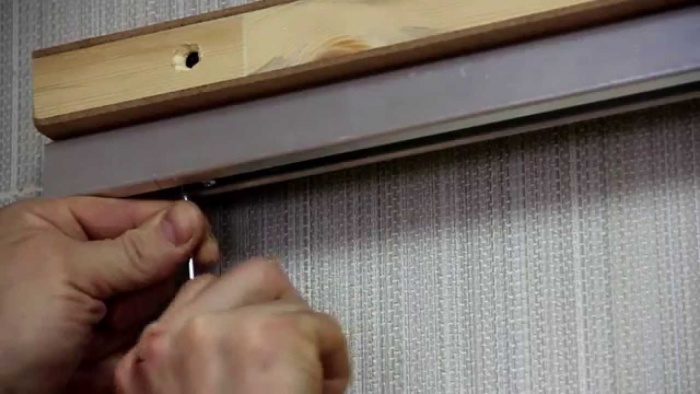
The marking under the guide is made with a thin drill or a nail. After that, holes are drilled for dowels or self-tapping screws and the timber is mounted. The final stage is the insertion of the sliding doors into the rail. After rolling up the structure, plugs are placed on the sides of the fittings, they protect the structure from slipping.
In the open state of the door, a flag roller is screwed onto the floor. It regulates the movement of the web along the vertical axis.
To give the structure an aesthetic appearance will allow the installation of a decorative overlay on the mounting profile. It is placed on finishing nails or self-tapping screws with decorative caps. Screw the overlay directly into the bar.

To install a sliding structure, more materials and tools will be required. If you want to learn how to install sliding cassette doors, watch the detailed video instruction:
Almost any canvas can be attached to a rail, and a sliding door can be designed. But in order for the system to function without failures, it is necessary to install high-quality fittings. Durable fasteners and rollers ensure a long service life of the door. Therefore, saving on accessories is not worth it.
The canvas itself can be made independently. The cheapest option is a bar frame with a plywood or chipboard body. The most aesthetically pleasing look in the interior is a solid product made of solid wood or glued wood. However, the assembly of such a product will cost more. Products from chipboard panels are pasted over with a film or a laminating surface. Wooden canvases can simply be sanded and coated with protective compounds.
It is very difficult to design a roller mechanism on your own. If you do not have a special tool, including cutters, then you will not be able to make accessories with your own hands. It is much easier and cheaper to buy a finished product.
There are few people who want to have an apartment or a house without interior doors. But, almost everyone thought about which doors between rooms are better to install. So that it is both beautiful and functional, and does not take up space.
This is exactly what sliding interior doors are - a slider (diverging, sliding, moving to the side (into a wall, opening, pencil case) in one plane, i.e. doors that ride on rollers, sleds on rails).
Sliding interior doors - pros and cons
From a constructive point of view, there are two types of interior doors:
 In this case, the door leaf is hung on awnings. Swing doors are traditional and have proven themselves well. They give the room a rich look, but take up a lot of space, which leads to inconvenience in the implementation of interior solutions.
2. Sliding interior doors.
A modern solution that allows you to more rationally use the space of the room.
Sliding doors are divided into two subspecies:
 Embedded in the wall(in a pencil case) and working on the principle of a compartment.
Sliding doors hidden in the wall (sliding into the wall, recessed into the wall) have a mechanism that allows you to move the door parallel to the wall.
The principle of operation of sliding doors built into the wall is as follows: rollers are installed on the door leaf, and guides are installed on the doorway (the door will go into the wall) or above the doorway (the door will go behind the wall).
The rollers move along the guides, freeing the doorway for passage.
 .
.
They consist of small lamellas (made of wood or plastic), which, when moved, can significantly save space.
The principle of the device is interesting, but cheap options are not practical. Instructions for assembly and installation of accordion doors are attached by the manufacturer.
The material was prepared for the site www.site
Sliding door advantages:
- unusual, non-standard solution;
- the absence of blind areas and problems with the arrangement of furniture;
- safety. The owner of sliding doors is not in danger of knocking on the corner of the door in an unlit room (but, you need to be careful, children can stick their fingers between the wall and the door);
- such a door will not open with a draft.
Disadvantages of sliding doors:
- high installation cost. But, doing the work with your own hands, the costs are minimized and no higher than when installing swing doors;
- bad insulation. The absence of an obstacle to the penetration of noise, light, odors can be eliminated by installing a felt gasket on the end of the door;
- the complexity of caring for the pencil case, i.e. the place where the sliding door goes with a hidden structure. This problem is solved in two ways. With the help of a vacuum cleaner with the nozzle removed, debris is removed from the pencil case. The second option, more radical, involves removing drywall from one side of the wall. It should be noted that in a residential building, the vacuum cleaner does an excellent job;
- the complexity of the repair. When installing a sliding door yourself, you can buy a few spare rollers to replace them if necessary.
Sliding door mechanism - sliding systems
![]() As you can see, the main difference between sliding doors and swing doors is the mechanism of their functioning, which determines the options for door movement.
As you can see, the main difference between sliding doors and swing doors is the mechanism of their functioning, which determines the options for door movement.
Thus, a sliding mechanism for interior doors can be:
1. Intrawall (hidden mechanism). As the name implies, such a mechanism involves the movement of the door inside the wall. The system of such doors should be implemented at the stage of wall construction, because free space is arranged in the wall - a case for a sliding door. Consequently, the wall becomes thicker by the width of the canister. This somewhat reduces the useful area, but the walls are freed up, near which you can install furniture, hang pictures or put flowers.


2. External (open mechanism). This sliding door system can be installed at any time, because does not require rebuilding the wall. In this case, the door moves along the guides along the wall. Therefore, you need to leave free space on one or two sides of the wall (depending on the number of doors and the direction of their movement).

It should be noted that there are a lot of options for door movement with an external mechanism (see diagram). That allows you to choose the best method for a particular room. Sliding doors, consisting of four leaves, deserve special attention. Here, the inner doors open towards the outer ones. What is especially important when you need to close a wide doorway or niche.

Guides for sliding doors
The last thing worth stopping at before starting the installation of sliding doors is the guide rails (profiles) along which the door moves during operation. They can be placed on top or bottom, or on both sides.
- top guides. The most popular way. They should be used with a small weight of the door leaf. Guides located at the top function longer and are less at risk of breakage;
- bottom guides. They are rarely used on their own, as they are easily deformed by simply stepping on them. In addition, the runners will need constant cleaning. And a door devoid of an upper support will not slide smoothly;
- combined. Used when doors are heavy or for smoother opening.
In this article, we will consider how to install sliding interior doors with an external sliding mechanism.
1. Material
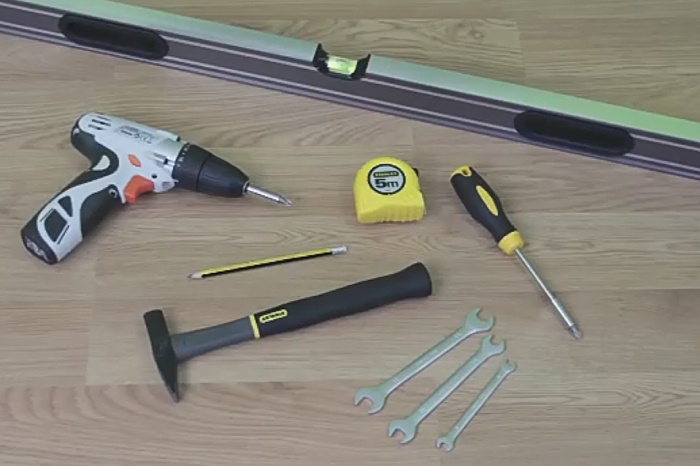
Knowing everything related to the types and mechanisms of the functioning of the door, you can proceed to the purchase of material and the preparation of the tool.
We will need:
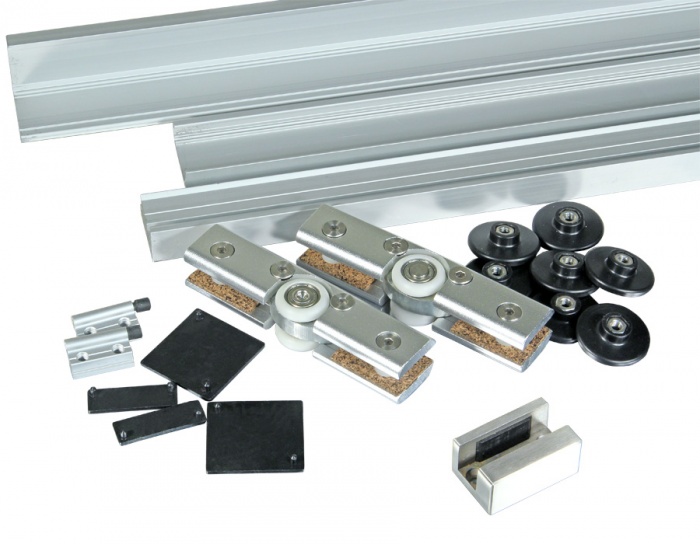
- the door itself (canvas, box, platbands);
- accessories (guide profiles (runners), rollers, handles, locks);
- timber 50x30 for fastening the guide.
- hardware for fastening;
- level;
- roulette;
- hacksaw with fine teeth;
- drill;
- chisel.
Advice. With a door weight of more than 27 kg. you need to use 4 rollers, for a lighter one, two are enough.
So that handles and locks do not deform the wall and do not spoil the wallpaper when moving apart, it is worth installing hidden options, i.e. the ones that hit the door.
2. Preparation
At this stage, it turns out exactly where the door will be installed, and in which direction it will open. If two sliding doors are installed side by side, then you need to consider the convenience of opening them.
Advice. Sliding doors can be hung on common long upper skids or hidden in one pencil case. In this case, the width of the pencil case should be sufficient.
If necessary, the old door is dismantled, and the doorway is brought to the desired state and the door frame is installed, taking into account the gap between the door and the finished floor.
Advice. For residential premises, the gap should be 10 mm. If the finished floor has not yet been poured (laid), then you need to take into account the height of the screed, leveling and the thickness of the floor covering.
3. Interior doorway
- We determine the dimensions of the doorway - the height and width of the door are measured.
Advice. It is better to take measurements at several points (top, middle, bottom). The door height is interchangeable in the closed and open state. This is necessary to take into account possible irregularities on the floor.
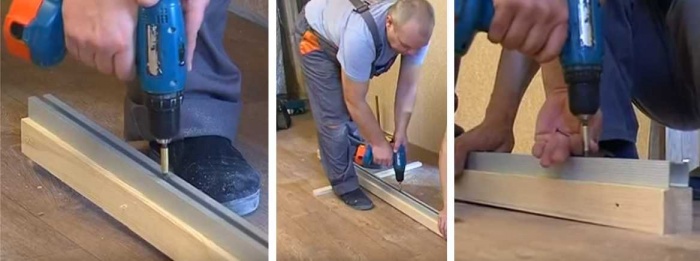
- The beam is installed. To do this, draw a straight line over the top edge of the box. The distance from the box to the line is equal to the width of the guide. A bar is attached exactly to the line. In this case, the middle of the timber should be located above the right side of the interior door frame if the door opens to the right.
Advice. The width of the beam must be sufficient so that after installing the platbands, the door can be freely closed.
- Upper guide profiles for sliding doors are installed. The skids are mounted on a beam and fastened with hardware.
Advice. To check the correct installation of the skids, you need to run a roller over them. With unhindered sliding, you can proceed to further work. If problems arise, it is best to remove them immediately.
- The lower skids (rails) are installed. To do this, you can choose one of several options:
- a part of the subfloor (or parquet, laminate, tile) is selected, and the lower guide is inserted there. The lower rollers will move along it;
- the guide is installed directly on the floor (parquet, laminate), and in order not to destroy it, a threshold is set;
- installation of the guide knife. But, since the system of lower guides is rarely used, if necessary, the so-called package knife is installed more often. Its purpose is to hold the door and prevent it from deviating from the given direction of movement.
The non-threshold sliding door system makes it possible to realize the operation of the door without destroying the floor covering (no need to lay rails). The mechanism works thanks to carriages with rollers on ball bearings, which move along guides with shock absorbers and bottom supply. The upper guide is hidden behind a decorative trim, in the same color as the door.
4. Assembly of sliding doors
We hang rollers (roller mechanism) on the upper end of the door.
At the bottom end, at a distance of 15 mm. holes are drilled from both edges. A groove is selected between them along the entire length. Its width is 2 mm. exceeds the width of the knife. The depth is equal to the height of the knife and is usually 10-18 mm. Part of the butt without a groove will play the role of a natural door stop.
5. Installation of fittings for sliding doors
Installation includes the installation of handles and lock tie-in. This must be done carefully so as not to damage the appearance of the door. Often this procedure is entrusted to specialists.
6. Installation of a sliding interior door
The door is installed in the rails. After the door has been moved, limiters (rubber shock absorbers) are inserted into the skids, they will not allow the door to “fall out” of the guides when opening and soften the stop.
7. Sliding door decoration
To make the doorway look beautiful, you need to close all the structural elements. For this, platbands are used. They are mounted on the door frame and upper rails.
But, this is not a prerequisite, because often the structural elements are an integral part of the solution. For example, when using high-tech or modern style.
The installed door in the section will have the form shown in the diagram (drawing).

Instructions for installing sliding interior doors video
8. Care and maintenance of sliding doors
In order for the doors not to create problems during operation, you need to properly care for them. For this you need:
- avoid getting water on the door so that it does not lead (if the canvas is made of wood);
- keep the guides clean. Debris trapped inside the guides will cause the door to close with difficulty;
- close the door gently. Do not close the door with force, this will accelerate the wear of the rollers. In the worst case, the limiter may fall out and the door will “fly out” of the guides;
- check the condition of the hardware from time to time. It is easier to replace the rollers in time than to deform the guide profiles over time;
- use special products for the care of the door and glass.
Conclusion
Proper installation of sliding doors between rooms and timely replacement of component parts is the key to the long-term functioning of any door.
Interior doors are one of the key elements in the interior of a house or apartment. Installing door structures allows you to solve several problems at once: isolate a particular room from other rooms, increase its level of comfort by protecting it from noise and drafts. Modern manufacturers offer the consumer door structures in a wide range of types, and one of the most popular solutions is interior sliding doors.
The key difference between sliding doors and other types of products is how they open and close - the slider simply moves apart, moves to the side or diverges. In the article we will talk in detail about the advantages of sliding doors, their features, and also give step-by-step instructions for self-assembly of structures.
Types, pros and cons of sliding interior doors
The demand for sliding interior doors among buyers is growing and this is due to the fact that their installation in the interior allows rational and ergonomic use of living space, which is especially important for rooms with a small area. Sliders are graded into several separate varieties:
- structures built into the wall. Their installation involves the installation of rollers on the door leaf and guides on the wall or doorway. Such sliders open and close similarly to compartment doors, that is, when the rollers move along the guide elements, the doorway will open to enter or exit the room.
- Accordion sliders. Doors of this type are made of small-sized lamellas, which, when folded, open the entrance to the room.
Sliding accordion doors are an interesting option for a modern interior, but it is extremely important to choose a design made of high quality and good materials, otherwise the product will quickly fail and lose its useful functionality.
Before deciding whether you will install interior sliding doors in your home, you should study in detail all the pros and cons of the structures. The advantages of sliders include the following characteristics:
- The originality of the solution, allowing you to create an ultra-modern interior;
- Space saving;
- Safety in operation;
- Reliable room insulation.
Cons of interior sliding doors are also available. In particular, it should be borne in mind that their installation is not an easy and rather expensive process, and the design itself and its elements will require regular maintenance.
Features of the functioning mechanism
In order to install interior sliding doors with your own hands with high quality, it would be advisable to study in detail the mechanism of operation of structures in advance, which can be:
- Hidden type. Movements to open and close the door will take place in the intra-wall space, and therefore the mechanism will need to be installed at the stage of wall construction by installing the door case inside.
- Open type. Doors with such a mechanism can be easily mounted at any stage of repair and construction, including the finishing stages. Installation of the product will not require adjustments to the wall structure, since the movement of the web will occur along the guide elements located along the wall surface.
Doors with an external functioning mechanism are presented on the market in a wide range, which gives an excellent opportunity to choose the best option for any interior style and room dimensions.
Having decided on the type of door according to the mechanism of operation, it is also important not to lose sight of the moment for the selection of guide elements - profiles along which the door leaf will move during operation. Profiles can be mounted in different areas of the doorway - in its upper or lower part, on both sides at once.
The easiest option is to install the sliding door on the skids placed at the top. Profiles mounted in the upper part of the opening have a fairly long service life, since they are less susceptible to mechanical damage. However, this arrangement of elements is suitable only for door structures of low weight.
Roller for sliding doorsFor heavy doors, it is better to use a combined version of the guides, which also give a smoother run of the blade when opening and closing, but the installation of guides at the bottom is rarely used, since the skids mounted in this area are quickly deformed and require constant cleaning.
Step-by-step guide for self-assembly of sliding interior doors
Below we provide detailed instructions for self-installation of doors with an external functioning mechanism. The process of preparing for installation work always begins with the acquisition of material and the collection of tools that may come in handy. It is worth preparing in advance:
- The door structure itself with all accessories;
- Door fittings - profiles, locks, handles, rollers;
The number of rollers is determined by the weight of the door - if its indicator exceeds the figure of 30 kg, then it is advisable to use four rollers. It is better to purchase locks and handles of a hidden type in order to avoid damage to the finishing of the walls in the course of work.
- Bars with a section of 50x30 for fixing the runners;
- fasteners;
From the tool in the installation work, a level, tape measure, hacksaw, drill and chisel will come in handy.
Training
At this stage of work on the installation of an interior sliding door, it is important to accurately determine the place of its installation and the side of its opening. After measurements and calculations, the old structure (if any) is dismantled from the opening, and the opening itself is cleaned of debris, dust and dirt, after which a box is installed in it.
When installing the box in the opening, do not forget about the need for a technological gap between the door structure and the floor surface. If the floor in your house is completely done, it will be enough to leave a gap of ten millimeters high before the final finishing layer under the gap. If the finishing of the surfaces is yet to be done, it is necessary to add the height of the screed and the thickness of the surface finish to the height of the gap.
Opening work
This stage begins with measurements - you should determine the height and width of the door structure. To obtain accurate indicators, measurements are taken at several points at once - at the top, in the center and at the bottom. The height of the structure is measured in two states at once, closed and open, this approach to measurements will take into account floor irregularities and avoid errors when installing the door.
Next, you need to strengthen the bars. They are installed along a line that is drawn directly above the top edge of the box. The center of the installed timber should be above the side of the box that you choose to open the door. That is, if the door opens to the right side, then the center of the bar should be on the right side of the box.
After fixing the beam in the selected area, the upper guide elements are mounted. They are fixed on the bar with fasteners. A simple test will help you make sure that the guides are fixed correctly: run the roller along the profiles and if it moves freely and easily, you did everything right!
Installation of the lower guides can be carried out in various ways:
- The institution of rails in part of the subfloor.
- By installing elements directly on the floor surface, followed by closing it with a threshold. The threshold will protect the skids from mechanical damage.
- Installing a bag knife that will support the structure and ensure its proper movement.
Another option is a non-threshold system with carriages and roller elements. It is optimal, because the door structure will move easily when opening and closing, there is no damage to the floor covering, and there is no need to spend time installing the rails.
Assembly and installation phase
To assemble a sliding door, you should first install a roller mechanism on it in the upper end of the structure. At the bottom of the product is done. To properly make a groove, you need to drill holes on both sides, at a distance of about 15 millimeters from the edge. Between the finished holes choose a groove with a depth of ten to eighteen millimeters.
Having finished with the fittings, you just have to install the door into the opening into the guides. Having put the structure in place, be sure to check its progress and, if everything is fine, insert rubber shock absorbers into the profiles, which play the role of limiters that hold the door in place.
They complete the installation of an interior sliding door by masking all noticeable structural elements. For this purpose, decorative platbands are used.
As a conclusion
Interior doors are a beautiful and functional element of residential interiors, which can last for a long time, provided that the structure is properly installed and regularly maintained. There is also nothing complicated in installing the product - you just need to spend time studying some of the features of the work and have basic skills and knowledge in the field of home repair.
We hope the article helped you learn useful details on the process of self-installation of interior sliding doors, and now you will be able to easily do this work on your own, without the involvement of professional craftsmen.
In an effort to free up the space of a small apartment to the maximum, the owners even redo the door blocks. One of the smart solutions is the installation, the sash of which rolls back behind the wall without forming a dead zone.
The main difference between sliding systems is the working mechanism. Traditional loops are replaced by rollers. The canvas moves along the rail. The rollers can be mounted only on the top of the sash or at the same time on top and bottom. In the second case, the load is evenly distributed on two rails. The life of the mechanism increases, but there is one drawback. The lower element is often clogged with dirt. If it is not cleaned, the sash will jam.
Do-it-yourself installation of interior compartment doors with your own hands is not difficult. The main work is the correct measurement, installation of the roller mechanism, guides, hanging the door leaf. The sash is suitable from,.
There are two types of retractable structures:
- the sash goes behind the wall;

- the canvas goes inside the wall.

The second option is more convenient, but difficult to manufacture. The system provides for the assembly of a canister installed instead of a partition.
The popularity of sliding structures is due to the large number advantages:
- saving usable space due to the absence of a dead zone;
- creating a beautiful modern style;
- simple installation;
- single-leaf or double-leaf design allows you to close the opening of any width;
- increase the service life of the door block due to the uniform distribution of the load along the rail.
disadvantage a decrease in the level of sound insulation and tightness is considered. A gap of about 5 mm is formed at the top and bottom of the door structure, through which extraneous sounds and odors enter the room.
What is needed for installation?
Having decided on a do-it-yourself installation, you need to know which ones will be needed materials:
- Railing. It is a beam fixed with anchors to the wall surface. Usually a wooden beam with a section of 50x50 mm is used. A rail is fixed to it.
- Mechanism. The set includes rollers, limiters, guide knife, rails.

- Accessories. For sliding systems, special mortise handles and locks are produced.

- Sash, .
From tools you will need a drill, screwdriver, screwdriver, jigsaw, level, tape measure and pencil.
How to install sliding interior doors with your own hands?
The installation of sliding interior doors is started after the alignment of the walls. The room should have a finished floor and the verticality of the doorway should be checked. If there is no floor covering, then when taking measurements, take into account its thickness.
The main problem of how to install is the difficulty of mounting the top beam and rail. The railing must be ideally set in level and height, fit snugly against the wall, securely fixed with anchors.
Before the start of installation work, it is determined in which direction the sash will roll back. If there are two products, then provide free space on both sides of the opening.

The sliding door installation instructions consist of the following points:
- beam installation;
- rail fastening;
- assembling the mechanism and hanging the canvas;
- fittings installation;
- decorative trim.
Beam installation
The beginning of installation involves marking the wall for the top beam. The sash is tightly leaned against the opening. Taking into account the width of the rail and a gap of 5 mm, the border of the beam location is marked on the wall. The fabric is set aside. A horizontal line is drawn along the mark.
For a sash opening to the right, the beam is positioned so that its middle is above the right side of the box. The level is set horizontally. Holes are drilled in the beam and wall and securely fastened with anchors of the upper beam.

Mounting the guide
When installing sliding doors, the upper rail is screwed with self-tapping screws to the lower plane of the beam. For convenience, it can be fixed to the beam in advance. After fixing, the rollers are inserted into the rail and run to check the smooth sliding.

If the installation of the interior provides bottom mount, then the installation of the guide is performed in three ways:
- A groove is cut in the floor covering. The lower rail for rollers is immersed inside.
- The guide is fixed from above to the floor covering without cutting a groove. Both sides are closed with a threshold.
- The guide is installed on the end of the lower part of the sash inside the pre-cut groove.
The third method is suitable if a guide knife is used instead of the lower rollers, which simply holds the opening blade. The element is fixed to the floor covering.

How to assemble sliding doors?
Begin the assembly with the installation of rollers. The location is chosen according to the manufacturer's instructions. The rollers can be installed with a distance of 1/6 of the sash width from the edge or directly on the edge. In the second variant, the indentation is formed by the mounting plates.
At the end, mark with a pencil a place for rollers. You can pre-drill holes for free entry of hardware. Mounting plates are screwed with self-tapping screws at least 70 mm long. Threaded supports, side covers are inserted into them. A platform of rollers is wound onto the thread of the pins.

If a guide knife is installed on the rollers from below, then a groove is made at the end of the blade 2 mm wider than its thickness. The rail itself can not even be installed. The depth is usually 10 to 18 mm. The groove is not chosen for the entire width of the end of the web, but a section without a slot of about 10 mm is left at the edges. These will be the limits.
At the end of the assembly of the mechanism, they begin to install the sliding door with their own hands on the prepared guides. The product is rolled along the rail to check the progress.
Hardware installation
The final installation of a sliding door with your own hands is the installation of fittings. It is more convenient to fasten all elements before hanging the canvas. First you need to install a door limiter in the skids - a rubber shock absorber. The sash is once again checked for free play, the places for the handles and the lock are marked, and the canvas is removed from the guide.

Grooves are cut out for fittings. Cutting wood is usually done with a chisel. Partially helps drilling. After installing the handles and the lock, the sash is hung back on the guide.
opening finishing
Upon completion of the installation of hinged doors, they begin to decorate the opening and. Elements give a complete look to the structure. In order to hide the mechanism, an additional board is attached to the timber.

Care and maintenance
In the process of using a sliding structure, it may be necessary to adjust the web if sagging is noticed. To eliminate the defect, remove the upper extension. There is an adjusting screw on the roller. It must be scrolled, at the same time checking the elimination of sagging of the canvas.
Care of the sliding system involves cleaning the guides from debris. The rollers are lubricated, and when worn, they are replaced. The sash closes smoothly. With sudden movements, the rollers may fly out of the guide.
How to remove compartment door?
How to remove the sash depends on the type of sliding system. If there are rollers with one wheel on top, and a guide knife on the bottom, then the blade is slightly lifted so that the knife comes out of the groove. The bottom is pulled over. Under an inclination, the canvas is lowered to the floor. At this time, the rollers should come out of the guide.
If there are double rollers on top and bottom of the sash, then the limiters are first unscrewed. The door leaf is simply rolled out of the guide. Sliding systems of premium class are equipped with a door closer. The fastening of the mechanism is unscrewed only from the canvas. The closer remains hanging on the door frame.
The sliding system is convenient to use and easy to install. If you follow the rules of operation, high-quality rollers will last for many years.
There is an opinion that do-it-yourself sliding doors at home is not realistic, but this is not so. A sliding door is not such a complicated thing, and then we will talk about what retractable doors are, go through the pros and cons of compartment doors, and most importantly, step-by-step instructions will be given on how to make a sliding door with your own hands, and in 2 versions.
Sliding structures in houses are not only beautiful, but also convenient.
The question of how to make sliding doors is just right to ask when you know what you want, so first let's figure out what they are like:

The harmonica looks original, but it is not very convenient to use.
The accordion sliding interior door consists of a certain number of sections connected by hinges, which are folded according to the accordion principle. It makes no sense to manually assemble this design, firstly, there is a lot of small and precise work, and secondly, the system is inconvenient to use, plus, a completely shifted package takes up part of the doorway.

Cascade sliding structures.
A cascading sliding structure is called several door panels that slide and hide behind each other. The whole point is that the canvases, no matter how many there are, move apart synchronously, and you can’t do such a sliding door mechanism with your own hands, and installation there is far from the easiest.

Retractable radius design.
Retractable radius design is aerobatics in this niche. You should not even try to make such sliding doors with your own hands, because almost all the details of radius doors will have to be ordered individually. Agree, it would be a shame to pay money for the order, and then break the doors, trying to install them yourself.

Making interior compartment doors with your own hands is quite realistic.
Sliding compartment doors are the best option for a home craftsman. Such a door can be single-leaf and double-leaf. The mechanism for sliding compartment doors is simple, but reliable, in short, guides are installed on the wall along which the doors move.
- Hidden doors that hide in the wall;
- A door that slides along the wall.
But this is not true in principle, because the drawings, diagrams and device of the structure itself are identical in both cases, the door slides in the same way, the roller mechanism is the same. The only difference is that a drywall box is mounted next to the door leaf, in which the canvas is hidden.

General scheme of hidden sliding doors.
Interior doors differ from similar structures in sliding wardrobes only in a more powerful mechanism, because the canvas is much heavier here. Therefore, it is not so important that you mount the sliding door with your own hands on a cabinet or on a doorway, the technology is almost the same.
We figured out the main differences and the choice of design, now let's talk specifically about how to make do-it-yourself compartment doors.
Two options for self-arrangement of sliding doors
Do-it-yourself sliding interior doors can be made in different ways, more precisely, for different rooms. Plus, the size of the budget plays a significant role, it is one thing to assemble doors for a small cottage with seasonal living, and quite another to make sliding interior doors for a city apartment.
Option number 1. A solid door for an apartment
In this case, we will learn how to properly install sliding doors on rollers with our own hands.
You need to forget about home-made mechanisms right away, we are talking only about the installation of ready-made systems. Of course, such designs are sold with a description, but there are nuances that are not in the description.
To install sliding interior doors with your own hands, you need a tool:
- Hammer drill or electric drill with impact function;
- Hydraulic level;
- bubble level;
- Screwdriver;
- Roulette;
- A set of open-end wrenches (from No. 5 and above);
- Manual frezer;
- Hacksaw for wood;
- Hacksaw for metal;
- Pencil;
- Hammer.

We proceed from the fact that the door is made from ready-made units, that is, we have a door leaf, guides, rollers, stops and other door fittings. The only thing you will need to buy additionally is a wooden block 50x50 or 50x70 mm.
Even before assembling a sliding door and even before going to the store for accessories, you need to make sure of fundamental things:
- Check how smooth your opening is, if there is a skew, take a wide canvas (with a margin);
- Make sure the wall can withstand the load. It is better for an amateur to work with a brick or concrete wall, leave foam concrete and plasterboard false walls to professionals;
- Absolutely all finishing must be finished. Door assembly is done at the very end.
How to make a do-it-yourself compartment door:
There are many models of rollers, we are interested in mechanisms on a carrier platform with the ability to adjust the gap between the blade and the guide profile.
Wide platforms are mounted on the edge of the canvas, but if the canvas is more than 80 cm, then you can step back from the corner by 1/6 of the door width.
Using a tape measure, we calculate the center and, by attaching a roller platform to the end of the canvas, we mark the entry points of the self-tapping screws.

It’s not worth driving the self-tapping screws on the markup right away, you don’t know what quality the plate is, when screwing the self-tapping screw “on the live” it can crack. Therefore, first drill holes, the drill diameter is about 2 mm. Next, attach the bar and screw in the screws.

Now insert the carrier plate itself into the grooves of the roller bar, equipped with a rod for the roller. In this case, the plate is fixed on the bar by screwing the stem a couple of turns (open-end wrenches come in handy here).

As you can see in the photo, the stem is equipped with a thread, we need to wind the rollers onto this thread. Of course, there is the possibility of adjustment, but the thread must enter the roller by at least 3 - 4 turns. It is better to count the revolutions, so that they are approximately equal on all rollers.

In order not to work later on, it is better to embed handles and locks immediately, especially when it comes to hidden handles, as in the photo. All such grooves in the canvas are cut with a manual milling cutter.

With the rollers and fittings finished, now we move on to installing the guide bar. The guide bar itself is metal, we will mount it on a wooden block. It is important here how to calculate the cross section and length of the bar.
Don't worry, we only need a tape measure and a pencil to calculate. If your doorway is simply plastered, without platbands, then you can take a bar of 50x50 mm. The platbands will take at least 10 - 15 mm, so under them you need to take a bar of 50x70 mm.
As for the length of the bar, it is calculated as 2 widths of the door leaf, plus another 50 mm for stoppers.

Now we lay the guide on the bar and fasten it with self-tapping screws in increments of about 200 mm. The holes in the guide are drilled in the bottom, that is, so that the head of the self-tapping screw does not protrude from above, otherwise the roller will begin to cling to it when moving.

Next, we hang the structure. It is enough for a professional to make a measurement once, after which the craftsmen fix the timber separately, and then hook the doors onto it. It is better for an amateur to try on assembled doors; for this, we put the rollers into the guide.

To make the measurement more accurate, you need to insert a wedge between the door and the guide bar, preferably not even one.

Above the bar you need to put a mark on the wall and already from this mark step back up at least 7 mm, plus the thickness of the carpets, if any are planned
Holes in the bar must be drilled immediately. The step depends on what exactly you will hang the structure on. For anchor bolts with a cross section of 6–8 mm, a pitch of 50–70 cm is sufficient, and for long self-tapping screws with plastic dowels, holes are drilled at a distance of no more than 25 cm.
We make markings on the wall through the bar. The photo below shows how the craftsmen drill the wall without removing the doors, we do not advise you to do this. We have the markup, now you can remove the door, attach the bar to the wall, set it on a level and mark the future holes with a drill. Then remove the bar and drill.

To prevent the rollers from popping out, you need to install stoppers along the edges of the guide, but they are installed after hanging the doors. The stopper is inserted into the groove and the clamping screw is tightened. The mounting point is empirically determined by the position of the rollers.

Our doors hang on a rail, but so that they do not dangle, they need to be somehow fixed from below. To do this, a groove is cut from the lower end along the entire length with a milling cutter, if the door is factory, then the groove should already be there.
The canvas will be controlled by a pinch roller, which is attached to the floor directly next to the door jamb.

In order for the door to rub against the roller less, it must be set strictly on a plumb line. The technology for setting the flag is shown in the photo below.

Control flag technology.
In principle, a do-it-yourself retractable door is installed, it will work, but you still need to bring beauty. To do this, buy a trim to match the door leaf and nail or screw it to the supporting wooden block. Such a bar will hide both the bar itself and the suspension mechanism.

Option number 2. Homemade to give
Sliding doors are a good thing and they have a lot of advantages, but all these advantages fade into the background when a person finds out the price of such fittings. Do not be upset with a creative approach, you can solve this problem. The design is not the most beautiful, but it is quite suitable for giving.
So, let's take a step-by-step look at how to make sliding doors for a summer residence yourself and not spend a lot of money.
The door leaf will cost the most. Although there are options here, for example, you can restore the old door and hang it.

Old doors can find new uses.
Then we go to the store with furniture fittings and buy the simplest furniture wheels there. Do not take swivel mechanisms on a hinge, it will only get worse with them. Such wheels are attached to the doors with a pair of self-tapping screws. There are 2 anchor points for each canvas.

From the upper end of the canvas, we fasten steel rings over the wheels. The thickness of the metal in such rings should be at least 3 - 4 mm, otherwise they will quickly fray.

As a guide, we will use a three-quarter-inch steel pipe, although this is not important, you can take any pipe, as long as the rings enter it normally. We calculate the length in the same way as in the case of a wooden bar.
We install, as shown in the photo below, the knee and the fixing “penny” can be found on any construction market, however, like the pipe itself.

Fixing the pipe to the wall.

Conclusion
As you can see, it’s not so difficult to install sliding doors with your own hands, but for those readers who found this information not enough, there is also a video on this topic.

A variant of a home-made design on the upper suspension.

