Baby cot your. Children's bed with drawers do it yourself
For parents, it is important that their children grow in a comfortable atmosphere, and their sleep has not threatened. If a person has a minimum set of tools and elementary knowledge, then baby bed do it yourself will make it completely easy, provided that there is Photo, sketch of the product, blueprints. The device of such furniture is simple.
Scheme and sizes of a crib for a newborn
Parents know that the baby for the baby especially at the age of the age of four is especially important, because the child sleeps a lot. Proper furniture is a pledge of a comfortable sleep. For small-sized apartments, such a bed in a nursery can replace the playpen.
It is easy to do in two to three days and provide all the subtleties and nuances for the comfort of the child.

Proper furniture is a pledge of a comfortable sleep.
First of all, it is necessary to deal with what elements this design will consist.
- Mattress. It is chosen on the basis of the weight and age of the baby, because it is better not to do it with her own hands, but just purchased in the store. The purchased mattress was developed in conjunction with orthopedists and takes into account all the needs of the body for a comfortable sleep and the correct formation of a children's spine. Mattresses are divided into two main types: on a spring block and without springs. A variety of springs can be on an independent spring block (each spring is placed in a separate bag of nonwoven material and the load on such a mattress is distributed point) and on the dependent spring block (the springs are combined with a metal frame, and the weight of the sleeping is distributed evenly on the entire area of \u200b\u200bthe product).

Comfortable pendant cot
Such mattresses are best acquired for children from 5 years. And the toddles with a slight weight are recommended products on a blackboard, where the frame itself, as a rule, consists of a PPU or a foam rubber and can depend on the degree of rigidity supplemented with coconut coirs or other materials.
- Frame. This element is done on the basis of the size that is supplied to the mattress of the bed. The material for it most often serves a stranded board.
- Lamel. These parts of the product are designed to support the mattress from below and represent the planks inserted into the frame of the furniture. They form a lattice with a distance between each other about 5 cm (for the mattress ventilation).

Making a baby cot with their own hands master class with drawings and photos
- Sidewalls. They are a fence so that the child does not fall from the crib. Depending on the parent's desires, they can be high or low, solid or carved. Forwards (product backs). On the head of their height will be higher than in the legs.

Drawings and photos of a crib for a master class
- Legs. This element can be made with your own hands or purchased in a specialized store furniture fittings. They can be initially strung on the sidewalls, and they can be screwed to it.

Crib drawing
We are determined with the model
In the children's room most often use several varieties of beds:
- With boxes
- Loft bed
- Bunk bed (if there are two kids in the room)
If the premises of the children's room does not allow a large bed into the room, and a compact model is necessary to save square meters, then it is better to choose a design with drawers. Boxes are used to storing bed linen, toys, children's things and everything that does not fit in the dresser or baby's couches.

Baby cot in two levels for young children
In order for the furniture to be high-quality, it is necessary to choose environmentally friendly materials for its manufacture. The perfect material will be fat plywood or tree. Popular in the furniture industry MDF or chipboard to acquire for the manufacture of the design is not due to the adhesives used in the manufacture of materials. Chemicals can adversely affect the kid's body, causing allergies.

Original bed for stylish interior of the children's room
Tip: It is not recommended to make a crib size less than 1.5 * 0.6 meters, but it is not worth doing it huge more than 1.8 * 0.7 meters. From a small bed, the child will grow rapidly, and if you make it too big, then the baby will not feel comfortable in it.
The base for such furniture is made solid, it can be purchased ready for it, and you can simply use the plywood sheet instead.
Dimensions should be repelled from the size of the acquired mattress. As a base, a lattice can be purchased, but as an option can be used by plywood, as the children's weight is not so big.

The perfect material will be fat plywood or tree.
Wood shield. It is better to use low resin wood, such as birch, linden. The shield size is recommended to take two meters long, 60 centimeters width and a thickness of about 3 centimeters.

On the furniture shield chalk, the future contour of the workpiece in size sketch is drawn. If onboard the design it is necessary to make holes, then they are drawn, attaching a glass for champagne or using an ordinary glass.
Furniture shield and Faneur can be cut by buying in the store. As a rule, in most stores such services have, but it is necessary to provide dimensions in millimeters and patterns. With its own, it is recommended to make it possible to make an electric bike, but if there is no jigsaw on hand, you can cut the materials of the usual saw.

Furniture shield and Faneur can be cut by buying in the store.
After cutting all the elements from the tree, itching with the help of sandpaper, so that the materials are made of the crib, the baby's gentle skin scratched.
If you failed to find corners of aluminum, then they are cut from an aluminum profile. Details of the bed must match the drawings of the sketch. And the length of the corner from the profile must coincide with the long side of the furniture. On these fasteners, holes are made to invent self-sustains. The sidewalls are attached to the beds to the bed lattice or plywood base, and this design is tightened with eight self-assembly.

Original children's bed in the form of a car for a boy
Initially, the parts are fixed on the one hand, then the future blank turn over the side. According to the scheme, it follows from time to time to check the order of fastening of the elements and the location of the parts. In order for the product to be stable and strong, follow the skewers and displacements of parts relative to each other. The bed walls are attached to each other and are tightened if there are no holes in the walls, then they are made using drill.

The framework of the product is ready, it is time to collect a back, which will be located above your baby's head. If you wish, it can be made of any form, the main thing is that this detail of the furniture fully performs its function, that is, protects the baby from injuries.

Carved Wooden Cot for Newborn Baby
Very often small children in a dream raise their head up, so the board here should be at least 10 centimeters in height. Another advantage of high onboard and headboard is to prevent throwing toys and bedding from bed.

Original Baby Cot for Boy
We make a headboard: take a furniture shield, from it, if you wish, you can make a carved back, looking beautiful and noble or decorating. The design of the head and the back in the legs should coincide that the design looks organically.

We make a headboard: take a furniture shield, from it, if you wish, you can make a carved back, looking beautiful and noble or decorating.
We screw the legs to the largest bed, which are purchased in the store furniture accessories. We do it with the help of high-length screws.

All elements of the bed body are additionally polished carefully, up to the slots and cuts, so that the child puts his fingers into the slot.
Tip: Smooth sandwicked surface will be used with a drill with a nozzle or grinding machine.

Decorated polished backs are attacked with a frame frame. To the fasteners not visible, they are drilled from below, directing the drill. The cutting of the holes should be as neat as possible, because this item is easy to damage. We make a hole under the screed yourself, the drill in this place will be difficult to do it. If the wood for making a bed is soft, then the hole is easy to break.

So that the fasteners are not visible to be drilled from the bottom, directing the drill
The bed configuration assumes that storage boxes are not attached to the frame of the bed, but have a type of roll-out tumb. Drawers should be supplemented with wheels so that the storage capacity for storage has rolled out.

Stylish Wood Cot for Baby
If the owner of the apartment decided to change the configuration of the crib so that the boxes are put forward, then the bottom rack is attached to the bottom of the workpiece, and the product itself will stand on the side planks. In this case, the sidewalls are made higher than intended earlier by several centimeters, equal to the height of the boxes. The retractable box itself (drawer) is placed on the guides.

Wooden crib for bright and spacious room
For the boxes, we take a plywood with a thickness of 1.2 cm, cut down the bottom and walls of the box, tighten with a self-drawing. Additionally, the box is glued, because things in the box are loaded on the design. Attach wheels at the bottom of the collected box.

Light spacious room with a crib
The legs on the bed, if it is decided to make them self-masted from the remnants of the furniture shield or from cropping a square of a square shape. Fasten the legs to the frame of furniture with self-draws.

For the boxes, we take a plywood with a thickness of 1.2 cm, cut down the bottom and walls of the box, tighten with a self-drawing.
Decorating the bed
When the works are completed, it is recommended to give the product a finished look. It is recommended to pass the upholstery cloth for furniture. Pre-from the fabric cut the parts by 2-3 centimeters more of the main parts and pass overlock so that they do not appear. The fabric is fastened with a furniture stapler, and its cuts are hiding inside the crib, so as not to spoil the aesthetic type of design. During decoration, the fabric is stretched so that the races, folds and bubbles do not appear.

Crib for the smallest family member and small bedroom
Another finishing option will be lacquering a skeleton of a crib, headboard, backs in the legs. To do this, it is recommended to use quick-drying varnishes on a water basis. More environmentally friendly for furniture in the children's room will be machining a verse. Previously all the details are recommended to sand and polish the drill with the nozzle.
19.09.2017
Furniture made at the enterprise, though beautiful, but deprived of spiritual heat. And so I want your own baby to have a cozy bed made with love and care. That is why many fathers create children's beds with their own hands. Furniture made by dad, baby will remember for life.
Variants of material
Material plays a particular importance in manufacturing. Today, store counters are filled with children's furniture from ...
- natural tree;
- Chipboard and MDF;
- metal;
- plastic and synthetic materials.
Furniture made of natural wood is considered the safest from an environmental point of view - this fact has long been scientifically proven. Wood does not have that particular smell that artificial materials possess. It is able to create a favorable, warm and cozy atmosphere for a kid, which has a positive effect on his health. It is worth noting that the natural tree will always look expensive and kindly. Products from this material will perfectly fit into any interior.

MDF - a stove made from a high pressure of a fine chip of the tree. From the point of view of environmental characteristics is close to natural wood indicators. For children's health, furniture made from MDF is considered safe.


In the production of chipboard, formaldehyde resins are used, therefore, during operation, they can exude harmful to health substances. But for many, the decisive factor becomes the price. Models from chipboard have the lowest cost.
Plastic and synthetics can be bright, very beautiful and stylish. But are they useful for a child? Young parents often do not think that toxic substances are used in the production of these materials. Therefore, it is important to remember that in the process of operation, harmful components will be distinguished and harming the baby's health.
Design elements
The main elements of the children's bed are:
- bottom;
- sidewalls;
- backs;
- frame planks (frame);
- legs.
Baby cots are also on wheels. In the models of such a design, it is convenient to rock the baby, such cribs are easy to move around the room, if necessary. Some have rocker rocking. There are both combined legs: the wheels can be changed on the end, and you can unscrew them at all. There are lulled cribs in which swing is provided by a hinge.
Baby beds can be performed in the usual all classic style. However, wooden models made on plots of fairy tales and cartoons are becoming increasingly popular today. Undoubtedly, that, and the other model will look good in the nursery.
However, often beds made in the thematic decoration occupy too much space.


This is their main disadvantage, because not everyone can boast of a big living space. Often the crib has to push into a completely limited space. Therefore, sometimes homemade beds of the required dimensions are made in order to save free space:
- bunk;
- transformers;
- attic or houses;
- with boxes and shelves.

This piece of children's furniture can be any. The main thing is to comply with the basic requirements: bed must be:
- safe;
- comfortable;
- beautiful.
Sketches and drawings
If you decide to make a bed with your own hands, it is desirable to draw a sketch yourself, perform a drawing or a scheme where the future "nest" will be depicted for your child. This drawing should accurately withstand all sizes, right up to each millimeter. It is from this that will depend on the strength and reliability of the design. 

A drawing or sketch of the future design will greatly facilitate the entire process of manufacturing parts and subsequent assembly. Exceptions are made up. These are quite complex projects for self-making. As a work plan, it is better to take a sketch performed by a professional designer: 

Production and assembly of elements of a baby cot - the process is complex. It requires special attention and great responsibility. Even a minor error in the work can lead to sad consequences: the bed can break and injure the child.
Necessary components
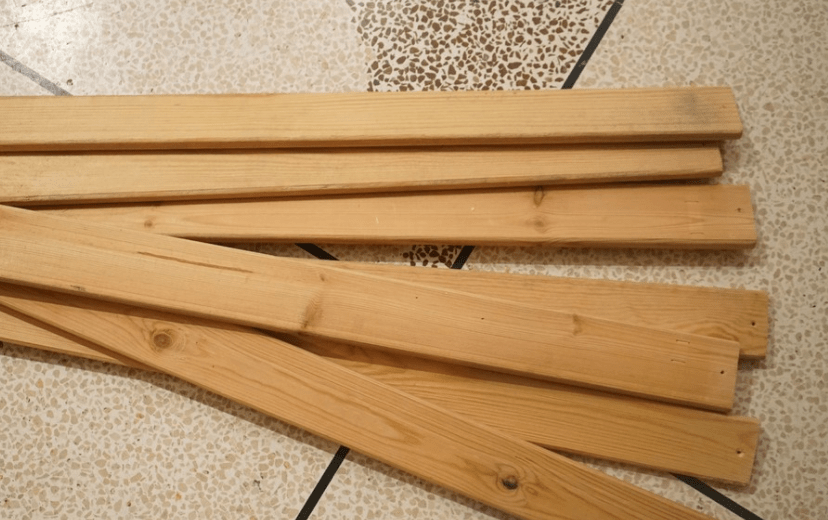
Before starting work, you need to stock material. Purchase:
- Edged type boards.
- Bruks, the size of the cross section of which should be at least 50x50 mm (are needed to perform the main framework frames).
- Reiki with a cross-sectional size of 20x20 mm (will be used to fill, for example, the manufacture of lags).
- Self-tapping screws and bolts.
It is worth walking through large stores with building materials in its assortment. It immediately becomes clear that the proposed wood is of different quality. You need to choose straight boards with the smallest number of bitch. This will be greatly simplified and accelerated the grinding process of all elements.


Important! Whatever the bed is manufactured (the most common, classical or done under a certain subject), you need to remember the rule - bruks and rails must be of particularly durable wood. The quality and further use of the product depends on this.
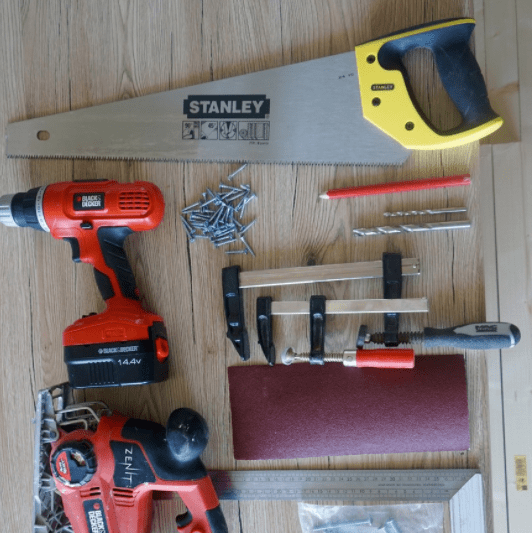
Tool
Despite the fact that the children's bed has a simple design and anyone can collect it, still need to be prepared. Before starting work, prepare:
- roulette;
- drill;
- circular saw;
- set kreg jig (special device to drill holes at an angle);
- adjustable measuring corner;
- adhesive for wood;
- self-tapping screws 30, 50, 60 mm;
- water-based lacquer;
- veil;
- brush;
- sandpaper;
- putty on wood.
Step-by-step photo report
As a sample, take the following model:

First you need to choose a suitable mattress. All elements of the future design will be manufactured. Then buy the desired building materials - edged-type boards, bar, railway, water-based lacquer, sampling, sandpaper and brush:

Prepare the necessary tool: tape measure, drill, drill, circular saw, set Kreg Jig, measuring corner, bolts and screws of different lengths. These things must constantly be at hand.
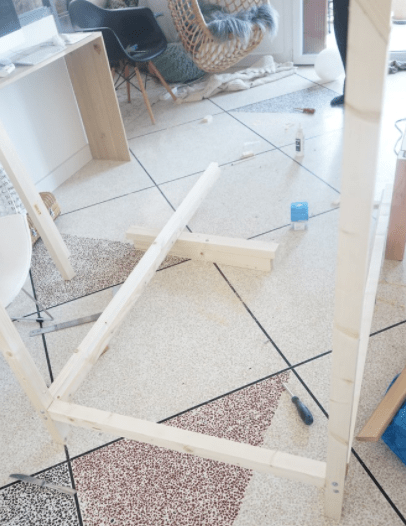
Work begins with the assembly of sidewalls:

With the help of the kitchen, make sure that all the angles of the assembled design are straight. Camerate places where board will be secured:

After the items are polished, and all holes are drilled, a little carbon black glue can be applied to the joints of the compounds. Without waiting for the glue dry, the excess must be removed with a napkin.
Fasteners with racks:

If necessary, fasten the boards from the inside at an angle. To drill guide holes - use the indispensable device KREG JIG. This is a convenient and easy to use the tool.
Secure the side of the future bed to the racks:

Cruise frame almost ready:

Now fasten the side of the second tier:

Then prepare the places where lags under the mattress will be attached:

The irregularity and skelethes of the frame first cover, then sand. Next you need to make a ladder on the second tier.

Cover the first layer of water-based varnish. In this case, the Lacra "Oak" was selected. One of his advantages is that it almost does not smell. This is important, since there are small children in the house. However, he has a very unpleasant flaw - it is almost impossible to sand, and even after drying, a sticky layer remains:

View of the stairs:

The staircase is not quite comfortable in this form - she "cuts" legs, so it will need to be slightly upgraded. But more on that later.
Upper floor is ready:

It can be seen that you need to build on the board. No need to add anything from the wall. The bed will be close to the wall, it means there to fall there. From other sides it will need to be done.

Now about the stairs. To descend on it, it was not embarrassing and hurt, a little process the edges of the crossbar hand-held row or grinding machine. Such a procedure will give them a neat appearance:

Result of Labor:

As a result, you will get a reliable and stable design. Now, with confidence, it can be said that makes such a bed with the abundance of materials and the necessary tools that are filled with the shelves of building stores, not difficult.
Large ideas and advice on the manufacture of bunk design you will find.
Decoration
Canopy

Bedding
To sew a pillowcase, a sheet and a duvet cover, it is best to use natural, breathable and at the same time beautiful fabrics. It is great here: flannel, hazard, satin, poplin.

Mattress cover
To protect the mattress from moisture, usually use a waterproof mattress cover. And it is easy to do it yourself. For this, a design consisting of a loaf (inner part) and a knitted, flannel or stem canvase (outer part) is made. In order for the mattress cover not slipping, the product is sewn around the perimeter.
The appearance of a child is a new stage in the life of a young family. They are preparing in advance, at that moment parents get closer, together manifesting care of their tea. In the house there are necessary things from the first days: oilcloths, diapers, diapers, baths, special hygiene products, personal sleeping place. The cost of all required objects can be very burdensome for young couples, sometimes unbearable. Many are trying to save, for example, they independently make toys, make a crib with their own hands.
If you correctly make a drawing, plan the design of the bed, then the furniture can be used for a long time, from the moment of birth of the child to its four-, five years. It is extremely important from the first day to teach the baby to sleep separately. It is unacceptable to lay it in the bed of parents. Although most mothers sleep very sensitively, but in a dream it can occur irreparable. In addition, it's hard to wean a child from the parent bed.
Advantages and features of the manufacture of beds do it yourself
Furniture stores sells many models of baby cots made from various materials. Mainly uses the tree and its derivatives, but there are plastic options. You can not always find furniture for a newborn, satisfying all requirements, and suitable products are distinguished by a very high price. In this case, homemade structures will become an excellent alternative, they have a number of advantages expressed in the following:
- Cost. The furniture produced by their own hands will cost much cheaper by purchased analogues, which will help save a family budget.
- Reliability. In the preparation and assembly process at each stage, the strength of all components is checked.
- Ecology. The bed for his son or daughter is made only from natural wood, which does not distinguish harmful substances.
- Exclusivity. An independently compiled drawing will be the key to an individual, unique product.
- Acquisition of experience. When working, a person acquires new skills, which can later be applied in the production of such items.
- Compatibility with interior and room style.
When making beds, you should follow certain rules:
- to work, it is necessary to use exclusively environmentally friendly materials to which the natural tree belongs;
- the surface should not have sharp corners, roughness, chips, protrusions;
- the product is required to match the growth, weight, physiological parameters of the kid.
- it is necessary to provide protection against falling, child rolling.
- for small apartments or houses, multifunctional structures are suitable, for this you can use free space under them, install additional boxes, make a game zone.
Designs and sizes of a baby bed
The easiest way to make standard furniture, which consists of four legs, frame, mattress and headboard. The model applies exclusively to sleep baby. If the berth is to protect around the perimeter with the walls with lattices, then a classic bed for a newborn is obtained. Although for such a category you can use the cradle, a player, a rocking chair, the attached options.
In small rooms, practical to establish multifunctional items. For this, they are equipped with boxes, chest of drawers, other useful elements. Very functional bed with a attic, where the bed is made on the second tier. From the bottom you can organize a playground, install lockers for storing items.
Furniture performed in the form of a typewriter looks unusually. This is an option for more adult children who have not reached adolescence. Non-standard design will allow you to make imperceptible lockers inside, hidden under the hood or behind the door. Many elements will have to tinker, which will require certain carpentry skills.
Among non-standard designs, you can choose a bed-house. This model will suit children over 3 years old. There are all elements of the standard subject, as well as doors and windows, a double roof. Decorative products will decorate any interior, will delight every baby.
What material to make beds
With an independent building of children's furniture, it is necessary to decide on the materials that will be applied during the work. The main requirement - the raw material used should be environmentally friendly, not harming the development of the baby. Let us dwell on this issue, consider the optimal option for all components of the structure:
- Mattress. It is recommended to purchase it in a specialized store, as purchased models are issued taking into account the recommendations developed by the doctors orthopeds. If the bed is planned to be used for more than one year, it is better to choose two-way products with different degrees of rigidity. For children under three years, a solid, rigid coating is required, which contributes to the fixation of the back, the correct development of the body. The filler should be woolen, you should not take the models, which include wool and foam rubber. Upholstery should also be made of natural tissue, have an antiseptic coating.
- Frame, lamella, legs, sidewalls. For a beloved child, you should choose only a tree. Coniferous breeds are suitable for work: pine, spruce. Natural wood breathes, it is strong enough, suitable for any interior. Those who decided to apply MDF or chipboard should be remembered that the plates contain phenol and formaldehyde resins, so it is necessary to take only models with the E-0 emission class.
- Protective means. To extend the life, wooden surfaces are treated with special compositions, they are stained, covered with varnish. For these purposes, nitroemal, acrylic, water-emulsion paint for children's rooms is used. An excellent option will be the use of wax. To preserve wood texture, you can use acrylic varnish, other options have high toxicity.
In the presence of free funds, you can purchase dense woods: an array of oak, larch. It is the most durable material, products look rich, but it is quite difficult to process the raw materials.
We make a bed do it yourself
Firmly deciding on their own design, it should be understood in all nuances associated with its creation. Initially, the drawing is developed, which displays all compound elements. Then acquire the necessary materials for work, prepare the tools, in the absence of any of them, it is purchased.
On the basis of the circuit, the raw materials are placed under constituent parts. They are cut, combined into a single design, are treated with special compositions, stained, covered with varnish, decorated. For clarity, consider in detail the main stages that include the process of making a classic baby cot.
Drawings and scheme
Creating any object is impossible without drawing. In the graphical image, made on a specific scale, the sizes of nodes are specified. It requires minimal skills in drawing, you can also use special programs. When developing a project, consider:
- The size of the room where the product will be installed. In the spacious room you can arrange a larger bed.
- Dimensions of standard products for children up to three years are 120x60 cm. If it is planned to use the structure in the future, you should give preference to larger models 150x60 cm, 180x70 cm.
- Lockers in which baby things will be kept.
- For preschoolers it is worth providing removable sides that will protect them from rolling and falling.
- Design and decorative design is chosen depending on parental preferences.
Required tools and materials
The following materials will be required for the manufacture and assembly of the bed:
- board;
- mDF sheet;
- varnishes and paints;
- self-tapping screws, fasteners, rubber knockers on the legs.
Instruments:
- saw on wood, electrolovik;
- hammer, screwdriver, screwdriver;
- drill, drill;
- measuring instruments, simple pencil.
Basic details and their preparation
Standard bed consists of 4 legs, 2 backs, sidewalls, removable sideboards, frame, lamella, mattress. The last element from the list is purchased in the finished form, the rest are made by their own hands. The process is as follows:
- In accordance with the drawing, the markup of all components is applied to the tree. You can perform this with a roulette and a simple pencil.
- Electrolovka, saw is made by cutting elements.
- Composite parts are grouped by sandpaper.
- Depending on the length of the sidewall, metal corners used to install the mattress are cut out with a grinder. They are drilled by the holes for the self-tapping screw, to fasten them to the tree.
- All composite parts are painted, processed by varnish.
The main stages of the assembly
Bed assembly work is produced in the following sequence:
- Collect the backs, located at the headboard and finite. They are connected to the legs.
- Prepare the base for the mattress. To do this, metal corners are fixed to wooden sidewalls with screws. The lamellas perpendicular to the side walls are recorded on top.
- The backs and base for the mattress are connected using furniture accessories, it is better to use the corners for reliability.
- A mattress is installed on the frame.
- The sides are added removable protective sides, fixed on a special metal or wooden fittings.
- If necessary, the finished product is decorated.
Production and assembly of the bed machine
From such a design, children will be delighted. Make it for everyone. To do this, you will need to draw a drawing or download it online. After that, you can proceed to the pattern of components and assembly. The work consists of the following steps:
- Out of the furniture shield, side and front walls are manufactured.
- On lateral surfaces, cuts, imitating the doors of the car, through which the child will be convenient to fall inside.
- On one of the end parts, the holes under the headlights and the radiator are neatly cut with an electric bike.
- Next, there are still a few pavements that imitate the hood of the machine, windshield.
- Wheels are prepared.
- Wooden corners are attached to the side walls to which the base for the mattress is stacked.
- A rectangular frame is collected from the prepared parts, which is installed on the wheels.
- The resulting billet is painted or vague.
- The base is fixed inside the frame, the mattress is stacked.
Bed assembly features for newborns
For newborns, the design of the bed must differ slightly. Its standard size is 120x60 cm, to achieve the kid for 3 years it will become cramped for him. When planning it is worth considering the possibility of regulating the height of the bed. When the child is small, it is convenient to arrange higher, and as soon as it learn to get up, the bottom will have to lower.
For comfortable sleep, crumbs, parents, neighbors, in the crib should be provided for one removable side or end wall, which will allow it to be located near the parent. The distance between the rods around the perimeter is made within 2.5 - 6 cm. This is the optimal dimensions in which the child will not be able to pinch your fingers or to push the head. Do not forget about the strength of the product, good fixation of removable elements.
In addition to listed features, often the legs of the bed are installed on the wheels, making it mobile. Also equip pendulum mechanisms or rocking things. Their use recommended pediatrician doctors. This makes it possible to easily burn the child. The bumper is preferably used only in the first months, it should later be removed, to increase the review, knowing the world of the child.
Bed Decor Soft Satellites Own Sewing
Not only dad can contribute to the family budget, building a finished bed. Mom can join this process, decorating the product with soft sideboards. Externally, thetery resembles covers stuffed with filler. In addition to the decorative function, they perform and practical, protect the baby from random strikes of the rods, do not allow him to sleep between them. With their sewing, specific requirements should be followed:
- The fabric should only be natural, Flax, hazard, cotton fit. As a filler, use wool.
- The material is better to choose bright, pastel shades that have a good influence on the psyche of the child.
- If the drawing is provided, then it should be made of medium size, the small one will annoy it.
Master class on the manufacture of a bunk bed
This is the perfect option for a family with two children of one age, whether a boy and a girl or same-sex kids. The design of the bunk is repeated single-tier. A small difference lies only in the presence of ladies, height of the product, fastening two lies on some supports. For safety from above, the side is provided for the entire perimeter. To understand all the subtleties of the model, consider the master class on the manufacture of such a bed:
- We prepare the boards with a cross section of 3.5x10 cm. According to the selected scheme, we cut out 4 blanks of 190 cm, 4 - 180 cm, 4 - 80 cm.
- At 190 cm of boards, retreating from each edge of 30 cm, from both end sides on top and bottom, we make grooves under the width of the crossbar 3.5x10 mm.
- We collect side backs. To do this, with the help of segments of 80 cm, two legs are connected.
- The finished backs are connected using 4 segments of 180 cm mounted in external end grooves.
- Top and bottom we make the basis for the mattress. To do this, over the perimeter of both tiers, lamellas are nailed over sidewalls. Here they can not be made, thanks to the sorts located in a circle.
- Mount the stairs. Its length should be the distance from the lower edge of the side partition to the top edge of the support.
- Installing flights, put the mattress.
Self-making bed with storage boxes
As a basis for the manufacture of such a design, you can take any drawing of a standard bed. The only difference will be in the presence of full-fledged lateral walls and boxes. First of all, it is necessary to determine their quantity. It can be one element that occupies the entire space under the bed, two, and even three. It is also worth considering the type of drawn parts. There are two drastically different options: independent of the main housing, fixed to the frame that advanced on the guides.
The process of facing the product will be similar to the preparation and assembly of a conventional single-bedroom bed. Here it is necessary to provide no legs, but side walls and intermediate partitions on which guides will be mounted. It is also worth considering the fact that the gap between the floor and the bottom of the tray should be at least 1 cm.
For the manufacture of the box itself, you will need to prepare four wooden segments, their dimensions depend on the size of the space under the crib. Further, they are connected to a rectangular or square box, a DSP leaf, plywood is nailed below. To enhance the design from the inside, there are 4 support bars around the perimeter, make a contribution bottom, which allows storing heavier items.
Ways to decorate
For a children's bed, comfortable conditions and practical designs are equally important. To make the baby to improve the conditions, auxiliary decorative elements are used, which are also carrying a number of useful functions. Consider the most popular options to decorate this item:
- Canopy. An elegant canopy that sews from any natural fabric. This element is recommended to use up to 4-5 months.
In addition to the decoration, the product serves insect protection. It settles a lot of dust on it, so it must often be washed.
- Canopy. Unlike the previous version, only light, transparent matters are used: tulle, organza, veil. The mount is performed using a bar.
- Valance. This is the framing of the lower edge of the bed. It closes the lower part of the furniture, which will make it great to disguise some errors made in the label of the crib.
- Suspended toys. Frequently suspended in a pair with music mobile. This type of cardboard or tissue decor is manufactured. Promote the child's development. May have the most diverse appearance, whether snowflakes, animals, flowers or others.
- Stickers. You can buy them in any furniture store. When they are fixed, it is worth taking care that the child cannot reach them.
Painting Bed - What paint is better to use
In the industrial production of children's beds use oil paints. They improve the appearance, protect the surface from damage, they are easy to clean from dirt. With an independent choice of coloring agents, their composition should be examined, it will be convinced that there are no toxic, poisonous elements. These requirements are responsible:
- Acrylic water-based paints. Different with high cost and good operational qualities.
- Nitrocracies. Do not have a pronounced smell, it is inexpensive, quickly dry.
- Water-emulsion. Characterized by a long service life. With their help you can hide shallow cracks.
- Wax. The most expensive option. This is a flawless, high-quality coating with water-repellent properties.
Without a pillow, man can not do. This is due to the device of the human body. The element supports the bending of the cervical spine, contributes to the influx of blood into the brain. The child is started to put this subject aged 1-2 years, depending on its physical development. The product must have a rectangular shape from 30x40 to 40x60 cm. Its thickness must be: for children up to three years - 3-4 cm, after - 5-6 cm. An important place occupies its elasticity, too soft pillow will result in pain in the cervical vertebrae, Fast fatigue.
A bird fluff, natural wool, buckwheat husk, Hollofiber, Latex, use as filler. The last three options are the best on elasticity. When selecting the fabric material, preference should be given to natural fiber treated with antiseptics. It is better to choose models that covers zipper, then you can control the status of the filler.
Unlike the pillow, the mattress is needed from the first days of the child. It must be hypoallergenic, safe, without problems absorb and evaporate liquids. For babies, elasticity is also of great importance, so it is necessary to take only orthopedic products. Otherwise, the requirements are almost the same as to pillows on the filler and trim.
Choose bed linen
Anyone during sleep is gaining strength, and the kids are still growing and developing. Every parent wants to make this moment calm. In this issue, bed linen helps them, which should be high-quality, made of natural materials. For these purposes, the following types of fabric are used:
- cotton,
- site
- satin
- hawk
- bamboo.
The color of the selected canvase should be neutral, it is better to use pastel, light tones that have to sleep. For newborns, the product is fitted without drawing, older children, but not teenagers - underwear with a print of favorite heroes from animated series. Also when choosing bedding worth paying attention to:
- the material should not lose its structure and color from frequent washes;
- do not take underwear with butchers, ribbons, lace;
Conclusion
After studying the finished schemes, having considered all the positive and negative sides associated with independent manufacturing of a crib for their baby, any parent will build a similar design. At the same time, all family members can participate in the process. Dad will prepare and collect the framework, and the mother will pick a mattress, pillow, bed linen, make it yourself decor elements. This will not only save a family budget, but also will show the child what they care about him, they love him.
The Scandinavian style for children's rooms is gaining increasingly popular, and the bed-house of his own hands is the present manifestation of parental care, skills and fantasies. The original design of the bed, made taking into account the size of the room and the age of the child, is beautiful, safely and economically. Adults can be confident in the reliability of the design of the bed, and children are in stock places for recreation, like the heroes of fairy tales.
Options, how to make a bed-house, a lot. In terms of construction work, it is increasingly standard, it is important to draw up a scheme of the intended product by preparing the necessary materials.
Instruments
Wall houses
First of all, drawings are made for a bed-house, using a simple pencil and a square. To build the walls of the described bed, four vessels are taken from wood, each of which is 1 m 20 cm. It will be supporting parts with a vertical structure of the bed bed. To give aesthetics, the duplex roof, all supports are scolded from above the edges to form an angle of 45 degrees.

Marking

Details of the walls of the house

Supports are dug edges at an angle of 45 degrees
Roof
This part of the bed-house will also require four bar and the same actions, including edges treatment at an angle of 45 degrees. All processed bars are collected, the upper case is attached with the help of a tree glue. Details can be secured with a self-tapping screw that should be screwed at a distance of 3 mm from the joint border of two parts of the tree. We advise you to follow some rules when working:
- it is recommended to purify all sections using sandpaper;
- self-tapping screws need slowly so as not to bundle wood;
- during drilling, it is recommended to apply vice for fastening the product;
- optimal modern rolled and slow process - a guarantee of quality work.
When two planks are fixed to two supports of the future bed, in the end, the house frame comes out. The re-procedure will lead to the appearance of two equal frames of the bed walls.


Glazer details

Connection of parts

Fastening the end frame
To complete the manufacture of the end frame of the bed at the bottom screw the bar at 8.2 cm to maintain vertical racks and stabilize the entire design. For a bed assembly, an eccentric screed of side components is preferable. It is very important to make an accurate project for the right hit. Self-timber will help facilitate the task. Also, the design is attached to simplify the assembly and saving time with flat corners - 3 cm square squares. All accessories for the procedure are available in a construction store.
Performing such a screed, drill holes in the crossbar with a 10-mm drill. They must be on its midline, not to be through and have a depth of 12.5 cm. The scheme shows how to fix their external edges by 3.5 cm from the edge of the crossbar.
6 mm drill helps to form a hole on the side. It is fixed exactly in the middle and falls into the prepared pre-deepening. Then the eccentric tightly fixes the necessary appearance of a screw. It is possible to use and wooden parts on long self-stairs with a preliminary sizing. We should not forget only about the stabilization of the connection with the help of angular brackets.

Fastening the end crossbar


Facial frame in finished form
Basis collection design
Two thick bars are harvested, like side beds. The inner side of the bar accommodates thin strips using self-tapping screws and involves screwing the screws on an equal distance from each other. These items will be a support for the frame of the future bed of the house, which will allow the fastening of the bedtooth bottom.
It is important for the exact work to make a pattern of 6 cm with holes for self-tapping screws - 2.5 cm. Pencils There are positions of holes on all racks for the complete coincidence of the upper edges with a crossbar. Drill in 6 mm - an assistant in organizing through holes in the marks. The procedure is four-time: in this way, all the racks with side sides of the bed are connected.
Next prepared the place of the hole for the eccentric on the longitudinal rack inside. Outside, long self-tapping screws are tightened, which should smoothly connect the side components of the beds and a vertical support with a possible sizing place of docking. Eccentric is inserted into the holes below and then the bolts are tightened. The procedure is repeated for connecting both frames with sides of the bed.
After bonding the side of the product to the ends of the bed bed, the frame is assumed to be fixed, thanks to the three longitudinal components of the roof. Three beams in the size of the side of the side are attached using eccentric or self-tapping and adhesive. When choosing the latter, the bed-house is necessarily strengthened by angular fasteners.

For assembly, you will need two fat timber

Thin strips will be a support frame


Frame collected using an eccentric screed

Connection of side supports with crossbars
Rack bottom
Rakes are screwed to flat plars, which, in turn, are fixed to the side frame sides. It is important to carry out the right twisting to hide the screws. The interpalary interval is obtained on average 7 cm, 13 parts goes to the bottom. The remaining lamellas are suitable for the safety side of the security collected by the help of corner brackets, but this is optional.
These rails can be borrowed from other beds. There are new types of bed lamellas for sale. There are also ready-made models that are inserted directly into the bed frame. This option is suitable for beds of standard sizes.

Fastening of Redeek

Decoration
At the bed-house created by their own hands, there is an indisputable plus - it includes copyright proportions, color gamut and sizes. For the boys, you can use the sea shade cloth or dense curtains for the organization of the military headquarters, and for girls - decor flags and canopy from organza or fate.
In the children's room there is not enough space for individuals? Collect a wooden bunk bed with your own hands. We have prepared for you design options, accompanied by their schemes and drawings, show the algorithm for the manufacture of such a bed with your own hands, illustrating photos and video materials.
A bunk bed for children or adolescents can be made of metal, but not everyone will have a neat welded design, and the appearance of such sleeping places is not too children's. Therefore, we will look at the manufacture of beds from wood and lumber, as it is inexpensive and easy-to-use materials, warm, beautiful and homely cozy.
Bed framework materials
A list of wood materials from which the bed can be made is quite lengthy. We highlight the most common.
1. Array. Dear material and quite complicated in preparation and manufacture, if you have no experience with it. The experience is important. Although the products from the array are obtained by the most beautiful and durable, but still a children's bed is used not for a long time - the children grow and begin to need other sleeping places.

2. Lumber - edged or planed board, timber - the most common and easy-to-work materials, provided that you are confident in the right drying, otherwise the carrying design can "Tale".

3. MDF - Warfather Plate. The emission of formaldehyde for the material is at the same level that in ordinary wood. When drilling a dust, without forming a chips. Laminated MDF looks very attractive. The slab without coating requires additional finishes, for example - varnodes. You can order separate elements of the bed in the furniture workshop or sawing workshop: everything will neatly cut out, edges stick.

4. Chipboard - chipboard. The emission of formaldehyde is raised without hermetic coating, the exclusion of the Class E1 slab. Easy to drink, but does not keep screws badly. Suitable for unloaded parts - for example, drawers mounted under the bottom bed. From the laminated plate (LDSP), you can make backs, decorative panels - film coating does not give formaldehyde to evaporate, but it is important that the slab ends are closed with a film.

5. Furniture shield - stove glued from individual bruscles of natural wood. Beautiful, durable, makes it even performing threads, but requires skill in work, as it has internal stresses that need to be considered.

When buying accessories, you should give preference to steel hardware. Aluminum is much less durable and rigid.
Methods for connecting wooden knots
In the manufacture of beds, various compounds horizontally, vertical, the formation of angles may be needed. This can be performed in various ways. Some of them we give for reference.
 1 - Connection "in drapery"; 2 - connection "in the paw"
 1 - cut full; 2 - cutting down not complete; 3 - steel corner
 1 - connection on rectangular swords; 2 - Connection on the "Lastochka Tail" swings; 3 - Connection in the indigenous spike
Design options (drawings and decor)
Bunk beds can be different constructively and be varied. Thus, the upper tier can be accurately over the lower, to be located with a displacement, leaving a place for a locker, or be perpendicular to it. The staircase can consist of drawers. Another option is steps that are folding boxes of drawers. The bed frame can also be supplemented with drawers located under the lower mattress. To do this, you will need guides - Stoles. Sometimes something else is added to the bed: a table, shelves, a wardrobe penalty or accessories for sports.
Below are the drawings of some beds with basic sizes.


 And now a few design ideas that can inspire to create an original bunk bed. Please note how absolutely "thrusters" materials are used in some models - hill, branches, trunks, snags.
 Bed for real Mowgli and Robinsons Cruise
 Man-made fairytale
 Bed - Sports Corner
 Bed - playground
 Bed - House
 Bed-coupe
 Bed for teenagers. Material - Laminated MDF
The method of manufacturing a bunk bed
Some of the most inexpensive materials are a board and a bar of pine. It is from them that we will make a two-story bed.
Calculation of materials
In the manufacture of the bed, it should be borne in mind that not only a child can sit on the bottom bed, so the distance to the bottom of the upper bed should not be less than 85 cm. Dimensional places in the case of purchased mattresses are determined by their width and length. If you yourself make mattresses of two strokes in a case of dense tissue, then the sizes are accepted based on personal preferences.
On the figure below, the individual elements of the bed are indicated, and the table is given a purpose, dimensions and number of blanks.
 1 - vertical racks (legs); 2 - external lining on the racks; 3 - boards of the carrier frame; 4 - upper and lower slats of the head of the head; 5 - Cartanley Plank Heads; 6 - lateral fences; 7 - railing stairs; 8 - Stairs Stairs
| Number of | Size, mm. | Name |
| 4 | 38x76x1730 | Vertical stands |
| 4 | 38x76x1730 | Billets for external pads for vertical racks |
| 4 | 38x140x2030. | Bed bearing boards |
| 4 | 32x44x1850. | Longitudinal layers of support of the mattress (not shown in the figure) |
| 24 | 20x76x1000 | Mattress support cross rail racks (not shown in the figure), trim around the place |
| 8 | 20x140x914. | Upper and lower heads / trap |
| 4 | 20x90x914. | Central Heat Planks / Flying |
| 1 | 20x90x1510 | Railing stairs |
| 3 | 20x64x482. | Stairs stairs |
| 2 | 20x90x1800. | Railing railings, cut to the desired size when installing |
Assembly units
The bed is furniture consisting of several assembly units, which are then mounted into a single integer. The same details can be cutting, covering them with vice or clamp, so they will turn out absolutely identical. Before assembly, you need to make sure that all wooden parts are cleaned, smooth and do not have burrs. It is better to work with a special grinding on a tree or "grinder".
1. Head and Flying
These are two almost mirrored elements. The difference lies in embedding the railing of fence in popping, as shown in the figures below.
 Head and popling
 Detailed layout with headboard and finite
 Installation order: 1 - 8 mm wanking; 2 - the backrest and planks are drilled simultaneously; 3 - This part is attached after the assembly of all other parts of the head of the head of the head.
2. Elements of the carrier frame
For the assembly of two carrier frames, four prepared boards will be required - longitudinal components of the frame. The longitudinal bar for the reliability of the design must be glued to the board and additionally fasten screws to the middle of the thickness of the board. Between the bars glued to the longitudinal layer of support of the mattress, transverse rails will be laid - the base under the mattress.
 Design and size of the boards of the carrier frame
3. Details of stairs and fences
The railing of fences is just a processed board, the staircase railing is a board with a sample for mounting on the frame. Places of fixtures of steps need to be placed in advance, and to trace so that the screws for fixing them do not fall on the carcass screws.
 1 - 38 mm cutouts; 2 - fastening places of steps; 3 - Stairs Stairs, 3 pcs.; 4 - Fencing
4. Assembly of the carcass
Flying and headboard are connected at the bottom with the boards of the carrier frame using screws. After that, transverse rails are stacked, mattress holders, and the extreme of them are written in the corners for a dense installation. You do not need to fix them. In the same way, the assembly of the second tier is performed.

5. Assembling stairs and fences
The staircase and the fence are simply fixed on the frame of the screws. If desired, the fence can be made from the wall side - for the bottom and upper bed. Then you will need four more planks.

Now the wood can be painted and opened with varnish, put the mattresses - and the bed is ready!
In conclusion, we propose to watch a video about the manufacture of a bunk cibble for real princesses.
Video. Part one
Video. Part two