Do-it-yourself wooden oval table. Original and functional: how to make a wooden table with your own hands
The table is the second item after the stool that every novice amateur furniture maker should be able to do. The table can be created from different materials and have unique characteristics. It is a great intention for you to want to make your own piece of wood.
A table made of wood is quite easy to create with your own hands, it is enough to have minimal skills in working with carpentry tools. And the cost of the material will be significantly less than the cost of a table using metal, glass or plastic.
A hand-made piece of furniture will correspond as closely as possible to the desires of a happy owner, and it will delight the eye incomparably more than what was acquired. And most importantly, when creating a table with your own hands, you acquire important skills in working with the material, which will make the restoration of operational defects much easier.
What can make a good table
A particularly beautiful tabletop can be made from cheap non-varietal pine boards, knotty and twisted (without falling out knots, rot, fungus, wormholes), which, when well processed, give a wonderful pattern, to achieve which, when working with an expensive tree, much more costs and efforts are required ...

When choosing a material, it is important to take care of the strength of the future product. To do this, pay attention to the density of the wood.

Soft (spruce, pine, chestnut, dogwood) is easily damaged during operation, which negatively affects the durability of the table. But scratches and dents can be hidden, although the restoration process will be quite frequent.

Hardwoods (beech, ash, maple, oak, walnut, fruit species, elm) are difficult to handle on their own. And you may have to look for masters to work with them. But provide the product with durability.
External characteristics
It is very important to determine in advance for yourself the appearance of your future product. The basic rule of a good table is considered if the structure fits well into the space allotted for it and leaves a lot of free space for those sitting.

It is also important to consider that a table with a rectangular top will accommodate fewer people than a table with a round or oval shape with the same area. And the table for guests will be more expedient to be made in a folding version, which unfolds for big holidays, but in everyday life it is folded. Also, such a folding table will be convenient in the backyard.

Most often, you need to choose a kitchen table. It should be roomy and pleasing to the eye, to facilitate the process of working with him. But it should not interfere with movement in the room and in no way interfere with the process of culinary creativity.

Based on this, it is absolutely clear that the size of the table is chosen depending on the area of \u200b\u200bthe room. Also, soft wood cannot be used for the kitchen table due to its use in "extreme" conditions.
The choice of the external characteristics of the product is a responsible process, therefore, before starting the personal formation of a table for a summer residence, it is extremely necessary to carefully assess the needs for which this table is made.

Transferring ideas to paper
When creating a structure that is the fruit of your imagination, you will have to develop a diagram and drawings of your table with your own hands. For which there is a huge variety of electronic programs.

After a thorough development process, it is imperative to transfer the result to paper. It is very important to use this manual all the time for fast and quality work.

Creative process
The preparation of the drawings is the last preparatory step. Then you can start the most important part of the work - the manufacture of parts. Do-it-yourself wooden tables are much easier to create if the drawings and diagrams are as informative as possible. This reduces the likelihood of errors to a minimum.
You can do it yourself personally as a desk, as well as a magazine or children's version. With a certain skill, it is possible to create a computer desk. And also a dining or country model. Each of the options is fairly easy to implement.

The cloth for the countertop and the board with the beams, from which the rest of the parts will be formed, are processed with an available tool or, at worst, with coarse-grained sandpaper to remove any defects in the form of irregularities and protruding knots.


The boards are sanded from all sides, including side edges and corners. If you create a canvas from wood cuts, you need to make sure that they are dry enough, and also repair small cracks found after visual inspection. And it is better to groove them. To get a more reliable web grip and save time for assembling elements.

Transfer the scheme to the finished canvas. The main elements are cut out with a jigsaw and, if necessary, the sections are ground. The protruding support elements are trimmed by about 3 centimeters. Horizontal cuts are made on both sides of the supports (legs).

The workpieces are covered with a preparation that prevents the ingress of moisture and pests, and only after final drying is it allowed to resume the process of creating the table with your own hands.
Putting the details together
After making all the necessary parts, you can proceed to the sacred service. Namely, to put together the desired masterpiece. And this can be either a round table or any other selected product.

First, it is necessary to assemble the supporting structure using screws and glue (first, thin channels are drilled with a drill to the length of the screw, otherwise there is a possibility of splitting the part). For the connection, you can use galvanized screws, since they do not rust, and this is very important for wood products. Or wood glue.

According to the basic rules, the frame in length and width should be 30-25 cm less than the countertop.


On the sides, you need to attach additional boards to give rigidity and to hide the place where the legs are attached. Cut off the chamfers in the places where the legs are installed.

Then the table leg is fixed in place with clamps, and bolt holes are drilled in the frame. Place the supporting elements in their places and fix them with stoppers. Reinforce the structure with wood glue. Then install the tabletop in place for which furniture corners are used. At the very end, all visible screws are hidden with wood-colored plugs.

The final stage. Finishing
A photo of the completed table can be seen below. This is surprisingly easy to achieve. Optionally, you can round either only the corners or completely the butt, depending on the type of table. It will be nice to make chamfers on the edges of the tabletop.
In the entire structure, irregularities are sanded, with the help of putty, mistakes are hidden. To extend the service life of a self-assembled table, it is necessary to cover it with several layers of varnish or stain.


Thus, making a beautiful wooden table with your own hands is quite a simple pastime. And easy to do. The guarantee of extracting a solid, ideal in size and aesthetic result according to its drawings is: precise adherence to the manual, error-free execution and weighed selected material. And the resulting table will harmoniously fit into the exterior.

Photo of tables with your own hands


An indispensable thing in any interior is the kitchen table. This furniture attribute can serve many functions. Tables can be more than just dining tables. For example, using a table like a bar counter, you can successfully divide the space of a room. At the same time, he will also fulfill his direct purpose. You can get acquainted with a lot of similar ideas from the photo of the kitchen table in any catalog.
The type and purpose of the table depends solely on the wishes and needs of the owner. To date, a huge range of furniture is on sale, from which you can choose the appropriate option.
But if you want to save money or strive to be original, you can make the furniture yourself. Therefore, we will consider what and how you can make a kitchen table with your own hands.
Varieties of kitchen tables
If you decide to make a table yourself, you must first carry out preparatory work. The preparatory stage involves the choice of style, shape, size of the future product. It is also necessary to calculate and prepare the place of its installation. If the table is built-in, consider mounting options.

There are many types of tables, for example the following:
- classic;
- corner;
- transformers;
- retractable;
- folding.

The tables can be made with tables or drawers. When choosing the type and size of the table, you should focus primarily on the size of the kitchen, the purpose of the future product, as well as the style in which the room is set up.

In a kitchen of a small area, it will be appropriate to use a folding, corner, bar table. Any ideas on how to make a kitchen table are welcome. This solution saves a significant amount of space.

To save space and ensure the functionality of the furniture, it is recommended to use transforming tables. A small table that folds out into a large dining table does two things at once.

A great idea to save space in the kitchen is tables that slide out of the kitchen unit. And the bar counter option is suitable as a division of space in a large kitchen or studio apartment.

Material selection
Natural wood (oak, walnut) is ideal for making a classic dining table. Inexperienced craftsmen are advised to choose pine boards, since they are easier to process. Such furniture will add luxury and elegance to the interior. But it is worth remembering that wooden products require special care.
The most popular material for making furniture is chipboard. Its main advantage is its affordable price. But purchasing it from an unverified manufacturer, one cannot be sure of the safety of the material.

A more reliable and safe material from this category can be considered MDF. You can also purchase special furniture boards.
The use of metal is allowed for the kitchen table, it is better to choose stainless steel. Metal furniture is durable. But such a product will cost a lot, and you will also need to use tablecloths.

Making a wooden table
Before starting work, prepare a drawing of the kitchen table and the necessary tools. It is better to purchase ready-made legs. To make a worktop that will be 80 cm wide, you need dry boards 1 meter 20 centimeters long.

Each board is sanded so that the edges are perfectly flat and there are no voids at the joint. Connect the prepared boards with dowels. Lay them against patterns to avoid deformation.

According to the instructions on how to make a kitchen table, holes must be made at the end of each board, the distance between which should be no more than 15 centimeters.

Attach the table legs to the base with screws. Make holes for fixing the table top in each longitudinal board. Fastening the countertop to the base can be done after twelve hours, when the glue dries. The finished table needs to be painted or varnished.
Note!


Photo of kitchen tables with your own hands


Note!


Note!


A great way to complement the interior of a house or summer cottage is to make an original and stylish piece of furniture. We are talking about how to make a table with your own hands in this article. Such a piece of furniture will become a real decoration of the living room, kitchen or study. It can be assembled at home from specially ordered planks and beams or from leftover materials. For this, the master will need drawings, tools and a little imagination. But the experience of making homemade furniture may be lacking. We offer you a very simple project for assembling a sturdy and stable table. Even a beginner can make furniture according to this scheme.
It all starts with an idea
How to make a table? You need to start work with the selection of a finished project of furniture for the living room or with drawing up your own diagram of the future product. You don't have to limit your imagination, but remember that the complexity of the drawings should correspond to your skill level. In the absence of sufficient experience, it is better not to try to assemble a very complex structure yourself.
The project of the table for the home can be drawn with a pencil on paper. First, you need to draw a structure of the desired shape, and only then indicate its dimensions. Most often, a do-it-yourself table for a living room is made square or round, but for a kitchen or study (and any small room), a compact corner or adjustable table is suitable.

The dimensions of the table with your own hands can be absolutely any, when choosing the dimensions of the product, it is recommended to take into account, first of all, the dimensions of the room in which it will stand. Then, using the drawings, you can calculate the amount of material that will need to be purchased. It is recommended to purchase materials with a small margin (just in case).
If you are a beginner who assembles furniture for the first time at home, then you better give preference to soft wood (for example, pine).
Such materials are very malleable and do not degrade during assembly. If you are making living room furniture and aesthetics are important to you, then choose poplar. If the homemade table is going to be used outside the home, then it is recommended to choose treated wood or mahogany.

A forged table with a wooden tabletop will also be distinguished by its durability. A wood product decorated with wrought iron elements will add charm to your yard.
To assemble a simple table at home, you will need:
- edged or grooved boards, beams with a square section (for legs) and with a rectangular section (for a frame);
- white or yellow wood glue;
- screws (preferably 4x60 self-tapping screws);
- screwdriver;
- drill;
- set of clamps;
- sandpaper or sander.

Making the countertop right
We begin the work by describing the process of making the countertop. There are several ways in which you can solve this problem. What determines the choice of this or that method? First of all, from the skill of the furniture maker and the intended appearance of the table for the living room or country house. So, here are the main ways to make a homemade countertop:
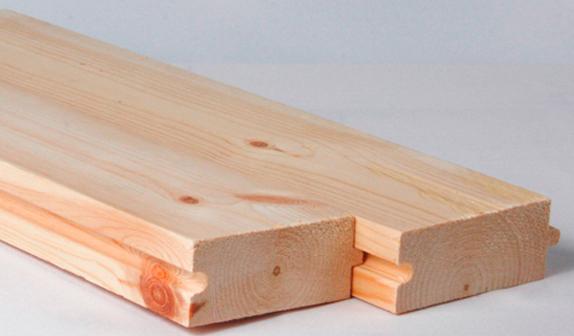
- Production from boards. This material is distinguished by its relatively low cost, excellent appearance and environmental friendliness. If you are a beginner craftsman, then you can make a table with your own hands from grooved boards (that is, blanks with combs and grooves.
An experienced craftsman can assemble living room furniture from their edged boards. To do this, he will need dowels or a soil carrier of a small length. They will be used to connect the boards to each other.
- Manufactured from a single piece of wood. In this case, you do not need to rack your brains at all over how to make a table with your own hands with a fairly durable and beautiful tabletop. The best option is to purchase hardwood plywood. However, such a product will be quite expensive.
- Assembling a product from leftover materials. This is a very cheap way to make home furniture, but it is quite complicated to implement. It will be necessary to select pieces of wood that will harmoniously combine with each other and will not create problems during the installation and further use of the product. Combining leftovers is also not easy. In this case, you will have to use screws and a large amount of glue or create an underframe (stiffeners).
In the first case, the boards are layered on top of each other, joining with screws and glue. Since all boards are of different sizes, it will be necessary to cut off protruding elements on the finished product and carry out a thorough grinding. The result is an original and comfortable table.

The second method involves fastening the remnants of materials in any convenient way (using glue, screws), followed by strengthening the structure by installing a subframe or stiffeners. Such a table with your own hands will be distinguished by stability and durability.

If the table will be located in the courtyard near the house or in a stylized living room, then you can order a forged frame with legs for it. This will add a special flavor and originality to the product.

When the countertop is ready, you can leave it overnight to dry properly. The manufacturing technology of this part of the table is approximately the same regardless of the chosen shape of the product. The main differences between the projects in this case are in the shape that needs to be given to the edges of the boards or a solid sheet of wood.
If you are making an original corner table, then the edges of the boards will have to be made at an angle. It is very important to correctly calculate the degree of each cut so that the edges of the product are even.
However, if irregularities are still formed as a result, then the edges of the table will need to be properly sanded. You can also first fasten the boards, and then draw a triangle on the blank and cut the finished product.

If you are making a round table in the living room or a product with rounded edges, it is recommended to fasten the boards of the future product, and then draw lines of future cuts on the blank with a pencil or chalk.

The finished worktop for such a project will look like this:

Frame as the basis for a robust table
The next step is making a frame for the living room table. The frame is a wooden square (for a square or rectangular table) or a polygon (for a round product), which is attached to the table top and secures the legs.

Making a frame for an ordinary table is not difficult, even for a beginner. To do this, turn the tabletop upside down, measure the canvas, count a few centimeters inward and make marks. Then you can draw a rectangle or square from the marks.
After that, you need to cut off four pieces of wood of such dimensions that correspond to the drawings on the countertop. For the manufacture of the frame, it is recommended to take a rectangular bar. The plank frame may not be strong enough. Then the frame must be attached to the countertop with glue or self-tapping screws. The second option provides a higher reliability of the structure, however, on the surface of the table top, in this case, the caps of the screws will be visible.
We make strong and reliable legs
At the next stage of the implementation of an unusual project, you need to make the legs of the table. First, you can cut off one leg of the desired height (it is recommended to use a square bar for the production of legs), and then, using it as a sample, cut off the remaining 3. If you are making a corner table, then there will be not 4 legs, but 3. After the cutting process is completed, follow clamp all the legs together and cut them so that they are the same length.

At the next stage of work, the legs need to be sanded with a grinder or sandpaper. But the top and bottom of the products should not be sanded, as you can spoil the correct cut angle. Then you need to attach the legs. To do this, the table can be turned upside down.
The first leg should be placed in one of the corners of the frame in such a way that the upper cut touches the table top, and the two sides of the leg are adjacent to the frame. Then, the contact lines of the parts must be liberally greased with glue and connected using fastening screws that are screwed through the table frame. It is advisable to make holes for the screws in advance so that the screws do not split the wood during the screwing process.
It is better to refuse the use of nails and a hammer in the manufacture of a standard or corner table, since nails can split wood, and using a hammer requires special skill from the manufacturer. In addition, screws hold wood better than nails and can be removed from the product if necessary.
Be sure to make sure that the legs are attached to the table at the correct angle. One of the advantages of screws is that they are easily adjustable. Their position can be easily changed if necessary. Then the same operations should be carried out with the rest of the legs. It is also possible to screw the legs through the table top, but in this case there is a risk of splitting the top of the legs. And the aesthetics of the living room table will suffer from this.

When the glue is completely dry, it is necessary to check the product for stability, strongly loosening it. However, if you have made a corner table, then this step can be skipped. It will be in contact with two walls of the living room or study, and this will give it additional strength. Then it only remains to grind the surface of the finished product and cover it with wood varnish or special paint. This concludes the work. Now you can add a wonderful product to the interior of your apartment or garden.
Tables are essential elements in any home, and they can be created from different materials and can also have a variety of parameters. The choice of a wooden table is considered an excellent solution, since it is an environmentally friendly, beautiful, durable product. You can even make a table with your own hands out of wood that will fit into the interior. It can be located in an apartment or in a country house. It can have different shapes, sizes, but a hand-made element will be inexpensive, fully meeting the needs of the owners. If desired, it is allowed to create a full-fledged kitchen with your own hands, which will have the same parameters as other interior items. However, before making a wooden table, it is important to carefully study the drawing of the table so as not to spoil the materials used in the process.
Size and shape
Beforehand, it is important to determine what dimensions and configuration the wooden table will have with your own hands. It is considered optimal to use some of the recommendations of professionals:
- a do-it-yourself kitchen table should fit perfectly into the area of \u200b\u200bthe room in which it is planned to install it;
- it takes into account how much space in the kitchen or in the gazebo is given for these purposes;
- if a street element is being created, then it is important to determine in advance how many people will use it at the same time;
- if you plan to use the product for a large number of guests, then it is advisable to choose a folding option, which, when assembled, will be used by the family, and for a larger number of friends, it is unfoldable;
- correctly made wooden tables must correspond in shape to the wishes of the owners;
- for each person, at least 70 cm in width should be allocated;
- a large-sized table is suitable for a gazebo or a large kitchen;
- if a children's table is formed, then the age, height of the child is taken into account;
- a homemade table in height should not be less than 70 cm;
- the structure must be sized so that it fits well into the space allotted for it, while leaving a lot of room for people sitting behind it.
 Round
Round  Oval
Oval  Rectangular
 Most often, you need to choose a table for the kitchen. The table in the kitchen should be beautiful, roomy, but it should not be allowed to interfere with the process of cooking or eating.
The configuration of a wooden table can be different, but most often people prefer to make a round table because it is comfortable and attractive. However, it is allowed to create a table made of wood with your own hands, which has a square, oval or some other shape. It is important here to focus on your own preferences and selected sizes.
When choosing sizes, you should take into account the number of legs, which are usually also made of wood. Tables can be installed on a different number of legs:
- one massive leg - this option is suitable only for small products. Most often, a table for a gazebo is chosen for this, which is small in size. Also, a children's table is often equipped with one massive leg. A reliable and optimal cruciform strapping is certainly performed, and without it one leg will not be able to cope with high loads;
- two massive legs - they should be located at an optimal distance from each other. They are usually chosen for structures that are oval or rectangular. A table for a summer residence, equipped with two reliable legs, is very convenient and people sitting behind it do not bang their feet on the legs. As a rule, the legs are narrow at the top, and widen at the bottom;
- a writing table or a dining table with four legs - this option is considered the most popular and frequently encountered. Making a do-it-yourself folding table with four legs is easiest. There is no need to make complex and specific calculations, and the stability and reliability of the final structure is also ensured. It is important to make the legs of the optimal size and length. They should be exactly the same so that the table for the summer cottage or kitchen does not warp during use. The four legs can be used for products in which the upper part has different unusual and complex configurations.
 Two legs
  One leg
  Four legs
 As for the size, here you should focus on the area of \u200b\u200bthe room in which you plan to use this furniture.
For a small kitchen, a product with a countertop size from 80x50 cm to 120x60 cm is suitable. The width of the countertop is most often chosen in the range from 80 to 110 cm. As for the height, 70 cm is considered optimal. But if necessary, you can make it higher or lower by 5- 10 cm.
Thus, the choice of the size and shape of the product is an important parameter, therefore, before you form wooden tables for the dacha with your own hands, you must carefully evaluate these characteristics.
Material selection
A country table or a structure for a house should be formed only from high quality wood. The durability of the product, its service life and parameters depend on the correct choice of material. If you choose a table from an array, you will have to prepare for quite significant expenses, since this raw material is considered the most expensive. However, from it it is possible to obtain a really high-quality structure that is resistant to various factors of influence.
- the density of the tree must be high in order for your object to be of high quality and durable;
- if soft wood is chosen, then scratches and other problems will constantly appear on the product, therefore restoration will be performed frequently;
- if you choose hard rocks, then it will be difficult to make high-quality processing yourself;
- a table for a summer residence can be created from different species, and inexpensive pine is often chosen, however, the resulting structure is necessarily covered with several layers of varnish;
- if you make it from solid wood, and at the same time choose a nut, you will get a durable, massive and heavy product;
- the ideal option is the choice of oak wood, since it is characterized by an increased indicator of strength and hardness, and a long service life of the product is guaranteed, and at the same time it is easy to process, restoration can be carried out and it does not deform during operation.
Production can be carried out from different types of wood, so the choice depends on the preferences of the future owners, the available financial capabilities and the experience of the person doing the work. It is important to choose a material that is easy to process for a beginner. A good choice is wood cut material, which is affordable and inexpensive.
 Wood blanks for the table
 How to make a wooden table with your own hands
If you plan to do the work on your own, you must carefully study the instructions on how to make a table out of wood. This process is considered simple, and such a product is perfect for a wooden gazebo, as well as for a house and apartment.
Required tools
- electric jigsaw;
- milling cutter;
- sander;
- screwdriver;
- sandpaper of different grain sizes;
- drills of various diameters;
- special solutions for processing wood and for eliminating various problems on it, and this includes various varnishes, paints or putties.
Some tools can be replaced with improvised tools available in the house of almost every man, however, this is allowed only for soft wood.
 Instruments
 Drawing and diagram development
The work should be carried out according to pre-formed drawings. A diagram is created that shows the sequential actions, following which, the achievement of a high and desired result is ensured. Photos of different drawings can be viewed below, after which the best option is selected, which brings it to life.
If you need to make a unique design, you will have to deal with the development of diagrams and drawings yourself, and for this you can use convenient electronic programs. After creating the documents, a photo is printed, which is constantly used in the process of work.
Manufacturing of parts
After the preparation of the drawings, the direct and responsible work begins, consisting in the formation of individual parts. Do-it-yourself wooden tables, the drawings of which will be detailed and understandable, are created simply and quickly.
It is allowed to make your own desk, coffee table or children's table, as well as a table for a summer residence or a dining structure. Any option is considered quite simple and straightforward.
The process of creating structural parts is reduced to sequential actions:
- the canvas is prepared, and it must be sanded and cleaned, after which it is covered with high-quality antiseptics;
- if you create a structure from wood cuts with your own hands, it is important to make sure that they have optimal moisture content, and small cracks are also closed if they are found after visual inspection;
- lines from the existing diagram are transferred to the prepared canvas, which allows you to get the main elements, and this includes the legs, stopper and table top;
- those parts that will act as support legs and strips are shortened by about 3 cm;
- horizontal cuts are made on both sides of the legs.
After preparing the main elements, a children's table or a desk is assembled, as well as a coffee table or a table for a summer residence, depending on the design chosen in advance. If you plan to make a folding object, then additional elements are prepared for its creation.
Before using any wooden part, it is important to treat it with special antiseptics and antipyrine, which protect it from decay, fire and high humidity.
Preparation of parts
Preparing and grinding the legs
Finished workpiece
Assembly
After the preparation of all the most important details, the creation of the structure begins, and this includes a coffee table or any other selected product. The legs and the stand are fastened into a single element, and a stopper is also attached.
Holes are created in each part, after which the elements are bolted together, which guarantees a truly durable fastening. Additionally, it is recommended to fix the attachment points with high-quality glue. If after assembly the tables wobble a little, then it is advisable to use tightening straps equipped with clamps for better fastening of the main elements.
 Assembling parts
  Build rules
  Attaching the legs
  Fastening the crossbars
 Finished product processing
Photos of the finished beautiful and high-quality wood product are presented below. Getting the perfect result is easy enough. After the final work, processing begins, which consists in simple and sequential steps:
- for countertops, the edges are manually smoothed;
- the entire structure is covered with high-quality varnish, and coating some of its parts with paint is considered an excellent solution, which will ensure its magnificent appearance;
- if in the process of work any mistakes were made, then they are hidden with high-quality putty, but it is important to choose a product that is ideally suited to the color.
If it becomes necessary to build a luminous table, then it is equipped with various small recessed lamps or a bright LED strip, and it can not only provide ordinary lighting, but also color.
 Finished product processing
 Since the creation of the structure was done by hand, a person acquires the basics of skills when working with wood. If it becomes necessary to repair the product, then this process will not be difficult. For this, all the necessary tools will already be available, and it is also enough to use wood and special means with which the restoration of various parts is carried out.
Thus, creating a table is a fairly simple job, easily done on your own. If there are no ideas as to what appearance the product should have, then a suitable photo can be found below. All work is carried out sequentially on it. If you follow the instructions exactly, select high-quality material correctly and avoid mistakes, then it is guaranteed that you will receive a high-quality, durable, beautiful and ideal-sized wooden table with your own hands, the drawings of which are presented below, which perfectly fits into the interior or exterior.
Video how to make a wooden table with your own hands
The video shows the technology for making a wooden table with your own hands.
Do-it-yourself furniture has a number of undeniable advantages. As a rule, self-assembly of such interior items is much cheaper than buying ready-made counterparts. For the manufacture of the table, you can choose exclusively high-quality materials and fasteners. And the appearance of furniture depends only on your tastes and preferences.
A do-it-yourself table will cost much less than a ready-made store version.
Many craftsmen believe that making furniture on their own is very difficult. But in order to assemble a dining table with your own hands, it will take a maximum of 3-4 days. Difficulties can arise only in the manufacture of countertops. But if you familiarize yourself with all the nuances of the upcoming work in advance, then there will be no difficulties.
Preparatory stage of work

If you want to make a large dining table, then you need a reliable and sturdy table top. It is usually made from wood. Moreover, the design can be of 2 types: prefabricated or made of a solid wood panel. Sometimes wooden plates are used to assemble expensive furniture. But in this case, it is better not to choose such material. The fact is that the lids cut from the solid wood are very heavy. And the tabletop can bend over time under its own weight.
For the independent manufacture of a dining table, it is worth using sufficiently soft and plastic materials. Too hard wood under the influence of moisture can crack and deform. But pine, which is usually used to make furniture, will not work in this case either. Therefore, it is wiser to opt for cherry, walnut or oak. These types of wood are not cheap.
You should not make a table from composite (glued) panels. Water and dirt can get between the lamellas (layers) of such plates. In this case, the tabletop will begin to collapse from the inside. But if you are going to make dining room furniture, then you can make the surface of the countertop type-setting. Such covers look very impressive, because in such a "mosaic" you can combine different types and colors of wood. But this requires certain skills and knowledge.

End embedding scheme
Legs can be of any shape and design. Usually, timber is used for their manufacture. But the supports can be cut from furniture board or thick enough plywood. Then the sidewalls can be made solid or decorated with a slotted pattern.
Dining tables look very impressive, for which wooden balusters serve as legs. They have a complex shape, but at the same time they are quite reliable and stable. You can buy such blanks in stores selling goods for the construction and repair of a house.
In addition, you will need a board with a thickness of at least 2-2.5 cm. It is needed for supporting ribs (ties, table legs).
Back to the table of contents
You may be interested in: How to whiten a yellowed and dirty tablecloth?
Table drawing and necessary tools

Before getting down to work, be sure to draw up a detailed drawing of the entire future structure. Indicate the required dimensions on it, think over the method of fastening the main nodes.
The dimensions of this furniture are 120 * 60 * 75 cm. Accordingly, if you use the dimensions given as an example, then you will not get the largest table. In addition, the height of this model is due to the height of the finished legs (balusters). Of course, you can make changes to the finished drawing.
To make a table of the simplest design, you will need the following blanks:
- Table top (1.2 * 0.6 m) - 1 pc.
- Longitudinal jumpers (100 * 2.5 cm) - 2 pcs.
- Cross bars (40 * 2.5 cm) - 2 pcs.
- Table legs (in the given example, their height is 70 cm) - 4 pcs.

Tools necessary for work: drill, plane, screwdriver, hacksaw or electric jigsaw, grinder.
Decide in advance on the type of fasteners for the future design. You may need additional slats (for example, if you want to make an additional diagonal rib screed).
It is wiser to prepare all the tools that you need for work in advance. You will definitely need:
- plane;
- hacksaw or electric jigsaw;
- drill;
- screwdriver;
- grinder;
- set of sandpaper.
Do not forget to prepare the instruments required for the measurement. When making, you cannot do without a centimeter ruler and square, a construction tape and a pencil. When everything you need is ready, you can start making the table.
Back to the table of contents
Making a dining table

The easiest way to assemble a table with your own hands is to use a ready-made tabletop. But such plates, made from rather expensive types of wood, are not always found. The shield can be assembled by yourself. To do this, you need a jointer or a long planer, commonly called a jointer. Plus, you can't do without a milling machine or hand-held milling cutter.
If you do not have such tools, then you can order the production of the necessary parts in a carpentry workshop. Just don't forget to specify the dimensions you need. Before assembling the countertop, all parts must be processed, planed off irregularities and protuberances, sanded "roughly" and treated with antiseptic impregnation.
The easiest way to attach a prefabricated worktop is to simply join the pieces edge to edge. In this case, the elements just need to be glued to each other. But a countertop like this won't last long. Especially if you intend to use the product outdoors. In addition, it is worth remembering that the larger the tabletop, the more reliable all fasteners should be. Otherwise, the tabletop will simply fall apart under its own weight.
You may be interested in: How can you remodel an old kitchen set?
The cover of a table intended for a garden or a summer cottage can be assembled with the help of transverse slats, which will pull together the tabletop boards from below. In this case, you only need to prepare lumber of the required length. Next, lay the boards edge to edge, making sure that the edges of the blanks lie flat. Use small nails to secure 2-3 crossbars (this side will be the bottom of the lid). The screeds should be approximately 7-15 cm from the edge of the table top. Another 1 rail can be placed across the middle of the cover.
Back to the table of contents
Assembling the furniture board

The most reliable method of fastening is the so-called "dovetail". With such a system, a groove is formed on one part, and a ridge on the other. But for the manufacture of this type of mount, a milling machine is needed. The task can be facilitated by using a strip of the required thickness as a comb. Then you will need to form grooves on both parts. This can be done using a special drill bit designed for a drill. Then a rail is glued into one of the grooves. The groove width directly depends on the size of the cutter used. But usually it is made from 6 to 15 mm. Naturally, the thicker the board, the wider the groove can be.
Slightly less reliable, but easier to manufacture is considered to be the "thorn-groove" mount. For him, holes (nests) are drilled from the ends of the parts for spikes. The depth of the slots should be ½ the length of the tongue. It is wiser to use ready-made spikes that can be purchased at the store.
The markings for the grooves must be done very carefully, making sure that the location of the sockets coincides on the connecting parts. As a rule, the distance between the holes is 7-12 cm. First, the spike is glued into one part of the tabletop. And only after complete drying, the elements of the table top are interconnected. The assembled countertop is tightened with clamps and left until the glue is completely dry.
Back to the table of contents
Assembling the dining table
The assembly of the entire structure begins with the connection of the legs. First, they are attached in pairs. For this, the transverse jumper is connected to the leg. On the inside, 2 holes are drilled, which should go strictly perpendicular to the leg. Make sure that the drill does not "pierce" the support through. The hole must be formed so that it is 1.5-2 cm from the edge of the leg. A self-tapping screw is screwed into the reamed socket.
It will be much easier to install the fasteners if you first form a longitudinal groove in the transverse screed about 5-7 cm long and 1.5-2 cm deep.

To do this, sand the mounting stock and slightly round the edges. In this case, the details will look much neater.
You may be interested in: How easy and inexpensive to decorate old furniture?
Before "planting" the self-tapping screw, grease the holes with wood glue. This will make the mounts much more secure. Connect all the legs in the same way, and then fasten the resulting pairs with longitudinal jumpers, forming a frame.
In order to make the structure more stable, diagonal ties can be placed in the corners of the frame. But usually such a precaution is considered unnecessary. Since a large table is reliable enough without additional fasteners.
The countertop is attached last. It is fixed in the same way as the transverse ribs. But the grooves for the fasteners should not be longitudinal, but transverse. Be extremely careful when installing the mounts. Make sure that the screw does not pierce the worktop.

