Make a brazier with your own hands from a cylinder. How to make a brazier from a gas cylinder yourself? Required tools for manufacturing
It is difficult to argue with the fact that resting outside the city at your own dacha is a real pleasure. After all, only in such moments of life can you truly feel the freshness of nature, cook fragrant kebabs and communicate with loved ones.
Especially the residents of large cities who have to live in constant urban bustle agree with this. For such citizens, their own dacha outside the city is a real salvation, where they can take a break from the boring atmosphere of the metropolis.
Naturally, in such a dacha it is easy brazier needed, because it is an extremely convenient means for cooking on fire, ever invented by people. Cooking on the grill began in the distant past, however, even in our time, many people are not averse to using this technique.
Brazier from a gas cylinder
Nowadays, a grill with a smokehouse is an indispensable attribute of any country cottage. As a rule, many summer cottages may have different house plans, sizes, furnishings, but any self-respecting owner of his own summer cottage has his own brazier with a smokehouse.
To reduce the cost of such a device to a minimum, it is best to make a brazier from a gas cylinder with your own hands. Such a smokehouse will practically not differ from that purchased in a store, and the amount of money that will have to be spent on it will be the minimum indicator.
The advantages of a handmade barbecue
Since the appearance of barbecues, a person has constantly modernized his device, adding new functions to it, making it more convenient, and so on. Thus, from the usual frying of meat on a stick, over a fire, we came to modern microwave ovens. Hence, assortment of barbecues so wide that everyone can freely choose the model that suits him.
However, as a rule, prices for modern models of barbecues are simply prohibitive and not many can afford such a luxury. That is why this article was created - because many people are wondering how to make a brazier from a gas cylinder with their own hands.
So, below we will look at a list of advantages as well as disadvantages of the design that we will be doing:
Pros:
- Large sizes that will allow you to cook a large amount of food at a time for a large company.
- Lightweight design, which is easy to make, even for those who are not tied to physical work. All you need is a gas bottle and a few hours of time to set up your smokehouse.
- Extremely low cost of a barbecue. Anyone who has their own summer cottage can afford such costs.
- Sturdy and durable construction that can withstand the highest temperatures. Due to this, the durability of your barbecue also increases.
- In the case of the presence of a hinged cover, the grill does not have to be brought under a canopy in case of rain. Plus, a barbecue lid is required in order to use it as a smokehouse.
Minuses:
- The first advantage of such a barbecue can also be called a disadvantage. The fact is that a large structure cannot always fit into the courtyard of the cottage, especially if its area cannot boast of large dimensions.
- A brazier and a smokehouse from a gas cylinder will not be a portable structure that can be rearranged at any time to a more convenient place. In order to transfer such a structure, you will need at least 2 people.
- Of the raw materials that can be used as fuel for the barbecue, only coal can be used, since there is too little space for firewood in it.
The production process of barbecue from a gas cylinder
The first step is to find suitable gas cylinder... In principle, this cannot be difficult, especially for those who have survived the time of refueling gas stoves with gas cylinders. To make our barbecue, you will need a large gas cylinder with a capacity of about 50 liters.
I would like to warn you right away that the manufactured grill and smokehouse will not have a presentable appearance. However, this will not affect the quality of food preparation. It's a matter of taste. Of course, you can specially equip it so that it looks neat.
It is also worth knowing that if you don't have a welding machine, as well as the ability to use it, then you will not succeed. In this case, the only way out is to contact a specialist in the industry. In principle, this cannot be called a significant drawback of the manufacturing process, since it will not be difficult to find a competent welder with his own welding machine.
Tools and materials that will be needed in the production process
So, in order to make a brazier from a gas cylinder with your own hands, you will need the following tools:
- Bulgarian;
- two door hinges for the cover;
- a set of tools that include:
- hammer;
- screwdriver;
- adjustable wrench;
- chisel;
- drill;
- corner;
- metal pipe.
Manufacturing instruction
 The first step is to cut the balloon. This process is quite unsafe, so all safety measures must be followed. Make sure the gas cylinder is definitely empty and has no gas residues.
When cutting a cylinder into 2 parts, be extremely careful, because if there is even a little gas left in the cylinder, it can ignite freely and cause a lot of problems.
So, when the cylinder is cut into 2 parts, you need to wait until all the remaining gas has evaporated. After that, you need to turn the cylinder upside down in order to drain all the condensation.
In order to remove an unnecessary tap on the surface of the cylinder, you can use a hammer or grinder. In the first case, it can be simply beaten off from the cylinder, in the second, it can be completely cut down. The second case is less secure, so we recommend the hammer.
After you have done all the above steps, you must completely fill the bottle with water and leave it like this for a few days. After that, working with such a structure will become absolutely safe and you can do whatever you want with it.
How to make a cover?
As you might have guessed, the top cover of the barbecue is an irreplaceable attribute. First, it is rain protection. Secondly, this is the introduction of the smokehouse function, without which your grill will not be as functional.
So, we will make the lid for the barbecue from the already cut off part of the cylinder. The cap must be cut from the cylinder from the top of the body along the middle. It is necessary to saw it out from the middle to the edge. After that, it is attached to the main part of the barbecue using the door hinges that we prepared earlier. The side walls must be left.
Assembling the top
 When the top cover is ready for use, you need a good quality attach it to the main part of the barbecue... To do this, we need, as mentioned earlier, door hinges and a drill.
First of all, using a drill, we drill holes for the hinges, after which we fix the latter with rivets and weld. Again, if you do not have a welding machine or the ability to use it, contact a specialist who will solve all your problems for a small fee.
You can get creative a little here. You can attach additional accessories to your barbecue, such as a lid handle. You can also construct a removable cover by pointing the hinge pins to one side.
Strengthening and fixing
In order to avoid the possibility of deformation of your future barbecue due to high temperatures, it is necessary strengthen the base of the smokehouse.
To do this, a metal corner must be welded around the entire perimeter. It is best to do this inside the barbecue. Thus, you will kill two birds with one stone: strengthen the base and create a comfortable support for the net or a skewer from a regular corner.
It is also best to make cuts so that the skewer fits perfectly into its place and stays firmly there.
 Naturally, any grill or barbecue maker should have its own legs. This did not pass our case either. For the legs, the usual ones are best. metal pipes the same length. There should be four of them.
To fix them, it is necessary to drill holes in the corners of the bottom, after which we fasten the legs with nuts. If after that the legs of your barbecue are not stable enough, weld additional hinges from below.
To top it off, drill a few holes in the bottom of the charcoal grill.
Outcomes
So, now you can easily make an excellent grill from a cylinder with your own hands. Moreover, as you could understand, this process does not take much effort and is extremely simple.
If you approached the whole process with all seriousness and did everything right, then such a structure can serve you for more than one year. And here you can not only fry kebabs, but also smoke various products.
Trust me if you make one yourself functional product, it will serve you for more than one year, which is good news.
Regardless of the design chosen, the first step in making a barbecue is cutting an old 50 liter propane cylinder. We do not advise you to immediately rush at him with a grinder. In this case, you need to follow the safety rules. Residual gas contained in each container may explode on contact with sparks and air.
Therefore, you first have to manually unscrew the tap. Removing the union on an old cylinder is not always an easy operation, as it “sticks” tightly to the body. You can try to move it using an open-ended adjustable wrench, hitting the handle with a hammer.
If the tap does not give in, then use another tool - an adjustable water wrench and a steel pipe as a lever.
Under the influence of such a powerful force, any thread will give up. In order to prevent the container from turning, on the other side, a stop angle is attached to its bottom.
To facilitate unscrewing, you can apply VeDeshka to the point of contact of the valve with the body and wait a couple of hours until the thread turns off.
After that, the container is slowly filled with water. It displaces flammable gas-air mixtures, eliminating the risk of explosion when cutting.
After that, the water is not drained, but the tap is put in place and the marking of the case is started.
There is a long seam on one side of the cylinder body. It will be the "beacon" for the first cutting line. The second line is drawn on the other side so that it is opposite the first and recedes upward from it by 8 cm. This will be the second cutting line. If you do not make such an amendment, then the brazier will turn out to be shallow.
Having made the markings according to the drawing, they take the grinder and cut through the walls, separating part of the case. It will be used as a hinged cover.
An important nuance! You need to cut the body carefully next to the seam so as not to damage the steel ring that is under it. It will serve as a stop for the lid so that it does not fall into the brazier.
In the lower photo, a ring is visible on the left side of the container. If the master passed the grinder next to the seam, then it would remain in place and serve as an emphasis. It is not difficult to correct the mistake made: you need to weld steel strips on top of the lid.
The next step is to remove the choke. It is trimmed flush with the body.
Remove burrs with a grinding wheel.
The further procedure for work depends on how you intend to use the grill: only for frying or combine it with a smokehouse. We will consider these operations after reviewing the finished structures.
Step-by-step instruction
The process of making a barbecue consists of several stages.
Sawing. The cylinder must be cut into two halves. This should be done along the weld, as close to it as possible. It is best not to cut the sidewalls. They will serve as good fire dampers and will help maintain the temperature. Be careful not to damage the side rings when cutting, as they will support the cover.
Sawing a balloon
Legs. The height of the legs depends only on your choice. You can screw the legs from an old-style sewing machine, or you can use pipe trimming.
 Legs can be equipped with castors for ease of movement
To fasten the pipe, it is necessary to drill four holes in the bottom of the barbecue, into which the bolts are inserted so that the thread is outside the barbecue. They can either be tightened with nuts or simply welded. Nuts are welded to the top of the pipes and screwed to the barbecue.
Advice. To make the installation of the cover easy, firmly fix the grill on the ground.
Cover installation. The lid for the brazier is attached to hinges, which are fixed with rivets and then welded. You can make the cover removable if the awnings are directed to one side. It is imperative to weld on the hinges, because rivets can simply fly out under the influence of high temperatures. But for mounting the handle on the barbecue cover, only bolts will be enough. When choosing material for the handle, remember that it must be heat resistant. Additionally, you can make a stopper for the lid using chains or a corner. A chimney can be installed in the valve opening.
 The cover can be secured with hinges
Assembly. So that the brazier does not deform under the influence of temperature, some craftsmen additionally weld a corner to the inner edges. It strengthens the perimeter and makes the structure more rigid. In addition, it will serve as a support for the grate and skewers. So that the ash does not have to be raked out by hand, holes are drilled in the bottom of the barbecue. In the absence of corners, the slots for the skewers are cut out with a grinder.
Advice. For greater functionality and convenience, the internal space of the barbecue can be divided into two zones. In one part, make supports for the grate, and in the other, connectors for skewers. Install additional clips on multiple levels to help you adjust the height of the grate above the coals.
The final touch will be staining... This process is optional and is a personal matter.
Make notches for skewers with a grinder
Illustrative instructions
So, the balloon is completely ready and flushed. Now you need to cut it into 2 pieces. The easiest option is to simply cut the cylinder in half lengthwise and get two classic open barbecue grills.

The easiest way is to cut the cylinder in half and use it like a regular open barbecue.
If you are making a barbecue grill, then you need to "cut out" and cut off a rectangle that will be the lid of the barbecue, and the second part remains as a base. Draw a rectangle on the surface of the cut lines, horizontal lines will run approximately in the middle of the balloon or 5 cm above it, and vertical (transverse) lines will be at a distance of about 20 cm from its edges.
Cutting the cylinder
To cut the cylinder, use a gas cutter or grinder. Mark the boundaries of the lid: from the welding seams connecting the base and the bottom of the container, step back 5 cm and mark the line along which the cut will be made. Saw from the middle towards the edge, while holding the grinder disc perpendicular to the cylinder.
From the intensity of the work and due to the thickness of the walls of the cylinder, the grinder's disc can burn out by the end of the cut. To avoid this, in some places, cut the sections not completely; then you can easily bite off these small pieces with a chisel.

This is how a cut cylinder looks like - a blank for a barbecue
Barbecue legs
Consider how high your barbecue should be, and then start attaching the legs. You need to firmly set the grill on the ground so that it is convenient to weld on the lid.

The easiest way is to attach legs from an old sewing machine or a metal underframe from a small desk to the barbecue
You can construct pipe legs by bolting them to the bottom. Make 4 holes in the bottom of the base, insert the bolts into them with the threads outward. Secure with nuts or weld to secure. Attach the nuts for the bolts to the tops of the legs by welding and screw them to the base of your barbecue.
Installing the cover and handle
To attach the cover, make holes for the hinges, fix them with rivets and weld them. If this is not done, the lid may come off due to the high temperature. You can install a removable cover without hinges, then inside, metal strips must be attached to the transverse edges of the barbecue so that the cover does not fall inside.

Fasten the lid to the grill with welded door hinges
Bolts can be used to attach the handle to the cover. You just need to drill holes for them and fix them. Choose simple, heat-resistant handles so they don't burn later. Very comfortable handles can be made from a metal rod by welding it to the base.

Choose comfortable heat-resistant handles for the barbecue
Now you need to install the limiter on the cover. Make it from a corner or part of a pipe. And the lid itself can be fixed from one or both sides with the help of chains, thereby determining the maximum possible amount of its "tilting".
It is better to pre-connect the parts during work with clamps, which will firmly press all parts of the structure, leaving no gaps.
Assembly
- You may experience brazier warping when using the grill. To avoid this, weld the corners to the inner longitudinal edges of the base. You can place a barbecue grill or skewers on the ledge from the corner. For the high legs of the barbecue, additional fixation is also needed, which you can easily provide if you weld a corner around the outer perimeter of the structure, which will increase its rigidity.
The body of the barbecue must be strengthened so that later the brazier does not deform
- Drill holes in the bottom of the barbecue. They are needed so that it is convenient to pour out the coals or drain the water accumulated after rain. In addition, the firewood in the grill will burn better if air is drawn from below.
Make holes in the bottom of the barbecue
- In the hole where the valve was, install a pipe for extracting smoke and weld. Not everyone does this, someone leaves the grill without a chimney, especially if you plan to cook mainly with an open lid.
Install the smoke exhaust pipe
- If you did not attach a corner inward, with the help of a grinder, you can make slots in the sides of the base into which the skewers will be installed.
Use a grinder to make slots in the walls of the skewer container
Examples of barbecues from gas cylinders
The easiest way to turn a gas container into a brazier is to cut it in half, drill air holes in the sides, and weld four legs to the bottom.
 Divide the balloon in half and get two braziers
The most popular option among craftsmen is cutting out the side of the case and turning it into a door. It will help keep the coals warm for longer when frying.
For ease of transportation, two legs need to be equipped with wheels, and the third should be used as a stop. You can make the carrying handle longer and attach the dish and seasoning board to it.

The best brazier bed is obtained from an old sewing machine bed. It lowers the center of gravity of the structure, preventing it from overturning.

Forged decor and side pipe for exhausting smoke improve the appearance and functionality of the barbecue.

Having made a smoke umbrella over the brazier, two tables on the sides and placing it on bent steel legs, we get a more solid structure. There is no particular need for an additional canopy, however, its presence improves the appearance.

Our review continues with a homemade grill-smokehouse from gas cylinders. It is a combination of two containers: 50 liter and 20 liter. The smaller one is placed below the main one, connects to it through a small window and is used as a smoke generator. To improve traction, the chimney is made higher.

A more advanced option is to install a third vertical tank. Products for cold smoking are hung in it. The total capacity of such a structure is sufficient to prepare meat and fish delicacies in reserve.

Taking pride of place on the site, the brazier becomes the subject of general attention. Knowing this, many craftsmen decorate it according to their imagination.
The most popular option is the design in the form of a steam locomotive. The fire and smoke emanating from the brazier fit perfectly into this image.

The smoke generator can be placed sideways in the "driver's compartment", or it can naturally be incorporated into the overall locomotive design.

The streamlined shape of the tank is suggestive of a submarine. We present to your attention an interesting example of the implementation of such an idea.

The gas tank reminded one master of an underwater ship, while another came to mind the association with a pig. It is not difficult to embody it in metal.

Having got acquainted with the examples of folk "mangal creation", let's move on to considering the practical issue of how to make a barbecue from a gas cylinder and a smokehouse based on it with our own hands.
Preparation of materials and tools
First, we choose a balloon. The recommended volume is 50 liters for a large roasting pan. Before proceeding with the manufacture of a homemade barbecue, the container is cleaned of fuel residues. This is done carefully, even if it seems that the container is completely empty.
Gas cylinder cleaning
Despite the fact that the bulk of propane in the tank has long been gone, dangerous condensate accumulates on the walls and bottom. To get rid of it, you need:
- release gas in a natural way - through the valve;
- flush the bottle.
For complete emptying, the container is turned upside down. To understand if gas is coming out, the valve is moistened with soapy water - it will bubble. Another way is smell. Due to the presence of odorizers in propane, the fuel smells strongly, especially if there is a lot of it in the cylinder. Therefore, the container should be cleaned in the open air, preferably away from people so that no one panics. And, of course, away from sources of fire.
Photo: sawed off the valve at the propane
The flushing of the cylinder is carried out as follows:
- The valve is sawn off. They do it together - the assistant constantly pours water over the saw cut so that the cylinder does not explode due to heat and sparks.
- Pressurized water is fed into the container through the hole. In the process, the balloon is shaken to rinse the walls well.
- The water is left for several days, after which it is drained. Since it is filled with mercaptans, the smell will be pungent. We do not recommend pouring such liquid onto the beds.
To prevent the water from smelling, potassium permanganate is added, which causes the oxidation of odorizing compounds.
Getting rid of the pungent gas smell is not easy. To finally remove it, the cleaned and sawn cylinder is fired from the inside.
Tools and additional materials
For further work you will need:
- Bulgarian;
- drill;
- welding machine;
- metal hinges and handle for the lid;
- steel pipes to create legs.
If the work is being done alone, rivets will also come in handy for temporarily securing the cover.
Balloon preparation
 The gas cylinder may contain gas residues, which when a small spark appears (and it always forms during cutting) explodes. Therefore, it is impossible to start cutting the cylinder without proper preparation.
Correct opening a gas cylinder under the barbecue provides priority gas release... To do this, open the valve or, if possible, unscrew it and turn the balloon over. Then they wait until the gas comes out. To check for gas, you need to use soapy foam. The absence of soap bubbles means that the gas has escaped. This is often noted in various videos.
Next step - cutting off a part, into which the valve was screwed in or in which there is a tightly fixed valve. Many sparks will be generated during this process. You can eliminate their appearance, watering the cut with water. It is better if the assistant will do this work. Also, the water will keep the metal from heating up.
There may be some gas residues in such a cylinder. To completely eliminate them, into the hole made in place of the valve pour water. She needs to fill the entire balloon. To facilitate the work, it is worth using a pressure hose. Shake the container while pouring water. After that, you can drain the liquid. However, it should be remembered that she absorbed not only the remnants of the gas, but also its smell. And it is stable, and it will be felt at the place of pouring out for several days. Therefore, if you do not want to feel it on the territory of the house or summer cottage, it is better to pour out the water elsewhere.
Making a barbecue from a gas cylinder
 BBQ from a gas cylinder
Before making a barbecue, you should carefully inspect the gas container: there should be no obvious damage and traces of corrosion on it, since in these places the metal will burn out the fastest. You can look at the photo and video on how to properly prepare a cylinder and how the phased production of a barbecue looks like. Drawings for working with a cylinder are not needed, since the manufacture of a barbecue and barbecue is not so difficult. There is no single design scheme, since charcoal cooking depends on individual preferences. If you intend to use coals and a grate, the cylinder can be cut exactly in the middle. If you plan to use skewers, the cut of the top should be smaller than the base of the container.
Balloon preparation
To make a barbecue from a gas cylinder with your own hands, you need to properly prepare a container from under the gas. Braziers are made from cylinders completely free from gas. If the container contains the slightest amount of gas, it may explode during cutting with a grinder.
To completely empty the container from the contents, you can fill it with water, then drain. To do this, you first need to open the valve and leave it for a while so that the gas evaporates. You cannot do this indoors! Then it must be turned over to drain the condensate. To control the release of gas, you need to apply soap foam to the hole and wait until it stops bubbling, and only after that you can work further. Next, the cylinder is placed on one side, and the valve is cut off, while the cut point is poured with cold water. After that, a hose with water is connected to the cut-off point, filling the cylinder to the top. In this form, it must be left for several days, then emptied and proceeded to autopsy.
If you need to ventilate a tank for LPG with a side flange, you can leave it for a while under the sun with a hole down. Since the gas is heavier than air, when heated, its residues will come out, after which the cylinder should be blown out with compressed air.
Opening the container
The cylinder should be cut with a grinder, because after the cut with an acetylene torch, irregularities remain at the edges that require additional grinding. The incision must be made very carefully along the seam of the cylinder so as not to damage the centering rings located inside and holding the structure during factory welding. With the help of concentric welds, the hemispheres of the sidewalls of the gas container are welded to the cylindrical base. The rings can be used to hold the lid of the future barbecue. Before opening it, it is better to mark the cutting area with a pencil: the horizontal marking should go approximately in the middle of the cylinder surface or 5 cm higher, and the vertical ones at a distance of 20 cm from the edges.
Cylindrical automobile gas cylinders on the body contain a special flange for connecting a multivalve and an air duct. Do not remove it, because in the future you can attach it to it if the structure is with a lid. If a valve is installed at the end, it must be dismantled with a hole plug or a chimney with a 90 degree elbow should be made.
After the container is cut, it is necessary to make a strong fire inside for several hours so that all the paint that covered its surface is burnt.
It is better not to remove the side hemispherical parts, they will serve as a good fire protection from the wind, and will also maintain the temperature inside the furnace.
Advantages and disadvantages of a barbecue from a cylinder
A high-quality grill and similar devices are quite expensive. If you make a barbecue from a cylinder with your own hands, the construction cost will be lower. As a result, you do not have to spend a large amount. Other advantages of this solution:
- considerable length (about 120 cm), which allows you to cook a large number of products in one go;
- relatively simple installation process;
- a minimum of materials used, since barbecues are made from a propane cylinder;
- the basis of the structure is heat-resistant metal (wall thickness 3 mm);
- the presence of a cover protects food and fire from precipitation, in addition, it can be used to regulate the flame.
However, there are also downsides. For example, the volume of the cylinder is quite large, which makes it difficult to operate in a yard with a small area. Another disadvantage is the significant weight. Moving such a barbecue is difficult. This work is best done together. Propane cylinders are distinguished by their considerable length and wall thickness. 
Another disadvantage is the unattractive appearance. It is not recommended to paint the structure, as it is constantly exposed to high temperatures, but if you wish, you can choose finishing materials with suitable properties. The impossibility of using firewood is also noted. And the thing is that a barbecue from a gas cylinder is not characterized by a large enough height. Considering that the free space is also limited by the grate, it is not possible to lay firewood inside.
Materials and tools
The first thing to prepare is, of course, the gas cylinder itself. The main condition is that the capacity of the device should be 50 liters, and the height should be 120 cm. This is the most suitable size for a barbecue, on which you can cook a lot of food at the same time.

An old, worn-out gas cylinder with a height of 120 cm can be used to make an excellent brazier
Note! The selected cylinder must be carefully inspected for damage. There should be no pronounced corrosion, since the places affected by it will quickly burn through when you use the grill for cooking
In addition to the balloon, you will need:
- Bulgarian;
- drill;
- hammer;
- chisel;
- adjustable wrench;
- screwdriver;
- 2 sturdy door hinges;
- metal pipe;
- corner.
The grinder is the main tool that you will need to make a barbecue
The brazier will need to be installed on legs. You can make them from metal corners or pipes, or do design and use, for example, racks from an old sewing machine.
The legs from the Singer sewing machine will be a very original stand for the barbecue
Step-by-step instruction
We described the initial operations for marking and cutting the balloon at the beginning of the article. Now we will supplement our instructions with photographs and explain the further steps.
It is more convenient to weld the hinges to the brazier body until the lid is removed by cutting a line on the back of the body. In this case, they will fall into place without distortions. On the other side, a steel bar handle is welded to the lid.

If you do not put a stopper on the side of the hinges, then the door will fall back when opened and it will be inconvenient to get it. As stops, you can use a short piece of the corner by welding it in the middle between the hinges.

Blow holes can be drilled, but it is easier to make them with a grinder in the form of vertical slots.

To install skewers on the edges of the brazier, make triangular cutouts or drill holes in the body with a step of 5-7 cm.
Barbecue legs can be made in two ways:
- "In a simple way" from pieces of fittings or pipes, by welding them to the bottom;
- By making a stand from shaped pipes and a bent strip on which the balloon will lie.

Close the lid to speed up the frying process. In this case, to remove smoke at the end of the container, you will have to make a hole and weld a pipe into it.
The brazier-smokehouse differs from a conventional brazier by the presence of a smoke generating compartment. For this purpose, a 20 liter cylinder is most often used. Having outlined a hole for the passage of smoke, it is cut out with a grinder.

The same operation is performed with a large container. After that, they are joined by welding. A large balloon is placed on its legs.

Having drawn the contours of the covers, they are cut out of the cases and put on the hinges. At the end of a large container, a hole is made for a chimney and welded on.
Inside the cylinders, shelves are made from the corner and lattices of thick wire are placed on them. Holes are drilled in the back of the smoke generator body and a rotary damper is installed to adjust the draft. A similar flap is attached to the pipe.
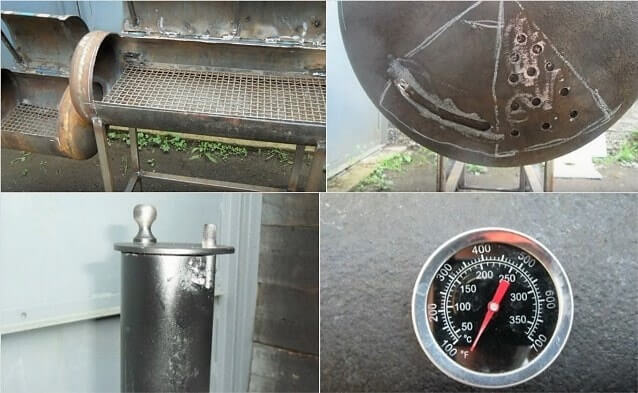
Experts strongly advise to put a temperature sensor on the body of the main camera (the upper measurement range is +350 C). He will help to accurately control the smoking process and get products of excellent quality.

The work is completed by painting the structure with a heat-resistant composition. published by econet.ru
Peculiarities
The brazier from old gas cylinders is divided into several types, which you can easily make yourself.
There are the following varieties:
- a simple brazier with no lid;
- B-B-Q;

Simple

B-B-Q
- smokehouse;
- smoker.

Smokehouse

Smoker
The last three homemade designs differ significantly from the first option, therefore, you should familiarize yourself with their features in more detail:
- B-B-Q is a simple design that you can easily create with your own hands. To create such a barbecue, you will need to cut off part of the container, which will later be hinged and act as a door. Inside the structure there is an area for coals and a grid on which the products will be located.


- Smokehouse differs from traditional barbecues in that there is a firebox in it. The structure itself must be airtight in order to fulfill the assigned tasks. To create it, half of the bottom is removed. The firebox is made of iron sheets. Some people use a different container for this purpose. The part is welded and equipped with a special chimney through which the smoke will be removed.

- Smoker also called "steam locomotive". It is a complex structure characterized by multifunctionality. Such a product contains all the options that are available to similar structures: brazier, barbecue, smokehouse, grill.
To make such a structure yourself, you will need to stock up on several cylinders, each of which will have its own role. In the end, the smoker will resemble a steam locomotive.


Braziers are made from propane and oxygen cylinders. Cylinders act as an excellent base for numerous designs. They have high-quality metal, almost finished shape and standard dimensions. These features make it possible to create a brazier with your own hands in a short period of time with minimal investment.
Due to the thick walls, the cylinders are able to withstand high temperature conditions, so such products are best suited for creating various smokehouses, barbecues and barbecues.


Advantages of a barbecue from a cylinder:
- This design will not burn out even after prolonged contact with an open flame.
- Thanks to the optimal configuration and thick walls, the brazier will not deform from the influence of high temperature.
- In such a grill, you can cook not only kebabs, but also bake vegetables, as well as smoke and fry.
- Once cooked, you do not need to extinguish the coals with water. For these purposes, it will be enough just to close the brazier with a lid. It also allows you to store the barbecue outside. Due to the large size, you can prepare portions for the whole company.


- Even if you need to purchase a cylinder, such a structure will cost you less than buying metal sheets in a store.
- Ease of installation. Even a beginner can make a brazier from a cylinder.
- It will take several hours to get to work.
- The design from the balloon is suitable for the implementation of any creative ideas.


Braziers created from cylinders have practically no drawbacks. Some users claim that the design disadvantages lie in the large dimensions of the structure. However, you can purchase more compact products. Another category of people reports that the semicircular bottom is inconvenient when lighting firewood. If you look at the situation from the other side, this configuration ensures that the coals are located at the edges. This promotes good baking of meat, which can remain soggy when cooked in traditional braziers.
According to professionals, the spherical structure of the barbecue walls is not very suitable for grilling kebabs, since such a configuration limits the processes that contribute to the "disclosure" of the aroma of baked meat.

Preparatory activities
Before picking up a welding machine, you need to pick up a gas cylinder and prepare it for work, draw up an approximate sketch of the future barbecue and stock up on the necessary tools and materials.
Which balloon can be used
Any cylindrical gas cylinders are suitable for the manufacture of a barbecue. The best option is a fairly capacious and most common 50-liter container for household propane-butane. If you want to get a more mobile and lightweight design that can be transported in the trunk of a car, you can take a standard 27-liter cylinder. It should be borne in mind that the width of the working space of a portable barbecue may not be enough due to the spherical shape of the sidewalls.
Gas cylinders are made of high-alloy low-carbon steels 30KhMA, 45, 34CrMo4, 30KhGSA. A high content of ligatures and a decrease in the amount of ligatures in the metal makes the alloy more durable and increases anti-corrosion properties.
An ideal option for a stationary barbecue would be a 50-80 liter automobile gas cylinder. It has an increased diameter, so it will be much more convenient to kindle firewood. In addition, such a vessel has an increased capacity. Its width makes it possible to use the entire length of a standard skewer, and this will allow you to cook dinner for a large company. The only caveat is that it will not be easy to find an unnecessary automobile gas tank, and buying a new one will be impractical from the financial point of view.

Braziers built from automobile gas cylinders are distinguished by an increased width and, consequently, a greater capacity.
Gas cylinders are made of high-quality alloy steel with a thickness of 3 or more millimeters, therefore, even if the container has been under the open sky for a long time, it will most likely be usable. If the vessel is badly rusted, then you should not waste time on it - it will not be difficult to find a workpiece in good condition.
How to protect yourself from an explosion
Even if the valve of the container used is completely unscrewed and the gas does not come out of it, do not rush to grab the grinder. Despite the fact that the pressure inside the cylinder equaled the atmospheric pressure, it most likely contained unsafe substances - propane-butane and condensate. The latter is drained by turning the vessel upside down, and in order to completely remove the explosive contents, the container is filled to the top with water and left for several hours. Only after this requirement is met and the liquid is drained, you can start cutting and welding metal.

You can start work only after the complete removal of gas residues
Schemes and drawings
A brazier from a gas cylinder is such a simple structure that it does not require careful design. Nevertheless, at the preparatory stage, it is recommended to draw up a small drawing or sketch of the future structure indicating the dimensions of all its elements. This will make it possible to determine how much and what kind of rolled metal will be required, and will also allow you to properly plan individual processes. Perhaps the drawings and diagrams presented in our gallery will help you in working on the barbecue.
Gallery of drawings and diagrams
Diagram of a brazier with a supporting structure Drawing of a brazier from a 50-liter gas cylinder Construction of a brazier from a gas cylinder Diagram of heated air movementMaterials and tools required for work
In addition to, in fact, the gas cylinder itself, you will need:
- sections of steel pipes and corners;
- metal handles for the barbecue cover;
- door or furniture hinges;
- a pipe with a diameter of 100 mm with a 90-degree elbow, if you plan to install a chimney;
- grill, which is needed for barbecue;
- bolts with nuts or rivets.
In addition, you should prepare decorative elements intended for ennobling the structure, as well as a primer, paint and solvent that will be needed to paint it.
If we talk about tools, then we are sure that everyone who is interested in building a homemade barbecue will find them:
- welding transformer or inverter;
- LBM - angle grinder (in common parlance "grinder");
- electrodes Ø3–4 mm;
- cutting and cleaning disc for angle grinders;
- electric drill;
- a set of drills for working on metal;
- clamps for fixing metal parts;
- long metal ruler;
- scriber;
- core;
- adjustable and gas wrench;
- set of wrenches.
If, after manufacturing, the grill is painted, then additionally prepare a brush attachment for a drill or "grinder", as well as brushes or a spray with a compressor.
What else can be done from a gas cylinder manufacturing nuances
On the basis of a gas cylinder, you can make dozens of variations of grills, barbecues and smokehouses. For convenience, we will briefly describe some of these devices:
- B-B-Q... We described this design option in detail above. A feature of this design is the presence of a hinged lid.
- Smokehouse differs from a barbecue in that a firebox is mandatory in it.
The smokehouse firebox from a gas cylinder plays the role of a small stove. Its task is to supply warm steam of constant temperature to the smoking section.
The entire structure must be airtight. Without fail, the structure is equipped with a chimney.
- Smoker- the second name is a steam locomotive. It is better to do it on the basis of precisely constructed drawings. This is the brainchild of a folk craftsman, because the unit combines the functions of several devices at once - a barbecue, a grill, a smokehouse and a barbecue.
Open grill from a gas cylinder... The simplest type of construction is from a gas cylinder. Even a schoolboy can make such a grill.
To create such a "masterpiece" will require a minimum of cost and time

How smoker works
One cylinder, of course, is not enough, each pipe has its own function. Such a product contains all the options that are available to similar structures: brazier, barbecue, smokehouse, grill.


How to make a smokehouse from a gas cylinder
Consider some of the features of making a smokehouse from two cylinders.
| Illustration | Description of action |
 | The base for a brazier-smokehouse with your own hands from a gas cylinder can be a stand for an old sewing machine or such a welded structure. |
 | We think in advance about the options for fastening a retractable or folding table. The design can be different. |
 | We prepare the cylinders following the instructions above. We cut each of them like simple barbecue braziers. Do-it-yourself smokehouse from a gas cylinder is best done according to drawings. |
 | The only difference is that it is necessary to make a hole in the firebox for the "blower", which will allow you to control the process of smoldering coal. Which, in turn, will create the smoke necessary for smoking. |
 | Weld the handle for opening it and the transport handles to the lid on the side convenient for you. |
 | We place a special grid for laying wood chips in the firebox. |
 | We begin work on the creation of a chimney. We weld the "elbow" and the main pipe. |
 | Cover it from above with an adjustable "curtain". |
 | And so we did such a multifunctional smokehouse from a gas cylinder with our own hands. |
 Cold smoked smokehouse - from assembly drawing to taste tests of a fragrant delicacy. In a special publication of our portal, we will tell you in detail about cold smoked smokehouses. You will learn the features of the cold smoking process, the scheme of the device and the principle of operation of the cold smoking smokehouse and how to make a smokehouse with your own hands.
Do-it-yourself gas cylinder grill
The gas cylinder grill is a variation on the barbecue. With only one difference - to create this structure, corners must be welded into the cylinder for attaching a special mesh.


do-it-yourself barbecue from a gas cylinder
We examined in detail an example of making a barbecue woman from a gas cylinder with our own hands in this article. If you still have questions about how to make a barbecue grill yourself from a gas cylinder, watch this video:
Do-it-yourself barbecue maker from a gas cylinder
The role of a kebab maker can be played by any of the homemade products discussed in this review. Even an open grill will perfectly cope with this task. However, it should be remembered that most often such structures are not protected from either wind or rain.
How to make a brazier-steam locomotive from a gas cylinder with your own hands
This is one of the most difficult and most time-consuming tasks that true masters of working with metal set themselves.

To create such a structure is beyond the power of a beginner. A “homemade product” of this type is capable of solving several problems at once: it is a brazier, a smokehouse, a grill, and a barbecue. Each compartment fulfills its task. Such barbecues have high performance due to the sealed design, there is practically no heat loss.
If you decide to create a brazier-steam locomotive, then from this video you will learn how to cook a brazier from a gas cylinder.
Even if you have treated your grill with an anti-corrosion coating, it is not recommended to leave the product in the rain or snow. The optimal place for installation is a canopy. When the cold season comes, the structure should be sent to a garage, shed or other utility room.
- When lighting a fire, the internal area of the structure should be divided into two parts. In one where there is a lot of heat, meat should be cooked. In an area with a lower temperature, bake fish or vegetables.
- It is not recommended to turn the skewer over often. For a good roast, you only need to turn the meat twice.
- The coals should be red with a gray tinge.


- Make sure that the meat is not charred. Black plaque on the product is a direct path to various cancers. Also, do not eat lightly cooked meat. Such foods can cause helminth infestation.
- By using a few branches from fruit trees, you can add flavor to the meat.
- If you are cooking in the rain, you should not move your grill indoors. Poor traction levels will increase carbon monoxide concentrations.
- To prevent fire, place the structure away from flammable items. There should be no grass, boards or branches near the legs. Ash must not be thrown away immediately, as it can smolder for a day, which can also cause a fire.

Brazier-smokehouse
The main difference between the smokehouse is its tightness. A brazier-smokehouse is made in the same way as described above, but a firebox is added to the structure. To do this, cut off half of the bottom - this is the place for the firebox. The firebox itself is made from sheet iron or any other suitable material.
 Brazier-smokehouse from two cylinders of different sizes
Some craftsmen make a firebox from smaller cylinders. The finished firebox is welded to the brazier and the required structure is obtained. The chimney is an obligatory element of the smokehouse. A finished chimney can be purchased at the store, or you can make it yourself.
Advice. For those who love to improve and are not afraid of difficulties, it is advisable to equip the structure with a motor that will independently rotate the spit.
You can start smoking after the grill has been calcined with wood. If the smell of gas has absorbed into the cylinder very strongly, then you will have to heat the grill several times until the smell disappears completely.
Do not forget that the smokehouse requires a chimney
We make a brazier from a metal cylinder
First, you need to decide whether creating a barbecue from such a container would be the best option. Still, you can make a stationary barbecue from almost any available materials: stove stoves, barrels, sheets of unnecessary metal, bricks - there are sea options.
Gallery of ready-made options


Advantages
The first and main advantage that distinguishes home-made barbecues is cost-effectiveness compared to purchased ready-made barbecues. Even if an old gas cylinder was not found on the farm, such a container can be purchased at a low price. It remains only to properly prepare it for turning into a brazier.
Other advantages of a cylinder brazier include:
- ease of manufacture- having the right tool and drawings, even a person with only basic skills can make a brazier with his own hands;
- functionality- the use of additional devices will allow you to cook not only kebabs, but also grill, as well as smoke meat and fish;
- durability and reliability- in the manufacture of cylinders, high-quality steel is used, such a grill will last a long time even with active use;
- the convenience of use- due to the strength of the steel, the bottom will not burn out, so the coals do not need to be extinguished after the end of cooking, it is enough to close the lid of the brazier;
variety of designs- you can implement different ideas, make a portable or stationary brazier, give a chimney for smoking the shape of a steam locomotive pipe, decorate a brazier in a vintage style, etc.
It is worth noting the dimensions of the structure: on the grill from the cylinder, you can cook twice as much meat as on a cheap purchased barbecue made of metal.
Feature articles:
- Homemade brazier made of metal
- Vertical barbecue grill
disadvantages
The disadvantages of using such a product include:
- Unsightly appearance of a standard cylinder, especially if it is old. Peeling red paint, dents, and weld marks will ruin the aesthetics of a barbecue if you don't tidy it up. It is better to use a heat-resistant coating - this will additionally protect against scalding during cooking.
- A large mass of the structure - such a barbecue will be portable only conditionally. You will definitely not be able to take the product with you to nature, so this option is only suitable for use in the local area.
- If the skills of working with the welding machine are not enough, the reliability of the structure will suffer.
- Making mistakes in the manufacture of the brazier, non-compliance with the technology will lead to low efficiency, or even inoperability of the brazier.
Do not forget about the main danger - the possibility of explosion of the cylinder during cutting. To prevent this from happening, you need to properly carry out the preliminary work.
Photo: when cutting a cylinder, remember the safety precautions
Materials and tools for the barbecue
The design is based on a gas cylinder, its volume is 50 liters. The height is 1.2 m, and this is enough for the heat to last for a long time later. And you can easily fit a couple of large barbecue grills (important for cooking large quantities of meat). There should be no external damage to the cylinder, otherwise small foci of corrosion under the influence of high temperature and open fire will turn into holes. Not immediately, but after several years of active use, such a fate awaits metal. And if you decide to cover the finished brazier with a layer of heat-resistant paint, the defects will come out. Holes can be welded, but the appearance will deteriorate. For work you will need tools and materials:
- electric drill;
- Bulgarian;
- pipe wrench;
- chisel and hammer;
- screwdrivers;
- metal pipe;
- hinges for doors;
- metal corner.
A frame from an old school desk, a stand from a sewing machine can be used as legs for a barbecue. You can also use homemade from a corner or professional pipes, fittings. If the grill is installed in a permanent place, then you can lay out a brick stand. Provide only that the bottom can be easily picked up ash.
How to properly cut a balloon
Almost always, some part of liquid hydrocarbons, called gasoline, remains inside the metal container. The danger is that if this substance remains, the liquid can evaporate instantly, increasing the risk of balloon rupture. Therefore, before cutting metal, it is necessary to remove gasoline and other gases from the inner container, and also prevent oxygen from penetrating from the inside to the cut site!

All of the above is done as follows:
- Using a shock load and an open-end wrench, unscrew the valve, thereby allowing the remaining propane to blow out.
- Fill the gas cylinder with water, leaving it in this position for a couple of days. During this time, water will dissolve liquid hydrocarbons. You can use soapy water if desired.
- Empty the water and then refill the container. Firmly cover the hole with some kind of sealant, then start cutting the metal according to the pattern.

An opened cylinder should be left only outdoors, away from sources of fire and children, or in a well-ventilated area!
From the experience of many craftsmen, we can say that not everyone can unscrew the valve the first time, because for many years it firmly "sticks". Of course, you can use a sledgehammer, but it, as a rule, does not always help. There is a simpler, albeit requiring more patience, method to fill the cylinder with water: unscrew only the valve-axle box, below which there is an 8-mm hole. Through it, calmly fill the container with water using a dropper, and then cut the balloon.

Water will flow out during the cut - continue to cut the metal as usual. Since the smell of gasoline can hardly be called pleasant, it is recommended to do the work with your own hands. away from residential buildings in an open area... For an identical reason, it is worth taking care of the presence of a respirator with gas protection! The resulting parts cannot be used immediately to assemble the barbecue; you must first calcify the components on a fire in order to get rid of the dirt that has accumulated inside.
Preparation of tools and materials
For work to go quickly, you need to take care of the availability of the necessary tools and materials. To make a barbecue we need:
- Welding machine.
- Bulgarian.
- Several clamps.
- Metal pipe.
- Electric drill.
- Thick metal sheets to add strength to the structure.
- Aluminum rivets.
- Cover hinges.
- The basis of the barbecue is a cylinder with a volume of at least 50 liters (if the cylinder is smaller, it will be inconvenient to turn the coals over).

The photo shows the main units for the manufacture of a barbecue.
IMPORTANT! Safety must come first, so the cylinder can only be cut when all the gas has escaped from it.
Gas removal is carried out simply: turn the cylinder upside down and twist the valve. The gas is heavier than air, so in this position it will come out intensively. To see if the process is going on or not, you need to soap the valve hole. If bubbles appear, it means that the gas is coming out - we are waiting for completion. To be sure at the end, the cylinder can be completely filled with water so that it flushes out the last gas residues.
Manufacturing process instruction
When the cylinder is empty, and all the necessary tools are at hand, you can get to work:
- The photo shows a standard 50 liter cylinder - this is the optimal size for making a barbecue from a gas cylinder. You can easily turn coals and make large batches of food at once. Alternatively, you can take a cylinder with a large volume, but you should not take less.
- It is recommended to leave the side walls, then the wind will not be able to fan the coals when frying meat. It is recommended to cut the metal straight along the seam.
- You will find base rings under the seams. They are installed in a cylinder factory to ensure the correct joining of the bottom and body. You do not need to cut through them, as they will later be used as shelves for the lid.
- As a result, from one cylinder we get two elements of the barbecue.
- The next step is to install the hinges. At the beginning of the process, they need to be riveted. This is for fixing, so the rivets can be aluminum. After installation, the hinges must be welded to the cylinder, since the lid on some rivets will not withstand high temperatures and will fall.
- As a result, the picture should look like this:
- After cooking, let the metal cool. After that, you can start making barbecue handles. Regular metal pens are recommended as they are cheap and resistant to high temperatures.
- There is a possibility that the metal of the cylinder can lead from high temperatures. To prevent this nuisance, you need to weld a corner around the perimeter of the cut edges. The photo shows a corner with a size of 32 * 32. Clamps will help in the work, since they allow you to press the corner to the body with practically no gap. In the future, the corner will serve as a support for the grate or skewers. The element is welded inside the body next to the hinges.
- Next, we deal with the legs. A description of their design and features is in the dedicated section of the article. Now our task is to make short bases so that in the future they can be increased to the required height.
- The next step is to weld with hinges to the body and lid of the barbecue. Here you need to decide what the cover should be. If you want it not to come off, then the loops need to be welded “to each other”. In the case when the cover needs to be removed, the hinges are welded in one direction.
- We cook the handles, after which we tighten them securely.
- On the finished hinges we put on the lid from the top of the cylinder. The process is the same regardless of the location of the hinges.
- We measure the angle and length, after which we make stops for the lid of a homemade barbecue.
- Check if the brazier does not fall when the lid is open. If the stability is low, then the legs can be additionally fastened with a metal corner.
- Holes must be drilled along the entire length of the housing. First of all, they are needed to provide traction and fuel combustion. Also, water will pour out through the holes, coal will spill out. If you decide to install a non-removable cover, then it is worth taking care of the holes in the case before installing the cover. On the sides of the body we make cuts for the holders of the skewers - the grinder will cope with this.
After drilling the holes, the manufacture of the barbecue can be considered complete. Clean it thoroughly and heat it several times so that the smell of gas completely disappears. As for the paint, this is an optional step. Some owners paint with a heat-resistant coating, others skip this step. All the same, after a few dinners with a good barbecue, the grill will be smoked and black. To increase the draft, it is recommended to install a chimney: a round hole is cut out at the end of the barbecue structure, where you can weld an ordinary drain pipe of a suitable diameter.
A couple of cast iron grates can be placed at the bottom of the barbecue. They are used in potbelly stoves and various boilers. Having installed these elements, there will be additional ventilation inside the barbecue. Hot grates help to save coal, as they also participate in the process of cooking meat. You can place the brazier in a brick gazebo or in an open place.
For convenience, the inner barbecue area is divided into two sectors. In one, protrusions for the grates are made, and in the second, slots for skewers are cut.
As tests show, the thickness of the automobile cylinder is quite enough for normal functioning - the shape of the barbecue remains under the influence of high temperatures.
From simple to complex outdoor grill, barbecue, smokehouse, smoker
There are several of the most common types of barbecues, and all of them can be built from an old, out of order gas cylinder:
- an ordinary brazier without a lid;
- B-B-Q;
- smokehouse;
- smoker.
The last three types have a number of significant differences, which we will consider in detail.
- Barbecue is a fairly simple design, both in appearance and in manufacture. A part of the side is cut off from the cylinder, which is then attached to the hinges and serves as a door. Inside there is a place for charcoal and a net on which you will put food for frying.
Barbecue grill - a simple design with a lid without a pipe for removing smoke
- The smokehouse differs from the usual barbecue in the presence of a firebox and tightness. To make it, a strip of metal is cut off in the bottom of the cylinder and part of the bottom, usually half, is cut off. A furnace made of sheet iron or from another cylinder must be welded and equipped with an additional pipe for removing smoke. When the smokehouse is ready, it needs to be ignited several times with wood, after which you can start actually smoking.
Brazier-smokehouse assumes the presence of a firebox and a chimney
- Brazier-smoker, or as it is also called - a steam locomotive. A much more complex design, but multifunctional - it combines everything that one could want from such a device: brazier, grill, smokehouse, barbecue. In order to build such a super-unit, you will need several cylinder pipes, and each will have its own option. As a result, this device really looks like a steam locomotive.
Brazier-smoker is the most complex, but also the most multifunctional design of several gas cylinders.
Photo gallery: how you can arrange a brazier
 Brazier-smokehouse can also be with comfortable shelves
  The flip cover is often attached to the chain for easy opening when hot.
  Brazier-smoker, in common people - a steam locomotive, practically does not need any additions and in itself looks decorative
  Barbecue grill can be decorated as a steam locomotive or antique car
  Perhaps the simplest option: a brazier with a removable lid on a pipe leg
  A woodpile is often placed below
  You can make shelves next to and under the barbecue Turn the barbecue into a submarine
 Preparation for manufacturing drawings and optimal dimensions
Before starting work on the manufacture of the barbecue, it is necessary to completely release all the gas that always remains in the cylinder, even when it is completely "empty".
Since there may be condensate inside the cylinder, you first need to open the valve and release the gas to the end. This should be done only outdoors (outdoors) away from potential sources of fire and other factors that can cause sparks and ignition of gas residues. In order to make sure that the gas comes out, you can use a soapy solution, which must be impregnated with the outlet on the valve. If the soapy water is very bubbling, it means that the gas is escaping.

Unscrewing the valve with an adjustable wrench to completely remove the gas from the cylinder
After you see that the cylinder is empty, you need to turn it over and pour out all the condensate, and then pour water into it to the brim and leave it for two or three days to remove the smell of gas. To fill in water, a regular garden hose is connected to the cylinder, and water enters it under high pressure. Further, it will be safe to work with the workpiece.

Pour water into the bottle to rinse it
The first stage of work consists in creating a drawing of the future barbecue, which will indicate all dimensions, elements and design features.
Cylinder dimensions:
- Height - 98 cm.
- Diameter - 30 cm.
- Wall thickness - 0.3 cm.
- Weight - 22 kg.
Balloon marking
- Since the diameter of the balloon is 96 cm, it can be easily divided into 4 parts, starting from the longitudinal seam, to ensure uniformity.
We mark the balloon with chalk
- It is necessary to retreat from the seam by 24 cm and mark two lines. Then lay the can horizontally, and make marks for the skewers.
- From the transverse circular seams (lower and upper), it is necessary to step back about 3 cm and mark the cutting line.
Gas cylinder markings for cover device
- Then it is necessary to mark 10 cm from the first and second lines so that you can then attach the legs exactly parallel to each other.
- The borders of the lid will be our first two marked lines from the longitudinal seam (24 cm each).
Cutting lines for the lid of the future barbecue
- If metal rings are welded inside the cylinder, then it is necessary to make a cut so as not to damage them, since in the future they will serve as a support for the lid.
Inner cylinder rings for cap fixing
Layout and dimensions of the future barbecue in the drawing

Drawing of a barbecue from a gas cylinder with dimensions
Choosing a gas cylinder
In order for the grill to turn out good, you need to find a suitable cylinder. If there used to be a gas stove in your dacha or in a country house that worked from such a cylinder, then you probably have a few left. You can look for a cylinder at scrap metal collection points, where they will sell it to you at the price of scrap, or dig around the world wide web.
Usually they use a large container with a volume of 50 liters. The main thing is that it is not rusty and does not have large holes in the case.
Tools required for the job
Before starting work, it is necessary to prepare all the necessary tools and additional elements so as not to be distracted at the most crucial moment in search of, for example, a hammer, chisel or drill. To work, we need a set of such tools:
- Welding machine;
- Angle grinder (grinder);
- Protective glasses;
- Gloves;
- Metal door hinges (3 or 4 pieces);
- Rivets (one set) and rivet gun;
- Hammer;
- Screwdriver;
- Chisel;
- Adjustable wrench;
- Drill and drill for metal with a diameter of 10–12 mm;
- Metal chimney pipe;
- Tubes or long iron legs for legs (you can use ready-made mechanisms from old foot sewing machines);
- Four squares for foot pads - approximately 10x10 cm.
Bulgarian and welding machine for work in the manufacture of barbecue
How to properly open a propane cylinder
Safe work is achieved through well-executed preparatory work. The washed cylinder must be cut into two halves with a grinder, the process is carried out as close to the weld as possible. The side walls are not dismantled, their purpose is to protect the fire from the wind, to maintain temperature indicators. Support rings should not be sawed, their job is to keep the cover closed.
Opening a gas cylinder
How to paint
From an aesthetic point of view, it is necessary to paint the balloon. The process is a choice of each individually, it is not at all necessary to spend time and energy on it. To paint a barbecue from a gas cylinder, you should use high-quality components that do not decompose under the influence of high temperatures, without changing the taste of food.
Before painting, a coat of primer is applied, which is selected on the market according to the type of paint. Before purchasing, you should study the purpose and instructions, the temperature indicators of the paint should be more than 600 degrees. As a rule, these materials are environmentally friendly, so it is possible to paint the structure not only outside.
Cover and blower
The hinged lid remains weld the handle, fixing elements and a metal strip. It is best to place the handle at one end of the cap, so that it is above the other side of the bottle. Of course, it must withstand high temperatures, because the lid will get very hot and give warmth to the handle. A handle located in one of the corners of the lid will prevent a person's hand from burning when opening the barbecue.
Need to limit opening value of the lid. This is done by attaching to its free edges and the base of the chains. Also, according to some drawings, it is possible from the hinge side weld on a metal pin. The lid will rest against it. It should be vertical. Its slope depends on how much the owner of the cottage wants to open the lid.
There will always be a gap between the cover and the base. To eliminate it, a metal strip is welded to the lid around the entire perimeter. The result of this process is often shown in the photo.
To make a blower, you need to a hole made in the lower part of the end with size 5x5 cm. weld a square pipe. Its length should not exceed 10 cm.In the middle of its two opposite sides, two holes are made into which they are inserted coarse wire or bolt. To the last, a metal square sheet is welded. It should cover the pipe opening. By twisting the bolt, it will be possible to change the position of the sheet and manage traction.
Few imagine outdoor recreation without a well-done kebab or grilled vegetables. The key to the successful preparation of products is a convenient device, for example, a brazier made from a gas cylinder with your own hands. With proper operation, it can last for more than one year.
The design is easy to make according to your needs using high-quality auxiliary materials and tools. For different situations, either a folding version of a grill from a gas cylinder is suitable, the photo of which is presented on this page, or a stationary structure, where a grill-smokehouse from a gas cylinder is securely fixed in the courtyard of a country house.
Varieties
It is customary to call a brazier a brazier, with the help of which dishes are cooked over hot coals from wooden logs. It is customary to classify into such groups:
- portable design, due to its small dimensions and maximum collapsibility, it is easily transported to the place of operation;
- portable devices that do not have a clear structural connection to a specific place, can move nearby, have the ability to be disassembled into several constituent elements;
- stationary installations, structurally embedded in a foundation or other base and do not have the ability to move.
Stationary structures are made using brickwork, while for the rest, sheet metal or remnants of metal containers are used. The owners of old unnecessary cylinders were more fortunate, because a brazier from a gas cylinder, made with their own hands as in the video, already has forms that are as close as possible to the required dimensions.
The cost of a developed cylinder is about $ 10-15, which is much cheaper than buying a finished industrial product for a barbecue or barbecue. At the same time, the walls in the gas cylinder are much thicker, which will ensure long-term operation.
Necessary materials
To make a barbecue, you will need a gas cylinder with a capacity of about 50 liters. The larger one will be difficult to move, and the smaller ones will not have such convenient operational properties, but they also look much more aesthetically pleasing and attractive.

The walls of the container are about 3 mm thick, which allows easy processing with an angle grinder (grinder).
You will need to stock up on this kit:
- drill and drill set;
- grinder with several discs for metalwork;
- hand saw for metal;
- portable welding machine and electrodes with a diameter of 2-3 mm;
- corner 40x40 mm or close to this profile with a length of about 6-7 m;
- door sheds 2-3 pcs.;
- ropes 10 mm in diameter if you intend to form a barbecue grate.
Preparatory work
It is advisable to take the cylinder without through corroded areas so that corrosion processes do not destroy the product. Before cutting the tap, you will need to relieve the pressure by opening the tap and turning the container over. Checking the complete gas exit is done with a soapy solution that can be applied to the outlet port. If there are no signs of bubbles, then the gas has escaped completely.
It is necessary to cut the crane with a hand tool in order to prevent overheating and sparking. Additionally, the process can be secured by pouring water on the cut.
Water is poured into the opened hole after the tap is cut to flush out the remaining gas condensate. If you wash the container poorly, then the grill-smoker from the gas cylinder will have an unpleasant smell inside for a long time.
The remaining water should be disposed of as far from the living area as possible, as they are poisonous and exude a characteristic odor for a long time. Only after the hapah is completely eliminated, you can start making a brazier from a gas cylinder with your own hands - drawings, photos, videos later in the article.

With the help of chalk, markings are made on the outside to cut out a segment that will serve as a cover. Having stepped back from the bottom and top by 3-5 cm, marks are drawn on both sides perpendicular to the axis along the circumference of the container. We connect these two chalk rings with two axial lines located at the maximum distance from each other. A rectangle has formed inside, which must be carefully cut out with a grinder.

It is necessary to leave intact a pair of inner rings on which the future cover will rest.
Making legs
After measuring the height, we saw off the legs. They can be welded into a single frame, which is the future basis for the structure, or made as separate detachable elements. In the first case, you will need a building corner 40x40 mm, and for the second option, you will need four equal pieces of pipe 40-45 mm. Another option is to weld the frame with your own hands to the underside of the barbecue grill from a gas cylinder, and the removable legs are bolted to the frame.
.jpg)
The design includes a cover fixed with door hinges. For them, holes are pre-drilled through which steel rivets are placed.
.jpg)
Aluminum rivets can be damaged by high temperatures.
The handle is bolted and the working part must have wood insulation to prevent burns during use. It is advisable to choose its material with the most heat-resistant characteristics.
The side hole can be welded with a patch or an exhaust pipe can be installed on it to increase the draft through such a chimney.
The cover can swing back and outweigh the structure. To prevent this from happening, you will need to weld a limiter in the form of a small corner or pipe.
Assembly of all elements
Frequent high temperatures can deform the structure of the container from under the cylinder. You can avoid this if you tighten the grill around the perimeter by welding a metal corner. An auxiliary shelf for skewers, grates, containers with meat or other household needs can be easily mounted to such a structural element.

To connect the rest of the parts, clamps are used, which will fix the structure in the required position. After assembly, holes can be drilled in the bottom to provide better ventilation and removal of moisture, ash and small debris.
Durability will help ensure the barbecue is stained with heat-resistant paint. Such a coating prevents corrosive processes from the outside.
Before use, it is necessary to heat the container several times with wood for 1-2 hours to get rid of the harmful smell.
Decorating
You can also use the brazier as a smokehouse, for this only from the side opposite to the pipe, mount a container for sawdust. However, in this case, it is necessary to ensure the maximum tightness of the structure.
The difference between a barbecue grill and a barbecue grill is that the first design option needs an installed meat net, and in the second case, slots for skewers are made at the edges of the cylinder.

To make a barbecue grill, a skewer is installed, on which meat preparations will subsequently be planted. It is mounted along the axis of the cylinder.
Stationary barbecues are designed in the form of stylized funny designs, for example, an old steam locomotive. In this case, the pipe acts not only as a decoration, but also performs the functional duty of the hood.
Brazier from a gas cylinder it is quite simple to do, following the instructions, and it does not take much time. The main thing is to be able to handle a welding machine and have the skills to work with tools.
The owners of country houses or summer cottages know that a brazier is a mandatory attribute used during rest. Due to the small size of this element, it is simply not convenient for many to fry in them. The cost of large models is correspondingly considerable, so not everyone can make such an acquisition.
In order to save money, as well as to dispose of things that are out of order, you can use such a part as an old gas cylinder. This item is quite popular, as it has a ready-made shape and its thick walls do not burn out. After small changes, done carefully, such a structure can not only be useful, but also decorate the landscape of the site.
How to make a brazier from a gas cylinder with your own hands
Before you start making a barbecue from a gas cylinder, you will have to prepare the necessary materials that will be needed during work:
Old 50 liter bottle;
Bulgarian, electric drill, welding machine;
Spanners;
Metal pipe, lid hinges, handles, rivets.
Instructions:
1. Remove residual gas.
2. Determined with the dimensions of the cover, cut it out.
3. Fix the parts, install the structure on the supports.
4. Make a chimney and skewer holes.
Gas cylinder preparation
After all the instruments are assembled, the balloon should be cut open. This must be done correctly: remove the remnants of liquefied gas and condensate. Therefore, you will need to open it carefully with a gas wrench to release the gas, and turn it upside down to remove condensate. It is possible to control this process with a foam made from soap, lathering up the valve opening accordingly.
Then water is poured into the cylinder for several days, which will displace the remaining vapors. This is easy to do: just remove the tap, connect the water supply hose and fill the cylinder with water under low pressure. The liquid should be drained away from buildings to prevent the spread of unpleasant odors.
Then you need to cut the valve. This is done together with an assistant to avoid heat and spark formation. One cuts, the other pours water into the cut. After preparing the balloon, you can sequentially create a barbecue, relying on the instructions below and using the diagram.
Markup
As you can see from the diagram, there will be two parts: the main part and the lid, so the cylinder will need to be marked before cutting. From the sides, the walls are left higher so that the wind cannot blow up the coals during frying.
Next, a cut line is drawn, stepping back 2 cm from the weld seam, which connects the bottom and the cylinder itself, and outline the lines. We find the longitudinal seam of the cylinder: we retreat from it in both directions 24 cm and mark the places where the lid will be and where to make the cross cuts.
Cylinder cutting
The grinder makes a cut in the horizontal plane. This should be done as carefully as possible and try not to damage the side rings, as they will be used to support the cover.
Assembling the structure
After the above steps, we got two parts that need to be connected together - this is the bottom and the lid.
Attaching the cover
The cover is attached to the main part with a drill and hinges. For this, holes are drilled in the bottom and hinges are installed. Their number is chosen at will, the main thing is to place them at the same distance from each other. This can be done using rivets or bolts. It is better to weld the hinges to the cover, which is necessary for the strength of the connection.
In order for the lid to be fixed open, a stopper should be welded between the hinges: a steel strip bent to the side.
You also need to take into account an important nuance - the hinges should be in one direction, which will allow you to remove this part if necessary. You can think of an additional accessory - a handle for the lid, securing it with screws at the front. For greater comfort during the use of such a design, it is worthwhile to provide a limiter that prevents the cover from opening.
Create supports
We create a frame to avoid deformation of the barbecue during use. To do this, a metal corner must be welded along the entire perimeter of the base of the cylinder along the cut line.
The dimensions of the shelves are 30x30 mm. Thanks to this element, the structure will:
Have extra durability;
protected from temperature deformation;
mounted on legs;
equipped with skewers or a grill that are installed on it.
You need to weld the corner without gaps, for this you will have to press it to the base with clamps. Legs for support can be made from the same corner or tubes and welded in the corners of the frame. In order for their structure to stand firmly, it is better to strengthen the legs with additional corners, connecting them together.
How to improve combustion
In order for the frying process in such a grill to proceed correctly, you should take care of a constant flow of air. The required ventilation can be achieved by drilling holes with a diameter of 10-16 mm at the bottom of the base in its back part in any order. 10 pieces will be enough.
In the place where the cylinder valve was located, you can cut a hole for installing a chimney in it.
You can also put cast iron grates on the bottom for additional ventilation. During combustion, they will heat up and require less fuel.
Brazier from a gas cylinder: nuances during operation
To make such a design as effective as possible, you should pay attention to the nuances:
Weld steel plates on the joint between the base and the lid in order to obtain an even distribution of heat.
At the bottom, a structure is made of reinforcing rods for reliability. In this case, the distance from coal to food should be 16 cm.
A thermometer can be reinforced to monitor the temperature.
Use a container under the food to prevent grease from getting on the charcoal.
The shelves from the old refrigerator are suitable for the grill, they can be welded to each other.
At the end of the work, you can paint the barbecue so that it fits perfectly into the style of the suburban area.
What could be more beautiful than outdoor recreation with family and friends? At such moments you enjoy communication, good company and delicious barbecue. Naturally, in such a situation, one simply cannot do without a good-quality barbecue. In today's article we will talk about how to make your own brazier from a regular gas cylinder. Trust me, it's not difficult.
Main advantages
Lovers of outdoor recreation give preference to home-made barbecues from gas cylinders for a reason. This choice offers the following advantages:
- Substantial savings- when purchasing the most common in the store, be prepared to shell out a lot. If you have an unnecessary gas cylinder at your disposal, you can spend a minimum of time and money to make a high-quality, practical and convenient barbecue.
- Ease of manufacture. Thanks to the detailed instructions below, this product will not be difficult to make even for a beginner. All that is needed for this is to prepare the necessary tools and materials for work.
- Possibility of installing additional devices. Making a brazier with your own hands, you can install additional add-ons for greater ease of use.
- Easy to transport. The manufactured device is quite easy to transport and move, since it is compact;
- Increased strength and durability. The fact is that the steel used for the manufacture of cylinders has an increased level of strength in order to withstand the pressure of liquefied gas;
- there is no need to worry about the bottom of your barbecue maker burnt out over time.
As you can see, the above benefits are in favor of homemade barbecues. If you put in a little effort, then you will get a really high-quality and reliable product for grilling kebabs in nature, in the backyard of a house or near.
Where to begin?
The first step is to find suitable bottle for liquefied gas. This will not be difficult if you have ever filled the stove with gas from cylinders. You just need to look into your garage. If you do not have an empty container for storing liquefied gas, it does not matter, an empty cylinder can be purchased at metal collection points. To make a quality grill, you need a capacity of 50 liters. 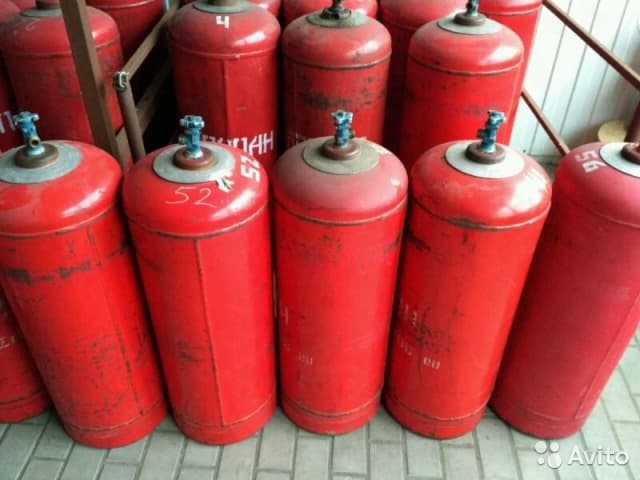
The choice of container capacity depends on what kind of barbecue you need. If you prefer a portable grill that is easy to transport over long distances, then you can use containers of 20-30 liters.
It is also worth considering that the beginning of the upcoming work provides for the presence of a welding machine, you simply cannot do without it. If you do not have this equipment, you can seek help from a welding specialist. This is not a problem today. There are tons of ads where highly skilled welders offer their services for a relatively modest fee.
Before starting the main work, you need to make sure that the cylinder is completely empty. Pre-release gas from an empty container, your safety depends on it.
Even an empty bottle may contain residual gases or condensation. To completely empty it, all you need to do is unscrew the valve and wait until the gas has completely escaped. These actions must be done in the fresh air, do not choose closed and cramped rooms for this. You also need to make sure that there are no sources of open fire or sparks nearby, because this can lead to spontaneous ignition of the gas.
To determine that there is no gas left in the container, it is necessary use a solution of soapy water... If the valve anointed with soapy water does not emit bubbles, then the job is done, the container is completely empty. But that's not all.
Further, it is necessary to turn the cylinder upside down with the valve so that the condensate accumulated inside can completely escape outside. After that, the container must be filled to the top with plain water and left for a couple of days. A regular hose with a water pressure is useful for this. He will tell you how to properly lay paving slabs with your own hands on concrete.
Only after the above steps will subsequent work with the container be as safe as possible. It is worth emphasizing that the actions mentioned are mandatory, your safety and the people around you depend on it.
After that, you can proceed to an equally important point -. This process is individual, since each person can make some adjustments to the drawing for further convenience of using the barbecue. Determine all the main parameters of the future product and write them down on a sheet of paper. In doing so, nothing should be overlooked.
It is also worth making sure that all the necessary tools are at hand, which include:
- electric drill;
- grinder with a disc for metal;
- screwdriver or screwdriver;
- loops of the required size;
- pipe;
- metal rivets;
- apparatus for welding.
Naturally, the main thing that is still required is the balloon itself. As mentioned above, it is preferable to use a container of 50 liters, but smaller cylinders can be chosen.
Subsequent markup
Next, you need to mark our container. As an example, we will choose a 50 liter model. This volume is suitable for making about 6 servings of kebab. The diameter of this container is 96 cm. To ensure evenness of the markings, make indents from the longitudinal seam. This diameter can be divided into four even parts, 24 cm each.
Space evenly from the seam and mark with chalk or a marker. Then lay the product horizontally and mark the locations for the six skewers. There are also transverse seams in the cylinder, it is necessary to retreat from them by approximately 3 cm. The step between these marks can be selected in 8 cm. It is necessary to make holes of the required diameter in the marked areas. Read how to make drip irrigation from plastic bottles with your own hands.
Better to measure multiple times rather than cut once. Take the markup process more than seriously. Recheck the length and breadth of the correctness of the calculations before proceeding to the next stage of the work being carried out.
Sawing
After you are convinced of the correctness of the markings, you can proceed to the next, more important stage of work - sawing. For these purposes a grinder is ideal. Saw strictly along the marked lines, without deviating from them by a millimeter. When working with a grinder, it is important to use basic safety rules. When cutting metal with a grinder, small pieces of wood chips can get into the eyes and on the skin. Because of these nuances, it is important to use special goggles, heavy clothing, a hat, and gloves. Remember, safety comes first. Find out how to choose a nozzle for watering a garden from a barrel.
It will not be difficult to cut a cylinder with a grinder, since the thickness of its walls is about 3 mm. After the sawing has been made, you can proceed to the subsequent work.
Welding of handles and lids
It is worth emphasizing that it is not necessary to make a brazier with a lid, you can do without it. But, if you still decide to make a barbecue with a lid, then this is the right choice. Thanks to the lid, you can extinguish the flame and protect the inside of the grill from moisture.
In order for the lid to open and close, you need a couple of sturdy hinges. Depending on the selected number of loops, they are placed at an equal distance from each other. One part of the hinge is welded to the grill surface, and the other part is welded directly to the lid itself. He will tell you about the rules for installing a polycarbonate greenhouse.
When determining the height too, it is important to consider several nuances:
- ease of transportation of the grill in transport;
- comfort when cooking.
If you make the legs too long, the grill simply will not fit in the car. Choosing short legs will make your grill uncomfortable. The main thing in this matter is to find a middle ground. Practice shows that the optimal construction height is about 40 cm.
In order to make the legs, you can choose a regular pipe, pre-cut into equal parts. To prevent the ends of the legs from going deep into the ground, make flat platforms at their ends. A sheet of metal of a certain thickness is suitable for this.
The handles, with which it is convenient to raise the grill and open the lid, can be made with your own hands or purchased in a store. Desirable use metal handles, since they will last much longer and will not deteriorate due to exposure to high temperatures. Read about growing ginger at home.
Dangers
When making a grill from a conventional cylinder, you need to take into account the potential hazards that can affect the quality of the product, namely:
- Poorly performed welding work will definitely affect the strength of the grill. If you are not competent in this matter, it is best to use the services of experienced professionals.
- Using a heat-resistant coating for your product, you will significantly raise its aesthetic appearance.
- The finished structure will have an impressive weight, which will affect the convenience of transportation.
Consider the above nuances when making your own barbecue.
Brazier from a cylinder, video
Making it with your own hands, like a grill from a cylinder, is as easy as shelling pears. All that is needed for this is to follow the instructions above, believe in your own strength and show a little ingenuity. Be sure you will succeed.

