Instructions for installing wooden platbands on a window opening. Real art: how to make carved architraves on windows with your own hands Decorative trims on the windows of a wooden house
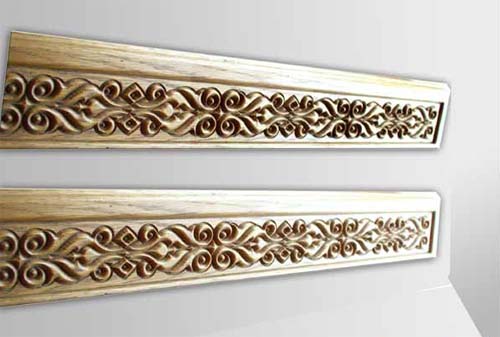
Carved platbands framing window openings organically fit into the architectural styles of wooden cottages. They emphasize the originality of log cabins, frame buildings, log houses. Light patterns, ornate ornaments, interesting drawings give originality to the elements of facade decor. They are applied to the surface of the wood using convenient stencils.


Functions of window frames
Maintaining the traditions of wooden architecture, carved details enrich the noble appearance of the estate, add expressiveness to simple buildings. They keep home warmth and comfort, delight when viewed from the outside. Stencils for window trims, selected in accordance with the preferences of the inhabitants of the dwelling, help to create a harmonious look of the new house, to revive the facade of the old building.
When used on window shutters, decorative platbands can serve as a frame. Playing a decisive role in the design of window openings, they solve a number of important tasks:
- reduction of heat losses due to the elimination of "cold bridges" along the perimeter of the window frame;
- reduction of noise level in the premises;
- reducing the amount of moisture and dust particles penetrating from the street;
- giving facades a unique, stylistic orientation;
- creation of a single architectural ensemble of residential and commercial facilities on the building site.
Regardless of the shape, size, appearance, wooden platbands must be strong enough to meet operational requirements. Stenciling with calculated geometric parameters allows them to be securely attached to the walls. It provides resistance to wind loads, temperature fluctuations. To increase the service life, effective protective coatings are applied.
Traditional and original ornaments
The choice of design elements for window openings should be approached with an understanding of styles and design techniques. With their help, you can give the window an elegant or strict shape, make its outline more expressive, and achieve a delightful visual effect. Choosing life-size stencils as templates for window trims, the buyer receives the most advantageous decor option. Convenient dimensions allow you to proceed directly to the manufacture of products.
The attitude to wood as a material of art is traditional for the culture of Russian architecture. With the repetition of individual structural and decorative details, it provides for the creation of a unique architectural image. Carved platbands have long been considered not only as a means of decoration, but also as a kind of amulets for the home. Based on the study of the surviving ancient buildings, unique images of symbols, animals, birds, and plants have been recreated.
Samples of stencils for architraves are designed in different styles and for every taste. They help to express certain traditions, personal preferences. The use of ready-made ornaments makes it possible to design buildings in accordance with ethnic and classical trends in art. Clear geometric patterns are more in line with modern trends in architecture.
Ornaments for slotted and overlaid platbands may contain a solid pattern or repeating elements of a common motif. To create a complete outline, when marking out parts, you need to take into account the dimensions of the window opening, the scheme and the sequence of patterns. High-quality stencils make it possible to accurately apply cut lines to the workpiece, to determine the boundaries of further processing of the material.

Marblewood (Diospyros marmorata) Family: Ebony Other names: zebrawood (Great Britain) Distribution: Andaman Islands and Guyana Marblewood - wood description The color of the heartwood is gray-brown with dark brown or black stripes. The wood is smooth, has an even texture and a straight grain. Weighs 1030 kg/m3. Marble wood requires care when drying. With slow drying, the material is not deformed. Mechanical properties Although wood…

Maracaibo boxwood (Gossypiospermum praecox) Family: Flacurtiaceae Other names: Venezuelan boxwood, Colombian boxwood, West Indian boxwood, zapatero (United Kingdom); Palo Blanco (Dominican Republic); Pau Branco, Castelo, Zapateiro (Brazil) Distribution: Venezuela, Colombia and the West Indies Wood Description Maracaibo Boxwood There is little difference between the sapwood and heartwood, which ranges from almost white to lemon yellow. The grain is straight. The texture is smooth and shiny....

Soft maple (Acer rubrum) Family: Sapindaceae Commercial names: maple tree (Canada and USA); silver maple (Canada and USA); Manitoba maple (Canada); Pacific maple (UK); Oregon maple (USA) Distribution: Canada and Eastern USA Maple Soft - wood description The color of the wood is creamy white. The grain is straight. Soft Maple is less shiny than Hard Maple and the growth rings are comparatively indistinct. Weight…

Rock Maple (Acer saccharum) Family: Sapindaceae Commercial Names: maple (UK, Canada and US); white maple (USA); sugar maple (A. saccharum) or black maple (A. nigrum) (USA) Distribution: Canada and Eastern USA Stone maple - wood description The color of the wood is creamy white with a reddish tint. Older trees may have a dark brown heartwood. The grain is straight. The texture is even. Average weight...

Japanese Maple (Acer mono) Family: Sapindaceae Distribution: Japan Japanese Maple - Wood Description Creamy brown to pinkish brown wood. Growth rings in the form of thin brown lines. The grain is straight. The texture is even. Weight depends on growth conditions. 610-710 kg/m3. Mechanical Properties Japanese Maple has a good bend classification and average performance across all strength categories. The wood dries slowly....
Look at all these platbands on the windows in a wooden house, the photos of which are posted on this page. These are not just beautiful attributes of a wooden facade that have come down to us from the past.
It has not only a decorative, but also a purely practical purpose. We will now consider the simplest casing on both sides.
The practical value of platbands in a wooden house
So, the platbands on the windows in a wooden house, the photos of which you see, are not just beautiful planks on the sides of the window.
Their very first and most important practical role is to close the gaps between the window frame and the log wall of the house. That is, the platband in this situation is a decorative flashing that covers jute or moss, with which the gap is clogged.

Indeed, in principle, each wooden house is similar to the other. You can try to distinguish them by roofing material, for example. But what to do in winter, when all the roofs are covered with a thick layer of snow?
It was the architraves that were the very distinctive sign by which it was possible to distinguish houses in a village or city, when there were no signs with street names and house numbers yet.
And even now you can often hear how a request to show the way is answered: go to the turn, and there you will see a house “with swans on the windows”.
Decorative platbands in a wooden house
And finally, the architraves, executed in the traditional style, are simple even for the simplest house.

Look and imagine that you have removed all these carvings. What remains? Just boards and logs. And with platbands, any facade becomes lively and attractive.
Architraves on windows in a wooden house - photo gallery
And here you have a choice of a wide variety of platbands for windows in a wooden house, photos of which are provided to us by readers.
Look, choose and use the most interesting options in your facade.


For buildings made of log cabins, carved architraves simply suggest themselves for decorating window openings. Making them yourself is not at all a whim or an attempt to save money, because there are very few really good woodcarvers now.
Required minimum tool
The manufacture of platbands, unlike artistic wood carving, involves the repeated execution of the same type of operations, resulting in a rather primitive repeating pattern. Therefore, most of the work is done with an electric tool: this not only increases the processing speed, but also achieves uniform quality in different areas.
 1 - jigsaw; 2 - drill; 3 - belt grinder; 4 - vibration grinder; 5 - manual router
The main work is done with a jigsaw and a drill. The tool must be reliable and of high quality, capable of being in continuous use for a long time. For cleaning and grinding products, it is better to use an electric grinder, at least the simplest belt grinder. Fast finishing of the relief is possible using vibration-type machines.
If you intend to add additional fine details to the edges of your product, you can not do without a router. Descents, chamfers and a figured border can also be done manually, but only with a variety of chisels, cutters and specific skills in working with wood.

How to choose wood
For platbands, hardwoods are best suited: oak, birch, ash, maple, alder. Since the thickness of the finished product is relatively small (30-45 mm), hard rocks will be less prone to rotting and drying out, therefore, they will retain their appearance longer.

If you plan to decorate carved platbands with flat-relief elements with many small details, you should give preference to softer rocks with a fine texture pattern. Suitable linden, poplar, aspen, walnut and spruce.
Wood for platbands should be selected and, preferably, chamber dried, with a moisture content not higher than 12%. It is not allowed to have traces of warping or other pronounced defects, large branches. Ideally, you should immediately order calibrated boards with a width of 100-150 mm and a thickness of 30-40 mm.

The length of the blanks should be sufficient to completely cover the window opening horizontally and vertically with an overlap in each direction by 1.5 board widths. It is important that you initially calculate the number of blanks needed and, in addition to them, purchase a few more boards of the cheapest breed for training and carving skills.
Making templates and stencils
Almost any wood carving begins with drawing a pattern on a workpiece according to a pre-made template or stencil. There are plenty of threading schemes in the network, the main difficulty comes down to transferring lines to the part accurately and without distortion. We will warn you right away: do not chase the high complexity of the drawing. A set of even the most primitive elements in the correct sequence and with well-chosen indents takes its modesty and quality of processing.


The first option for marking is the manufacture of a small piece of plastic or solid sheet material, on which a single element of a repeating pattern is applied. Such a template is successively applied to the workpiece and outlined in pencil.
It is also possible to produce a single template. You need to take a strip of paper of the appropriate width, fold it with an accordion several times, and then cut out the pattern according to the principle of a Christmas tree garland. The resulting tape must be glued onto cardboard or LMDF, and then cut out the desired shapes. This method is welcomed with a significant amount of work.

The resulting stencil is subsequently simply superimposed on the board and outlined with a soft pencil. Ideally, saturated, but precise cut lines and boundaries for further processing should remain. When marking out the details, it is also necessary to take into account the layout of the pattern so that the platbands form a solid and complete contour, and the repeating pattern is not interrupted at random.

Through hole selection
The first step is to trim the edges of the workpiece and select holes in the center. With the edges, everything is simple: we cut out the excess with a jigsaw, stepping back from the marking line 1-1.5 mm outward for further processing. To cut out figures in the center of the plane, we drill a part at the very line of each cutout, then select the inner contour with a jigsaw.

For making large holes, it is reasonable to use core drills. In this case, it is necessary to mark on the template not the contours, but the centers of the circles in which the centering drill bit will be installed. A similar technique can also be used in the manufacture of oval holes or elements with small rounding radii: a complex bend is drilled with the appropriate radius, and everything else is cut out with a jigsaw.

When the excess parts of the workpiece are sawn out, the cut edges must be carefully processed with a rasp and then sandpaper. It is recommended to use bars of square, round and rounded profiles, on which sandpaper is stuffed. This way you are less likely to "collapse" the edges and you can get right angles on each edge.

Rectangular edges look rather rough, so they are smoothed out with chamfers and slopes of different profiles. The easiest way to diversify the product is to walk along the outer and inner contours of the casing with a figured cutter. But manual processing options are also possible:
- to chamfer, walk along straight edges with a chip, keeping the angle of inclination of the handle to the part constant;
- a semicircular convex descent can also be made with chips, changing the slope of the blade, or use a concave cutter for this;
- concave semicircular pairing is performed with a chisel or a cutter with a rounded edge. Such elements must be cut out in stages, removing small chips layer by layer and carefully controlling the depth of the tool and the tilt of the handle;
- if the descent has a complex profile with several convex, concave and straight elements, this profile is divided into several stages and cut in strict sequence, starting from the widest outer part and ending with the deepest and shallowest tier.


Blind carving: we apply a relief
When you're done with shaping, it's a good idea to diversify the remaining flat pieces with simple ornaments or floral designs. Here are the simplest ways to work:
- A groove (branch, furrow) is made with a narrow chisel or cutter with a square, triangular or concave blade shape. The carving is carried out strictly along the line, the relief is selected with small chips and then polished.
- Sheet - several small grooves that imitate veins cut with a circular knife. From the center between the veins to each of them, small notches are made with a semicircular chisel, imitating the body of a leaf, then an external contour is drawn with a thin cutter.
- The flat areas adjacent to the descent can be diversified with a blind carving of a small ornament. For example, cut two grooves from the edge, forming a triangle with it, and punch an asterisk in the center with a notch.


Wood processing and installation of architraves
Due to the carved elements, the wooden product has a large surface shape, due to which it is more susceptible to aging. Therefore, wood should be treated in a special way.
First of all, carvings for placement on the facade should be soaked in an antiseptic composition for 5-8 hours, for which you can dig a small trench in the ground and put a plastic film there to temporarily equip the bath. After soaking, the parts are dried for several days stacked with linings after 30-40 cm.

When the wood has dried, it must be carefully sanded, achieving smoothness and finally eliminating all traces of sawing and carving. The protective composition is selected in accordance with the type of facade finish, it can be either alkyd enamel or polyurethane varnish, tinted or transparent.
Finally, for the correct installation of the platbands, the window opening should be framed with a flat rail 10-15 mm thick and so wide that its outer edge is not visible through the carved pattern along the platband contour. The purpose of this plank is to eliminate the remaining irregularities in the wall and provide a solid base for the carved element to be attached to. Often this rail is painted in a color that contrasts with the coating of the casing itself for greater expressiveness of the pattern.

Platbands can be attached with straight and oblique trim, depending on the type and density of the pattern. Oblique trimming is performed with a 45° cut on each side, while the cutting line must pass through identical sections of the pattern and not cross the figures cut inside.

With a straight cut, a horizontal element is placed between two vertical ones. Their upper edge should be 1-2 cm above the crossbar if the cut end is straight. It is also possible to manufacture on the edge of the thread according to the general scheme, if, during the manufacturing process, fitting and precise fitting of the platbands are carried out. The very fastening of the platbands is elementary - for it they use ordinary ruffed nails without a hat. It is only important that the nail pierces the casing and the lath, protruding at least 5 mm from the inside.
After installing windows in a wooden house, there is always a gap between the wall and the window frame. The easiest way to eliminate it is to install platbands. In addition to functionality, they play the role of a decorative element that decorates the facade of the house and makes it look unique and complete. One of the most beautiful are carved platbands made of wood.
Types of platbands made of wood
Today, there are not only wooden platbands, but also wood-fiber, plastic and even ceramic. But the most popular material for their manufacture is still wood. This is due to its environmental friendliness, affordable price and high aesthetic qualities. In addition, wood can be restored, thereby extending its service life.
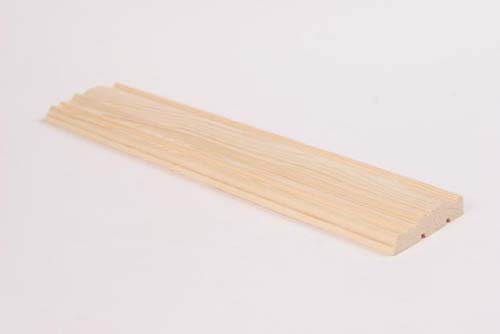
Smooth or profiled from solid bars. If in the future the platbands will be painted, then conifers are used, most often pine. When made from precious woods, they are varnished. Nails, screws or liquid nails act as fasteners.
With figured carving from solid bars. They are mainly made of precious wood and varnished. They can be fastened both on screws and on simple and liquid nails.
Smooth or profiled from glued beams. They can be produced already with a laminate or fine wood veneer finish, eliminating the need for additional finishing. But, there are also unfinished, intended for painting.
Stylized for a certain style. The most expensive type of platbands, which are made exclusively to order.
In addition, they are divided in appearance into flat, shaped and figured architraves.
Flat. The cheapest and easiest type of platbands. But it has a low aesthetic value.
Shaped. Most often they have a convex surface, which has cuts, protrusions or grooves. They cost more than simple flat ones. This is due to the production technology, which requires the use of special equipment.
Architraves wooden figured. They are elements of decor and give the house individuality. They are produced on special machines equipped with vertical cutters. In this case, the desired pattern is programmed, and the machine automatically mills the surface. But, despite the latest technology, the capabilities of such equipment are limited.
And only a master can make an openwork relief. The price of a handmade wooden trim will depend on the complexity of the ornament and the type of wood.
But the main difference between manual milling and machine milling is that the machine does not make a through thread, but only applies a pattern to a certain depth of wood.

Wood for making platbands
If it is necessary to make a flat or shaped casing, then a simple pine is used. For the manufacture of carved, soft wood is needed, such as linden. It is easy to process even with hand tools and is easy to grind. But because of its high hygroscopicity, it needs a high-quality finish. This involves the application of several layers of paintwork.
In regions where significant temperature fluctuations are possible, as well as high humidity or, conversely, a dry climate, wooden platbands are made from dense and hard woods. These include birch and oak, which are extremely difficult to process, but they will last for decades. Therefore, platbands from these types of wood are most often made on milling machines.
The only drawback of all types of wooden platbands is their high hygroscopicity, which eventually leads to their cracking and drying out. This can be avoided by periodically updating the protective paint layer.
Tools needed to make carved architraves
Through carving is the most affordable way to decorate trim for non-professionals. It does not require special skills, you just need to have patience, diligence and a sense of beauty.
A large number of companies offer a variety of platbands made industrially. But it is much more pleasant to make it yourself. As a tool, manual milling machines, conventional or electric jigsaws, various types of drills, chisels and hacksaws can be used.
Basic rules for making a platband
When making wooden platbands with your own hands, it is important to consider that after installation they should not interfere with the normal opening of windows. Therefore, the internal dimensions of the casing are made larger than the size of the window frame by 2-3 cm.
The upper part of the casing is called the “kokoshnik”, if necessary, it can be increased by fastening the parts with spikes. The lower part is called "towels" and is attached at an angle from the wall to drain water. It also has a thread that matches the style of the “kokoshnik” thread, but the bar for it should be 1 cm thicker than the top bar.

Before installing the platband, it is necessary to nail the slats around the perimeter of the entire window - this will completely cover all the irregularities of the wall. The joints, however, must be carefully adjusted.
All platbands are made in the same style.
Preparation for work
To make a carved wooden casing, you should choose a board 3-4 cm thick. It is optimal for the free opening of window sashes. The width should be sufficient to cover the edges of the walls and protect them from moisture. Alder, linden, aspen or conifers can be used as wood.
Choosing a small ornament is not the best solution. It will be difficult to distinguish at a distance, and for manufacturing it will require more time and a special thin tool. Therefore, the ornament should have large elements that are clearly visible from afar.
The location of the carved elements along the fibers of the tree will protect the casing from cracking. This is especially true for coniferous wood.
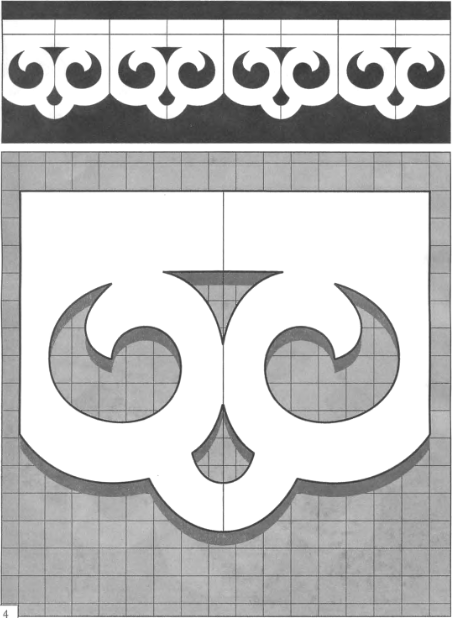
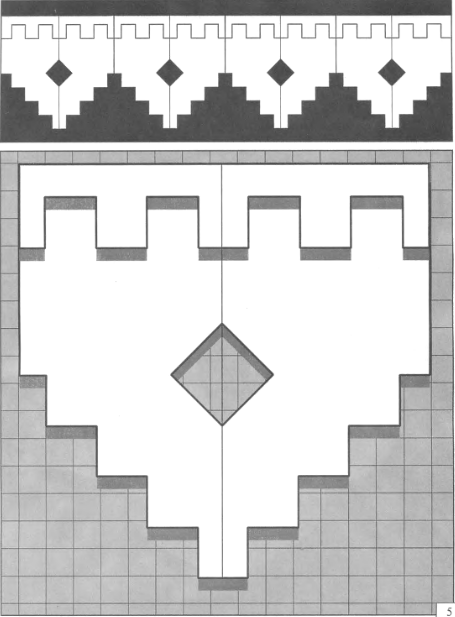
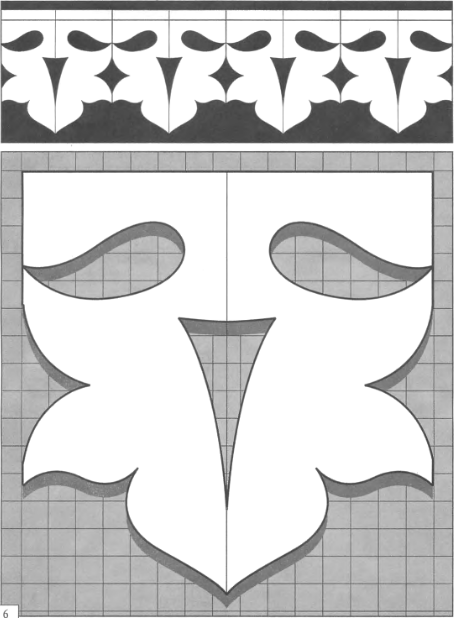
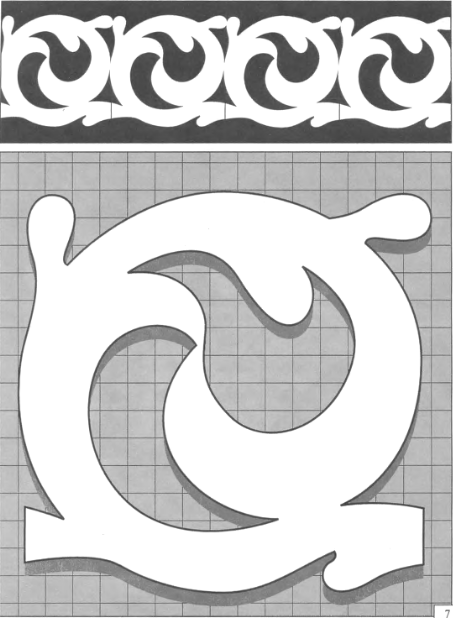
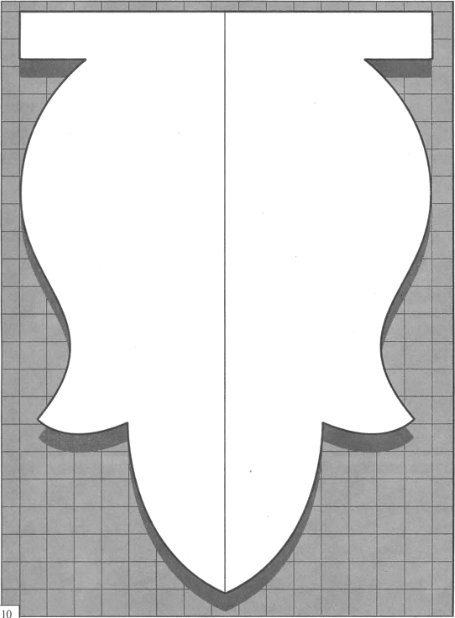
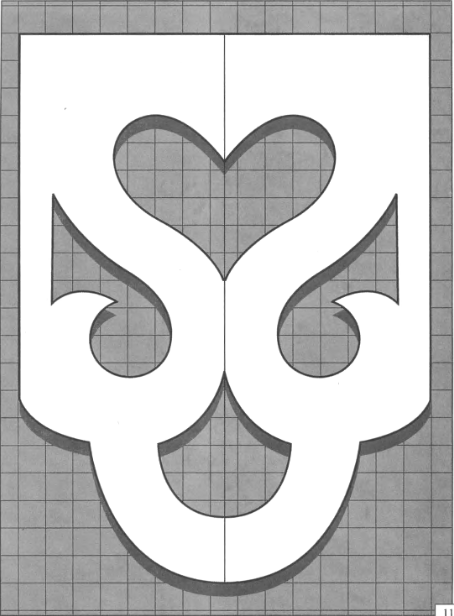
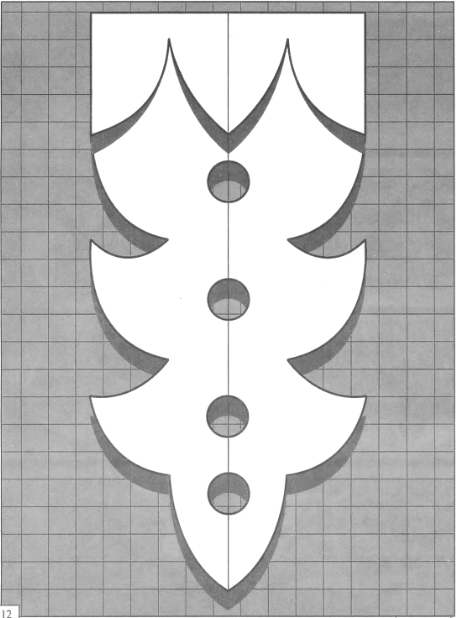
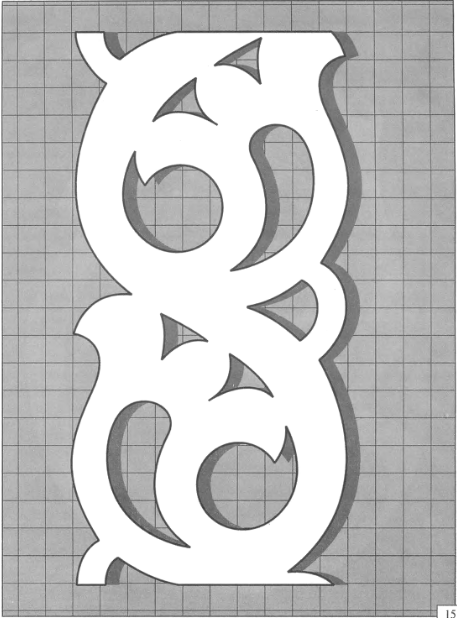
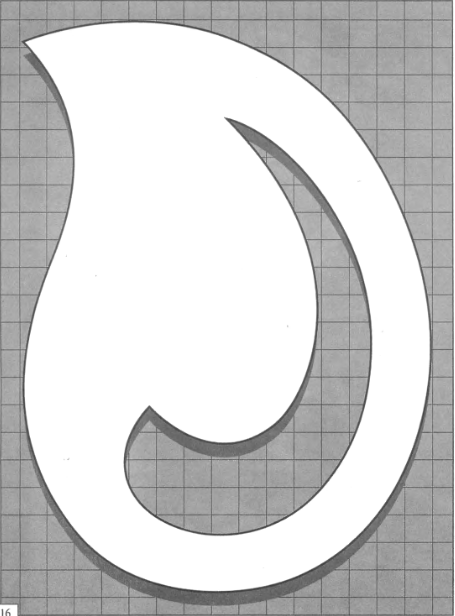
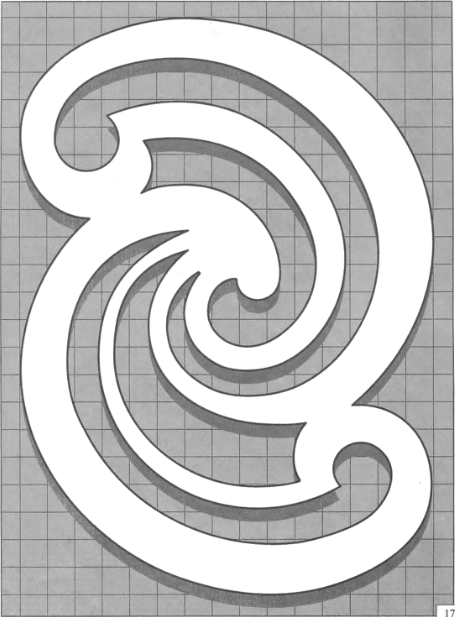
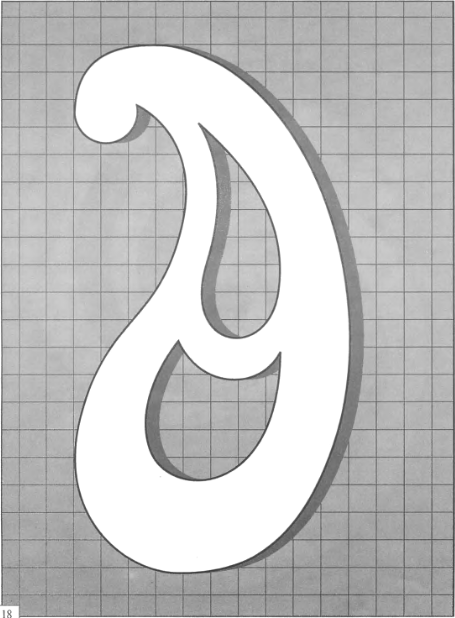
Use simple patterns first. The easiest for beginners in carving are round elements of the pattern, which are simply drilled with a drill. Below are sketches of samples of wooden platbands.
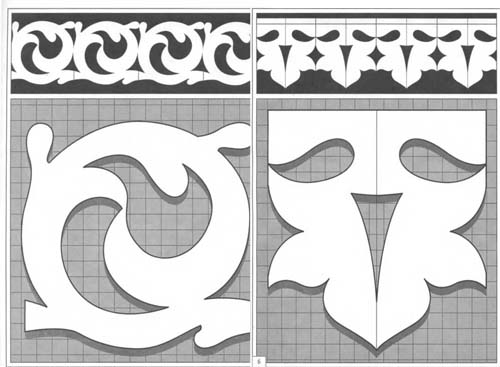
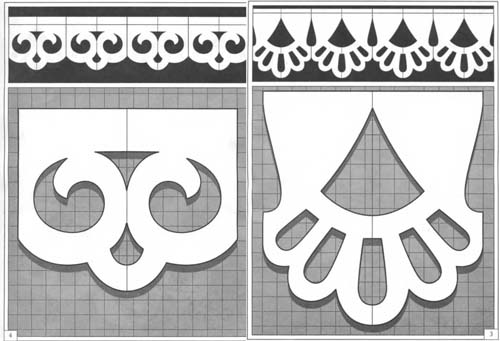
You can watch the video for more details on how to make them.
Installing trim on windows
You can make stencils yourself or transfer the drawing from ready-made sketches. First, a pattern is applied to the workpiece, then a hole is drilled with a drill, and the necessary ornament is already cut from it with a jigsaw. Further, the cut-out platbands must be well sanded with sandpaper.
After the carved blanks are made, they should be properly connected. In total, there are two ways to connect: on spikes or on a half-tree connection. The first method is much simpler and more popular, the second is rarely used.
A special glue is used to fasten the platband. It is important that it is synthetic, since fungus can appear in the organic compound, and moisture can also collect. All this is very harmful to wooden platbands.
If the elements are attached to nails, it is advisable to pre-lubricate all joints with glue, and only then fix them with nails. We should not forget about the treatment with glue of all joints and especially spikes.
The easiest way to install platbands on windows is with wood screws. You can decorate their hats with sawdust mixed with glue, which will later be painted over. But even without this work, the screws will be almost invisible against the general background.
Finished platbands must be coated with a protective compound that will extend their service life for many years. To do this, it is better to use special impregnations, which are enough to be updated periodically. The paint, no matter how high-quality it is, will eventually begin to crack and peel off, and it will be much more difficult to fix it.
When choosing a pattern for the future trim, it is very important to take into account the style of the whole house, because they should harmoniously complement it. Here are some examples of photos of wooden carved platbands.


Beautiful things are the weakness of every person, and if they are made with their own hands, pride in oneself overwhelms the senses. It is to such creativity that woodcarving can be attributed. How original and unique your house looks with carved architraves, where the owner put a particle of his soul into the work.
What is a cashier? It has the form of a decorative overlay and is mounted on the outside of the window and is an ornament where a decorative technique is used.
It can be:
- Plants showing unity with nature.
- The sun, located on the kokoshnik, personifies energy and life.
- Earrings indicating the hospitality of the owner of the house.
- The cross, symbolizing the harmony between the spiritual and material world.
- A bird that speaks of the unification of all time.
- A snake representing fertility and wisdom.
- Wings, confirming strength and power.
Platbands are different in style, material, shape. They are the completion of construction, which emphasizes the individuality and style of the home. And at the same time, they perfectly mask all the flaws of the opening (slit).
Application area
 Widespread use of framing around various openings has found itself in doors and windows. The location of the slats can be both on the outside of the street and indoors.
Basically, platbands of the same type are installed, but the thread may differ. And at the same time, a common theme is preserved. For example, in a children's room, the plank will be with a bunny. Flowers are carved around it. Then in the kitchen a bear cub should also be framed with the same flowers.
Now plastic double-glazed windows are considered a brand. Some people manage to put a wooden plank on them. In this case, you need to paint it white or choose a double-glazed window made of wood.
The slats around the window opening perform some functions:
- Combine all the buildings in the yard into a single style.
- Reduce heat loss.
- Protect from dust and litter, moisture, draft.
- Increase sound insulation.
- I emphasize the uniqueness of the residential building.
- An opportunity to express the traditions of the region, family, country.
- The ability to visually stretch and expand the house.
- They complete the building.
- Close the mounting seams.
In the times of our ancestors, the owners of houses firmly believed that the slats on the windows had not only a beautiful and original look, but also were protection from the evil eye and evil spirits. Therefore, they paid close attention to their manufacture, and tried to perform only in a unique form.
Kinds
 The product can be a colorful luxurious carving or have a modest shape. The lower part of it is called a “towel”, the upper one is called a “kokoshnik”.
 If we consider the platbands by material, they can be from:
- tree;
- metal;
- plastic;
- foam and polyurethane;
By form:
- drop-shaped;
- curly;
- semicircular;
- flat;
Before starting work, it is worth stocking up on templates or stencils of carved platbands, without their help it is impossible to achieve an excellent result. And to perform your work without them is available only to a master who has been working on wood carving for more than one year.
You can get stencils for today freely - these are in stores, magazines, and the Internet.
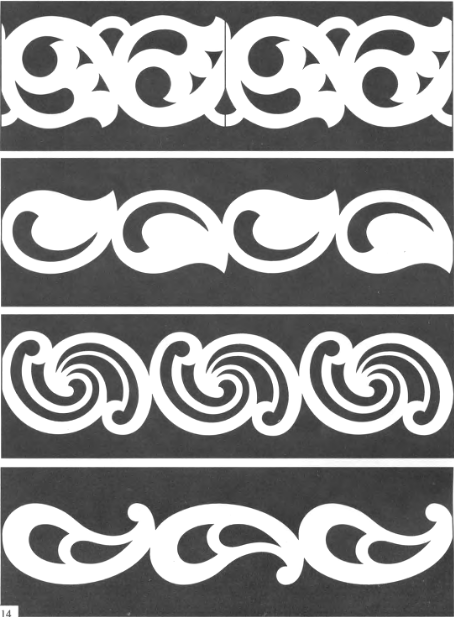
They can be applied to any pattern that the customer or the master wishes. Contours of plants, figurines of animals, ornaments of geometric lines and figures are very popular.
The style of the product can be different, and here the most unusual fantasies of the performer are realized.
How to do?
 Photoshop stencils
 Stencils are made in different ways:
- With the help of a graphic editor. The desired image is located and processed by Photoshop. Every computer has the Paint application, it is used for editing, coloring and drawing. By visiting this page, you can design personal images ranging from simple to complex projects. It is possible to add text and various elements to existing picture files.
- Photocopies. A picture is selected that you really liked and when copied, it immediately increases to the desired size. The second option is to scan and print the sample on a printer.
- By hand. It uses the technology of scaling (copying) and by cells (linear scaling).
Thread making

We make a template from cardboard, the size should be natural. A personal template is made for all elements of the picture.
Now, you need to lay it on the board and circle the outline with a pencil.
We outline the places for the holes. Let's say you need to cut a leaf. To begin with, a hole is drilled, then a leaf appears with a jigsaw. Following the holes, we make all the internal patterns, then move on to the external ornament.
There is a copying method for drawing a picture. Here we use carbon paper. We trace the drawing through it onto the board and get a pattern on the wood.
Required tools:
- sandpaper of various numbers;
- jigsaw;
- drill with a set of drills;
- a set of chisels;
Instruction:
- We make the pattern the same on all windows. To do this, use a stencil or sketch.
- We place the drawing on the workpiece correctly, where we place all the elements not across the fibers, but along. That will not allow the thread to crack.
- We paint over the slotted areas with a pencil.
Wood carving is done in two ways:
- Invoice. In this option, we use a thinner workpiece, then the work is simplified. Here we make separate elements, which we will then fold on a single board.
- slotted. In this case, we make a cut through, we get a kind of lace, which is exquisite and beautifully frames the window.
Platband installation

Creating a beautiful product is one thing. But properly fixing it to the window is another.
Aesthetic appearance, and long service life closely depends on the quality of installation of platbands.
There are two ways to mount on wooden windows:
- Through spike. The method is simple and not very reliable. Spikes should be installed in places where they will be invisible. This provides additional moisture protection.
- Silent spike. The spike goes into the casing. Whereas a hole is drilled in the frame for it. It is necessary to lubricate the spike with glue and bring it into the groove. Fastening is considered difficult, but it is more reliable than the first method.
Fastening to a plastic window is carried out with liquid nails, in order to avoid violating the integrity of the structure.
Walkthrough:
- We take measurements from the window.
- Choose a type of wood and dry it well. The choice of width and height does not play a big role for carved platbands, the main thing is that the thickness is 3 cm. This is if the thread will be slotted, for the invoice - 1 cm.
- We process the tree with sandpaper, starting with coarse-grained, and at the end with zero.
- Cut out stencils.
- We take a simple pencil and apply a drawing or pattern on the front side of a wooden surface. We paint through the cuts.
- Let's start cutting out the pattern. Let's start with the through holes. Where the jigsaw will enter, it is advisable to use a drill for a more accurate cut.
- The holes are carefully processed with sandpaper.
- To remove dust from blind holes, use a vacuum cleaner.
- When using overhead thread elements, we fasten them to nails without caps. And, for reliability, let's go through the glue on the back side.
- Now take a damp rag and wipe the pattern until the area is completely dedusted.
- The finishing operation will be considered a stain, with which we will tint the platband or cover it immediately with varnish.

- If you are just starting to work on a stencil on a platband pattern, you should choose a simpler pattern with large shapes. The smaller the drawing, the more complex it is. It is good to try elements of the pattern from through holes.
- Open elements are cut with a jigsaw.
- Beech, larch and oak are expensive and difficult to work with, but they have a long service life.
- The easiest to process is a material such as linden.
- The material most commonly used is pine.

