Hot glue gun for needlework and other needs: how to choose, use and repair. Crafts made with glue gun and hot glue Glue gun for wood
A hot glue gluer is an indispensable thing that will always come in handy in everyday life. However, not everyone knows how to use this device correctly and why in some cases the result is satisfactory, while in others it is necessary to glue, or even redo the work.


Design
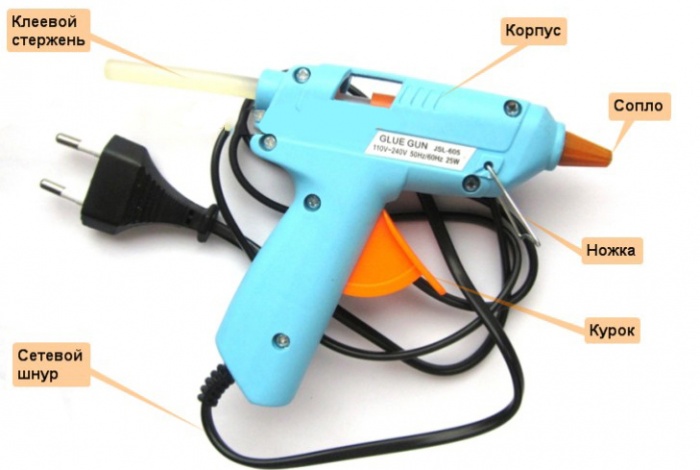
A device for working with hot glue is called a "heat gun" or "hot glue gun". The device owes its name to its appearance, since outwardly it looks like a child's gun. The case of a product of all models is made of fire-resistant plastic. This lightens the weight of the device and makes it easier to work with it. The hot glue gun is designed to glue various materials using a special type of glue in the form of cartridges. More often, the device is powered by electricity: for operation it is enough to plug it into a 220 W socket.
However, today there are other varieties that operate on batteries or gas. Mobility adds advantages to their work, but the lack of a fixed connection also has disadvantages. This is due to rapid discharge, as well as insufficient heating of the adhesive.


The key design elements are:
- frame;
- viewing window;
- nozzle;
- nozzle;
- stand;
- trigger;
- Temperature regulator;
- adhesive dispenser;
- power button.


Inside the case there is a special chamber for glue. In addition, the internal components of the device are fuses and heating elements. The viewing window allows you to see the remaining amount of glue. The typical nozzle diameter is 3 mm for models with 11 mm stems and 1.5 mm for models with 7 mm stems. Professional models may have removable jets to change nozzle size.
The heating element melts the glue sticks, and glue is forced out of the nozzle under pressure on the trigger. To ensure the user's safety, the nozzle has a silicone casing.


Peculiarities
Despite the fact that the gun has a single purpose, it has 2 varieties. The device can be household or professional. The second products are automatic. They are mainly used on conveyors. In fact, these are low-power and high-power electrical appliances. Household devices differ in the mechanical supply of glue and may be different depending on the criteria for them.
For example, they differ in the diameter of the cartridge. In stores, you can buy devices designed for rods of 7 and 11 mm. Less often on the shelves there are options for thermal guns for glue sticks with a diameter of 8 and 12 mm. Usually, for domestic use, they try to choose a product with a cartridge diameter of 7 mm.


Analogues with a large diameter are characterized by a higher glue supply rate, therefore they are convenient when working in need of a large gluing area.
However, for needlework, the size of the nozzle is of great importance. The smaller the outlet diameter, the more accurately the molten adhesive mass is fed. For needlewomen, this factor is one of the most important when buying.


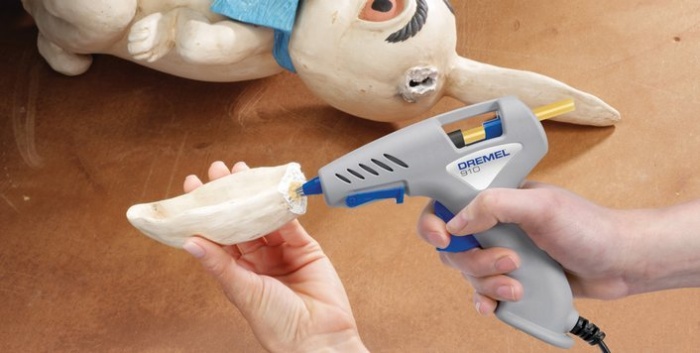
Instructions for use step by step
Before connecting the device to the network, you need to prepare a workplace. It is necessary to cover the work surface in advance, preventing glue from getting on it. You can use a silicone mat or plain cardboard for this. It is important to collect loose hair, protect the workplace from children and pets. In addition, it is necessary to provide ventilation in the room where it is planned to work with hot glue.
When all the preparations are made and the workplace is covered, they take the gun and put it on the existing stand so that the nozzle nose looks down. It is important that at the location of the spout, the work surface must be covered from glue, because when heated, some part of the glue (about 1 cm) will come out and can ruin it. After the hot glue gun is connected to the network and the power button is pressed, if any (the indicator will light up). Take the glue cartridge and insert it into the hole located at the end of the case.


Glue is smoothly advanced forward until it begins to rest. No foreign objects other than glue should be placed in the hole. In addition, only glue sticks of the appropriate diameter should be used for a particular diameter. At the same time, it is worth knowing that the melted and subsequently hardened glue is placed back into the hole and cannot be reused.
After the glue is placed in the hole, you need to wait for the device to heat up. On average, it takes 5-7 minutes for the composition to melt from the moment it is turned on, provided that the glue is already inside the device. Do not press the trigger at this time, checking how well the glue has warmed up and melted. This can damage the glue gun itself.


If the device has a heating temperature control, set the operating temperature in the range of 105-200 degrees. With a lower value, the glue will melt for a long time, with a higher value, it will begin to form threads. If the model is equipped with an adjustable trigger stroke, you need to tighten the screw to set the approximate amount of glue output.
When the glue is heated, it is applied to one of the surfaces to be glued. This is done by gradually pressing the trigger, dosing the molten mass. Its amount will depend on the force of pressing the trigger. After the composition is applied to one of the surfaces, the gun is placed in its original position and the two materials are connected.

When the rod comes to an end, insert another cartridge. This is necessary so that he gets into the gripping mechanism and pushes the ending piece of glue. At the end of the work, the device is turned off from the network and wait until it cools down. You can then put it away until next use.
It is not difficult to use a thermal gun: usually there are no difficulties during work, whether it is needlework or the use of the device in construction.


Safety
When working with a hot glue gun, you must follow safety precautions. It is important to protect not only the workplace, but also clothing, since glue can also get on it. If you need to melt the glue or make any kind of needlework with it, this is done immediately. When the device is not needed, it is immediately turned off, even if a break in work is planned for about 15-20 minutes.
It is important to check the integrity of the case and the network cable each time before work. If any malfunction is detected, as well as the smell of smoke, immediately turn off the power to the device and stop using it. This tool must not be left unattended. In addition, its incorrect position may cause the heated adhesive to enter the electrical circuit, which will cause damage to the device.


Do not overheat the hot glue gun, as this will cause the glue inside it to boil. In addition, the molten composition should not be touched, as it will leave burns on the skin at the points of contact. You need to work with the device very carefully and carefully. Avoid touching metal parts. It is not allowed to remove the rod from the gun when it is warmed up.
When modeling or creating various design things, there is a need for a gluing method that is very simple and quite fast. In this regard, the Zubr glue gun or from another manufacturer will be useful.
There are a few basic rules for using this tool that can extend its life. About what consumables exist for such a pistol and the advantages of its use will be discussed in the article.
Benefits of using glue guns
You can talk a lot about the benefits of glue guns, here are just a few:
- ease of use;
- small weight of the product;
- minimum curing time;
- work with various materials;
- high bonding strength;
- no harmful fumes;
- moisture resistance;
- low consumable cost.
There is no need for complicated instructions to learn how to use a glue gun to create crafts. Everything is intuitive and accessible. The gun is lightweight, so even a child can easily handle it. Consumables are special rods. After heating, the rods turn into a liquid mass, which carries out gluing. At the same time, solidification occurs in a matter of minutes, which is very convenient.
For crafts using a glue gun, you can use a variety of materials. It is known that the glue gun sticks together with rods not only wood and metal, but also various polymers and glass.
Note! The glue gun is not suitable for gluing cement-containing and similar components. This is due to their dustiness, which does not allow the expected adhesion to occur.
After the core hardens, a strong seam is obtained, which, when properly processed, is not inferior to other adhesive compositions. If desired, the glued parts can be separated and then remove the remaining adhesive so that no trace is visible. The advantage of such glue from a gun is its fluidity. It is able to fill cracks and deformations well, which additionally levels the surface and makes the joint airtight.
Using glue gun rods is safe for children. This is due to the fact that the composition of the consumable does not include toxic substances that could evaporate when heated. A hobby that requires the use of such a device will not cost too much. The price of the rods is within reasonable limits.
Design features

The glue gun got its name because of its appearance. It really does look like a toy gun. The case is usually made of refractory plastic, which does not deteriorate from constant exposure to temperature from the heating element. There is a comfortable handle with a large button. It is connected to a pusher that pushes the rods towards the heat source. The absence of harmful emissions is explained by the use of polyurethane in the rods. The diameter of the consumable may vary depending on the model of the main tool. The minimum size is 7 mm, and the maximum is 11. They are inserted into a special hole, which is located at the back of the device.
The heating element is most often located in the stem part. It can be made in the form of a tube, where the consumable completely enters. It is heated from below, due to the good thermal conductivity of the metal, the temperature quickly spreads over the entire area. Pistol models from top manufacturers have several rod heaters. On the one hand, they increase the melting rate of the rod, and on the other hand, they can duplicate each other in case of parallel connection. If one of them fails, the second will continue to function quietly. You will have to pay extra for such a feature, but the efficiency will increase significantly. When choosing a gun, you should focus on the power consumed and output. The higher they are, the better the product. The size of the metal chamber where the rod is placed also affects performance.
The movement of the rod inside the pistol mechanism is carried out using a small ring, which is moved by the trigger. The latter has an installed spring that returns it to its original position. The gun pusher works by shifting the axis of the ring, which allows you to lock the rod and force it to move. This is one of the weakest pistol components. When working with it, you should not make significant efforts. It is enough to gradually advance the rod as it melts.
Note! Do not try to use larger diameter rods. With a lot of physical effort, it is easy to break the ring that clings to the glue.

After the trigger mechanism of the gun, there is a guide tube for the rods. It is fixed before entering the heating element. Its purpose is also to prevent the molten rod from flowing into the operating mechanism. At the outlet of the heating tube of the gun, the hole narrows. This gives greater freedom in dosing the composition when applying it to the craft when gluing. In quality models, the outlet closes when the trigger is released. This prevents the melt from flowing out on the surface, which, for example, could ruin paper charts or documents. Cheap models of such pistols come with a bracket on the handle. When hanging, there is no danger of glue backflow. With some pistols, a stand may be supplied with the device, on which the device is located at an angle.
For greater user comfort, the handle can be made in an ergonomic shape with rubber inserts. They can be thermal absorbers that prevent burns. Better control over the movement of the glue rod is facilitated by the presence of a window between the pusher and the heating chamber. Most often, it is not protected by organic glass, so that if necessary, it is easy to remove adhesive residue.
Application area
The use of a glue gun has no restrictions on the type of activity. It is perfect for household and other tasks. The following are possible usage patterns.
Solving household problems
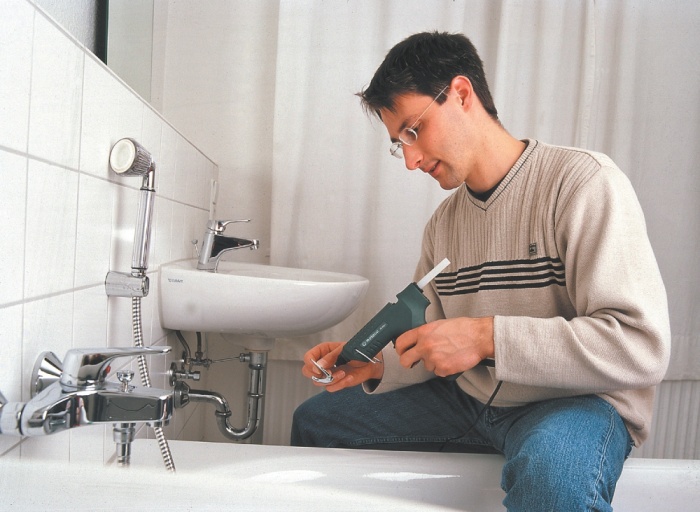
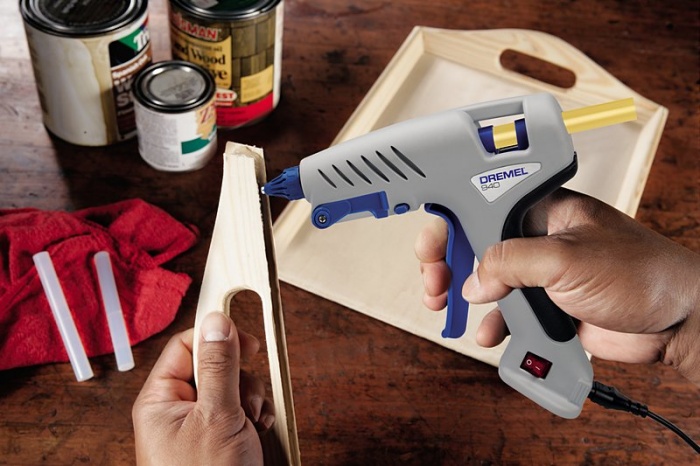
The glue gun is an indispensable tool in the household. With it, you can prepare the apartment for a cold winter. If old wooden windows are installed, through the cracks of which a large amount of heat escapes, then they can be sealed with such glue.
If a piece of tile has broken off in the bathroom or kitchen, it is easy to fix it in place using polyurethane adhesive. Punctured rubber boots are easy to repair with this gun. It will be enough to degrease the surface well and apply the composition to the surface. It will perfectly seal the gap, which will prevent the re-entry of water inside.

To connect some parts of furniture products, PVA glue was previously used. But I had to wait quite a long time until he gained strength. With a glue gun, this happens many times faster. It is enough to melt the rods to the required consistency and fill the holes with them. Some types of paper cannot be glued with such a gun. This is due to the glossy surface, which does not allow adhesion of the molten rod to occur.

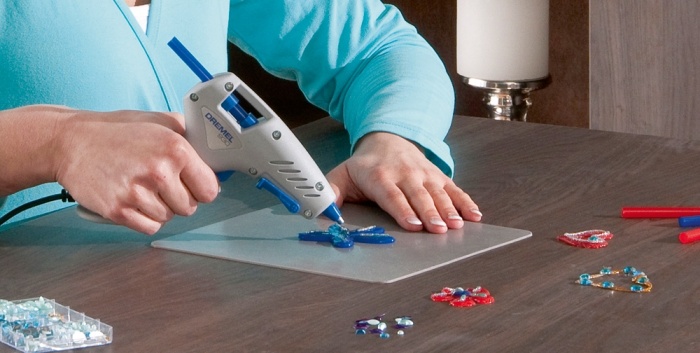
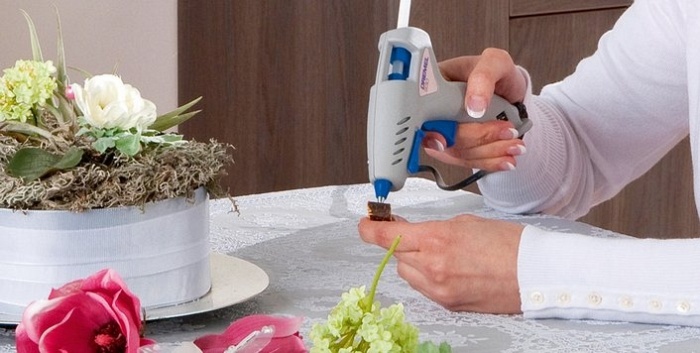
Hobby Application

Modern needlewomen, whose crafts require the quick connection of various parts, cannot do without glue guns. With their help, it is easy to create intricate shapes and patterns that would be impossible to hold using traditional glue. Molten rods do an excellent job of bonding natural and artificial fabrics to each other and various components with them.
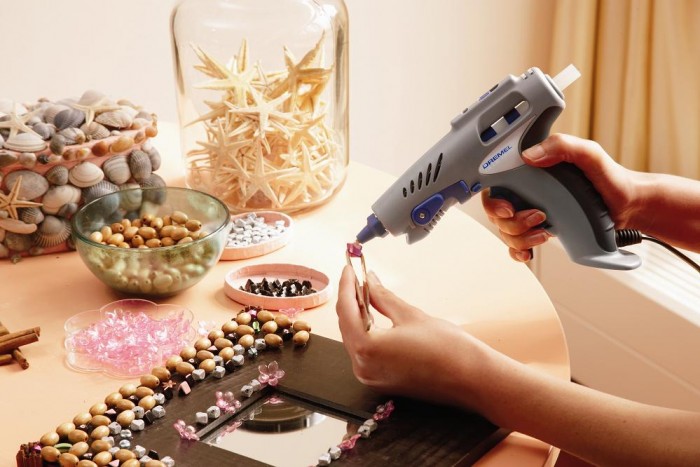
For example, it is easy to plant artificial pearls or rhinestones on such glue. Manufacturers of glue sticks in some cases may add a certain dye to them. This makes the hardened glue almost invisible on the finished craft. There is freedom in combining materials, because there are practically no barriers for glue in the rods.
Additional features
When choosing a gun, you should pay attention to how the feed mechanism is made. It can be carousel or slider. The first type is more difficult to use, because it requires not pressing the trigger, but turning it, which can be inconvenient. Different types of rods may differ in melting point. To solve this difficulty, it is better to purchase a gun that has a built-in regulator. It allows you to pre-set the desired mode of operation. If mobility is required in the manufacture of crafts, then you can get a battery-powered gun. It can function without a central power supply.
Conclusion
As you can see, using a glue gun can be very helpful. With the minimum cost of both the gun itself and the rods, you can have it at home just in case. When it appears, it will definitely find a use for solving everyday problems.
We talked about what a glue gun for needlework is, its device, advantages over other types of gluing. Today we will talk about how right and safely use this indispensable tool. This is especially important if you work with children.
Instructions for using the glue gun
- Before starting work, prepare the workplace by protecting the work surface from the ingress of glue
- Install the gun by folding the leg-stand
- Insert the plug into the socket, turn on the button on the case (if any)
- Insert the glue stick into the hole in the back of the case until it stops
- It is necessary to wait 4-5 minutes for the glue to heat up and melt. The glue gun is ready to use when a drop of glue appears on the spout
- The surface to be bonded must be dry, free of dust and grease. If necessary, you can sand the place of gluing
- Press the trigger to dispense glue. The amount of glue coming out depends on the depth and number of clicks
- After applying the adhesive, firmly press the parts to be joined for a few seconds. Try to immediately accurately attach the part, because. clutch occurs instantly and it will be impossible to move
- When the glue stick runs out (when you pull the trigger, the glue will stop flowing), insert the next one and advance the previous stick with it a little. At this point, be careful: if you apply too much pressure, a lot of glue may flow out of the nozzle.
- To replace the rod of one color with another, provided that the glue is heated in the gun, tightly grasp the rod and rotate it around its axis several times, gently pulling it out of the heating chamber. After the rod is removed, insert another one and, pulling the trigger, "lower" the remnants of the previous color, for example, on a piece of cardboard. When a new pure color comes out of the spout, you can get to work
- When finished, unplug the gun from the mains.
Safety rules while working with a thermal gun
- The glue gun nozzle heats up over 200 °C, so make sure that the working area is out of the reach of small children and animals
- In working condition, always place the gun on the stand with the nozzle down.
- Be careful while working, melted glue can cause burns
- Do not leave the switched on thermal gun unattended
- Protect the device from falling. If the contacts are broken, the gun may flare up
- It is not recommended to continuously use the glue gun for more than 1 hour
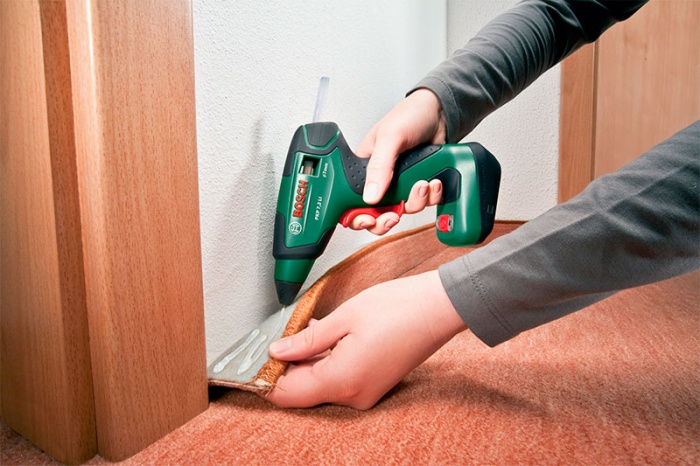
Buying a battery-operated glue gun, a small or solid adhesive sticker tool, is essential for a whole range of repair tasks. These devices are characterized by a simple design, affordable price and a wide range of repair options.
What is a glue gun for?
What is the glue gun for and what does it glue? It's easier to say what he does not glue. By means of this small and convenient device joints are sealed and assembly seams are filled. It allows you to speed up the laying of ventilation in the garage and will ensure a quick installation of sound insulation. With it, it is easy to glue lagging wallpaper or a curly plinth on the ceiling or in a hard-to-reach corner. A gun with adhesive stickers will quickly and easily fix the stucco molding on the ceiling or the application on the wall.
Many types of force majeure repairs are carried out with the help of softened and carefully dosed glue, up to gluing a randomly flying off decorative stone from gypsum - do not dilute a tub of mortar for the sake of one rebounded tile. The glue tool is used by designers and radio amateurs, it is useful in modeling and construction. There are craftsmen who are able to give design merits to the adhesive mass itself, placing it with balls, elongated beads or multi-colored rain on walls, panels, postcards and souvenirs. So the possibilities of such pistols are not limited to repair only.
Advantages and disadvantages of adhesive mounting tool
The repair advantages of guns with adhesive sticker inserts are quite numerous, a typical tool:
- Provides almost instant gluing of parts - the polyurethane mass of stickers hardens in 40 to 180 seconds, depending on the thickness of the applied layer;
- Guarantees high strength to glued wood, metal, fabrics, plastic, glass, natural and artificial leather, ceramics and earthenware, as well as all combinations of these materials with each other;
- Gives the glued surface an excellent appearance. A large selection of color adhesive rods allows you to choose the right shade for repairing products of any color scheme;
- Indispensable for fastening work on surfaces that do not tolerate mechanical stress. You can not drill, ditch and hammer - use the ability of the glue tool;
- Eco-friendly and safe. Expendable rods do not contain impurities harmful to human health, are economical to use, the cured glue is impervious to moisture.
As for the shortcomings of the tool, then they should include poor bonding of polyurethane with concrete, cement and most plasters. If the glued product will heat up later - for example, as a lining of a brick fireplace - it should be fixed differently (mechanically, with mortar, with heat-resistant glue, etc.).
Hot principle of sticker guns
Any gun - powered from a standard outlet, from a generator or from a built-in battery - provides for heating the glue sticks inside the tool before use. That is, "hot" are all pistols by default. How a hot glue gun works, the use of which is very convenient, can be described in just a few sentences.
The appearance of the tool is similar to a small drill, including the shape of the handle and the presence of a start button on it. From the back of the "barrel" the gun is loaded with cartridges made of polyurethane glue. The glue stick first enters the receiving chamber (in most models it is made of elastic plastic or tubular rubber). To start work, you need to “send the cartridge into the chamber” - push the rod into the heating sleeve. Under the influence of electric current, the sleeve is heated, the glue stick softens to a thick liquid and is squeezed out through the nozzle onto the surfaces to be glued.
The warm-up time of the “glue cartridges” in a standard pistol is from 3 to 5 minutes, so there is no point in pressing the feed piston immediately after loading. The pressure force is adjusted manually, it can be additionally adjusted by installing nozzles of various diameters. Working with this tool does not provide for large amounts of glue to be applied, rather, it is associated with the accuracy and thoroughness of gluing various products.
Typical glue gun device
Before using a glue gun, it will be useful to know its "stuffing". It consists of several interconnected nodes:
- heating mechanism. There is a thermal chamber in the supply barrel, the heating elements cover it from all sides (less often) or simply brought down by a thermal platform from below (more often). The size of the thermal chamber and the power of the heating elements directly determine what can be glued with a glue gun in terms of productivity and thickness of the parts. A good quality gun will usually have a very reliable heating unit that will not need to be repaired over the lifetime of the gun;
- feed mechanism. Represents a pusher of rods to a thermal chamber with transfer levers controlled from a trigger. The feed mechanism can break if careless or strong pressure is applied to the trigger, or if glue sticks of a non-standard diameter are used. Using a tool without the risk of damaging the feeder is one of the main tricks when mastering glue guns.;
- Guide clutch. A plastic or rubber receiver for glue sticks is located between the end of the gun and the heating mechanism. When the guide sleeve is worn and cracked, the glue gets inside the gun, it fails. Therefore, the adhesive rods should be inserted into it smoothly, without scrolling, it is forbidden to pull them back - the glue should only come out through the nozzle;
- Nozzle (sometimes called a nozzle or nozzle). Serves for molding softened glue, a useful option is a shut-off valve on the nozzle in the form of a nipple or plate with a spring. A nozzle with a shut-off valve prevents spontaneous leakage of a large amount of adhesive. Direct-flow nozzles are also found in cheap pistols, but you have to pay for their efficiency with glue stains when working (sometimes in very undesirable places);
- Instrument case. Made from tough impact resistant plastic. Firstly, this eliminates the risk of electric shock to the worker, and secondly, it significantly lightens the weight of the entire device (there are models weighing up to 250-300 grams). The cordless tool has more mass due to the built-in battery - you have to pay for mobility with an increase in weight.
If there are viewing windows in the body of the device to control the state of the guide sleeve, and in front there is a folding bracket for vertical installation of the gun, this will be a great advantage in terms of long-term reliability of the glue tool.
Putting the gun on its side during operation is highly undesirable. When the heating mechanism is turned on, the guide sleeve overheats at the lying tool, it fails much ahead of time - and with it the entire device with the insides filled with glue.
How to choose a pistol according to technical parameters?
What can be glued and how to use a glue gun, how to choose exactly your tool from a variety of sales offers, depends on its technical characteristics:
- Performance (do not confuse with power!). It is the power that is indicated in the passport - professional models suggest power from 250 watts, amateur ones range from 50 to 150 watts, semi-professional ones fill the gap of 150-250 watts. However, in addition to power, the volume of the working chamber should be taken into account. If it is small, then a low-power device will be a convenient installation assistant;
- Melt temperature. The guns use glue sticks with a diameter of 7 to 11 millimeters, almost all of them "flow" already at 105 ˚C. The higher the operating temperature, the faster the bonding. A tool with two heating modes is especially convenient - up to 105 ˚C in a heating mode (powerful) and then in a stationary lower power. If a dual-mode device is not affordable, it is reasonable to stop at a gun with an operating temperature of 165-175 ˚C;
- The glue supply rate for various models lies in the range of 5-35 grams per minute. For the first experience of adhesive work, modest indicators of the sticker feed rate are sufficient. Working with a glue gun is good for changing the model to a more powerful or specialized one. The cost of the tool is low, as it is mastered, you can always purchase a device with other repair capabilities.
An inexpensive and at the same time very necessary, and sometimes irreplaceable device in everyday life - a glue gun. The tool must be selected in such a way that it is convenient to work with it, and the point here is the dimensions, weight, type and characteristics of the model you like.
Advantages and disadvantages
Advantages of the glue gun:
- depending on the thickness of the layer, the adhesive hardens in 10-180 minutes, thus providing almost instant bonding of parts;
- something that cannot be nailed, ditched or drilled will be perfectly fastened with a glue gun;
- you can choose an adhesive rod of any color, since their range is very diverse, which allows you to maintain the excellent appearance of the glued product;
- rods are economical to use;
- perfectly glues leather (artificial and natural), (except for synthetic ones - they melt under the action of high temperature), metal, glass, as well as wood, earthenware and ceramic products, used for gluing plastic;
- the rods do not contain substances harmful to humans and are a safe environmentally friendly product;
- cured glue is waterproof.
The glue gun also has its disadvantages.:
- poorly bonds concrete, cement and most plasters with polyurethane;
- do not use a glue gun if the product will be exposed to heat in the future.

What can be glued
The glue gun is able to hold almost anything together and is used for various materials:
- fill mounting seams;
- make the joints airtight;
- glue wallpaper that has lagged behind the wall;
- mount a figured plinth to the ceiling or in a hard-to-reach place;
- make designer pictures on the walls;
- repair clothes;
- or plaster decorative stone.
The glue gun is used in design, needlework and modeling, as well as for the manufacture of panels, souvenirs, postcards.

How to use a glue gun
The device must be prepared for the first use. To do this, insert the glue stick into the glue hole at the back of the gun and push it in as far as it will go. Then plug the tool into the outlet, if there is a stand, place it on it, while the gun nose should be pointing down. Wait a bit, the device should warm up, it usually takes 2-5 minutes, depending on the characteristics of a particular model. As soon as a drop of melted glue appears on the spout, the device is ready for use.
To glue two surfaces, press the trigger of the device, hot glue will be portioned out of the spout - just direct it to the desired area. Apply glue to only one of the two surfaces, then put them together and press them together.
Advice
Actions must be very accurate and precise, since the adhesive composition seizes almost instantly, there will be no possibility to correct defects.

Glue Gun Precautions:
- in order not to stain the table with glue, cover it with a film or ordinary newspaper for the duration of the work;
- distribute the adhesive carefully: frozen glue droplets easily lag behind metal and wood, but they cannot be cleaned off paper;
- the nose of the gun heats up very much, so try never to touch it, as it is very easy to get burned;
- the molten glue is very hot, when it gets on the skin, a thermal burn is formed, so try to work with it with extreme caution;
- be sure to follow the usual electrical safety rules: do not leave the device turned on unattended, use only serviceable electrical outlets;
- do not keep the device turned on for more than 60 minutes, if you have to work for a long time - let the device “rest” for 5-7 minutes;
- Keep the glue gun out of the reach of children.
Main selection criteria
A glue gun is an easy-to-use tool, for this reason, even buying it at random, there are great chances of becoming the owner of a very high quality model. To choose the right product for your own needs, pay attention to the technical specifications indicated by the manufacturer.

The most important parameters:
- Rod diameter. Most of the models on the market are 11mm (rod diameter 11mm). There are tools with a rod diameter of 7, 8 and 12 mm, as well as allowing you to change nozzles, thereby adjusting the diameter. For needlework, a 7 mm rod is ideal, as even the most delicate work will be done accurately with it. For repair and construction work, 11 and 12 mm should be preferred.
- The heating time ranges from 3 to 10 minutes. The faster the glue gun heats up, the sooner you can start working.
- Temperature: The adhesive can be heated from 105 to 5000°C. The higher this number, the faster the tool can be worked. For normal household needs, heating up to 2000 ° C will be quite enough.
- Power. This is the number of watts consumed by the heating element of the glue gun. A professional tool takes 300 or more watts, an amateur one - 30-150. Some manufacturers produce glue guns in which the power is adjusted automatically. For example, the instrument draws 200 watts at the start of operation, later goes to the normal operating power of 40 watts, and in standby mode it requires approximately 15 watts. For lovers of needlework and crafts, 15-60 watts is enough, if you plan to use a repair tool, you will need at least 100 watts of power.
- Performance is directly related to power. For needlework and decorative work, a productivity of 5-15 g / min will be sufficient. If you need to glue large parts, this figure should be higher - 15-30, since gun glue dries very quickly.
- Dimensions and weight. Such a selection criterion is purely individual. The more powerful the tool, the more it weighs and the larger it has.
For domestic use, mechanical models are excellent, in which you need to pull the trigger to apply glue. There are professional glue guns, but they are used, as a rule, in production, on conveyors.
Additional functions
Working with a glue gun will be as comfortable and safe as possible if the model is equipped with additional features:
- Automatic temperature control;
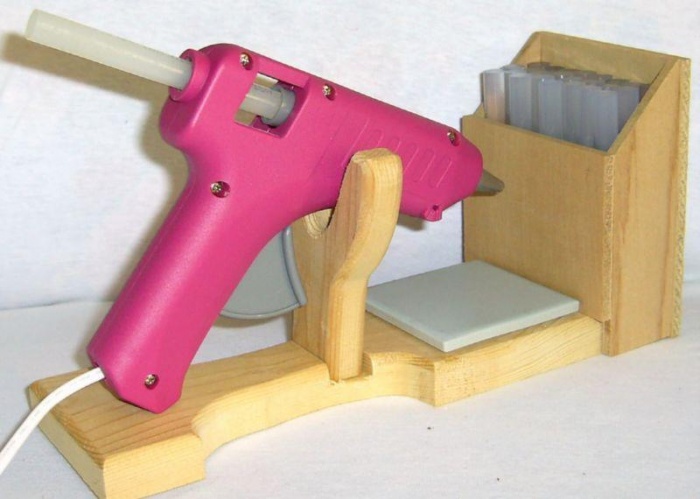
- stand;
- viewing window;
- temperature switch;
- illumination of the working area;
- tool status indicator;
- on/off button located on the case.
In some cases, gluing technology involves the use of a special two-component adhesive composition. On sale you can find glue guns, in which the hardener and binder are supplied evenly and in the same amount from the spout. Otherwise, the principle of operation of such a device is no different from a conventional glue gun.

How to choose in the store
When deciding which gun is better in the store, you need to pay attention to several nuances:
- plastic should not have minor defects in the form of notches, scratches and a pronounced smell (unpleasant);
- on the stand, the tool must remain stable;
- the power cord must be sufficiently long and thick, as a thin one will be unreliable in terms of electrical safety;
- there should be no gaps between the elements of the gun, and all components should be securely fixed;
- the trigger should be easy to pull.
Test your glue gun before you buy it. Ask the seller to plug the tool into an outlet, so you can check the operation of the heating element. You can find out how high-quality the model you like is by asking the seller how often buyers return it. Be sure to ask about warranty repairs, as inexpensive models often break.
How to choose a glue stick
Usually glue sticks (otherwise called stickers) are not included with the gun, they must be purchased separately. They are transparent white, intended for ordinary bonding of surfaces, or colored, with sparkles - they melt more slowly and are used for needlework.
Stickers come in 7, 8, 11 and 12 mm diameters. There is a glue gun that works on oval shaped rods. Some instruments are very sensitive to the diameter of the stickers used.

The length of the rods varies in the range of 4-20 cm, it does not affect the quality of work in any way, just longer "reserves" will have to be changed less often.
The color of stickers can be completely different. This is due to several reasons:
- A colored rod is used to mask the glue line, for example, blue on a blue product.
- Glitter and multi-color stickers are used in needlework, for decoration.
- Different colors may indicate different uses for the rods. For example, a transparent sticker is universal, a black rod is used for sealing, yellow - for gluing glass.
There are no uniform standards for the color designation of stickers; each manufacturer labels them differently. For this reason, please read the instructions carefully before purchasing.
Most of the rods have the same melting point, which is approximately 100-105 ° C. If the glue gun heats up to 200 ° C and above, then you should not worry: the sticker will not lose its properties, it will simply reduce its melting time. There are rods whose melting point is 150°C.
The range of glue guns is simply amazing. The product has a simple design, therefore, even for very little money of 200-400 rubles, you can become the owner of a good quality item. A branded glue gun costs about 3 thousand rubles, it will be equipped with additional functions and a good margin of safety. A professional construction tool will cost much more, up to 22,000 rubles. *
* Prices are indicated for 2017.

