Original jewelry made of polymer clay. Polymer clay modeling: a master class for beginners
Every day more and more fashionistas give their preference to handmade jewelry. Indeed, very often there is a situation when there is nothing suitable for an outfit in a store, and an image of the desired product has already been drawn in my head. What to do? Stock up on material for modeling and start translating your ideas into reality. Who knows, maybe this hobby will become a source of additional income. In addition, handmade jewelry is a great gift for friends and loved ones.

First, let's talk about the basic rules and secrets of working with polymer clay. Indeed, the quality of the finished work depends on their observance, and the process will become much more pleasant.

1. Work surface cleanliness. The table you are working at must be absolutely clean. Otherwise, any speck and speck of dust will ruin all your work. Or you just have to cut off the whole layer while sanding. Therefore, it is very important to put things in order before starting work.

2. If you're working with different colors of clay, go for white first. If you take up bright shades, then be prepared for the fact that the material remaining on your hands can spoil the whiteness of light parts in the future when kneading. Another good tip is to wipe your hands with a damp, lint-free cloth each time you change the color of the clay you are using.

3. If the clay sticks a lot to your hands, squeeze it between regular scrapbook sheets. The paper will absorb excess plasticizer and make your work easier.

4. To make the hole in the beads even and neat, it should be made from both sides, and not through.
5. For baking beads, you can make a special “dryer”. Take a piece of foil and make a ball out of it. Stick toothpicks into the resulting ball and string the beads on them carefully.

6. And the most important thing! Don't be afraid to experiment and everything new!

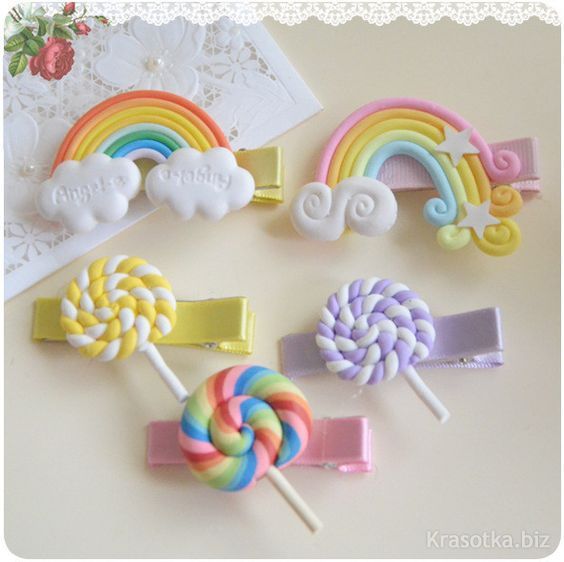
These simple rules are easy to follow. The only thing left is to find suitable ideas and begin to implement them. We have collected several interesting master classes on making cute hairpins and other polymer clay jewelry.

Remember, you don't have to follow inside and out. You can always bring something of your own. What is also very interesting: both a hairpin and a brooch blank can serve as the basis for your masterpiece. That is, a product molded according to a master class can be made in the form of absolutely any decoration.
Simple but very bright bracelet

The bracelet made using this technique is very fashionable, since the gradient does not leave the covers of magazines and instagram photos for which season. It is very easy to achieve a smooth color transition of polymer clay. Then you can always use this technique when creating new masterpieces.
The bracelet is based on bright beads and small medallions. This bracelet will appeal to both a young girl and a little princess. Optionally, you can complement the bracelet with bright matching beads.
So, you will need:
- Polymer clay in two different colors (more if you wish);
- Stationery knife;
- Talcum powder (baby powder will work);
- Coarse table salt;
- Toothpicks;
- Brushes and glue;
- Lace and metal rings.
Step 1. Take two polymer clay colors that go well with each other. For example, a great combination of white with any other, and the gradient will turn out interesting, and the risk of error is minimal. By the way, as an experiment, try to take three colors, when you mix them, you will get an unusual transition from the first color, through the second to the third.
Cut two identical pieces (rectangular) of different colors of clay. As a rule, the clay bars sold in the store have special notches, along which you can safely cut off the required amount. Cut the resulting rectangles diagonally, and then align the two triangles of each color with each other. You now have two two-color rectangles.
Step 2. Cut the rectangles into small, equal pieces. There should be exactly as many beads as you planned to make. Depending on the ratio of the colors, the color of the beads will change. Each cut piece should be thoroughly mixed so that all the colors mix well.
Step 3. Dip each bead in salt and carefully roll it between the palms so that the grains of salt are imprinted into the clay. This should be done with each bead three times.
Step 4. We make holes with a toothpick in each bead. Remember that it is better to do this on each side, and not through and through.
Step 5. Now we are making small pendants, which for your convenience should not be much on the bracelet. Roll out the piece of the desired plastic thinly. For greater beauty, you can give a certain texture to your future pendant by pressing the rolled piece onto corrugated paper, for example, or a special plastic blank that can be bought in a specialized store. Then take the shape you like and print it on the rolled piece. This will be your pendant. The basis can be your favorite metal pendant, an unusual textured button, etc.
Step 6. When all the parts are ready, send them boldly to the oven and keep them there for exactly as long as indicated on the clay packaging. Then take out and let cool. The beads also need to be rinsed with water so that all the salt is washed off the surface. The result is unusual rough beads.
Step 7. String the beads on a rubber thread (the main thing is that it is strong). And attach the pendants with metal rings at the very end to the bracelet.
Such unusual beads can be assembled into various compositions and attached both to the base for earrings and for hairpins.
Real owl
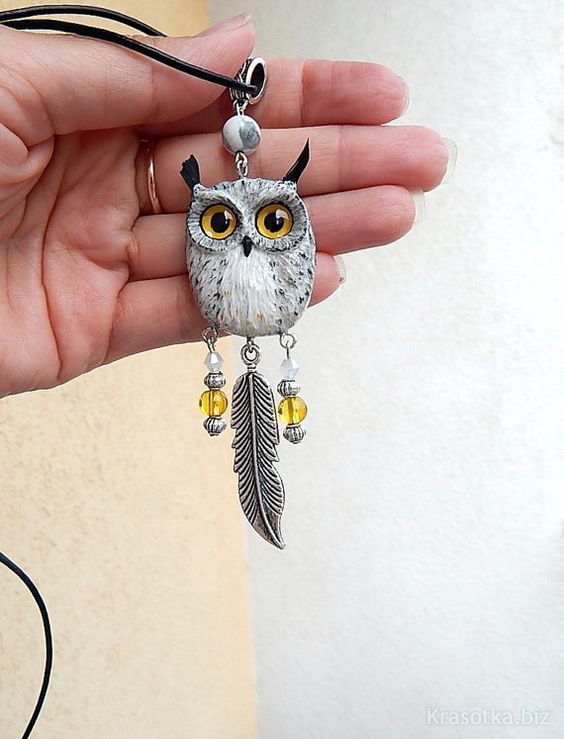
Such a decoration in the form of a flying owl can be made in the form of a cute hair clip, an extraordinary brooch or a beautiful pendant.
To create it you will need:
- Clay white and ivory;
- Acrylic paints of mainly brown and gray shades;
- Stationery knife;
- Small beads (shiny, no more than 3 mm in diameter - these are the future eyes of an owl).
Step 1. Make a ball out of a small piece of beige clay, and then turn it into a blunt-ended drop. This is the body of a bird. Depending on what size you want the product, choose the size of the ball. The sharp side of the droplet should be flatter. Where the head will be, you need to make a small indentation using a handy tool, for example, a pen cap or a marker. Put the prepared white plastic "cake" into this resulting cup.
Step 2. On the white flatbread of the bird's face, make two indentations for the eyes with the round edge of the handle. It is necessary to insert beads into them at an angle. In place of the beak, draw two stripes with a needle or a thin awl so that you get a triangle imitating the beak and two points (nostrils). Two small tiny pieces of white clay need to be rolled into sausages and made into eyelids, placing them around the beads. Use the needle to outline the eyes. Also, with a needle, you need to draw lines from the center of the face to the edges, imitating feathers. Just don't touch the beak.
Step 3. Wings. For manufacturing, you need a standard rectangular piece (cut along the grooves) of beige plastic. We cut the rectangle diagonally and from the resulting triangles we sculpt two bases for the wings. Later we will attach feathers to them, so you shouldn't bother with the ideal form. It is important that the wings are reliable.
Step 4. Roll out a long beige clay sausage and crush it to form an elongated drop. Then cut off thin pieces no more than 1 mm thick. Attach the feathers to the two wings at once so that they are symmetrical. Large feathers at the bottom, then a little smaller in the middle and very tiny at the top.
Step 5. The tail is also attached with feathers. Blind the legs by attaching them just above the tail. Now you need to add texture to the feathers and body of the owl using a thin needle. Draw the feathers the way you want. The finished bird must be attached to a brooch pin or the base of a hairpin. Here as your heart desires.
Step 6. Send your masterpiece to the oven and then paint. You can use paints in natural shades to achieve the natural color of the owl, or, conversely, fancy, so that the bird turns out to be unusual.
The creation of such a decoration takes much more time, but the result will also please you very much.


Such material as polymer clay has been used recently, but many craftsmen have come to love it. Jewelry made from this material looks great and is easy to create. Working with polymer clay is quite easy, it is plastic, it is easy to give it the desired shape. Once dry, it becomes as hard as plastic and looks great.
Each person can master several modeling techniques and create masterpieces. A huge variety of things can be made from it - from luxurious jewelry to toys for children. The main thing is to show your imagination and try to make various products from polymer clay, having previously watched the master class.

Working with polymer clay
Many firms sell polymer material, so its price and appearance are different. If you are a beginner and not confident in your abilities, you should not immediately purchase expensive polymer clay. Get basic colors and try to create simple polymer clay jewelry out of them, a master class will help you with this. In the process, you will understand how the colors are mixed, what combinations can be obtained.

You can make amazing DIY polymer clay jewelry. In order to do them, you must use the following five techniques.

- Treatment
Polymer clay must first be processed and softened. Therefore, it needs to be warmed, kneaded with your hands, and then flattened until it is thin enough to go through a special machine. Folding and passing the polymer clay through the machine helps prepare the material for future use.

If you don't have a machine, you can process the polymer clay by hand by folding and straightening it several times. You can heat the clay with a hair dryer or heat lamp to relax it and make it pliable.

- Shaping the color
One of the most attractive features of polymer clay is its color. It comes in a huge variety of colors and can be mixed in an unlimited variety of colors. Therefore, mix colors to get the one you want. You can even imitate expensive materials if you learn how to mix colors correctly.

- Shaping
You can cut clay, ruffle it, weave it, flatten it, fold it, texture it, stamp it, etc. Ceramic tiles and wax paper are ideal surfaces for working with polymer clay. One of the most creative methods for polymerizing clay is caning, which creates structures by rolling logs of different clay colors and arranging them in a specific way.

- Baking
In order for the clay product to solidify and your creation to be preserved, you must bake it in a special clay toaster. This will be one of your most important polymer clay tools.

Bake the clay on parchment paper, cardboard, or ceramic tiles. Note that curing the clay directly on the metal will create shiny spots on it. First you need to preheat the oven to 12o degrees and then bake the polymer clay pieces for 30-60 minutes between 121 and 129 degrees.

Note: Polymer clay can melt or release toxic fumes if temperatures exceed 130 degrees. Make sure you have a good thermometer (don't rely on the oven setting and keep an eye on it). Also, always work in a well-ventilated area.

- Finishing
After your ceramic clay jewelry is set and chilled, it can be finished to make it look even more attractive. You can sand it with sandpaper or a sanding sponge and coat it with a thin coat of varnish or clear sealant to protect the surface or add shine. You can highlight specific areas as you wish.

In addition to polymer clay, you will need other tools. However, for starters, you can make things out of one polymer clay and use whatever tools are available in your home. You can use ordinary knife for cutting, paper clips, toothpicks, rubber forms for cooking and anything with an interesting texture.

Try baking a piece of polymer clay and see how it behaves. If it has changed color or cracks have formed on it, then its quality is not very good. When heating in a stove, follow the instructions that should be written on the box.

Wear medical gloves to avoid getting dirty. The surface you are sculpting on must also be clean.

We present to your attention crafts made of polymer clay, this master class will help you, especially if you are a beginner in this. All of them can only be made by hand, using your oven, as well as using any everyday objects that you use in your daily life.

Polymer Clay Necklace
A material such as polymer clay is perfect for making jewelry, this master class will help you make a necklace.
What you need: polymer clay of any color, waxed cotton cord, toothpick.
Start by heating the clay between your hands until it is soft and pliable. Take a small piece of clay, roll out the beads, and then make small balls with your palm. You can make them as big or small as you like.

Use a toothpick to punch a hole in the center of each ball. If the clay you are using is soft, it is best to wear latex gloves. Place your beads on a baking sheet and bake according to the directions on the box.
Thread the beads over the cotton cord. This is where you get creative. You can put all the beads on one strand, or make a bunch of necklaces and fold them. All this is at your discretion! Attach a magnetic snap so that you can open and close them.
Polymer clay bracelet
What you need: polymer clay, razor blade. Mix the clay with your hands to soften it. Roll up three long tubes with your palms. Put 3 sticks together and start braiding.
Weave the bracelet to the length you need, focusing on your wrist. You can cut off the remainder with a razor. Bring the two ends together gently to form a solid circle.
Bake for 25 minutes at 245 degrees. You can make more than one bracelet, but several, it will look pretty nice.

DIY earrings
Make these lovely polymer clay earrings for yourself and your friends. They can be a great gift for anyone.

Consumables: polymer clay, earrings, glue, acrylic paints.
Working process:
- Work with the clay first to make it soft and pleasant to the touch.
- Form a heart using the end of a needle or toothpick.
- Bake the hearts according to the directions on the package.
- Once your figurines are cool, you can paint them with acrylic paint. After the earrings are dry, take the glue and glue them to the earrings. It will look pretty cute and become one of your favorite pieces of jewelry.


Decoration with a bow
What is necessary:
- polymer clay;
- cutter;
- spring rings;
- pliers;
- clasp;
- chain;
- oven;
- pencil;
- pin.
It's very simple. Follow these steps:
- Clay works best on waxed paper to prevent staining. Crumple the material until it feels soft and pliable. Form a long stick in the shape of a log and divide by four. Take each one and smooth it until it is flat.

- Pinch the sides as shown in the picture, and then join them together. Clamp all the parts in this way and connect them together. Be careful not to ruin the folds!

- Then take some clay, roll it up and wrap the middle of the bow. Cut out excess and smooth a little. That's all - a beautiful bow is ready.
- Place the pencil inside the bow to give it a nice shape.

- Bake the clay according to the directions on the package. Attach the jumping rings and the chain necklace is done!

This is a summer or spring decoration, but it can decorate any outfit, regardless of the season.
The options are endless, you can make a ring if you attach it to a base or a pair of earrings. Attach them to your phone case to decorate it.

Headband with horns
It looks funny, besides, it is fashionable now to wear a headband with horns.
To make a headband like this, you first need to choose a polymer clay color. You will need at least one block of polymer clay or more if you want to make large antlers.

Divide the block in half, remember it a little, and then sculpt the two shapes into a cylinder. Pinch the tops and shape them into a cone.

Take a wooden dowel (or pencil) and punch holes through them. Bake polymer clay according to packaging directions.

Cut a piece of tape that can be tied around the head. Pass the tape through the holes and make knots on both sides of the horn.

Tie the ribbon around your head so that the horns sit well on your head. Now you can go to any party to conquer others with your appearance.

Earrings "Friendly Monsters"
What you need: Various colors of polymer clay, toothpick, sharp blade, ring, brush (optional), pink chalk pastel (optional).
Instructions:
- Close the earring mold with clay as shown.
- To form the eye, place a small circle in the middle of the monster's forehead. Add a smaller portion of green and then a smaller portion of black on top of the green.
- Add horns as needed.
- Use a sharp blade to cut the gap to form the mouth.
- Smooth out your mouth with a toothpick.
- Take a piece of pink clay and form a small tongue.
- Make a depression in the middle of your tongue with a toothpick.
- Use a brush to paint some of the chalk pastel onto the monsters' cheeks (optional).
- Bake according to packaging instructions.

All is ready! Make as many little friends as you like and have fun! Cute monsters are fun and easy to make.
Polymer clay ring
You can also make a ring from polymer clay.To do this, you can take a ready-made shape or shape it with your hands.
If you are going to make a solid ring, it is better to use a special silicone mold - mold. You will need to bake it in a mold and then sand and varnish it.

If there is no mold, then you will need to purchase a base, which are usually available in stores where accessories for making jewelry are sold. They already have fixtures for attaching plastic, so you will have to shape it yourself from polymer clay. You choose any design according to your preference.
Don't be afraid to mix colors and get interesting combinations. Create and get beautiful admirable jewelry.


Instructions
Most polymer clays set at high temperatures, so they should be baked to remove plasticizer from the material. Some polymeric materials freeze in air. You can work with polymer clay in various techniques, creating the effect of glass, ivory, clay, plastic and many other materials.
Before sculpting the product, carefully knead a piece clay the desired color to give it plasticity. If you have never sculpted products from clay, start practicing sculpting simple round. Roll out a piece of plastic, cut the sheet into squares, and roll each square into a small ball.
Before baking, the beads must be put on toothpicks to keep the hole in them. You can sculpt beads from one-color plastic or mix two or three colors to get beautiful streaks.
Having mastered the sculpting of beads, try to mold a product using the canning technique, using any - found on the net. The essence of the method is that the plastic of the desired colors is rolled into thin sausages, and a drawing is laid out of the sausages, which should appear on the cut of the finished products... The finished part, assembled from several sausages, is compressed and stretched, and then cut into pieces of the same size, which can be used for any purpose.
When your product is ready, proceed to the crucial stage - baking the figurine. Make sure that the oven temperature exactly matches the temperature for that specified in the instructions for your polymer.
Bake the product, maintaining the correct temperature, and then cool it completely. When the product has completely cooled down, you can continue to work with it - process it with sandpaper or a file, paint, polish, varnish and so on. It is best to paint the product with acrylic paints.
Related article
After the fashion for products from macrame and beads, crafts made of plastic, or polymer clay, became popular. Jewelry made from it looks original and fashionable, and besides, they are quite durable.

You will need
- - polymer clay;
- - baking dish;
- - waxed paper or a piece of plexiglass;
- - tools for work;
- - container for preparing the product;
- - varnish;
- - oven or stove.
Instructions
First you need to purchase clay. It comes in different brands, varieties, colors and differs in consistency. Each plastic manufacturer produces several types of clay. It can be standard, soft, flexible, doll-like and with different effects: fluorescent, mother-of-pearl, metallic, translucent, imitating natural stones, etc.
Beginners are usually advised to use German Fimo polymer clay, which is the most popular. Also in demand are the brands Sculpey (USA), Cernit (Belgium), Kato Polyclay (USA), Premo (USA), Sonnet (Russia), Tsvetik (Russia), etc.
Each type of clay differs from others in softness and strength after the baking process.
Clay should be chosen depending on what kind of product you want to create from it. On the packaging you can read about the purpose of each of them. For example, ultraviolet clay differs in that it glows when exposed to UV rays. Decorations made from it will appeal to fans of nightclubs.
Before you start making a plastic product, prepare your workplace. Cut the clay of the desired color or several colors into pieces. Then mold a product out of them: a pendant, earrings, magnet, ring, flower, doll, figurine, etc. You can mix several colors of plastic if desired. Don't be afraid to show your imagination and let your imagination run wild. If you do not feel confident in your abilities, start by sculpting the simplest product, where special skills and skills are not required. For example, it can be multi-colored beads or jewelry for a keychain.

There are 2 ways to work with polymer clay. The first method: carefully lay the molded product on foil and put it in the oven at a temperature of 110-130 ° C for 15-20 minutes. Before doing this, do not forget to read the instructions on the packaging.

You can make the product in another way: take the dishes and boil it in boiling water. Cooked in this way will be more durable. However, not every clay can be cooked. After the product has cooled down, cover it with varnish. When it's completely dry, attach it to the hardware.
note
Do not use utensils for food purposes after plastic products have been cooked in them.
If the temperature during firing of the product is higher than indicated on the package, the clay will give off toxic smoke and burn. Therefore, be careful.
Do not forget to ventilate the kitchen and wash the oven thoroughly after baking the plastic. clay can release toxic substances hazardous to health.
Polymer clay is a very convenient material for making jewelry with your own hands. This plastic mass lends itself well to sculpting. It comes in initially different colors, and is also easily dyed in the finished product. Depending on the type of material chosen, the workpieces are baked in the oven or hardened in the air.

DIY polymer clay beads
For this decoration, you need to make beads, which in their appearance resemble colored stones. Select several pieces of baked polymer clay to combine in one bead. Knead two of them in your hands to make the clay even more plastic.
On glass or on an ordinary white sheet, roll out two crushed pieces with a rolling pin, turning them into rectangles of approximately the same size. Place two layers on top of each other. With a sharp knife, cut off the colored shavings from the rest of the pieces and place them evenly on top of the layers.
Roll the resulting layers with a rolling pin. Tear off small uneven pieces from the formation and form balls from them. Then roll each into a smooth bead. If you wish, you can not roll the bead, but leave the roughly shaped pieces of plastic.
Bake the resulting beads in the oven. Set the temperature according to the instructions on the polymer clay label. Holes in the beads can be made before baking with an awl, or drilled ready-made with a small drill.
Collect the resulting colored beads into a single piece. String them, one at a time, on a waxed cord of the appropriate color, and tie knots on both sides of the beads so that they are held in place. Tie the ends of the cord into a nice knot. The beads are ready.
Beads can be strung on a thin satin ribbon.
Polymer clay earrings
Original earrings resembling bunches of mountain ash can be made of polymer clay. Knead a piece of orange clay in your hands and roll about forty small balls from it. Use the tip of a knife to make cuts in the center of each ball so that it looks like rowan berries.
Insert a hardware stud on the other side of the ball. Its cap should be immersed in clay, and its sharp tip should stick out. Use a toothpick to smooth the clay around the bonnet. Repeat this operation with each orange ball.
Knead a piece of green clay and roll it into a thin layer. Using a mold or knife, cut out a few leaves according to the template. Make veins on the leaves with a knife or the sharp end of a toothpick and poke holes for the rings.
To make the leaves, you can use special silicone molds, which are sold in art stores.
Mash a piece of red pastel on a piece of paper. With a soft brush, tint the leaves along the edges and in the veins, as well as all the berries from one side. Bake the resulting blanks in the oven at the temperature indicated in the instructions.
After taking out the baked elements for the earrings, stick the clay berries with the sharp edge of the fittings into a piece of foam or crumpled foil. Place a drop of liquid brown acrylic paint on the grooves on each berry and let dry.
Bite off the cloves with a pair of pliers so that the remaining tail is about 1 cm.Fold it into a loop with round-nose pliers. Attach chains 5-7 cm long to the hooks. Divide the berries in half and fasten them to the chains. Pinch the loops with pliers. Attach metal rings to the leaves and secure them on top of each bunch.
Related article
Polymer clay is a plastic material based on PVC particles, it is intended for modeling small sculptures, jewelry and other products. When working with the material, it is required to wear rubber gloves, and also follow basic safety rules.

Polymer clay is conventionally divided into two large categories: one hardens by air drying, the second requires baking at a high temperature (for example, in an oven). Both the one and the other type of clay can be painted, but there are some nuances.
Baked polymer clay
Various manufacturers offer baked polymer clay in a huge spectrum of colors. You can additionally paint it, if necessary. Suitable for this:
- acrylic paints;
- gouache;
- pastel;
- wax crayons and pencils;
- a piece of chalk.
After the clay product has been baked in the oven, it must be cooled. It is not recommended to paint over hot polymer clay as it can cause burns. And the paint won't stick at all. The only exception is pastel. It is used to paint a product that has not yet been baked in the oven. For painting, it is recommended to use soft brushes made of natural hair, so as not to disturb the integrity of the composition.
Self-hardening polymer clay
This type of clay is presented in a very meager palette: white, gray and terracotta shades. Some manufacturers have expanded the color spectrum of polymer clay, which naturally cures in air. For example, "Fimo" offer not only standard colors, but also bright shades that can be mixed into the base color, making it original and unique. There are two options to paint self-curing polymer clay.
The first is to add paint to the base plastic during kneading. Only water-based acrylic paints are suitable for this purpose. Add some paint to the mass, knead the clay. If there is not enough brightness, you can add some more paint. Several colors can be mixed for an unusual shade. If the clay is mixed unevenly, a very original and unique color can be obtained for the product.
The second is to paint an object already sculpted from clay. For this, not only acrylic paints are suitable, but also oil, pastel and gouache paints. You need to apply paint on an already hardened finished object. Once the paint is dry, you can cure it with clear varnish. This will give additional strength to the polymer clay product. It has been noted that some paints change color after drying. To prevent this from happening, you need to apply them in several dense layers, each of which must be dried.
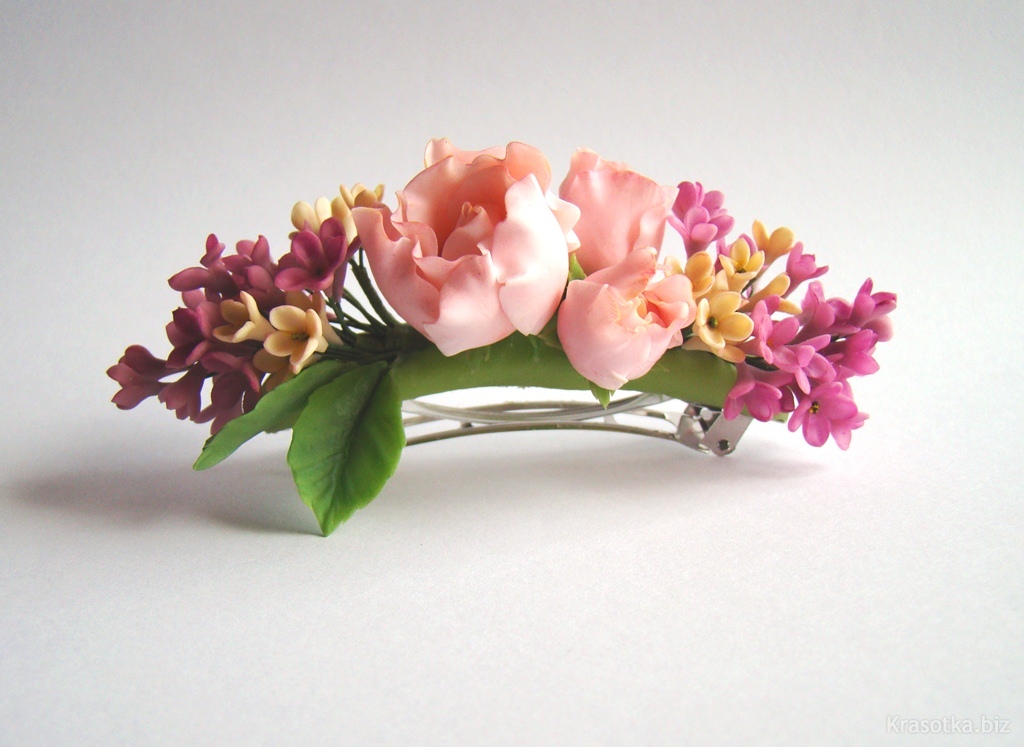
Polymer clay is used quite often to make a variety of products. For example, flowers can be made from this material. Try making a rose with your own hands.

To mold a rose from polymer clay is a rather painstaking business. But the result will surely please you - such roses are no worse than real ones.
Polymer clay rose
For work, you will need the material itself from which you will make the flower, and a thick green wire. It will serve as a stalk. The modeling begins with the petal of the very center of the rose. To do this, you need to roll a small ball and make a thin layer out of it, which is then twisted into a petal. It is better to bend its outer edges slightly to give the flower a natural look. Next, you need to make the next petal and carefully superimpose it on the previous one. You need to apply from below, attaching the parts well. When 2 petals are ready, you can put them on the wire. And then you should attach all the other petals, not forgetting to bend the edge of each of them. Sepals must be made from green clay, which are attached to the bottom of the rose. It remains to connect the parts, and the rose is ready.
Heart of roses
To collect a heart from roses, you will need the following materials and tools: polymer clay of different colors, an oasis base, thick wire, wire cutters or good scissors, tape tape (you can buy it at florist shops), round nose pliers and PVA glue.
To make a heart of roses, each flower is first made separately using the technology described above. Rosettes are best made in different sizes. Then they start making leaves. To do this, take green clay and roll it into balls of different sizes. To apply veins, you can use special blanks with a characteristic relief. A green ball is rolled over this blank, shaped into a leaf, and the clay is pressed in to leave streaks. Now, using glue, you need to attach a piece of wire to the finished sheet. The length of the wire can be made any at your discretion.
At this stage it is necessary to dry both the roses and the leaves. It is convenient to do this with the upside-down gasket from the candy box. So the products will not wrinkle and will not spoil their appearance.
Now, at the end of the wire, you need to make a small loop with round nose pliers and insert the wire into the center of the rose, being careful not to damage the flower. The loop should be inside the petals. Thus, the wire is inserted into all ready-made roses.
For the stem, take a wire of the required length. To connect the stem and leaf, you need to wrap them together with tape. To begin with, it is cut to the same length as the stem and stretched at both ends so that it becomes sticky. The same procedure is carried out with the rest of the roses.
When assembling the heart, it is important to consider that the flowers are evenly spaced and there is no empty space. Each rose should be inserted into the oasis carefully. On the edges of the base, the flowers must be arranged so that they cover it with themselves. For better fixation based on the wire-stem, it is recommended to dip it in glue. By placing
Flower brooch made of polymer clay
To make this brooch, you need two shades of plastic: yellow for the center of the flower, and whatever you want for the petals. Also, petals can be made with a color transition from lighter to dark, sat down to mix clay of two shades. In addition to plastic, prepare:
- a piece of glass or ceramic tiles with a smooth surface;
- varnish for coating polymer clay;
- acrylic paints;
- brush;
- the base for the brooch;
- glue "Moment";
- a sharp stationery knife;
- rolling pin;
- a toothpick.
Roll a ball out of yellow plastic. Flatten it a little and apply the texture with a toothpick.
Roll out a thin layer about 2 mm thick from polymer clay to make petals. A cylindrical object with a smooth surface can be used as a rolling pin for this purpose. This can be, for example, a can of deodorant or a glass bottle.
Use a sharp knife to cut out a few rounded petals. Thin the edges of the parts with a rolling pin. Apply several streaks with a toothpick and shape the petals into a curved shape.
Collect the flower. Take the middle and place the petals around it. Give the workpiece the desired shape. Place on a glass or ceramic substrate and send to bake in an oven preheated to 110-130 degrees.
After the flower has cooled down, scratch the back of the flower a few times. This is necessary so that the brooch clasp is held as tight as possible.
Drop a little glue, after a couple of minutes, when it starts to harden, attach the base for the brooch and press it firmly with your fingers. Let the glue dry, then highlight the veins on the petals with acrylic paints and cover the product with a special varnish for polymer clay.
Flat brooch
You can mold a product of almost any shape from plastic, but the simplest product is flat. Perfect option .
Prepare several colors of polymer clay. You will also need a shape cutter. This can be a special cutter or any other template according to which it will be possible to cut the desired figure with a sharp knife. Other materials and tools:
- a piece of glass or ceramic tiles with a smooth surface;
- plastic varnish;
- the basis for the brooch;
- glue "Moment".
Roll out a layer 2-3 mm thick from polymer clay of the main color with a rolling pin. Then make thin strands of plastic in different colors. Place the resulting sausages side by side and roll them back together into a thin layer about 1 mm thick. Work on a glass or ceramic substrate.
Cut 2 identical parts from the resulting blanks. Place a multi-colored figurine on the base. Press it down lightly and place it in the preheated oven, while sending the work to bake without removing it from the substrate.
After baking, take out the workpiece, let it cool down and remove it from the substrate, picking up the bottom side with a knife. Lightly scratch the back and glue the brooch base to the surface. Cover the brooch with polymer clay varnish and let it dry for several hours.
Hand-made products have always been especially appreciated. It's a way to get something unique, creative and something that no one else has. The most popular material for creating unique handmade products is polymer clay. We have already written how to make such clay on our own at home (see).
However, you can not only make polymer clay and sell it as a separate product, but also create various things yourself from this material. Polymer clay can be used to make decorative ornaments (bijouterie), key chains, photo frames, Christmas tree decorations, dolls, figurines and in general any things that may be useful for home decor.
Polymer clay (plastic) is soft material based on polyvinyl chloride. Polymer clay is initially plastic and soft; it can be molded from it like from plasticine. When the product has been given the desired shape, it is heated, as a result of which it solidifies and becomes solid. Some types of polymer clays harden without heating, simply by exposure to air. When creating a product, you can immediately use colored polymer clay, or you can paint an already finished solid product. Any acrylic paint will easily fall on it. If products made of polymer clay are not exposed to frequent blows and other damage, then they can retain their "presentation" for a very long time.
How to sculpt from polymer clay
Let us warn you right away that art modeling is a creative process that requires certain talents. At a minimum, the arms should grow out of the “right” place. If you have always been praised in kindergarten for the fact that you are good at molding a man out of plasticine, this does not mean that you will be great at modeling from polymer clay.
If you want to do modeling purely for yourself, then, of course, you can do it as you like. But if you want to create your own business in the production and sale of plastic products, and make money on this, then your products must be at least competitive, and at the most, stand out sharply from the rest for the better. It takes practice to make significant progress. Therefore, if you feel that you are gaining mastery by practicing, then continue in the same spirit. In the opposite case, it is better to think about another type of earnings.
Molding
The very first step that you should definitely take is to carefully knead the piece of polymer clay with which you are going to work further. This will soften the plastic and make it much easier to shape it to the desired shape. Start training with the simplest elements, gradually moving on to more complex ones.
For example, the first thing you can try to do is a flower and a leaf. To make a leaf, form an oval out of a small piece of clay with your fingers, then lightly press it against the work surface to flatten it. Make a sharper edge on one side of the oval, and leave a rounded edge on the other. Using a toothpick, use punching movements to draw veins on the leaf. You will end up with something like this:
Moving on to the next element of the flower - the petals. Roll five small balls of polymer clay, and use your fingers to roll them out on the work surface. Try to keep the edges as rounded as possible. Now you need to shape these petals into a flower. Since each petal sticks slightly to the surface due to pressure, you can break its shape when you detach them. Therefore, it is better to do this not with your fingers, but with a blade or other flat object. Lay the petals in a circle on top of one another, overlapping one edge with the next. Then place a leaf under the finished petals - and your flower is ready:

Baking
Next, you need to expose the product to heating so that it hardens. You can use a conventional oven for this. However, if you use an oven in which, in addition to baking polymer clay, you also cook food, then it is better to place the product in a container or food sleeve before sending it to the oven. When baked, plastic can give off fumes, which will settle on the oven walls and adversely affect the quality of your food.
Despite the fact that the required temperature and baking time for a particular type of plastic are always indicated on the packaging, it is better to try it first on a small test piece. Try not to overexpose the product in the oven, otherwise it will burn (turn black) and generate a lot of smoke. In this case, it is urgent to ventilate the room.
Degreasing
You can remove excess fat from the product using any detergent. Apply a small amount of the product to cotton wool and wipe off the product immediately after baking.
Grinding
Not every piece will require grinding. This procedure should be performed only if there are fingerprints on the product, any irregularities or lumps on the surface. If you are just starting to create with polymer clay, then you are unlikely to be able to immediately create products with a perfect surface. In addition, if you plan to cover the product with varnish or paint, then you cannot do without polishing - the varnish will lie much better on a perfectly flat surface. Therefore, the ability to skin and polish will come in handy.
You will need sandpaper and a small piece of cloth. Denim (always an old fabric, since a new one can leave traces of paint on the product), corduroy or suede is best suited. Fill a bowl with room temperature water and mix in just a little detergent. Next, you need to dip the product in water and slightly wet the sandpaper. Start sanding around the edges and back (that is, not the front side) with coarser sandpaper. Use water to rinse off dust and small pieces that form from the sandpaper. When you have finished working with coarse sandpaper, change the water and start sanding with fine crumbs. Grind the front side as carefully as possible so as not to spoil the presentation of the product.
At the end of sanding, once again rinse the product from the remaining detergent and grains of sandpaper, and dry it. Then polish the item with a piece of cloth - just rub the item on all sides with vigorous movements.
Varnishing
To varnish the product, it is best to use special varnishes, which are designed specifically for polymer clay. Some "masters" use nail polishes or decoupage varnishes on an acrylic basis, but this is not quite the right decision. Such products can be made only for themselves, but they are unlikely to be suitable for sale. Some products, after thorough polishing with a cloth, no longer require varnishing.
Direct skin contact with polymer clay can cause allergies or other unpleasant reactions. This does not happen very often, however, it is not worth the risk. Therefore, when performing your first work, it is better to use disposable medical gloves. It is also better not to use dishes that have direct contact with polymer clay when eating.
Polymer clay tools
Each master has in his arsenal the following tools, which are very useful in working with polymer clay:
1. Surfaces for sculpting. These are flat surfaces made of glass or plastic, preferably large. Working on stone or wood surfaces is not recommended.
2. Blades, knives. They are needed in different sizes and thickness of the cutting part. All blades and knives should be as sharp as possible so that the product does not deform during cutting.
3. Sandpaper. It is used for sanding or, conversely, to give the product an uneven shape (for example, imitation of an orange peel).
4. Fabric (denim, corduroy, suede). It is used to polish the product and give the surface a radiant shine.
5. Knitting needles and needles. We need different sizes and thicknesses. Used for making through holes (for example, in beads) or for small dents on a product.
6. Glue. It is necessary for gluing together the individual elements of the product.
7. Extruder. This is a special tool that resembles a large syringe from which polymer clay is squeezed out. For extruders, there are various nozzles with which you can get an element of the future product of the shape you need.
What can be made from polymer clay?
Real plastic sculpting professionals offer a wide range of products. Among the assortment you can find:
- Earrings;
- Rings;
- Pendants, pendants;
- Beads;
- Bracelets;
- Hairpins and hair ornaments;
- Brooches;
- Keychains;
- Photo frame;
- Figurines, figurines;
- Christmas decorations;
- Dolls;
- Paintings.
For work, you will need not only different polymer clay, but also additional elements. For example, chains for pendants and pendants, metal bases for rings and hairpins, clasps for bracelets and earrings, hooks for Christmas tree decorations, threads (for example, for doll hair), various sequins, beads, and so on. All of these can be purchased at any art store.
How and to whom to sell polymer clay products?
Your clients will be people who want to buy jewelry and crafts made of polymer clay for themselves or as a gift to loved ones. Practice shows that a significant percentage of clients are young girls. Nowadays, communities on social networks created by plastic sculptors are very popular. There they post catalogs of their products, and each member of the community can choose the product they like and place an order. The main difficulty in this type of product sales is to attract and retain social network users in the community.
Another way to sell your product is to participate in fairs and exhibitions of hand-made products. Such events are now quite in demand and are periodically organized in almost every major city. Find out how and where such fairs and exhibitions are organized in your city, and keep track of the dates of their organization. Offer your products to the organizers as a product. If your products are of high quality, then, most likely, they will not refuse you.
Also, in each city you can find shops that sell various souvenirs, jewelry, home decor items. Try to negotiate with such stores on the sale of your goods on mutual terms. In this case, you will be the supplier of the goods.
Since the main advantage of hand-made products is their uniqueness, be sure to offer your customers the opportunity to create a unique product to order. Of course, it would be more reasonable if you introduce such a service already when you become a real master. The client describes his wishes to you, he may show you approximate sketches of the work, and you make a product especially for him. Such works usually cost a little more than those done in advance, however, there is a risk that the client will not like the product and he will refuse to pay for it. The moment, of course, is an unpleasant moment, but you can always sell such a product through the general catalog.
Polymer clay modeling video
There are many videos on the Internet that can be good helpers in teaching polymer clay modeling. At first, you cannot do without such videos. We offer you several useful training videos, in which the wizards explain each step in an accessible and understandable way. If there are inclinations for creativity, then even a child can learn how to beautifully sculpt from clay using such videos!
To inspire your creativity, we offer you amazing works made of polymer clay by real masters!


How much can you earn on polymer clay products
It depends entirely on you. A package of imported polymer clay (for example, from the manufacturers "Premo", "Sculpey", "Kato", "Pardo", "Fimo") costs about 2 to 6 dollars, depending on the volume. Polymer clay from domestic producers (for example, Tsvetik, Sonnet) is even cheaper.
The cost of additional materials will also be insignificant, especially since they are not required for all products (for example, for a simple figurine, you do not need anything other than the polymer clay itself). But the cost of finished products can be completely different. Custom-made exclusive items can cost up to $ 15 per piece. Various earrings, pendants, rings are sold for an average of $ 4-5. If you can learn to work quickly and create quality products, you can make pretty good money in this business.
Clay modeling is a fun and easy hobby that even a child can learn. It makes it possible to create a variety of things: from well-aimed decorations to impressive sculptures, creating an interesting decorative design for a room or presenting them as a gift.
Children engaged in such an activity can not only recreate their favorite cartoon characters, please with entertaining crafts, but also develop spatial thinking and the ability to work with their hands.

For children, clay crafts are one of the best hobbies, and for adults it is an option to relax, calm down and enjoy the work done.

Where to get or how to prepare clay
Polymer clay is a material that, in structure and characteristics, resembles plasticine known to everyone from childhood, but it is capable of hardening, making crafts durable. There are several types of clay: those that solidify only after baking or firing, and the other without the use of high temperatures.

Clay can be bought at any office supply store or made at home with your own hands. Such a material cannot be called polymer, since when creating it at home, completely different components will be included in the composition. However, the properties of such a material will be similar to purchased polymer clay.

To obtain such a mixture, you must:
- 250 ml of PVA glue and the same amount of corn starch;
- 2 tbsp. tablespoons of lemon juice;
- 1 tbsp. a spoonful of petroleum jelly and the same amount of any cream;
- Polyethylene film;
- Kneading surface;
- Mixing bowl and spoon.


These ingredients are enough to prepare 350 grams of finished material. All components, except for the cream, must be mixed in a prepared container and put in the microwave for half a minute at maximum speed. The cream is needed to lubricate the surface on which the clay will be kneaded.
After the microwave, stir everything again and put it on a surface greased with cream and knead intensively, like a regular dough, for 5 minutes. Subsequently, an elastic plastic material should form. Next, you need to give it a shape, wrap it with a cloth to remove the remaining water. When the clay has cooled, it is ready to use.

Polymer clay crafts
If you are new to clay business, do not see the advice of sellers to buy a variety of tools to create masterpieces. Many of them may be unclaimed. At the initial pores, there will be a fairly hard surface, a clerical knife, toothpicks, contours for forming figures, a rolling pin for rolling out the material, gloves and wet napkins.


If you pay attention to the photos of clay crafts, you will notice that there are many modeling techniques. Before starting work, you can watch several master classes in order to better get acquainted with the nuances of the upcoming work.

Of the most original methods, one can single out: "the cane technique": rolled plates of different shades are laid on top of each other and rolled into a roll, and then cut into circles. The cut shows a colorful unusual pattern.

"Salt technique" involves rolling the product in salt and baking. After that, the salt is washed off the inputs and an interesting surface structure remains.

When using the "kaleidoscope" technique, different clays are rolled into a roll and different shapes are cut out with molds. There is also a transition technique: using pieces of different colors, they form a smooth transition from one shade to another.


After drying, self-hardening clay looks like gypsum, and the one that needs to be baked becomes denser and resembles a plastic product.

Clay crafts for beginners are best made in the form of a flower, bouquets or simple jewelry. It is better to paint with acrylic paints, however, in order to save money, it is possible to purchase gouache, but it should be covered with several layers of varnish to fix it.

What is better to blind first?
The easiest way to make a rose. To do this, you need to say a ball and give it the shape of a drop - this will be the basis. Then make a few smaller balls and flatten them with your fingers - these are thin petals that need to be fastened around the base until you get a full-fledged flower.

To make beads or earrings, just take the shape of a square and cut out the required number of shapes - this will help to make each of the same size. After the figure, roll it into balls, and then make holes for the lace using needles or toothpicks.


Modeling from ordinary natural clay
Clay is formed by the destruction of rocks. Due to the difference in the minerals that make up it, it can be of different shades: yellow, green, white and even blue.

Professionals prefer red and white clay for sculpting. Therefore, if production from polymer clay, for some reason, does not bring pleasure, you can try to sculpt from ordinary clay, extracting it yourself or buying it in a store.

Before starting work, you should sign up for several lessons or watch video tutorials on the Internet in order to get acquainted with the features of clay and understand what it should be for use.

Before shaping the product, you need to carefully dislodge it and beat it off with your hands to eliminate air, otherwise, when baking the void, the product will break.


For work, you can use various tools, the most convenient is a spatula. After completing the work, wipe the finished figure with a sponge or a soft brush. Then it is left to dry for 10 days, and then fired.

The finished product is decorated using various techniques: painting with glaze, decoration with colored clay, coating with acrylic paints and more.

conclusions
The more you sculpt, the easier this business will be. After familiarizing yourself with the features and properties of clay, you can create real masterpieces - baskets, boxes, vases, figurines and even sculptures of people. Crafts made of polymer and ordinary clay for beginners will become a real decoration of an apartment, created with your own hands.


Photo of clay crafts


