How to fold a brick chimney. Do-it-yourself chimney for a stove: we make chimneys for stoves using different options Laying a chimney from facing bricks
The choice of a brick device as a chimney for the stove is primarily due to its excellent draft and presentable appearance. In addition, such a chimney will serve its owner much longer than analogs made of metal or pipes. Arrangement of a brick chimney requires adherence to the subtlest technological nuances associated with masonry. We will qualitatively consider how to lay out a chimney from a brick further.
Brick chimney: requirements, size, configuration
The chimney is the most important part of the heating system, because the correct functioning of all equipment depends on its quality. The main function of a high-quality chimney is to remove products that have formed during the combustion process and provide a high draft that contributes to the combustion of fuel.

A brick chimney is distinguished primarily by its low cost, durability and good performance. Brick tolerates both low and high temperatures.
It is the correct calculation of the chimney that provides comfortable conditions for people who live in the building. A high-quality chimney can reduce the fuel level required to heat the stove, in addition, fire safety and indoor air quality depend on it.
Each equipment connected to the chimney must meet the following requirements:
- providing protection against fire - the chimney must have a high level of fire safety, the minimum distance between the chimney and the wall must be at least 38 cm, in addition, in the areas where the chimney passes through the ceilings, it is necessary to build special extensions;
- the height value significantly affects the draft, a correctly determined chimney height significantly improves draft and the fuel combustion procedure is highly efficient, the minimum chimney height is 500 cm;
- chimney thickness - a parameter that ensures fire safety in a room, the thicker the chimney, the less it heats up, the optimal chimney thickness parameter is 100 mm;
- in relation to the internal section of the chimney, it must be laid out in such a way that no differences are obtained in terms of internal size.

Please note that each chimney is individual, its calculations are made in relation to the individual characteristics of the room, but still each chimney made of brick must be airtight and have a smooth inner surface.
Smoke moves inside the chimney in a spiral manner, therefore, most often the chimney has exactly a round shape. Although, the brick does not allow you to build a chimney in this shape. Most often, a brick chimney is rectangular or square.
Although, the corners of the chimney are places that prevent the normal movement of smoke in the system. With the help of a plaster mixture, leveling values, it is possible to smooth the surface of the chimney so that it turns out to be round inside.
Please note that the quality of work must be at the highest level, since the plaster, due to the temperature drop, is prone to crumbling. The size of the chimney significantly affects the quality of the draft. In addition, the chimney must be in harmony with the overall exterior of the room. On a small house, a chimney that is too large in size will look ugly.
The optimal chimney size is considered to be 26x13 cm.This structure is constructed when laying each row of five bricks. Although it is possible to make a chimney with a larger diameter, this will require more effort.

Brickwork chimney pipe
It is necessary to start laying on top of the stove, before that, a packing pipe is installed on its surface. For its construction, you will need to observe the dressing between the rows.
The brick is laid in the same way as during the construction of the wall. But, nevertheless, there are certain features of the brickwork of the chimney:
1. Make sure that each of the rows is horizontal, check it regularly for evenness. In addition, it is necessary to monitor the verticality of the entire structure.
2. To ensure strong adhesion between bricks, it is recommended to use a composition of clay, cement and sand as a mortar. The ratio of sand to cement is two to five, and it is necessary part of the clay.
3. The mortar is applied to a brick with a thickness of five to ten millimeters. If the layer of the solution is too thick, then the structure will be less durable, since temperature drops will lead to its crumbling.
4. Another important aspect is the correct filling of the joints between the bricks. If this procedure is neglected, then sparks from the chimney will fall into the room.
5. In the process of laying, use only whole bricks, if you need to install a certain part of the brick, then the layer of mortar for laying it should be minimal.

What brick for the chimney should be used
For the construction of a brick chimney, you will need only two basic materials in the form of brick and mortar. We suggest that you familiarize yourself with the recommendations for the choice of materials for the construction of a chimney:
1. The choice of bricks must be carried out with the utmost seriousness. The material must be fireproof and high quality. The minimum grade value is 200. In appearance, the brick should have smooth edges, a clear rectangular shape, good firing and be sufficiently strong. The optimal brick size for arranging a chimney is 25x12x6.5 cm.
2. The next moment is the preparation of the solution. To build a solid chimney, you will need a solution that contains water, sand, clay and cement. A high-quality mortar contains fine sand with small grains. Otherwise, the thickness of the solution layer increases, and the quality and strength of the chimney decreases. Particular attention should be paid to clay, it should not contain foreign impurities, and the water for preparing the solution should be clean and soft.

The stove roof is adjacent to the chimney using a special material that waterproofs this area. To protect the room from moisture and atmospheric precipitation, a thickening called an otter is made on the outside of the chimney.
If the otter is absent, then a material in the form of galvanized iron is used, which is mounted on the roof in a special way.
If you follow the previously given tips and tricks, then the brick chimney turns out to be of high quality and durable. However, there are certain points in which inexperienced builders most often make mistakes, and we will talk about them further.
The first and most common mistake is a small pipe. It leads to the fact that there is no draft in the stove or other heating device. Such a chimney is not able to function normally. Therefore, before carrying out work on the arrangement of a brick chimney, you should carefully study the recommendations for determining the optimal length of the chimney pipe, which is capable of providing good draft.

Failure to comply with the proportions for preparing the solution leads to the fact that cleaning the chimney becomes difficult, and the solution crumbles over time. The more evenly located the inner channel of the chimney, the better the smoke and all combustion products are removed from it. If the channel is made poorly, then the smoke penetrates into the room, and this threatens the inhabitants of the house with poisoning.
Try to ensure the maximum verticality of the chimney, avoid too long horizontal sections. If it is planned to arrange a chimney deflection, then on an area up to 100 cm, the chimney should deviate by no more than thirty degrees.
How to make a brick chimney: design features of a chimney
Before making a brick chimney, you should carefully study its design. The first element of the chimney is a shoulder pipe. It has a catch. To lay out the pipe, the bricks must be bandaged.

If you count 5-6 rows of bricks from the ceiling, then at this stage you should equip the fluff neck. This element is a kind of broadening, although, in terms of diameter inside, it is the same as the chimney. The diameter of the outer part of this element is reduced by 30-35 cm.
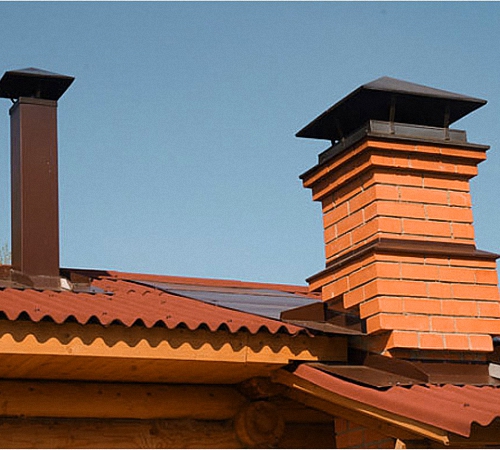
The chimney located in the attic is called a riser; this section extends right up to the roofing base. The next cutting element is the otter, it expands on each side by at least 100 mm. It is this fragment of the chimney that prevents atmospheric precipitation from entering the interior of the room.
After the otter, the arrangement of the neck follows, the size of which is similar to the cross-section of the chimney. The final fragment of the chimney is the arrangement of the head, on which a part is installed in the form of a deflector or a metal cap. Thus, the chimney is protected from snow, rain or wind. In addition, these elements significantly improve traction.

Do-it-yourself phased construction of a brick chimney
We propose to divide the work of laying a brick chimney into several stages:
1. Preparatory stage.
First, you should consider the schemes of brick chimneys and choose the best option that suits the individual parameters of the room and heating equipment. If you have a conventional wood-burning stove, you will need to carefully design each of the rows of masonry. And if the stove is gas, then a metal pipe must be installed inside the chimney.
Before laying the chimney, a rectangular foundation should be installed. For its construction, you will need solid brick or concrete with the presence of metal reinforcement. The minimum foundation height is 300 mm and the width is 150 mm larger than the chimney itself.

2. The next stage involves direct work on laying a brick chimney with your own hands.
For these works, a special scheme will be required, according to which each brick is laid. For laying out the chimney, use red or fire bricks. If the temperature in the chimney is too high, it is recommended to use special fire-resistant mortars to join the bricks. Otherwise, it is sufficient to use a solution of cement with lime or cement with clay.
In order to cut off a certain part of the brick, you should use a grinder, and the marks are made using a marker. The durability of the chimney directly depends on the thickness of the layer, the thinner it is, the stronger and more reliable the chimney.
To form an otter or other areas of a similar purpose, it is enough to use metal rods that are mounted on the frame of the structure. Please note that the rods should not be located along the diameter of the chimney, as they will become an obstacle to the pathways for the removal of combustion products. In addition, one should take into account the moment that the chimney is high and the width depends on the thickness of the mortar that is applied to the brick.
In addition, in the process of making a brick chimney for a boiler, special holes should be made that will simplify the procedure for cleaning it. The wall inside the chimney should be particularly flat. For this, they must be finished with plaster. Thus, soot will not collect on the walls, which negatively affects the quality of the chimney.
3. The final stage of the manufacture of chimneys for brick ovens.
If the chimney is being erected directly in the vicinity of the wall, then to increase its stability, it should be fixed on it with steel anchors at intervals of 25 cm.At the junctions of the chimney, ceiling and roof, a fabric based on asbestos or fiberglass should be laid. Although the heating of the brick is quite slow, it is still necessary to reduce the potential for fire. Another important point is the fact that the minimum value of the chimney height above the roof is 300 mm.
To increase the attractiveness of the brick chimney outside the building, it is necessary to carry out its thermal insulation and decoration. Choose insulating materials that are highly resistant to high temperatures and moisture. Thermal insulation will help to avoid the accumulation of condensate in the chimney due to temperature changes. It is recommended to use cladding bricks or special roofing materials as finishing.
Brick chimneys video:
Nowadays, there are a large number of different chimneys suitable for a solid fuel or gas boiler. The latest developments in this area and the emergence of new materials allow manufacturers to produce chimneys, which by their design are separate complex units that can successfully resist corrosion, soot deposits and condensation. But still, despite this, many people prefer to lay down a brick chimney with their own hands.
Recently, the construction of country houses has become widespread. Along with this, interest in fireplaces and stoves has increased. People try to build stoves according to old, proven recipes inherited from their fathers and grandfathers. But the art of stove in a certain period of development of our country in some regions was almost completely lost. Today we will try to help you fold the chimney with your own hands.
Chimney - what does it consist of?
Before folding a brick chimney, you need to figure out what parts it consists of. After all, many people think that brick chimneys are an ordinary rectangular pipe made of bricks laid on a mortar. This is not entirely true. But let's start in order.
At the beginning . This part of the pipe is installed directly on the oven. A valve can be installed in it. The back-up pipe must be laid out observing the binding of bricks in each row. The attachment part is not brought up to the interfloor overlap for 5 or 6 rows. It all depends on the height of the stove, the room and the thickness of the interfloor overlap. This place is called the fluff neck.
When laying a brick pipe, the cross-section of the chimney in the overhead pipe and the head must be the same. Thus, the cross-section of the entire smoke channel at any place in the chimney has the same size.
The fluff or cutting should be laid out in several rows, broadening the outer part of the chimney 250 - 400 mm.
Then you should lay out another cut, which is called an otter. The otter forms an expansion on the chimney on all four sides, not less than 100 mm... This expansion prevents atmospheric precipitation from entering through the gaps between the chimney and the roof directly into the attic space. The absence of an otter entails the penetration of moisture into the attic, leading to the destruction of the supporting structures of the roof and ceiling.
Above the otter, the chimney must be laid in the same way as the riser. This place is called the neck of the pipe.
After the neck, the outer masonry expands again, forming a chimney head. A weather vane or a metal cap can be installed on the head, which will protect the inside of the chimney from atmospheric precipitation.
A well-chosen weather vane or hood can significantly increase the draft in the chimney.
DIY chimney masonry
We examined all the main parts and their names, it's time to tell you how to make a brick chimney with your own hands.
Basic preparation completed
Today we will not mention materials, tools or which brick for the chimney to use; quite a lot has already been said about this on the pages of our resource. We will assume that we have everything ready. Our task today is to consider how to properly build a brick chimney.
The first stage is acquaintance with the drawings
Before us is a drawing of a brick chimney. While there are many other options, this is the standard brick chimney layout for a stove, solid fuel boiler, or fireplace. Using a special alloy metal pipe inside such a chimney can easily turn it into. Since the requirements for the conditions of flue gas discharge of a solid fuel and gas boiler are somewhat different.
The numbers in the drawing indicate:
- Weathervane.
- Neck of the pipe.
- Cement mortar.
- Otter.
- Roof.
- Lathing.
- Rafters.
- Riser.
- Cutting (fluffing).
- Overlapping.
- Insulation.
- Smoke damper.
- Oven neck.
It is important to know: fluff and otter can be laid a little differently, it all depends on the location of the chimney relative to the roof and on the angle of its slope.
The size of the channel directly depends on the thickness of the masonry joints - remember this.
Chimney masonry - first steps


Formation of cutting

Looking from the inside, it becomes clear that the fluff begins to take its shape.

- In the next row, the outer dimensions are already 570x710 mm.
- Bricks of 90 - 100 mm thickness are inserted inside.
Finishing cutting

- The fifth row is laid out with a whole brick.
- It is necessary to lay out the sixth row in the same way as the fifth, but strictly observing the dressing.
If necessary, to make the fluff higher, you can lay another row, with a dressing under the underlying masonry.

Works in the attic


- The riser is carried through the roof.
This completes the work in the attic, then you need to begin the construction of a part of the chimney on the roof.
"Roof work"

We continue to lay out the riser on the roof. Pay close attention to the bandaging of the brickwork.

- The riser is displayed 1 - 2 rows above the roof, then the laying out of the otter begins.
Otter - making ledges

- The otter is laid out in nine rows.
- Each next row is larger than the previous one in terms of outer size by one fourth of a brick.
- In this case, do not forget about compliance with the size of the smoke channel.
- Select the inner brick plates so that the flue channel does not widen or narrow.
As you can see, in this row, the brickwork forms only one ledge, forward. At the edges, the outer dimension of the chimney remains unchanged.


Thus, we have a front and two side protrusions. It remains to lay out the rear ledge.
Finishing the otter


We spread the neck


You can see all the dimensions of the chimney height above the roof on our resource. This applies to all chimneys, whether they are chimneys for brick boilers or other heating units.
The final stage is the head


Inexperienced builders believe that laying a brick chimney is the same as building walls. However, the chimney device has its own nuances. In particular, experts do not recommend using a cement-sand mortar. Such a solution will not withstand sudden temperature fluctuations that occur in the wall of the chimney pipe. In addition, the usual solution will collapse from condensation, which inevitably settles on the pipe wall.
Therefore, it is necessary to lay a brick chimney using a thermo-efficient and chemical-resistant solution. You can prepare a solution using ready-made mixtures. But this is expensive, so many people prefer to prepare a thermo-effective solution on their own, such a solution consists of cement, sand, lime and chamotte. Some experts recommend using clay mortar.
If the boiler is gas
If a brick chimney is justified for a wood stove and a solid fuel boiler, then for a gas boiler this is not the best option for flue gas disposal. It's all about the different modes of operation of the furnace, solid fuel and gas boiler. If solid fuel equipment does not require large traction, then the use of a rectangular brick pipe for a gas boiler will lead to a decrease in the efficiency of the heating unit.
When using a gas boiler, the requirements for the chimney device are different than when installing solid fuel equipment. Therefore, if a house is being built, then a chimney from a metal pipe is needed for a gas boiler.
If a gas boiler is being installed instead of a solid fuel or wood-burning stove, then the construction of a new chimney is impractical. However, the requirements for the flue gas boiler must be met. In this case, the brick chimney is insulated, that is, the installation of a metal pipe inside the existing brick chimney. Thus, the requirements for the smoke exhaust device will be met and you will not have to disassemble the old pipe.
Nothing is impossible
By and large, do-it-yourself brick chimneys are a completely feasible task for any person who loves to work with his hands for his own pleasure. It is sometimes believed that brick chimneys are a thing of the past. This is not the case, for example, the liner of a brick chimney with pipes with a special coating, and the device of a brick chimney allows this to be done, allows them to be used in work with the most modern heating boilers. We hope that after reading this article, the question of how to properly make a brick chimney for a fireplace or stove with your own hands has disappeared. Try, practice, and brick chimneys built by your own hands will delight you and your loved ones with perfect work under any conditions. Good luck to you!
Brick laying is a rather painstaking process. If you did not make just brickwork, then you should not try.
It is better to turn to specialists. But if you held the trowel in your hands, then you can do it yourself. How to lay out a brick pipe - today we will consider in detail. There will also be a video in this article, where you can see everything clearly.
Chimneys: classification
By design, chimneys are divided into:
- Prefabricated;
- Attached;
- Brick root;
- Wall
The laying of a brick pipe is determined by its design. There are generally accepted provisions that must be followed when choosing any design.
- Masonry bricks are a kind of massive assembly that hangs over the stove masonry. The optimal thickness of the masonry is not less than half a brick. Brick root are an assembly that stands separately in the form of a riser. The assembly is constructed from an asbestos-cement pipe with a diameter of about 150-250 millimeters.
- The prefabricated structure is constructed using heat-resistant concrete in the form of free-standing blocks. But the wall ones are mounted in the main wall of the house in order to save the volume of the building, its area.
- The chimney, which is built into the load-bearing wall, must be inside the room.
Attention: It is not recommended to install the chimney in the outer walls, because the outside air is able to cool the flue gas, reduce the draft and form condensation on the inner walls of the duct.
- As a result, it becomes impossible to obtain high efficiency from a furnace with this tube. If they do not come up with another method for the location of the wall pipe, then they install a pilaster with a ledge towards the building. When installing this assembly, an important condition must be met: the work must be carried out with maintaining the main distances from the smoke to the outer wall. The distance can be 1.5 bricks, 2 bricks and 2.5 bricks.
- The location of the pipe is only vertical, without retreating in the inner area.
- If there is a drift in the assembly, then it must be more than one meter.
- The internal section of the pipe should fluctuate within 140x140 mm. In order to create optimal traction, the height of the pipe is recommended at least five meters.
- If the height is less than 5 meters, then a deflector-diffuser is used to create thrust. With the simultaneous use of a fireplace and a stove in a building, two chimneys are installed, since with different draft one of the hearths may start to smoke.
- If the building is built of wood, then a thickening of approximately 1 or 1.5 bricks is erected in the pipe abutment sections.
- Structures from the chimney, subject to light fire, are covered with sheets made of metal or asbestos-cement sheets. To eliminate the possibility of a pipe skidding with snow, its height should be somewhere half a meter higher relative to the roof. If the pipe collapses, this can happen as a result of this, because moisture can get here. Therefore, do not neglect it.
- The end of the pipe head can be protected by a steel edging or a metal cap.
- In the place where the chimney comes out, the assembly of the passage through the roof is carried out in order to minimize the risk of moisture getting into the attic.
- The passage unit can be made with your own hands from sheet steel.
- The deflector on the pipe performs the function of preventing the draft from overturning in the opposite direction. If a deflector is missing, then the pipe head should probably be chamfered.
Pipe laying
Now let's look at how to fold a brick pipe and foresee everything. The sequence of work is quite important here. You also need to follow the masonry technology. Everything is done in the following order.
You will need a tool
To build a chimney quickly with your own hands, you need some tools and fixtures.
These include:
- Master OK;
- Measurement fixtures;
- Sheet iron;
- Clamps for brickwork;
- Hearth, red and fireclay bricks;
- Sand-lime mortar;
- Asbestos cement slab;
- Pickaxe hammer;
- Trowel;
- Solution container
Work order
The main component of any stove or fireplace is the chimney. It performs the role of eliminating gases and harmful substances formed as a result of fuel combustion.
There are several main types of chimney:
Traction and location
Of course, the chimney must certainly be in an upright position, and inside it must be perfectly smooth and without indentations.
- The optimal internal section of the chimney is more than 14x14 cm. Only in this case all harmful gases and vapors will be freely discharged. The height must be at least five meters from the grate level.
Attention: If it is not possible to bring the pipe to the desired height, then you can install a deflector-diffuser, which significantly improves traction.
Trumpet: its device
The stove chimney consists of specific elements.
These should include:
- Riser;
- Neck;
- Smoke damper;
- Metal cap;
- Head;
- Masonry
Attention: It is worth taking into account that the laying of the chimney must be done as tightly as possible.
- As a rule, a special stove brick, based on red clay, solid and refractory fireclay bricks, is chosen for the chimney.
- But the double silicate brick M 150, endowed with high resistance to frost, will also fit perfectly, and it is this property that we will need when we take the pipe to the roof.
- Let's go back to the solution. Since hazardous combustion products pass through the brickwork, the joints between the bricks should not be so tight.
Attention: Due to the fact that the usual solution is permeable to carbon dioxide, it is recommended to resort to a solution based on sand and clay.
So, we proceed directly to the laying.
Chimney bricks are described above, but a combination can be made here. For example, make a brick head of a brick pipe and use a metal insert inside.
In this version, it will only be necessary to make the rings of the brick chimney with good sealing.
A DIY brick pipe is made in the following order:
- First, lay out several rows without using mortar, adjust the brick. Now we look closely to see if protrusions have formed and if everything is fine.
- The next step is to apply mortar to the surface of the bricks. Here we will definitely need a level. With the help of it we check the horizontal guide of the masonry. But with the suspension we measure the vertical guide. A more secure bond is guaranteed if the brick is moistened with water before applying the sand and clay based mortar.
- After we have laid out five rows, lightly wipe the inner area of the masonry with a damp cloth. This will ensure the complete rubbing of the brick pipe from the inside, which guarantees tightness and tightness between the joints.
- The correct geometric shape is achieved thanks to the usual rectangle made of metal, with which we check the evenness of the masonry. The same method is used in the laying of pillars and provides significant assistance in the work.
- The most optimal option for the removal of combustion products is a rectangular masonry. It is this form that is convenient to work with. In the chimney device, the main thing is always to observe the vertical direction and try to lay it out so as to avoid slopes. If possible, the tilt should be in the 60 degree range. It is in the slope that the greatest air resistance is achieved.
Ventilation
Note the fact that a plug is provided in the chimney, which radically affects the amount of natural air draft. It should be done in the first rows of the chimney.
- One more window will be needed right next to the pipe outlet to the roof, which is necessary for easy cleaning of the pipe from contamination: dust, plaque.
Carrying out to the roof- This stage will seem too difficult to many and will cause a storm of fears. Don't worry like that. Due to the presence of precise instructions, the removal of the pipe is quite an easy matter, which will not be difficult to cope with.
- To implement our plans, we need a material that we will lay between the roof and the masonry. In most cases, for these purposes, they take mineral wool in the form of a slab. Next, we make a rectangular hole in the roof. It should be a couple of centimeters wider than the pipe.
- Then we will install mineral wool between the roof and the masonry. It serves for good sealing and is a mandatory fire safety rule, since the chimney can easily heat up from hot gas.
- As mentioned above, the layout of the take-out can be made from a different type of brick. The cost will not change significantly from this, but this fact will significantly affect the technical parameters for the better.
First, condensation can be avoided by using frost-resistant bricks.- The issue can be successfully resolved by installing a transition from a pipe to a sandwich. No matter how, namely the sandwich will instantly eliminate any troubles associated with the formation of condensation.
But here you have to proceed from your own tastes and design preferences.
The next step is waterproofing all joints of the roof and chimney. For these purposes, you can apply mastic. Then we put the headrest. A chimney for a brick pipe can be made by yourself or purchased in a specialized store.
All is ready! Our chimney can function!
The chimney is laid out in the same way as the stove. You can use a masonry of 4.5 or 6 bricks.
- The laying of the pipe in the attic should be carried out using a beacon. To do this, after laying out the first three rows in the attic, we release the plumb line from the roof plane to the corner of the masonry, absolutely any. Where the plumb line is, we hammer in a nail. In the place where the plumb line was leveled or in the seam of the corner of the masonry, we hammer in a nail, and between them we tie a thread of silk. The laying should be carried out along the control angle, necessarily with a check with the use of a square every three rows.
- If the pipe is laid above the roof, then for greater reliability of the assembly, it is recommended to purchase clay-cement instead of a cement-sand mortar. To do this, in the clay-sand mixture, which was used for laying the furnace, we include one liter of cement for ten liters of water. Mix the mixture thoroughly by using a mixer.
- The head of the pipe is more of a decoration, which means that you do not need to make it. If you still gave your choice in favor of building a head with your own hands, then in no case change the inner section. If you change it, then the swirl of smoke in the channel is inevitable.
- In order to protect the pipe from atmospheric precipitation, a cap made of galvanized iron must be installed in its upper area. The cap will help keep moisture out of the duct.
A brick pipe part of the work cannot be done with one material, and the second with another. This is a complex structure and therefore it is necessary to think over everything from the beginning.
There are instructions on the rules for its manufacture, you should not make a deviation, listen to the recommendations and then everything will be at the highest level.


The efficiency and safety of heating equipment - stove and boiler, - the principle of which is based on fuel combustion, is determined by the state and technical parameters of the chimney. The most popular and reliable design for private households and baths is a brick chimney. It features attractive appearance, good traction, and easy operation.
High-quality construction of a chimney provides for strict adherence to all stages of the technological process, which is associated with brickwork.
General rules for the construction of brick chimneys
When building a chimney structure for a private house, it is important to consider a number of basic rules:
- The installation of the chimney elements starts from the bottom up.
- The inner tube is installed in the previous structural element, and the outer part is inserted from above. This provides protection against the formation of condensation on the insulation layer, which is located in the inner part of the circuit.
- Clamp connectors are used to fix the chimney with triple and branch elements.
- The connecting sections should not be located at the level of ceilings or roofing pie.
- The tee is mounted on a support bracket.
- Every 200 cm of the chimney is fixed to the wall with secure fittings.
- When fixing the pipe to the wall surface, there should be no deflections or deformations of the chimney. This will result in less thrust in the finished system.
- The flue duct should not come into contact with the main communications: electrical wiring, gas pipe, water pipes, ventilation.
- When removing the chimney through the ceilings and the roof, it is necessary to make a small indent of 15 cm for insulated pipes and 30 cm for non-insulated pipes.
- Avoid creating horizontal sections of the flue system longer than 100 cm.
In addition, when arranging the chimney, the thermal expansion parameter of the system should be taken into account.
When using flammable materials for roof installation, the chimney is equipped with a special spark arrester made of fine-mesh metal mesh (mesh size 5 × 5 mm).
Structural elements
Structurally, stove chimneys consist of several sections, each of which has its own purpose and technical features. The chimney design is represented by the following elements:
- Beam with overlap.
- Fluffed up.
- Pipe riser.
- Rafters.
- Roofing.
- Otter.
- Crate.
- Cement mortar.
- Neck tube.
- Head-on.
- An iron cap.
The main purpose of the chimney is to quickly and safely remove the combustion products of the fuel material from the combustion chamber to the outside. For this, the chimney is connected to the internal ducts with which the furnace equipment is equipped.
A fluff is a wide part of the chimney, which is located at the site of its outlet through the ceiling of the attic. It is designed to protect floor beams from the negative effects of high temperatures. The wall thickness ranges from 32 to 40 cm, which ensures high-quality insulation up to 25 cm thick.
The otter is a technically difficult section of the chimney system, which serves to protect the roofing material and pipes from the negative effects of atmospheric precipitation and the formation of condensate. In addition, it provides the necessary space for laying the waterproofing material.
The chimney neck is a structural element that is equipped with a smoke damper to adjust the draft.
The riser is a straight piece of pipe, made with even masonry, which is located in the attic between the fluff and the otter.
The cap is part of the chimney, which forms a special visor made of brickwork, which provides the necessary protection of the pipe from external negative factors.
Iron cap - a structural element in the form of an umbrella or a cap, located above the pipe head. It is designed to protect the internal flue gas duct from clogging.
Calculation of the parameters of a brick chimney
For a high-quality installation of a chimney system, a preliminary calculation of the main parameters is required - the height of the pipe and the cross-section of the channel for exhausting gases. This will provide excellent traction and safe operation of the structure.
Pipe height
This parameter is determined based on technical requirements:
- The minimum allowable height difference between the grate and the head is 5 meters.
- If the roof is made of flammable materials, the height of the chimney head will be 150 cm; when roofing with non-combustible material, the height will be 50 cm.
The presence of a parapet or ridge should not interfere with the safe operation of the chimney. For this, the following rules are observed:
- When the pipe is located at a distance of 150 cm from the ridge or parapet, its elevation above them is 50 cm.
- When removing the chimney head from the parapet and ridge at a distance of 150 to 300 cm, no additional elevation is required.
- When the head is removed from the edge of the roof by 300 cm, it can be located below the ridge to a height along an inclined straight line with an angle of 12 degrees.
If there is a tall building on the site, the chimney should be 50 cm above its roof.
Channel section
If the chimney is equipped for a metal stove or for a solid fuel boiler, then the calculation of a suitable section is carried out taking into account the operating power of the equipment:
- Power - up to 3.5 kW, cross-section - 14 × 14 cm.
- Power - from 3.6 to 5.1 kW, cross-section - 14 × 20 cm.
- Power - from 5.1 to 6.9 kW, cross-section - 20 × 27 cm.
- Power - from 7.1 kW, cross-section - 27 × 27 cm.
The data on the capacity of the factory heating equipment are indicated in the technical passport. For homemade devices, a similar parameter is calculated using the formula:
W = V × 0.63 × 0.8 × E / t, where
W is the power of heating equipment (kW).
V is the volume of the combustion compartment (cubic meters).
0.63 - coefficient of the average load of the combustion compartment.
0.8 is a coefficient that determines the part of the fuel material that burns out completely.
E is the thermal energy of the fuel material (kW × h / cubic meter).
T - duration of combustion of one fuel load (hour).
Thermal energy depends on the type of wood and its moisture content.
Brick types
The operation of a refractory brick chimney is carried out in special conditions with temperature changes, therefore, for its construction, it is necessary to use building material of the best quality. The safety and reliability of the structure, the resistance of the structure to cracking and deformation, and the reduction of the risks of creating a fire hazardous situation depend on the correct choice.
Top-notch
Solid refractory bricks are made from high quality clay by long-term firing at high temperatures. It is characterized by the following signs:
- Density of consumables, absence of porosity, foreign inclusions.
- Smooth and even surface without deformations, dents, cracks and other visual defects.
- When tapped, a clear and pleasant sound is produced.
- Possesses high frost resistance and durability.
- It has an attractive red color with a slight yellowish tinge.
Second-rate
Brick is obtained with insufficient clay firing, therefore, it is characterized by:
- Dull and short sound when tapped.
- Porosity and low structure density.
- The presence of various deformations and defects on the surface.
- Unsaturated orange or ocher hue.
In addition, this material has a low heat capacity, frost resistance and durability.
Third-rate
Bricks of the third grade are of low quality and burnt structure. They have the following features:
- Too high-pitched and loud sound when tapped.
- Low density porous structure.
- The presence of significant visual defects and flaws.
- Intense red and brown shade.
Burnt-out blocks are not able to withstand significant mechanical loads, therefore they are prone to cracking and deformation. In addition, they do not tolerate excessive heating and cooling.
For the construction of the chimney, building material of the first grade, grades M 150 and 200, is used.
Mortar for masonry brick chimney
Since a brick pipe consists of separate sections, which are characterized by different weather, mechanical and temperature conditions of operation, therefore, masonry mortars are used for them.
- If a main chimney is provided, then for the first orders from the foundation, a cement-sand mixture is used - 1 part of cement and 4 parts of sand. To increase plasticity, ½ part of quicklime is added to the mixture.
- The next sections are the beginning of the chimney masonry from the stove to the fluff. They must withstand extreme temperature loads up to 400 degrees, therefore, a binder mixture based on clay and sand is used for laying bricks. When the fluff passes from the room through the ceiling to the attic, brick ordering is also performed on a clay-sand mixture.
- Further, there is a section that serves for thermal insulation of the chimney by installing a metal box. The box is fixed around the chimney in the place of its outlet through the ceiling. As a heat insulator, you can use non-combustible materials - asbestos, mineral wool, expanded clay and vermiculite.
- The last section is the standpipe, chimney neck and otter, which are exposed to excessive wind loads. Therefore, a lime-based mixture is used for brickwork. A similar composition is suitable for arranging the head.
For the preparation of masonry mortar, clay of medium fat content is used, without a pungent odor and foreign impurities that can lead to cracking of the surface.
To prepare a cement-sand mortar, it is better to use mountain sand or ground brick battle from fireclay or ceramic bricks.
Step-by-step instructions on how to lay out a chimney
The construction of a brick chimney is a technically complex process that requires high-quality masonry in order to obtain an airtight, safe and durable structure.
First, you need to select the appropriate installation schemes for the chimney system. They can be ordered from design bureaus or found ready-made on specialized resources. The dimensions of the future chimney structure are determined at the planning stage and performing the necessary calculations.
Brick chimney masonry is performed as follows:
- Erection of an overhead pipe, the lower part of which is set on a thin layer of clay and sand mortar. If several channels are provided in the chimney, then a three-channel pipe can be used. But the masonry algorithm is preserved for any type of construction. The masonry is carried out by the dressing method, when each subsequent row has a shift to the side by 0.5 bricks. On the 5th row, before reaching the floor beams, the installation of the pipe is completed.
- The fluff is being laid. The outer perimeter expansion should be 590 x 450 mm, and the inner one 140 x 270 mm. The expansion is carried out by displacing the edge bricks by 5 cm. After the completion of the fluffing, the expansion is necessarily insulated with 10 mm sheets of asbestos or other selected material.
- Placing the otter requires meticulousness and care as the rows are laid out to create a special overhang. The first row is similar to the previous row of fluff expansion, then it is necessary to lay out the second protrusion and subsequent ones.
- Installation of a riser. Masonry is carried out in the attic close to the roofing system of the building. It must be brought out through the roof with an elevation above the ridge of the building to a height of up to 100 cm. The brickwork ends with the organization of a chimney neck, at the end of which a head is erected and a protective cap is installed.
Roof chimney
An important stage in the construction of the chimney is the waterproofing of the pipe when passing through the roofing.
Often for these purposes, a prefabricated metal box is used, the lower part of which is hemmed with refractory material, and the inner space is filled with a heat and waterproofing layer.
Outside, the roof penetration is protected by waterproof waterproofing on an elastic base. It is highly flexible and can take any desired shape. Installation is carried out using bitumen mastic or roofing screws.
If you follow the construction technology, you can get a safe, reliable and durable chimney. Having the necessary knowledge and minimal experience in working with bricks, you can independently organize a high-quality chimney system without the involvement of third-party specialists.
The chimney serves to remove gaseous combustion products and suck in fresh air, to create conditions for fuel combustion.
The choice of material for the construction of the chimney depends on the purpose of the heater. For long-burning boilers, it is impractical to build a brick pipe. Condensation that forms inside will inevitably damage the masonry. A deposited layer of soot on the inner surface will lead to a deterioration in the efficiency of the structure.
Brick chimney laying rules
Before proceeding with the construction of a brick chimney with your own hands, it is recommended that you familiarize yourself with the necessary regulations and rules for such work. The project document should include furnace device drawings with orders and elements of protection of the building from fire.
For boilers with flue gas temperatures from 140 ° C to 300 ° C, for stoves and fireplaces, it is preferable to use brickwork made of solid ceramic stove bricks, without cracks and chips. Silicate bricks can only be used when laying the pipe head.
The chimney is erected with brickwork in buildings up to four stories high.
The smallest chimney height corresponds to five meters, the cross-section for creating the most favorable conditions for smoke output from 14 × 14 cm... Hot, sparkling gases escape through the chimney, as a result of which it is necessary to fill the joints with a solution especially carefully, in order to avoid fires.
The mouth of the structure is equipped with a spark arrester and an umbrella for protection from precipitation.
Chimneys of a quadrangular or circular cross-section are built with brickwork. The advantages of a circular pipe are that the rate of exit of cooled combustion products is higher, less soot is deposited inside. But the construction of square masonry is less laborious and costly.
The air-hardening mortar must be continuously stirred to prevent seizure. The laying is carried out at a temperature not lower than 10 ° C. All joints, both horizontal and vertical, are completely filled with mortar. The thickness of the chimney masonry joints should not exceed 10 mm.
Unfolding and twisting of the structure about its axis during construction is unacceptable. The straightness of the masonry is checked by the rule.
Chimneys are cleaned of soot before the start of the heating season, and thereafter every two months.
The gap between the smoke and the outer surface of the wall is calculated depending on the air temperature in the cold season:
- at t ° - 30 ° C is 60 cm;
- at t ° - 2 0-30 ° C is 51 cm;
- at t ° - 20 ° C and above should be 38 cm.
These parameters should be adhered to in order to prevent hypothermia of the smoke and the formation of condensation.
Classification of brick chimneys
There are 3 types of chimneys:
- mounted;
- wall;
- indigenous.
Packed structures are placed directly on the furnace mill, they serve to remove combustion gases for only one furnace.
Wall chimneys are erected simultaneously with the laying of the walls, they are built into the load-bearing wall. This is the most convenient and efficient installation method. Condensate settling inside the pipe, a decrease in thrust occurs as a result of overcooling of the pipe. Therefore, from the chimney to the outer wall leave distance:
- with a wall thickness of 3 bricks - 2.5 bricks;
- 2.5 bricks - 2;
- 2 bricks - 1.5 bricks.
The root chimney is a detached structure on a fortified foundation. Up to three channels are brought to it, do not forget about the ventilation. The ventilation duct must not communicate with chimneys. It is better not to place the stoves connected to such a chimney on different floors of the building, since in this case the stoves of the lower floor interrupt the draft relative to the upper ones. It is advisable to erect the foundation for the pipe simultaneously with the construction of the supporting structures, in order to avoid various settlements.
Chimney placement above the roof
 Chimneys are laid as close to the roof ridge as possible. The head of the structure should protrude 0.5 m relative to the ridge, when the pipe is removed from the ridge at a distance of 1.5 m. At a distance of 1-3 m, the chimney should rise flush with the ridge. The location of the stove in the house indicates how to position the top tube.
Masonry solutions chimney made of bricks and chimneys:
- lime or lime-cement when laying indoors;
- cement - when laying above the roof;
- clay or cement-clay mortars are used for plastering pipes. Whitewashing will allow you to notice cracks and soot in time.
Brick chimney device
The wall or root pipes communicate with the furnace by means of a crossover sleeve, no more than two meters in size. Arranging the sleeve at an angle of 10 ° in the direction of the gas outlet improves traction.
The chimney consists of a neck, a furnace junction and cutting. Cutting (fluffing and otter) - intersections with interfloor floors and a roof.
The neck is laid out from three rows of bricks.
Expansion of the pipe in the attic, fluffing, protects the wooden elements of the building from overheating. At a distance of 25 cm from the pipe neck to the ceiling they begin laying the fluff, expanding each row by 7 cm. The thickness of the masonry is at least one brick. Thermal insulation is made using an asbestos sheet. The distance between the fluff and the floor in the attic is filled with concrete or any non-combustible material.
The riser is placed between the attic floor and the floor. The thickness of its masonry is 0.5 bricks.
The otter is located above the roof and is designed to protect the riser and attic space from precipitation.
Thrust
 The opposite movement of gas advance, swivel channels, protrusions inside the pipe are an obstacle to traction - the movement of furnace gases from the firebox to the pipe. The stove works well if the draft is greater than the resistance.
When erecting a brick chimney with your own hands, it is necessary to provide conditions to create optimal traction:
- smoke will not return to the pipe if it is placed as close to the ridge as possible;
- in smoke flows, surfaces are leveled, made smooth, without protrusions, the smallest length;
- combustion products must have a temperature of at least 120 ° C;
- 5-6 meters - this is the distance of the pipe from the grate.
Traction is influenced by factors such as wind, surrounding buildings and trees.
Errors when connecting two ovens to a pipe can also disrupt cravings.
If there is not enough knowledge and skills to build a chimney with your own hands, you need to enlist the support of a specialist stove-maker in time.

