Drawing on the theme of a bouquet for March 8. New master classes in the "Drawing and Painting" technique, on the topic "March 8
For example: charcoal drawing, pencil drawing, ink and pen drawing...
Painting - a type of fine art associated with the transmission of visual images through the application colors on a rigid or flexible base; creating an image using digital technology; as well as works of art made in such ways.
The most common works of painting are made on flat or almost flat surfaces, such as canvas stretched on a stretcher, wood, cardboard, paper, treated wall surfaces, etc. Paintings also include images painted on decorative and ceremonial vessels. whose surfaces can have complex shapes.
And remember, the so-called first "Kalya-Malya" of your baby can become unsurpassed masterpieces of painting or drawing in the future.
The long-awaited spring is approaching, and with it our favorite holiday - March 8th. It's International Women's Day. It is celebrated at the very beginning of spring, when there is still snow in some places, icicles are hanging and even frosts are possible ... But spring is already in the air, the sun is shining and the soul becomes warmer. We congratulate our mothers, grandmothers, sisters, girlfriends, classmates. We give them flowers - the first, tender, spring ones ... also on this day it is customary to give gifts and, of course, postcards. Let's draw a drawing for March 8 in stages and include it in greeting card made by hand. That is why such a gift is valuable that it is made by hand.
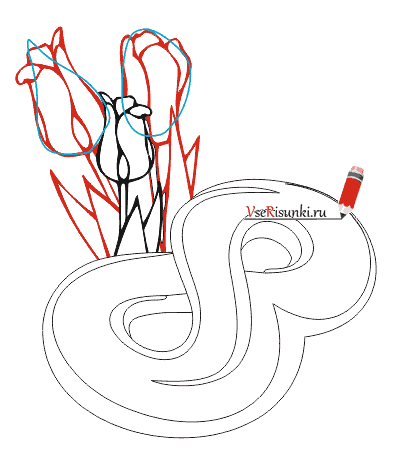
Stage 1. So, we draw the basis of our image. Two figures that look like a circle, but not quite round, but rather, oval, we will place on one straight line passing obliquely on a sheet of paper. A curved line departs from the lower oval, at the top of which we draw two small figures - one looks like an oval, the other looks like a leaf.

Stage 2. On two oval figures, we begin to draw curved lines for the future number "8". They are curled, each of them is similar to a steam room, but directed in a different direction.
![]()
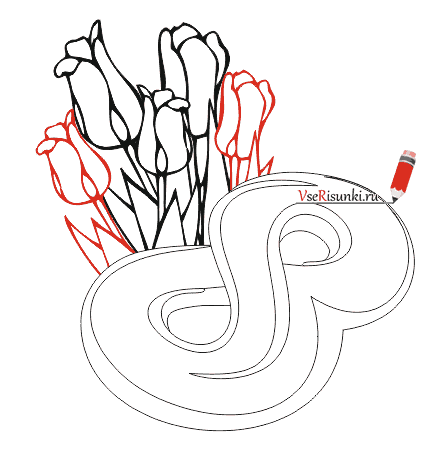
Stage 3. Along the borders of the ovals, we make the edges of the number "8". Slightly retreat from the original lines inward. The number "8" should be depicted as if lying on the plane of the picture.

Stage 4. Along the curved line drawn in stage 1 from the lower oval, draw a spring flower - a tulip: a straight stem, two acute-angled protruding leaves and the flower itself, consisting of closed petals.

Stage 5. Now add more tulips. We draw their flowers just in those small figures from stage 1. These are buds. Stems go down from them and leaves are also visible below.
Stage 6. Along the edges of these three tulips, draw two more flowers. They are smaller in size. The result was a bouquet of five tulips, located behind the number "8".
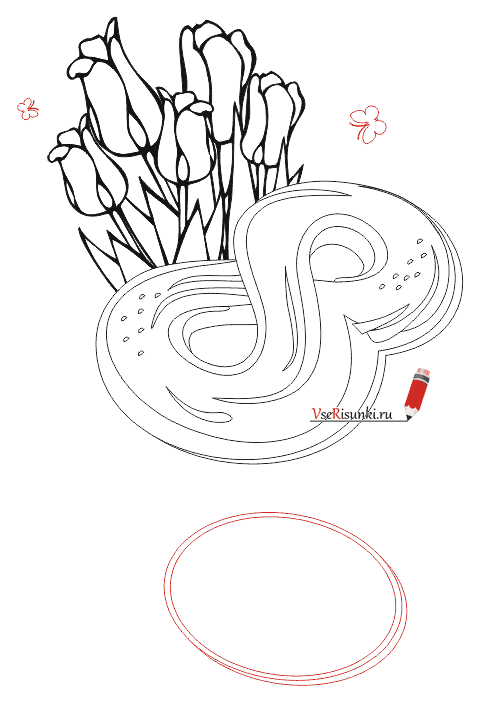
Stage 7. Using the number “8” itself, we will make additional smooth curls of various configurations: patterns, dots, etc. This will then give some volume to the figure when coloring.

Stage 8. Below we will add an oval in which there will be an inscription. From above we will draw small butterflies.
Question Description
Coming soon March 8, this day is considered International Women's Day. Of course, not all people know the true and historical meaning of this holiday. It all started in the late 1880s, when the female sex began to seek equality with men, first in Europe and then around the world. After that, the attitude towards women also changed, they began to be more respected and appreciated in society, and their equality was recognized. It so happened that once the holding of such events by women coincided with a day off, it was March 8th. Therefore, they decided to legalize this date and recognize it as Women's Day. Of course, everyone has long forgotten the legal and political side of this holiday, but they still continue to celebrate it, on this moment it took shape simply as a day of increased attention and reverence for women. Not a single holiday is complete without solemn remarks, congratulations and holiday posters or postcards. Let's make our contribution to the women's holiday and decorate it beautifully with posters, or draw a postcard. I will give you two options for drawing flowers for the 8th of March, you can do both of them, or choose the one that suits you best.
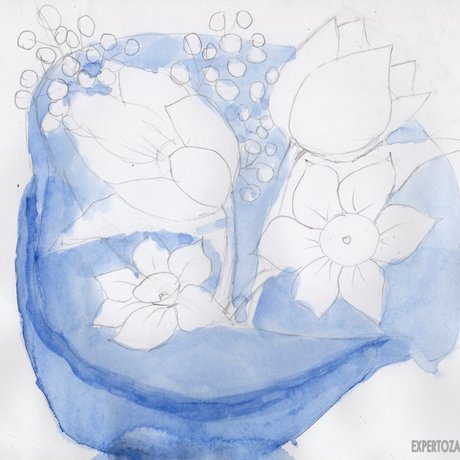
Step by step solution I'll start, perhaps, at first with a more complex option. You and I need to place our future bouquet of flowers on paper so that it is harmonious, so we will make its outlines, draw an oval, flowers will peek out of this “oval”. Then we will draw to this oval like a “bottom”, you must admit that now it really looks more like a ladle, these will be the edges of our bouquet, but this is far from the whole work on the outline of the bouquet wrapper. When drawing, try not to put pressure on the pencil so that your strokes can later be covered with paint, or easily erased with an eraser if necessary.
 Now schematically we outline the flowers. No, we will not have four flowers in a bouquet, we will simply not mark mimosa and other very small flowers. It is better not to detail small, light, white flowers with a pencil much, as then we will have difficulty filling the pencil with paints.
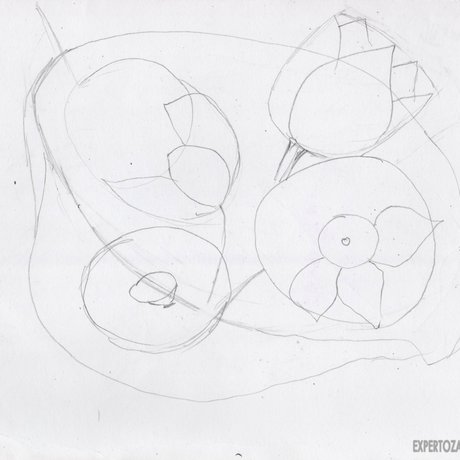 Now let's start drawing the largest and most visible flowers, and these are two daffodils and two tulips.
 This is how the traced flowers look like, we have two branches of mimosa, two tulips, two daffodils and light, white, small flowers peeking out of the bouquet on the right side, so the number of flowers we will have is correct and congratulatory.
 Now we will take an eraser and erase the auxiliary lines of the pencil so that they do not spoil our poster or postcard in the future.
 Decide on the color of the bouquet wrapper and apply it carefully, without touching the flowers. The paint should be thinned on the palette and not applied in a thick consistency. It is desirable that the wrapper was not red tones, since we will draw the tulips shown here in red.
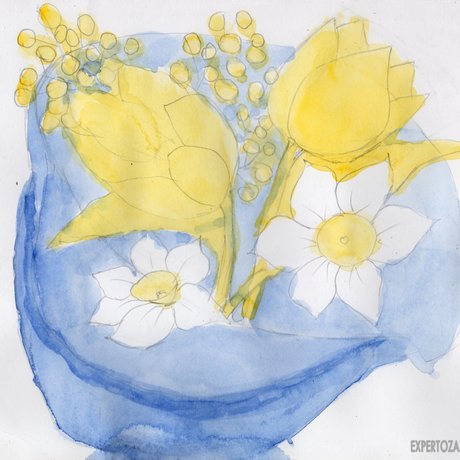 Let's wait for it to dry. When the bouquet wrapper has dried up, take the yellow one and paint over the tulip heads and leaves from them. The leaves can be painted over with a salad color, as you like, we are still preparing the base now. No, we will not have yellow or salad leaves, our tulips will not be yellow here, it's just that this color is secondary and it is a little in shades, this color is the basis. We will paint over the heads of tulips, as well as the middle in daffodils, give color to mimosa and leave to dry again.
 When drying has come, we will take the scarlet color and begin to draw the petals of our tulip with a not wide brush. Look very carefully at the picture Special attention to the direction of the strokes on the tulip petal, which I started to paint, they go, as if in an oblique direction in the middle of the petal, repelling each other.
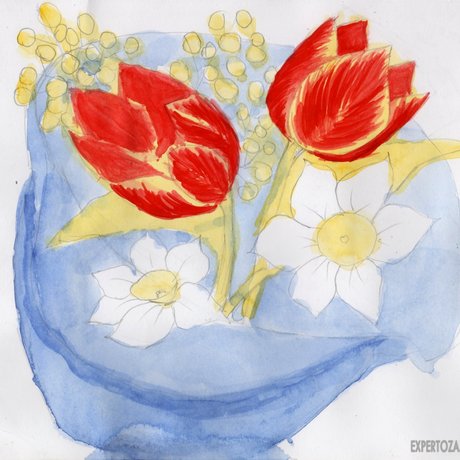 So, we complete the work in scarlet. When you paint inside tulip, then just paint over it without this shading, which I told you about in the previous step, this only applies to the surface part of the petal. The yellow color on the tulips should show up a bit and shine, especially around the edges. We are waiting for drying to continue working.
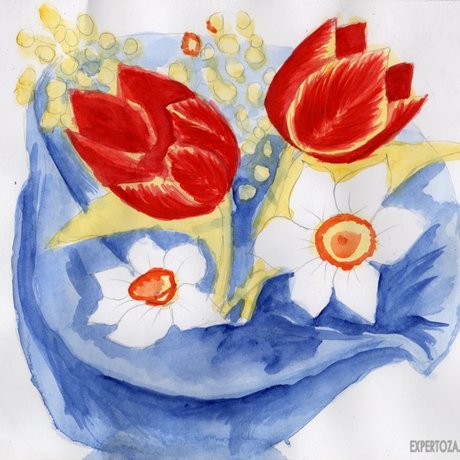 Let's take the color of pink kraplak and scarlet on top, make the same strokes as we did before. Just do not need to be zealous and completely clog the scarlet color, it should be translucent, pink should be applied in places. Let's work on the middle of the daffodil, you will need a thin brush and Orange color. We will also make a shade on the wrapper of our bouquet with a color slightly darker than the color with which we completely painted the bouquet.
 We complete the shading of the bouquet wrapper. Let's work on the daffodils again, this time with petals. Dilute the blue color to a faded state with water on the palette and shade it closer to the middle of the petal, this must be done on each petal of the narcissus.
 Now let's start with mimosa, look to the left side of the picture, with small dots we will make a border for mimosa, for each of its “balls”. Let's work on the stem and leaves of our flowers, take a dark green, marsh color (glauconite, chromium oxide) and write them down.
 Work on each "ball" of mimosa is completed, just look at the stems and leaves of flowers, as you can see, we have not a purely dark green color, but a little translucent and intermediate yellow, I hope now you understand what it was used for with me.
 Let's draw some greenery, here we don't need an intermediate color, we'll also make mimosa stems. Let's start adding small light flowers on the right side of the bouquet, we will take a thin brush with a blue color.
 At this stage of our work, we will give clarity to the postcard and darken in places where it seems to us that there are not enough shades. As you can see, we have finished drawing on the right right amount small flowers (you can do more), now take blue and circle the daffodils for brightness. All of you have probably noticed many times that closer to the stem, on the head of the tulips, a black color is clearly visible, in order to give the tulips more realism, I suggest you do this too. Dilute black paint on the palette and carefully draw, just do not overdo it with black, it should not look like a black spot on tulips. Who is afraid to spoil, it is better to give up this idea, your tulips will look great anyway. When the work dries, it can already be considered finished.
![]() Now I will tell you more simplified version drawing a bouquet with flowers. I came up with these flowers myself, with flowers you can do everything that your imagination allows you to. In this work, watercolor paper was used, but this is not a prerequisite, a simple thick paper is also suitable, we will not engage in multi-layer color overlay and mixing them. So, we draw a vase, we will schematically represent it with a rectangle.
Now I will tell you more simplified version drawing a bouquet with flowers. I came up with these flowers myself, with flowers you can do everything that your imagination allows you to. In this work, watercolor paper was used, but this is not a prerequisite, a simple thick paper is also suitable, we will not engage in multi-layer color overlay and mixing them. So, we draw a vase, we will schematically represent it with a rectangle.
 Let's draw our vase in a rectangle, of course, you can come up with a vase of your own shape.
 We draw three stems and three small circles above them, these circles will be the center in our flowers.
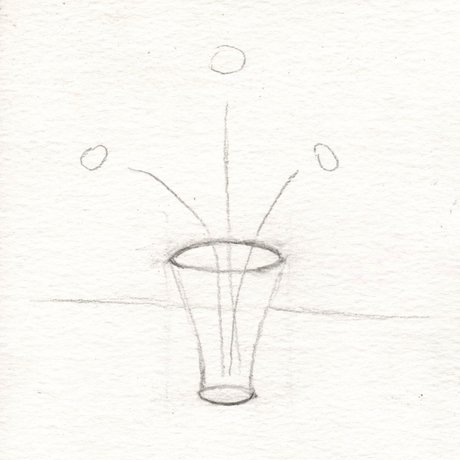 Erase the auxiliary lines with an eraser carefully. In general, the sketch with a simple pencil is completed, we will do the rest with paints.
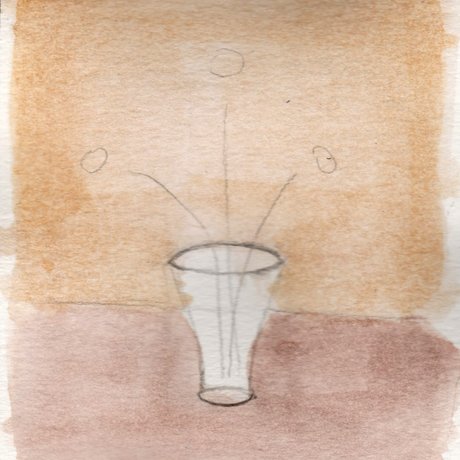 Let's choose the color of the table on which the vase will stand and the color of the background (wallpaper). I chose sand (ocher) for the background and brown for the table. We first painted the top, the background sandy, then the table brown, now we are waiting for drying.
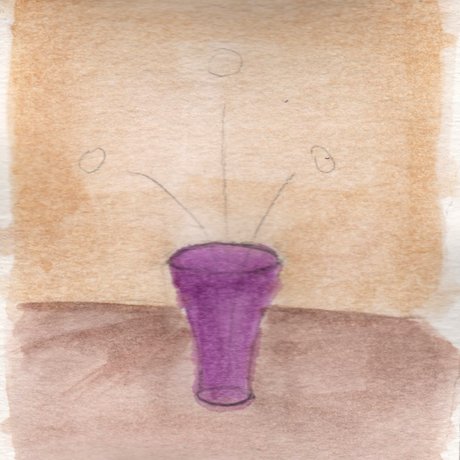 When you are sure that everything is dry, take cobalt violet light (depends on who chose what color) and paint the vase with a clean color, again we wait for drying to continue further work.
 Let's apply chiaroscuro to the vase, we will do it with the same color as we painted the vase, only the paint should be a little more dense. We are waiting for the paint to dry.
 Let's put a shadow on the table, we will do it with the same paint color that we painted the table, the table is closer to the background (wallpaper), it should be a little darker, but it should not be noticeable, paint this part of the table again.
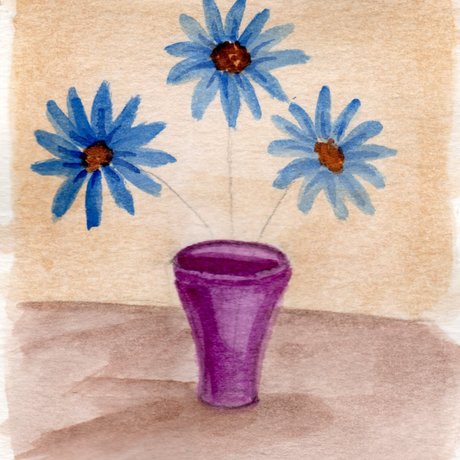 When you surround the middle circles with petals, let the paint dry, then take a thin brush and make lines in the middle of each petal.
 Let's paint the stems of our flowers with dark green swamp paint.
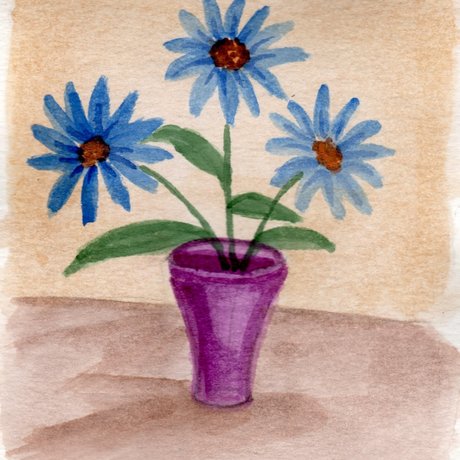 With pure dark green paint, with one number of the brush, draw the leaves. When the work dries, it will already be considered complete.

