Greenhouses from a bar 50 50. How to build a greenhouse from a bar correctly? Wooden greenhouse from window frames
Many summer residents and villagers purchase ready-made greenhouses produced by factories and cooperatives. Their wide variety allows you to choose the design of the required parameters. But if a greenhouse is made from a bar with their own hands, then the owners feel proud of the work, and the greenhouse comes out exactly of the configuration that is needed in a particular case. This building is much cheaper than the purchased one.
- it is readily available, that is, it can be purchased everywhere, and its cost is low;
- there is no need to look for high quality material;
- the wood must be properly dried and free from defects;
- no special skills are required to assemble the frame;
- the material is non-toxic and environmentally friendly;
- the construction is durable, and its service life is at least 5 years.
- to protect the frame from decay, it is necessary to treat it with a special compound;
- if it is necessary to move the structure or dismantle it, then this will not be easy to do;
- the environment negatively affects the tree (bad weather, microorganisms, moisture, insects, etc.);
- in comparison with metal, such structures are easily flammable.
- illumination is one of the main conditions for raising yields;
- site relief - it is better to build a building on a hill;
- protection from wind gusts - the installation is carried out near the fence;
- distance to the water source (if a centralized irrigation system is not equipped);
- soil composition.
- 1. For the base of the greenhouse, the soil is drilled and the posts are prepared, into which the studs are then inserted. The depth of the wells should be 0.6 m. The columns are poured with concrete.
- 2. On the completed foundation, a strapping of 10 x 10 cm beams is assembled (for these purposes, it is better to use larch). Holes are drilled in the harness, pins sticking out of the columns are pushed and pulled with a nut and washer.
- 3. The frame is erected and sheathed with polycarbonate.
- 4. Make a gable roof and cover it with the same material.
- 1. Install the frame. The distance between the posts should be 72 cm. Impregnate everything with the Senezh-Bio mixture.
- 2. In the upper part of the building, the vents are organized (act according to the drawing). For example, in the greenhouse in the drawing there are 4 windows with an area of 16 m². Automation is installed to open them.
- 3. Fasten polycarbonate so that there are no gaps.
- 4. Plumbing is installed. To do this, put a large-volume container and make piping for drip irrigation of the beds.
- 5. Install doors and vents.
- 1. Drive the strapping bars into the ground, checking the correct installation using a level. They are fixed using self-tapping screws. Docking is done in half a tree.
- 2. The joints are reinforced with metal plates. Along the perimeter, the lower strapping is sewn up with galvanized steel and buried in the ground.
- 3. The polycarbonate is fixed with self-tapping screws and washers. For the roof, rubber products are used. In other cases, self-tapping screws with press washers are used.
- 4. The end of the polycarbonate is closed with a plastic corner. The sheets are overlapped, processing them along the edges with a sealant.
- 5. Treatment of the lower strapping is carried out with an antiseptic in two layers. After drying, it is painted.
- 1. Dig a moat 60 cm deep, pour ASG into it, tamp it. Three concrete blocks are laid on each side.
- 2. Two beams are treated with an antiseptic, and after it dries, their upper and lower sides are coated with bitumen.
- 3. Install the frame and treat it with an antiseptic.
- 4. In the corners of the greenhouse, braces are fixed with a length of 1 m.
- 5. A rafter is made and all measurements are made on it.
- 6. Saw out the racks and install them in the right places.
- 7. After the roof is erected, its ends are painted.
- 8. The whole structure is covered with polycarbonate with a thickness of 4 to 8 mm.
- 9. Outside, blocks are installed around the perimeter, and EPS is used inside the structure. This will keep the greenhouse warm.
Show all
Positive and negative characteristics
Before starting the construction of a greenhouse, everything is well thought out. The site is measured and the location of the structure is selected. They draw a sketch and make drawings, which indicate the exact dimensions of the building. This is necessary to calculate the amount of material.
The greenhouse can be made of PVC pipes, polycarbonate, window frames, boards, beams, etc. But most often a wooden bar is chosen for these works.
For a greenhouse with a frame, this material has several advantages:
It is worth noting that the tree, in addition to its positive characteristics, has some disadvantages. Among the "disadvantages" of greenhouses made of beams are:
How to choose the right place?
In addition to the shape, material and dimensions, one of the important points in the construction of a greenhouse is its location. After all, the convenience of use, the ripening of vegetables, fruits and other plantings largely depends on this.
There are some factors that need to be taken into account when choosing a greenhouse location:
Most often the greenhouse is located away from tall buildings or trees. Natural light should constantly fall on the greenhouse throughout the day. Since it is difficult to install a structure on a hilly surface, a flat area is chosen under the greenhouse or a hilly one is leveled. If a greenhouse made of wood is unstable, then with a slight wind it can deform or collapse.
The installation of such a structure is not always possible. If the area is swampy, then it is impossible to build a greenhouse on it, because moisture accumulates in the lowland. If the soil is sandy on the site, then it is necessary to equip the foundation for the construction. It is best to locate the greenhouse on a level hill.
It should not be cool inside the greenhouse, and so that the cold does not penetrate inside, a fence is installed around it or a low shrub is planted. Heat loss is reduced by slightly reinforcing the roof. If the body is overlapped with glass or film, then an additional layer of the same material is used.
Configuration and dimensions
First, they are determined with these parameters, since you should not overdo it. After all, completely different conditions are needed for each variety of vegetables. For example, tomatoes and cucumbers cannot be grown in the same building, since the latter require high humidity, and tomatoes cannot tolerate it. Therefore, two different structures are often built for them, which will be more useful than one large one.
The optimal size of such a structure is considered to be 3 x 6 meters. You can build a structure with other dimensions, for example, 6 x 20 or 5 x 4, it all depends on the size of the site itself and the requests of the owners. These dimensions are relevant if the greenhouse is rectangular.
Many summer residents do not want to have a greenhouse of a standard shape. Therefore, the site owners have structures of different configurations. If this is a geo-dome, then its dimensions are determined by measuring the diameter of the structure. To make it convenient to work in a greenhouse, its height should be 2.5 meters. A taller structure will not retain heat and is unstable. If you want to make a gable roof, then the height of the greenhouse should not be more than 2 meters.
Greenhouse in the form of a geo-dome or semicircle
Typical configurations include semicircular and arched. They are practical and unaffected by gusts of wind. Snow does not accumulate on the roof, and the design is pleasing to the eye. This shape is easy to make from aluminum or plastic arches, but not from wooden beams.
Arched structure

Roof types
Most often, buildings have a single or gable roof. The first type of roof is used when the greenhouse is located close to the house or adjacent to its wall. In other cases, the second type is used.
In areas with little snow, when the site is located far from the central water supply, structures with a horizontal roof are used. As it, a perforated film with holes through which rain penetrates is attached to the frame. This is how watering is done. But more often than not, a flat roof is not used for greenhouses.
In a greenhouse with a pitched roof, it is convenient to grow plants near the walls of the structure, and use the internal area to the maximum. Various precipitation does not linger on the roof. Such designs can even be made in the form of a polyhedron.
Step-by-step construction instructions
For a standard gable greenhouse, the soil is first leveled under the structure. Mark out the base and lay bricks around the perimeter. If you want a more solid foundation, then it is poured with a concrete solution.
A box is assembled from a bar and installed. From the same material, door panels, walls and roofs are assembled. The greenhouse is sheathed with polycarbonate, foil or glass. All these works are done in calm weather. At the beginning of the winter season, the film is removed, as it cracks in the cold.
If an arched-type greenhouse is being built, then the foundation for it is made thoroughly. For year-round construction, the brick base is poured with concrete. The elements of the arches for the structure are made of fresh wood, as they are more flexible. The frame is erected and the covering is installed.
Before building any structure, they buy high-quality material, the necessary tools and select the type of frame. The drawing and detailed diagram of a wooden greenhouse are so simple that anyone can create them. Therefore, the construction site is like a Lego constructor.
Drawing of a standard wooden greenhouse
Several construction options
To build a standard greenhouse measuring 6 x 4 meters, any type of foundation is suitable. Most often, a columnar base is used.
The construction process consists of the following steps:
Standard greenhouse
Greenhouse according to Mittlider
Such a structure has dimensions of 6 x 8 m. According to this technology, such a structure has a gable roof, under the ridge of which there are vents.
Greenhouse drawing according to Mittlider
Of the materials, boards of 0.5 x 10 m (2 cubes), bars of 30 x 50 and 50 x 70 cm were used. For the construction itself, a monolithic strip foundation is first poured using 4 x 8 mm reinforcement. The width of the base is from 20 to 35 cm. Outside, the foundation is impregnated with "Penetron" so that it does not crumble. Subsequently, it is surrounded by a stone.
Greenhouse according to Mittlider. Appearance
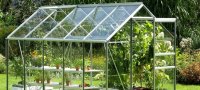
Greenhouse made of wood for polycarbonate
For its frame, a bar measuring 45 x 45 mm is used. The structure has a length of 8 and a width of 2.7 m. The structure is equipped with 8 vents and 2 doors. The distance between the posts is 1 m and the truss rests on two of them.
For strapping, a metal corner with dimensions of 45 x 45 or 50 x 50 mm is used. To obtain a base, a 12 cm incision is made with a grinder, bent at an angle of 90 ° and a base is obtained. It is on it that the harness is fixed. The corner is painted with an anti-corrosion compound.
Construction under the film
This construction is not heavy. For it, piles are made of aluminum corners 5 x 5 cm, up to 90 cm long. They are covered with a primer and driven into the soil. Their alignment is carried out with a laser level and the assembly of the base begins.
To install the rafter structure, beams of 3 x 3 cm are required. They are sheathed with 8 mm plywood, which is connected with glue and self-tapping screws.
The frame is painted, but before that the tree is treated with an antiseptic. Assemble the window frames and doors. The entire structure is covered with foil. Inside the structure, cables are pulled to tie the plants. Install a watering system. If the terrain is rather cold, then the tension of the second layer of the film is carried out inside the structure, which is attached with a stapler to the frame.
Greenhouse wooden frame
Portable structure
Any small wooden greenhouse is lightweight, so its location is changed if necessary. This design has a foundation that can be easily disassembled. For example, 5 x 5 cm beams are used as the base of such a greenhouse.
Such a foundation is not poured with concrete. To build such a greenhouse, the following actions are performed:
Small portable greenhouse
From such a building material as a tree, you can build a greenhouse not only in the form of a "house" or an arch, but also a beautiful "pyramid" and a dome. The owner of the site makes a choice of design based on the size of his allotment, the amount of materials and his own taste. The greenhouse will delight not only the owner, but also his guests with a good harvest for a long time.
The price availability of polycarbonate, unique performance properties make it an indispensable component in the construction of indoor facilities. Another component of greenhouses is the frame.
Comparisons between iron, plastic pipes and wood do not reveal a clear winner: each of these materials has advantages and disadvantages. But if you ask yourself what a novice summer resident will like, the answer will be unambiguous - a wooden greenhouse for polycarbonate with your own hands. Wood is a material with a lot of positive qualities.
The advantage of timber frames
The main advantage of the tree is its ease of use. The construction of a wooden frame from a bar is available to everyone who knows how to hold a hammer, hammer in nails and screw in screws. High-quality and properly processed wood is as strong and durable as plastic pipes. Attaching polycarbonate to the beams is much easier than to the arches. Simple installation, ease of replacement of parts, relatively low price - all these are the advantages of wooden structures.

Less weight in comparison with iron allows you to get by with a lightweight foundation, and the ease of processing will help you independently set the length, width, height of the greenhouse required for growing crops.
Building a durable structure
The wooden structures of the greenhouse are exposed to the damaging effects of sunlight, insects, moisture, fungi, microorganisms. The durability of the building depends on the processing methods, the type of wood, and its quality. Protective treatment, available to any summer resident, is:
- superficial - staining;
- penetrating - impregnation with antiseptics.
With the help of a blowtorch, heat treatment can be carried out - light firing.

Choosing a wood species
Sorts of wood are divided into: soft - easy to drive in a nail, hard - difficult to process. For the construction of frames, it is better to use coniferous trees. You can buy timber on the market.
- pine - wood is durable, soft, lightweight. Drying, it almost does not warp, moreover, it is easily processed, painted, impregnated;
- spruce is close in structure to pine, but differs in a significant number of knots. Hence the difficulties in processing and high-quality impregnation with an antiseptic. The low content of resinous substances allows the paint to dry faster.
- larch is a structure of high density, the products are very durable.

Drawings of a polycarbonate wooden greenhouse
With the drawings in front of your eyes, it is not difficult to determine the size, quantity and cost of the required building materials. The project displays the dimensions of structural elements, attachment points. On the basis of the graphic image, a plan is drawn up for the sequence of works on the construction of a greenhouse (or, scientifically, the construction of protected ground). It includes:
- foundation construction;
- frame installation;
- sheathing of sidewalls, roofs.
It is better to draw up a drawing of a wooden greenhouse with reference to the installation site, the choice of which is made taking into account some features.
Choosing a suitable place for construction
The yield of greenhouse crops largely depends on the location of the greenhouse. When choosing a place to build a greenhouse for polycarbonate, one should be guided by the rules of agricultural technology. The growth of plants, the ripening of fruits is facilitated by illumination. You cannot install the greenhouse in the shady part of the garden, next to the house, outbuildings. When attaching a structure to a house, one should pay attention to the movement of the sun. The best option would be an east-west wall.
The accumulation of water, frequent frosts make the lowlands of garden plots unsuitable for installations of protected ground structures. Hills with light loams look preferable. By installing the greenhouse on a slope, the surface is leveled. Installation of a wooden structure on clay soil, where moisture accumulates, will lead to rapid decay and deformation of the frame. Heavy loams are improved by adding humus, compost, sand - in a bucket per square meter. m - for the autumn digging. The greenhouse is raised 20-30 cm above the ground due to the foundation. Installation of the structure away from home is not justified - watering and connection of the necessary communications are difficult.

Construction material
The material for building the foundation is determined by the type of greenhouse and the condition of the soil. Creating a reliable foundation will require the use of concrete, concrete blocks, sand, gravel, crushed stone, cement, brick, wood, and reinforcement.
Laying the foundation
A significant discrepancy between the foundation and structure leads to deformation and destruction of the greenhouse.
When choosing a bookmarking method, it is necessary to take into account the type of greenhouse: winter or seasonal, service life: long or short-term, size.
If frequent transfers of the frame are not planned, then the foundation should be made capital. It will give the greenhouse stability, protect against the adverse effects of precipitation, and have a positive effect on yield. Wooden, relatively lightweight construction, can do without a capital foundation. A small greenhouse lined with polycarbonate can be installed on a strip foundation from a bar. Simple installation and dismantling will allow you to quickly move the structure around the site.
A bar with a section of 150x150mm, treated with an antiseptic, is laid in a trench 20 cm deep, according to the size of the greenhouse being built. Roofing material will serve as protection against the effects of soil moisture. The rows of beams are connected with metal pins. For large protected ground structures, a more solid foundation will be required. A concrete strip foundation is considered an inexpensive and practical option. A ditch 30 cm deep and 35 cm wide is dug along the perimeter of the proposed structure. The bottom is covered with a layer of sand - 10 cm. Anchor bolts with a diameter of 12 mm are mounted in the poured concrete around the entire perimeter. After hardening, 2 rows of bricks, roofing felt and a wide base beam are laid on the concrete, leaving free space for the anchor bolts.

Frame erection
The lower wooden elements of the greenhouse frame must be impregnated with an antiseptic, and parts of the outer side must be treated with bitumen. Knock down the structure according to the shape of the foundation and fix it with anchor bolts to a wide base beam.
Racks are installed in the corners using a timber: for lightweight greenhouses 50 × 50 mm, for significant structures, 100 × 50 mm is better suited.
The upper parts of the corner posts of the greenhouse wooden frame are interconnected. Then, vertical supports are placed around the entire perimeter at a distance of 1 m from each other, using parallel straps. Details are fastened together with metal corners. In a long DIY greenhouse made of wood and polycarbonate for growing tomatoes, it is better to provide 2 doors on opposite sides. For them, vertical supports are installed with a distance of 100 cm, allowing the cart to be rolled in. For better ventilation of the covered structure, vents are provided at the intersection of transverse and longitudinal structures.

Fastening of the ridge beam and rafter elements is carried out with plywood overlays reinforced with metal corners.
Covering a wooden greenhouse
Correct connection of polycarbonate with a wooden frame will be the key to the long-term use of a closed ground structure. There are several ways of fastening:
- profile - connecting profiles are installed on the frame, where polycarbonate panels are inserted;
- point - fastening occurs directly to the frame;
- mixed - a combination of the first two types.
When installing, it should be borne in mind that with temperature differences from -30 ° C to + 30 ° C, the size of the polycarbonate sheet changes by 4.88 mm.
The following means will save carbonate sheets from premature thermal destruction: profile joints, provided gaps, holes exceeding the diameter of the fasteners by 2-3 mm, thermal washers. It is better to carry out work on covering the greenhouse with polymer plates at a temperature of 18-20 ° C. The covering of the wooden frame is accompanied by the preparatory process of cutting, drilling holes, and end sealing.
Standard polycarbonate panels are 6 meters long and 2.1 meters wide. It is possible to cover a wooden structure with whole sheets if the dimensions are the same. An example is the side frame structures. The cutting lines dividing the polycarbonate into individual parts of the skin are marked with a marker. Cutting is carried out using an electric jigsaw or a construction knife. Remains of plastic sawdust trapped inside the cells must be removed with a pump, vacuum cleaner.

Drilling holes is a crucial moment. A properly prepared workplace, which should be level, clean, dry, will help to avoid damage to polycarbonate. The edge of the polymer sheet is freed from the protective film by 5-8 cm. After the aligned marking, the holes are drilled at a distance of 40-50 cm from one another, without touching the cells between the plates.
When all the necessary holes are made, the ends of the polycarbonate are sealed with tapes that protect against the penetration of insects, microorganisms, and moisture into the cells.
It is not difficult to cover the wooden frame with blanks. The main thing is to check the correctness of laying the panels with the light-protective layer outward and provide for a temperature gap of 5 mm.
Installation of doors and vents
The construction of a wooden greenhouse, covered with polycarbonate, perfectly retains heat, creates the prerequisites for an increase in temperature, and therefore should provide for the presence of doors and vents. The purpose of the structure of the closed ground, the size, the planted crops affect the design of the door. The long greenhouse assumes two wide (100 cm) entrances, allowing you to freely transport garden tools and ventilate the room. The polycarbonate blank is fixed on the door frame, knocked down from 50 × 50 mm beams. Handles are attached to the door and hung on the hinges. The presence of vents reduces the possibility of plant disease with fungal diseases, promotes fruit setting (high temperature and humidity lead to pollen sterilization).

The design and size of the vents allow the use of a semi-beam with a size of 30 × 50 mm. Details of the opening structure are connected by a thorn-groove method or an end connection is used on self-tapping screws. Metal corners will give the window additional reliability.
The most popular timber frame models
Growing vegetables in greenhouses is an integral part of truck farming. Many years of using indoor facilities have made it possible to select the best models that are successfully used in garden plots. Popular types of timber frames are:
- small standard design;
- wooden greenhouse along the Mittlider;
- wooden greenhouse for polycarbonate;
- film-like construction;
- portable greenhouse on foundation blocks.
Small standard design
The small size of a standard structure, 6 × 4 m, makes it possible to get by with a simple foundation. To build it you need:
- Dig a trench 0.5-0.8 m deep.
- Drive in metal corners in the corners - 100 mm.
- Cover with a layer of sand, rubble, tamp, lay any unused materials: slabs of garden paths, pieces of concrete curb, red brick.
- Roofing material is spread on top.
- A harness from a bar - 15x15 cm, on which the frame is erected, is attracted to the metal corners.
- The finished and fixed structure is sheathed with polycarbonate sheets.
Wooden greenhouse according to Mittlider
The large dimensions of the Mittlider structure (length - 12, width - 6, height - 2.7 meters) require a reliable foundation, namely a strip foundation - 20 × 30 cm. A prerequisite for a greenhouse according to Mittlider is an east-west location. The ventilation flaps of the south-facing windows prevent the penetration of the cold north wind, providing illumination and warmth. The design of the transom in the upper part of the roof promotes natural air circulation, which helps to maintain the necessary level of carbon dioxide to feed the fruit that is pouring.

The strength of the frame is ensured by the frequency of racks installed every 70 cm. The construction of the frame will require significantly more material than for a conventional greenhouse of the same size. However, it's worth it. The large size of the greenhouse provides an optimal microclimate for the plants. Sudden changes in weather do not particularly affect the temperature regime inside.
Wooden greenhouse for polycarbonate
Growing quality vegetable seedlings, especially cabbage, requires greenhouses, which can be of various sizes. The following dimensions are considered convenient for work: width 90-110 cm, height 80-100 cm, length - depending on the site. The structure can be lean-to, gable, with a flat roof.
It is important, especially for a lean-to greenhouse: the structure should be located from east to west.
To build a wooden greenhouse you will need:
- boards - thickness 30 mm, width 200 mm;
- bars - 50 × 50mm:
- slats;
- mounting angles;
- antiseptic.
The construction of a gable greenhouse begins with leveling the surface. The boards are sawn to the required size, the box is knocked down. The structure from the inside is treated with an antiseptic, dried, sheathed with roofing material. In the middle of the ends of the box, stands are installed - a bar of 50 × 50 mm, - which are attached with corners. (If the greenhouse is longer than 2 m, it is necessary to provide a middle rack for the ridge bar).
A ridge bar - 50 × 50 mm is laid on the racks, fixed with self-tapping screws and corners. Then the frames are made of square slats - 20 × 20 mm, according to the size of the sidewalls. Polycarbonate is attached to the frames. The finished structure is connected to the frame.
Portable greenhouse on foundation blocks
A do-it-yourself polycarbonate greenhouse on a wooden frame is a fairly light structure, which involves moving to another place during operation. Therefore, the foundation should also assume a simplified excavation and transfer. Small concrete blocks - 20 × 20 × 40 cm or a lawn block - curb 500 × 70 × 211mm are suitable for this. Depending on the size of the greenhouse, a trench 60 cm deep is dug, the bottom is covered with sand. Blocks are placed in the corners and in the middle of all sides. A wooden bar is laid on them - 150x150, impregnated with an antiseptic. The free space between the structure and the ground is filled with sand. Roofing material is spread on top. An existing or newly built greenhouse can be installed on such a base.
Varieties of designs and drawings
The wooden frame and polycarbonate give room for imagination, allowing you to build greenhouses of any configuration:
- arched;
- domed
- shed
- pyramidal
- gable
A drawing will help to make a greenhouse with the necessary functionality and the required dimensions. A competently executed plan includes the calculation of the amount of materials, determines the order of assembly, the dimensions of structural elements. Displaying on paper simplifies the choice of the shape of the structure being erected, makes it clear. Additional information about a particular configuration will help you make the right decision.
Arched
Structures of this type are distinguished by their ease of assembly. Making the frame, installing the greenhouse will take a maximum of 2 days. Carbonate bends easily, does not require sealing new seams. The ventilation windows are easily mounted between the transverse and longitudinal ribs.
Arched greenhouses withstand significant snow and wind loads.
The curved surface reflects less sun rays, providing uniform light access. Condensation moisture from internal surfaces flows down the walls without getting on the plants. Covering with thick cellular polycarbonate makes it possible to use it in winter. The area inside is used as much as possible. Ceiling semicircle contributes to the convenience of lighting installation, sprinkler installation.

Arched structures are easily expanded by adding new sections.
Domed
The main purpose of protective soil structures is the maximum yield of vegetable crops.
The complexity of erecting a domed wooden greenhouse, the consumption of materials and the resulting minimum usable area give an understanding: the structure does not meet the purpose.
Inside the greenhouse, beds of the wrong configuration have to be stirred. Installing trellises becomes a pointless exercise. There is no need to talk about the convenience of work. Dome-shaped greenhouses have one advantage - they are an adornment of landscape design.
Single slope
Garden plots of a small area are more suitable for single-slope closed-ground structures. Structures of this type are installed as an extension to houses, utility blocks, capital fences. The greenhouse is located on the south side of the building. The length of the lean-to structure corresponds to the size of the wall. Height and width - depending on the number of crop beds. The angle of the slope is based on the climate. The disadvantage of wall greenhouses, especially when facing south - server, will be low light.

Pyramidal
Passion for the secrets of the East led to the appearance of pyramidal greenhouses in the garden plots. The construction of an unusual structure is carried out in compliance with special requirements. The base is a square with equilateral edges of a strictly defined length. The ribs of the frame should converge at the top - always above the center of the base. The frame is installed strictly taking into account the directions of the cardinal points. The entrance is on the north side. An error in proportions (calculations require taking into account the ratio of the base - 1.57, and the edges - 1.49 to the height) deprive the pyramid of miraculous properties. Assertions that the pyramidal structure contributes to the recovery of plants and an increase in yields, there is no scientific evidence. But even if this were so, the design itself is not adapted to obtaining a large harvest.
In the pyramid, it is probably good to grow seedlings, germinate seeds. It will serve as a decoration for the landscape.
Gable
Gable structures continue to be the most used in garden plots. Greenhouses are of two types:
- seasonal - used from spring to autumn;
- winter - heated.
Seasonal indoor facilities are classified as stationary or portable. Stationary ones are erected on a buried foundation. Portable, lightweight - set on surface or freely removable bases.

Winter greenhouses are solid structures, covered with polycarbonate, on a thoroughly made base, with lighting and heating. The cultivation of vegetables and herbs is carried out all year round. One-, two-month breaks are necessary for replacing soil, repairing broken structural elements.
The advantages of a gable greenhouse are time-tested.
The simple design makes it possible to erect from easily processed materials - a wooden beam. The sturdy structure reliably resists wind and snow loads. The area of the closed ground is maximally used. Convenient maintenance of crops - facilitating work is facilitated by the possibility of increasing the doorway. The height of the structure allows you to work without bending. The height of the gable greenhouse promotes uniform heating, free ventilation, which makes it possible to grow any vegetable crops and even combine plantings.
The time spent on the construction of a protected ground structure pays off handsomely. The cultivation of garden crops becomes as much as possible adapted to the individual characteristics of the owner. The width of the aisles, the length of the trellises, vents, doors - everything corresponds to the exact purpose. A wooden greenhouse for polycarbonate with your own hands, in addition to significant cost savings - to build it cheaply - also satisfies the need to feel like the creator of a small, but own space.
Many summer residents turn to building a greenhouse to grow natural vegetables and berries. Such an erection is made from different materials. Most often, there are options from a metal profile and a bar. We will talk about the latter in more detail today.
Peculiarities
Today you will not surprise anyone with a greenhouse at a summer cottage. Such structures can be bought ready-made or built with your own hands. In this case, it is permissible to use various materials. This applies to both the frame base of the building and the covering material that complements it.
Some of the most popular and popular today are specimens made of wooden beams. They can also be easily made with your own hands, adhering to uncomplicated technology.


The sizes of such structures are also different. For example, options from a bar, the dimensions of which do not exceed 50x50 mm, are being erected as soon as possible. It also doesn't take too much effort.
The tree itself is a rather malleable and docile material that can be processed without problems if necessary. That is why not only standard, but also more original designs with various kinds of decorative elements are often made from timber.

It is very important to keep in mind that wood will only last long if it is properly treated and cared for. Structures made of wooden blocks will need to be impregnated with a special antiseptic composition.


According to experts, most of all for the construction of log greenhouses suitable tree species such as spruce, pine and larch... These raw materials produce highly efficient and attractive structures. The construction of a spruce construction will be the cheapest. Larch is quite expensive, but it is good because it is weakly susceptible to decay, therefore it lasts longer and is more wear-resistant.


Log greenhouses should be installed on solid foundations. At the same time, the structure will be more stable and better fixed. In addition, in such conditions, a wooden greenhouse will not need regular major repairs - it will not be distorted on the foundation.

As for the covering material for the beamed greenhouse, here you can also refer to different products. It will be possible to select and install it only after the completion of the construction of the frame base.
Kinds
Greenhouses made of timber are different - the choice is huge. Of course, the most popular and common are gable and single-pitched structures, as well as structures with a simple flat roof. A dome-type or hangar-type greenhouse will look more interesting on the site.


The simplest externally and in matters of construction is rightfully recognized as a single-slope model, installed directly to the wall of a house or other outbuilding. Often, such structures are combined with a barn or installed as a stand-alone structure. Thanks to such a solution, you can get a very convenient and functional structure, which will be extremely useful.

Size and shape
Greenhouses of various sizes can be made from timber. It can be either a very small or a spacious building for a large number of different landings.
To place a couple of beds in the greenhouse and place a small path between them, you should construct an erection with a width of 2.4–3 m.
The parameter of the length of the building depends on the area of the summer cottage and the planned number of landings. The optimal length is considered to be 5 and 6 m.... In such conditions, it will be possible to grow plants for a family of 4-6 people. Since tomatoes and cucumbers require different levels of humidity, as well as temperature conditions, you will need to organize a separate greenhouse for each crop.

In most cases, greenhouses are made trapezoidal and equipped with gable roofs. Moreover, their height should be at least 1.8–2 m.
Tools and materials
As mentioned above, it is quite possible to build a greenhouse from a bar on your own. Carrying out such work is easy and does not take too much free time, since wood is an easy-to-build material that can be processed without problems if necessary. However, you should start the direct construction of a wooden greenhouse only after acquiring all the necessary tools and materials.
As far as tooling goes, here's where you come in handy:
- nails and hammer;
- plane;
- hacksaw;
- roulette;
- building level (it is advisable to buy a laser or bubble instrument);
- perforated corner for fasteners;
- screwdriver and self-tapping screws.


Before starting construction work, it is necessary to select a suitable timber. It is very important to ensure that it is completely dry.. In addition, it must be free of major defects.- knots, chips, cracks (especially deep ones), as well as signs of decay. Pay attention to the cross-section of the wooden beam. Make sure the wood has not been attacked by harmful insects. In addition, the bars should not have voids.

How to build with your own hands?
If you have stocked up with all the necessary materials and tools, you can proceed to the direct construction of a wooden greenhouse. In order for this construction to stand as long as possible and does not require frequent repairs, it should be installed on a foundation. In most situations, strip or columnar foundations are prepared for greenhouses.
The tape backing design is more expensive. It is recommended to contact her if you plan to put a large greenhouse on the site, in which there will be many beds.

Foundation or foundation
For a small to medium sized greenhouse, a columnar base will suffice. To build it, you will need sand, cement, gravel and wooden boards. In carrying out such installation work, it is imperative to use the building level.
With the foundation, the structure will be located on one territory specially designated for it. Columnar foundation is cheaper. Usually it is made using concrete, blocks, bricks and rubble concrete.


When carrying out such installation work, the usual formwork is replaced with metal or asbestos-cement pipes.
If we are talking about the installation of a medium-sized greenhouse, then it is permissible to use standard concrete pillars, which are usually used when installing fences.
These details must be well dug into the ground cleared in advance. This must be done in such a way that the pillars stand securely and firmly. After that, they are cut with a grinder using a level.


When assembling the foundation, it is necessary to observe the maximum accuracy of all values. The horizontal plane must be perfectly flat. Please note that it will be much more difficult to design a frame on a poor-quality foundation.
When the foundation base is ready, you will need to prepare all the components that will be useful for the further assembly of the frame. The bars must be trimmed in accordance with the dimensions of the future building. To protect the material from possible destruction, it is treated with antiseptic substances and covered with linseed oil.

Frame
Having cut all the required parts, you can proceed to the next step - designing the frame base. You will need to fix the corners of the fasteners with dowel-nails. Instead, it is permissible to use anchor bolts, which will also perfectly cope with their main task. Further, a dimensional bar must be attached to them, which will play the role of a lower strapping, which is a supporting element of a one-piece structure.
In the process of preparing the frame, special construction corners are used, with the help of which the parts are seamlessly attached to each other.

Then you need to install window and door structures. Their installation will not take much time, but you will need to apply cladding. For example, it can be film, glass or polycarbonate sheets. Having equipped the upper harness, you should attach the rafters for the roof.
Experts advise to make the slope at a certain angle (for example, at 45 degrees). A too steep slope should not be present on the roof, because moisture and snow will accumulate on it.

Sheathing
The final stage of the work will be the installation of the greenhouse sheathing. As stated earlier, different materials can be used for this, but lately, more often people turn to polycarbonate. It is a fairly durable material and is not afraid of mechanical influences from the outside. In addition, polycarbonate sheets are installed quickly and easily. It is quite possible to cope with such work without helpers.
Polycarbonate is cut into plates of suitable sizes (these parameters are usually indicated in the diagram and project drawing). As a rule, sheets of this material are attached using a special sealing gasket. This part will prevent damage to the material. These processes take very little time. The main thing is to prepare everything in advance for installation work.

Finishing work
Competently executed timber greenhouses are able to decorate an existing site. Often, such structures attract a lot of attention, as they have an aesthetic and neat design.
Many owners cover these structures with various paints and varnishes that have a variety of shades - the choice of the ideal option depends on the preferences of the owners and the surrounding landscape design. Experts recommend contacting a water-dispersion emulsion... Such a coating will last a long time and will look attractive.
A variety of facade paints used in the decoration of wooden greenhouses are very popular today. Such coatings should be applied only if the temperature outside the window is at least +3 degrees. In such conditions, the paint will completely dry in about 2 days, and then it will crystallize within 3 days.


Of course, not all gardeners turn to painting a wooden greenhouse. According to many users, this process is absolutely unnecessary - this will not make the building more functional, and its decorative properties are not important for everyone.
When self-manufacturing a greenhouse from a bar, it is permissible to use not only polycarbonate cladding, but also glass. It can be plain glass. Some users use film instead of this material, but it will not last long - it will only last for one season.

All joints of wooden parts must be treated with antiseptic agents. Make sure that chemicals do not get into the ground, because such work must be carried out directly at the assembly site of the structure. It is advisable to use a bedding made of a special protective film.

In the process of self-construction of a greenhouse from a bar, it is necessary to make notes on all beams and slats of the future structure. Thanks to such marks, it will be possible to quickly disassemble the greenhouse for the winter storage period. In the spring, it can also be easily assembled.
Before preparing the foundation for the future timber construction, you should carefully prepare the allocated place. It is necessary to remove absolutely all the garbage, remove all the weeds. Often, a small top soil layer is removed altogether, proceeding with the installation of the foundation only after that.

If you decide to decorate a wooden greenhouse with a special film, you need to start installing it from the top point. For this purpose, the required number of canvases is attached to the ridge bar in accordance with the width of the greenhouse itself. They are fastened with thin slats and small nails.
Before starting the construction of a greenhouse made of wood, you need to draw up a detailed plan and drawing indicating all dimensions and other parameters of the future construction. Based on the developed schemes, it will be much easier to make a house for planting with your own hands.

The bars should not only be well processed and clean, but also even. It is not recommended to use parts with uneven and curved surfaces in construction work.
Many people prefer natural vegetables and fruits, so they try to grow them on their own whenever possible. But for this it is necessary to create conditions that meet the standards and requirements. Therefore, the idea of building a greenhouse comes, thanks to which the desired result can be achieved. The greenhouse can be made of wood, in the size that suits the parameters of the site. This is a simple design, so you can build it yourself.


Peculiarities
Natural wood is the material that is often used for the construction of such structures, and the greenhouse is no exception. First you need to decide whether the greenhouse will be summer or winter. Seasonality plays an important role, since this indicator affects the choice of material from which the frame will be erected.
The attention of the consumer is offered not only natural wood, because you can also use metal, brick or polypropylene.


If you are interested in building from a bar, the dimensions of which reach 50x50 mm, the work will not take much time. Wood is considered a pliable material that can be easily processed, and with proper use and care, it can last for many years without losing its attractiveness and former quality. In addition, it handles design changes if something needs to be updated. After choosing the material, you need to decide on the scheme of the future greenhouse, so you will have to look through the rich assortment, among which there is something that meets the requirements and wishes.

Tools for the job
Before construction, you need to purchase materials, as well as stock up on tools so as not to be distracted while working in search of equipment. A hammer with nails, a plane, a hacksaw, and a screwdriver with self-tapping screws will be indispensable in solving such a problem. We must not forget about the tape measure in order to check all the parameters of the structure, as well as purchase a building level in advance, since not everyone can rely on the eye.


Varieties
There is a wide choice in this area. You can pay attention to options such as a gable or single-slope structure, a structure with a flat roof, or a hangar or dome installation. The simplest is the single-slope model, which is an extension to the wall. If you want to connect it to a barn or other structure, then you can get many benefits. One of the advantages is the simplicity of connecting the heating system, since it is installed quickly and without complications. As for the lean-to greenhouse, this is a capital structure, which can also be attached to the wall of the main room.


How to choose?
If the material is processed correctly, it can last for more than five years. This figure is comforting, besides, the cost of wood is low. It is not necessary to purchase valuable species, because even from pine wooden blocks, you can build a structure that is strong and strong.
The main thing is to impregnate the material with special means, which will improve its performance.
After choosing a breed, you need to decide on the size, and this is one of the most important tasks. A detailed construction scheme is indicated in the project, which can be drawn up independently, or you can ask for help from qualified specialists who have experience and knowledge in this area.


A 50x50 mm section of timber is best suited. It is important to make sure that the wood is dry and free from rotting or warping. The cleaner the material, the faster it will be possible to complete the construction, and achieve a high-quality result. For the base, you will need a beam twice as large. The bars are used for laying the lower part of the greenhouse, the dimensions are chosen according to the perimeter of the structure. If you are interested in a 5-meter-long structure with drawings, then you can consider several options.


Important characteristics
A bar is one of the main components, therefore, recommendations for choosing a bar must be taken into account. The material must be smooth, dry and free from defects. It is worth paying attention to the cross-section, and make sure that the structure of the wood is not damaged or affected by insects, and whether there are no voids in it.
Greenhouses are often rectangular in shape.
Therefore, with this choice, it is necessary to ensure the reliability of the structure so that the rib does not sag, but can withstand its own weight.
For this, racks are used that are installed perpendicular to the base. Consideration should be given to the amount of material that will go to the windows and doors.


Once all the tools and materials are purchased, you need to proceed to the next step. You will need to prepare a greenhouse project in advance, as well as determine its parameters. If there is enough space, but there is a desire to grow for pleasure and in small quantities, then a structure with an area of 3x6 m can be made. The site must be level so that the structure is stable.


The preparation of the foundation plays an important role, since the entire structure will stand on it. A hole is being dug in every corner. If the greenhouse is long, it is necessary to lay bricks around the entire perimeter, and then use cement for pouring.
Thanks to such a foundation, if desired, it will later be possible to build a more serious building or make the frame more massive.
As soon as the base has hardened, it is necessary to prepare all the components from which the frame will be made. The timber is cut to fit the size of the structure. To protect the material from destruction, as well as improve its properties, it is necessary to treat it with an antiseptic, and also cover it with linseed oil.


Additional tools
At hand should be hinges, nails, as well as a fastening corner with a puncher. All of these tools will be indispensable during work, so it is important to prepare them in advance. In some cases, greenhouses are installed without a foundation, and it will be more difficult to fix it to the ground. But for stability, it is better to take the time and make a foundation that will hold the structure in strong winds.


Installing the frame
After cutting all the parts, the next stage begins. The corners are installed with fasteners on the dowel-nails. They can be replaced with anchor bolts, which also do their job perfectly. Then an overall bar is attached to them, which performs the task of the lower strapping. It is a load-bearing part of a one-piece structure. During the assembly of the frame, construction corners are used with which the parts are attached to each other.


Installation of door and window structures
Installation does not take much time, but it will be necessary to use a casing, the role of which is played by polycarbonate. After arranging the upper strapping, you need to attach the rafters for the roof. It is recommended to keep the slope at an angle of forty-five degrees, so that it is neither steep nor collecting a lot of snow on itself in the winter. After that, it can be considered that the construction of the frame is completed.


The final part of the work
The simplest task is to cover the greenhouse. The masters call the best material polycarbonate when it comes to such structures. Unlike polyethylene, it has increased strength, so it easily copes with mechanical stress, resisting them.
In addition, the material is easy to install, so you can figure it out without additional help.
The polycarbonate is cut into plates, the dimensions of which must be indicated in the project diagram. The parts are fastened with a gasket to prevent damage to the material. Such work does not take a lot of time and effort, the main thing is to prepare everything in advance, develop a project and follow the recommendations.

How pleasant it is to collect the first harvests of greens or radishes from the garden. It is even more pleasant when it happens in early spring. And in order for this to be real, it is necessary to build a greenhouse. A greenhouse made of wood, even not a large one, is an excellent solution for a garden and a vegetable garden, which will allow you to harvest in large quantities earlier. And do not think that a greenhouse is a complex structure, which must be built by professionals in their field using complex drawings and using special tools. No.
Greenhouses made of wooden beams
First you need to understand what greenhouses are, what materials are used to build them and what tools are needed. There are several types of greenhouses that differ in shape and purpose. The two main types are winter and summer. As soon as you decide on the seasonality, we proceed to the selection of materials for the frame.
You can use metal, wood, polypropylene and even brick. After that, we decide what the greenhouse will be sheathed with. It can be glass, polycarbonate, or plain polyethylene. In this article, we will consider the option of building a greenhouse from a 50x50 wooden beam and polycarbonate.

Wood is a malleable material that, if properly processed, will last a very long time, and in which case, unlike welded metal elements, it will easily undergo structural changes. Having decided on the material, we need a detailed diagram of our future greenhouse. There are many of them.
From the tool we need:
- Hammer and nails;
- Hacksaw;
- Plane;
- Screwdriver and self-tapping screws;
- Roulette;
- Building level (well, or you can rely on your eye).
Greenhouses can be gable, shed, flat roof, hangar or domed. And we will consider the simplest, gable model, which, with due diligence, is erected in one day. Single-slope models are most often used in the form of extensions to the wall, capital structure, i.e. adjoin one of their sides closely to a house or a shed and are most often used to build winter greenhouses, since it is easier to mount a heating system in them.
Which timber to use for the greenhouse
Wood is inferior in durability to metal, but with proper processing it can last 5-7 years without any repair, which is a good indicator if you compare the price and ease of production. There is no need to look for wood of any exotic or valuable wood species, their service life is almost equivalent, so a simple pine tree will do, and it is easier to find bars from it in hardware stores and carpentry workshops. When we have decided on the type of wood, it is possible, based on the planned size, to purchase timber for the construction of a greenhouse.

For the construction of the frame, a 50x50 bar will be enough. It is advisable to choose dry wood, without knots, distortions or signs of decay.
The smoother and cleaner the timber, the easier it is to work with it. We also need material for laying the base. This should be a bar with a cross section twice as large as ours. Those. 100x100. The bars should be enough for laying the lower piping of our greenhouse, i.e. the size along the length should correspond to its perimeter. If the greenhouse has a rectangular shape, you need to take care that the long edge of the rectangle does not sag under its own weight. It may be better to put uprights perpendicular to the base to add strength to the structure. Also, to calculate the amount of material, you need to take into account the windows and the door.
So, the criteria for the bar that we need to pay attention to:
- Dryness;
- Evenness;
- Lack of external defects;
- No knots;
- Section;
- No damage to the structure of the tree (decay, voids, deep darkening).
Windows are one of the important parts of the greenhouse, since it is necessary to ventilate it with fresh air, and one open door will not be enough, and the resulting moisture will have a bad effect on both the plants and the state of the greenhouse.
What you need to build a greenhouse from a bar with your own hands
When everything you need is purchased and ready for assembly, we begin preparing the site for installing our structure. First you need to level the area slightly larger than the greenhouse itself. Mark out the future building and prepare the foundation.

For this, four pits in the corners or more are enough if the heifer is long, around the perimeter, 50-70 cm deep, with laid bricks filled with cement.
In the future, this foundation can serve for the construction of an outbuilding or a more massive frame. You can, of course, fill in the strip foundation, but this is more laborious, and if a decision is made to move the greenhouse, the strip foundation is more difficult to dismantle. While the foundation is solidifying, we proceed to the preparation of parts for the frame. We cut the timber according to our dimensions and cover it with an antiseptic, paint or drying oil, which will protect our structure from fungus and rotting, which inevitably occurs when exposed to the environment.
What else can be useful for assembling a greenhouse with your own hands:
- Mounting angle;
- Hinges for windows and doors;
- Dowel nails;
- Perforator with a drill.
You can make a greenhouse without a foundation, but in this case you will have to take care of fixing it to the ground, since strong winds can move the greenhouse and damage the plants that are inside. If it is decided to do without a foundation, then we skip the pouring point and immediately proceed to assembling the frame and installing the timber, but do not forget to thoroughly saturate the base with an antiseptic.
Making a greenhouse from a bar with your own hands: a detailed diagram
Now that the foundation is ready and all the details are cut, you can proceed to the final stage of construction. First, we will install the corners by attaching them to the dowel-nails or anchor bolts to the foundation. A thick beam can be attached to these corners, which will serve as the lower strapping and will be the load-bearing in our structure. After that, you can start assembling the frame using a simple fastening - building corners.

We also make installation of doors and windows that can be sheathed with the same polycarbonate. After the top harness has been installed, we begin to attach the roof rafters.
It is advisable to install the roof slope at an angle of 45 degrees, so that it turns out steep and does not require close monitoring of the amount of snow in winter. As soon as we finished with the construction of the frame and the installation of the rafters, the simplest thing begins - sheathing the greenhouse with polycarbonate. The material is very easy to install and has a huge number of advantages over polyethylene, since it is durable and will not tear from accidental mechanical stress.
Having cut polycarbonate into plates of the required size, we fasten it with special fasteners or self-tapping screws through a sealing gasket to avoid pushing the material with a self-tapping screw. This role can be played by simple rubber or plywood.
In short, the build process looks like this:
- Installation of the supporting beam;
- Frame assembly;
- Installation of doors and windows;
- Sheathing with polycarbonate.
Do-it-yourself greenhouse from a bar (video)
As it became clear, building a greenhouse with your own hands is not a difficult task, and everyone can do it. The main thing is to draw up a project, think over the drawings and be creative in solving this problem. And do not forget about safety precautions when working with the tool.

