Table: material, manufacturing technology, diagrams, designs - simple and complex. DIY folding table for a small or narrow kitchen How to make a dining table
The peculiarity of the layout of most of the apartments of typical buildings of the 20th century: a small area of premises, especially the kitchen (even if the apartment is multi-room). Under such conditions, the ideal solution to avoid unnecessary crowding with furniture in an already tight space is to increase the functionality of the main pieces of furniture. If in the living room it can be a sofa, lengthening, if necessary, to seat a certain number of guests, then in the kitchen such an object is a table. For a large family living in an apartment with a conventional layout, a sliding dining table is an indispensable attribute of the interior: in its normal state it takes up quite little space - and when sliding it can fit a large number of eaters behind its countertop.
Advantages of a sliding table if you made it yourself
Nowadays (with the choice of various materials and furniture accessories offered by specialized stores) it is much more profitable to make a sliding table yourself: the cost of the table is cheaper, and everyone can choose the design, including individual sizes. Agree - it's nice if there is a single table in your kitchen!
The design of wooden sliding tables has been known for a long time. If earlier all the details were made of wood, and only a high-class carpenter could make a good sliding table, today even a beginner can make such furniture - thanks to commercially available mechanisms made of durable metal.
Possessing the simplest skills of working with elementary tools: an electric drill, a jigsaw, a screwdriver - you can easily make a table of the shape and size you need. To do this, we suggest you use a few simple examples of sliding tables.
The general principles for making such tables are the same for any do-it-yourself products:
- Determination of the dimensions of the future product;
- Drawing up a design drawing (or making changes to an existing drawing);
- Purchase of basic and finishing materials, fasteners and accessories;
- Cut out structural elements, intermediate surface finishing of parts;
- Assembly of the structure;
- Finishing finish.
Moreover, the first and last points of the algorithm are individual for each case, and it makes no sense to describe them in detail. Detailed instructions for the remaining steps are provided in the proposed descriptions.
Option 1. Making a sliding table - "minute" of the simplest design
The table is named "Minute" because it takes a minimum of time to make it.
The table has a height of 735 mm, the table top: the minimum size is 1200x800 mm, the maximum size is 1670x800 mm.
We need:
- Chipboard sheets 25mm thick: 600x800 mm - 2 pcs., 470x800 mm - 1 pc .;
- Full extension telescopic rails, 500 mm long - 2 pcs. (fig. 1);

- Leg for a kitchen table with a flange (710mm) - 4 pcs .;
- Aluminum corner with an edge of 50mm - 2 meters;
- Frog-type latch-lock - 4 pcs. (fig. 2);

- M4 screws 10 mm long and nuts for them (it is imperative that the nuts were with a stopper) - 16 pcs.
Manufacturing of the main element - a sliding table mechanism
- Cut the corner into 4 parts, grind off the sharp corners of the side edges, as shown in Fig. 3;

- Disconnect the telescopic guides into two parts - a narrow strip and a wide canvas, attach each of the parts to the corners to get the structure shown in Fig. 4;

- Repeat the process with the two remaining corners and the second "telescope".
Assembling the table
- Fold both parts of the tabletop together;
- Install the corners on the back of the tabletop (Fig. 5);

- Install the latches on the sliding parts (Fig. 6, a);
- Move the tabletop apart by opening the locks and insert the removable part;
- Install parts of the latches on the tabletop insert so that all parts of the tabletop can be firmly fixed (Fig. 6, b);

- We fasten the legs to the table top - the table is ready!
As you can see, making a sliding table of the simplest design is easy and does not take much time.
Some inconvenience of this design is in the removable part of the table top: this table does not provide a place for its storage, so it is removed into the closet until the next "influx" of guests.
The next option will help you make a sliding round table, free from this inconvenience.
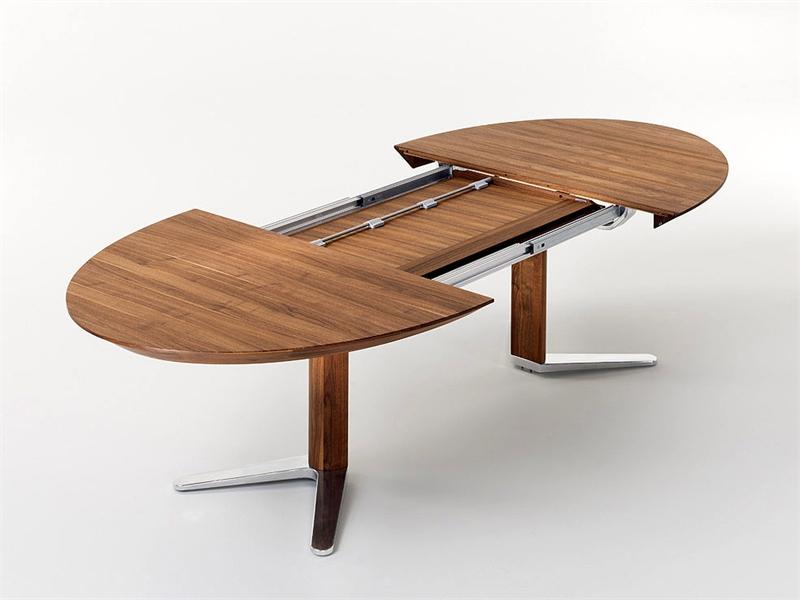
Option 2. Making a round sliding table with a folding insert
You will need:
- Laminated chipboard 25 mm thick
- For countertops - 850x850 mm - 1 sheet; for the insert - 850x 370 mm;
- For false countertops - 600x600 mm - 1 sheet;
- For the underframe: slats 100x575mm - 4 pcs and 2 slats 120x600mm (laminated chipboard, 18mm).
- Legs - bars 60x60x710 mm;
- Telescopic rails 250 mm - 4 pcs, swivel mounts (Fig. 7) - 2 pcs. and hidden end hinges (180 degrees) -3 pcs., as well as stops for the folded insert;

- Furniture corners, confirmations, self-tapping screws, wooden dowels.
Manufacturing of round table elements:
- We cut out the tabletop. There are several ways to create a perfectly round countertop. The first of them is to make a pattern from ordinary Whatman paper, drawing a circle with a large compass, or with the help of a simple device (Fig. 8a), and then start cutting along its contour.
We suggest doing a little easier: to assemble the sawing "compass" from a jigsaw or an angle circular electric saw (depending on what you have) - you can use it repeatedly.
For such a "compass" you will need the actual cutting tool, tape measure, drill, 3-4 self-tapping screws and a meter rail made of plywood. The width of the rail is equal to the length of the tool sole (see Figure 8c, this is how the whole structure looks like).

The solution of such a compass can be changed in the range from 20 cm to 1 meter (respectively, the diameter of the cut-out tabletop can be from 40 cm to 2 meters). It is very simple to use it, the cut is clean, and the circle is perfectly even: at a distance of 425 mm from the cutting blade (disk or file) we drill a hole, use a self-tapping screw to attach the structure to the material to be cut - the compass is ready, it remains only to push the tool forward evenly, and he himself will move along the desired trajectory.
Important! It is better to cut the countertop not from the front side - the trace from the self-tapping screw in the center will spoil the appearance.
The tool must be driven slowly and without jerking, otherwise you can get uneven chips of the chipboard surface (if a saw is used, it is better to gradually increase the depth of cut).
- Divide the countertop in half. To divide it into two equal parts, you need to draw a straight line through the center of the circle (diameter), and then carefully saw the tabletop along this mark.
- We glue the end tape on all the cuts. It must be said that it can be of two types - melamine (made from paper with a special coating) and more expensive (but also of better quality) ABS plastic edging.
Melamine edgebanding tape is produced with a layer of hot glue already applied to it (glued with a regular iron).
However, in order to achieve a better coating, it is advisable to putty and sand the sections before gluing the tape - and only after that start gluing the tape.
The tape is applied to the end of the chipboard, pressed with the sole of the iron and so it is kept for some time (so that the glue melts under the influence of temperature). Then, after removing the iron, it is advisable to press the tape with your hand (after putting the cotton fabric folded in several layers on it). Cut off excess tape with a sharp spatula or knife - be careful not to damage the cut corners!
The ABS edge is more durable, but it is not so easy to adhere. For edging with ABS tape, glue is required (as a rule, manufacturers recommend the most suitable one). Moreover, when removing excess glue that protrudes from the edge of the tape, the solvent can damage the laminated surface of the chipboard - this requires special care and practice.
- The part intended for the insert is cut into 2 parts 425x370mm, all ends are also pasted over with tape. We connect the parts of the insert with hidden loops, like a book.
- In the false countertop, exactly in the middle, we cut out a hole 430x4400 mm - we glue the end parts of the hole with the same tape (Fig. 9).

The assembly of the table takes place in stages:
1st stage: underframe with false tabletop (scheme 1);

2nd stage: assembly of the sliding table structure (diagram 2);

The dining table is an important element of the kitchen interior. The design and dimensions of the kitchen table should allow the entire family to be placed behind it, but at the same time not interfere with free movement. On sale there is a large selection of kitchen tables of various shapes, from domestic and foreign manufacturers. But if you have a little bit of carpentry skills, then it may make sense to make a table with your own hands, with your own design, which will perfectly fit into the overall interior of the kitchen.
In our article we will tell you: how to make kitchen tables of different models, what tools and materials to use for this. Also at the end of the article, you can familiarize yourself with unusual models of kitchen tables.
Tools
Despite the variety of table models and production methods, the set of tools used for the manufacture of tools, with minor exceptions, remains the same:
- Electric jigsaw.
- Hacksaw.
- Drill.
- Screwdriver.
- Set of drills.
- Screwdriver Set.
- Electric planer.
- Electric planer.
- Sander.
- A set of hexagons (in the case of using confirmations).
- Iron or hair dryer (for edging the ends with tape).
- Yardstick.
- Pencil.
- Ruler.

Depending on the complexity of the table design, additional tools are included in the set.
Materials for making
The following materials can be used to make a kitchen table:
- Chipboard - Particleboard.
- LDSP - Laminated chipboard.
- Glued board.
- Plain edged board.
- Wooden bar.
Often in the manufacture of kitchen tables, a combination of two or more of the above materials is used. 
Fittings
The fittings for the kitchen table include the following fixing and decor elements:
- Furniture corners.
- Confirmates.
- Eccentric bolts.
- Hinges for folding tables.
- Rollers for sliding tables.
- Corner leg mounts.
- Chipboard table legs.
- Plastic profile for the table top.
- Cutting adhesive tape.
- Decorative caps.

Certain table models may include additional fittings that are not included in the list.
Variants of tables and methods of making them
Simple kitchen table made of chipboard
Markup
On the purchased sheets of chipboard, mark the parts of the table:
- First of all, mark out the table top, as it is the largest element of the table. The table top is made in the form of a rectangle with rounded corners.
- In the second step, draw two side posts that will serve as the table legs. The stances are usually made in the shape of a chess rook, with a round cut at the bottom. But you can show your imagination and make racks of a different shape, the main thing is to observe two conditions: the racks must be stable and not crawl out from under the table top.
- In conclusion, mark the upper and lower crossbars connecting the racks to each other and increasing the stability of the table and the strength of the table top. Please note that the lower crossbar is made 1.5-2 times wider than the upper one. The shape of the bottom bar can be either flat or wavy.
When making the markup, take into account the fact that the table stands should be located 15-20 centimeters from the edge of the table top. 
Cutting out parts of the table
- Place the chipboard sheet on the table.
- Use a jigsaw to cut out the countertop. When cutting, do not forget to place an unnecessary piece of plywood under the cut line, this will help to avoid chipping on the back of the cut.
- Cut out the rest of the table. Avoid slack in the sheet, this can cause the jigsaw to jam and break off the part to be cut.
- Sand the edges of the cut out parts with sandpaper or a vibrating sander.

Facing the edges of parts with tape and profile
- Slide the plastic profile over the edge of the countertop.
- Having reached the place of the corner bend, heat the profile with a building hair dryer and rotate the profile.
- For a more reliable installation of the plastic profile on the tabletop, additional universal glue can be used.
At the second stage, it will be necessary to trim the racks and beams of the table with a special tape:
- Clean the ends of parts from dust and grease.
- Pressing the tape with a hot iron, glue it to the end of the part.
- Cut off the excess with a knife, making the width of the tape equal to the width of the end. Smooth out irregularities with sandpaper, while being careful not to scratch the tape and part.
- Stick the tape on the ends of the remaining parts.

Please note that gluing the trimming tape is only required in visible areas of the table parts.
Assembling the table
- With the help of confirmations, connect the racks from the roof to the upper and lower crossbar. The location of the top bar should allow the table top to be supported and not bend. The lower crossbar is attached above the round cutouts of the uprights 20-25 centimeters from the floor.
- Having made the base of the table, install the tabletop on it, securing it to the furniture corners from the inside.
- Install the plastic feet on the underside of the table legs.
- Close the heads of the confirmations with decorative plugs.
A simple table for the kitchen made of chipboard is ready! 
You can also watch how to make a table from laminated chipboard in the video:
Kitchen table "book"
The "book" table consists of the following parts:
- The base is made of uprights and crossbeams.
- Narrow main table top.
- Pairs of movable legs-stands.
- Two opening side worktops.
- Piano and regular hinges.
- Fasteners.
A table of this design can be made from laminated chipboard, or from glued and edged beams. Also, metal parts are used to make the base.
Let's take a look at the process of making a table from laminated veneer lumber.

Manufacturing of countertops and racks
In order to make a tabletop from glued together bars, you need to have at least two racks with clamps, on which you will form the tabletops. Racks and tabletops for a table made of laminated veneer lumber are made in the following way:
- Take a few bars with a cross section of 50x30 millimeters and lay them on racks with clamps. Place the blocks in such a way that the annual rings on adjacent blocks are facing in different directions, this will avoid distortion of the part during subsequent use.
- Form a shield out of the bars, slightly larger than the future countertop.
- Coat the ends of the bars with PVA glue.
- Clamp the shield with clamps. Avoid squeezing too hard, otherwise the shield will buckle.
- Leave the glued sticks for a day to completely dry the glue.
- After one day, remove the shield from the clamps and process the surface on a thicknessing machine or using an electric plane.
- Cut the backboard to size and finish off the edges with a plane or hand cutter.
- Thus, you need to make two table posts, two rungs, one narrow and two wide side tabletops.
 Bars clamped with clamps
 Making retractable legs
Pull-out legs for the "book" table are made in the form of frames, where the lower crossbar is located 15-20 centimeters from the floor. To make a frame, you will need four 50x25 mm bars. The connection of the bars can be done using long screws, spikes and glue or confirmations.
Assembling the table "books"
- Assemble the table base by connecting the uprights and crossbars.
- Secure a narrow tabletop to the base.
- Attach the retractable legs to the table columns using the hinges.
- Attach the side panels to the narrow tabletop by attaching them to the grand piano awnings.
- Install the lining legs on the uprights.
- Check the operation of all moving parts of the table by unfolding it completely.
 Book table
 Coating the table with varnish
To emphasize the beauty of the wood, cover the finished table with a transparent varnish, if desired, pre-treat its surface with a stain. To get a polished effect, you need to apply several coats of varnish. 
How to make a "book" table, see the video:
Extendable kitchen table
The sliding table has the function of increasing the surface of the tabletop by installing additional elements. This type of table is popular in small apartments, where the area of the dwelling does not allow the installation of an ordinary large table.
A sliding table is made from the following parts:
- Two main countertops.
- Additional collapsible table top.
- Bases with a pallet.
- Four legs.
- Corner leg mounts.
- Rollers for countertops.
- Table top fixing hooks.
- Retainer spikes.
It is best to make a sliding table from a combination of chipboard and bars.
 Sliding table fittings
 Manufacturing of countertops
- From a sheet of chipboard, cut two countertops of the same size, which will form the main surface of the table.
- Cut out an extra tabletop. The width of the additional tabletop should not exceed a third of the total area of the table, otherwise the table in the extended position will not be stable.
- Apply edging tape to the edges of the countertops.

Making the base of a sliding table
The base for the extendable table is made of four narrow beams connected by corner leg brackets and a pallet. To lighten the total weight of the table, instead of chipboard, you can use plywood with a thickness of 5 millimeters for the pallet. Also, instead of a pallet, manufacturers often use metal or wooden crossbars, which reinforce the structure and serve as a storage place for the middle countertop.
Making table legs
Legs for a sliding table are made of four bars with a cross section of about 50x50 millimeters, slightly beveled towards the bottom. A hole is made at the top of each leg for a fixing screw. The hole should be on the inside. Do not forget to work the legs with a plane and sandpaper.
Assembling the sliding table
- Install the sliding table tops onto the base by attaching them to the roller mounts.
- Pull the tabletops apart and install the removable tabletop. For a good fixation of the additional tabletop on the base, install spikes on it, which will connect all parts of the table to each other.
- To prevent the countertops from diverging when the table is assembled, install hook locks on them.
- Attach the legs to the base.
- Cover the pallet and legs with varnish or paint.

Instructions for assembling the sliding table are also in the video:
Folding wall table
If you have a very small kitchen and there is no way to put an ordinary kitchen table, then making a folding wall table can be the solution to the problem. Its advantage is that when folded it takes up only 15-20 centimeters of kitchen space, and when disassembled, two or three people can easily have lunch behind it.
The folding table consists of three parts:
- Countertops.
- T-shaped wall mount.
- Triangular folding stand
You can make a table from plywood, bars, hinges and screws.
 Parts of the wall table
 Making a wall table
- Use a plywood jigsaw to cut out the countertop.
- From bars with a section of 100x20 millimeters, make a wall mount in the shape of a T.
- Make a triangular stand that will hinge and keep the tabletop open.
- Install the mount on the wall using dowel screws.
- Attach the table top to the top bracket. Use hinges or piano awnings to connect.
- Install the triangular stand.
- Test the operation of all parts of the table by disassembling and reassembling it several times.
- Cover the table with varnish or paint.
If you have a tabletop, but do not want to make parts for a folding table by hand, then purchase folding brackets in the store. Bracket models are specially designed for wall mounting and are not very expensive from 170 to 700 rubles.
 Wall bracket for table
 You can find another version of the kitchen table in the video:
Design and shapes of kitchen tables
To help you with choosing a kitchen table, we present you with photos of the original models:

- Kitchen table made of glued board in a rustic style.

- Table "tansformer" on one leg of a complex structure.

- Extendable table with a pattern on the countertops.
- High-tech style glued board table with rounded tops.

- Round table with original legs.

- Massive kitchen table from a bar.

- An original table made of laminated veneer lumber.

- A beautiful table made of planks of a very simple design.

- with internal electric lighting.
Now that you know everything about making tables, it will not be difficult for you to make your own table for the kitchen!
Making a dining table with your own hands will take a little skill and a lot of time and patience. If the carpentry skills are well developed, and at home there is a full set of tools (from a circular saw to a milling machine), then such work will be completely simple. In this case, you can choose the option of making a table that matches not only skills, but also financial capabilities.
The choice of materials and the size of the future table
The dining table is the center of the kitchen or dining room, even if it sits under a wall. Its size should be selected depending on the size of the room and the number of people who often dine together. A comfortable area for one person at the table is 60 cm.Total, for a family of 4 people, there will be enough tabletops with dimensions of 80x60 cm.But sometimes you have to receive guests, so it is better to increase the size of the table to the most suitable for the dimensions of the room.
So it will take up a minimum of space, but if necessary, the useful area is doubled. In this case, it is better not to make the table attached to one wall, because sometimes you may need to move it to another room.
What is the best way to make a dining table?
Solid oak is an ideal material for a kitchen table. Strong, durable and wear-resistant material will last more than one generation with proper care. Pine, on the other hand, is much softer and easier to process, so it is better suited for novice builders. If you take a ready-made furniture board, you do not have to adjust and fasten the boards yourself, but such a tabletop will cost more.
It is advisable to choose sturdy wood for the legs - they must support the weight of the countertop with numerous dishes and plates. In addition, a table is often used instead of a stepladder - this must also be taken into account when choosing wood. Natural wood can be stained, varnished or painted in any color. Or experiment with combining different types of finishes and even change the style every year.

If you need maximum savings, you can buy a laminated chipboard board, since the choice of decorative coatings is extremely wide - like natural wood, plastic, monochromatic and colored. If you order a sheet of the required size, assembly will take a minimum of time. But you need to choose only products with a durable top coating and insulate the edge of the countertop well, otherwise, if moisture gets in, the surface will begin to "swell".
How to make a simple dining table
For those who decide to start making furniture with their own hands for the first time, a simple rectangular table with a chipboard top is best suited. It will require:
- Purchase a sheet of chipboard of the required size.
- Buy 4 legs - these can be ready-made balusters or bars with a square section of at least 5x5 cm, which will have to be adjusted in height and sanded with sandpaper. In addition, metal chrome legs can be found which will give the table a modern and stylish look. The included mounts make it as easy as possible to assemble the table.
- If the legs are wooden, the frame is assembled from the facing boards - for a stronger fixation. The crossbars are attached to the legs on the sides - with self-tapping screws on metal corners from the inside.
- Legs are attached to the table top 10 cm from the edge. Wooden - on corners, metal - using ready-made fasteners. The frame to the table top is also fixed from the inside with corners - one on each side.
- The wood is treated with wood stain or painted with a preliminary primer - depending on the chosen style.
- A cut of a chipboard sheet is closed with a furniture edge. It is very convenient to use a rigid U-shaped PVC edging. Silicone sealant is generously applied to its inner side (to prevent moisture ingress) and simply snaps onto the edge. The ends are closed with plugs, and the excess sealant is removed.
- If the table top is round or curved, you can take a flexible profile - it is attached to the sealant, the edges are cut off after the glue has set. The flexible piping allows you to create an edge with only one seam, which significantly improves the appearance.
- For greater reliability, you can use a T-shaped profile, but for it you will have to mill the groove clearly in the center of the entire edge - and not everyone has a manual router. But such an edging with wide antennae perfectly hides the uneven cut edges, if they are replete with chips and cracks. Such defects cannot be hidden with a regular edge.


The advantage of a chipboard table is its maximum simplicity and cost-effectiveness. To assemble it, you need a minimum of tools:
- screwdriver or screwdriver;
- sharp knife for edge cutting;
- sandpaper for grinding wooden legs;
- brush for coating wooden parts.
Folding table-book - for all occasions
In order not to think about placing guests on the floor in the best Japanese traditions, a folding dining table is ideal for a small apartment. How to make a folding table with a swivel mechanism?

No more complicated than a regular rectangular table, just a little more expensive:


In addition, you can make a sliding table. In this case, the frame is made "half". One part is screwed to the lower tabletop in the usual way, and the second is made wider so that it can go onto the first. Full extension telescopic guides are fixed on the outside of the narrow part of the frame and the inside of the wide part. But this design is still less reliable than a rigidly fixed frame.

How to add originality to the table?
If you want to make the table special and have the opportunity to realize your idea, why not give it a try? For example, make it glow or decorate with tiles.
Glowing table - how to impress guests
For such a table, a tree with defects is specially selected - chips, cracks and holes from knots. First, the boards are sized and glued together. For better fixation, they can be attached to wooden chopiks - dowels:


If you need to fill through holes, boards covered with waxed paper are placed under them. You can take ordinary parchment for baking. To prevent the resin from spilling over the edge of the edge, you can stick an adhesive tape on it so that it rises a centimeter above the surface. To make even edges at the chipped board, formwork is made, which is also covered with paper and filled with epoxy.

After the first layer has dried, the table top is sprayed and sanded "wet" with fine sandpaper, dried and a second layer of paint is applied. This continues until a perfect shine is obtained. In addition, the wood will be protected from moisture, which is very important for the kitchen table.

Ceramic table - practical and durable
The basis for ceramic tiles can be any - an old tabletop, a sheet of metal or an OSB plate. The choice of decor is also unlimited, although the mosaic looks better. To simplify the work, you can buy a ready-made mosaic on a grid - you don't have to assemble it yourself, and the thickness is minimal, which is quite important for table decor.

Tile adhesive is applied to the countertop with a notched trowel. The pattern is laid from the corners along the outer perimeter of the countertop, gradually filling the entire surface.

After the glue has completely dried, grout is applied and as soon as it dries, the excess is wiped off with a damp sponge. If you add sunflower oil to the water, the grout evens out in the joints and does not cling to the sponge.
To protect the edge of the countertop, it is sealed with masking tape, which is removed after the grout has dried. If the edge needs processing, it can be painted in a contrasting color, which will give the table even more originality, or completely covered with the same tiles.
The mosaic laid out only in the center of the table looks original. In this case, a tree is selected to the height of the tiles with a jigsaw and a mosaic is laid out in the resulting depression.

Even if it was not possible to maintain the same depth, the height of the tiles can be adjusted by increasing and decreasing the adhesive layer. The main thing is that the table top is flat, so each row of tiles is checked with a level.
You don't have to buy expensive materials if you can use something that no one else needs. How to make an original and beautiful dining table for a summer residence from old pallets can be seen in the video:
Perhaps the main attribute of a dining room - a dining room or a kitchen - is the kitchen dining table. Choosing any furniture for a small-sized kitchen of a typical city apartment, you have to compromise between free space in the room and spaciousness, the convenience of furniture, this fully applies to the choice of a table. Finding a small kitchen table in stores with the desired shape of the countertop is not easy, custom-made promises considerable additional costs. There is a decent way out - to make a table with your own hands.
For a room with an area of 6-8 square meters, probably the most successful countertop size will be in the range from 800x500 mm to 1200x600 mm, with a standard height of 750 mm from the floor. The elongated shape of the table top - oval or rectangular - allows you to position the table along the wall, saving free space.
Selection and purchase of materials and accessories.
When making a kitchen table, it would be the right decision to use a factory-made material intended for the same purposes, namely a postforming chipboard countertop. These tabletops are covered with wear-resistant decorated plastic, used in the furniture industry for the manufacture of kitchen sets, supplied in the form of canvases about 3 m long, 600 mm wide, 26 mm or 36 mm thick (as standard). Postforming countertops are notable for their low price. Their front overhang (end) has an aesthetic semicircular shape and is also covered with plastic. Standard fittings are produced for them: end and connecting strips, edge for end processing, screeds, etc.
There is no need to purchase a single piece of kitchen countertop just for the sake of one third of its length. The right piece can always be found (bought for a proportional fee) in furniture workshops, where they accumulate in large quantities as leftovers from the production of kitchen sets. In the same place, in the furniture shop, you can ask to immediately cut the part on a panel saw to obtain a rectangular blank part with the required dimensions.

Postforming table top.
However, chipboard countertops have one feature - they have only one or two plastic-covered overhangs along the length of the canvas. For us, for the table, we need to have all the ends processed (from all sides). For this reason, it will not work directly (without processing the ends) to apply ready-made kitchen countertops. Moreover, you will have to cut off the front factory overhang. The open ends of the chipboard must be processed taking into account the protection against water ingress, not forgetting about the aesthetic appeal of processing. There are two main ways: apply (glue) a special edging tape or use a PVC-based furniture edging. We will go along the second path, as the most practical from the operational point of view and forgiving some minor mistakes to the master. We will use a furniture edging with sides (girths), this will not only give the countertop a more solid appearance, but also give additional protection. You can buy a piece of piping of the desired length at a furniture accessories store. A T-shaped (with a central tenon) PVC edging with girths is required, for chipboard with a thickness of 25 mm or 32 mm. When buying a 25th edging, you must first make sure that it can be easily put on the 26mm end. The use of the 32nd edge is also quite acceptable and gives the worktop a visually greater thickness.

T-edging with girths (sides) in section.
Another important point is the legs (supports). Today there is a wide selection of both piece supports and ready-made table bases. The most common solution is a round leg with a height of 710 mm and a diameter of 60 mm. Legs of this type are collapsible, adjustable in height, have a low price, are easy to install, they exist in several versions of the outer coating (shiny, matte, painted in various colors). If you need to transport or compact storage of the table, it can be easily disassembled. The legs are also sold in specialized furniture stores. As a rule, the manufacturer packs them in packs of 4 disassembled. When purchasing a whole pack, a hex key must be included in the kit.


A set for making a table: a cut of a kitchen worktop, four legs, edging.
Table making process.
We have already described in detail what tools are needed for this, we will not repeat ourselves, we will briefly list the main stages and dwell on some of the nuances.
Step 1. Apply the markup. On the front (working) surface of the table top, we apply a pencil markings according to the project of the future table. All roundings must be made with a radius of at least 60 mm, in order to avoid discoloration of the edging in places of sharp bends (depends on the edging manufacturer).


Marking for rounding corners on the front surface of a rectangular workpiece.
Step 2. Giving the shape. according to the markings, leaving a small margin of 2-3 mm, cut off the excess. The jigsaw should have a reverse (reverse) direction of the teeth (see article about), in order to avoid chips of the plastic coating, even though the edging with its girths can partially hide the small chips of the cut. We bring the contours of the table top to the exact coincidence with the markings with a belt-type sander.


Cutting corners with a jigsaw and finishing with a belt sander.
Step 3. We mill the groove. Depending on whether the edging is applied exactly to the width of the tabletop (25 mm) or more (32 mm), the groove is milled exactly in the center of the end, or with an offset. The exact milling parameters are calculated after measuring the geometry of the edge used with a vernier caliper. In the absence of a "native" cutter, with which you can make the desired groove width in one pass, you can perform multi-pass milling using a cutter with a lower tooth height.


Measuring the edge with a caliper: inner width and thickness of the tenon.


Milling a groove for a 32 mm edging in a 26 mm thick worktop (the groove is offset downward relative to the end center).
Step 4. We fill the edging. Before filling the edging, the end of the countertop must be covered with silicone sealant. It will not be superfluous to lay the sealant in the groove, and also apply it to the upper side (girth) of the edging, directly adjacent to the working surface of the countertop. This will ensure maximum protection against water ingress. The edging is stuffed with a rubber mallet, starting from the place where the butt seam will be least noticeable. After filling is completed, the ends of the piping are precisely joined using a sharp knife. The last operation will be the excess sealant squeezed out during the filling from the surfaces of the countertop. The table top is ready.

Applying sealant to the chipboard end. It is sufficient to apply only to the upper half, which is above the groove.


Edging. When fixing the countertop with struvtsin (as in the photo), care must be taken to spacers under the countertop to prevent damage to the lower, protruding edge of the edging.

Step 5. We attach the legs. To attach the legs (more precisely, their cast holders), we apply pencil markings on the underside of the tabletop in the form of two perpendicular lines at the attachment point of each holder. As a rule, it is a good option to install the legs at a distance of about 100 mm from the edge of the table top (see photo). The holders can be fixed with self-tapping screws 20-25 mm long with countersunk head. It remains to put the legs on the holders, fixing them with a hex key, and the dining table for the kitchen is completely ready, you can use it.

Markings for attaching the leg holders.


The table is ready.

Table version with an oval top.
The design of the kitchen table made of postforming worktop is simple, unpretentious, available for self-production, and reliable. However, it must be remembered that in case of careless handling - a strong impact on the leg in the lateral direction - there is a possibility of breaking the holder made of a relatively fragile alloy. With careful handling and proper care, the table will last for many years.

