Do-it-yourself material for an ottoman. How to make a do-it-yourself ottoman: made of wood, knitted pouffe, homemade cover, pouffes in the interior
It's nice when an apartment or house has this soft and comfortable item called an ottoman. Today we decided to dedicate you to another interesting and outstanding lesson, called do-it-yourself ottoman from a bucket.
Materials:
- plastic bucket;
- the cloth;
- rope;
- construction stapler;
- glue gun;
- foam rubber;
- scissors;
- buttons;
- sharp knife.
Paste the bucket
We remove the handle from the bucket and proceed to the long, but important process of decorating the base for our ottoman, that is, the bucket. We take a thick rope that resembles a rope and use a glue gun to glue it in a circle with hot glue.
The inverted bucket in our case has a ribbed surface at the bottom. On the one hand, it took us a little more rope, but on the other, a certain ledge turned out and the ottoman, as it were, expanded to the bottom. So in terms of design, we did an excellent job.
The main thing! When you wrap a rope around a bucket and you run out of rope, try to glue all the ends on one side! Such places are clearly visible and if they are all on the same side, they can be easily hidden by turning the pouffe in the opposite direction.

Cushion base
After the bucket is completely glued with a rope, you can proceed to the manufacture of the upper soft pillow. To do this, we need cardboard, a pencil or marker and scissors. We turn the bucket over, circle the bucket along the contour and cut out the base for the pillow from cardboard. Then we put the resulting cardboard blank on the fabric and, adding 10 cm to the outer radius, circle the fabric in a circle with small strokes.

We fasten the button
After, we take a button and attach a bolt to it. You can just use a button and a thread, but we have a button like this in the photo, with a thread at the end. We determine the center in the cardboard base and fabric and, having made holes there, insert the button into the cardboard and fabric. Then we need to find some unnecessary towels, or any other soft cloth that we can use to replace the foam, or buy foam and cut it to the right size.

We twist the towel into a tube, wrap one end tightly around the button, and glue the other with hot glue. Repeat the procedure until the surface of the base is completely covered with towels.

Nailing the fabric to the kraton
We straighten the fabric, press the edges and turn the resulting pillow over and simply nail the fabric to the cardboard with a construction stapler.

Closing the bottom of the pillow
Now we need to cover the bottom of the cardboard with a cloth. To do this, cut out another cardboard blank, which will be slightly smaller in diameter than the pillow. Trace around the fabric and cut out. We glue the resulting circle of fabric with hot glue.

Cushion clasps
In order to prevent our pillow from fidgeting and falling off the base of the ottoman, we use special self-adhesive fasteners that can be found in a fabric store. First we attach them to the upper uncovered part of the bucket, then we sew them to the pillow.

The ottoman is ready
That's all, we put the pillow to the bucket and get a completed, beautiful ottoman. If you make several pillows, you can also change them depending on your mood and the situation in the apartment.

Interesting video:
Another, simpler and more interesting option is how to make an ottoman from a bucket.
How about minimal investment? You can make a designer ottoman with your own hands, which, in addition to the decorative function, also solves several practical problems. This is a rather unusual accessory that immediately attracts attention. Having shown a little creative imagination, you can make a completely unique product from old tires or suitcases, and the addition of wheels will make the design more mobile. Today, the editors of the online magazine site will hold several workshops on making an ottoman from unusual things, with the help of which you can first make simple, and then more complex and unusual interior items.
The ottoman came to us from the East, they do not use it so often, preferring to sit on small structures. It quickly gained its popularity due to its mobility and versatility. The main advantage of the design is that it is easy to make it yourself from old things that you decide to dispose of. Today you can buy an ottoman bag or on a rigid frame of any design and finish. But why shell out money for something that is easy to do with your own hands in just 1-2 hours?

Non-standard ideas for making a pouffe from unusual items with your own hands
Manufacturers produce a wide variety of ottomans: for a children's room, hallway, bedroom, and even for a holiday home. They are offered at a fairly high price, but why spend personal finances on something that is quite within the power to do it yourself? And for this you absolutely do not need to be a professional, just show a little imagination and follow our instructions.
Step-by-step instructions for making a do-it-yourself ottoman from plastic bottles
The easiest way to make an ottoman is from plastic bottles. You must first prepare the following materials:
- plastic bottles - 14 one and a half liter pieces;
- transparent tape;
- plywood sheet;
- material for decor;
- double sided tape.
- thin and thick foam rubber or.
Advice! First you need to unscrew all the lids and put them in the cold overnight or put plastic bottles in the freezer. In the morning, immediately screw the caps on and put them under the battery. In such a simple way, the strength of the bottles increases.
A step-by-step photo description of making a pouffe with your own hands from plastic bottles.
| Illustration | Action Description |
 | Connect with an elastic band 2 times 2 bottles, 2 times 3 bottles and 1 time - 4 plastic. Then secure with adhesive tape. |
 | Connect the entire structure together and fasten. |
 | Cut out 2 ovals from plywood according to the size of the bottom of the ottoman, make small notches on them from the outside. Glue a dense fabric onto one oval - this will be the bottom of the structure. |
 | Glue plywood to the structure from above and below with double-sided tape. |
 | For greater strength, tie the ovals with twine along the notches. |
 | Wrap an ottoman with thin foam rubber and sew with a dense thread. |
 | Cut out the top of the structure from wide foam rubber. |
 | Sew the seat to the foam sides. |
 | Sew a cover of bright fabric, pull the cord along the bottom base and put it on the workpiece. |
 | The finished product weighs no more than a kilogram. |
For more details of the master class, you can watch the video.
Related article:
Photo examples, drawings, schemes, materials; features of the manufacture of furniture for the garden, nursery, baths, gazebos, advice and recommendations of the masters - read in our publication.
Ottoman in the children's room made of plastic 20 liters
If you have a 20-liter bottle left, you can make it for the smallest children. For this you will need:
- 1 twenty-liter and 4 one and a half liter plastics;
- Scotch;
- fabrics and decor.
The work is carried out as follows;
- Cut off the top of the 20 liter plastic.
- Insert one and a half liter bottles into it, which will act as legs.
- Next, you need to decorate the workpiece. To do this, you can use a dense soft fabric, colored tape, fur, the options depend on your imagination.

The nuances of making a do-it-yourself ottoman from a tire
A creative ottoman can be made with your own hands from an old wheel. It is quite heavy, so either is more suitable. In addition, this is a great option for or. The production order is as follows:
- Wash the tire thoroughly and dry.
- Cut out 2 circles from plywood, the diameter of which is equal to the diameter of the tire.
- Drill a few holes in both pieces of plywood and screw in.
- Starting from the center of the structure, glue the twine in a circle in the shape of a snail.
- So that the ottoman can be left on the street, it should be varnished.
- For mobility from the bottom side, you can install wheels.

In more detail, a master class for making an ottoman from an old tire can be viewed on the video.
How to make a pouffe from an old plastic bucket
If you have an old plastic bucket, you can also convert it into an upholstered seat. For work you will need:
- measuring tape;
- chalk or a piece of dried soap;
- glue;
- stapler;
- foam rubber and interlining;
- the cloth.
Before sheathing the ottoman with your own hands, you need to measure the diameter of the lower and upper parts of the bucket. Further, the algorithm of work is as follows:
Ready ottoman will be a real decoration of any interior.

In more detail, the process of making an ottoman from an old bucket can be viewed on the video.
Related article:
: what is it, advantages and disadvantages; step-by-step production of a coffee table, armchair, sofa, bench, rack; features of the decor with a photo - read in the publication.
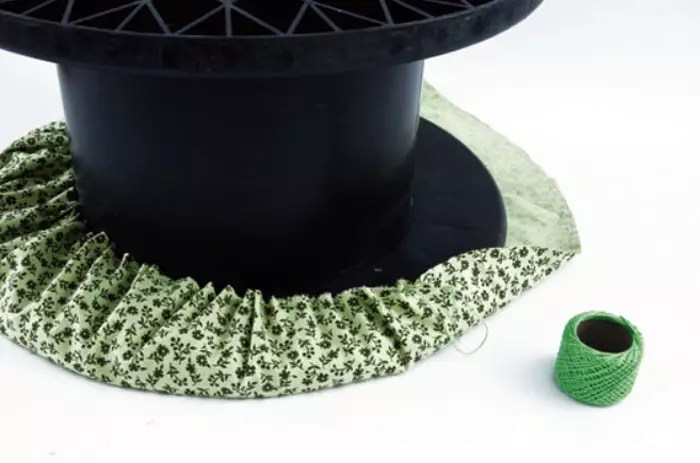
Non-standard solution: do-it-yourself ottoman from a cable reel
A comfortable child seat can be made from an old coil of electrical cable. For work you will need:
- synthetic winterizer;
- glue gun;
- braid for decoration.
Progress:
Interesting ideas for making poufs for the bedroom
For the bedroom, soft frameless poufs are perfect, which, in addition to the functional load, also act as a bright accent in the interior, photo examples are proof of this. And if you take expensive fabric for decoration, the soft design will emphasize the wealth of the owner and taste.
How to knit a round pouf
Needlewomen can please their families with their creativity and knit a cover on a bag with filler. This is a great addition to the stylish interior, decorated in. First, you should sew the bag, fill it with foam rubber, and then proceed to the main work. Master class on making a knitted ottoman with your own hands:
- Tie two circles, their size should correspond to the diameter of the bag.
- Sew the edges of the blanks to the middle.
- Sew a zipper into the hole.
- Put the cover on the bag and fasten the zipper.

Another interesting master class on making a knitted ottoman can be viewed on the video.
The nuances of making a soft frameless square pouffe
The order of work is practically no different from the manufacture of a round pouffe, only the templates should be prepared in a square shape. Each part must be knitted separately, the inner cover is sewn, into which the filler is then poured. You can also make a frame model, for example, from which they are covered with foam rubber and decorative fabric. In more detail, a master class on making a pouffe from pallets can be viewed on the video.
How to sew a frameless pear-shaped pouffe with a soft back
A modern accessory that many families love so much is the pear bag. To make a soft ottoman with your own hands, you need to master the sewing technique. Before work, prepare the following materials:
- upholstery fabric 320×150mm;
- smooth material for interior decoration - 300 × 150 mm;
- filler. It is advisable to find polystyrene foam with a holofiber with a volume of about 1 m³;
- zipper at least 60 cm long;
- pattern paper and thread.
The production order is as follows:


Work for half an hour or how to sew a pouffe in the form of a bag
From beautiful matter, you can sew a bag of any shape. For work, you should prepare a flowing fabric for the inner cover and a beautiful material for the outer surface. Before you sew an ottoman bag with your own hands, you need to make patterns for 4 sidewalls, the bottom and top, photos of ready-made solutions will help you choose an interesting design.
Then transfer them to the fabric and cut out taking into account the seam allowances. After that, sew all the fragments of the inner cover, leaving a small hole into which to pour the filler. All manipulations should be carried out with decorative fabric, the patterns of which can be made according to the same patterns.

How to properly assemble and finish soft square and round ottomans on a rigid frame
More complex work will require a little more time and carpentry skills. But there is nothing difficult in such work, just look at a few of our step-by-step instructions, and you can do everything yourself.
Detailed instructions for making a square soft ottoman on wheels with a drawer for small items
With a little work, you can make a more solid design - a square ottoman with a removable lid on wheels. It is also an additional toy, and you can also store slippers for guests in it. For work you will need the following materials:
- plywood sheet 12-16 mm thick. Sizes are for children and adults;
- wooden block 20 × 40 or 40 × 40 mm;
- wheels;
- piano loop;
- foam rubber for a soft seat up to 100 mm thick;
- synthetic winterizer;
- upholstery fabric;
- carpentry;
- glue.
An ottoman up to 40 cm in height is suitable for children, up to 55 cm for adults. In the table, we have prepared the dimensions of details for an ottoman intended for children and adults.
| Detail | Quantity, pcs. | Dimensions for children, mm | Dimensions for adults, mm |
| Front and back panel | 2 | 350×250 | 400×370 |
| Side panels | 2 | 326×250 | 368×370 |
| Bottom and top | 2 | 350×350 | 400×400 |
| Wooden blocks for sidewalls | 4 | 40×40×250 | 40×40×370 |
| Bars for the top | 2 | 350×1450 | 550×1650 |
| Upholstery fabric for sidewalls | 1 | 350×1450 | 550×1650 |
| Sintepon | 1 | 300×1410 | 450×1610 |
| Foam rubber | 1 | 350×350×50 | 400×400×100 |
| Lid material | 1 | 500×500 | 650×650 |
Step by step manufacturing process


The second life of an old stool
Do not rush to throw away the old, but still strong stool. Just a couple of hours, and you will add an interesting designer piece of furniture to your interior. The manufacturing process is as follows:


Detailed master class for making a pouffe on a wooden frame
Such an ottoman can be made in any geometric shape. Consider one of the easiest ways: making a round product. For this we need:


Conclusion
Making a pouffe with your own hands is not difficult at all. For starters, you can practice on simple designs. In the process of work, creative inspiration will appear, which will help to create more complex things. Unique items made by yourself will always be a bright accent in the house, delight loved ones and surprise guests.


We hope that our instructions will be useful to you, and you will soon please your relatives with a new invention. Have you ever made ottomans with your own hands? Tell us in the comments what model you have already made or are planning to make. And finally, we offer you to watch a master class for making a large ottoman with a carriage screed.
The pouffe is a small and very functional piece of furniture. Its popularity has not diminished over the past few years. Now this useful piece of furniture is popular, as before. Its manufacture can be the first step towards the start of independent production of upholstered furniture. This will allow, first of all, to try your hand and work out the technology.
This short review will describe how to make an ottoman with your own hands. The assembled product will be a great addition to the interior of the living room or hallway.

Choice of design and construction
This item is the easiest to manufacture, so any, even the most novice craftsman, can handle it. Before starting work, first of all, it is necessary to decide on the design of the future product. The study of photos of various ottomans will help in this.

The ottoman can have a rigid frame or do without it at all. Various materials can be used as a frame. The most commonly used classic carpentry materials such as boards, plywood, chipboard.

Pouffes with a frame can also be made from old plastic bottles, buckets or car tires. Pouffes without a frame are a neatly sewn bag stuffed with expanded polystyrene.


Ottoman frame
The assembly of this item is not difficult. Let's figure out what and with what materials you can make a pouffe with your own hands. Depending on the design, different tools and materials are used.

Frameless pouffe
The simplest soft ottoman without a rigid frame is made using a minimum set of tools. To do this, sew a lined bag and fill it with granular expanded polystyrene, specially produced in the form of balls for stuffing furniture. Therefore, it is easy to purchase at a hardware store or on the market.

Tire pouffe
A new and quite popular model now is ottomans from an old car tire. Making them is also very easy. This will require an old tire, preferably fixed on a metal disk for rigidity.

If the tire is without a disk, then wooden partitions installed inside the tire can give structural rigidity.

In order to make such an ottoman, it is necessary to cut two circles from plywood 3-5 millimeters thick and attach them with screws to the tire from above and below to create horizontal planes. Then, using a quick-drying glue, glue the rope to the surface from the center to the edges with a spiral.

The top wooden surface and the rubber side surface are covered with a rope. Before buying a material, it is necessary to calculate the length of the rope and estimate its cost.


Perhaps such a piece of furniture will not fit into the living room or bedroom, but it may be suitable for a home workshop or office. At the same time, you can try not to finish its surface with a rope, but only stick a soft seat on the upper surface, leaving the rubber intact.


Pouffe from plastic bottles
You can make such furniture from a variety of materials. For example, even plastic bottles, old buckets can be used as a frame, but it is better to use more durable materials. They are not so expensive in price and their consumption is very small.

With their help, you can create an ottoman of any size and shape and add additional structural elements to it: assemble an ottoman with a hinged lid, a drawer for various small things, legs or rollers.

Pouffe made of plywood, chipboard
Quite simply, puffs are made with a frame made of chipboard, wood or plywood. Such products can be heavily loaded and can be used as an ordinary stool.

To create it, sheet material is first cut in accordance with the drawing. It is fastened with screws and wooden bars fixed along the edges of the sheets. Small irregularities will be hidden by soft upholstery and finishing fabric.


The pouffe may have a hinged lid that can be lifted. It will be possible to store small things in it, but for this you need to make a bottom. The lid, depending on the base, can have a different shape: round, square.


Lining
The next step is to attach the soft lining. For these purposes, a synthetic winterizer or foam rubber is used, which is fastened with building brackets and glue. A decorative covering made of fabric or leather is attached in the same way over soft upholstery.

The color and type of coating determines the design of the product as much as its frame. The finish of the product determines its overall design, so it depends on how the product fits into the interior. Since the product turns out to be quite small, it is quite possible to use the most daring color schemes, which will almost always be appropriate.

For convenience, the pouf can have legs or rollers. They are installed in the last step. If you decide to do it without rollers, then in order not to scratch the floor, glue four small pieces of felt from ordinary insoles from below.

In the production of any furniture, the main thing is to patiently complete all the work, carefully following each step. You can make an ottoman with your own hands from almost anything, you can use a wide variety of materials and ideas.

The most important thing is that for this you will be rewarded with a new piece of furniture that will serve you for many years, delighting you with a pleasant appearance.


Photo of do-it-yourself ottomans


When the old interior is already boring, and you want changes, it is not necessary to start repairs. Various additional items can change and revitalize the interior. Do not immediately go shopping in search of something new and unusual. Do not forget that with your own hands at home you can create many masterpieces. One of the practical and interesting things in the room is the ottoman. It comes in all shapes, sizes and colors.
You can fit it into any of the rooms and in different styles. If you are thinking about how to make an ottoman with your own hands, you will need some useful ideas in this regard. But the main advantage of such an item lies in the wide choice of materials for creation.
Multicolour fabric ottoman
Sewing a bright ottoman from fabric is not a difficult task.
Before starting work, prepare:
- fabric of different colors;
- lining fabric;
- filler;
- sewing machine;
- a needle and thread;
- 2 large buttons.
As a filler, you can take a synthetic winterizer or thick foam rubber. Then the pouf will turn out to be moderately soft and will keep its shape.

The first stage of work is a pattern. Draw a circle on paper the size you want the pouf to be. Divide this circle into 12 equal parts. Do you have fewer colors? You can alternate them or make a division into 6-10 parts. Finished patterns are applied to the fabric and triangular patches are cut out. Cut them out with a margin that will go to stitching. The fabric for the lining is cut in the same way.

The next step is stitching. Grab the petals of the circle between each other with threads on the sides, and then sew them on the sewing machine. You should get two round multi-colored bases - the top and bottom. They need to be sewn from the inside out with high quality. Leave one piece open to fill the pouffe.

The final step is filling. Put the required amount of filler inside the cover. The pouf will immediately become voluminous. There should be a lot of synthetic winterizer or foam rubber so that the pouffe does not significantly change shape when pressed. Carefully sew the last piece. And close the place of stitching the petals in the center of the circles with large buttons. Do-it-yourself multi-colored pouffe is ready.

Plastic bottles as a basis for a pouffe
Plastic bottles have many uses in everyday life. When a considerable number of them have accumulated, you can make an ottoman with your own hands.
You will need:
- about 40 pieces of bottles with caps;
- soft foam lining;
- cardboard;
- wide tape;
- cover fabric;
- needle, thread.

Take bottles with tightly screwed caps and use tape to connect them to each other so that they form a filled circle. Cut out 2 circles from cardboard. Their diameter should match the diameter of the bottom of the glued bottles. Tape the cardboard tightly to the plastic containers with tape. The frame for the ottoman is ready.

Then you should prepare the foam for the lining. 3 blanks are cut out: 2 circles of the same size with cardboard blanks and 1 rectangle. It will wrap around the ottoman vertically. You can fix the blanks with the help of threads or a construction stapler. It remains only to sew a cover for a pouffe from the desired fabric. This is not difficult if you have minimal sewing skills. A cute do-it-yourself ottoman is obtained quickly and cheaply.

Non-standard use of a plastic bucket
An old unnecessary plastic bucket can easily turn into a useful and beautiful thing - an ottoman.
For the ottoman you will need:
- jute rope or rope;
- construction glue gun;
- cardboard;
- the cloth;
- stapler;
- big button;
- microfiber cloth.
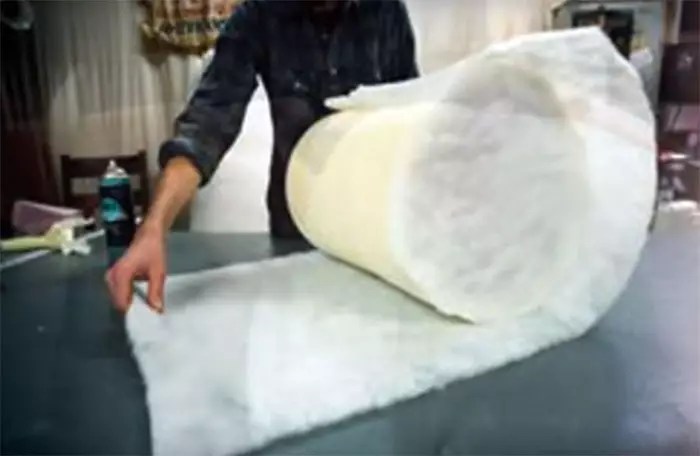
A bucket without a handle should be turned over and tightly wrapped around with a rope. When winding, each stitch must be planted on glue so that the rope subsequently sits tightly.

When the task is completed, you can begin to build a soft seat for the pouffe with your own hands. Take the cardboard, attach it to the ottoman and cut out a circle from it the same size as the bottom. It is also necessary to cut a circle from the fabric, but with a diameter larger by 10 cm. Connect the fabric to the cardboard in the middle with a button. Roll the microfiber into a tube and start wrapping it between the cardboard and the fabric around the button. Use a glue gun to fix. Wind the fabric until you reach the edges of the cardboard. Attach the top fabric with a stapler to the back of the cardboard. The ottoman is ready, it remains only to connect the lid and base with glue or Velcro tape.

Functional ottoman with a box inside
The task becomes a little more complicated if you want to do it yourself and use the ottoman as a place to store things. Having a ready-made box will greatly facilitate the task. But it is also possible to do it yourself.
Prepare for him:
- 4 rectangles of chipboard of the same size. They will be the faces of the pouf;
- 2 squares of chipboard for the base and cover;
- wooden blocks for fastening and small legs;
- screwdriver and screws.
If you do not have the skills of a carpenter, then it is better to ask for help in collecting the box from a more experienced and strong person. Assemble the structure from the parts, use self-tapping screws and glue to fix.

The seat is not attached to the ottoman, it must be freely removed and put on. So that during operation the seat does not move out, stops are attached to it on the inside. It is necessary to attach the stops at such a distance that when removing and putting on the cover, they do not rub against the edge of the chipboard and do not touch the bars inside.

The frame of the box must be covered with a cloth, you can fix it with a stapler. Inside the box is sheathed too. Thick foam rubber should be laid in the cover under the fabric for comfortable seating. This is how it turns out a practical ottoman with legs that will fit into any style of interior. You just have to choose the right fabric.
Video gallery
It is very practical to have a round ottoman in the home interior. You can make such an ottoman with your own hands, but you will need a special tool. The manufacturer is not responsible for the quality of work.
For the production of an ottoman, materials will be required:
- Chipboard or plywood sizes 16, 18 mm;
- Wooden pine beam 20 × 40 mm, but there may be other sizes;
- Self-tapping screws 45 mm long, they fit best in size;
- Fiberboard 3.2 mm, 2.5 is possible;
- Foam rubber 40 mm, 1 mm: density 25;
- Sintepon 10 mm, possibly thinner;
- Leatherette (eco-leather), or fabric, genuine leather;
- Interlining;
- Odorless glue;
- Threads;
- Staples or nails.
After the procurement of materials, we proceed to the production of an ottoman
- First, cut out the bottom of the pouffe. For this, two halves of a chipboard are taken, two circles are connected and cut out. The seat is ready.
- For the manufacture of legs, we cut a pine beam 45 cm long, 7 pieces.
- On two circles, we evenly mark places for attaching 7 beams. We drill 2 holes on one beam. With self-tapping screws, 45 mm long, we connect the legs with circles.
- A small frame came out.
- We cut the fibreboard into 2 parts according to the height of the ottoman.
- The plate is fastened with 16 mm brackets along the bars, as well as along the bottom and top around in a circle.
- The frame is ready. We begin to upholster the ottoman.
- First, we smear the top of the pouffe with ALIMP glue. ECO glue "and glue the foam rubber 4 cm thick. Then we lubricate the sides and glue the foam rubber 1 cm thick.
- Further, the entire soft surface is sealed with synthetic winterizer.
- From the leatherette we cut out the upper part of the pouffe according to the dimensions of the chipboard, as well as the sides and sew it on a sewing machine.
- We pull the finished upholstery onto the pouffe. The bottom is fixed with a staple gun.
- Flizelin close the bottom of the pouf.
- We fasten the plastic legs with a screwdriver and 3 cm wood screws.
Cut the chipboard to the desired diameter. A beam of the desired height, depending on the required height of the pouffe.


We upholster fiberboard around the perimeter.


To align the folds on the upholstery material, we use a synthetic winterizer.


Apply with a spray gun or just by hand.

Foam rubber thickness from above - 4 cm


We put on a cover and hammer it with a stapler or nails.

Screw on the plastic legs.

The round pouffe is ready.

