How to sharpen nail clippers and scissors without a machine. How to sharpen nail clippers at home: actionable tips What can be done
Reading time:
- Tips when choosing a whetstone for sharpening
- Sharpening Japanese knives
Sharpening knives is an inevitable process for any person. Despite the routine of this procedure, many not only do not know how to sharpen a knife correctly, but also pass on their “experience” to friends and acquaintances. There is an opinion that the correct sharpening of knives is relevant only for blades made of expensive steels, and a simple kitchen knife can be sharpened with a simple household sharpener for 200-300 rubles. In fact, any knife can be sharpened to a razor sharpness, just on a knife with poor steel, such sharpening will last no more than five minutes.
Manual sharpening of knives is a rather lengthy procedure, which includes the use of natural abrasive stones and diamond bars. In order for the knife to shave the hair on the hand, it is necessary to “finish” it on the skin, using the GOI paste of various numbers.
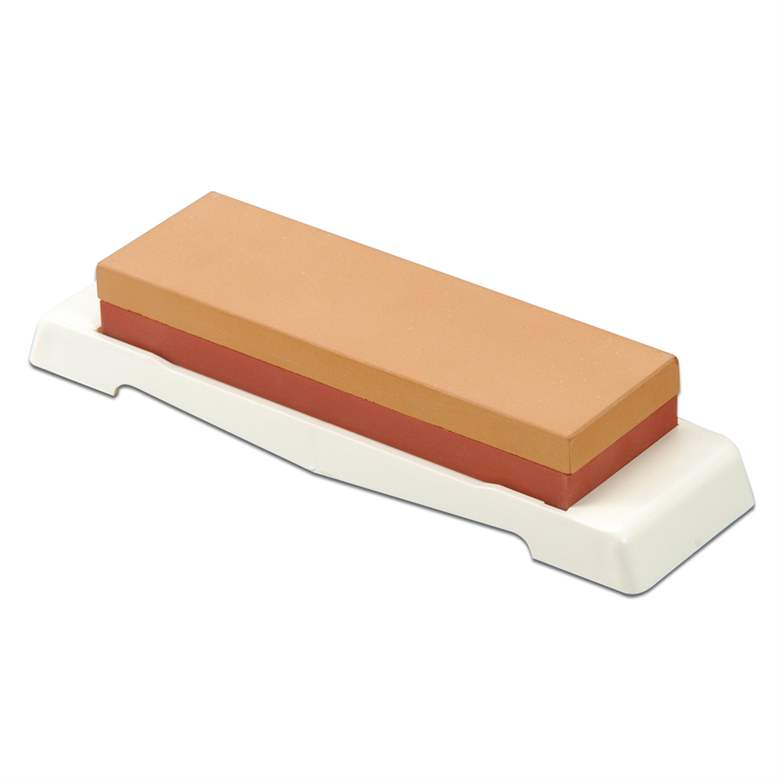
Choosing whetstones for sharpening
Grinding bars for manual sharpening of knives can be divided into four large groups, depending on the material used in their manufacture:
- Ceramic whetstones;
- Diamond stones;
- Natural stones of natural origin;
- Japanese water stones.
Ceramic knife sharpeners are the most affordable way to sharpen your kitchen knives. It is with ceramic bars that the shelves of hardware stores and markets are filled. They are of several types. The most common is the "boat" bar. As a rule, it is very rough and is only suitable for rough sharpening or for changing the sharpening angles of a knife. Often there are bars from Poland, having two sides, with a rough and smooth surface. This is the best budget choice. If the bar is worn out, it is not a pity to throw it away and replace it with a new one.

Diamond stones are rarely used in professional knife sharpening. The sharpening process itself when using diamond bars is more complicated, and the cutting edge quickly becomes dull. Diamonds often leave deep scratches on the cutting edge and "eat" too much metal when sharpened.
Natural knife sharpening stones and Japanese water stones are the best sharpening stones for knives. The big disadvantage is their high price, often you have to order them from abroad.
The first criterion that you should pay attention to when choosing is the size of the bar. Its length should exceed the length of the knife blade by 1.5-2 times. The surface of the do-it-yourself knife sharpening bar should be smooth, without chips or cracks. If the stone is damaged, it is better to refuse the purchase.
For sharpening kitchen knives, a ceramic double-sided whetstone, or several bars of different grain sizes, made in the USSR, is suitable. No matter how they scolded the Soviet industry, grindstones in the USSR were made strictly according to GOST. Unfortunately, now such bars can only be found at flea markets.
If your task is not just sharpening kitchen knives, but you want to sharpen hunting or tourist knives to the state of a razor, then purchase GOI paste for finishing polishing the cutting edge.
Choice of grindstone grit
Grinding stones are usually divided into three categories:
- Rough grit;
- Medium grit;
- Fine graininess.
Not everyone knows that in addition to this, they are separated like sandpaper by the number of abrasive grains per conventional unit of area. The bars start at 100 and end at about 15,000.
Usually, when sharpening, bars of 600-800 units are used. To polish the edges, marking bars 1500-2000 are used. Bars over 2000 are used only by professionals and are rarely available for sale.
Step by step instructions for sharpening a knife

Before you start sharpening a knife, you need to understand a few rules for yourself:
- The angle of sharpening the knife must be strictly maintained;
- Do not press hard on the knife when sharpening, it will not sharpen faster, but the grindstone can be damaged;
- Sharpening stones should be washed with water to remove metal dust.
If you are trying to sharpen a knife for the first time, do not practice on expensive models, take a simple kitchen knife and bring it to a razor sharpness.
- First of all, you need to wash the bar with water and soapy water or dishwashing detergent;
- The second stage is the preparation of the workplace. To do this, a straight board is placed on the table, on which a grindstone is installed. Everyone chooses the position of the bar according to their feelings of convenience;
- Before you start sharpening, you need to choose at what angle you want to sharpen the blade. It should be remembered that for fine work, the sharpening angle should be about 20 degrees. For a utility knife, 30-40 degrees is also suitable. The choice of sharpening angle directly depends on the quality of the steel on the knife blade. Higher quality steel is able to keep fine sharpening for a long time. Sharpening cheap kitchen knives at a small angle is impractical;
- The essence of setting the correct angle of the blade is that the cutting edge is perpendicular to the movement of the knife along the whetstone. If the angle of the knife before sharpening suits you, it is not difficult to withstand it, the cutting edge simply presses against the bar with its entire surface. To change the sharpening angle, it is better to use special devices to hold the sharpening angle. They can be purchased at specialized knife stores or made by yourself;
- Having fixed the blade at the desired angle, we begin to slide the blade along the bar away from us. The blade is sharpened until a “burr” appears along the entire length of the cutting edge. When it appears, you can proceed to sharpening the other side of the knife. The dust that appears during sharpening must be periodically washed off under running water;
- After sharpening on a coarse abrasive, you can proceed to fine-tuning on a smaller stone. The procedure for such fine-tuning is no different from sharpening on a coarse grindstone. If you have several stones with a finer grit, continue sharpening, changing them from smaller to larger;
- For a kitchen knife, such sharpening will be enough, it will thinly cut a tomato and paper. If you want to achieve a razor sharpening of the blade, you should grind the RK (cutting edge) on the skin with GOI paste;
Bringing the cutting edge to razor sharpness

For “finishing the RK, they use a special GOI polishing paste, developed back in the days of the USSR by the State Optical Institute. The paste is spread on a piece of leather, which is preferably attached to a wooden block, the size of a standard whetstone. The peculiarity of polishing on GOI paste is that the knife blade must be polished with movements towards itself.
Sharpening Japanese knives
Sharpening of Japanese knives takes place according to a special scheme, since the blades of Japanese knives have a geometry different from others and one-sided sharpening. This geometry results in products not sticking to the knife blade.
Japanese blades are sharpened with the same abrasives as other types of knives, only they are sharpened on one side, until a burr appears. When it appears, the blade is flipped to the other side and the burr is removed with a few strokes. After that, the whetstone is replaced with a finer grit stone, and the procedure is repeated.
Household manual knife sharpeners
There are many small kitchen sharpeners out there that the manufacturer claims can sharpen a knife perfectly in one minute. In fact, these sharpeners can only be recommended to those who want to get rid of the knife in a short time. These sharpeners “eat up” a large amount of metal, and soon the knife becomes thin and unsuitable for further use.
There are excellent knife sharpeners that not only can sharpen your knife to razor sharpness, but also make it easy to maintain or even change the blade's sharpening angle. These are systems like Edge Pro Apex or Lanski. A knife sharpening machine is quite expensive, about 6,000 rubles.

There are also analogues of the Chinese company Ganzo, which are half the price. The machine for sharpening knives of this manufacturer has proven itself quite well.
Common mistakes when sharpening knives

People who are not experts in the field of sharpening knives often make gross mistakes in this process:
- Having bought one first bar that came across, they believe that this is enough for a complete sharpening. In fact, a knife sharpening set should at least include several bars of different grain sizes;
- Knife missing. During sharpening, a lot of small burrs form on the cutting edge of the knife, which can give the feeling that the knife is sharpened. Such burrs quickly break off in the process of working with a knife, and it has to be re-sharpened. In order to avoid such a situation, it is necessary to carefully inspect the RK during the sharpening process;
- Some start sharpening without even cleaning the knife from dirt and grease, after seeing how professional chefs adjust their knives with moussat during the cooking process. It must be remembered that mussat is intended only for straightening the cutting edge, it does not sharpen the knife blade;
- Do not strongly press the knife to the bar during sharpening, this will only spoil the grindstone;
- Wrong sharpening angle. It must be remembered that too large a sharpening angle will not allow your knife to cut food thinly, and with a small sharpening angle, the blade will quickly “sit down” on solid foods.
When sharpening, just follow these simple rules, and you will succeed.
Device for sharpening knives with your own hands
If someone is not satisfied with the high price of a branded tool for sharpening knives, then you can do the installation yourself. The advantage of self-production is that you can make a knife sharpening kit according to your wishes, changing the design in any direction.

To start manufacturing work, you need to find a suitable drawing on the Internet. Usually homemade sharpeners are of two types:
- A simple Lanski type sharpener;
- Homemade sharpener, similar to the model from Edge Pro Apex.
It is up to you to decide which model to copy, just remember that the first option is easier to manufacture, but less convenient to use. A set for sharpening knives of the second type is technically more difficult to make, but it is much more convenient to work on it. We will consider how to make a simpler version in more detail.
Making a Lanski type sharpener
To make a Lanski type sharpener, you will need whetstones of different grain sizes, a piece of thick Plexiglas, from which we will cut out holders for stones, an aluminum corner, a thin steel bar and an aluminum profile.
To begin with, blanks are cut out of plexiglass for sticking abrasive stones. They should be slightly longer than the whetstones, as there are still holes to be drilled in them in order to insert a rod there. A bar pre-curved with the letter “G” is inserted into the drilled holes and fixed with a fixing bolt.
From the aluminum profile and the corner, you need to cut several blanks in order to then make a clamping system for the knife from them. In the upper part of the assembled structure, do not forget to drill several holes for different sharpening angles, similar to the Lanski system.
Do not forget about making a rack to secure the entire structure in a fixed position. You can do without it, but it will create great inconvenience in the work.
Camping knife sharpening kit
Naturally, on a hike you won’t be able to take a full-fledged knife sharpening kit with you, but it’s advisable to put a double-sided stone and a bar with stretched skin in a backpack. Let the steel on your knife have outstanding characteristics, no one is immune from potholes and jamming of the cutting edge. It will be problematic to sharpen a damask knife or a powder steel knife, so take a small carbon steel knife just in case, it won’t take up much space, but it will help you out if the main knife fails. Carbon steel has a very aggressive cut and can be easily sharpened on a simple whetstone in a couple of minutes. At the same time, such knives hold sharpening quite well. The only negative is the lack of corrosion resistance of such steel.

It is not difficult to sharpen a knife correctly, you just need to follow the advice of professionals and have the necessary set of sharpening accessories. Everyone can choose the composition of this set for himself, taking into account his vision of the sharpness of the knife.
Many people choose to throw away scissors that are already dull. But it is better to learn how to sharpen scissors, and thereby significantly save on their purchase.
After all, now on the shelves of the store you can buy only modern Chinese unreliable fakes.
The easiest thing to sharpen are stationery and clipping scissors. It is much more difficult to sharpen a manicure set. Before sharpening them, you need to make sure that the malfunction is related to blunting.
 It is quite possible that they simply loosened the fastening axis, where a bolt or a simple rivet is mainly used. Just tighten the bolt.
If the screw is tightly tightened, and the scissors still do not cut well, then sharpen the heel limiter, which is located near the hole with the bolt.
Do not try to close the blades, as you will aggravate the situation.
If a rivet is used at the junction, then tighten it. But before that, open the scissors and put it on any metal object.
Then, using a beard, flatten the rivet and check how well the blades close.
If nothing has changed after the steps taken, then you will need to sharpen the scissors at home.
Procedure
In order to sharpen scissors, you need to use a whetstone. It can be purchased at many hardware stores.
Most varieties of stones have two different sides, one of which is fine-grained and the other is rough. First you need to use the rough side.
How to sharpen scissors yourself? The algorithm includes several steps.
- Place the whetstone on a cloth and lightly dampen with water.
- If a bolt is used as a fastener on the scissors, then disassemble them. If a rivet is used, open the blades as wide as possible.
- Make sure that the slope of the factory sharpening is observed. Don't change it. It is required to lay the blade in such a way that its plane tilts away from itself.
- Make sure that the chamfer is parallel to the surface of the bar.
- Sharpen the scissors correctly, slowly drive the blades along their entire length and only in one direction.
- Once you have sharpened them on the rough side of the stone, start sharpening on the other side. Do the same.
When finished sharpening, test the scissors on a piece of fabric. If they are well sharpened, then without problems they will evenly cut the material by weight.
Sharpening nail scissors: how to
To sharpen nail scissors correctly, you need to use a small bar with a fine grain.
 Give preference to grinding stones with diamond chips.
Manicure scissors can be sharpened in the same way as ordinary scissors. But this should be done as carefully as possible.
This is especially true for sharpening the inclination of the cutting chamfer, as it differs from others.
If you have blunt nail scissors with curved blades, it is easier to buy new ones.
The only thing that can be corrected in them is a bolt.
How to sharpen garden shears
To sharpen garden shears yourself, you need to disassemble them.
- Unroll them first. This will be required to sharpen the blades along the entire length.
- To sharpen the lower concave blade, use the whetstone the radius of which is not more than 3.5 cm.
All other actions are similar to those described above.
Quick Methods
In order not to waste time on parsing and turning the presented tool, you can use the following methods.
- Sandpaper. Find a small piece of this material, fold it in half with the rubbing side facing up. Start cutting the paper into about 15 strips. In the same way, you can use abrasive material on fabric, metal wool.
- Aluminium foil. Take a sheet up to 25 cm in size and fold it several times. Then start cutting it.
- Glass jar or bottle. If you want to sharpen small scissors, you can use the neck of a bottle. Place open scissors in the neck of the bottle and begin to carefully connect the rings.
- Cutting a sewing needle. It will help sharpen nail scissors.
How to use the tool correctly
In order for the presented tool to retain its sharpness for a long time, one should adhere to some recommendations.
- If you use scissors to cut fabric, then use the tool only for this purpose. No need then to cut fish, cardboard and other objects with them.
- Other scissors are used to cut zippers and metal threads.
- If you use them for cooking, plant care, and nails, disinfect them regularly.
The main thing - do not boil the scissors, but treat with a simple antiseptic. Otherwise, they will quickly become dull and rusty. Do not forget to lubricate them every six months.
Each master in his arsenal has a large number of tools that may be needed to create a beautiful manicure. The quality and duration of the work performed depends on how sharp a tool such as tweezers, scissors or tweezers is. In this article, we will consider how to sharpen nail clippers and other manicure tools at home.


Types of sharpening manicure tools
It should be noted that a newly purchased manicure tool must also be sharpened before being used for its intended purpose. Some, very expensive brands, can give a guarantee, and then for a while, to use the tool immediately after purchase. You can sharpen the wizard's tools in the following ways:
- An individual master is a sharpener who usually comes to the master’s house and sharpens manicure tools with the help of a diamond wheel;

- A certified specialist in the workshop, who can sharpen any tool at his workplace using a diamond wheel or special machines. But its difference from the usual master is the cost of the service, but on the other hand, the quality of the work. Workshops often give a guarantee of their work - about six months of tool life, regardless of the frequency of use);
- At home.
Tool sharpening at home
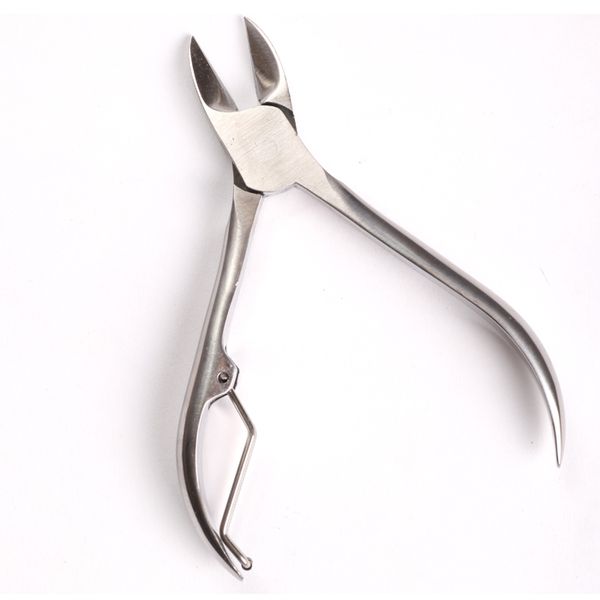
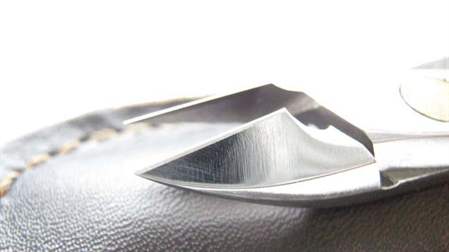
Unlike nail scissors, sharpening nippers is much more difficult due to their shape. Therefore, before you start sharpening the tweezers, you should unscrew them. As a rule, 90% of tweezers have backlash. Next, they begin to sharpen from the inside of the blade, and only then proceed to the outside.


After sharpening, we check the blades for the sharpness of the tweezers, you should not forget, be sure to grind those areas that will be in contact with the skin. How to check the sharpness of the blades at home? You can take a napkin or a plastic bag and bite it, the cut of sharp tweezers should be even.
At home, it will be easier to sharpen tweezers or any other manicure tool, provided that the following necessary materials are purchased:
- Machine with diamond wheels;

- Felt sheets or polishing wipes;

- Polishing stones 8 and 12 thousand grit;
- Grinding stone from 2 thousand grit;

- The machine can be replaced with a diamond needle with low abrasiveness.

Basic rules for sharpening tools
The quality of the work performed by hand-sharpened tools is directly affected by the sharpening of tweezers, scissors, wire cutters, etc. Therefore, you should follow the elementary rules that will help you sharpen the tool correctly:
- Before sharpening, all tools should be unscrewed. Firstly, it will eliminate possible breakdowns, and secondly, it will facilitate the work in the process of sharpening;
- The machine must be operated at minimum speed. The sharpening area should not exceed 0.3 mm, and only in one direction;
- In addition to polishing work, there must be grinding work;
- You should not try to use polishing stones with an abrasive less than recommended (less than 8 thousand grit), otherwise the tool will be irretrievably damaged;
- Do not forget that each tool that requires sharpness adjustment has its own sharpening angle. Therefore, when manually sharpening, this should be remembered, otherwise there is a possibility of spoiling the cutting function, or they will simply be poorly sharpened;
- In order not to spoil the tool, you should practice on a different type of tool, because there is a risk from the very first attempts to sharpen the tool badly;
- When using diamond wheels, you should be extremely careful when sharpening the corners of the tweezers, because there they are very thin, and accordingly it is easy to change the cutting edge;
- It is important to know and remember about your safety - be extremely careful and use safety aids such as a mask, goggles, gloves, etc.

Checking the work done
After sharpening at home and avoiding injury with further use of the tool, an analysis of the extended work should be carried out. What you should pay attention to:
- The edges of the tweezers should be smooth and even. It is equally important to check whether a gap has formed between the cutting edges;
- Tweezers should be carefully tugged in your hand to make sure that all the screws are in place and well fixed.

When sharpening a tool such as nail clippers, you can use ordinary sandpaper, but this sharpening procedure will have to be done much more often, although there is less effort. Sharpening a manicure tool at home, in principle, is not difficult, provided that the necessary material is at hand. Although, on the other hand, it’s better to turn to a specialist, and for six months forget that the tool should be sharpened.
Video on the topic of the article:
A manicure set is an essential companion of every self-respecting woman. He can insure in the most unforeseen situations. In this article, we will look at options for how you can quickly and without much difficulty make nail scissors no less sharp than when you bought it.
When your favorite nail scissors lose their former qualities and become dull, it becomes inconvenient to use them. They no longer cut the nail as perfectly as before, and can even cause microtrauma, as if by chewing on the nail. In this case, you can either throw away the old scissors and buy new ones, or try to correct the situation yourself and sharpen them with the help of improvised means.
What can be done
- Sandpaper works well for this case. It is better to choose one that has a large grain size. Having folded the sheet in half, you can start cutting it, while it is desirable that the blades touch the abrasive for the entire length. With each move, the scissors will become sharper. After finishing the sharpening, you need to wipe this manicure tool with a damp cloth to remove the microparticles remaining on it.
- Ordinary aluminum foil, which is sold everywhere, can also be used as an abrasive material. Having folded it in several layers, you can start cutting into strips. If a strong sharpening of the blades is required, then you need to make as many cuts as possible. After finishing work, you need to wipe the blades.
- A whetstone is perfect for this job. Its coarse-grained part is better suited to start turning when the blades are still very dull. After that, it is better to continue working with a fine-grained surface in order to finish grinding the scissors. Before grinding, you need to disassemble the manicure tool to make it more convenient to work. To do this, just unscrew the central screw and divide it into two halves. After that, you need to put one of the blades with the inner flat side (which is usually in contact with the other half of the scissors) on the touchstone. Next, you need to choose the right angle at which you want to sharpen the blade. A dozen repetitive movements will be enough to complete the job. To understand that the tool is sharp enough, you can mark the sharp parts of the blades with a felt-tip pen before sharpening. If after the procedure the marks are erased, then the scissors are sufficiently sharpened. The check can also be carried out on a piece of polyethylene, if they do not crumple it and cut it easily, then the cutting edges are sharp enough.
- You can use an old unnecessary glass jar for sharpening. To do this, holding the container with one hand, open and close the blades of the scissors with the other, pressing them tightly against the walls of the jar. Glass will make the blades sharper. After finishing the sharpening, do not forget to wipe them with a damp cloth to remove burrs.
- Use a pin or needle according to the same principle as described above. By moving the metal base of the pin between the interlocking blades, you can add sharpness to them with just a few strokes. In this case, you need to watch the blades so as not to get hurt.
- The presence of a diamond wheel will simplify the work at times. At the same time, the effect of its use remains for a long time. When working, you should take into account the shape of the tool, since manicure scissors often have semicircular blades, which requires attention to their processing. Without the skills to work with objects on the machine, it is better not to start it, as you can ruin the scissors by removing too much metal. For rounded blades, the edge of a whetstone with a radius close to the radius of the blade's curvature is ideal.
Many people do not hesitate to throw away scissors that have just become dull, but otherwise work properly. But they can be sharpened quite simply without resorting to the services of special workshops. Thus, having learned how to independently return the scissors to working condition, you can use them for a long time without buying new ones. At the same time, following the advice outlined in the article, you can return your favorite nail scissors to working condition, which you are used to and do not want to change.
Video: how to sharpen nail scissors at home