How to put a toilet in the country. How to build and where to put a wooden toilet on the site
We all love comfort in everyday life, but rarely when we get it just like that, without any effort. Someone pays for repairs in their home to "specialists", often getting hack-done work, and someone prefers to do everything with their own hands, which, without the proper approach, can also lead to problems.
At the same time, any path involves significant financial costs, and therefore the initially correctly chosen approach not only saves your nerves in the future, but also saves the family budget.
And if at the moment, most apartments are already equipped with all the necessary amenities, then at summer cottages, things are often somewhat worse, often people who come from the city to their dacha experience a number of inconveniences, and one of the most noticeable is the lack of a toilet.
In this article, I would like to tell you how you can make a toilet in the country with your own hands using relatively cheap materials. He will delve into the intricacies of this process, explain all the nuances and difficulties, because a toilet in the country with your own hands, a photo of which you will see in the article, is not a luxury at all, but a necessity.
So, how to build a toilet in the country with your own hands?
First of all, it is necessary to know about this process that the construction of such a structure nowadays requires more costs than before, unfortunately, it is connected not even with the trend of fashion, but with new sanitary requirements, which strictly indicate the need to preserve an ecologically clean environment.
At the same time, there is an acute issue of disposal of accumulated waste, because the need to regularly clean it from a simple toilet in the country can turn the life of any person into a nightmare. This problem will be helped by modern technologies, which have now become much cheaper and more accessible, which allows most people to use them on their sites.
Finally, here again the desire to create the most comfortable conditions for existence intervenes, few people will now be satisfied with a small rickety booth with a hole in the floor, which is understandable, because such structures do not at all improve summer cottage rest, and, moreover, spoil the view of the site as a whole.
In this regard, it becomes clear that an ideal toilet for a summer cottage should be safe for the environment, convenient in terms of waste disposal, comfortable to use and beautifully fitting in a summer cottage.

After defining the main task, it is necessary to solve a number of other important issues:
1. Based on the terrain conditions, determine how the wastewater will be discharged, where it will be discharged, and how it will be disposed of.
2. Find a suitable place in the summer cottage to install the toilet.
3. Make a choice of the preferred design solution - it can be a booth or a cabin.
4. Find a decorative design that would be optimally correlated in terms of the complexity of construction and appearance.
5. Determine the necessary for all expenses.
All these issues are largely interrelated, so they need to be addressed in an integrated manner, thinking about how to make a toilet in the country with your own hands. At the same time, when building a booth, you can afford more freedom, since only appearance and convenience depend on it, and the base is the most complex and expensive element here.

What to build a toilet from in the country?
In most cases, it is best to build a wooden toilet for a summer residence, this is due to the cheapness of this material, in addition, wood is very easy to process, it has good heat-resistant characteristics and, with a competent approach, does not cause any harm to a person. Proper processing can make it resistant to weather conditions and unsuitable for the development of any bacteria or insects on it.
In addition, a lightweight wooden structure allows you to save on the foundation, which in some cases may not be useful at all, because the size of the toilet in the country with your own hands can be small, in which case its cabin can simply be placed on reinforced concrete monoliths or bricks.

To build a simple toilet in the country with your own hands, you need to decide on the types of materials.
For the construction of the frame, an ordinary timber is often used, it is convenient to cover the floor and the toilet seat with a tongue-and-groove board, trimmed or tongue-and-groove boards are suitable for outer sheathing, and trimmed and uncut boards are well suited for roof sheathing.
In the construction of cladding, boards made of waterproof plywood or OSB can be effective, which can also be used to create battens for lathing. A good material can be a grooved board, which, at a slightly higher price, surpasses most other materials in its properties.
For curved sections, it is optimal to use a marine dinghy board, which, in addition to everything else, will last much longer in areas where precipitation is frequent, however, in comparison with sheet pile boards, it restrains gusts of wind worse.
Without exception, all wooden elements must be treated first against rot, and then against dampness. It is this sequence that is most correct, in which the boards will serve the longest.
Those parts of the toilet that will face inward (towards the cesspool and soil) must also be treated with bitumen mastic or hot bitumen.

What kind of toilet to build in the country?
Even if you decide to build a simple toilet in the country with your own hands, you must not forget about the importance of its appearance. There are a number of types of cabins, in the form of a house, hut, hut, birdhouse. Ultimately, you can always experiment with shapes, do something completely unusual, however, in my article I will focus on the basic options, without going into the area of complex design.
So, what is the difference between the listed types of cabins:
1. When building a hut, one must understand that it is strong, constructive, has good resistance to precipitation and wind, does not require large expenditures of materials, at the same time, it requires a lot of space and suffers from a number of inconveniences, primarily from cramped conditions. If you try to make it larger, then the benefits of saving materials are lost. The design itself is primitive, and may not suit some suburban areas.
2. In terms of the complexity of construction, a birdhouse is even simpler than a hut, it does not require large expenditures of materials and takes up minimal space. However, it has a weak structure, poor temperature retention, and is prone to drafts. Despite the disadvantages, such a design can be optimal if an outdoor toilet is supposed to be used for summer cottages.
3. In the construction of a house, you can achieve greater heat resistance and strength than a birdhouse. It also requires a little land and materials, but it is more difficult to install a water tank with it. This design allows the use of a wide variety of finishes and design elements.
4. The difficulty in erecting a hut is superior to other types of cabins, moreover, it requires a higher consumption of materials. At the same time, its faceted shape makes it possible to create very strong structures that are well protected from adverse climatic conditions. In terms of functionality and ergonomics, this is one of the best options. And the design possibilities are almost endless.
When the type is finally selected, it is necessary to determine the size of the toilet in the country.
For a birdhouse with a house, the ideal floor and toilet seat dimensions are at least 1.2 meters in width and 1.5 meters in depth. In the case of a hut and a hut, the depth can be left at the level of 1.5 meters, and the width can be taken in the region of 0.9 meters.
It is important that there is at least 40 centimeters of distance from the head of the person entering to the walls. In this case, the optimal ceiling height can be called a few meters. In general, when the question arises of how to build a toilet in the country, it is important to remember that many of its parameters will depend on your preferences. In this regard, the size of the toilet can be adjusted depending on your own height, etc.
Almost all of the types of cabins listed above suffer from a common disadvantage, namely, exposure to wind gusts if the toilet door is not closed. To combat this, you just need to install the door on the barn hinges. For more durable structures such as a hut, secret hinges can be used.

Where to put the toilet in the country?
You cannot think about how to make a simple toilet in the country without taking into account such important aspects as its location, especially if it involves the presence of a cesspool, the construction of which is prohibited if the groundwater is located at an elevation above 2.5 meters.
The choice of a site for construction should be based on a number of factors, such as the type of soil, the proposed foundation, distance from the house, etc. All these elements are closely related and require a serious approach, because not only convenience, but also safety for you and the environment depends on it.
There are strict sanitary standards that prohibit the location of structures of this kind at a distance closer than 12 meters from the nearest housing, and the distance from a water source must be at least 20 meters. In addition, it is important to remember about neighbors who are unlikely to approve of building a toilet right under their fence.
In order to build a toilet for the dacha yourself, you must first decide how far you are ready to walk, in some cases, moving the toilet away from the house only has a positive effect on the atmosphere of the summer cottage, and the proximity of the house to the cesspool can be completely unpleasant, for example, due to possible odors. At the same time, the location of the toilet should be accessible for the entrance of a sewage truck, because the maximum length of its hose is about 7 meters.
It is good if it is possible to install a toilet in an inconspicuous and secluded place, for example, in a garden, where trees block it from the general view. It is also important to remember that placing the toilet in a low-lying area can lead to faster filling of the cesspool, due to the fact that most of the rainfall will fall directly into it. And the location of such a structure at a height can make it susceptible to strong gusts of wind.
Once the location has been definitively needed to decide what type of cesspool is suitable for it.

Varieties of cesspools for a toilet in the country
In order to build a toilet in the country in stages, it is important to choose the right type of cesspool. They differ mainly in the degree of penetration of waste products into the ground, and are divided into sealed pits, as well as pits with a filter bottom.
Sealed pits are expensive due to the more frequent need to clean them. Pits with a filter bottom are cheaper, but they are fraught with environmental pollution, in addition, their use is not permissible from the point of view of sanitary standards.
There are different types of walls for cesspools, they can be monolithic, brick, plastic, and also consist of concrete rings. Each option has its own merits and demerits.
Brick cesspools cannot be called cheap, however, they are strong enough, they can be made quite deep, which reduces the need for frequent cleaning, they have a fairly good seal. It is possible to create both a sealed version and a design with a filtering bottom.
Plastic containers are quite inexpensive, however, due to their size, they will require more frequent cleaning, when creating a sealed structure, only the upper part is cut off the container, when creating a filter, the lower part is also cut off, while the bottom is covered with a filtering layer.
Constructions made of concrete rings cannot be airtight, because they easily move in the ground, their use is permissible only in those places where groundwater is located at a considerable depth. After filling the pit with rings, its bottom is either covered with a concrete screed or with a filter layer.
Monolithic concrete cesspools have good sealing, but due to the nature of their construction it can be difficult and expensive to make them too deep, and therefore, they will have to be cleaned often.
Speaking about cesspools, one would think that the construction of such structures is extremely difficult, below you will see how you can build a toilet in the country, photos, instructions, a description of the process.

Do-it-yourself toilet in the country in stages with a photo
Approaching the question of how to make a toilet in the country yourself thoroughly, we will take a relatively simple and comfortable design, accompanying its construction with photographs, because to build a toilet in the country with your own hands, drawings are not necessary, it is quite easy to do without them.
The foundation will be concrete pillars, for them we make holes of 130 millimeters by 0.8 meters. We insert pipes inside to the maximum possible depth (for example, old water pipes). After that, we fill everything with a solution using roofing material and sleeves.

The strapping will be a 100 by 100 beam, which we will screw to the corners.

Cover the floor and toilet seat with grooved boards. The design for the toilet seat itself is standard, nothing special, you can make it removable.

We make the racks from a bar 50 to 50.

The roof is made of planed boards 25 by 120, we add flat galvanized sheets to them, bending them along the edges at the back and front, from the sides we close the boards with a galvanized profile.

For the walls and the toilet seat, we take 9 millimeters of OSB, on the inside we cover them with varnish to reduce the risk of getting splinters, the toilet seat is also varnished.

The outer crate is made from a bar of 25 to 50, almost any will do, we put siding on top of it.


In the lower part around the perimeter of the structure, you can put some scraps from the corrugated board, this will help create the desired visual effect.

The threshold can be finished with zinc plating.

For the window at the entrance, you can use polycarbonate; to create ventilation, it is possible to allow small gaps.

The door is made from a sheet of OSB, 25 by 120 boards are applied from below and from above, a board is also placed on the outside, space is left for siding, you can fasten the boards to the OSB sheet with simple self-tapping screws. Siding is also attached to the structure with small screws.
I hope that a description of how to make a toilet for a summer cottage with your own hands, a step-by-step photo of this process, will inspire someone to new deeds in improving life comfort, because it is on such little things that you get full pleasure from a summer cottage.
Now you know how to make a toilet in the country, what difficulties this can be and what you need to consider.
Do-it-yourself toilet in the country. Video of the construction process.
What do you think appears at the summer cottage in the first place? You say, a house, a shed for tools, a bathhouse or planting? No, these are all secondary purposes, and the toilet is considered the most important. It is possible to do without all of the above amenities, but not without a toilet.
A toilet for a summer residence is an important building, but extremely simple. Anyone can easily cope with the installation of such a structure. Even if you have never encountered the construction process, you should not worry, the main thing is to do everything strictly according to the instructions.

In the photo of country toilets, put by your own hands, you will find a lot of ideas for construction.

Types of country toilets
In order to start building a toilet in the country, you need to decide on a system for collecting waste. By this criterion, toilets are distinguished with and without a cesspool.

If you do not know which option to choose, watch the video of making a suburban toilet with your own hands. Many indicate how to determine the level of occurrence of waters.


A toilet with a cesspool is possible only if the groundwater is not very close to the surface. The cesspool is dug into a depth of no more than 1 meter above the groundwater level.

The volume of the pit itself is determined depending on the number of people and the frequency of visits to the toilet. The pit shape is most often made round or square. Be sure to line the walls with something. The cesspool is provided with waterproofing.

Such a toilet must be equipped with a good ventilation system, as there will be an unpleasant smell from the cesspool. Most often, a cesspool is made directly under the house, such a system is most convenient for installation.

There is also a second option - a separate arrangement of a waste pit. This option is more expensive, but easy to use.

If there is no opportunity for digging a cesspool, then you should choose the option without it. There are several options for collecting waste. First, there are special powder closets. They represent the presence of a container under the toilet seat and another container.

The second contains sawdust, peat or ash, with which the waste is sprinkled. Thus, an ecological fertilizer is obtained. Here you only need to periodically change containers and find a sprinkler.

Secondly, specialized bio-toilets will do. Surely, many have seen such booths in cities. They work with a solution containing bacteria. They act on waste, recycle it and get the same fertilizer.

The third option is a chemical toilet. It is analogous to a bio-toilet, but here the role of bacteria is played by a chemical solution that recycles waste. However, such wastes are not used as fertilizers as they are hazardous to plants.

What you need to know about the location of the toilet
When building a toilet in the country, some mandatory rules must be followed. They relate to the distance from some objects and buildings.


This is especially important for pit latrines to prevent the possibility of contamination. Be sure to draw up a project of a country toilet with your own hands.

Any source of water, natural or artificial, should be located at least 25 meters from the toilet. In this case, it is necessary to take into account those that are in other areas.


The cellar is located no closer than 12 meters, a bathhouse, a shower - 8 meters. Outbuildings with animal habitation - 4 meters. Trees at a distance of 4 meters, shrubs at a distance of 1 meter.

Thus, it is necessary to arrange the toilet not only in the account with your site, but also taking into account the neighbor's. This way you can avoid problems that may arise with them and with the law. It is best to draw up drawings of the country toilet and its location.

DIY toilet house
The house can be made in different versions. But first of all, even before determining its appearance and materials, it is necessary to think over the size of the country toilet.

There is no standard size for this type of buildings; it is made depending on the wishes of the owners and their characteristics. It is quite clear that a large or tall person needs a large house that will correspond to his dimensions.

The dimensions have been determined, it's time to start installation. You can make a house from wood, metal profiles, slate, bricks and even concrete blocks. It is usually built from leftover building materials.


If it is wood, slate or profile, then a frame will be needed. A construction made of timber or metal will do.

In addition, you need to think about the roof. It is most often made single-pitched from the remnants of the roof; any material will do. Next, you should find a step-by-step instruction for making a country toilet with your own hands, in which the process will be described in detail.


Diy photo of a country toilet


Previously, there was complete certainty with dachas. If the owner was not a responsible leader or a member of a creative union with regalia and titles, then it was about a plot of 4 or 6 acres in a dacha cooperative and a small garden house "without amenities." And the country toilet in most cases was a "birdhouse" detached above the cesspool. And although such summer cottages exist and flourish now (in the spring and summer in the literal sense of the word), the summer resident is no longer the same - he prefers comfort and does not want to give up his habits even outside the city.

When the aesthetic component is higher than the functional Source ydachadacha.ru
Features of arranging a toilet in the country
Such an important aspect as the arrangement of a country toilet has a mandatory regulatory framework. Including an article in the Code of Administrative Violations, according to which the discharge of fresh sewage into compost or a well without a bottom is regarded as a fact of "spoilage of the earth" (as well as the use of a leaky cesspool).
According to the regulations, there are three ways to collect, neutralize and remove sewage in the country:
- local (local) treatment facilities;
- using cesspools;
- unanalyzed methods followed by composting.
We have already decided that the construction of a toilet in the country in a "classic" outbuilding is not practiced in a modern country house. As a result, all attention should be paid to the arrangement of a more civilized and modern organization of the "latrine".
A modern country toilet can be located both inside the house and on the street Source liveposts.ru
Popular solutions
The disadvantage of a separate cab, which is called “courtyard amenities”, is the seasonality of use. That is, you can use it in warm weather, but not with the onset of cold weather. And what about those cases when in late autumn and winter the cottage is used as a place for a weekend out-of-town rest - fishing, barbecue, etc.? Especially if the family is leaving - women and children. Therefore, for such summer cottages, a warm toilet is needed, which would be heated along with the house. And there are several such options:
- autonomous "winter" sewerage plus water supply;
- backlash closet;
- dry closet.
Autonomous sewerage
This type of "country toilet" has the same device schemes as in a country house of permanent residence. And to reduce the load on wastewater treatment plants, it is recommended to use the separation of effluents into "gray" and "black".
"Gray" drains are those that enter the sewer from the kitchen or bathroom, and "black" - from the toilet bowls.

A system without waste separation simplifies the organization of the country sewage system, but increases maintenance costs Source fmstroy.com
It is imperative to provide for the drainage of water from the system when the summer cottage is uninhabited in cold weather. And the most "problematic" part of this procedure is the water locks, from which the water will not leave by gravity. There is an option for maintaining the air temperature by the heating system at the level of +7 ° C - many modern gas and electric boilers have an anti-freeze function. But the disadvantages of such a system are obvious:
- large initial investment during the construction phase;
- significant costs for maintaining the system in working order;
- dependence on the stability of the power supply (in the absence of the owners, in the event of a network failure in winter, the system may freeze and the pipes may burst).
This option makes sense if the family's budget allows such expenses or the dacha is located close to the city and is often used (in the mode of a country house).
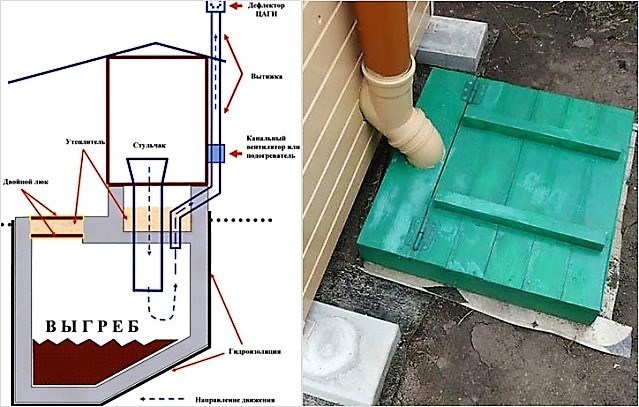
Backlash closet
In the classic version, not far from the wall of the house, behind which the bathroom is located (almost under it), there is a cesspool.

Scheme of a classic backlash closet when the chimney is next to the chimney in one channel. This increases cravings and improves washroom air quality Source pudymev.zebadu.ru.net
It is impossible to equip a backlash closet as a combined bathroom in a city apartment. In this case, a toilet with a flush and a water seal is rarely used - water in the "elbow" of the outlet plus an excess of liquid, which leads to unscheduled pumping. And the discharge from the washbasin and shower belongs to gray drains, and they can be discharged into a filter trench or a well with sand and gravel backfill. If we take into account that the smell is inherent in the backlash closet, then the "convenience" has to be divided for this reason as well.
Inside the dacha, it is better to separate such a toilet with a vestibule or corridor, and inside it is necessary to provide ventilation - a separate pipe (ventilation duct) for the pit and forced for the room, or install a window with a vent for ventilation. By the way, the window will also be a source of natural light, and to provide privacy, you can put frosted glass or install blinds.
On our website you can find contacts of construction companies that offer the service of assembling structures. You can communicate directly with representatives by visiting the Low-Rise Country exhibition of houses.
Video description
You can clearly see what a backlash closet is in the video:
There are certain guidelines for pit placement. It is better to place it on the north side of the house or in the shade of trees. And away from the front door, palisade, lawn for children, benches, gazebo and summer kitchen. Of course, the hatch of a classic cesspool should be airtight, but the process of pumping out the contents is not always neat.
Attention... The construction of a cesspool should be coordinated at the design stage of a toilet for a summer residence with the local authorities for the protection of groundwater and the sanitary and epidemiological service.
Water closet
This is a simplified version of "autonomous sewerage", but without wastewater treatment (the most expensive part of the system).
In a modern version, the cesspool is replaced by a large plastic container (up to 20 m3) with three holes (for the drain pipe, ventilation and pumping out) - a storage septic tank. Of course, a hole has to be dug here too, but it does not need to be built from prefabricated reinforced concrete rings or bricks, or concrete must be poured into the formwork for a monolithic structure. And then to equip the concrete floor on the ground, plus it is imperative to carry out reliable and complex waterproofing of the entire structure so that "black" drains do not fall into the ground, and vice versa - the seasonal top water does not fill the hole.

A modern storage septic tank is better than a cesspool Source kostromaterem.ru
The capacity of a septic tank cannot simply be buried in the ground - it must have a solid foundation so that it is in a stable position.
To reduce the disposable portion of water, you can use toilets with a tank capacity of 4 liters and an economy mode of 2 liters. And in this case, a 2 m³ tank will be able to withstand from 500 to 1000 flushes, which is quite enough for a month of permanent residence for a family of three (subject to separation of drains).
There remains only the problem of winter freezing of water in the water seal. There are two ways to solve this problem:
- fill in the "anti-freeze", which is used in cars for washing windows;
- pump out water with a syringe for technical fluids or to change oils (standard volume up to 0.5 l);

With such a syringe, you can pump out water from the water seal in several steps. Source chevpac.co.nz
For septic tanks with biological treatment of sewage, the use of "aggressive" liquids is undesirable. Although the volume is small, microorganisms that neutralize sewage will partially die.
Regardless of the method of arranging the cesspool, the inconvenience in maintenance is the same - you need to periodically call the sewer truck. And also provide for her entrance to the site and site at such a distance from the tank hatch that the suction sleeve reaches almost to the bottom of the pit.
Dry closet
There are several fundamentally different systems that can be combined under this name, but not all of them are suitable for giving.
- First "Dry" dry closet has been known for a long time - it is a powder closet.

The simplest powder closet Source pinterest.es
But if earlier craftsmen were looking for schemes for self-production, now it is much easier to choose a ready-made factory kit, and then buy consumables for it. The difference from the classic one is compactness, more "active" powder (which speeds up the composting of waste), a sealed cover, a separate pipe for removing gases released during the processing of feces, and almost complete absence of a "constant" smell.
This type of toilet is quite popular in summer cottages, since it does not require connection to the water supply and electricity, and as a result, you can get pure organic fertilizer at the exit.
The device is simple - a toilet seat, under it there is a storage for feces, which, as the toilet is used, are sprinkled with peat from a separate or upper container (such as a tank, but with a rotary handle).

Factory peat dry closet already with a chimney Source tvoysad.ru
In modern models, not just peat chips are used, but a mixture "enriched" with microorganisms. When the bottom tank is full, it is emptied into a compost pit, where fertilizer for the beds is formed in a couple of years.
There are two drawbacks - manual cleaning and "productivity". With a large number of visits, the peat may not always have time to absorb all the liquid - and although it is already quite clean after processing, it must be drained from the lower tank. Therefore, it is better to build a toilet of this design separately from the country house.
There are also two advantages - free fertilization and the absence of a cesspool.
Video description
See the video clearly about the choice of dry closets for a summer residence:
- Electric dry closets... In this species, as a result of work, the "waste products" are divided into two phases - liquid and solid. The liquid enters the evaporator, and the solid component is burned or dried to a "mummified" state and collected in a special container, which is emptied into a compost pit - and this needs to be done much less frequently than for a peat dry closet.
For normal operation, two conditions are necessary - the availability of electricity and the laying of a ventilation pipe from the "combustion chamber". There is only one drawback - high cost. But if you compare prices with designer models of conventional toilets, then they are not so significantly different.

The electric dry closet is the easiest to maintain and does not need any consumables Source septik.guru
- For chemical dry closets There are two types of reagents - formaldehyde and ammonium. The first, in fact, stops the biological decomposition of feces and "kills" the odor, but it is toxic. The second regent is used in septic tanks, and it processes wastewater without the presence of air, although with frequent use, the process simply does not have time to reach the formation of a compost mass.
Chemical dry closets are good only when there is a nearby company that serves them. The contents of the tank must be disposed of by their employees.

Chemical dry closets have portable models - they can be transported in the trunk of a car Source kekkila-magazin.ru
They also produce dry closets that work on preparations using special bacteria for processing sewage. But the microorganisms obtained as a result of genetic engineering and "grown" artificially do not create compost that would be suitable for fertilization. And they, together with their contents, must be handed over for recycling.
The procedure for installing a country toilet cubicle
The easiest way to build a toilet in a seasonal dacha is to buy a ready-made booth made of wood, profiled sheet or plastic.

Even inside a courtyard toilet, you can provide a modern level of comfort Source tech.pp.ru
Then there are two options for further actions: make a cesspool or install one of the models of the dry closet.
The cesspool can be of two types: concrete (or brick) and on the basis of a large capacity similar to a septic tank, but with its own "working" holes.
The classic cesspool, above which the cabin is located, is an anachronism, because there will always be a smell in the cabin. It is better in this case, too, to use a water closet scheme - with an airtight container and a toilet with a water seal. And at the dacha of seasonal residence, the tank can be connected to the summer water supply.

Ready-made models of toilet cubicles can be found for every taste Source megapolis-tula.ru
Conclusion - which is better to choose
Despite the abundance on the Internet of projects of country toilets with drawings of cabins for every taste, it is better to buy a ready-made one - the difference is small for money, especially considering the wholesale and retail prices for building materials. And if there is no model that would match your desires or landscape design, then there is also a custom-made service.
Everyone knows the catch phrase that the acquaintance with the theater begins with a hanger. We will not be mistaken if we say about the dacha that it begins with a toilet. By its appearance and structure, one can judge the owner. For a "rugged" owner, this building is beautiful and neat. There are no drafts and no unpleasant smell in it.
It will be useful for newcomers to dacha life to learn about how you can build an inexpensive and comfortable outdoor toilet with your own hands.
In this article, we will talk about the most common types of closet structures, their structure and consider the possibility of combining with other summer cottages.
According to the method of disposal of sewage, these structures are divided into three types:
- Powder closets;
- Toilets with a cesspool (septic tank);
- Water closets.
The first type of outdoor toilet is easy to set up and operate. Its main part is a seat (toilet seat), under which a removable container is installed. After each visit, a peat mixture is poured into it with a scoop, which absorbs liquid and unpleasant odors.

A stool with a sealed lid and a bucket of peat are all you need to equip an outdoor latrine
A significant drawback of this design is the small capacity of the bucket. For those who rarely visit the dacha, a powder closet is optimal. If you plan to spend weekends at your site or your family has more than three people, then you will often need to empty the container.
An improved version of the powder closet is a peat dry closet offered on the market today. It consists of a plastic case, inside which one or two containers are placed. A tank with a peat mixture and a dispenser is installed on top.

1, 2 - containers for solid fraction; 3 - funnel for liquid; 4 - funnel for solid fraction; 5 - a tank with a dispenser for peat; 6 - ventilation pipe; 7 - drainage tube
To eliminate unpleasant odors, the structure is equipped with an exhaust pipe, which is brought out to the roof of the booth. You don't have to empty containers in such a toilet more often than once a week. This is achieved by separating the liquid and solid fraction of the waste.
When using a dry closet, liquid enters a funnel located in the front of the case and is discharged through a tube into the ground or a plastic container located outside. Dense fractions of sewage accumulate in the inner container.

Dry closet in "combat position" and in the process of installation. In the first case, the tightness of the booth catches the eye, so we do not advise you to save on its area to the detriment of comfort.
Despite the advantages of a peat toilet over a classic powder closet (conversion of waste into fertilizer, good ventilation and an extended period of use), many summer residents choose the option with a cesspool (septic tank). Its device is cheaper than buying an "advanced" dry closet, and the frequency of cleaning is 1-2 times a year.
At the same time, one should remember about two serious problems that a cesspool can present to its owners in case of improper construction:
- Soil contamination with pathogenic bacteria;
- Bad smell.
It is not enough just to dig a large hole in the ground and place a closet box above it. The tank with sewage must be reliably isolated from the ground. A concrete tank treated with a waterproofing impregnation is best suited for this purpose.
The second condition is the introduction of special bacteria into the cesspool. They quickly decompose impurities, disinfect them and eliminate odors. Dry concentrates of bacteria for septic tanks and cesspools can be bought today in any household supermarket.
The design of the backlash closet (air toilet) cannot be called too complicated. Its main part is a concrete pit with a hole. A booth is installed on it. To eliminate unpleasant odors, an exhaust pipe is placed on its back wall. Its lower end is in the pit, and the upper one rises above the roof. Due to the height difference, thrust is generated. Air from the booth is sucked into the pit and discharged into the atmosphere through a pipe.
Backlash closet design diagram
Another popular option for a summer cottage is a water closet. Its main part is the well-known toilet bowl with a cistern. There is a water lock in it, which excludes the possibility of smell coming out of the pit into the booth. Unfortunately, it is impossible to use such a system without heating, since in winter the water in the toilet bowl and cistern freezes. Therefore, this design is designed for the warm season.

Drawing of a street water closet
With the onset of warm days, the container on the roof of the booth is filled with water. The branch duct is connected to through a tee equipped with a vertical ventilation pipe.
Options for toilet street stalls
You can build a toilet cubicle from different materials. Most often, the basis of the structure is a wooden frame sheathed with OSB, tongue-and-groove boards, plywood or siding.

The toilet, lined with a planed board, looks neat and cozy
Moving away from the use of the frame and sheathing, the house can be folded out, thereby creating a picturesque imitation of a log house.

Lovers of natural wood can also be advised to use a blockhouse for cladding. It is cheaper than a massive log and can be easily mounted on a frame. The walls of the toilet, lined with herringbone wooden clapboard, look no less attractive.

Many owners of summer cottages are not satisfied with the rustic look of the "birdhouse" toilet. Striving for originality, they erect luxurious log mansions on the sites for "solitary contemplation."

Bricks and blocks are still very popular as materials for the construction of latrines. Whatever one may say, but the capital structure will stand for more than a dozen years. Neither dampness, nor wind, nor sun will damage it.

If there was no facing brick at hand, then the walls can be built from the remains of red and silicate. High-quality plaster will hide the unevenness of the masonry.

A booth, built of different-sized bricks, awaits plastering
You can use translucent polycarbonate for cladding the booth made of metal profiles. This material looks very aesthetically pleasing and is not afraid of moisture.

Sheeting is a practical and durable material for toilet cubicles. It can be placed on either a wooden or a steel frame. The only condition is the inner lining of the walls with insulation. Without this addition, there will be a hot “oven” in summer and a freezer in winter.

Interior decoration of the booth with plastic clapboard - laconic and hygienic
Straw blocks can be classified as unusual materials used for the construction of latrines. The cabin built from them is warm and cozy. Anyone who wants to impress the imagination of neighbors and guests does not go to the construction base for materials. Having collected a certain number of empty bottles, he builds out of them a toilet "to everyone's surprise."

In addition to rectangular and rounded structures, "huts" of various sizes are very popular.
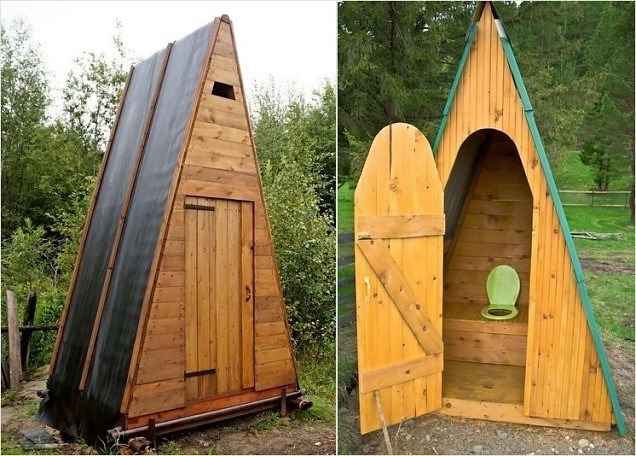
There are two rational seeds in such a solution:
- Steep roof slopes replace walls;
- The unusual appearance of the building adorns the landscape.
Very often the toilet becomes part of the utility block. This solution allows you to place several rooms in one building. As a result, savings in construction are achieved (common walls) and the comfort of use is increased (a warm toilet is always at hand).

A solid toilet / shower combination lined with siding and covered with a four-pitched bituminous roof

Option of a brick toilet interlocked with a shower

Aesthetically, it is not very successful combination in one outbuilding (toilet-shower) of a log cabin and a roof made of plastic slate

Some owners combine two toilets in the building: “for gentlemen and ladies”.
How to build a simple toilet for a summer residence yourself?
Having decided on the waste disposal system (powder closet, cesspool, septic tank), you can start construction.
Minimum internal dimensions of the booth- width 1 meter, depth 1.4 meters and height 2.0 meters.
The basis of the structure, the step-by-step construction of which we will consider, is a wooden frame made from an antiseptic bursa. It can be placed on a block foundation or on a shallow concrete "tape". A thick plywood sheet or OSB board with a rectangular hole cut into it is attached to the top of the frame.

Having assembled the base, the vertical racks of the frame and the strapping bars are set in level.

Having made the frame, it is sheathed with plywood using a jigsaw and a screwdriver.

The next step is to install the roof rafters. They are made from dry timber with a section of 5x10 cm, cutting it into the upper belt of the wall trim. In the upper part, the bars are connected to a horizontal ridge board.

Having completed this stage, the rafters are sheathed with plywood. This is the best base for shingles that will fit on the roof.

Having finished with the roof, proceed to the assembly of the "podium" frame. It will contain a storage container for the "powder closet" and an opening for a seat with a cover.

The toilet door is assembled from a grooved board, fastened with transverse strips for greater rigidity.

After tying the doorway with a bar, the door leaf is attached to it with the help of hinges. Finishing operation - painting the closet booth outside and inside.

In conclusion, we will say that we considered the option of building a summer outdoor toilet. For the winter season, the walls must be insulated from the inside with polystyrene (mineral slab) and sheathed with any sheet material (plywood, OSB, board, plastic).
If you decide to bring light into the booth, then along the way you can increase the comfort of use with minimal costs. Install an electric fan heater. In just a few minutes, it will warm up the air to above-zero temperature.
Country toilet do it yourself
Even if there is no house or gazebo in the suburban area, then without a solid, neat toilet any rest will not be a joy. And although usually the toilet is located in the farthest corner somewhere on the edge of the site, it must be made stylish and comfortable. We will tell you how to build a toilet with your own hands and present to your attention detailed drawings of the most popular designs. With their help, you can quickly install the toilet you like, avoiding mistakes in construction.
Drawings and dimensions for the construction of a wooden toilet
The most common, one might say, standard option in the country is toilet in the form of a wooden house with a cesspool... Recently appeared dry closets or peat toilets make it possible to do without a cesspool, but in any case, a booth will have to be built.
If you want to create your own, original design, then it is best to use a personally-designed drawing of a toilet with dimensions to determine the required amount of material. Otherwise, you can use a typical project.
Developing a drawing of a country toilet, start by designing the frame... In doing so, indicate dimensions buildings, mark, how much and what materials will be needed, indicate the required section of timber and planks.
Remember that , that on the drawing of a wooden toilet, it is necessary to indicate a cutting pattern for the facing material. As a rule, the calculation of its amount is done for the front, rear and one of the side walls due to the symmetry of the structure.Then add the required amount of building material for the other side.
When developing a toilet drawing, do not forget that the front side should be higher than the back walls to create the required slope.
If you plan to have a wooden ceiling, make the necessary calculations in your plan, additionally indicate the dimensions of the roofing sheet. At the end of the work, make a final estimate of the required materials.
As an example, look at the finished drawing of the toilet and familiarize yourself with the features of its design.
- For the frame is used timber 100 x 100 mm or 150 x 150 mm and edged board with a thickness of at least 20 mm.
- The height of the toilet should not be less than 2 meters, with a width of 1.2 meters. The exact dimensions can be found by examining the drawing of the toilet for the dacha.
- Front and rear wall of the booth - rectangular, and lateral - trapezoidal, which allows you to achieve the required roof slope.
- For daylight penetration and quality exhaust ventilation a window is cut in one of the side walls.
- Floor slab done boards 50 mm thick and sewn up sheet OSB.
- It is installed on base from a bar with a section of 150x150 mm connected by nails. To increase the strength of the runners, their joints are made "in a groove" 50 mm deep.
- Do-it-yourself drawings for the construction of a toilet in the country indicate required door dimensions 1950x705 mm... For its manufacture, an edged OSB board and plates.
- As you can see, for roof constructions , with a step of 400 mm are installed rafters from boards 100 x 50 mm... Their connection to the frame with nails is provided. As a roof, profile sheets or slate are used.
The ready-made drawing of a wooden toilet taken as a basis, which can be used for a summer residence, can be modified to suit your conditions. In this case, it is important to observe the necessary proportions. Keep in mind that an increase in size will entail additional costs for the purchase of material.
Drawings of country toilets of the "birdhouse" type
Regardless of whether you will use a chemical, peat dry closet or a cesspool design, you will need booth... We bring to your attention drawing of a wooden toilet "birdhouse" .
To make the frame of the base and floor, you will need larch boards and beams, and pine lumber can be put on the walls, doors and ceilings.

It is necessary to build a toilet with your own hands from the assembly of the frame, drawings of which are made on a separate sheet.
Remember that this will determine how smooth and neat the country toilet will be, so strictly observe the dimensions and study the drawings in the most careful way.
After making the frame start covering the structure with boards and door installation... At the final stage, roof and outdoor work... The house itself can be painted with oil paints or varnishes, and the floor and base additionally need to be treated with an antiseptic.
You can build a toilet in the country with your own hands, the drawings that we offer have been checked in more than one area. We will only show you some of the nuances of its installation.
If you are going to use a peat or dry closet, then the house can be installed on a crushed stone pillow. To do this, soil up to 20 cm deep is removed along the perimeter and covered with crushed stone or broken brick. Anchoring the toilet to the base is not required.
Drawing of a country toilet Drawings and dimensions of a country toilet
The basis is a bar with a section of 150 × 150, treated with an antiseptic.
In the case of installing a "birdhouse" with a cesspool, you will need a foundation of concrete blocks 200 x 200 x 400 mm or an overlap of two borders.
For the roof, a sheet of metal profile is used, as a ridge - a bent strip of galvanized steel.
A country toilet can be built with your own hands over the weekend, since the drawings presented by us contain dimensions that have been tested in practice. Moreover, the quality of such a structure will be much higher than that of a purchased product.
Drawings of country toilets of the "hut" type
A country toilet of the "hut" type with your own hands is not difficult at all. The drawings and assembly diagrams presented below will help you create a structure as soon as possible.
Work should start with assemblies of the front and rear walls ... For this you will need edged pine board with a thickness of at least 30 mm... You can fasten the structure with both nails and self-tapping screws.
Installing transverse , longitudinal and spacer beams, start assembling the toilet with your own hands (see drawings). After that, install the pedestal cross member, securing it to the rear wall and the spacer beam.
Having assembled the frame, sew up the base of the floor and the platform with boards ... On the floor, it is better to use hardwood boards up to 50 mm thick. After that, proceed with the sheathing of the slopes. For them, you can use a 20x100 mm edged board.
Toilet front wall Toilet front wall Toilet rear wall Toilet back wall Toilet frame without flooring
General view of the frame Sheathing Sheathing Toilet plan: side view Toilet plan: front view
When installing a "hut" type toilet, pay attention to the drawings of the back wall. It is there that a ventilation box must be installed during cladding.
At the last stage, they collect and hang the door. .
The toilet "hut", the drawings of which we recommend to use in our work, can be assembled by one person in one or two days. Do not forget to protect the wood of the house with paint or varnish, and additionally treat the base of the floor with an antiseptic.
Choosing a material for a country toilet
Most often, in suburban areas, they install wooden toilet structures... This is due to the simplicity of their construction, the availability and cheapness of the material. However, even wood treated with antiseptics rots and collapses over time, so such toilets are very short-lived. If the drawing of the country toilet was made by an amateur, then this process can go even faster in the event of an incorrect construction of the base of the floor or errors in the arrangement of the roof.
The most durable is considered brick toilet, which is quite easy to build with your own hands, you can not look for drawings. Important is correct mark the base, build a foundation and keep the walls vertical... This is the only way to hope for the sufficient strength of the structure.
No less reliable is metal country toilet , whose drawings and dimensions are not a problem in the age of information technology. But for its construction, you will need a welding machine and the ability to handle it. Despite this, such structures are very simple to manufacture, therefore they are successfully used in many summer cottages.
Toilet placement requirements
When installing the toilet, approach the issue of its placement in the most careful way. Here a few recommendations :
- The building should not interfere with neighbors, so be sure to indent 1-1.5 meters from the fence and install the house with a door towards your yard.
- Consider the depth of the aquifer when setting up a cesspool.
- Be sure to provide access roads for the sewer truck.
- Do not build a toilet in the lowlands, as it will be flooded during the flood.
- Consider the prevailing wind direction in your area.
Having listened to these tips and additionally studied and fulfilled the sanitary and hygienic requirements, you will not have to move the toilet to a new place after a short time.
Construction of pits for sewage at the country toilet
All toilet cesspools are divided into two types: drainage pits and sealed ones. The first type is much simpler and cheaper, but with a high location of groundwater it can pollute it and therefore is prohibited by current regulations.
Sealed pits have no installation restrictions.
You can build a pit for sewage in one of the following ways:
- Brickwork.
- Polymer tanks.
- Reinforced concrete rings.
- Concrete, poured with lathing.
To build a country toilet with a sealed pit made of brickwork, reinforced concrete rings or with concrete walls, they dig a pit with dimensions corresponding to those that are applied by making drawings with their own hands. After that, the bottom of the pit is compacted and covered with a layer of sand.
Next, concrete is poured, and after it has hardened, depending on the type of walls, they are laid out of bricks, reinforced concrete rings are installed or a crate is installed and poured with concrete. Further, the walls need to be plastered and processed together with the bottom with bitumen mastic. Please note that the walls should rise above the surface of the site by at least 16 cm.
The same pit from any of the above-described capital walls can be built with a filter bottom. For this, it is not concreted, but covered with a 30 cm layer of crushed stone or broken brick. It should be noted that the walls of such a pit do not need plastering and bitumen treatment. This design contributes to the absorption of the liquid fraction into the soil, therefore, such a pit will have to be cleaned much less often.
Installation of a plastic container in a pit prevents the ingress of fecal matter into the ground, therefore, it is allowed by sanitary and hygienic standards for use in any territory.
How to put a wooden toilet in place
In this chapter, we will talk about how to build a toilet, the drawing of which is given below. We present the complete instructions for its construction:
Assembly drawing Drawing of the frame Drawings of the frame parts
- Set the foundation ... For this purpose, it is not required to pour a concrete base, it is enough to dig in concrete wall blocks or pillars around the perimeter of the building.
- From a wooden beam 50x50 mm or 80x80 mm, put together a frame ... In the same capacity, you can use shaped metal pipes. The frame must have four vertical supports.
- Longitudinal elements are installed as roof trim protruding at least 30 cm beyond the perimeter of the house.
Grinding the floor Cut out and knock down the beams Fastening the seam with a hairpin
Fastening the floor with a bracket We nail down the block house Fastening the door frame with a hairpin
- To strap the base, fasten the four strips at the level of the toilet seat. ... In this case, be sure to take into account your height for the convenience of using the toilet. Usually the height of the toilet seat is set no more than 40 cm from the finished floor.
- Next, install the jibs along the diagonal of the rear and side walls. .
Diagonal spacers
- Add two vertical supports to install the door no more than 190 cm high, connected at the top with a lintel.
- Sheathe the frame with wooden planks , corrugated board, slate, etc.
- Make a door on the back wall for the convenience of emptying the waste container. You can make a cutout along the entire width of the wall to the height of the toilet seat, securing it with hinges.
- Covering the roof, seal it with roofing felt or another moisture barrier in the case of wooden boards. It is still better to use slate or metal profile sheet.
We fill the crate We fix the ondulin
- Install a ventilation pipe if necessary by cutting a hole in the toilet seat and roof. Be sure to seal all gaps.
- Hang the door ... Remember to equip it with a latch or hook. Make a window in the door for natural light.
Curtains Window Washroom ready
Handle and bolt Lavatory side view Lavatory rear view
Don't forget to paint the toilet to protect it from the weather. If you are installing a metal frame, then it is covered with a protective layer before sheathing.
Country powder closet
In the case when your site is located in an area with a high groundwater table, it will not be possible to equip a cesspool - this is prohibited by sanitation standards. Drawings will help to get out of this situation, with the help of which you can build an eco-friendly country toilet - a powder closet with your own hands.
Its design provides a container for collecting sewage, which after each visit is "powdered" with a layer of peat or sawdust. After filling the sewer tank, its contents are dumped into a compost heap, and then used as fertilizer.
Despite the fact that the powder closet can be installed even in a country house, the structure is quite laborious to maintain, therefore it is used only as a temporary solution to the problem.
Backlash closet for summer cottages
You can build a backlash-closet toilet in the country house next to the house (see drawing) or even in a specially designated room inside. However, first familiarize yourself with its main feature - since the cesspool is outside, in the winter, using the toilet becomes problematic, so the sewer is made heated.
Sometimes, in order to avoid spending on heating, such a toilet is used only in the warm season, completely cleaning the pit before the onset of cold weather. In this case, in winter, they resort to using a powder closet or dry closets.
So, consider the drawing of a country toilet and familiarize yourself with the features of its design:
- Cesspool - only hermetic type, with an electric heating circuit in the walls.
- Required availability chimney ... Ventilation can be carried out through a stove or fireplace. Sometimes the pit is heated with warm air from the stove heating of the dacha.
- Above the cesspool settles double structure hatch or cover with intermediate insulation.
- Mandatory requirement is presence of a slope in the bottom of the pit away from the house.
Despite the obvious convenience of using backlash closets, they are not widely used, since they require additional costs for heating the pit in the winter.
Before you start building a toilet in the country, look at the photos and drawings of existing structures. Perhaps you just want to repeat one of them, or maybe take the most original ideas in order to create a toilet stall of your own design.

