How to properly glue a suspended ceiling. Ceiling tiles: how to glue in different ways
Ceiling tiles can be seen in many apartments and houses. She is the most affordable and simple finishing method. How to glue ceiling tiles, what kind of glue to do it - we will talk about this today.
What is this article about
What is ceiling tile
Ceiling tiles are a very common method for cladding ceilings in residential and public spaces, offices and retail outlets. Typically, polystyrene products are used for these purposes. They are available in square or rectangular shapes with 90 ° angles. Polystyrene (aka polystyrene) is very easy to install, it tolerates moisture well, and is environmentally friendly. Plates of this material can be smooth or with a relief pattern. On some examples, the front surface is finished with a film with the texture and color of fabric, natural wood or stone. The edges of the tiles may have bevels.
Different models of products have different properties and require special care methods. Tiles with a film can be washed well with water, without a film they can be cleaned with a vacuum cleaner or a dry cloth. Expanded polystyrene products are available in several versions. They differ in manufacturing methods and appearance. Ceiling tiles can be:
- pressed;
- extruded;
- injection.
Pressed tiles are made from block polystyrene. In its manufacture, the stamping method is used. The thickness of the finished product is 6-8 mm. Extruded ceiling materials are produced by pressing from polystyrene strips. They have a glossy smooth surface. The colors of the products imitate natural wood shades, marble and stone colors. Injection products are manufactured by sintering raw materials. They have a regular shape and a deep pattern on their surface. The thickness of such tiles is 9-14 mm.

In order for the gluing of the ceiling tile to occur efficiently and quickly, when buying material, you need to pay special attention to its size. The form must be absolutely correct. Any deviation from it is a product defect. It is impossible to glue tiles with defects correctly. There will certainly be gaps between the individual elements, which will have to be covered up, and this will lead to additional costs and damage the aesthetic appearance of the ceiling. The individual grains of the material must be the same size. The smaller they are, the higher the quality. The edges of the tiles must not crumble. If you take a quality product by the corner and lift it, it shouldn't break. No cuts or dents are allowed on the surface of the drawing.
Calculation of the amount of material
How to stick the tiles to the ceiling correctly? To do this, you need to calculate the required number. In a rectangular or square room, this is quite easy to do, more difficult in a room with an irregular ceiling. For calculations, you need to prepare:
- paper;
- pencil;
- tape measure.
When performing calculations, you should remember this rule: we glue the ceiling tiles from the center of the ceiling to its edges. On paper, you need to outline the location of each tile. It should be borne in mind that the rows of material can also be located diagonally. The side of the tile is usually 50 cm. Sometimes other sizes can be found. It is quite easy to count the whole tiles. It is more difficult with trimming near the wall rows, especially when you have to combine the elements of the picture. In order not to make a mistake when buying, it is better to take the number of tiles by 10 percent more than the norm. With the cheapness of the material, this will not be very noticeable.
Choosing an adhesive for the job
Many apartment and house owners believe that ceiling coverings can be mounted using any adhesive. It is possible to attach the tiles to the ceiling with good quality only with good glue. Manufacturers of cladding products have long developed special formulations for gluing various materials. There is an adhesive composition for different types of polystyrene ceiling products. What kind of glue to glue the ceiling tile, how to choose it correctly? To choose, you need to know some indicators:
- the adhesive should fix the finishing material with the base so that later you do not have to redo the work;
- the tile should stick quickly;
- the consumption of glue should be quite reasonable: the higher the adhesion, the lower the consumption;
- the adhesive must be well applied in both very thin and thick layers.

There is a tile adhesive with minimal consumption. It is based on liquid rubber. Any adhesive should be applied to the surface of the facing material and dried slightly. Many people use the following formulations:
- Eco-Set;
- "Titanium";
- "Moment";
- "Liquid Nails".
These compounds adhere the tiles to the ceiling well and quickly. It just needs to be pressed and held for a few seconds. The glued tile material adheres very firmly. "Eco-set" and "Titan" adhere well to tiles made of PVC and other materials, but they dry for a very long time. Better to use the domestic "Moment". It dries up in a few seconds. The same can be said about Liquid Nails glue.
How to properly glue the ceiling tiles? The surface of the ceiling must be prepared. The quality and speed of cladding installation depends on the quality of preparation. The old coating must be completely cleaned off. If the ceiling was covered with wallpaper, it must be removed without fail. From a surface covered with lime, its layer must be completely washed off. You can only leave a layer of paint if it does not peel off. If the paint cracks, it is also removed completely with a spatula. The ceiling has been cleaned. Now it needs to be primed. It is better to use a deep penetration primer for this operation. The primed surface dries for at least a day. You cannot work at this time.

The dried ceiling should be carefully examined again. If dark spots, various depressions are found, then the ceiling should be putty. After the putty has dried, apply another layer of primer and dry again. A day after that, they begin to install the tiles.
Bonding tiles
How to glue tiles to the ceiling? First, let's prepare the required tool:
- roulette;
- building level;
- pencil;
- painting cord;
- sharp knife;
- ruler;
- high table;
- brush;
- putty knife;
- glue.

The tools are ready. How to glue ceiling tiles with your own hands? It is necessary to make markings on the prepared surface of the ceiling. Laying is usually done from the center. To determine it, you need to stretch the cord from corner to corner diagonally. The intersection of the two cords will be the center of the room. There is often a chandelier hanging in this place. If so, then the corners of the tiles need to be cut off a little. This place will later be closed with a figured glass, which is found on each chandelier. 4 elements are greased with glue and applied alternately to the ceiling. Then other tiles are attached to them. They will have to be cut at the wall. This is done with a sharp knife along a ruler. The cut piece of tile is placed against the wall.
You can glue the tiles to the ceiling in another way. Work begins from the wall opposite the door. Glue is applied to several sheets of material and kept for some time. This time is indicated on the package. Then the tiles are glued one after another to the base. Ceiling skirting boards are attached last.
Other mounting methods
How to glue ceiling tiles in other ways? You can combine colors. The most common options: intersecting or parallel diagonals of different colors, a snake, gluing panels of different colors in the center of the ceiling or around its perimeter, gluing the ceiling with dark and light tiles in a checkerboard pattern.

How to glue a foam ceiling tile? You can glue it directly onto the whitewash:
- on the primer;
- over a partially scraped ceiling.
The old whitewash on the ceiling is primed. It adheres well to the base. After it has completely dried, the foam tile should be glued. You can partially scrape off the whitewash with a spatula. Then apply a layer of glue to the product and glue the tile, holding it with your hands for several minutes.
Conclusion on the topic
Renovating ceiling coverings is difficult. You can use different facing materials: suspended and tension structures, panels made of mirror panels of different shapes. But the most common finishing material is foam ceiling tiles, how to glue and different ways of placing it on the ceiling were discussed above. The matter of choosing each individual owner is how to glue the ceiling tiles. This business also depends on the financial capabilities of the family. The tiled ceiling in the apartment is a decoration of the house. Ceiling tiles can only be properly glued onto a specially prepared base. Foam tiles only adhere well on a flat surface.
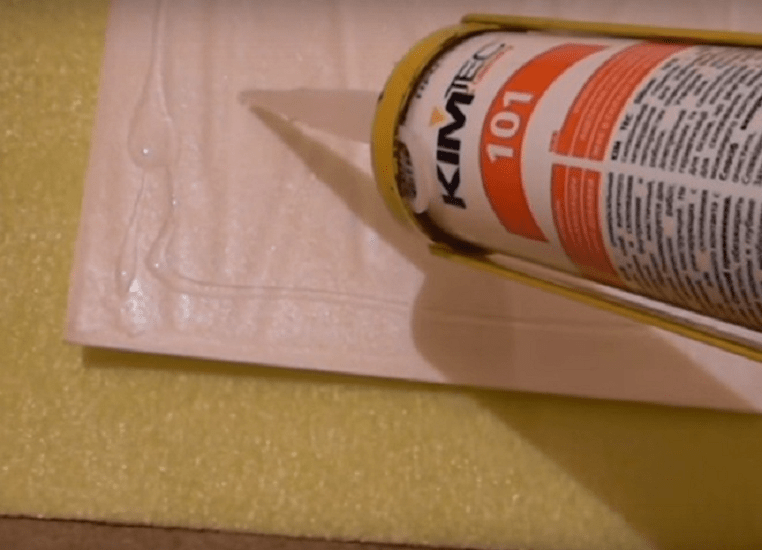
How to glue ceiling tiles - this question worries many. It is a very lightweight material that does not weigh down the ceiling structure. When to stick the tiles on the ceiling: before wallpapering the walls or after? This is also a challenge for many. The glued ceiling will not do any damage to the walls. Therefore, it is better to start repairs with it. We also learned how to properly glue the ceiling tiles and what kind of glue to use. It remains to prepare tools, materials and start repairs. After installing the tiles, you will not have any questions about how to glue the tiles to the ceiling. A white sealant can be used to seal the joints if the tiles are white. And the main thing is that you can do everything yourself.
Today, expanded polystyrene, or plastic tiles for pasting the ceiling is perhaps the most common material. It is inexpensive, easy to stick, easy to maintain, and modern manufacturers offer such a wide selection of tile designs that you can easily transform your room into something that your fantasy tells you with its help.
Everyone who decides to repair the ceiling with tiles wants to approach this work not only individually, but also responsibly. You will need to learn a few features of choosing the right tile, the rules for preparatory work and other interesting information.
First of all, let's look at what types of tiles there are in order to accurately choose the one that suits you best.
Choosing a ceiling tile: types and their features
Expanded polystyrene tiles for the ceiling are of several varieties, and each differs in both appearance and production method:
- Pressed tiles are made by stamping from polystyrene blocks; the minimum thickness of the slab is 6 mm, the maximum is 8 mm;
- Extruded blocks, which are produced from a strip of polystyrene by pressing, have a smooth glossy surface, imitate natural materials - marble, stone, wood;
- Injection tiles are produced by sintering raw materials, have the correct shape, deep pattern; plate thickness from 9 to 14 mm.
In order to properly glue the tiles to, pay special attention to the physical, and especially the geometric parameters of the product when buying.
For example, you opted for a square tile. All corners of the element must be absolutely right, that is, equal to 90 degrees. Any deviation, even the slightest, in the process of work will lead to the formation of uneven seams, and this will entail additional material costs and an unaesthetic appearance of the ceiling. The corners of the tiles must not be rounded or rounded off under any circumstances.
It is also very important to take into account the material from which the ceiling tile is made. Make sure that the edges of the polystyrene tiles do not crumble, and that the grains are the same size among themselves. The best quality is considered to be fine-grained tiles.
A polystyrene foam plate, if it is of good quality, will not break under its own weight when you hold it around the corner. The pattern must be clear and uniform throughout the package. Any flaws, dents and deformations are strictly not allowed.
Ceiling tile adhesive: the right choice is the key to success
Have you ever thought about how important it is to choose the right one for a given job? Many people mistakenly believe that "glue is also glue in Africa," and whatever you take it will still stick to glory. True, then you have to redo the repairs again, spending even more money and time on it.
It is not in vain that manufacturers of construction and repair materials have been distributing adhesives according to a narrow specialization for many years. It can be considered a marketing ploy that there are a huge variety of types of glue for the same ceiling tile on store shelves. But the fact is obvious: with glue for pressed tiles, you are unlikely to properly attach injection tiles to the ceiling. What features should be considered in order to choose the right option?
- First, the adhesive should provide your ceiling covering with many years of service without the need to modify individual elements from time to time.
- Secondly, the glue must have high bonding properties to ensure ease of use. Working with a ceiling is much more difficult than working with a floor or even a wall, so it is important to attach each tile to the surface as quickly as possible.
- Thirdly, it is very important to take into account the consumption of glue. The higher the level of adhesion of the substance, the less you will use it, saving significantly on materials.
- Fourthly, the glue should adhere equally well to the surface in both small and large layers. This is due to the fact that in many houses the floors are uneven, which creates differences between the slabs of about 2 cm. In such cases, more glue may be needed so that the tiles do not fall off. You can pre-align the ceiling, but this is a time consuming and expensive procedure.
First you need to determine how many tiles you need for the entire ceiling area. The calculation is quite simple: you need the ceiling area and the exact size of each plate. The standard ceiling tile size is 50 X 50 cm.
It may turn out that the dimensions of the ceiling and sides of the tiles are not multiples. This will lead to gaps at the edges. For this particular case, experts recommend buying 10-15% more tiles than with a preliminary calculation. This will also insure you against rejection or pruning errors.
For your information: you can save a lot on glue if you choose a liquid rubber based product - its consumption is much lower. In order for the fixation to be strong, let the glue applied to the tile dry a little.
How to glue ceiling tiles correctly: we describe the workflow step by step
Glueing the ceiling tiles with your own hands is not a difficult task, and therefore many do this work themselves. Beginners will definitely need our advice.
- First of all, you need to mark the center of the area to be trimmed. Pull two strands in from the diagonal corners. The intersection of the threads will be the very center.
- You can start work from, taking its location as the center. You will need to cut the corners of the plates at the docking point at the wire. At the end of the work, you will close this gap with a curly glass attached to the chandelier rod.
- The fastest and easiest way is to stick the tiles from the wall row by row. If you have chosen this option, then take into account one nuance: you need to lay the first row against the wall opposite the front door or window. Thus, the gaps closed by partial fragments will not be visible. Carefully cut off the shims along the edges of the tile before gluing it. Thus, you get a seamless ceiling tile with a perfectly flat surface.
- Do not forget to observe the symmetry of the pattern at the joints of the elements. Any deviation can disrupt the entire finish.
There are several options for placing tiles on the ceiling in relation to the walls in the room. Most often, parallel and diagonal arrangement is used. Tiles can be monochromatic, colored and combined. For the combined option, there are the following location methods:
- Snake;
- Alternating diagonals;
- Intersecting diagonals;
- In the center of the ceiling;
- Along the perimeter of the ceiling;
- Staggered.
After all the work is completed, install around the perimeter of the ceiling. If you chose plastic skirting boards, use the same glue as for tiles, if wooden, it would be more correct to fix them with nails or screws.
Seamless ceiling tiles: what are their advantages?
Seamless ceiling tiles are almost ideal if you want your ceiling to look noble. In fact, this is a tile made of expanded polystyrene familiar to us, but its edges are decorated in such a way that the joints are almost invisible. This material is very fond of interior designers, because it allows you to transform any room without much time.
- Seamless ceiling tiles are made from expanded polystyrene by hot stamping. This method compresses the sheets to a thickness of about 5 mm.
- The usual size of models of seamless ceiling tiles is 50 X 50 cm, while there are usually 8 such tiles in a package. This allows you to tiled a ceiling of 2 square meters without much effort and measurements.
- Tiles can have both smooth and wavy contours. The shape is designed in such a way that the docking is as easy as possible and the transition is perfectly observed.
- The design performance of seamless tiles is very diverse: imitation of plaster stucco, natural texture of stone or wood, wood carvings.
The advantages of seamless ceiling tiles are obvious:
- Low cost;
- Refractoriness;
- Moisture resistance;
- Easy to maintain;
- Possibility of painting in any color.
Plus, seamless tiles make it easy to hide the unevenness of the ceiling, and you don't have to level up.
Tip: When purchasing seamless ceiling tiles, immediately purchase a special ceiling plinth. It will be needed in order to hide the joints between the wall and ceiling, where the tile trim line is located.
Preparing the ceiling surface for the installation of seamless tiles
You don't need any special skills to install seamless tiles - it is practically no different from gluing simple tiles. But you will need to perform some preparatory operations. Their quality will determine how effective your ceiling will look afterwards.
- First of all, carefully the ceiling from the previous finishing materials: remove the old wallpaper with a spatula, clean off the paint with a metal brush, wash off the whitewash to concrete.
- Be sure to remove the chandelier from the ceiling or dismantle the lamps, insulate the wires from the lighting fixtures.
- Cover the ceiling with several coats of primer. Modern adhesives allow you to attach tiles directly to concrete, but the primer increases adhesion, so it will not be superfluous.
Please note: since seamless ceiling tiles hide small surface defects well, alignment with a putty is required only in case of sagging more than 5 mm and large depressions.
After the preparatory measures are completed, proceed directly to gluing the tiles. This process has several features that are worth paying attention to:
- It is advisable, having opened the packaging with tiles, leave it to lie in the room where you plan to mount it;
- To make it easier for yourself, apply the markings on the ceiling as described in the third part of the article;
- Be sure to remove any glue that comes out of the gaps immediately so that the tiles will not be damaged after it dries.
It is undesirable to glue the tiles to the ceiling whitewashed in several layers. Such a layer, weighted with glue, will surely collapse over time. Ceilings treated with frozen lime are also not suitable for tiling. The fact is that such a solution will crumble like dust, and the glue will not have a setting zone.
Be sure to clean the ceiling before work: sweep it from debris and cobwebs and wipe it with a wet rag.
Video on how to glue ceiling tiles
We hope that our article has shown you all the simplicity and ease of installation of ceiling tiles. Surely these tips will help you in the process, and if you have any questions, ask them in the comments, and we will be happy to answer them. Please leave advice, suggestions, share your experience in gluing ceiling tiles with our readers. Comfort for your home!
Ceiling tile is a beautiful and inexpensive material. Moreover, it is easy to install, and the original result will delight the most demanding apartment owner. By the way, the advantages do not end there. The good thing about the ceiling tile is that it does not “steal” the space of the apartment (its width is no more than 1 cm), but at the same time it easily hides the defects of the ceiling and has the property of additional heat and sound insulation.
The advantages are obvious, and everything is clear with them. It remains only to figure out how to glue it in the apartment.
How to choose a tile
When choosing a ceiling tile, it is important to take into account the characteristics of the apartment
Before you go to hardware stores, it is important to decide on the size and materials of the tile from which it is made and is best suited for a particular city apartment.
As for the material, there are exactly two options:
- expanded polystyrene;
- styrofoam.
Both of them are very similar in their characteristics and in the manufacturing method. However, the first one is somewhat more expensive, and therefore is less popular compared to foam.
Depending on the production, products are distinguished:
- injection;
- stamped;
- from extruded polystyrene (or from expanded polystyrene).
Of the options presented, the simplest is a stamped plate. Its thickness ranges from 0.6 to 0.8 cm. On the front side of such a tile, as a rule, there is some kind of pattern or a simple pattern. However, the quality of the material is far from the best, so it must be handled very carefully, and the laying should be done as carefully as possible so as not to damage the plates.
Injection tiles are of higher quality. Its thickness ranges from 0.9 to 1.4 cm. The use of such a tile gives the possibility of a certain maneuver when repairing an apartment, because later it can be painted with water-based paint.
In addition, the material of such a tile is stronger, it can be washed - it is not afraid of moisture and is suitable for bathrooms and kitchens. The injection plate is different:
- clearer drawing of the pattern;
- strong edges;
- thermal insulation.
Extruded tiles are the thinnest. Its thickness is from 2.5 to 3 mm. Moreover, it is the most resistant and durable product of all available options. Often these panels are called "laminated" - because they are smoother and more dense than other options. These stoves are ideal for bathrooms and toilets. Cleaning such a ceiling will not be difficult. At the same time, extruded tiles will delight other aspects of care. For example, it is not afraid of strong detergents and can absorb excess moisture well.
Rectangular tiles can also be used for flow if space permits.
When choosing a tile, it is important to pay attention to:
- the condition of the material (there should be no cracks or other defects on it);
- the edges of the tiles (they must be perfectly even so that they can be “seamlessly” joined together);
- the inside of the slabs (it is important that there are no voids there);
- reliability of the material (it should not break or crumble in the hands).
A special case is the choice of bathroom ceiling tiles. Most likely, you won't be able to save money in this case. You will have to purchase the highest quality material, which will cost more. Pressed products, as well as injection products, are contraindicated for rooms with high humidity. Such a tile may last only two months, and then it will simply disappear, and you will have to start all over again.
Separately, it is worth dwelling on the type of seamless tiles. Its advantage is that during installation it does not create seams that are conspicuous and frustrating for apartment owners. This can be achieved by special processing of the edges of the tiles, which makes the seams (in fact, they still exist) completely invisible.
An important point in choosing a tile is to determine the right amount of material. You can understand how many slabs are required for one particular room as follows:
- measure the width and length of the room;
- multiply these numbers and get the size of the ceiling area;
- purchase tiles for a given volume - with a "margin" of about 20 percent of the area.
An additional “stock” purchased in advance will be useful in case of force majeure. For example, plate breakage occurs very often during work.
The standard size of a ceiling tile is 50 cm by 50 cm. Thus, when combined together, four tiles will cover a space of 1 meter. However, if you wish, you can paste over the ceiling with rectangular plates. They look good in rectangular rooms and even slightly expand their space.
As for the appearance, it all depends on the taste of the person.... However, it is preferable to make a choice in favor of the classic options, which over time will not look "wild" and are unlikely to bore the owner of the apartment.
The variety of types of ceiling tiles never ceases to amaze - in stores there is an offer for every taste
Although the scope for choosing types of tiles is wide. She can:
- imitate noble wood;
- be made "marbled";
- create the effect of an iron ceiling.
In addition, the tiles can be made in the form of textiles in completely different colors. The most daring option is tiles with pictures.
When choosing a material design, it is important to calculate what kind of skirting boards and corners will be installed in the room. With a successful combination, they can complement each other.
Of the tile brands, experts recommend paying attention to products from Germany - from the firms Grelich and Ormit. Decent quality at a reasonable price is provided by the Spanish brand Dune. Of the Russian options, it is worth taking a closer look at such tile manufacturers as "Solid", "Martin", "Format" and "Unix".
When choosing a tile, you should not worry about the safety of the material. The options presented in stores are equally harmless to the health of apartment residents. All materials are protected in advance from damage by fungi and mold, and should not succumb to decay processes.
Adhesive selection
The choice of adhesive for ceiling tiles in specialized stores is wide and varied. However, it is worth purchasing brands that provide the fastest setting and do not require long manipulations.
The result of the work done depends entirely on the choice of glue.
Stop your choice, perhaps, is on two options. The first is the glue "Moment - liquid nails", which sets quickly (3 seconds is enough), which allows you to install the plates very quickly and not spoil them with long pressing.
The second option is "Titan". It holds plates tightly, but has a number of features when used. So, the tile must first be treated with the composition. Next - attach to the ceiling, but immediately remove and hold in your hands for about a minute, and then glue it completely.
Another option for fixing tiles to the ceiling is with a special mastic. Many masters are increasingly making a choice in its favor. After all, it has a number of advantages over other types of glue, first of all - more flexibility. Thanks to this, the fixed tiles do not even have to be supported. The only caveat: this method of fixing the plates is only suitable for rooms with a flat ceiling surface. In cases with irregularities, it is not suitable.
During the gluing of tiles, it is important to monitor the occurrence of excess glue and remove them in time
When working in a bathroom, it is important to use an adhesive with high humidity that is specifically designed for such areas. In addition, he must:
- have excellent adhesion;
- be environmentally friendly;
- to lay down equally reliably in both thin and thick layers.
Surface preparation
The ceiling must be ready for gluing ... The reliability and durability of the work depends on how well the master processes the surface.
In addition, preliminary preparation greatly affects how the ceiling will ultimately look - whether the slabs will lie flat and whether they will not bulge.
Preliminary preparation includes:
- complete and final removal of the old finish (whitewash must be washed off with soap and water, paint must be removed with a spatula);
- temporary dismantling of the chandelier (with insulation of the wires remaining after it);
- applying a primer to a dried ceiling - in several layers.
The peculiarities of applying the primer should take into account the type of ceiling in the apartment. If it is concrete, then a special concrete contact composition is perfect for work. A deep penetration tool is required when preparing a plaster ceiling.
Correct preparation of the ceiling affects the quality and reliability of the work performed
In damp rooms, the choice should be in favor of a primer with an antiseptic, which, among other things, will prevent the appearance of microorganisms.
It is also possible to glue the tiles directly to the concrete ceiling, but still it is highly discouraged to do this. After all, the primer gives a much more stable grip.
The case when the slab is glued directly to the whitewash is rather an exception. To do this, it must be in perfect condition and hold perfectly on the ceiling. Previously, such a ceiling must be primed. However, one cannot count on the durability of the results of gluing tiles in such conditions. This technology is permissible only in cases when a quick cosmetic repair is carried out in the apartment.
Another moment of surface preparation is the implementation of the marking, in accordance with which the tiles are to be glued. Moreover, the master can choose one of two options that suit him the most:
- straight;
- diagonal.
With direct marking, the installation of the plates will be carried out strictly parallel to the wall. It is necessary to draw lines from opposite corners of the room to the center. In order to get a more accurate result, you can stretch the cords under the ceiling. The point of their intersection will be the center of the room (as a rule, it coincides with the place where the chandelier is attached). When gluing tiles, you must strictly follow these markings, especially if the geometry of the room is far from ideal.
Diagonal markings will give you some interesting results. The tile will be fastened from the center and along the formed diagonal lines. In order to accurately apply such markings, the master again has to use cords that allow you to accurately determine the center of the ceiling.
Required tools and materials
To carry out the work you will need:
- stable staircase;
- a sharp painting knife for cutting material;
- handy jar for glue;
- a brush for applying it to tiles;
- tape measure, ruler and cords for measurements when marking marks on the ceiling;
- a bucket of soapy water - for cleaning the ceiling - and a scraper (for removing old wallpaper and paint).
From the materials - tiles purchased in advance in the required quantity, plinths along the edges of the walls, as well as a primer (to prepare the ceiling for pasting work).
Ceiling tile gluing: step by step instructions
Even those who do not have great skills in construction work can cope with the installation of tiles. It is important to prepare the tools and think in advance about the location of the tiles on the ceiling - so that it harmoniously combines with the wallpaper, increases the space of the room and plays out its drawing as effectively as possible.
Even before starting work, it is necessary to open the packages with tiles, and lay the material on the floor so that it lies at the temperature of the room where the pasting is planned.
In the meantime, the master can begin to apply markings to the ceiling - using diagonal or straight lines, carefully outline the entire space, defining the places where each of the plates will be glued. After that, you can proceed to the most important thing - installing the plates.
The space of the room in which the renovation is planned can be beaten with the help of ceiling tiles
An important point: you need to start gluing not from the corners of the room, but from its center.The starting point, as noted above, can be a place near the chandelier.
The process is quite simple: a drop of glue is applied to the middle of the inner side of the tile, as well as to its edges. Further, the tile is pressed against the ceiling - in accordance with the drawn lines.
It is not recommended to press hard on the plates - the risk of damaging the material is more than high. When gluing, it is important to press the tiles as tightly as possible to each other, to prevent gaps, and if glue protrudes somewhere, remove it immediately - before it begins to dry. In the future, unfortunately, it will not work to remove traces of glue without spoiling the new ceiling.
In the course of work, small joints will inevitably appear between some of the tiles. These places should be sealed with a sealant (white acrylic is suitable; for a bathroom, it should be silicone so as not to let moisture through).
The final chord should be the installation of the plinth along the edges of the walls.... It is also fixed on glue, but for greater strength in some places it is worth using small nails. This is a temporary measure: the next day, the carnations are taken out, and the places remaining from the holes are sealed with acrylic putty.
After finishing work, the room should be closed and not entered there for three to five hours, so that the plates are finally fixed and the glue dries. It is important that the room is not only free of drafts, but even a slight breath of air. This must be ensured before starting work.
With all the advantages of ceiling tiles, it also has weaknesses. Material life may be short-lived. First of all, this applies to inexpensive options that quickly turn yellow in the sun. In addition, ceiling tiles are highly flammable. And this makes it unsafe in terms of fires. Also, ceiling tiles are not the best option for those apartment owners who are regularly flooded by neighbors from above.
However, these "disadvantages" of the material are by no means a reason to completely abandon its installation. After all, there are also many "pluses". It is only important to take into account all the nuances during the repair, and when choosing tiles in the store, do not chase the cheapest options.
If you need to tidy up your ceiling quickly and inexpensively, look at styrofoam or polystyrene tiles. If you approach the matter correctly, you can get a very decent result. How to glue tiles to the ceiling correctly, what to use for this, and we will talk further.
Kinds
If you look closely, for all its similarity, the tiles on the ceiling have significant differences. It's not about drawing and shape, but about appearance - density, surface smoothness and other "little things" on which the appearance and service lines of this type of finish depend. This is explained by the use of different materials and technologies:

The easiest way is to glue and maintain extruded polystyrene tiles. The second in quality is injection, and the most "capricious" in care and installation - stamped. Now you yourself can choose the type of tile, but there is still the appearance.
Ceiling tiles are most often produced in the form of squares with a side of 5o cm. There are non-standard options - rectangular. By the type of surface, there are tiles with an edging forming a clear seam at the junction, there are seamless options. The edges of the seamless slabs can be straight or curved.

Types of decoration - piped, seamless
The principle of gluing does not change from the type of edge, only the appearance of the product changes. There are a lot of design options for this type of finishing materials. There are geometric, floral, no pattern, but with a variety of relief. In general, there are a lot of options.
Calculation of the number and features of choice
Before gluing the tiles to the ceiling, you need to calculate their quantity. This is not difficult. Most often it is produced with a side of 50 cm. This means that there are 4 tiles per 1 square meter. If you know the area of \u200b\u200bthe room, you can easily determine the required number of tiles: multiply the area by 4. For example, the room has dimensions of 3.2 m * 2.8 m. The total area is 8.96 m2. Rounding up, we get 9 m2. To calculate the number of tiles, multiply by 4: 4 pieces * 9 m2 \u003d 36 pieces. It will take some more for trimming, some may be broken. Therefore, we increase the total number by several pieces. How much exactly - you need to look at the layout, but usually 10-20% of the stock is enough.

To make ceilings made of foam plates look beautiful, when choosing a material, pay attention not only to the appearance and type. Carefully evaluate the geometry: all tiles should be the same size, the same thickness, angles exactly 90 °. The quality of the picture should be stable, clear, there should be no sagging or irregularities on the side edges. When choosing pressed boards, pay attention to the "grain" sizes. The smaller it is, the better.
What to glue on
Most often, ceiling tiles are glued on glue such as "Titan", "Naset", "Moment" or liquid nails. All of them are not bad, but with their use you need to hold the tile for a while. You have to hold from 3-5 seconds to several tens, and this is not very convenient. The Moment "seizes" the fastest of all, but it is not ideal either: the applied glue has to be kept in the air for some time.

In addition to these compounds, there are mastics for ceiling tiles. They are sold in small buckets, they are paste. It is easier to work with this type of adhesives, as they are more "sticky". Tiles smeared with this composition stick to the ceiling, it does not need to be kept as long as greased with ordinary glue.

All of the above options are for flat or flat ceilings. Where there are drops (plate joints), this method is not suitable. If the ceiling is uneven, you can glue the tiles on a gypsum plaster) or Perlfix glue. The starting or finishing composition - depends on the required layer, the finish is suitable if the height difference is not more than 5 mm, with a larger layer, take the starting one, but it is better to pre-align such a ceiling or use another system (for example, it is also an inexpensive and quick way put in order a frankly crooked ceiling).

Both of these materials allow you to simultaneously level the ceiling and glue the ceiling tiles. Only the method of gluing changes, and radically (more on this a little below).
Foundation preparation
Before gluing the tiles to the ceiling, the surface must be prepared. First, remove anything that might fall off. If there is a significant layer of whitewash on the ceiling, it is better to remove it - although the ceiling tile weighs little, it may fall over time with the whitewash. Therefore, we clean it dry with a spatula or rinse it off with water. If in the process of stripping large "craters" have formed, it is better to close them up. It is easier for this to use a starter putty or the remains of any plaster composition.

If the base is loose, loose, you cannot do without a primer. For concrete it is better to choose "betonokontakt", for gypsum base - any composition of deep penetration. After drying, you can start gluing the polystyrene or foam tiles to the ceiling.
Placement methods and markup
Squares on the ceiling made of foam or polystyrene are placed with faces along the walls or diagonally. When glued diagonally, the material consumption is higher - more scraps and not all of them can be used, but visually it looks better - it is more difficult to notice the seams.

Most often they start gluing from the chandelier. In this case, it is easier to "fit" it, since the edges of the slabs can be cut a little, and the resulting gap will then close the cartridge from the chandelier. But not all rooms have a chandelier - often there are several lamps and they can be located on the walls. Then they begin to glue from one of the walls, most often from the opposite to the entrance. With this approach, most likely the extreme row will be cut off, and it will not be so noticeable near the entrance.
If you need to glue the tiles on the ceiling from the chandelier, markup is necessary. Everything is simple in a square room - we find the center, we start from it. To do this, we take a painting cord, one end to one corner, the other to the opposite, pulling the cord and letting go, we get a line on the ceiling. We repeat the operation with another pair of corners. The center was found, it is not difficult to glue the tiles from it. For diagonal gluing, there are already guides, and for parallel gluing, you will have to make two more strips - through the center to the opposite walls (in the picture above).
But this is a very rare case. More often the rooms are rectangular, and the chandelier is not in the middle of the ceiling. Therefore, you will have to do more complex markup.

To begin with, we also find the center of the room (paint cord diagonally). If it coincides with the place where the chandelier is attached, it is great that we "dance" from it. If not, move the starting point to the chandelier. Further, the markup is the same. We measure the distance from the starting point of installation to the nearest wall. Using this value, draw the squares as shown in the picture above (using a paint cord). Having drawn the diagonals, we get the guides for laying the flow tiles. Along them we level the edge of the first row. The more accurately we set this row, the easier it will be to glue the tiles to the ceiling further.
How to glue tiles to the ceiling: two technologies
Foam or polystyrene tiles on the ceiling attract the fact that it allows you to quickly and inexpensively put in order a far from ideal ceiling. If the ceiling is relatively flat, the tiles are glued with special glue. It is applied in a thin layer, but provides a secure hold.
With uneven ceilings, this method will not work: the tiles simply will not stick with large drops or the view will be deplorable. alignment is not always time, desire, or opportunity. Moreover, often this finish option is considered as temporary, then planning to do or. Therefore, it makes no sense to waste time and money. In this case, another technology is used - for an adhesive composition for drywall or putty. They work no worse than glue, at the same time leveling the base.

Before starting work, unpack all the material, make sure that it is the same color, size. If there are irregularities, nodules, they are cut off with a blade or a sharp knife. Now you can start installing the ceiling tiles on the ceiling.
How to glue on a flat ceiling
If the ceiling is even, ordinary glue for polystyrene or foam tiles is used, the technology is as follows:

As you can see, everything is very simple and these are all the rules for how to glue tiles to the ceiling. Only one nuance: you need to press one square to another tightly. If you have already glued it, and there is a gap, you can move it by pressing a wooden strip to the free edge. When you try to do this with your hands, you can break the foam or polystyrene, and it is easier to achieve what you want with an even bar.
If the ceiling is uneven
If the ceiling has significant irregularities, it will not work to glue the tiles with ordinary glue. To remove significant differences, use drywall glue or putty. The mixture is diluted to a pasty state, applied to the ceiling, grooves are formed with a notched trowel. The amount of glue depends on the overall curvature, but it is advisable to start with a minimum layer. The area to which the glue is applied at a time is about 4 fragments. During this time, the composition will not have time to grab, and it is not difficult to align such a fragment.

Tiles are laid on a layer of glue. It adheres well, moves without problems. Aligning the edges of the laid fragments, take a rule or a building level (preferably one and a half meter) and put the tiles in one plane. Just press down the fragments harder in the right place.
Then the composition is again applied to the ceiling, and, again, on about 4 tiles. All of them are exposed in the same plane, or at least so that there are no sharp changes. Only in this case it is necessary to ensure that the required layer of glue does not grow too quickly - it is better not to apply more than 3-5 mm, otherwise everything will fall.
Cleaning and sealing
You know how to glue tiles to the ceiling, but there are some nuances left, without which a decent result is unattainable. When working on the face of the tile, adhesive often gets into. It must be removed immediately and completely. You can use a sponge or a soft, non-fading cloth. Wipe off the surface immediately after placing the fragment in place. In a few minutes it will not be possible to do this and traces will remain. Therefore, keep a bucket of water and a sponge / cloth close at hand while working.

If there are small voids between the plates, you can fill them with the same mastic or putty (if it is white), only remove the excess immediately. Another option is a white acrylic sealant. It perfectly masks all cracks, adheres well to polystyrene and polystyrene. Fine gaps can be filled with a rubber spatula, and the excess can also be wiped off immediately with a damp cloth.
Everyone knows how to glue ceiling tiles, even those who for the first time have to deal with the fascinating process of pasting the ceiling with tile material. At first glance, the simplest process will require some skill and skill before you can glue the tiles into a monolithic ceiling surface. And to try to eat for the sake of something, after a little practice, gluing the ceiling trim from polystyrene tiles is no more difficult than gluing wallpaper, and the visual effect is an order of magnitude higher and more expressive.
Ceiling tile: description, characteristics
Foamed and extruded polystyrene or polystyrene is the raw material for the manufacture of ceiling decoration. Depending on the technology used, tiles for ceiling decoration are produced in several versions:
- Dense textured tiles with a lot of micropores, with a slightly rough, as if untreated surface. The material is produced with an edge of 20-60 cm and a thickness of 9-14 mm. Thanks to a mixture of polystyrene fibers and balls sintered in an injection mold, the material is sufficiently strong, lightweight, with a porous surface;
- The pressed ceiling board features a smooth, almost glossy surface. The wall thickness is 4-5 mm, the structure of the finishing board is quite strong and dense, like polyvinyl chloride;
- Ceiling slabs made of hot semi-molded foam or low density polystyrene foam. Instead of a scattering of balls, sheets cut from a block are used in the production process.

The last method is the simplest, so the ceiling tile is relatively inexpensive, but not the most durable. Glossy plates are considered the most resistant to dirt and damage; it is enough to simply glue such a cladding to the ceiling, even without helpers. It is easy to change, paint or add new trim elements if necessary.

For your information! Due to the use of heat pressing, finishing tiles may differ slightly in external dimensions even within the same pack.
Most ceiling tiles are made with a small processing allowance that does not interfere with gluing the slabs or lamellas. A small variation is not considered a marriage. Before gluing the covering, the boards are sorted and cut exactly to the template.
When choosing a ceiling tile, more attention should be paid to the presence of chips, cracks and streaks in the material. Such plates are immediately rejected and sent for trimming, ceiling surfaces in “blind” corner zones are glued in separate pieces, or a repair adhesive mass is made based on dichloroethane.
Calculation of the number of tiles on the ceiling and the choice of glue
Before gluing foam ceiling tiles, you must at least calculate the required amount of material. The calculation procedure itself is relatively simple and is performed in three stages:
- We measure the size of the ceiling of the room;
- We count the number of tiles;
- We make adjustments for the seam width.
After measuring the dimensions of the room from wall to wall, we get the size of the ceiling in width and length. Knowing the size of the tile that we will glue, we divide the sides of the ceiling in turn by the leg of one tile. We get the number of pieces of tile material that fits on the ceiling along each wall, multiply and find out the total number of pieces.
For your information! If the room in which the ceiling tiles are to be glued takes up several hundred squares, for greater accuracy, the width of the tile joint must be taken into account.
Calculation features
Calculating the seam width is easy. It is enough to take three or four single tiles, lay them in a row with a minimum gap at the seams or even with a small overlap, approximately as they will be located on the ceiling. It remains to measure the total length of the laid out row with a tape measure and subtract from the result obtained the size of a single tile, multiplied by the number of pieces. This is how the joint adjustment for a given amount of ceiling lining is determined. For small rooms, the seam adjustment can be neglected.

If the ceiling tiles are supposed to be glued in a wooden house, the material should be laid with a slight overlap of the edges, about 1.5-2 mm. In this case, the estimated number of tiles must be increased by 4-5%. Without an overlap, the ceiling lining will erode over time, and thin seam stripes will appear between the tiles.
If you don't want to mess with such difficulties, you can simply divide the square of the ceiling covering, which is supposed to be pasted over with foam trim, into the area of \u200b\u200bone tile. The ceiling must be measured with your own hands, the dimensions of the tile material can be taken from the catalog. With this approach, the material will need to be bought with a margin of 5-7% in order to be able to experiment with the cutouts of the ceiling cladding in more critical areas.
Choose the right adhesive
The modern market offers more than two dozen different adhesives and tools that can easily be used to glue anything on the ceiling, from wooden slats to plastic and cardboard.
If a base of plasterboard, plywood or fiberboard has already been assembled on the ceiling, then it is best to glue it with polyurethane and acrylic adhesives. They provide a very tough and durable seam. The only drawback is that such adhesives are always made in an opaque form and inconvenient packaging. You can use "Super-Moment", rubber glue, "Globe", but such adhesives are quite expensive.
It is best to glue the tiles with transparent "Titanium" or "Dragon", you can use polypropylene hot melt glue, especially with a heating gun it is much more convenient to glue it than with a regular tube.

The transparent silicone sealant holds well, over time it becomes whitish-cloudy and can stand out at the seams. Acrylic and methacrylic sealants turn yellow over time, like the popular "liquid nails", so they are used to install ceiling cladding in limited quantities.
Ceiling tile gluing options
The technology for manufacturing the ceiling slab is built in such a way as to make the cladding as adaptable as possible to all irregularities and defects in the ceiling. The use of a soft edge for glue, the rejection of gloss and the application of a relief pattern on the surface of the tile, in addition to purely decorative qualities, helps to glue the tile to the ceiling surface with defects, delamination or a slope to one side.
Layout schemes for ceiling tiles
If the ceiling is flat and smooth like a table, you can glue the ceiling cladding in any order, you just need to choose the right direction of incidence of daylight and fluxes from the chandelier. If the ceiling surface has small defects, then it is best to glue the material according to one of the most common schemes:
- Laying material from the far corner or the main window of the room;
- Installation of plates from the geometric center or suspension point of the chandelier;
- The arrangement of the ceiling tiles in a diagonal pattern, a snake, a chess set, with a banding of rows.
Advice! Craftsmen advise to glue the ceiling decor so that the lower part of the ceiling is primarily illuminated. In this case, the decorative finish will visually look smoother.
If the ceiling base has slopes or defects in several places, then it will not be possible to solve the problem with the orientation of the tiles alone; it will be necessary to glue the material with a more complex pattern, for example, a snake or diagonal stripes of several colors.
Why glue ceiling decor from a chandelier
The first and basic rule for installing ceiling tiles is that you need to start gluing the material from the place where the chandelier is suspended. Only in this way can a stable impression of even and symmetrical rows be ensured, even if the boards are glued with a slight error.
Often there is a situation when, at the whim of electricians or builders, a central ceiling lamp or chandelier is not hung in the center of the room, but with a shift of half a meter to one side. In this case, it will be correct to transfer the starting point of the installation from the geometric center of the ceiling to the chandelier fixture.
If the room has perfectly flat walls, the proportions and dimensions of the ceiling plane correspond to the correct rectangle or square, you can glue the board material from a window or corner, but with the obligatory use of marking cords or a laser level.
How to properly glue ceiling tiles
The quality and durability of the slabs directly depends on how well the surface is prepared and the correct way of fixing the ceiling cladding is chosen. There are two ways to glue:
- Directly onto the concrete base of the ceiling;
- With the use of an intermediate sublayer laid on the ceiling surface.
The second option allows you to get the best quality of fastening, it is easier and easier to glue on a prepared base than on concrete. In addition, the use of a slab base allows you to align the plane of the ceiling and make it as smooth as possible.
The first option is the fastest and simplest, but the quality of the sticker is worse, in addition, it will take a lot of effort to level and clean the concrete surface, otherwise you will not be able to stick the tiles smoothly and beautifully.

Ceiling surface preparation
In any case, the surface of the ceiling must be cleaned of the old decorative finish, the remnants of the primer and the water-based paint layer, wallpaper and glue flakes must be removed. At first glance, the ceiling plane may appear fairly flat, but the impression can be deceiving. In any case, at the end of the stripping, two cords are pulled, one of which is basic, the second is movable.

The base cord is pulled along the midline of the room and leveled horizontally using a building level. A movable cord, stretched perpendicular to the base one, is sequentially rearranged along the ceiling with a step equal to the width of the tile. By the distance from the ceiling to the cords, the dips in the ceiling surface are determined and eliminated with a finishing putty. After drying, the spots are cleaned and primed.
Ceiling markings
For marking work, use the same two cords as for stripping. If the tile is planned to be glued in the classical in-line way from the far corner, the cords are not changed, the movable cord is transferred to the first line of laying the material. To simplify the work, it is recommended to apply marking lines to the ceiling, along which you can glue the tiles, without being distracted by the rearrangement of the marking cords.
If it is supposed to glue the plates diagonally, the cords are pulled at the corners of the room, or with an offset, if the initial point does not coincide with the geometric center of the ceiling surface.
How to glue tiles to a flat ceiling
The first tile must be glued in the center of the row. The technology of the sticker is quite simple, the slab is laid in the place of the future gluing and risks are applied to the concrete with a pencil, indicating the dimensions of the spot. Glue is applied on the back at five points - in the center and at a distance of 3-4 cm from the corners.
The slab is placed on the spot and aligned according to the previously made risks. To be sure of the positioning accuracy, we apply a thin wooden strip 80-100 cm long to the front edge of the tile, and align the position of the plate along it before gluing the next one. It is advisable not to rub the tiles to the base, as is usually done with wallpaper, in order to expel bubbles. Before gluing the next part of the finish, you must wait at least 5-7 minutes.
Pasting uneven ceilings with tiles
Often times, tile cladding has to be glued without carefully leveling the ceiling base. In this case, an additional thread is pulled along the row, which determines the lower level of the facing surface. With the help of a thread, you can level tiles even on a crooked ceiling, but this will take three times as long.
As in the previous case, initially the risks of the spot border are applied to the ceiling, on which the tiles will need to be glued. If there is a depression in the ceiling, an increased amount of transparent silicone is applied under the tiles, the material is laid on the base. After 30-40 minutes, the slab can be straightened along the thread without pressing and fixed with an invisible pin.

Whitewashing ceiling tiles
The answer to the question of whether ceiling tiles can be glued to whitewash sounds simple. You can glue on whitewash, paint or lime, subject to the gluing technology. The ceiling surface is pre-treated:
- Sweep dust, chalk or lime with a damp cloth, rag, sponge;
- They are treated twice with a water-based primer so that the whitewash layer is soaked and saturated with a soil solution to concrete.
After the ground layer dries, the whitewash turns into a strong crust, to which you can glue any tile. Sometimes the dried primed surface is rubbed with coarse-grained emery to increase the quality of adhesion of the adhesive to the ceiling surface.
A more difficult option is considered to glue the slab to the ceiling, covered with water-based emulsion or lime and soap. The coating must be carefully cleaned with a spatula along the marking lines.
Cleaning and sealing
No matter how carefully they try to glue the ceiling lining, all the same, in the lines of the seam, and sometimes on the edges of the tiles, the remains of the adhesive mass remain. If the cladding material is laid with overlap, there are usually no problems. It is necessary to carefully remove the protruding traces of glue with a carving knife. We leave everything that gets on the front part of the foam until the glue mass dries completely.

Any attempts to wipe off the glue ahead of time and even accidental touching will lead to the appearance of dirty spots, therefore, it is necessary to glue the material only with clean hands, preferably in cotton gloves.
In the event that it is necessary to glue the slabs joint to joint, the resulting joint must be painted over with a special toner or closed with a plastic edging.
Painting ceiling tiles
With all the advantages, foam tile has one significant drawback - the material collects and absorbs, like a sponge, a huge amount of dust and fumes. Instead of gluing new boards every year, it is easier to paint the surface with high-quality water-based emulsion or acrylic paint.

It is enough to remove the dust accumulated on the ceiling trim with a vacuum cleaner, and carefully apply a double layer of paint with a roller or spray gun.
Conclusion
How to glue ceiling tiles, and what is the secret of high quality work, can be understood only after a little independent practice. In each specific case, any master has to look for his own installation method, the most convenient marking scheme and the best glue option. To glue the ceiling decor efficiently, you do not need to save on two things - on glue and on the time allotted for the work.

