Lightweight models of houses made of cardboard. Paper models in half an hour - reality or fantasy? Simple layouts of paper houses and reamers for gluing
Volumetric modeling is an exciting activity that will not leave indifferent neither children nor adults. It is modeling that makes it possible to see a three-dimensional image of a future building or equipment. There are many ways to use modeling. Let's stop at one of them. How to create a paper house layout? What is this layout for? And what do you need to make it?
Creating a layout with your own hands is not only the embodiment of your architectural and construction prospects. This is a great way to make an original gift for a child, capture a piece of the history of building your own home, improve your creative skills and abilities. It is undeniable that a three-dimensional model of a house made of cardboard or paper is useful not only for students, architects, builders, but also as an excellent advertising engine. After all, having seen the future housing in such a miniature form, having examined it from all sides and from different angles, you will certainly want to buy it.

Before you start work, you need to stock up on everything you need:
- several sheets of paper and cardboard;
- quick-drying glue;
- stationery knife;
- pencil;
- Scotch;
- drawing set;
- thick cutting board.
Cardboard or paper for modeling are selected dense and textured. The accuracy of creating a layout directly depends on the accuracy of the drawing, so drawing the details of the future layout should be done very carefully. First you need to decide on the original building from which the layout will be made. And designate the scale, taking into account which the model of the house will be built. A scale of 1:100 is usually used.
The next stage of modeling is the construction of a sweep - an image of a layout unfolded on a plane of paper or cardboard. The construction of the sweep starts from the reference point. This can be any corner of the building, along which all segments will be measured.

Step by step and slowly, the development of the layout of the house is being built, taking into account the exact size of the walls, gables and the addition to the valves for gluing. Separately, markup is made for the roof of the building and the stand. The stand is made 1-2 centimeters wider than the base of the walls of the house model. This modeling principle is quite simple and does not require any special knowledge. After the development of the house has been built, it is necessary to draw or glue window openings and doors from colored paper. And after that, proceed to the final assembly of the paper model of the house.

If the model of the house is more complex, then it is made by gradually creating the facades of the building, the roof and the base. Using a stiffener, the model is assembled into a complete composition.

Internal partitions, windows and doors are attached with glue or adhesive tape. Bending the details of doors and windows forms a stiffener and allows you to independently hold the shape. To give the model additional stability, internal partitions can be made of rigid cardboard or foam.

To detail a three-dimensional model of a house, furniture and interior items are made of paper. This is quite simple, since paper is a very plastic material. Pieces of furniture are cut out on paper, glued together and placed inside the building model. If the area of the house model is not large, it is advisable to display interior items against the background of the walls of the model.

For the purpose of spatial orientation, the models perform modeling of the area adjacent to it, green areas and infrastructure. To do this, use multi-colored paper, dry branches of trees and shrubs, paint and children's toys. The implementation of such a model allows you to determine the placement of the house relative to the cardinal points, with the supply of communications, the preparation of estimates for the construction and houses, the improvement of the backyard plot and other construction features.

A special role in the modeling of the house has a color scheme. With the help of color, you can effectively emphasize the merits and hide the flaws of the designed house, as well as focus on the main details of the room. You should not paint a finished monochrome paper model at home. This can lead to deformation of the layout design. It is better to glue the necessary colored elements from a colored film or paper.
A paper model of a house, unlike plastic and wooden models, is less detailed and durable. It is not resistant to the influence of moisture and temperature, which accordingly requires careful use.
The main advantage of this layout is the speed and ease of assembly, as well as economy. Such do-it-yourself paper layouts are indispensable for all kinds of presentations and exhibitions, as well as a basis for creating more complex modeling using plastic and detailing the internal filling of the space of the room.
One of the examples of creating a paper layout:
Dear readers, comment on the article, ask questions, subscribe to new publications - we are interested in your opinion :)
Such a craft will not take much time and materials, and for a child this activity will be very useful.
nym. When working with paper and three-dimensional figures, spatial thinking develops, fantasy and ingenuity work. Among other things, this is just an exciting activity for both adults and children.
Every girl dreams that her favorite doll lives in a house. Is it worth it to spend huge sums of money to purchase a doll house, if you can easily make it with your own hands. In addition, the child will treat the toy more carefully when he himself takes part in its creation.

To make a beautiful house out of cardboard boxes, you need very few materials and, most importantly, imagination!
You'll need:
- Boxes made of durable cardboard in different sizes;
- Paints;
- colored paper;
- Knife and scissors;
- Glue gun;
- Scotch;
- Pencils or markers.
You can make any house - large or small, with a removable roof or a stationary one, with separate rooms or one large one. To get an idea of how the house will look like, look at the approximate diagrams and sketches on the Internet (instructions are attached to each). Based on them, you can draw your own plan for the dollhouse.
DIY large cardboard house for children
Getting a kid interested is pretty easy. Build him a house! If you live in an apartment, making drywall housing at home will be very difficult - due to lack of free space. But there is a way out, because for sure each of you at home on the mezzanine or in the garage has large boxes of household appliances - a TV, refrigerator or gas stove. Unless you're planning a massive move, these boxes are unlikely to be of any use to you. But from them you can make a great house-teremok for your child. It will be interesting for the kid to play in such a spacious house.

To make a children's house with your own hands, you need:
- A large cardboard box or two medium ones;
- Glue;
- Scotch;
- Colored paper or wallpaper;
- Ruler;
- Stationery knife.
Place the box in such a way that the opening parts are at the top. Cut out a piece of cardboard from an unnecessary box to make a quadrangular roof. Fasten all bends with tape.
You can leave the top of the roof empty - so that air flows better.
Think about where the door will be located. The hole should be large enough for the baby to crawl inside the house. Draw a door and cut it out with a utility knife. We do the same with windows. Finished holes can be decorated with old tulle, this will make the home cozy.
You can lay a warm blanket on the floor, so the baby will not freeze, even if he sits inside the house for hours.
Homemade house is ready and waiting for its owner!
Do-it-yourself cardboard houses: schemes and nuances of construction
To create a house, first of all, you need to draw a sketch. You can download the finished drawing of the house on the Internet or try to draw it yourself, based on the child's requests. If desired, you can make a house layout from plain paper.

House project:
- According to the drawing, cut out sketches of the future toy house from a cardboard box.
- Cut windows and doors. Remove unnecessary pieces of cardboard.
- Joints must be sealed with tape.
- If you glue the bends correctly, the house can fold, and in this form it will take up very little space.
- The roof of the house is made from the end parts of the box. They are fastened together with adhesive tape, on top of the roof can be pasted over with colored paper.
- To make the second floor, you need to install an interior partition. Put a sheet of cardboard on top and firmly fix it along the edges with the walls of the house.
- The stairs between floors are also cut out of cardboard.
Now you can decorate the house with doll furniture or make it yourself from cardboard.
Helpful tips for making:
- The door of the house should open outward;
- In order for the house to be stable, cardboard pipes must be installed in the corners;
- For safety reasons, only adults should cut cardboard.
How to make a cardboard house with your own hands: step by step with pictures
A beautiful and original house for Barbie can be made not only from boxes, but also from ordinary colored sheets of cardboard. Let your daughter help you create the house, make the layout and think through the decor.
For work, you will need sheets of thick cardboard, colored tape, felt-tip pens and a stationery knife.

Let's get to work:
- Our house will not have a front wall - so it is more convenient for a child to play with a doll if the dwelling is supposed to have several tiers.
- The basis of the house are four standard sheets of cardboard, which are fastened together with colored tape.
- Before connecting the sheets, you need to cut out the window of the future house.
- Having fastened the sheets, we make the second floor. To do this, you need to connect 3-4 sheets together so that the overlap is more durable.
- Glue the sheets to the walls of the house around the entire perimeter with adhesive tape.
- The walls of the house can be pasted over with wrapping paper, imitating wallpaper, and thin felt can be laid on the floor - like a warm carpet.
It will be very interesting for the child to play with the new acquisition, to equip the house. These skills will definitely be useful in adult life.
If the child is already going to school, he can take his creation to an exhibition or just brag to his classmates.
Do-it-yourself cardboard house: how to decorate a doll house
A dollhouse, like an ordinary apartment, requires comfort. To make your home more comfortable, you need to stick wallpaper on the walls - from colored paper, packaging wrappers or simple glossy magazines. You can hang curtains on the windows, for sure you will find a piece of unnecessary fabric. To attach them, use pushpins or a stapler.
Like any apartment, the house should not be empty. Favorite doll also needs furniture. From the boxes you can build a voluminous sofa, wardrobe or bookcase, table and chairs. They can be painted with watercolors or pasted over with appliqués.

The floor can be covered with felt, which is attached to the box with a glue gun. Now the Barbie doll will be able to walk barefoot on the floor.
To make the house light and cozy, you can hang an LED garland along the walls.
Around the house, you can arrange decorative flowers in pots and build a fence from plastic bottles. However, this option is acceptable if space in the nursery allows.
Let the child design the house himself, because your tastes may differ. Entrust this work to the kid, let him develop his imagination!
Step-by-step master class: how to make a cardboard house for a cat
If you have a tailed whiskered animal at home, you know how cats love to hide - they jump into a stroller, climb into boxes or on a rack. You can make a house out of the box and your pet will have a personal apartment that no one will claim.
A cardboard box for a cat is an original and interesting idea, but, alas, such a house will quickly become unusable. Cardboard is afraid of water, so it cannot be washed. If your pet confuses the house with the tray, the cat's apartment will have to be thrown away.

In addition, cats like to sharpen their claws, and this will also harm the house.
Despite the disadvantages, this option is the cheapest and fastest to perform.
Building a cat house
- You need to choose a box in which your cat will not be cramped. Cats love space and love visibility, so don't put the box in the farthest corner of the room.
- Place a rug or pillow on the floor.
- You can paste over the outside of the house with old wallpaper so that the cat's home does not violate the interior of the "human" room.
When the house is ready, invite the cat to examine it. Let him get used to the new thing, study it. It is not necessary to force the cat to immediately climb inside, this can only scare him away.
How to make a cardboard house (video)
If you have a fantasy and love to craft, you can make a toy house out of cardboard. Such a gift will appeal to both toddlers and older children. Even an adult girl will appreciate such a gift, because very often you want to return to a carefree childhood and play with Barbie dolls again.
For staining sawdust, ultramarine blue is taken, diluted in hot water, where wood powder is immersed, stained before the eyes to the degree of the desired color. Removed from the paint, it is wrung out and placed in a thin layer on a baking sheet to dry.
Wood powder can be used to cover models instead of paint, but for this it is harvested in a wide variety of colors, dried and folded into jars. The best dye for this is aniline, sold in bags for dyeing cotton fabrics. The powder is applied in a thin layer to hot carpentry glue and pressed down. After drying, its excess is poured into a jar and stored for the next work.
The snow surface is made as follows: the desired part is smeared with glue and sprinkled with borax with an admixture of boric acid to give shine. You can also make a surface of cotton wool (hygroscopic), which spreads evenly and thinly over white paper. Cotton wool is sprinkled on top with boric acid.
When the glued parts dry, they are covered with a putty made from chalk (tooth powder) and glue. Depending on the color that the soil should have, various paints are added to the chalk. Putty is applied in a thin layer, and in those places where required, it takes the form of the necessary bulges, relief, ledges, banks, etc.

Putty coating aims to fasten the layout, smooth out irregularities or create them, make it dense and monolithic. Pebbles, roots imitating one or another object can be interspersed in the putty when it is applied.
The background of the layout can be painted with brown paint or sprinkled with wood powder over glue, or pasted over with dark paper. The whole layout after finishing, while it is damp, sprinkled with diamond mounds, from which it comes to life, especially in the evening light.
The inscriptions are made on drawing paper with ink and placed under glass, like labels, and the layout is ready.
Let's turn to the manufacture of some details of the layouts.
The forest and bushes conditionally depict green deciduous mosses. They are going ahead. You need to choose the greenest, brightest and not very juicy, dry them in a draft, but not in the sun. Very dense bouquets are tied from mosses, which are inserted into the holes made in the layout with an awl.

Grass layout
The grassy surface on the models can also be depicted with moss. The surface is pasted over with matte green paper or painted with green paint. The green background is smeared with glue and sprinkled with finely trimmed moss. You can replace the moss with green-colored small sawdust. If it is necessary to present a part of the vegetation in its natural form, then one has to take real plants or parts of them dried in the sand.
Surface irregularities, pits, small elevations, etc. do this: moisten a lump of thin paper in liquid carpentry glue of the desired size and stick it on the surface of the stand. Wet another piece of colored paper in glue. When it becomes soft, put it on a lump and press the edges around the lump to the surface of the stand. Coat the irregularities made with glue and sprinkle with sheared moss or earth.
Simulation of the earth's surface. The easiest way is to arrange a flat surface of the soil. It is enough to grease a piece of cardboard and sprinkle it with earth or sand. The cardboard must be painted in the color that the prepared soil has.

"Earth" is done like this. Take thin cardboard and black matte paper. Cut out a piece of cardboard of the desired size, paste over it with matte black paper, paste over the back of the cardboard immediately with paper, otherwise it will warp. In the absence of paper, cardboard can be successfully painted with soot on glue. Apply carpenter's glue to the black side of the cardboard, cover it with earth in an even layer, let it dry for half an hour and only then shake off excess earth.
Dry earth is not black, but gray, and therefore, in order for it to remain black, it must be colored. This is done before the sticker. Take black mineral paint, dilute it on a saucer and pour earth into it. Dry the soil soaked with paint in the sun or in an oven.
The sandy surface is made with exactly the same methods, it is only necessary to take yellow instead of black paper, best of all ordinary wrapping paper. Occasionally it is necessary to paint the background with watercolors if the prepared “breed” has a shade of a different color.
For sandy landscapes, artificial sand is prepared. It is made up of 20% natural sand and 80% ocher. The mixture is thoroughly mixed.
From natural pebbles, it is best to use pebbles extracted from a stream, as well as fine gravel. In order to attach pebbles, sticks or any objects to the cardboard, they are smeared with very thick wood glue and lowered to their intended places. When cooking lei, a little sugar is added for strength.
Creek layout
The brook is decorated with paints, and its bed is covered with a specially applied blue putty with a blue embankment powder, which emits a shine, and the shore is covered with earth and pebbles.
Animals to enliven the landscape can be sawn out of plywood, painted and attached to the appropriate places on the layout. Also foreground plants. Stones must be prepared from paper pulp, and then painted. You can also use the corresponding drawings for this purpose by cutting and pasting them on cardboard, and then attaching them to the layout.

High slopes and cliffs. A box of the desired size is bent and glued from cardboard. Bottom up, it is glued to a piece of cardboard. This will be the skeleton of the mountain. On all or some sides, you can stick a sheet of thick paper so that with one edge it is attached to the edge of the bottom of the box, and with the other to the cardboard, you get a slope of the desired steepness. The paper is taken in the appropriate color, depending on whether it is an earthen, sandy or grassy slope. When the model is completed, this slope is smeared with glue and sprinkled with sand, earth or sheared moss.

For a break, thin gray wrapping paper is taken. Cut off the desired piece, soak it in liquid wood glue and apply in the same way as the “slope”, but, of course, lower it much steeper. The glue will dry soon, and you can easily collect the paper into any folds and folds. When the glue dries and the paper hardens, coat again with glue and, holding the "cliff" up, sprinkle with sand. Then the assemblies and folds will resemble potholes washed with water on the slope of a ravine. You can sprinkle the "cliff" not only with sand. Having collected multi-colored clays, pour them on the glue in horizontal stripes and visualize the layering of the earth's crust.
Such models of mountains, cliffs, coasts and even ravines can be easily made from nature if you have drawings and maps of the area.
If you are assembling a rock collection from a cliff, then an accurate, proportionate model of the cliff, made (sprinkled with glue) from authentic, locally sourced materials, will greatly enhance the value of your collection.
The construction of models of dwellings or villages develops in students resourcefulness and creative initiative. And the made such models will serve as valuable aids for the geographical office. You can use pictures, drawings, etc., as well as descriptions in magazines and books for guidance. Let's take a description of one layout as an example.

A man sits by a fire in front of the entrance to the cave. All the inhabitants of the cave went hunting. The rest must protect the dwelling and maintain the "eternal fire".

A well-executed model of a primitive man's cave will help you imagine the life of our ancient ancestors. The size of the mock-up is 40 X 40 cm. The height of the back wall is 40 cm. Model a model of a mountain with a cave from clay. Paste the model with layers of paper. Pre-tear the paper into pieces 150 × 150 mm. You will get a cast of the mountain from papier-mâché. Sew the mountain to the underlay and to the back wall of the layout.
Cover the area around the mountain with earth and green sawdust. Color the mountain so that it looks like it is made of stone. Animal skins are well obtained from pieces of an old shaggy towel. Color the "skins" and glue them inside the cave. There are stone tools in the cave. Model the stone parts of the ax and spear from plasticine or other material. Make a fire out of tissue paper dyed red and yellow. For the figure of a primitive man, make a frame of soft thin wire, then apply plasticine to it. Dress the person in a piece of animal skin.

We will make a cute Victorian paper house with a diagram from Lisa in this do-it-yourself master class. And as always, making such a craft will be very simple, since the paper house layout is already ready in all the details, you just need to download the diagram, print it and use it as a template for your craft. It is only necessary to choose a suitable thick paper with a print that you like, such paper for creativity is now sold in large quantities in art stores and craft stores.
How to make a paper house
And so for the future crafts of a Victorian paper house, we need the following materials:
- thick paper with a print;
- dummy knives;
- pencils;
—
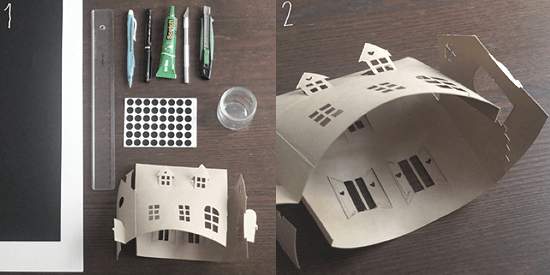
We print the diagram on plain printer paper to use it as a template. We evenly cut out all the necessary holes on the template and applying it to a pre-prepared dense sheet, transfer all the hole marks to it. All solid lines are cut and dotted lines are bent.
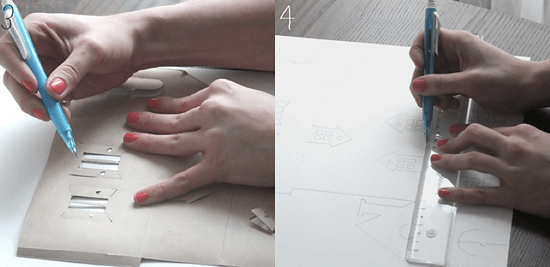
Then, along the ruler, we cut the door windows with a breadboard knife, cut out the layout contour. If you only have a white sheet of thick paper at hand, you can always additionally decorate it with stickers or paint it. You can also print the layout right away on a clean, thick sheet of paper - 200g printer paper is ideal for such crafts, and then decorate it yourself.

In order for all the corners of the house to be neatly bent and not to break, it is necessary to score all the folds - just walk the stack along the ruler, pushing through all the folds.
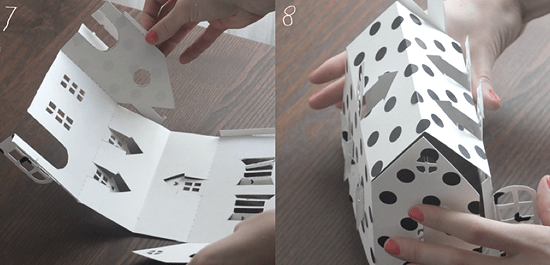
Then you can fold the house out of paper, fastening the edges by inserting them into each other.
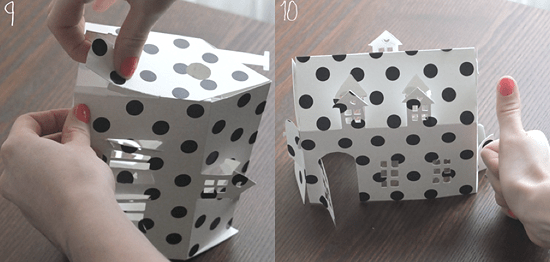
By the way, such a house made of paper can also play a practical role, for example, the role of a candlestick - you can hide an electronic candle on a battery under it.

The creation of miniature models (models) of buildings is usually done by architects. Before you start building a house or an entire residential complex, you first need to make a sample of it on a scale (photo). Real architects make models from PVC (polyvinyl chloride), and cut out details for future buildings on a special milling machine, which is given a specific computer program.
In your future home, you will definitely need a waste disposal system. This is where slurry pumps come in handy. We did not write about this, not quite our profile, but we found an excellent article with reviews of the best manufacturers of slurry pumps. Read for health!

Such a machine is able not only to cut out microscopic details with jeweler's precision, but also to apply a section on their surface that imitates brickwork or other coating. Due to this, the maximum reliability of the layout is achieved. The machine cuts tiny windows, doors and other details. After that, the architect connects them together using a solvent that melts the edges of the PVC plates and tightly fastens them to each other.
All the same can be done at home, but only without a milling machine, PVC and solvent, but with the help of cardboard, paper, PVA glue and scissors. The production technology is very similar to that used by the pros. The difference lies only in the materials and, of course, the quality of the layout produced in this way.
But if you really try hard, you can make a paper building no worse than what an architect creates with a high-tech milling machine. So, how to make a do-it-yourself home layout using a basic set of stationery?
What do you need to work
To make a house layout, you will need the following tools:
thick white / color paper A4 (several sheets);
cardboard of the same size;
a sharp construction knife (it is convenient for them to cut the walls of the building, and then cut small windows and doors into them);
brush for glue;
PVA glue;
a wooden or plastic board for modeling (it is convenient to cut out details on it so as not to damage the table);
scissors;
pencil;
ruler.
You can also use a regular household hair dryer to quickly dry the glued parts. You can cut a building out of both paper and cardboard. The latter option is more reliable, but a little more difficult to work with. You can cut the entire layout out of paper, and then fix it on several “bearing” cardboard walls (photo). This will strengthen the entire structure and give it more stability.

Creating a scheme of the future building
There are two ways to create the walls of a future building. For the first, such a scheme is used, as in the photo below. This is literally the whole building completely, but in a turn. The adjacent walls can be made together and not cut. They will just need to be bent later, forming the corners of the building.

Immediately mark the location of future windows. They must be on the same level. Do not forget to leave small indents on the sides and bottom of the walls, as in the diagram. After that, with their help, it will be possible to connect the parts of the structure to each other. The whole building should be made to scale so that in the future the walls, roof and other parts of the house are proportional.
Making a layout: method 1
After the whole scheme is drawn on paper, all that remains is to cut out the future building, bend the lines marked with a blue dotted line and cut through the windows with a construction knife. Use a modeling board. On it, cut out parts from cardboard, and then glue them much more conveniently.
The scheme shown in the photo above is suitable for the production of the simplest houses. A more complex design will literally have to be made up of several parts. By the way, the layout can also be made opening (so that you can see the interior of the house). It is by this principle that children's houses for dolls are made, which can be purchased at the store.

To make such a layout (photo), it is advisable to use the thickest cardboard that you can find. In order for part of the wall to open, an appropriate mount is used (this can be found in old Soviet-made caskets) or simply a piece of cardboard bent in half. In the same way, you can make doors open.
Method 2
The second method is suitable for the production of building models of more complex configurations (photo).

First, a sheet of paper needs to be folded with an accordion, as in the photo. The more folds, the more walls will turn out, but their width will be, accordingly, less. On one fold, you need to draw ½ of the facade of the building. We draw very carefully, with a thick line outlining the places of the cut, and with a thin line, outlining the places of the fold of the paper.

Then cut along the thick lines and unfold the accordion. The result is a whole facade, absolutely proportional and even as in a mirror image. We bend the paper holders as in the photo and cut through the windows with a construction knife.

After that, the parts of the structure are assembled together, smeared with glue at the joints and glued together. From cardboard we make the base for the layout. When the whole building is ready, you can paint it with paints or stick some images (as in the photo).

Making trees and grass
To make the layout look more authentic and to be able to visually assess its scale, it is advisable to decorate the cardboard stand with greenery: grass and trees. This will require:
can of green paint;
acrylic paint of several green shades;
dried twigs (dead wood);
a piece of foam rubber;
glue;
awl;
paint brush.
First, in any unnecessary container, several tones of green acrylic paint (dark and light to achieve the maximum authenticity effect) should be mixed. After that, you need to cut the foam rubber into small pieces and soak them properly with this paint. When the foam is colored, leave it to dry for a day.

We cut the dried foam rubber into such small pieces that they literally resemble crumbs. She will be our herb. After that, we paint the cardboard stand well several times with greenery, and when the paint dries, cover it with a thick layer of glue. Pour green foam crumbs on wet glue in random order. The grass is ready.
When the glue is completely dry, several holes need to be made in the cardboard base with an awl. Be very careful not to damage the entire layout. We paint dry branches with green spray paint and stick them into the holes in the stand. Now the trees have taken their place. Thanks to all this vegetation, our paper building model looks more realistic.

