Drainage scheme around the house: the nuances of designing drainage systems. Do-it-yourself cesspool drainage How to make a drainage pit for sewerage
Plot and main principles drainage. In this post, I would like to take a closer look at ways elimination of excess water in the area and decorative possibilities design of devices for the removal of moisture.
After all, water on the site is not only a natural disaster, it is also a huge opportunity and a great tool for a landscape designer.
The project of the drainage system on the site
The installation of a drainage system is an important stage in the improvement of the site. If there is a danger of flooding high or poorly permeable to water, drainage of the pit is mandatory. It is better to find out the need for this in advance, so as not to run into a problem after the construction of the house is completed.Drainage structures are therefore called system that underground drainage and pavement, and even surface grooves, are all a single complex, an artificial recreation in a small area of the natural water cycle in nature.
The moisture that falls out with precipitation is partially absorbed by the soil, and partially flows down into the natural slopes. The water that has infiltrated into becomes groundwater and also, along the slopes of the impervious layers, flows towards the reservoirs located in the lowlands.

If you are going to make a drainage system, you need to try to recreate the natural conditions for the existence of water in nature with the help of artificial devices. It is highly desirable to design the system so that it works as independently as possible, without the use of coercion in the form of drainage.
It is necessary to try to think over the design of the drainage system so that there is no need to force the water to move where it does not flow itself. The principle of operation of the drainage system should be based on gravity: we collect surface water in ditches and allow it to flow away from the site; With the help of drains and drainage pillows, we make clay soil that is slightly permeable to moisture easily absorbing water.

So, drainage ditches and trays imitate rivers, underground drains imitate flowing groundwater, collection points for diverted water - lakes and seas: everything is like in nature. Then the functioning of the drainage system will be the most reliable, independent of power outages. And it will also be easier to fit such a system into the landscape. When planning drainage, it is necessary to take into account the natural slopes of the relief, the depth of occurrence, the location of buildings and tall trees on the site.
Surface drainage
Since the main water load falls on the warm season, it is not in all cases necessary to dig below the freezing depth to drain water. Surface drainage is quite effective, especially if the site is located on a small one.Ditches and grooves
The easiest and most affordable option to divert water is to arrange surface drainage grooves. Drainage ditches cope with the removal of water during heavy rainfall or during snowmelt. Usually they are located along the perimeter of the site, observing the slopes for the gravity flow of water.The ditches are directed towards the water intake located in the lowest part of the site. This can be a street ditch running along the road, a storm sewer if the village is equipped with it, as well as a reservoir - natural or artificial.
In addition to ditches along the borders, if necessary, the device of surface drainage systems is also used along the territory of the site itself.

The bottom and walls of the ditches are made simply ground or lined with some material, for example, or slabs of. When arranging channels, it is necessary to distinguish sewage And drainage ditches.
Waste the ditch receives water flows already collected earlier, or water coming from above - for example, during rain. Therefore, its walls can be waterproof. Such a channel is made in the form of concrete or plastic trays. drainage the ditch absorbs excess moisture from the soil, so its walls must be permeable to water.
Surface drainage ditches can be built above deep drainage pipes in the soil as an additional measure.

Do not be embarrassed that trenches will appear on your site. There are several ways to decorate them that can turn a utilitarian drainage structure into an element. The choice of style depends on the design of the entire site.
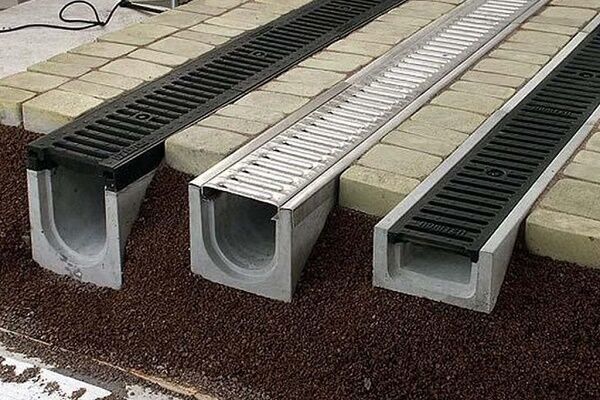
The channel for water drainage using ready-made trays is decorated with decorative gratings - plastic or metal.

You can use it as a material for finishing the walls of the ditch, just do not forget that if a solution is used to fix the stone, then this method is suitable for sewage ditches. drainage the ditch must be trimmed with large stones using the “dry masonry” method - then the walls will remain permeable.

In the photo below you see a drainage ditch lined with natural stone using the “dry masonry” technology - a functional component of the drainage system and a decorative element of the landscape. 
Another way to finish and at the same time strengthen the walls from shedding is to use the so-called reno mattresses. These are analogues - metal meshes filled with crushed stone or cobblestones - only oriented not vertically, but horizontally or obliquely.

Drainage ditch and slope of the pond bank reinforced with Reno mattresses. Photo from sitkazahid.com
The use of Reno mats is not only a way to drain the soil, but also the ability to strengthen it on the slopes of drainage ditches, as well as reservoirs, if any, on your site. Strengthening the soil on the slopes with such a technique in the design of the site can be combined with gabions as or fences.
In addition to the ditch itself (a shallow and narrow ditch), surface drainage can be designed as:
- natural stream

- "French" ditch

- "Dry" stream

French ditches are straightforward, they first appeared in regular ditches, popular in France during the Baroque era. imitate the path of a dried up natural river or stream or kurum - a stone river.
- Tracks

When arranging such paths, do not forget that their surface must be permeable. As a material, use fine, granite chips, laid without mortar, in the sand. Additionally, paths in the garden on the outer sides can be equipped with drainage trays directed to the general drainage system.
Garden ponds as elements of the drainage system
Through ditches of various designs and appearance, water flows into a water intake, one of the options for which can be a reservoir - natural or artificial. Surface drainage is an excellent reason for arranging a pond in the country. It will serve as a water intake for an open-type drainage system, and in combination - the center of the landscape composition of the site.
Prue, if it is not arranged with the help of a ready-made plastic container, but has a natural bottom, is a drainage in itself. If it is located at the lowest point of the site, excess ground and surface water will drain into it, draining the area. In simple cases of flooding of the territory, a pond dug in the right place may be the only and sufficient element of the drainage system.

If there is no place for a garden drainage pond on the site, but there is a natural pond, lake or river nearby, then the collected water can be diverted there. Of course, if the expediency of such an event is adequate to the labor costs for the production of earthworks. Water can be diverted by a surface method, all the same ditch (tray), or by laying an underground pipe.

You just need to make sure in advance that the level of the reservoir is always below the pipe, even in the spring flood. Otherwise, in the spring you will get the opposite effect: instead of draining excess water from the site, part of the reservoir will also flow to you through the pipe. Or the pipe must be equipped with a check valve.
Do not forget that in a natural reservoir do not drain heavily polluted water, for example from a filtration system.
Surface drainage from buildings
The flow of water towards the drainage ditches should also be facilitated by a well-arranged vertical layout site when developing a project for the construction of a house and other buildings. Such a layout is one of the components of the general drainage system. The creation of an embankment under the house during construction improves the conditions for the removal of rain and melt water from the foundation of buildings.
To drain water, the blind area around the perimeter of the house, the platform and paths in front of the building are made with a slope towards the general drainage. In the direction of sewage and drainage ditches or underground drainage structures, drainage trays that receive water from
Backfill drainage around the house - soft blind area
Around the house (along the perimeter) you can organize backfill drainage. The principle of its construction is the same as in the "French" ditches described above: a trench covered with rubble and gravel. The top layer of backfill can be decorative, such as colored pebbles.Backfill drainage - replacement or addition of a blind area with a hard coating. It may be better suited to the design of your site. There are several options for the final coating of a soft blind area:
- decorative or pebbles;

It is good to use backfill drainage not only along the perimeter of buildings, but also around the open one and this will make the site more accurate.
Creating a surface drainage system is not too difficult. Of course, ditches will have to be dug and improved if necessary. But in general, work can be done independently, armed only with and.
The main thing is to correctly plan the directions of the ditches: so that the excess water is gone, and the plantings, especially trees and shrubs, are not left without moisture. It is also important to observe slopes to ensure gravity flow.

If the conditions on the site in terms of excess water are more severe, groundwater is located high, then surface drainage is indispensable. Requires "heavy artillery" - deep drainage. There is no way to cope with a shovel here, large-scale earthworks and engineering calculations will be required.
The removal of ground and storm water from the foundation will significantly increase the service life of both the capital building and the summer cottage. A drainage system that is simple in design will protect underground concrete structures from gradual erosion, and basements from flooding. But it is extremely important to prevent the destruction of the very foundation of the structure, right?
A well-designed drainage scheme around the house will help to build an efficient system for collecting and discharging natural water. We invite you to familiarize yourself with carefully selected and verified information based on regulatory documents and the real experience of builders of low-rise buildings.
We will talk in detail about the types of drainage systems, the features of their device, the specifics of operation. We will give arguments in favor of choosing a particular type of drainage. The useful information offered to your attention is supplemented with photos, diagrams and video instructions.
When designing a drainage system, first of all, determine the goals that are planned to be achieved. They may consist in draining the entire site, in protecting the foundation and basement of the house from excess moisture.
Of the existing drainage systems, two main types can be distinguished - open and deep (closed). The first can be used for the needs of agriculture, for water disposal from cultivated areas. Closed drainage is used to drain water in summer cottages and cottage areas, to protect buildings from the negative effects of high groundwater levels.
The organization of the drainage system is necessary with a high groundwater table, which is especially evident during the flood period. Drainage to protect the concrete foundation from the aggression of underground water and reduce the hydraulic load
Combined drainage systems are also used. They are often supplemented with storm sewer branches designed for the disposal of atmospheric water. Provided that they are properly designed, they can significantly save on the construction of each system separately.
Image gallery
The first and main sign, according to which the owners of the site need to arrange drainage, is the stagnation of water during the snowmelt period. This means that the soils underlying the soil have a low filtration capacity, i.e. do not pass water well or do not pass it at all
Drainage is necessary in areas with pronounced signs of soil erosion: cracks that appear during the dry period. This is a manifestation of soil erosion by groundwater, which ultimately leads to destruction.
Collection and drainage of water is required if, during the period of snowmelt and heavy rainfall, groundwater rises to the level of laying communications
Drainage systems are built in areas with a characteristic slope. But in this case, they are needed for a balanced distribution of water and keeping it on elevated sites.
Flooding of the site during the snowmelt period
Erosion and erosion of the soil under the foundation
Water at the level of laying communications
Country plot with slope
#1: Open Drainage Device
Open drainage is the simplest and most economical way to drain water, which can be used under the following conditions:
- the underlying soil layer is clayey, poorly permeable to water, which is why the fertile layer, located 20–30 cm from the surface of the earth, is waterlogged;
- the site is located in a lowland, into which rainwater naturally flows during a period of heavy rainfall;
- there is no natural slope in the relief of the site, which ensures the movement of excess water towards the street.
Open drainage is arranged in areas with a high GWL, the mark of which is most often due to the location of the land allotment in a lowland or the clay composition of soils that do not pass or very weakly pass water into the underlying layers.

A drainage system designed to drain excess groundwater works great in tandem with a storm drain, the work of which is to collect and remove precipitation (+)
Planning a drainage scheme is best done at the design stage of a house. This will allow you to tie the work and place the storm water inlet under the gutters to the blind area.
Open drainage is considered the simplest and does not require a diagram. It is a trench 0.5 m wide and 0.6-0.7 m deep. The sides of the trench are at an angle of 30 °. They encircle the territory along the perimeter and direct wastewater into a ditch or pit, into a storm sewer.
Areas with a slope towards the street are easier to drain. For this, a gutter ditch is dug in front of the house, across the slope, which will retain water from the garden. Then they dig a ditch, it will direct the runoff towards the street, into a ditch.
If the site has a slope in the opposite direction from the road, then a transverse gutter is dug in front of the fence facade and another longitudinal one is made to the end of the site.
The disadvantage of such drainage is its low aesthetics and the need for regular cleaning of the gutters from silt and dirt, which periodically accumulates in them. This type of drainage is not recommended to be arranged under the road surface, as it leads to subsidence of the soil and deformation of the canvas.
The length of the lines for water flow, the number of wells and sand collectors depends on the area of the site, its topography, and the intensity of precipitation in a particular area.
Drainage ditches can be strengthened from erosion with the help of reinforced concrete slabs, stone paving, turf with crushed bottom
If the site is considered to be more or less even, and its level of waterlogging is not too high, then the simplest drainage system can be dispensed with.
Along the foundation of the fence, at the lowest point of the site, they dig a ditch with a width of 0.5 m, a length of 2-3 m and a depth of 1 m. Such a drainage system, although it will protect against a high groundwater level, and cope with precipitation perfectly.
To prevent the edges of the ditch from collapsing, it is filled with rubble, broken glass and bricks. Having filled it, they dig the next one, it is also filled and compacted tightly. Excavated soil is used for filling low-lying places in the territory
Over time, this simple drainage system may become inoperable due to gradual siltation. To prevent this from happening, it can be protected with a geotextile. It is laid on the ground, after backfilling the ditch, the drainage layer is overlapped with it. From above, to hide the ditch, it is sprinkled with a layer of fertile soil.
#2: Building an Efficient Stormwater Drain
Storm sewerage is necessary for the accumulation and removal from the site of water that falls in the form of precipitation. It is equipped with point and linear catchment devices.
Image gallery
Storm sewer systems are arranged to collect atmospheric water and prevent it from penetrating into the soil, and then into the underlying soil.
According to the type of water intake devices, storm sewer systems are divided into point and linear. The first are built in areas with organized drainage, the second - with unorganized
Linear water intakes have a much larger collection area than point ones. They are installed next to houses with unorganized drainage and on sites paved with a waterproof coating.
In linear stormwater, water is both collected and transported through a network of channels closed with a metal or plastic grate. In point systems, water is drained through a system of pipes laid in the ground.
Storm sewer with a point water inlet
Spot drainage channels
Water receivers of a linear variety
The structure of trays with gratings
The first type of water collectors is installed under the risers of an organized drainage system. The second type of water collectors is located under the slopes of roofs with unorganized drainage.
Water entering the sump moves through an open or closed pipeline. It is diverted either to a common well-water collector, or to a collector well, from which it moves to a centralized sewer network or gutter.
The storm water inlet is a container for collecting water, equipped with outlets for connecting pipes of a linear drainage system. Devices are made of durable plastic or cast iron (+)
The elements of the storm system with point water collectors are also drains, drains, dampers. Some manufacturers provide for the possibility of connecting storm water inlets with roof drains, as well as with underground drainage systems.
In addition, ready-made production models provide for the presence of sand traps and waste bins, which simplify the maintenance of the system.
A device with a decorative grille installed should be located 3-5 mm lower than the level of the track, the ground
This is a system of gutters made of plastic or concrete, which are installed on the site in those places where the accumulation of water is most likely, but highly undesirable.
For a drainage well, choose the most distant place from the house, well, cellar. If there is a natural or artificial reservoir nearby, then water can be drained into it
When designing with linear water intakes, the first thing they plan is the placement of a catchment or collector well. Next, determine the location of the rotary and revision wells. Their arrangement will depend on the placement of storm water inlets and closed sewer branches.
To prevent water from the street from entering the yard, gutters are installed along the gate line leading to the yard, garage doors, and also in the gate area. When choosing system elements to be installed on the roadway, the future load on them is taken into account.
To prevent moisture from getting inside the building, the slope of the coating in the garage is done towards the water intake grate. So water, when washing the car or thawing snow on the vehicle, will drain into the gutter.
Drainage trays must be installed on the porch, around the pool. They are also installed along the blind area, garden paths, laid out from the facing material of the sites.
To give the storm drain a neat look, special trays made of polymer concrete and plastic are used, which are closed with metal or plastic gratings. At the entrance to the house use a special pallet for cleaning shoes.
The grate for the gutter installed near the pool is chosen plastic, white, in order to avoid burns on a hot summer day.
With intensive use, drainage trays are mounted on a concrete base. The higher the load class on the roadway, the greater the thickness of the concrete base should be (+)
Gutters and water intake points are connected to a drainage tank. At the junction of gutters and pipes, inspection wells are provided. They are designed to facilitate access to the system and clean it from possible clogging.
Revision wells are made mainly of plastic. In order to obtain the required depth, their design provides for the possibility of building with the help of special extension elements.
Placement, slope and length of storm sewer pipes - all these characteristics are very individual and depend on many conditions on the site
A wide range of system elements allows the most rational design, which will be optimal from a technical and financial point of view.
The main elements of linear drainage are gutters made of concrete, polymer concrete, plastic, point receivers, sand traps, grids (+)
#3: Building Indoor Drainage Options
Underground, closed drainage is used if the device of an open system takes up too much space on the land plot or it does not fit into the landscape picture of the territory at all. The conditions for its installation of a closed drainage system are similar to the prerequisites for organizing a network of open drainage ditches and ditches.
Closed drainage schemes are used to protect the foundation, basements from groundwater and increase their service life. By analogy with open ones, they are used to drain a suburban area from excess groundwater.
It is mandatory to organize underground drainage on the site if:
- it is located in a lowland, in a swampy area;
- there is a natural reservoir near the buildings;
Underground drainage can be divided into two types:
- wall drainage;
- trench (formation) drainage.
Both types of underground drainage are carried out at the stage of building construction. If it was decided to start the problem of drainage after the construction of the house, then a trench ring system is used. There are also limitations for the use of trench drainage. It can be used if the house does not have a basement.
The fact is that, after, backfilling the pit with sand or soil creates a looser environment between the bedrock and the foundation. As a result, perched water penetrates into this environment, and then even the presence of a clay castle does not protect the building from moisture.
Therefore, if the house has a basement, for effective drainage, it is best to do wall drainage. It is used for draining groundwater directly from the foundation of the building, to protect basements, cellars, basements from flooding.
You can not plant trees and shrubs near the drain. The distance to the planted tree can be at least two meters and to the bush at least one meter.
Wall-mounted limits the rise in water level, preventing it from rising above the line of drainage pipes - drains. It is believed that a drainage pipe 1 m long is capable of draining an area of about 10-20 m 2.
When arranging wall drainage, the pipe is laid along the perimeter of the building. The depth of the laying of drains cannot be lower than the base of the foundation slab or the base of the foundation. If the foundation is very deep, then it is allowed to lay the pipe slightly above its base (+)
The distance from the drainage pipe to the foundation depends on the location. They are laid in each corner (or through one corner) of the building, as well as in places of turns and pipe connections.
Revision wells are also located in places with a large difference in the level of the site and with a large length of pipes - the distance between the wells should be no more than 40 meters.
In the revision well, the pipe cannot be solid, it breaks. This is done so that if the pipeline is clogged, it remains possible to flush it using a high-pressure hose.
The whole system closes on the last well. It should be located in the lowest place. Further, the water flows into a conventional sewer or open reservoir. If it is not possible to divert water from the house by gravity, then pumping equipment is installed and it is pumped out forcibly.
To ensure gravity drainage of water, the pipes are laid to the side to the collection manifold. The slope should be two centimeters per meter of the drainage pipeline. The depth of the pipe should be greater than the depth of soil freezing.
The pipe is covered with drainage material - gravel, fine gravel or sand. The minimum layer that will ensure the flow of water into the drain is 0.2 m
To save on geocomposite materials and prevent them from mixing with the soil, geotextiles are used. It freely passes water to the drains and at the same time retains particles that lead to siltation. The pipe itself must also be wrapped in protective material before backfilling. Some drain models are produced with ready-made geotextile filters.
It is possible to increase the efficiency of wall drainage using a profiled polymer membrane, which can be two- or three-layer. One of its layers is a polyethylene film with formed protrusions, the second layer of the membrane is a geotextile fabric.
The three-layer membrane is equipped with an additional layer of smooth polyethylene film. The membrane helps filter water from the soil and at the same time serves as a waterproofing layer for the foundation of the building.
Closed trench-type drainage protects the building from flooding and moisture. It is a filter layer, which is poured into a trench at a distance of 1.5-3 m from the wall of the house.
It is better that the depth of the drain is 0.5 m deeper than the base of the foundation - so the water will not exert pressure on it from below. Between the trench with drainage and the foundation of the house, a layer of clay soil remains, which serves as the so-called clay castle.
As with the installation of a wall drainage system, drains are laid on a layer of gravel or fine gravel. Both pipes and gravel layer are protected by geotextiles from clogging.
#4: Building a Wall Drain Step by Step
In order to get a visual representation of the drainage process around a country house, consider an example. The site given in it required the installation of a groundwater drainage system, tk. under the soil-vegetative layer lie loams and sandy loams, which are extremely poorly permeable to water due to their low filtration capacity.
Image gallery
For drainage, we develop a trench around the house. Since the work was carried out with a mini-excavator, they retreated 1.2 m from the walls so as not to damage the building. If you save manually, you can make closer. The bottom of the working is 20-30 cm below the foundation
The branches of the trench formed around the house should have a slope towards the common trench, intended for the pipe for draining the collected water to the collector well
We fill the bottom of the trench with sand. We ram it and form a slope of 2-3 cm per linear meter. We direct the slope towards the common trench, the bottom of which is also filled and rammed. In the case of crossing the trench with communications, we take into account that the drainage pipes must pass below them
We prepare drains, perforated polymer pipes, for laying in a trench. We wrap them with geotextile, which will prevent clogging of the system and filter groundwater
We cover the rammed bottom of the trench with a second layer of geotextile, pour gravel on it and put drains
The channels for draining water from storm sewers and the drainage system are laid in one trench. It is permissible to divert the water collected from them into one collector and use common manholes
Having wrapped the gravel backfill along with the drainage pipe with a second layer of geotextile, we fill the trench with quarry sand. We do not use the soil dumped during the development of the trench, the sand will better pass the water to collect the drain
The common trench, to which circular drainage is supplied, is brought to the installation site of the collector well
A properly built cesspool has been functioning for years, absolutely not requiring any attention. However, over time, the efficiency of its work decreases and there comes a time when the filling of the sewage tank occurs very quickly. At first, of course, you can save yourself by calling a sewage machine to clean the sewer. When the interval between calls is reduced to several weeks, the understanding comes that the problem cannot be solved by simple pumping out. Meanwhile, there are several very effective methods, ranging from fairly simple to radical ones, the use of which will make the sewer system work with the same strength.
Reasons for fast filling

During the operation of the cesspool, the effectiveness of its drainage layer decreases over time.
When equipping a cesspool, a leaky structure with a drainage layer at the bottom is usually used. For a long time, the drainage performed its functions, diverting liquid waste into the ground. Over time, the gaps between its elements became clogged with fat residues, food residues, and simply silt. Spontaneous sealing of the bottom of the pit occurred. As a result of this, wastewater does not have access to the soil layer and simply fills the tank, and since a sewage pit is usually built based on a three-day drain volume, its volume is filled very quickly.
Another reason for the inefficient operation of the sewer system may be its freezing in the winter. Naturally, draining water onto frozen ground will be impossible.

For the normal functioning of the sewerage system in winter, it is necessary to insulate the sewage well
With a decrease in the efficiency of the cesspool, the following signs are observed:
- The walls of the waste sewer tank are covered with fatty deposits, which are quite problematic to wash off;
- Accumulation of bottom sediment;
- A fetid odor from the pit;
- The time to fill the cesspool is reduced to a week or less.
For the normal functioning of the sewage system, it is necessary to properly clean the cesspool and restore its performance.
Sludge removal

Silting of the bottom of the cesspool
The main reason why the normal operation of the sewage tank is blocked is the silting of the bottom. You can overcome this problem in the following way:
- First of all, it is required to pump out sewage using a sewage machine. In order to remove deposits from the bottom of the pit as much as possible, it is necessary to drain the sewage from the machine under pressure. In this case, the upper layer of silt deposits will be eroded and pumped out again by the sewer.
You can mix the bottom sediment well with the help of a long pole with an element in the form of a fungus at its end.
- Fill the bottom with clean water. So they will be further liquefied.
- Add special biological preparations containing bacteria directly into the pit or through the sewerage system. The fact is that bottom sediments are food for many types of microorganisms. After processing, there will be very little solid residue, because the main part of the sludge will turn into a liquid that will successfully go into the soil. It is best to add the biopreparation directly into the pit, splashing it on the walls.

Biological products for septic tanks will help to cope with the problem of silting the bottom of the cesspool
As a result of the use of preparations containing bacteria, they achieve not only liquefaction of the solid sediment and a decrease in the amount of waste in the pit, but also the elimination of bad odors, as well as the restoration of the drainage system.
The positive side of the use of biological preparations is the production of organic substances that are absolutely harmless to humans and nature. They can be easily poured onto the ground.
Sludge can be pumped out not only with the help of special equipment, but also using household fecal or drainage pumps. The former are preferable for compacted sludge, since they have a knife in their design that grinds the solid sediment for its normal passage through the hose. In the process of work, it is better to release sludge into a compost heap and later use it for fertilizer purposes.
Pumping out a cesspool with a drainage pump
Ways to improve efficiency
There are several ways to improve sewerage performance. The work can take from several hours to several days, depending on the degree of complexity.
Improvement of the cesspool to a septic tank

An old cesspool can be modified to a simple septic tank
The silting of the bottom of the cesspool can be easily turned to your advantage by using the resulting sealed container as the primary chamber of a simple septic tank. In order to move a step forward in wastewater treatment, you just need to install a filtration well a few meters from the first structure and make an overflow and ventilation system. When doing this work, follow the recommendations of experts:
- You can dig a pit both with the help of earthmoving equipment and manually. The first option is preferable when arranging a septic tank away from buildings. In addition, the earth loosened by an excavator will absorb water much more efficiently. The second method is much cheaper and does not require access roads for construction vehicles. It should also be borne in mind that a manually dug pit will exactly repeat the outlines of the elements for strengthening the walls of the septic tank, so this method is much more effective in hard-to-reach places or near buildings.
- When choosing materials, if possible, preference should be given to prefabricated concrete rings with perforations. They are durable and very effective. Their only drawback is their heavy weight, requiring installation with a crane. The way out of this situation is the manual digging of the rings by the method of gradual selection of soil from under their walls and internal space. Also, to build a filtration well, you can use brickwork with a gap or car tires from trucks.
- The overflow pipe from the waste pit is installed half a meter below the level of the sewer sewer inlet. Usually use products with a diameter of 110 mm. The end of the pipe must be at least 20-25 cm from the inner wall of the filtration well. This requirement is especially important for red brick walls, since its surface will not be destroyed during the draining process. Note that it is better to use rejected burnt bricks. It perfectly copes with moisture and has a low cost.
- When arranging a filtration well, one should not forget about sanitary standards and SNiP, requiring that treatment facilities be located no closer than 30m to a well or well, 1m from the border of a neighboring site and 3-5m from the nearest structure, depending on its number of storeys.
In the process of using an improved cesspool, one should adhere to the same rules as when working with septic tanks - the regular use of biological products, the absence of chemical components of household chemicals in wastewater, and the periodic removal of sludge.
Improvement of filtration parameters

Perforation of the walls of concrete rings greatly increases the performance of the seepage well
Of course, after completely pumping out the sludge from the bottom of the cesspool, you can use the method of cleaning the drainage with biological products, but nothing will give such an effect as a complete replacement of the drainage layer. Of course, this work cannot be called pleasant, but if you manage to complete it or find a volunteer, you will get an almost new sewer facility. To remove the old drainage, you can use a bucket with a rope and a regular shovel with a short handle. After the old filling is removed, the pit is deepened by 30-40 cm and covered with a 20-30 cm layer of fine gravel, and then a 30-40 cm layer of coarse gravel, small rubble or broken brick.
If the walls of the cesspool are made of monolithic concrete rings, then perforations can be made in the two lower structural elements. To do this, it is better to use an electric hammer drill or impact drill and a diamond drill with a diameter of 50-80mm. The distance between adjacent holes, as well as between their rows, must be at least 25 cm. Otherwise, the strength of the structure may suffer.
Pit defrosting

In winter, a thick layer of snow will keep the cesspool from freezing.
In rare cases, the performance of the cesspool is reduced due to the freezing of waste. Often this is not at all due to poor thermal insulation or improper design. It happens that “General Frost” is to blame for all the troubles, and then you have to resort to drastic measures.
In order to not wait for the spring heat in order to defrost the pit, it is necessary to prepare an extension cord, a copper wire, a steel rod 20-30 cm long and a gripper.
When carrying out work related to electricity, be sure to follow the safety regulations. Wear electrician's gloves and shoes with thick rubber soles.
If the sewer pipe is frozen, then it is enough to wrap it with a copper conductor, the end of which is connected to the phase wire. After several hours, in the process of current flowing between copper and ground zero, the pipe will warm up and thaw. It is only important to prevent children and animals from entering the working area.
If the entire pit is frozen, then a steel rod is required to be driven into its center, a copper conductor is connected to it and phase voltage is applied. It is possible that it will take not several hours, but a whole day to thaw the pit, but this will happen in any case. After completing the work, it is necessary to turn off the voltage and only then remove the rod with wires.
The effectiveness of its work in the future, as well as the frequency of cleaning the sewer system, will depend on the method of restoring the health of the cesspool. The use of biological preparations will help to postpone the call of a sewage truck for a long time, it is only important to adhere to the rules for using a sewage system with a bacterial cleaning method.
Share with friends!We will send the material to you by e-mail
A fairly important hydraulic operation is considered to be drainage in a summer cottage. The easiest way to improve the water balance of the soil should be mandatory, because the ratio of moisture in different periods of the year can change not only due to natural factors. Sometimes even a nearby construction site can upset the balance.
Uncomplicated system for draining water from the building
Soil drainage can be carried out using open trenches or specialized pipes placed in the ground. The first of them are simple in design, but do not look very aesthetically pleasing. In this regard, some developers create closed-type channels that do not violate the attractiveness of the landscape.
surface lines
Although surface collection systems are relatively simple, they effectively remove moisture from the site in the form of precipitation. Through special trays and depressions, water is directed to the central gutter or drain well. Among the advantages can be distinguished:
- high speed of construction;
- small costs;
- sufficient level of efficiency;
- ease of cleaning.

Useful advice! If we are talking about how to make drainage on the site with your own hands without unnecessary financial investments, then first of all you should consider the option with an open channel system.
Closed drains
Depth line systems are ideal for both stormwater and groundwater in close proximity. Most often they are arranged using polymer pipes that are immersed in the ground for a certain distance.

In practice, two types of drainage with closed channels are well applicable:
- point (water is collected in one place);
- linear (moisture collection is provided throughout the pipeline through special holes).
Note! Within the same area, the presented species can be combined. For example, for the drainage system of a house, you can use a point collection, and for groundwater - a linear one.

Drainage at the dacha: the easiest way to device for specific conditions
Before you make a drainage system on the site, you must choose its type, based on operational features. It is worth considering the most optimal options for arranging water drainage systems, which are popular under certain conditions.

An example of site drainage with a high groundwater level
With a close occurrence of groundwater, a deep system of a linear type may be the best option. It will remove moisture from the entire site to a sewer, ravine or ditch located one level below. It is proposed to use perforated plastic pipes in the geotextile filter as the main elements.

One of the simplest methods of drainage in a summer cottage with groundwater located near the surface comes down to the following scheme:
- A trench breaks out to the distance of soil freezing. Its slope should be 2 cm per linear meter towards the liquid collection point. For leveling, a layer of sand is poured.
- Geotextiles are spread on the prepared bottom so that its edges overlap the walls of the pit by at least 1-2 m. A small layer of gravel is poured on top.
- Next, plastic pipes are laid, after which they are again covered with approximately the same layer of gravel. The ends of the geotextile roll up to form a protective barrier. The rest of the trench is covered with soil.

For your information! Knowing how to properly drain around the site and on its territory with a close occurrence of groundwater, you can avoid serious problems associated with an excess of moisture.

Related article:
Do-it-yourself open drainage device on a site with clay soil
For land with clay soil, a system with an open channel arrangement is more suitable. With a closed piping system, water will not be able to seep through such soil and go to specialized septic tanks or other suitable places.

In places where water accumulates, ditches are dug with a depth of at least 50 cm. Their width should increase as they approach the place of reception. It is necessary to make the widest trench, which collects water from the ditches adjacent to it. To facilitate draining and protect the edges from collapse, the side walls are cut at an angle of 30 degrees.
Since the open view of the trenches spoils the appearance of the site, it is necessary to decorate them. It not only allows you to increase the aesthetic properties, but also to strengthen the side surfaces of open lines. In this regard, the operation of the system is significantly increased.

Stones of various sizes can be used as material for decorating pits. The largest of them should be laid on the bottom, and medium and small - on top. If there are good financial opportunities, the surface can be covered with marble chips, which will give the branch lines a respectable look.
If money is tight, then regular brushwood can be a good option for decoration. It is necessary to find dry branches of any wood species that grow nearby. They should be tied in bunches and laid on special stands installed at the bottom of the ditch.

The thickness of the bunches of brushwood should be no more than 30 cm. It is better to place the branches so that the larger ones lie in the center, and the smaller ones at the edges.
Related article:
Average prices for turnkey site drainage
Many companies offer professional drainage services, but they don't come cheap. During the work, a double-walled pipe with a geotextile filter will be used.


Care rules
Drainage structures will function properly for many years if the basic rules are followed during operation.
A drain well, known in everyday life as a pit, is the end point in using an autonomous water supply system, which allows you to operate communication with maximum convenience for residents. Any country house or dacha that has a functioning water supply must be provided with sufficient drainage in depth. Without it, laying a water pipe will be meaningless, since the vast majority of small settlements are not provided with a central sewer system.
Drainage pits are of different types, differing in design, but they have one task - the timely disposal of wastewater. It is not customary to drain the drain from the toilets into the drain; this structure accumulates sufficiently clean water, which, with appropriate treatment, can be reused for technical needs or irrigation. Of course, we are not talking about sewerage, which drains liquids with a high content of chemicals that are dangerous to the environment. For example, acids, drugs or chlorine.
Device
There are three main structural types of drains. You can choose any of them for your suburban area, subject to all the requirements and expectations of the owners.
- Sealed pits are the safest structures for the environment and humans, from which pathogenic bacteria or harmful substances cannot enter the ground. Such structures are often called settling tanks or storage wells. The liquid is stored in them until the very moment of pumping out by sewers. You can build such a hole yourself. For artisanal models, concrete rings are used, followed by sealing of joints, old plastic or metal containers (barrels, tanks) equipped with tight-fitting lids.
- Industrial samples are also produced, completely ready for operation. The only drawback of such a drain will be the volume limitation - more than necessary, the water cannot be drained. And calling a sewer is always an additional expense.
- Filter pits are not quite legal structures, which, nevertheless, continue to be used by summer residents. The design of the drain involves the use of a bottom filter made of natural sorbents - sand or peat. You can also use broken red brick, crushed stone. The principle of operation of the pit is to gradually drain the liquid into the ground. Seeping through a thick filter layer (at least 0.5 meters), the water is cleared of large organic impurities and absorbed into the ground. Such plums are rarely pumped out by pumps or special equipment. The need for the help of sewers arises only when the bottom and walls are clogged with silt or fatty deposits.
It should be noted that with the active use of sewage, it is forbidden to build such a drain. A large amount of liquid makes the filtration poor. As a result, the soil is contaminated with bacteria and environmentally harmful chemical impurities (for example, detergents).
According to sanitary standards, filter wells are used only with a daily flow volume of one cubic meter.Such a structure is ideal for draining water from baths, showers, bathtubs.
 In rare cases, used water from washing machines can be diverted here (provided that the drain is located remotely from wells, wells and water pipes, as well as vegetable beds and gardens).
Two-chamber structures are an attempt at a handicraft construction of a complex system of a sump and a filter well. Two wells (pits) are connected at the top by an overflow pipe. Water enters the first sealed pit. Gradually, it settles, large impurities settle to the bottom. Then the liquid flows into the adjacent pit, which does not have a sealed bottom. Water is gradually absorbed into the soil. And from the first well, the contents must be regularly pumped out using a drainage or fecal pump. For greater efficiency of the system, it is recommended to fill the sealed sump with biological products that will process the waste to safe components - the sludge will sit on the bottom, and completely purified water will go into the filter well.
Purpose
It is forbidden to divert waste from the toilet or kitchen into drain-type pits!Drains are designed to collect relatively clean water: 
- from showers;
- baths or saunas;
- from washing machines;
- washstands and sinks.
Water can also be drained here through sewer trays and gutters after washing the car.
But such water must be placed in an airtight pit, as it contains residues of gasoline and engine oils.
Additionally, you need to take into account the capacity of the sewage truck, which will periodically have to be hired to pump out the drain. If the volume of the pit is too large, it will be pumped out by half, which is not very profitable from an economic point of view.
How to find the right place for a hole
Of course, it is rather difficult to choose a suitable place for digging, if the territory of the site is already built up. However, even in such a difficult situation, it is necessary to strictly adhere to the basic sanitary and technical standards:
- The pit should be separated from housing by at least five meters. Moreover, the distance to the structures located on the neighbor's site is also taken into account. The same distance separates the drain from the fence - these are the sanitary standards for this element of sewer systems.
- A free access is provided to the pit - an access platform for a truck is being equipped.
- It is forbidden to arrange a drain on the slopes! Placement in such a place will lead to erosion of the soil and collapse of the walls of the pit (plastic containers may float).
- From any sources of drinking water, the pit is located at a distance of 30-50 meters.
The depth of the pit itself is two meters. Ground water very quickly damages or washes out the structure of the pit, rendering the drain unusable.
What can you build
For sealed pits use:
- Old plastic or metal containers. This is one of the budget building options.
- Concrete rings of large diameter (the well is sealed!) Or concrete mortar. A timber formwork is preliminarily built, into which the solution is poured. This type of building is completely sealed. Additionally, the walls and bottom can be treated with a sealant solution.
- Industrial wells made of polymers are a rather expensive solution to the sewer drain problem. But its installation does not require additional labor costs.
Suitable for filter pits: 
- Brick. With the help of such a building material, it is easy to achieve good water permeability of the walls. Drainage holes are usually made at the bottom of the pit, as an addition to the backfill filter.
- Special concrete rings that already have drainage holes.
- Car tires are perhaps the most budgetary building material that can ensure high-quality absorption of liquid into the ground.
- Old metal or plastic containers are a universal way to build both a sealed and filter well. In the latter case, holes are cut in the bottom or holes are drilled.
Work order
The construction of the drain includes the following works: 
- Trench and pit are being prepared. The size of the pit should be slightly larger than the main structure of the pit.
- Sand and gravel are laid out at the bottom, the pillow is compacted.
- A concrete slab is laid on top of the pillow or a screed is made. For filter pits, this is not necessary.
- Depending on the building material, it is carried out: brickwork, installation of rings or ready-made containers.
- With the help of rubber couplings, a sewer drain is connected.
- A ceiling is installed on top (a concrete slab with a hole for a hatch or a shield made of boards).
- A hatch with a cover is installed and a ventilation pipe is equipped.
- From above, the structure is covered with soil, and clay, sand or fine gravel can be used for side backfilling.
Tools and building materials
To carry out the work you will need: 
- bayonet and shovel;
- manual roller for compacting the pillow:
- hacksaw for cutting pipes;
- perforator for punching technical holes in concrete (if a reinforced concrete structure is being built);
- sealant;
- cement (used when laying concrete rings);
- sand and gravel for the bottom cushion;
- plastic or metal container (if you plan to use this option);
- bricks for the construction of a brick well.
Construction work should be preceded by a plan and calculation of the amount of building materials. According to the exact data, the list of building materials and required tools is being corrected. see our material.
Very expensive, but pays for itself quickly!
If you have damaged precious metals, then you are, in any case, interested in making a profit from them. You will learn how to do this in our