How liquid wallpaper is glued to the walls. How to glue liquid wallpaper on various surfaces
Currently, there are many different types of water supply systems that can be installed in the country. All of them are highly efficient. Standing apart here is the water supply from the well in the country. This system is completely autonomous, so more and more people prefer it for their country houses and plots.
Making water supply in the country from the well is quite difficult. However, nothing is impossible in this matter. For work, it is worth acquiring additional patience and labor resources, because it is not always possible to complete the entire range of activities alone. The water supply of summer cottages is reaching a new level thanks to the use of wells for these purposes.
Main advantages
Creating a water supply system using wells carries a number of positive aspects:

- a huge supply of water, that is, liquid is drawn from the bowels of the earth, here its supply is endless;
- since water is taken from a depth, it has an increased chemical and physical purity;
- the possibility of obtaining almost any volume of water for all your needs;
- long service life, which can be 50 years or more.
It is worth considering the issue of water supply in the country with the help of a well in more detail. In this case, we will talk about a well in which a submersible pump is mounted.
Back to index
Kinds

Today, all wells that serve to organize water supply in the country can be divided into two large groups - artesian and sandy. At the same time, sand wells can go deep to a depth of 30 meters and provide water flow in a volume of approximately 1.5 cubic meters per hour. The second option can be buried as much as 70 meters. The volume of water is about 10 cubic meters per hour. Water supply in the country is organized by both methods.
Sand wells have one very significant drawback, which makes their use for organizing water supply in the country limited, namely, they are very often polluted due to sediment or other substances. Artesian wells should be used in conjunction with a filter to purify water from iron and other heavy elements. At the same time, a specific type of filter is selected only after a thorough biochemical analysis of water has been carried out. Installation of an artesian well also entails a number of inconveniences. Groups of filters are often installed here, from which it is rather problematic to drain water before the preservation process is carried out.
However, water supply from a well has recently been considered the best option for giving.
Back to index
Additional elements

Today, all wells that are used to organize water supply in the country are equipped with a pipe, which is selected in accordance with the diameter of the system itself. A head is mounted on top, which prevents various small particles of dust and dirt from entering the well.
Water from the well is pumped out by means of a submersible pump, which is selected based on the parameters of the well itself, as well as on the basis of what needs a person living in a country house has.
The pump itself, together with the hose and cable, is quite heavy. Sometimes, to immerse it to the required depth, you need to use special lifting mechanisms. In this case, a winch is ideal. She can quite cope with the task. In addition, you can additionally install two coils, on one of which the cable will be wound, and on the other a hose.
It is better to equip water supply in a country house from a well in cases where we are talking about year-round living in it. In this case, all systems will work stably. If the residence will take place only in the summer, you need to think about how to think over other methods of organizing water supply in your area.
Currently, most often, a water supply system is organized to supply water directly to the house, which is based on polypropylene pipes. They have excellent performance characteristics, are not subject to rust, and are not exposed to harmful aggressive chemical environments. An excellent solution for any water supply system.
If the water supply in the country house will be operated exclusively during the warm period, then laying pipes too deep does not make sense. Here you can limit yourself to 1 meter depth. However, it is worth remembering that it will be necessary to drain all the water from the system in the fall. When laying pipes, it is worth remembering that all pipes should be mounted at a certain angle to the well. Moreover, the slope should be in her direction. This ensures complete purification of the water supply system from excess water. This completely eliminates the possibility of a break in the water supply system in the winter.

In order to be able to drain all the water from the system even before the onset of frost, it is necessary to install a special drain solenoid valve. In the event that the water supply in the country house will be operated all year round, it is necessary to lay pipes to a great depth. It should exceed at least 20 cm the depth of freezing of the soil. In this case, they will be completely protected from external weather conditions. It is worth remembering that the depth of soil freezing is not the same in all regions of the country. This phenomenon needs to be researched first.
It is not always advisable to lay pipes to a depth of more than two meters. This phenomenon can be avoided. For this, special heaters are used, which are mounted outside on the polypropylene pipe. Such heaters are now quite widespread. They perfectly protect the pipes in the winter. In this case, the depth of the bookmark can be made much less than originally intended.
Back to index
Used filters
As noted earlier, after the submersible pump, special cleaning filters must be lowered into the water. Of course, not all models that are on the market are suitable for a particular situation.
All filters are selected according to the type of water that prevails in the area.

Well water filtration system.
In the event that we are talking about using an artesian well for organizing a water supply system, it is imperative to install an iron filter.
If the depth of the well is not so great, then filters can also be used that limit the flow of fine mechanical particles into the pipeline. Any filter must be installed even before the accumulator. In this case, its contamination with sand and other particles can be excluded. Cleaning the accumulator itself is very difficult. In any other places in the system, the filters must be installed in such a way that they can be easily reached. In this case, they will be easy to clean and change.
Back to index
Automation and hydraulic accumulator

Automatic water supply eliminates the possibility of hydro-impact.
The automatic water supply control system ensures the stability of the entire water supply system, eliminates the possibility of water hammer and helps to optimize the operation of the pump in the system to ensure optimal on / off cycles.
Here we are talking about the installation of two types of control relays. The first relay is a pressure switch that turns on the engine when the pressure drops to a certain value. The second relay is the idle relay. Due to the fact that the pump will turn on and off at the slightest leakage of water from the system, it may fail in the near future. The bearings and the shaft itself will begin to wear out. Naturally, a submersible pump is a very complex mechanism that costs a lot of money. To compensate for its work, it is necessary to install a hydraulic accumulator in the system.
The accumulator is a container, which is divided into two parts. One contains liquid and the other contains air. At the same time, both sections are separated by a special waterproof membrane. Air pressure in this case can have a variety of values. Its parameters can be adjusted using special controls.

The principle of its operation is quite simple. Water from the system is first drawn into it. At the same time, the air that is in its other part is gradually compressed to a certain value, which is set using a pressure switch. After the liquid pressure reaches its maximum, the pressure switch is activated, which turns off the pump. After that, the liquid gradually begins to be spent on the needs of the consumer. At the same time, the air pressure gradually decreases. It falls until it reaches a certain set value. The pump will then turn on again.
Leaving for a country house outside the city, few people are ready to completely abandon the benefits of civilization, especially when it comes to plumbing. Agree, the importance of water supply to a summer cottage is difficult to overestimate.
Water is necessary for watering the garden and garden beds, as well as solving household problems. What can we say about the use of household appliances that require connection to the water supply network. For the arrangement of water supply, you can attract specialists or manage on your own.
To make plumbing in the country with your own hands, you first need to decide on the source of water, select the necessary equipment and materials, and study the sequence of work. These are the questions we will help you solve.
For a better understanding of the water supply process, we illustrated the material with visual diagrams and photographs, supplemented the information with video clips.
The device of any water supply begins with the choice of a source of water supply. Although the choice is usually not great. It can be a centralized water supply system,.
From where the water will come from, not only its quality depends, but also the methods of constructing the entire plumbing system, its technical complexity and cost.
Image gallery
Winter plumbing is a much more complex system. Everything must be taken into account - from the natural slope of the terrain to the depth of soil freezing. Be sure to have a pump to provide water pressure. In a word, a winter-type summer water supply system is no different from a water supply system for residential private houses.
Image gallery
Liquid wallpaper is a material that is one of the varieties of decorative plaster. The mixture contains fibers from cellulose. In the role of additives, silk fibers are placed in some types. To add color saturation, liquid wallpaper contains dyes and various fillers, such as sparkles. In order for the wallpaper to be easily glued to the wall, one of the components is KMS glue. This glue is already familiar to many, since it can be used to glue roll wallpaper.
It is because of the structure that this material is called - liquid wallpaper. But if we analyze the gluing technique, then they are close to decorative plasters.
According to their composition, wallpapers are divided into the following types:
- based on silk;
- based on cellulose;
- combined base: silk together with cellulose.
Silk liquid shown in the photo:

The most reliable and durable in use is wallpaper material based on silk.
Tools that are used to lay the mixture on the walls: trowel and grater.
The advantage of liquid wallpaper
Let's take a closer look at liquid wallpaper and start with the positive characteristics:

Important! The disadvantages of liquid wallpaper are few, but they still exist. They are very afraid of water. Therefore, in rooms where it is necessary to wash the walls, liquid wallpaper should not be used.
After watching the video below, you can learn how to choose the right liquid wallpaper and stick it on the walls:
Surface preparation
Before sticking wallpaper on the walls, you must carefully prepare the surface. If they are able to hide minor roughness, then spots, especially dark ones, can show through. This material is diluted with water, and it can become a solvent for various contaminants on the surface, which will be visible after the wallpaper has completely dried. Surface preparation consists of several important steps. The type of walls is determined, and only then they begin to prepare them.

Important! At the stage of surface preparation, you should not save on a primer. It is thanks to this procedure that it is possible to ensure the strength and durability of liquid wallpaper.
Mixture preparation
The wallpaper mixture is prepared in advance. This process must take at least 12 hours. All components of the mixture are already well mixed and packed in plastic bags. Shake the bag well and empty the contents into a plastic bowl. Mix thoroughly again, do not press the mixture strongly and crumple. The amount of water to be poured must be specified in the instructions. In the photo - the initial stage of wallpaper kneading.

Important! First, water is poured into the container, and then a dry mixture of wallpaper is gradually poured.
Each package must be mixed separately. It is strictly forbidden to mix only part of the package. In such cases, the proportion is violated, and the structure of the wallpaper material will be different. After adding water, the mixture must be kneaded by hand, as in the photo.

It is unacceptable to do this process with a mixer. In this case, all the components that make up the wallpaper material can be deformed. In principle, it is worth making sure that the metal does not come into contact with the mixture. After the mixing process, when the components are completely saturated, it is best to put it in a plastic bag, close tightly and leave for a long time (12 hours).
The video provides instructions for diluting the components and then sticking liquid wallpaper:
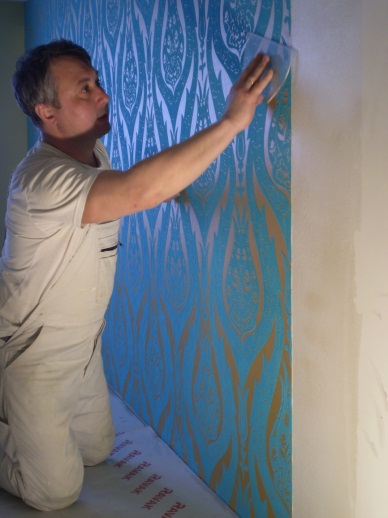
Wallpapering the walls
We begin the process of gluing wallpaper on the walls. To do this, we take out a small amount of the prepared mass from the bag or container with our hands, put it on the trowel and distribute it on the wall. The layer thickness should be about 3 mm. Apply in small areas, gradually distribute centimeter by centimeter. After a certain part of the mass has been applied to the wall, smoothing should be done with a float. This process is shown in the photo.

Consider the main points in applying wallpaper material to the surface:
- when smoothing the wallpaper, the fibers will lie in the direction of the float. Therefore, it is necessary to drive the grater in different directions. It is best to carry out circular movements;
- if the general view will be divided by a pattern or columns, then to give symmetry, apply liquid wallpaper in opposite directions. Do the same with the grater;
All described processes can be viewed on the video:

How to prepare the walls and stick liquid wallpaper on your own is shown in the video:
Liquid wallpaper can be glued to any surface. With proper preparation of the walls and the material itself, all gluing work can be done by yourself, and the result of the work will be extremely positive.
The simplest finishing material for walls is liquid wallpaper. How to glue them, because they have little in common with ordinary rolls? On the benefits of finishing and proper work with the material, read on.
Characteristic
What is liquid wallpaper? This is a modern finishing material for walls. In appearance, such wallpapers resemble sawdust or plaster. They consist of cellulose, silk or cotton fibers with the addition of acrylic, dye, fungicidal and adhesive components. Sometimes they are supplemented with decorative elements: sparkles, stone chips. Sold in two versions: in the form of a dry mixture (in plastic bags of 1 kg), which must be diluted with water, or a ready-made solution.
Why is liquid wallpaper so attractive? The method of their application differs from the laborious gluing of rolls. This reduces the repair time, which is good news. A layer of liquid plaster, just applied to the wall, resembles paint, but when dried, it turns out to be embossed, does not collect dust, lasts a long time and can be easily removed when tired.
You can experiment with coverage. From a white mixture without additives, original compositions are prepared with the inclusion of various dyes and decorative elements. But this method is more accessible to professionals.

Advantages and disadvantages
- They are plastic, easy to prepare and apply to the walls. Installation does not require special skills, expensive tools. They are convenient to paste over corners and relief surfaces (arches).
- It is an eco-friendly material, safe for health. Such wallpaper can be glued in the children's room.
- Liquid wallpaper allows you to create patterns.
- They look attractive and neat. Has no seams.
- Wallpaper regulates the humidity in the room, absorbing or releasing moisture, depending on its excess or lack.
- The cover is soft and warm to the touch.
- Wallpapers have antistatic properties.
- They do not absorb foreign odors.
- They repel fungus and prevent the development of mold.
- They have sound and heat insulating properties due to the porous structure.
- Do not cause allergic reactions.
- Not afraid of shrinkage.
- Suitable for any space.
- Easily restored in case of mechanical damage.
- Attaches to many types of surfaces: concrete, wood, metal, drywall and even painted surfaces.
Of the minuses, it is worth noting the rather high cost and non-standard rules of care (you can not wet it). Such a coating does not withstand mechanical loads. Otherwise, liquid plaster is trustworthy.
Advice! Since liquid wallpapers are afraid of moisture, it is worth covering them with a colorless varnish when finishing. The coating protected in this way is suitable for all types of rooms, including bathrooms and kitchens.
Preparatory stage: walls
Another advantage of liquid wallpaper: they can be applied to a wall that is not completely even, as they smooth out small surface defects. However, a little preparation is needed:
- First, the old finish is removed. Plaster and paint are removed with a spatula, old wallpaper is soaked with water and peeled off.
- The coating is applied only to a clean wall. The surface gets rid of dust and other contaminants, as well as small particles of the old finish. Cleaning is done with sandpaper.
- If there are nails in the wall, it is recommended to cover the hats with white enamel.
- Next, all cracks and chips are sealed. It is necessary to putty the wall depending on its condition. If it is more or less even, then it is partially puttied. Minor defects will hide under embossed liquid wallpaper.
- After the putty has dried, the base must be primed. On sale there are special primers for walls for sticking liquid wallpaper.

Advice! If the walls are made of drywall, then they must be puttied and covered with an aqueous emulsion. This will help to avoid soaking the surface when applying the liquid layer. To increase moisture resistance, PVA glue (3: 1) is added to the putty mixture.
Mixture preparation
More often wallpaper is bought in dry bags. To stick liquid wallpaper on the wall, you need to prepare a mixture:
- Pour warm water into a deep container.
- Add the dry mixture in small portions, while stirring with a building whisk. And it is best to stir the composition with your hands to avoid damaging it.
- Add and stir until a thick creamy mass is obtained.
- If desired, decorative components are added.
- The mixture should be left for 15-20 minutes for the wallpaper to swell.
- Mix again, remove large lumps.
- The mixture is ready.

A solution of liquid wallpaper is recommended to be prepared immediately for the entire room, so that the finish is uniform in color. Follow the directions on the dry mix package to achieve the most accurate result when mixing your wallpaper.
How to stick
Wallpaper is applied in two ways: by spraying with a special gun or by spreading with a wide spatula. Since it is not always possible to get special equipment, consider the second method.
To glue, or rather apply liquid wallpaper, you will need:
- putty knife;
- roller-knurling;
- colorless varnish.

How to apply the mixture correctly:
- We scoop up a little solution with a spatula and apply it to the wall so that there are no bulges and voids under the coating. It is better to apply layers in a certain way: horizontal or vertical stripes, herringbone, zigzags or spirals. This will result in a beautiful finish, and applying in a chaotic way does not form an aesthetically valuable coating.
- We level the first portion.
- Now we distribute the next part of the finish in the same way.
- Each layer of wallpaper should smoothly transition into another. Keep the coverage uniform.
- Each square meter is leveled with a roller.
- If defects are found, then we fix them in hot pursuit: lightly moisten the place with water, remove the unsuccessful coating with a spatula, apply a fresh portion and level it. Be careful: wallpaper does not tolerate contact with water, so make adjustments no more than three times.
- The recommended layer thickness is from 1 to 3 mm.
- Wait for complete drying. This will take from 1 to 3 days, depending on temperature and humidity. The warmer and drier the room, the faster the liquid wallpaper dries.
- If necessary, the dried finish is covered with a colorless varnish. Such wallpapers can be washed, and they also become more attractive in appearance.

Advice! You should not press the wallpaper too hard, otherwise you will not be able to achieve a textured surface. But underpressure is also not recommended: this way the wallpaper layer can move away under its own weight.
On liquid wallpaper, you can create a relief pattern. To do this, you need a roller or brush. You need to wet the object and draw something on the wet surface. Drawings of different colors are created from liquid wallpaper.
You will need a stencil. Place it on the wall and fill it with one type of wallpaper, smooth the edges. The next layer is applied after the previous one has dried. In this case, it is not necessary to observe the same thickness of the parts of the picture - individual elements can be thicker or thinner than the main layer, creating the effect of a bas-relief or high relief, creating a three-dimensional composition.

To keep the repair for a long time, follow these recommendations:
- Work is carried out in a room with an air temperature of at least +10 degrees.
- Tools must also be clean and free of grease, as well as surfaces.
- Pasting walls with one color of wallpaper is done in one stage. Don't leave an unfinished finish.
- If the solution does not stick, then add a little water to it.
- When applying the mixture with a spatula, you can help yourself with your hands, as the composition is safe.
- After finishing work, ventilate the room well, as the coating acquires its final form after complete drying. However, avoid drafts.
- It is forbidden to use hard brushes and detergents to care for liquid wallpaper. They damage the coating, which is not resistant to mechanical stress.
- Do not throw away the remaining solution. It is useful for adjusting the finished coating. Store it in an airtight container in a cool place. You can wait for the mixture to dry and pour it into the bag.
Liquid wallpaper is an alternative finish that does not require much time and effort. No need to make tedious measurements and be afraid that the wallpaper sheet will be covered with bubbles. Although the liquid version of the wallpaper has its drawbacks, the advantages still exceed them. The end result of the installation will delight the owners with beauty, reliability and practicality, if everything is done correctly.
Modern realities make an increasing number of people think that it is quite possible to carry out finishing work on their own. One of the most significant questions is how to glue liquid wallpaper on various materials. Indeed, this variety is significantly different from its paper or non-woven counterparts and requires a special approach.
First of all, you need to understand that working with liquid wallpaper is significantly different from sticking rolled options. The process is much more reminiscent of wall cladding with plaster or putty. There is a simple explanation for this: the material is a set of components, including crushed fibers of cellulose, cotton and silk. The binding elements are various environmentally friendly additives. Distinctive decorative effects are achieved through all sorts of inclusions.
Thus, a mixture of amazing properties is obtained, which makes it very popular. The only significant drawback is the high price, which is largely due to the complexity of production.

sticker or application
Currently, there is a lot of debate about whether it is worth doing the work completely on your own. Many craftsmen insist that only professionals who are well acquainted with the application technique can perform this work qualitatively. This leads to the fact that for gluing liquid wallpaper, many turn to specialists.
In fact, there are no restrictions, you can stick such wallpapers yourself. Technological features of the product do not require special experience and the use of special tools. The main thing is to clearly follow the necessary order of work, which includes several interrelated stages.
 The technology for applying liquid wallpaper is quite simple and, with proper skill, you can do the work yourself.
 It is also worth mentioning that the term “glue” is more understandable for perception, but does not characterize this procedure at all, the concept of “application” or “laying” will be more accurate.
On a note! Such products are sold in the form of a dry mix, packed in plastic bags. Each of them contains instructions for use, which must be read in order to understand what conditions must be observed in the process of work.
The feasibility of high-quality wall preparation
Of course, this material can be glued to any surface, but it looks more advantageous on the walls. After spending a little time and making an effort, you can get an effect that will exceed all expectations, because there are many options for the manifestation of fantasy.
But sticking liquid wallpaper involves careful preparation, which depends on the base material. It will be a mistake to take into account the frequently encountered advice that the prepared solution will hide all existing defects.
 It is best to apply decorative material on pre-prepared walls.
 Working with old or plastered walls
This option occurs in most cases. The wall is a surface that has already been finished many times. Therefore, you should do the following:
- Completely remove the previous decorative coating. Particular attention should be paid to the painted areas, they cannot be left, so the only right solution is a complete cleaning.
- Check the quality of the plaster or putty. In view of the fact that defects and shedding are unacceptable, all defects are eliminated. If required, complete finishing is done.
- Obligatory impregnate the surface with a primer. It must have deep penetration.

GKL surfaces
Drywall is increasingly being used to level walls, so it's not surprising that it will serve as the basis for decorative cladding. But it is necessary to take into account some nuances:
- Much attention is paid to the joints. This is the most problematic area. The fact is that liquid wallpaper creates a solid canvas, so cracks will immediately be reflected on the front side of the coating. To avoid such troubles, all seams must be reinforced with reinforced tape.
- Difficulties may arise with an untreated cardboard surface. This will lead to two problems. First, the water will soak in too quickly, causing bumps and shrinkage. Secondly, if you need to remove the decorative layer, then the plate itself will suffer. Therefore, it is advisable to cover the plates with putty.
- We must not forget about the use of a primer, this is a mandatory procedure.
A similar scenario of work with wooden surfaces that were previously lined with plywood or OSB.
The technology of applying liquid wallpaper
First of all, it is worth clarifying how to work with liquid wallpaper during the preparation of the mixture. This step can have a significant impact on the final result. It is important to remember the basic rule: stirring must be very careful, so it is carried out by hand, this will avoid damage to the base.
 Hand kneading of silk plaster
Required tools:
- A set of spatulas. This tool must have sufficient plasticity.
- Trowel. It will be needed to distribute the mixture in a given area.
- Grater. With its help, it is possible to form the necessary texture, so it is better to choose transparent options.
On a note! In view of the fact that some tool may have been previously used, it is advisable to make sure that its working surfaces are completely clean.
Although the work itself is not difficult, applying the composition will require concentration and care. This will help you avoid mistakes.
VIDEO: how to glue liquid wallpaper on the wall
Step-by-step instruction:

Summarizing the above, it becomes clear how to glue liquid wallpaper yourself and get the desired texture. The main thing is to practice a little to understand the basic principles. And then in the process of work there will be no unforeseen difficulties.