Wood burning pizza oven. How to build a wood-fired pizza oven with your own hands
The Pompeian stove has several names - Neapolitan, among Italians it is called Roman, and among the people it is simply called "pompeika".
With it, you can cook anything, but still the main dish is pizza.
If it was cooked in a Pompeian oven, then its taste and aroma will be unique, because the taste, as many say, depends not only on some specific special ingredients, but also largely on the way it is baked. Having tried such a pizza once, others cooked in a different way will seem somehow tasteless to you.
The Pompeian oven has a number of advantages and features over other similar designs, in this article they will be considered. It will also be discussed how to make a Pompeian oven with your own hands, we will discuss the device of this design, as well as various nuances of construction. And then you can cook a real Italian pizza in a homemade Neapolitan oven.
In this device, you can bake not only pizza, but also other pastries, as well as cook a variety of dishes. An analogue of the Pompeian oven is the Russian oven, where unique bread is baked.
Features and Benefits
 The Pompeian or Neapolitan stove has a number of advantages and features:
- The minimum cooking time for any type of pastry, as the temperature in the Pompeii oven can reach about 500 degrees Celsius. The baking time at this temperature for Italian pizza is one minute. In the crowded restaurants of Italy, the fire in the stoves is kept constant, almost does not go out, as there are a lot of people who like to eat pizza with friends in this country.
- There is a wood-fired Pompeii oven where you can adjust the temperature, so this oven is very good for baking pizza and other types of pastries, as well as preparing second courses. The temperature can be adjusted from 50 to 500 degrees Celsius.
- The Pompeian stove runs on three types of fuel. You can use electricity, wood or gas. Which type of fuel to choose is up to you.
Device
The device of the Neapolitan stove is light. Making your own Pompeian oven is not difficult.
Components of this furnace:
- The base of the Pompeian furnace (foundation).
- A table that is necessary for comfortable cooking of any dish.
- A hemispherical vault or otherwise it is called a dome. Another component of the furnace is under. Under (the bottom of the oven or its floor) is the place where the fire is kindled and the pizza itself or another dish is cooked.
- The fourth part is the chimney.
- Outer body.
- heat-insulated layer.
These are the main components of the Pompeian oven, which do not require professional intervention for their construction.
Building
The main distinguishing feature of the Pompeian oven is the presence of a hemispherical vault. The advantage of this arch is the uniform distribution of the temperature of the burning fire over the entire surface of the Neapolitan stove.
To build a Neapolitan oven, you must follow a certain algorithm of actions, it consists of four main steps.
Let's look at the construction scheme of the Pompeii oven:
- Like all structures, the construction of the Pompeian oven must begin with its foundation (foundation).
Take into account: the foundation of the Pompeian furnace must be strong, since the overall structure will weigh almost seven hundred kilograms. The main part of the foundation of the Neapolitan stove should be a slab, which is made of reinforced concrete.
- The stand rises to a height convenient for you and is placed on the already made base of the Pompeian oven. The stand is usually made of brick, but can be made of metal materials. The Pompeian Furnace Stand can be used to store firewood (if you are using that type of fuel resource).
- When you have made a stand, a table is set on it. The material from which the table is made is concrete.
Take note: the thickness of the Neapolitan stove table should be just over twenty centimeters. This thickness is needed in order for the table to withstand the rest of the structure of the Pompeii oven.
The composition of the heat-insulating layer includes a concrete mixture. It also contains perlite. Perlite is a rock that is of volcanic origin, comes in the form of sand, and is used in the construction of various structures.
- The wood-burning Pompeian oven itself for cooking various types of pastries is made of bricks. The brick material must endure high temperatures for the proper operation of the Neapolitan kiln.
It is worth noting: a calculation must be made to determine the ratio between sand and clay in order to make a material that will perform these functions. Otherwise, the Pompeian oven will be unsuitable for operational use.
- Thermal insulation is necessary, since the oven quickly reaches its heat in a short period of time, and the cooling of the Neapolitan oven takes a rather long period, which allows you to cook pizza and other pastries at different temperatures.
Installation nuances

 The construction of the Neapolitan stove has its own characteristics and nuances that must be observed:
- After the table for the Pompeian oven has been made, a circle drawing must be made on it. The average diameter of this circle should be one hundred centimeters. On the outer edge, this circle is lined with cut bricks. You will get the so-called "well", in which you need to put a certain type of heat-insulating material (the heat-insulating material may be different). Inside, this "well" is made of stone, as it is lined with stone tiles.
- The construction of the domed part of the Pompeian oven is the most serious step in the construction of the Neapolitan oven. The dome (vault) is also made of bricks. Before building the vault, the bricks must be divided into halves.
Note: for easy construction of the domed component of the Neapolitan stove, any kind of frame installation must be used. This frame must be either wooden or metal. The laying of bricks must be even - without various defects.
You can build the domed part in different ways, which differ in the methods of laying bricks and their order. Ordering is the order in which bricks are laid.
Note: building a vault in a Pompeian oven is the most difficult job in building an entire oven, so it is best to turn to a professional to build this part of a Neapolitan oven.

Master's note: the drying process of the thermal insulation layer should last half a month.
Overclocking

 After the entire construction process is over and everything is dry, you need to disperse the Neapolitan stove.
To disperse it, it takes several days of heating:
- The very first heating takes place with the help of three kg of straw.
- The next heating also takes place with the help of three and a half kilograms of straw.
- For this heating, almost four kg of wood chips are needed.
- For the fourth heating, you need a small size - a log.
- For the rest of the fires, the amount of firewood just needs to be increased.
That is, in about a day, you need to carry out seven fires to disperse the Pompeian furnace.
Expert advice: if your Pompeian stove is not indoors, but is located on the street and is outdoors, then in order for the structure to be used for a long period of time, it is desirable that it be under a canopy.
For an outdoor Neapolitan stove, you will need to apply two layers:
- The heat-insulating layer, its thickness should be almost 15 millimeters.
- A layer for a moisture resistant surface. The thickness of this layer should be five millimeters.
 If you are a real gourmet of Italian pizza, the Pompeian oven is a must for you.
Building a Neapolitan stove is a rather time-consuming process, but it is not necessary to hire professional craftsmen.
Everyone can handle the construction of the base of the furnace (foundation), stand, table, chimney. All the main difficulty in the construction of this structure is the construction of the domed part or in another way the arch, which has a hemispherical shape.
After the long procedure of building a pompeian oven, you will be satisfied with the result, as you will be able to cook homemade delicious Italian pizza for yourself, your family and friends.
Watch the video, which shows in detail the process of building a Pompeii pizza oven with your own hands:
A clay wood-fired pizza oven can brighten up any garden. Yes, and pizza cooked in such an oven will be incomparably tastier than bought in a store or made in the oven. In this article we will tell you how to fold the oven with your own hands.


Materials and tools
- clay
- sand
- straw
- large polyethylene sheet
- concrete or ingredients for its preparation
- fittings
- steel door
- refractory bricks
- newspapers
- Master OK
- slate or tarpaulin
- steel pipes or wooden beams
- various fasteners
- Bulgarian
- hacksaw.

How to fold the oven with your own hands
To make a stove for a summer residence with your own hands, the first step is to decide on the shape and size. The size of the oven depends on what you are going to cook in it, and, of course, on the availability of free space in the garden.
You are unlikely to be able to immediately determine the amount of materials, so it is best to take it with a margin. Our rather large pizza oven took 600 kg of clay and about 950 kg of sand. When building a furnace, it is also important to pay attention to the wall thickness. If you want to bake pizza or bread one after the other, without having to fire again every time, it is advisable to make the walls thicker - so the wood-burning stove can accumulate more heat and, accordingly, the temperature in the chamber will remain high enough for longer. As a basis, you can take the inner diameter of the furnace chamber at least 40 cm, with a wall thickness of at least 15 cm.
The pizza oven can be equipped with a chimney
The main advantage of a chimney is that the smoke does not come from the firebox directly into your face, but without a chimney, the design is greatly simplified, and heat loss is minimized. We advise you to first build a stove without a chimney, and if you decide to add one later, you can do it without problems.
Certain ratios must also be observed between the inner diameter of the furnace, its height and the height of the furnace opening. The height of the opening should correspond to 63% of the height of the chamber - this is important for efficient fuel combustion. The height of the chamber should be 60-75% of its diameter. A refractory brick must be laid at the bottom of the chamber, so the diameter of the chamber will to some extent depend on the number of bricks that you have.
When you decide on the dimensions of the oven, you need to draw two circles on a large sheet of cardboard on a scale of 1: 1, the smaller one is the base of the inner chamber, the larger one is the outer surface of the furnace. Cut out the template according to the markup.
The stove must be placed so that the firebox is directed in the direction opposite to the main direction of the wind. It is also desirable to build a canopy over the stove.
Since the wood stove will be quite heavy, the construction of the foundation must be approached responsibly. We poured a square concrete slab with a side of 130 cm and a thickness of 6 cm. We laid reinforcement inside. We installed the stove on the base from the old stove. If you're building a stove from scratch, you'll have to dig a trench below freezing depth, fill in the foundation, and then build brick walls to form the base for the concrete slab.

Place the template on the concrete slab, outline it with a felt-tip pen. From clay, make low walls, the height of which will correspond to the height of the base of the furnace. Pour crushed stone inside, tamp it down. Pour at least 10 cm of sand over the rubble. Lay refractory bricks on the sand. If you do not have such bricks, you can use large stones.


Bricks must be laid close to each other. The thicker the bricks, the more heat they can store. To fit the bricks to the size you need, you can use a grinder (you'll need a lot of spare disks), or lay out the base of the chamber with square bricks and brick the corners into the walls. Bricks must be laid so that they form an even base.
To shape the roof of the furnace chamber, you need to make a sand mold, having previously installed the firebox door. The door may be steel, or it may be wooden. If you settled on a tree, then it should be fireproof, oak works well. Before closing the wooden door of a heated oven, it will need to be moistened with water. It is desirable to fasten a metal door not to clay walls, but to a concrete slab.


It is desirable to make the walls of the inner chamber straight up to a certain height, and round the top with a dome. To make a sand mold with smooth walls, you will need a formwork made of thick cardboard. The mold sand must be damp. So that the form does not dry out and does not crumble, it is advisable to paste over its surface with wet newspapers.
To build the walls of the furnace, you can also use ordinary clay, which in some areas lies very close to the surface, but in this case you will have to experiment with the composition of the mixture. If you do not have clay, you can buy it packaged in 30-kilogram bags. Clay must be mixed with the same amount of sand and half the volume of straw trimmings. Stir the mixture well, gradually adding water, bring it to the desired consistency. Clay can be kneaded in a large trough or on a film sheet. The solution must be thoroughly kneaded, like dough. Kneading helps to get rid of air. The easiest way to knead clay is with your feet. Make bricks out of clay and use them to gradually build walls. Try to keep the wall thickness the same.


Since you made the walls of the furnace not from liquid clay, but from improvised clay bricks, you can start extracting sand almost immediately after completing the dome. If you want to be on the safe side, you can let the clay dry for a week or two. Sand must be removed through the firebox door. To make the inner chamber dry out faster, you can periodically burn large candles in it. It is advisable to make a fire no earlier than a week after the extraction of sand. Try not to overdo it with the amount of firewood. If there is not enough oxygen in the furnace to burn all the fuel, the furnace will begin to smoke heavily. We did not take this into account, so the wall above the door was covered with soot.


Insulation. The surface of our oven was heated to 100 degrees, which is unsafe and indicates large heat losses. If the walls of your oven are also very hot, it is advisable to take care of thermal insulation. It is a mixture of volcanic glass and clay. If the thickness of this composition is 8 cm, the surface temperature is halved, and the oven retains heat much longer. Vermiculite or pumice is also excellent as an insulating material.

You may need to apply a thicker layer of insulation. It all depends on the material and the wall thickness of the furnace.
The canopy over the stove is best made of slate on a metal frame. In principle, a tarpaulin stretched over a wooden frame is also suitable for these purposes, but wood, like tarpaulin, must tolerate high temperatures well, it is better to place such a canopy higher above the oven roof.
The first few times you can not calculate the temperature by heating the oven for too long or vice versa not enough. Over time, you will get used to it. As a guide, you can take this mode: heat the stove for 2 hours, remove coals and ash from the furnace, and then let it “brew” for 1 hour. An extra hour is needed to ensure that the heat is evenly distributed throughout the oven. It is most convenient to control the temperature in the chamber using an electronic thermometer, but there is another method: just throw a handful of flour into the chamber, if it turns brown in 10-20 seconds, then the temperature is optimal for baking bread or pizza. By the way, it is best to bake bread and pizza on special wooden planks, otherwise the bottom may burn.


A person who at least once tried pizza cooked on fire in a real oven, and not a semi-finished product heated in a microwave oven, will definitely want to acquire such a cooking device in his backyard. The mere sight of a ruddy fragrant pizza, which has just been removed from a hot oven, causes an appetite and a desire to enjoy this wonderful pastry.
Self-construction of such a pizza oven is a rather time-consuming process, but interesting. On the other hand, if there is no desire to mess with clay mortar and bricklaying, you can always purchase and install the finished product. Modern models of ovens prepare excellent pizza that will appeal to even the most strict gourmets. And yet it’s worth understanding: what are the features of a pizza oven, and how difficult is it to build it yourself?
The best pizza oven
Today, in the conditions of noisy megacities, pizzerias offer fairly cheap options for such a dish as pizza, which is made in-line in a modern electric or gas oven.
In more advanced culinary organizations use special hearth stones- flat plates made of natural or artificial stone. It should be understood that even such stones are, in fact, an illusion of a “pizza oven”, which is not able to replace a real Pompeii wood-fired oven.
Really reputable restaurants install specialized oven equipment in their kitchens, which they proudly announce to visitors. However, a real connoisseur of Italian pizza cooked in the oven will figure out for himself what was served on a tray - a real culinary masterpiece or a semi-finished product heated in the microwave.
I would like to note that a real pizza oven - an unusual device in shape and design, completely unlike the standard products erected by the stove-maker. First of all, this is noticeable by the unusual domed shape of the stove, reminiscent of the house of heroes living in fairy tales, and not by the device in which gourmet dishes are prepared.
Design feature of the Pompeian oven
 It does not take much time to cook pizza or other culinary masterpieces in the Pompeii oven for the simple reason that the temperature inside such a device reaches 400 ° C. With such temperature indicators, cooking your favorite pizza does not take more than two minutes.
Such a furnace device has gained maximum distribution in the Mediterranean countries. And his closest "relatives" are the Russian oven for making bread and the tandoor. IN pizzerias in Italy, the fire in the Pompeian oven does not go out day or night. At the same time, only some types of wood are used for the furnace, which do not emit soot and do not contain various resins in their composition:
- firewood from olive trees;
- cherry wood;
- alder logs.
A wood-fired oven isn't just for cooking pizza. It can also cook other dishes at different temperatures. Wherein temperatures can vary over a wide range from 70 to 400° C, which makes it possible to select the appropriate temperature for various dishes.
The Tuscan grill is very popular, for the preparation of which burning coals are collected at the mouth of the oven, and a metal grate with legs is installed on top of them, on which this uniquely delicious dish is prepared.
All wood-burning pizza ovens are classified according to the type of energy carriers:
- gas ovens;
- wood-burning units;
- electrical devices.
But only a wood-fired pizza oven is the best assistant for preparing truly delicious, and, most importantly, fragrant culinary masterpieces. Therefore, every self-made pizza lover should figure out how to build a do-it-yourself wood-burning oven.
 The main feature of wood-fired oven equipment for making pizza is an unusual vault, resembling a hemisphere. The ignition of the fire occurs on one side of the device, after which the heat begins to rise to the top of the arch and, reflecting, falls into the center of the hearth, thereby creating optimal conditions for cooking pizza.
To date, there are two main types of vaults of wood stoves:
- Neapolitan vault with a dome height of almost 80% of the kiln diameter.
- Tuscan arch, the height of which is equal to the diameter of the stove.
The inner surface of the Pompeian stove is laid out only from fireclay bricks. The chimney in such a device is erected from the side of the entrance directly above it. The entrance of such a furnace is not very high and is slightly more than half of the parameters of the dome. It is this ratio of proportions that distinguishes the Pompeian wood-burning stove from similar designs. They were not chosen by chance, but were designed specifically to increase the efficiency of the stove.
Structural components of the Pompeian oven
Wood-burning pizza ovens are not too complicated. In comparison with the channel analogue, the Pompeian stove can even be made by hand. At the same time, it includes the following structural elements:

Under the outer shell of the furnace device is meant the outer heat insulator wall, which also performs a decorative role. For the aesthetic finish of a wood-burning stove, decorative plaster, tiles and other high-temperature-resistant finishing materials are used.
The main features of the construction of the furnace
If it was decided to independently build a wood-fired pizza oven, then you need to scrupulously study each stage of construction work.

Also, a high-quality heat-insulating layer is of great importance, especially when it comes to a thin-walled Pompeii stove. Due to this, rapid heating and slow cooling of the furnace equipment will occur. It is this feature that leads to the fact that pizza cooked in a wood-fired oven becomes the most delicious.
We build a pizza oven with our own hands
The construction of the furnace device before the countertop is installed does not cause difficulties when doing do-it-yourself work. In turn, all further manipulations must be thought out to the smallest detail, so that in the end you get an effective device for baking culinary dishes.

After complete drying of the furnace equipment, they pass to the external thermal insulation of the body. Most often, plaster is used for this, for the preparation of which cement and perlite are used in proportions of 1: 5. In addition, you can use a mineral-based insulation. After that, the oven is again left to dry for two weeks to a month.
We disperse the pizza oven
After the finished stove has completely dried, it is accelerated. To do this, carry out at least 7 ducts with an interval of 24 hours:

If an outdoor furnace structure is being built, then it is advisable to place it under a canopy. This will increase the operational life of furnace equipment.. At the same time, the street structure is additionally plastered with two layers:
- a layer of heat-resistant plaster up to 1.2 cm thick;
- decorative plaster on a moisture-resistant base 5 mm thick.
Only a wood-fired oven built with high quality with your own hands will make it possible to cook not only delicious pizza, but also other works of culinary art right on the site of your country house. This will save a person from having to order tasteless convenience foods heated in the microwave at the nearest pizzeria or look for a decent restaurant with a Pompeian oven.
Pizza honestly won the right to have the status of a favorite dish served in specially created establishments - pizzerias. It has evolved from a fast-food staple to a full-fledged lunch or dinner staple.
Today, pizza is prepared not only in an Italian restaurant, semi-finished products are easy to find in a store or cafe. But since everyone considers himself a true connoisseur of natural Italian cuisine, preference is given to establishments that use the word "Real" in the slogan. At the same time, many people argue that if you build a wood-fired pizza oven, then you can easily make the most real pizza yourself.
Original oven for working with Italian cuisine
What is real pizza
Nowadays, pizza has become popular in many countries. Each contributed to the creation of the recipe, so such varieties as American pizza, French pizza are known. Italy is considered the birthplace of this masterpiece.
There is no single history of the creation of the recipe, since the prototype was created back in the Middle Ages, but the most amusing version is that it is indicated that pizza was invented by contemporaries in order to “empty” the refrigerator.
On a flat cake made of unleavened dough, products were laid out that had been lying on the shelves of the refrigerator for quite a long time, these were cheese, salami, mushrooms, lettuce, tomatoes. Naturally, with such an approach, there can be no real single recipe. This explains the variety of types of pizza, which differ in composition.

Pizza making process
Cooking equipment
With all the variety of pizza recipes, there is one common requirement. Its baking should take place for a short time, but at a sufficiently high temperature. A conventional oven will not cope with this task, since its limit is limited to 300 degrees, and about 400 degrees are required.
It is quite possible to cook pizza on your own right at home, and there is no need to build a special oven. Purchased ready-made models of brands such as PrismaFood, AVA, Roller Grill, Hendi are designed for baking. They differ in technical characteristics, visibility, dimensions and fuel consumption. Gas pizza oven, convenient for home, due to easy installation, low cost operation, small size.
There are models of ovens that allow you to bake pizza on the street. Such factory designs work on wood and are ceramic ovens, in which the temperature, although it does not reach the required value, is quite high. The presence of a handle and wheels make the oven portable. Often there are options based on the chassis of a real trailer.

mobile kitchen
Such a pizzeria on wheels can be mobilely deployed at event venues to serve freshly baked pizza.
It is impossible to attract real connoisseurs of the Italian masterpiece with dishes prepared using factory designs. They claim that the brick oven, the wood as fuel, and the slight smell of smoke all add to the unique taste of the pizza. Therefore, another device that is considered the most authentic is the Pompeian pizza oven. Its peculiarity lies in the external structure, the vault of such a furnace is made in the form of a rounded dome.
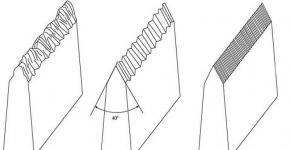
Digressing from the topic, I would like to recall the principle of a hyperbolic antenna. A wave hitting the surface at any angle will be reflected to the same point. Imagine that this principle was known to the Italians in the Middle Ages.
Of course, no one thought about creating stone ovens in the form of a hyperboloid, however, a kind of dome reflects radiation from the fire and focuses it in the place of the hearth where the pizza is located, and this achieves the required temperature value.

The original form of the furnace
We build ourselves
If we take a strict approach to the issue of baking pizza, then no factory equipment can give a truly “real” result. This means that lovers of "Neapolitan" or "Diabol" will have to build a pizza oven with their own hands.
Foundation
The total mass of the finished structure is quite large. Even the installation of any brick oven outdoors requires a solid foundation in the form of a foundation. Our Italian stove will rest on a solid reinforced foundation with a crushed stone cushion.
To dig a pit, you need to know the dimensions of the future furnace. As with any other construction, you will need a drawing. The scheme of laying the furnace is quite simple, therefore, only the dimensions of the structure are reflected in the drawing. The pit should have linear dimensions slightly larger than the dimensions of the furnace podium.
At a depth of 40 cm, a pillow is arranged. To do this, a layer of rubble is poured and tightly compacted. Then, the rest of the foundation is poured with a solution, for the preparation of which cement and sand are used. This is an ordinary solution with a ratio of 1 and 4, which fills the space limited by the formwork. A reinforcing mesh must be placed on the surface of the pillow and throughout the solution layer.
After removing the foundation to the desired level, you need to check the horizon and leave for several days to completely dry the solution. So that the evaporation of moisture throughout the depth occurs evenly and cracks do not form, the new foundation is covered with a film.
Stand and table top
It is still too early to design a firebox, as it will be low and inconvenient to work with. In addition, it is possible to form a functional addition to the stove - a compartment for storing firewood. A stand will be formed on the surface of the foundation. It plays a supporting role and determines the height of the furnace. With independent construction, the height is selected according to your height. The walls of the stand are formed by solid concrete blocks, the front wall is missing. A kind of niche is formed, incoming for storing firewood.

Creating walls
The tabletop will be a solid self-leveling solution with a reinforcing element. The tabletop slab is poured on site. Therefore, a formwork is designed on the stand, which limits the solution not only along the perimeter, but also forms the bottom.
The height of the countertop is usually 10 cm. Two layers of reinforcing mesh should fall on such a layer of mortar. A gap of 5 cm is provided between them. After pouring, the countertop is covered with a film and dries for several days. Now the base that can withstand a wood-fired pizza oven is ready.
Walls and dome
To build any wood stove, you need to stock up on refractory bricks. The inner surface of the furnace, where the highest temperature is observed, is laid out from fireclay bricks. A clay mortar with good adhesion can be purchased at the store as a dry mix. Self-preparation of the solution will take a lot of time, since you first have to select a clay rock that is suitable for fat content, grind it and mix it with sand.
At the first stage, the arch of the vault is laid out. It is necessary to prepare a wooden template that will hold the arch until the mortar hardens.

Creating an arch of the desired shape
After that, we proceed to the construction of the dome. A row of bricks is laid out on the countertop around the circumference. To form a dome, many craftsmen advise making a wooden inner frame.

Appearance of the finished building
But there is a more convenient and practical way. Sand is poured into the space bounded by the first row of bricks. A pile of compacted sand is given the desired shape. It can be used to lay out the dome, and then extract the sand through the furnace inlet.

Creating a firebox shape with sand
The body of the wood-fired pizza oven is plastered with clay mortar. Clay is able to withstand the temperature and will prevent heat from escaping from the firebox through possible cracks.
Chimney
The design of the chimney in the Pompeian stove is quite simple, but at the same time it has one feature. The pipe protrudes forward, towards the entrance to the furnace. Since the furnace model is outdoor, there is no need to build a high channel. Just enough to get the smoke out.

Construction work completed
After completing all stages of construction, the furnace must be left for several days. Despite the fact that the solution dries quickly on the outside, moisture will remain throughout the depth for a long time.
Although the design is ready, do not rush to use it right away. If you melt the stove, then deep cracks in the masonry cannot be avoided. It is necessary to disperse the new design. This process is the removal of moisture throughout the volume, since exposure to air will only lead to drying of the masonry on the surface.

Commissioning
To disperse the oven, 7 kindling cycles are used. The first kindling must be carried out with straw. The mass of straw does not exceed 2.5 kg. After complete burnout, the furnace should stand for about a day. Only then does the second kindling begin.
The same amount of straw is taken and 0.5 kg of dry chips are added. Between each cycle there is a break of one day. In the third cycle, straw is not used at all. The mass of chips reaches 4 kg. Then the subsequent kindling is done with firewood, starting with one log, and continuing with the addition of one log at a time.
With proper observance of all requirements for the design of the oven, we must get a functional device that allows us to become a real Italian professional or implement our own recipes, as well as bake any flour products.