Do-it-yourself ikebana from natural materials. What you need to bring into the house in the fall
Made from natural material, autumn ekibana can perfectly fit into the design of absolutely any home. By creating such a craft with your own hands, you will fill every room with the atmosphere of autumn and add zest to the interior of your home.
The creation of ekibana becomes relevant in the autumn period. Due to the fact that in autumn there are fewer and fewer fresh flowers, and the desire to decorate your home with floral motifs does not weaken, despite the gloomy rain outside the window.
And this does not mean that there is no opportunity to find different natural materials for making compositions on the theme of autumn. A huge variety of all kinds of unique and colorful elements can be found during this period - all kinds of cones, tree fruits, autumn leaves, acorns, rowan berries and other autumn gifts.
Compositions created on the basis of natural materials will be endowed with special energy and will bring peace and tranquility to your home.

In the case where you need to create an ekibana for the autumn ball yourself, you need to think about preparing the necessary materials in advance. You need to start collecting the necessary material for the composition from the very beginning of the autumn period, because most of the vegetation quickly withers and disappears.
You can choose a favorable sunny day and take a walk through the forest or park, where you can find a wide variety of leaves, see a riot of colors and choose the necessary material for making ekibana. You should choose only the material you like. Or you can collect everything unusual and beautiful, since all this can be useful in the future.
Collecting materials for ekibana "Autumn" with your own hands
Before you start creating an ekibana, you need to prepare the required material. To create a beautiful composition of autumn leaves, you should select only undamaged and healthy leaves.
The material should be dried in the middle of the pages of a book or album, placing them under a load. This manipulation is required in order to eliminate the possibility of leaves curling in the future. Having prepared autumn material using this method, it can be used for children's applications, collages and herbariums.

Do-it-yourself volumetric ekibana "Autumn"
If you need to create a three-dimensional structure, autumn leaves should be soaked for three to four days in a solution of glycerin (200 ml) and cold water (400 ml). Having processed them in the described way, the leaves become flexible, pliable and retain their original beautiful appearance.
Flat crafts
There are four methods to prepare leaves for flat buildings:
- The natural way. Having collected natural material, it must be tied into bundles and hung on a thread in a dry, well-ventilated room.
- Dry using a hot iron. Place the leaves on thick cardboard, place thin paper on top and gently iron with a hot iron. This procedure should be carried out until the moisture from the leaves completely disappears.
- Volumetric drying. Using this method, flowers best maintain their shape and volume. The flower must be cut and placed in dried and calcined sand for one month.
- Oven drying method. To do this, you need to set the oven to a low temperature, no higher than 60 degrees Celsius. Place the prepared natural materials on a baking sheet and dry slowly. During this procedure, it is necessary to constantly monitor the condition of the leaves and flowers; they should not darken or lose shape.
Autumn themed ekibana can be placed in a decorative vase, basket or on an artificial stand. If you show more creativity and creativity in this matter, then, for example, the vase can be replaced with a pumpkin or a small hollowed out log.

The procedure for making a composition on the theme of autumn depends entirely on personal imagination and preferences. It can be varied with various details. But do not forget that the initial task when composing a composition is to make a base or “backbone”. You need to think it through in advance.

If you want to create a composition with your own hands, you can find a variety of photo ideas on how to make it on the Internet.
To fix the craft, it is better to use plasticine or foam rubber, which must be placed in the selected container.
An autumn composition made with your own hands will help complement the design of your home. You can do this process with your children. For children, schoolchildren and even adults, this activity will be educational and exciting.
Video on the topic of the article
Greetings! Today I have selected a lot of ideas for you on the theme “Autumn”. More precisely, we will figure out how to make autumn bouquets with our own hands. With the start of classes in schools and kindergartens, parents are often puzzled by what needs to be done. I think that if you have fruits, leaves and dried flowers, it is easiest to create a composition of flowers.
And they also turn out so beautiful that they are suitable as a gift for a ball, for Teacher’s Day and for the autumn holiday itself.
And to make it easier for parents, I decided to make a selection where I collected the most interesting ideas for bouquets using everything that is at hand: from paper to twigs and seeds. There will be simple ideas and more complex ones for those who feel a creative touch and want to create a masterpiece.
One of the most accessible autumn materials is leaves. They have already turned red and yellow. They are collected into beautiful compositions, used as a basis for bouquets, or simply placed in a vase without embellishment.
And we can make a rose out of them. And then make a bouquet from such roses and buds. This is not very difficult to do and for 1 rose you will need 5-7 leaves. This depends on the level of openness of your flower.
It is important to take those leaves that still bend easily and do not break. Unfortunately, nothing will come of dry things.
By the way, take them in so that there is a long tail at the base. It will help you hold the workpiece comfortably and tying a “rose” with it will also be easier.
So let's take:
- 5-7 leaves,
- threads
Let's start by choosing the smallest leaf available. Fold it in half horizontally.

And twist it into a tube. This is what we got in the middle.

Hold the middle with one hand. And the second one folds the next sheet horizontally again. We wrap it around the middle. We don't tighten it too much.


We wrap this way until we run out of leaves. Not all of them can be used if you want to make a bud.

We open the “petals” and tie all the tails with thread. To make it more convenient, ask your family for help.

This is how the blanks turned out. They can already make a bouquet.

I think that any schoolchild will be able to repeat these simple steps and create a bouquet of “roses” on their own.
Now let's compose the composition. After all, in floristry, not a single bouquet is made without it. The idea always comes first.

You can combine such roses with fresh flowers, dried flowers or rowan.

The main thing is that there are no empty spaces in the bouquet, otherwise there will be a feeling of incompleteness. Here is an example with the addition of regular leaves. After all, they are also beautiful in themselves.

And here the flowers lie on a beautiful background and the middle is highlighted with a bright accent.

If you try, you can make roses of different shades that will look very realistic in a bouquet.

It’s not a shame to give such beauty at the Autumn Ball or on Teacher’s Day.

It is very beautiful when leaves of different colors and shapes are combined. Nevertheless, our autumn is very diverse and plays with all the colors of the rainbow.

Another idea is to use green plant branches.

I really liked how the leaves were beautifully wrapped in a tube in this photo. This immediately highlights the composition and makes it individual.

Here, in a composition with autumn fresh flowers, the leaves also actively attract attention. Agree, it turned out very original.

Another small composition on the theme “Autumn”. Very cute and beautiful idea with an apple.

Just go to a park or a forest and you can immediately collect a whole bag of material. Branches of birch, maple, rowan, apple tree - anything will suit us. 
A variant of an autumn tree in the form. It can also replace a bouquet. All the gifts of the trees are used: from leaves to berries and cones.

You don’t have to fold the leaves, but simply collect them beautifully and tie them with a ribbon. You can maintain the color style. For example, take only green or only red leaves.

But you can use the branches themselves! Look how self-sufficient they look.


I think that any mother would be happy to help her child create such compositions. And collecting leaves together in the woods during a walk will only bring the family closer together.
Autumn bouquets of vegetables and fruits
You can use autumn fruits. Bouquets with them are also very popular now and look quite unusual.
For creativity you need to choose beautiful, small fruits. No dark spots or wrinkled sides.
Let's begin to consider possible options for compositions of fruits and berries. And then we’ll smoothly move on to vegetables.
Here is an idea with tangerines and rowan berries. Fruits are strung on skewers for kebabs. For strength, they are fixed with tape or special floral tape.

Here you can see that the apples are strung on skewers. They combine beautifully with asters and rowan and bird cherry. My parents made a very original stand from birch bark.

Apples go well with any leaves and berries.

Here the emphasis is on rowan. Twigs of coniferous trees add splendor to the composition.

These bouquets are made to order. Here it is important to firmly connect all the workpieces together.

I was captivated by the idea of painting fruits. For example, such “golden” apples look very expensive. You won’t immediately realize that they are real!

Variations with fruits, cones and berries in a pumpkin. A little later I’ll show you how you can use this vegetable.

You can put the composition not in a pumpkin, but in a zucchini.

Apples go well with the “roses” we made earlier.

Step-by-step video about making fruit compositions.
Now I’ll show you options for bouquets with vegetables. You may not collect all types. And turn on the designer’s imagination and use only two types - pepper and garlic. Look what came of it.

Small fruits make cute arrangements.
The entire space between the vegetables, where the joints could be seen, was covered with rowan berries.

By sticking to a certain color scheme, you can create a very stylish bouquet. For example, using cabbage and succulents. After all, autumn can be different.

In this photo, I was captivated by the background of rolled leaves. The composition is clearly visible here. The highlight is in the form of earrings that fall down under their own weight.
Look how beautiful the idea of painting the ears looks. Very bright and lively.

Now let's move on to the very common idea of using a pumpkin as a vase for flowers and herbs.
Bouquets with pumpkin
It is convenient to place bouquets in a pumpkin. But in order for them to stand and not wilt longer, all plants need water. How to place it in this large vegetable?
There are three most convenient options: using a floral sponge, using a tin can, or combining both of these options.
So, take out the middle with the seeds from the pumpkin. They can be dried and used for appliqués and panels. More on this below.

And put a floral sponge inside. It is sold in many flower shops, as well as in creativity departments.
Then you water it with water and insert flowers. Most often, this option is necessary when you create a bouquet of fresh flowers. The sponge also helps keep the shape of the composition when the stems are stuck into it.
You can also put a tin can inside. In this case, there is no need to remove all the pulp. The main thing is that the jar is not visible. We use canned pineapple containers. You can also pour water into it, but you don’t have to do this if you are using dried flowers.
For these purposes, it is better to take a wide pumpkin.

Instead of a jar, you can use a glass. Its top side indicates the diameter that needs to be cut to fit the glass. For fresh flowers, put a floral sponge inside and saturate it with moisture.
 Ideas for compositions in a pumpkin are in front of you.

A vegetable vase can be decorated with ribbons or braid. 
There are only fresh flowers here.

And here we see the use of spruce branches, bunches of bird cherry and rowan. 
The whole composition is on the theme “Autumn”. 
This craft will appeal to both schoolchildren and children in the older group of kindergarten.
The main thing is not to be afraid to use the materials that are at hand. Making a bouquet is a very entertaining and creative process.
How to make paper compositions on the theme “Golden Autumn”
There is an idea to make autumn bouquets from paper. Initially, flowers are prepared from which the composition is created.
It turns out very beautifully when using the origami technique.


Interspersed with .
Let's add leaves in autumn shades to them.

This master class describes the detailed process of creating leaves.
Coat the ends of the accordion-folded sheet with glue and connect.
Maple leaves can also be made using the origami technique.

Here is a detailed master class. 
If it’s not clear from the photo, I’ll attach a video.
Everything is described in detail here. I think that using the video you can definitely create a craft by repeating all the steps step by step.
Master classes and ideas from natural materials for kindergarten
For small children you need something simpler. Therefore, I suggest using natural material for bouquets. We will look at ideas from pine cones, peanut and pistachio shells, pumpkin seeds, and dried flowers.
From the cones
It turns out that cones are very similar to flowers. Especially if you put unopened things in water. They become saturated with moisture and open up. My child, when he saw these metamorphoses, was simply delighted.

The cones can also be attached to skewers, sushi sticks or toothpicks. To create a round composition, round floral foam balls are used. I made them from regular polyurethane foam.
They come in different diameters. All kinds of plants and materials are stuck into them. You can use both fresh flowers and branches, and any other materials.

A beautiful bouquet when the pine cones are turned with their tips facing forward. It turns out to be a very neat composition. The tips themselves are decorated with beads, ribbons, rhinestones and flowers. They stick well with hot glue.

How do you like this autumn composition? I think it's very original.

The cone also lends itself well to painting. They can be painted with gouache or spray paints. The intensity of the color depends on the number of layers.


dense gouache can also cover up the natural brown tint of the buds.


If you remove the inner branches, the flowers will turn out more open.
Or you can take just one thing and make it the center of the composition.

Another idea from the gifts of the forest. Everything that lies near the trunks and under our feet is used.
Agree, pine cones are an excellent material for creating an autumn bouquet for children in kindergarten.
From pumpkin seeds
Pumpkin seeds can also be used as flower petals.
There are two options for buds. The first is to glue the seeds on paper in several rows. Here is a detailed master class.

The middle can be painted or covered with a piece of colored cotton wool.
You can make daisies like this using plasticine.

Or flowers like this.

Let's take a closer look at how this is done. Rows of pumpkin seeds are inserted into a plasticine ball. You can form different buds and inflorescence options.

Also very interesting, don’t you agree?
From peanut shells
We rarely buy peanuts, but we often pick up shells from friends after men's get-togethers. To make such bouquets for teachers once a year in kindergarten.
You can get whole “hydrangeas” from pistachios.
It is convenient to attach them to plasticine.

It will be easy for children to make these daisies. Younger children can insert petals from the shell into plasticine. And the older ones connect them with hot glue.
Using floral balls (I wrote about them a little higher), you can create the correct spherical shape of a sunflower. Look how organic the coffee beans look. After all, these are all the gifts of autumn.

Whole pistachios and peanuts can be given as gifts. To do this, put them into little bags and decorate them with corrugated paper.

With walnuts
Of course, we won’t ignore walnuts. You can make an autumn topiary from the shells.
Walnut bouquets with whole fruits look very presentable.

You can cover the voids with pieces of napkins.

For fun, you can combine all of the listed natural materials and fruits.
From dried flowers
Dried flowers fit our fall theme very well. They look noble and can be painted. They will complement any composition.

Anything will do - dry herbs, cereals, leaves.
And here the spikelets were painted. 
Cotton flowers make the composition very delicate and airy.
A beautiful bouquet of dried flowers in a stand decorated with branches.
More ideas for you.

An interesting frame for a bouquet of branches.

Mix dried flowers and rose leaves.
Golden ears have a very presentable appearance. But you’ll have to go a long way to get the material – to the field. Look for wheat that has not yet been harvested. 
Dry grass and leaves combine harmoniously.
I just loved many of the ideas.
Applications with flowers on the theme of autumn in the middle group
For the older group, you can offer ideas for applications or panels. They are made from leaves, dried flowers, cereals and seeds.
An idea with a vase with twigs inserted into it. Only the side edges and bottom are glued. The top is left free to allow material to be inserted.
Use a box of chocolates as a base and frame for the panel.
Leaves, pine cones and coffee beans create such an autumn bouquet.
Different types of pumpkin seed flowers for applique.

Use pine branches.

All bones, seeds and grains stick well to hot glue.
Leaves and flowers made from paper are no worse than natural materials.
You can also take a regular frame for the base.

You can make simpler applications in the form of bouquets, or you can make them more complex.
Autumn ideas for bouquets of candies and corrugated paper
Flowers made from corrugated paper look incredibly realistic and beautiful. For Teacher's Day, there is an idea for a small bouquet of sweets.
Or such a gift idea.
Flowers for gifts can be wrapped in autumn leaves.
You can use these flowers without candy.
Let's combine sweets with natural materials: dried flowers, cones and leaves.

Composition with sweets in a basket.
And now a detailed master class on creating roses from corrugated paper. It can be easily stretched and folded and can imitate real leaves.
The colors of autumn are very cheerful and any yellow, orange and red flowers go well with them.
I am attaching a video on how to make several types of flowers.
Corrugated paper is sold in bookstores, stationery stores, floristry, craft, and party stores.
Ideas on how to arrange a bouquet
And now you have already decided what your autumn bouquet will be made of, you have even made preparations. But you need to somehow design it so that it has a more marketable and presentable appearance!
Therefore, I offer several ideas.
For example, let’s take the now popular craft paper. Or packing tight mesh or fabric.
You can make a beautiful envelope from the same corrugated paper. With this design, there is no shame in giving your craft.

Insert the craft into a paper bag. It can even be rolled from scrapbooking sheets.
Polyurethane foam, foam rubber, floral sponge or polystyrene foam are inserted inside.
Ideas made from reed napkins turn out beautifully.
You will need:
- napkin,
- can,
- cardboard,
- pencil,
- hot glue (glue gun).
Place the jar on the cardboard and trace the bottom. We cut it out and stick it on the tin. We will also cover the sides with cardboard.
We measure the height of the walls of the tin and cut off its size on a napkin. Wrap the sides and secure with hot glue.
That's it. Everything is ready.
The bouquet can be placed in hat boxes or shoe packaging. To do this, they are covered with fabric or special paper. The bottom is lined with film, on which we place a floral sponge. We fill it with moisture and begin to form a composition.

There is a fun idea for decorating jars with plastic cocktail straws. The main thing here is to cut them carefully and evenly.
Insert dried flowers or paper flowers into paper boxes. Here's one idea. By the way, in this article I described very, maybe you will like something too.
Cardboard fits very harmoniously into this composition. Original and beautiful.
To congratulate teachers, you can decorate the packaging with letters. 
Or just put the bouquet in the basket. They are now made not only from wicker, but also from newspaper tubes, paper and canton.
Thank you for your attention and wish you productive joint work. I’m just sure that you will be able to find an idea for yourself and create a composition that you wouldn’t be ashamed to give to a teacher or send to an exhibition!
When autumn comes into its own, painting the world around us with multi-colored cheerful colors, you want to endlessly wander in the garden, rustling the fallen leaves. And in order to preserve the mood of autumn longer, you can create compositions with your own hands from natural materials, which this season gives people in abundance. An excellent product would be a DIY “Autumn” ekibana made from leaves. In addition to fancy forms of foliage, you can use dried flowers, vegetables and fruits.
What can be done?
From the materials that autumn presents, you can make various compositions together with your children. These will be absolutely free crafts made from pasture materials, but their value will lie in the warmth of the relationship between an adult and a child. In addition to the moral benefits, such a pastime is also beneficial for children physically: fine motor skills of the hands develop, which is necessary for speech, sensory abilities, and imagination. This is especially important for young children in the early stages of their development.

The adult theme developed by the designers will allow you to place exquisite panels, paintings and compositions on the walls of the rooms, for which you can use mixes of foliage of different tree species. Chestnut, maple and oak leaves go well together.
Preparation of materials

Before making an ekibana or other composition, it is important to properly prepare the source material. This is done in several ways:
- Autumn leaves are placed between the sheets of albums and pressed on top with a weight so that they do not curl when drying. Healthy, whole leaves are selected for planting. This preparation method is suitable for making herbariums, children's appliqués or sheet collages.
- To make voluminous crafts and bouquets using autumn foliage, the latter must be processed in a special way, which will be discussed below. This is necessary so that the foliage does not crack when twisted, is pliable and does not lose its original appearance. This method is suitable for making topiary or dried flower arrangements.
With proper preparation of the raw material - leaves - the crafts will retain their beautiful appearance, and the composition of leaves will not turn into twisted, shapeless, cracked masses. After all, you can make something like roses, cornflowers, chrysanthemums, daisies and water lilies from foliage. Moreover, their color will not only be natural - red or yellow - the products can be painted with colored acrylic primers. You can apply a variety of patterns on top with a gel pen and then varnish it.
Activities with your child: ideas for ekibana
For manual creativity, you can offer the following ideas:
- Application. For it, you can use dried castings and flowers for the herbarium. On a thick sheet of paper, you need to lay out the available materials, combining them by color and shape. When the desired location is achieved, each element is glued using PVA glue or photo glue.
- Collage-ekibana on the theme “Autumn”. This composition is made for a frame. A layer of large bright leaves of dark colors is laid out on a thick sheet of cardboard or paper, on top - smaller and greener ones, and at the very top - small bright yellow and red leaves. You can mix in autumn dried flowers, getting And also you can lay out various shapes from foliage and flowers.
- Beautiful compositions can be made from leaves, flowers and pine needles, securing them to cardboard with wire.
- The fallen branches are fixed in the form of a tree, and leaves and flowers are attached to it.
Preparation of raw materials for volumetric crafts

Volumetric ekibans from natural material “Autumn” are not made by folding dried leaves, as they will break. Therefore, the material for such work is processed in a special way.
This is done like this:
- Prepare a solution consisting of 200 ml of glycerin and 400 ml of clean cold water.
- Place fresh fallen leaves evenly and carefully in a plastic bag and fill them with the prepared solution.
- The edge of the bag with the contents is hermetically sealed using a heated knife or carefully sealed with adhesive tape.
- The bag should be left for three to four days in a cool, dark place, and then removed and the foliage placed on a paper towel to dry.
Leaves treated with this method will be flexible, retain their original appearance for a long time, and flowers of various shapes can be arranged from them to create a stylish and original composition of leaves.
Preparation of material for flat compositions

For flat crafts, there are several methods for drying raw materials:
- Drying with a hot iron. Autumn foliage and some small flowers are dried with an iron. To carry out this operation, the raw materials are laid out evenly on thick cardboard and covered with thin paper. Then all this is carefully ironed until the moisture has completely evaporated. The iron should not be very hot.
- Drying using the natural method. For this method, the collected flowers, folded into bunches, are hung on a rope in a dry room where there is good ventilation. The bunches are arranged with the inflorescences facing down. A DIY leaf ekibana “Autumn” created from such material will have an original natural look.
- Oven drying. This method is great for drying and preparing large single flowers (roses, tulips, peonies) for making ekibana and compositions. To do this, the temperature in the oven is not very high, within sixty degrees Celsius, and the raw materials, laid out on the base, are slowly dried. At the same time, you need to carefully ensure that the flowers do not begin to turn brown or lose shape.
- Volumetric drying of flowers. This drying method best preserves the color and natural shape of the autumn flowers that will make up the leaf ekibana. With your own hands, you can preserve autumn in this way for a long time. After cutting, the flower is placed in pre-calcined and dried sand for about one month. A container with a fine mesh bottom and a retractable bottom can serve as a container for this. Terry volumetric flowers, such as roses, dahlias or lilies, are placed with their stems down, and flat inflorescences-baskets of flowers such as asters, buttercups, forget-me-nots or daisies are placed with their stems up. At the same time, holding the flower in the desired position, it is carefully sprinkled with sand in layers to the top.
Tools for work

Before making Ekibana, you need to prepare the following tools for work:
- scissors, for adults - large, long, and for children - small with rounded tips;
- stacks - for children and a stationery knife - for adults;
- an awl with a thin tip and a comfortable handle;
- manicure tweezers, in which the front part is folded and twisted - for twisting some parts and wires;
- long tweezers - for small parts;
- thin, durable and flexible copper wire for frame crafts and toys 0.35 mm in diameter;
- foil paper and foil for decoration;
- threads and sewing needle - for fastening parts and bouquets.
Materials for work
To create a do-it-yourself ekibana “Autumn” from leaves, the following materials may be needed:
- types of paper different in thickness, color and density (wallpaper, corrugated, parchment, velvet, copying, wrapping and landscape);
- multi-colored polymer clay and plasticine - for sculpting additional details of compositions;
- PVA or "Mars";
- brushes and gouache or watercolor paints are useful for painting materials and flat compositions;
- For large-scale work you will need soft squirrel brushes and acrylic paints.
Rose from autumn fallen leaves

Ekibana on the theme “Autumn” will decorate the interior in an original and stylish way if it contains a flower such as a rose. You can make it yourself without much difficulty.
You will have to work creatively with plain maple leaves, strong threads, sunflower oil and golden paints. The foliage is pre-treated with a glycerin solution, which is described above.
They turn out to be large, so five to seven of them will be enough for a bouquet. The foliage will be the same maple leaves.
Do-it-yourself ekibana “Autumn” from leaves is performed in the following sequence:
- Fold the maple leaf in half, right side out, and roll it into a roll.
- Place the bud at the base of a second maple leaf of the same color.
- Wrap the second leaf around the bud, thus forming a rose petal.
- Next, take the next maple leaf and repeat the operation with an offset. The more rose petals you make, the more voluminous the flower will be. For the look of a blossoming flower, each subsequent leaf needs to be moved a little lower.
- Secure the craft with a thread a little above the leaf petioles - and the first flower is ready.
- Make five to seven more similar flowers.
- To preserve their appearance, grease maple roses with sunflower oil and cover them with golden paint.
At the final step, you need to take a small flowerpot, place several maple leaves in it and arrange the made roses in the form of a bouquet between them. Ekibana is ready and will delight the eye for a long time.
When autumn comes into its own, painting the world around us with multi-colored cheerful colors, you want to endlessly wander in the garden, rustling the fallen leaves. And in order to preserve the mood of autumn longer, you can create compositions with your own hands from natural materials, which this season gives people in abundance. An excellent product would be a DIY “Autumn” ekibana made from leaves. In addition to fancy forms of foliage, you can use dried flowers, vegetables and fruits.
What can be done?
From the materials that autumn presents, you can make various compositions together with your children. These will be absolutely free crafts made from pasture materials, but their value will lie in the warmth of the relationship between an adult and a child. In addition to the moral benefits, such a pastime is also beneficial for children physically: fine motor skills of the hands develop, which is necessary for speech, sensory abilities, and imagination. This is especially important for young children in the early stages of their development.
The adult theme developed by the designers will allow you to place exquisite panels, paintings and compositions on the walls of the rooms, for which you can use mixes of foliage of different tree species. Chestnut, maple and oak leaves go well together.
Preparation of materials

Before making an ekibana or other composition, it is important to properly prepare the source material. This is done in several ways:
- Autumn leaves are placed between the sheets of albums and pressed on top with a weight so that they do not curl when drying. Healthy, whole leaves are selected for planting. This preparation method is suitable for making herbariums, children's appliqués or sheet collages.
- To make voluminous crafts and bouquets using autumn foliage, the latter must be processed in a special way, which will be discussed below. This is necessary so that the foliage does not crack when twisted, is pliable and does not lose its original appearance. This method is suitable for making topiary or dried flower arrangements.
With proper preparation of the raw material - leaves - the crafts will retain their beautiful appearance, and the composition of leaves will not turn into twisted, shapeless, cracked masses. After all, you can make something like roses, cornflowers, chrysanthemums, daisies and water lilies from foliage. Moreover, their color will not only be natural - red or yellow - the products can be painted with colored acrylic primers. You can apply a variety of patterns on top with a gel pen and then varnish it.
Activities with your child: ideas for ekibana
For manual creativity, you can offer the following ideas:
- Application. For it, you can use dried castings and flowers for the herbarium. On a thick sheet of paper, you need to lay out the available materials, combining them by color and shape. When the desired location is achieved, each element is glued using PVA glue or photo glue.
- Collage-ekibana on the theme “Autumn”. This composition is made for a frame. A layer of large bright leaves of dark colors is laid out on a thick sheet of cardboard or paper, on top - smaller and greener ones, and at the very top - small bright yellow and red leaves. You can mix in autumn dried flowers, getting And also you can lay out various shapes from foliage and flowers.
- Beautiful compositions can be made from leaves, flowers and pine needles, securing them to cardboard with wire.
- The fallen branches are fixed in the form of a tree, and leaves and flowers are attached to it.
Preparation of raw materials for volumetric crafts
Volumetric ekibans from natural material “Autumn” are not made by folding dried leaves, as they will break. Therefore, the material for such work is processed in a special way.
This is done like this:
- Prepare a solution consisting of 200 ml of glycerin and 400 ml of clean cold water.
- Place fresh fallen leaves evenly and carefully in a plastic bag and fill them with the prepared solution.
- The edge of the bag with the contents is hermetically sealed using a heated knife or carefully sealed with adhesive tape.
- The bag should be left for three to four days in a cool, dark place, and then removed and the foliage placed on a paper towel to dry.
Leaves treated with this method will be flexible, retain their original appearance for a long time, and flowers of various shapes can be arranged from them to create a stylish and original composition of leaves.
Preparation of material for flat compositions
For flat crafts, there are several methods for drying raw materials:
- Drying with a hot iron. Autumn foliage and some small flowers are dried with an iron. To carry out this operation, the raw materials are laid out evenly on thick cardboard and covered with thin paper. Then all this is carefully ironed until the moisture has completely evaporated. The iron should not be very hot.
- Drying using the natural method. For this method, the collected flowers, folded into bunches, are hung on a rope in a dry room where there is good ventilation. The bunches are arranged with the inflorescences facing down. A DIY leaf ekibana “Autumn” created from such material will have an original natural look.
- Oven drying. This method is great for drying and preparing large single flowers (roses, tulips, peonies) for making ekibana and compositions. To do this, the temperature in the oven is not very high, within sixty degrees Celsius, and the raw materials, laid out on the base, are slowly dried. At the same time, you need to carefully ensure that the flowers do not begin to turn brown or lose shape.
- Volumetric drying of flowers. This drying method best preserves the color and natural shape of the autumn flowers that will make up the leaf ekibana. With your own hands, you can preserve autumn in this way for a long time. After cutting, the flower is placed in pre-calcined and dried sand for about one month. A container with a fine mesh bottom and a retractable bottom can serve as a container for this. Terry volumetric flowers, such as roses, dahlias or lilies, are placed with their stems down, and flat inflorescences-baskets of flowers such as asters, buttercups, forget-me-nots or daisies are placed with their stems up. At the same time, holding the flower in the desired position, it is carefully sprinkled with sand in layers to the top.
Tools for work
Before making Ekibana, you need to prepare the following tools for work:
- scissors, for adults - large, long, and for children - small with rounded tips;
- stacks - for children and a stationery knife - for adults;
- an awl with a thin tip and a comfortable handle;
- manicure tweezers, in which the front part is folded and twisted - for twisting some parts and wires;
- long tweezers - for small parts;
- thin, durable and flexible copper wire for frame crafts and toys 0.35 mm in diameter;
- foil paper and foil for decoration;
- threads and sewing needle - for fastening parts and bouquets.
Materials for work
To create a do-it-yourself ekibana “Autumn” from leaves, the following materials may be needed:
- types of paper different in thickness, color and density (wallpaper, corrugated, parchment, velvet, copying, wrapping and landscape);
- multi-colored polymer clay and plasticine - for sculpting additional details of compositions;
- PVA or "Mars";
- brushes and gouache or watercolor paints are useful for painting materials and flat compositions;
- For large-scale work you will need soft squirrel brushes and acrylic paints.
Rose from autumn fallen leaves

Ekibana on the theme “Autumn” will decorate the interior in an original and stylish way if it contains a flower such as a rose. You can make it yourself without much difficulty.
You will have to work creatively with plain maple leaves, strong threads, sunflower oil and golden paints. The foliage is pre-treated with a glycerin solution, which is described above.
They turn out to be large, so five to seven of them will be enough for a bouquet. The foliage will be the same maple leaves.
Do-it-yourself ekibana “Autumn” from leaves is performed in the following sequence:
- Fold the maple leaf in half, right side out, and roll it into a roll.
- Place the bud at the base of a second maple leaf of the same color.
- Wrap the second leaf around the bud, thus forming a rose petal.
- Next, take the next maple leaf and repeat the operation with an offset. The more rose petals you make, the more voluminous the flower will be. For the look of a blossoming flower, each subsequent leaf needs to be moved a little lower.
- Secure the craft with a thread a little above the leaf petioles - and the first flower is ready.
- Make five to seven more similar flowers.
- To preserve their appearance, grease maple roses with sunflower oil and cover them with golden paint.
At the final step, you need to take a small flowerpot, place several maple leaves in it and arrange the made roses in the form of a bouquet between them. Ekibana is ready and will delight the eye for a long time.
Galina Bogacheva
Autumn sunny day
Filled me with inspiration!
I send you greetings from Kuban!
AND autumn I wish everyone a wonderful life!
Autumn It's a great time for creativity. After all, it is autumn gives us wonderful natural materials to create something extraordinary.
To realize my ideas and fantasies, I also use waste material. By combining two types of material (waste and natural) I did it ikebana« Autumn mood» .
To make it we need: cones, waste material, glue gun, acrylic paint, hard wide brush, sharp scissors.
Advice: To make crafts, it is better to use large cones with well-open scales.
Move work: cut off a wide part of the cone, about 5-7 scales. Cover the resulting part well with paint. (color each scale on both sides). Wait until the paint is completely dry. Apply a second coat of paint, carefully painting each scale.


If you want the flowers to be placed on the base at different levels, screw a screw into the middle of the painted cone or glue a small piece of foam plastic.

As a basis for forming a bouquet, you can use various waste material: plastic plate, mayonnaise lid, bottom of a plastic bottle, etc.
I used: a basket made from a dried bouquet and a plastic ball. To make the craft stable, I glued the ball to the bottom of the basket with a glue gun.

Then we form a bouquet and add our imagination to embellish it a little.

Ikebana is ready.

Publications on the topic:
Master class “Flower mood” For work you needed: - beads of different colors; - thin wire for beads; - an empty jar from.
Children return to kindergartens, to their home groups. Groups welcome children in a new outfit, in autumn. Autumn is the time of leaf fall. How.
Hello! Our city's birthday is coming soon! So we decided to decorate our group not just with flowers, but with ikebana.
Children's master class “Such different moods!” The mood was gone. I looked for him everywhere: Under the sofa, under the table, in the yard and around the corner.
In anticipation of the New Year 2015, our group held a master class “Orange mood”. Goals: include parents in educational.
Hello, dear visitors of my blog! I bring to your attention how my middle school children and I made a magical autumn forest.
Master class “Autumn tree”. Video Good day, dear colleagues. I congratulate everyone on the upcoming Knowledge Day, I wish you success, health and good mood. In July.
Ekibana is the ancient Japanese art of bouquet arranging. Decorative combinations are created from natural and artificial materials. This set is a great way to decorate your home and develop your creativity. Practicing this type of creativity will help relieve fatigue and lift the mood of any person.
Features of art

Composition in autumn style
Before you start making ekiban, you should get acquainted with the features of this type of art. . Recommendations:
- rigor and conciseness are the basic principles when composing combinations; it is worth paying special attention to the location of the main components;
- during work, materials are placed on the right, and the container is at eye level;
- live and dry gifts of flora are used, as well as trees, branches, berries, fruits;
- the main material is living gifts of flora, which have an individual philosophical sound, which must be taken into account when compiling.
Making it yourself: photo
The finished product will depend on your imagination. It is worth presenting the result in advance and understanding the shape of the bouquet. When compiling, you should not restrain the flight of your imagination.
Striving for Harmony- an important component of any creative process. But in order to get a beautiful and harmonious combination, you should adhere to some rules when composing:

Variable works of art from flowers
- In each architectonics, the main element is identified; there may be several of them.
- It consists of three central elements, symbolizing heaven, earth and man.
- To make the sound dynamic, it is worth placing some components at an angle.
- There must be asymmetry.
- Living gifts of flora are not placed next to heating devices.
- Materials are selected depending on the time of year.
- The vase chosen is inconspicuous and dim, which will not attract attention. The focus is on flowers or leaves.
It shouldn't be too big. This is its main difference from traditional European bouquets.
From flowers
To start composing, First prepare everything you need: a small vase, gifts of flora, three shoots, garden pruners, floral sponge.

Refined composition in Japanese style
Place a sponge in a vase or bowl and pour water.
Then the flowers are prepared. If opportunity allows, you can take traditional Japanese ingredients - sakura, chrysanthemums. If they are not available, any others will do, as well as fruits.
The long stem symbolizes the sky. It is placed tilted to the left. To secure you can use plasticine.
The second flower or sprout is 2/3 the length of the first. It is also tilted to the left. This is a symbol of a person.
The third sprout is also 2/3 long; it represents the earth. Its tilt is to the right.
If you look at it from the outside, you should get the feeling that there is only one shoot in the vase.
The gaps are filled small flowers or greenery, but there is no need to use many small elements.

Refined simplicity
All elements of Japanese bouquets carry a certain meaning. Opened buds, as well as dry carpels and fruits mean the past. Unopened flowers and fresh leaves symbolize the present. Symbols of the future are buds and buds.
Roses are a symbol of youth, sakura means devotion, bamboo means hardness, pine means endurance.
It is also worth considering color compatibility, since not all types of plants suit each other well. For example, poppies and lilies are not combined. Lilies of the valley, daffodils and roses also do not like the proximity of other flowers.
It’s good if the flowers are complemented by shoots and leaves. Other decorative elements look original: ribbons, lace, stones.
From leaves

Leaves in a basket
To compile the autumn version with their own hands they take a container, twigs with bright autumn leaves or branches of physalis, rowan, moss.
Place a sponge or foam rubber into the selected container. Install a tall twig with a slope. Add smaller branches. Decorate with autumn leaves and moss.
To maintain freshness, pour water into the vase.
As a container you can use pumpkin. To do this, cut off the top, clean out the pulp and seeds. Before the creative process, the pumpkin should dry out a little. Next, they are composed according to the same rules as in the vase.
From fruits

Fruits in a basket
Such compositions cannot stand for long, so I make them t as a gift for any event.
Choose different fruits, as well as a vase or basket. They can be used whole or chopped. You will also need a sponge and skewers.
Then cut into beautiful shapes: in the form of hearts, flowers and other interesting elements. Place on skewers and insert into a sponge. Do this to fill the entire vase or basket.
You need to give such a bouquet on the same day, before they lose their attractiveness. Unfortunately, this beauty cannot serve as interior decoration.
New Year's variation
To make a New Year's bouquet use colors:
- red;
- golden;
- silver;
- white;
- green;
- blue.

Bouquet with pine cones
To start determine the leading color. An additional one is added to it. Diluted with gold and silver.
New Year's bouquets use not only flowers, but also other natural materials: pine cones, spruce shoots, cinnamon sticks, Christmas tree balls, candles, candies, ribbons. The candle can be located in the center.
Put in cart floral sponge. The edges of the basket are framed with spruce twigs. Branches, leaves are placed in the sponge, flowers are added. Decorated with New Year's balls.
A great DIY gift for the New Year is ready!
A correctly composed bouquet will become an unforgettable gift and can decorate any interior.
Photo gallery


Autumn ekibana made of natural material fits perfectly into absolutely any interior in the house. If you create an ekibana in the fall, also with your own hands, it will fill any room with a special atmosphere and become the highlight of your home.
The most pressing topic of creating an ekibana with your own hands becomes in the fall. Why, you ask? And all because at this time of year the number of fresh flowers for home arrangements becomes less and less, and the desire to diversify the interior of the room with floral motifs does not depend on the time of year outside the window. However, this does not mean that it is impossible to find another natural material for creating autumn ekibana! An incredible amount of diverse, unusual and colorful components can be found in autumn nature (various cones, tree fruits, autumn leaves, acorns, rowan berries and much more). A composition made from such natural materials has its own advantages: it is more stable and durable than a craft made from fresh flowers.
It’s worth thinking about creating an autumn-themed ekibana quickly and easily with your own hands in advance. Start collecting suitable materials for crafts at the very beginning of the autumn season, as many plants quickly bloom and disappear from nature. Choose the warmest and most pleasant autumn day and take a walk through parks and forests. At the autumn plant ball you will find a huge variety of leaves, see a riot of colors and be able to choose the natural material you like to create an ekibana. Choose the materials you like most. Collect all the most interesting things and you will definitely find a use for them in the future.
Making ekibana about autumn with your own hands in a master class
In any case, it is very important to properly prepare the source material. In order for the ekibana of autumn leaves to look beautiful, you need to choose only whole and healthy leaves. You need to dry the leaves between the pages of a book or album, pressing them down with a weight. This must be done in order to avoid curling of the leaves in the future. Autumn leaves prepared in this way are used for children's applications, leaf collages, and also for herbariums.
If there is a need to make a volumetric composition, autumn leaves are soaked for three to four days in a solution of glycerin (200 ml) and cold water (400 ml). When treated with this method, autumn leaves become flexible, pliable and do not lose their original beautiful appearance.
Flat crafts.There are four ways to dry leaves for flat crafts:
- Natural method. The collected natural materials are tied into bundles and hung on a thread in a dry, well-ventilated area.
- Hot iron drying. Autumn leaves are laid out on thick cardboard, thin paper is placed on top and carefully ironed with a hot iron. It is necessary to iron until the moisture from the leaves has completely evaporated.
- Volumetric drying. With this method, autumn flowers best retain their shape and volume. The flower is cut and placed in dried and calcined sand for one month.
- Oven drying method. It is necessary to set the oven at a very low temperature, about 60 degrees Celsius. The prepared natural raw materials are laid out on a base and slowly dried. You should always monitor the condition of the leaves and flowers to prevent them from darkening or losing their shape.
Autumn ekibana can be decorated in a decorative vase, basket or artificial stand. You can approach this issue very creatively and creatively: use a pumpkin or a small hollowed out log instead of a vase.

The process of creating an autumn ekibana depends entirely on your imagination and desire. You can add unusual, varied elements to your composition. However, before you make an ekibana, you need to know that the primary task is to form the base or “backbone” of the composition. It needs to be thought through immediately. This will allow you not to forget what result you are striving for, what your initial compositional idea was. After this, you can completely surrender to creative impulses and ideas: add dried flowers, cones, berries, acorns, roots and leaves. The most important thing is that the final result looks harmonious and that all the constituent elements of the composition are combined with each other.

If you want to create an autumn ekibana with your own hands, on the Internet you will find many photos with various design ideas.
To secure the autumn composition, it is best to use plasticine or foam rubber, which must be placed in the selected container.
As you can see, a DIY autumn-themed ekibana will be a great addition to the interior of your home. Start creating it with your children. For children, schoolchildren and even adults, this activity will be fun and exciting.
Video on the topic of the article
It was in the spring, and we knew about the upcoming event several months in advance. We prepared, worried, doubted. This time there was no time to worry or doubt. In the same way, however, to prepare - we learned that there would be an exhibition two weeks in advance. During this time, of course, you can buy as many flowers as you like, and the concept of the work is such a thing, you can “give birth” in about fifteen minutes. But in order to feel it... So, in order to walk around with these thoughts - that there will be an exhibition, and there needs to be a composition, and autumn is in the yard, and the composition should be autumn, and autumn ikebana is not necessarily made of “yellow maple leaves”, it can be bright and flowery, but the breath of autumn must be felt.... Somehow my teacher’s story about how five hundred years ago in Japan monks wandered through the mountains for weeks, looking for the right branch - the one that they had dreamed - sank into my soul. and it certainly had to be found... Nowadays there is jiyuka - “free form”, and you can bend everything to the wires, but then everything was strict, no delays, as nature created, so take it...
Younger and I, however, wandered around in search of branches. Not for two weeks, of course, and not in the mountains, but in the surrounding fields, and everyone looked closely at the willows and acacias, but they didn’t find anything sensible. The willow branches are light and well curved, but somehow everything was wrong. Acacia branches are dark, and their pattern is clear, whimsical, they look very picturesque, but acacia leaves will not last even two hours, if you cut a branch, they wither immediately. We couldn't find any branches, so we decided to put up flowers.
This is mine (photo below). Shoka sim-pu-tai. In general, shoka is a form where all the flower-twigs are placed in one line, from the viewer back. And if you look from a frontal angle, as it should be, you get the impression that everything is “growing” from one “point” - by the way, you can see it in the photograph if you enlarge it. That branch that bends forward was given to me right there, during preparation, and I placed it. Such an autumn twig. Oh, yes, so that’s what shoka is, I said, and “shim-pu-tai” is a form of three elements. One is the main one. It can be anything, but it must be beautiful and have clearly defined characteristics. For example, "tall-straight". Or “dense-bright”, or, for example, “massive, low”. Anything, really. Any “sign” that expresses the beauty of a plant. The second element, accordingly, is the opposite of the first. Well, the third one “breathes” life into the composition, introduces either movement or a color accent, and saturates it with variety.
The photo below is Younger’s composition. Free form, jiyuka. A “composite” vase, made of four elements, two white, two red. I would have placed the green chrysanthemums in the long white section differently, but that’s the author’s right. The teacher approved, and the sensei approved. And Younger herself is happy. Okay then.

Well, the third work is our joint work, mine and Junior’s, and the sensei herself had a hand in the end - she added yellow flowers. The situation was a little extreme, and we staged this composition “instead”. Before leaving, my treasure announced that she was not going anywhere, and in general “she didn’t need anything.” In response to my admonitions on the topic that in general now it doesn’t matter what she personally needs and what she doesn’t need, she has no right to let people down - our teacher and sensei, she has a place at the exhibition, she is on the list of participants, and now the same situation , when you just need to go and do what you have to do, Treasure twisted her face and continued to mumble that “she doesn’t need all this.” There was no time to think about her motivations and look for “approaches” to her mysterious soul, and I decided that let everything go as it goes. Perhaps her refusal to go was explained by the fact that the day before she had smashed one of Younger’s vases (there were only five of them), on purpose, out of spite, and was afraid of retribution? Retribution would hardly come, and the sensei and our teacher usually don’t bother with little things like broken ceramics, apparently rightly believing that everything in this world is transitory, and only glimpses of beauty are eternal... But our Treasure, I think, such simple thoughts come to mind they didn’t come, and she stayed at home. And we grabbed her vases, and, after we realized our own ideas, we quickly staged the third work. In my opinion, it turned out very well.

By the way, this is already the fifth exhibition of Nihon-no-bi - The Beauty of Japan - in Russia. It takes place there, at the Museum of Decorative and Applied Arts, on Delegatskaya Street. With master classes, tea ceremonies and other beauty. Open all week. When you have time, come.
DIY autumn ekibana crafts made from natural materials.
Ekibana is the traditional Japanese art of creating flower bouquets. Translated into Russian, this word, incomprehensible to us, means flowers that live. As a rule, the Japanese use exclusively live and, if possible, freshly cut flowers to create their floral sculptures.
But since we live in a country where it is not possible to grow fresh flowers all year round, our ekibana has been slightly transformed. In the autumn-winter period, florists and simply lovers of beautiful floral objects make it from all kinds of available materials. In addition to dried flowers and herbs, our people use chestnuts, autumn fruits and even rowan.
Crafts - do-it-yourself ekibans from natural materials on the theme of autumn: ideas, photos
Idea #1
 Idea No. 2
  Idea No. 3
 Idea No. 4
  Idea No. 5
 Idea #6
 As you probably already understood, not only compositions made from fresh flowers have the right to be called ekibana. Therefore, if you wish, you can quite easily use any floral material. True, when composing these objects, one must remember that visually they should look as harmonious as possible.
Therefore, when choosing material for your future masterpiece, try to ensure that it matches perfectly in color. That is why you must remember that ekibana is not just flowers in a vase. If desired, it can be secured in a basket, a large glass, a plastic container, or even in a pumpkin. The main thing to remember is that the container in which you will attach the floral material should not be very bright.
If it is noticeable, it will draw attention to itself quite strongly and, as a result, the ekibana itself will be lost against its background. And, of course, remember that such a composition should be as dynamic as possible, that is, it will be better if you try to install the material at different angles and create at least two-tiered objects.
How to make autumn ekibana from leaves: preparation and volumetric compositions
 Bouquet of roses from maple leaves
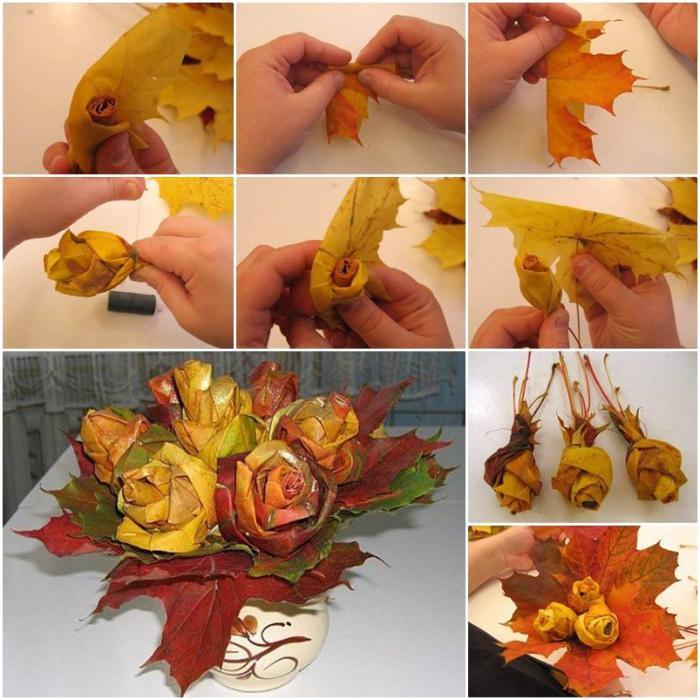
 Master class on making a bouquet
 The creation of any floral object begins with the preparation of the material. If you ignore this stage, then with a high probability you can say that in the end you will not get exactly what you wanted. As for preparing leaves for autumn ekibana, the first thing you should do is prepare a beautiful and undamaged material, and first lightly dry it from street moisture.
After drying, the leaves will definitely need to be treated with a composition that will make them more pliable and elastic. To do this, you will need to dilute 220 ml of glycerin in 450 ml of water, and soak all the decorative material in the resulting solution. After it has been in it for 3-4 days, the liquid will need to be drained and the leaves should be blotted with a paper napkin. And only after they become elastic can you begin to make a floral object.
- So, first, prepare a vase, approximately 40 pieces of maple leaves, threads and beads for decoration
- Then we take the still wet leaves and begin to form a rose from them (the master class can be seen above)
- We make the required number of buds, and then begin to attach them to the stem
- It can be made from any flexible twig of brown or green color
- After your autumn roses are ready, let's start collecting ekibana
- To do this, pour sand into the bottom of the vase and start sticking the stems of our roses into it
- Having arranged all the roses, be sure to make them a so-called wrapper of beautiful maple leaves and, if desired, decorate them with beads
- If you don’t like this edging, you can easily replace it with a satin ribbon tied in a bow
How to make autumn ekibana from leaves: preparation and flat compositions
 Leaf Butterfly
 Mouse made from leaves
 Birds made from leaves
 House of leaves
 Leaf painting
 Flat ekibana is an ideal option for schools and kindergartens. Some florists also call it foliage paintings and panels. Since in this case the leaves are attached to a dense base, all that will be required of you is to give them the correct shape and form certain shapes. If you wish, you can very quickly make a beautiful and airy butterfly, a small mouse, flowers from autumn leaves, or lay out a beautiful clearing.
But in order for you to get all these pictures, first you will need to prepare the decorative material. And if for a volumetric composition the leaves must be flexible, then for flat ones they must be as dry and even as possible. In view of this, all collected material will need to be properly dried.
So:
- The easiest way is to simply collect leaves of different shapes, tie them in small bunches and hang them to dry in a room with good ventilation. True, you must understand that in this case, when drying, the leaves will curl and will not be smooth and beautiful.
- If you want to get the smoothest possible material, then you can dry it with an iron. To do this, you will need to take a leaf, place it between two sheets of cardboard and iron it with an iron. This manipulation will need to be continued until all the moisture has evaporated from the material.
- If you have time, then put the leaves in a book and put it under a press. Open it periodically and let the moisture accumulated in it evaporate. If you are patient, you will eventually get a material that will retain both its color and its structure.
Ekibana - DIY autumn composition made from chestnuts

 Recommendations for making topiary
  Ready-made chestnut topiaries
  Chestnut beetle
 Vase of chestnuts
 Chestnuts are an ideal material for autumn crafts. With their help, you can make some pretty cute toys for preschool and school-age children, as well as wonderful and, most importantly, exclusive interior decorations. Above you can see an example of how using chestnuts you can make a composition called a beetle on autumn leaves.
Kids will definitely like this craft. You can also decorate a vase with this wonderful material (simply placing it on glue), and insert the same roses from maple leaves or dried flowers into it. Well, those who want to do something truly original with their own hands can try making a topiary from chestnuts.
- First, pour the gypsum mixture into the container in which your tree will stand.
- When it begins to thicken, install the trunk of the future topiary in it
- While it is fixed in plaster, start making the top
- Take a foam ball and cover it with chestnuts (be sure to cut them in half)
- Next, cut the corrugated paper into as small pieces as possible and fill the voids between the chestnuts with it (use glue to fix it)
- When the top is ready, fix it on the trunk and you can safely start decorating
- For this you can use dried flowers, small leaves, acorns, large beads
Autumn ekibana made from fresh flowers

 Ekibana autumn
 Floral composition with leaves
 Autumn motives
 We already told you a little higher that ekibana is, first of all, harmony, so when choosing material for this autumn object, give preference to flowers that bloom at this time of year.
The best option in this case would be asters and chrysanthemums. And in order for others to understand that you have created an autumn composition, you can supplement it with leaves, grass and interestingly shaped branches that have already changed color.
Yes, and when composing an ekibana, remember that it is advisable to place the brightest and most massive flowers in the center of the composition, this way you will create a point that attracts the eye, but at the same time does not distract from all the other elements of the man-made object.
So:
- At the initial stage, think about what your ekibana will ultimately be like, and in accordance with this, select a container for it
- After this, take a special sponge for ekibana and adjust its size to the selected container
- Place the sponge in a container and fill it with liquid, which will prolong the life of living flowers
- In the next step, start preparing the flowers (cut their stems at an acute angle)
- After this, carefully stick them into the sponge and try to immediately give them the desired slope
- Fill empty spaces with leaves, grass and branches
Ekibana from dried flowers
 Ekibana from dried flowers
 Homemade vase
 Bouquet in a beer glass
  Autumn composition
 Dried flowers are good because you can use them to create quite a lot of different objects. These can be bouquets, wreaths, paintings and original panels. The simplest ekibana, of course, is a bouquet. It can be done in two ways. If you prepare flowers yourself, then simply collect the plants that you like, make a bouquet of them, tie the stems well and hang them to dry in a dark, well-ventilated place (buds down).
If you do everything correctly, then in the fall your home will be decorated not only with a beautiful and pleasant-smelling composition. If you buy dried flowers and then make compositions from them, you will first need to adjust their stems to the same length, put all the flowers together, and then carefully look at whether all the elements of your ekibana are in harmony with each other.
As a rule, if ekibana is made from separately dried elements, then some of its parts stand out from the general visual sequence. If this happens to you, then just take sharp scissors and carefully cut off what, in your opinion, spoils the bouquet. After this, take a ribbon or thin twine and wrap it as carefully as possible around the stems of the flowers.
- If you need to attach a bud to a stem or form one large one from several small flowers, then do this using thin wire.
- If you need to secure a ready-made composition, then use medium-thick wire. It will help you connect all parts of the floral object together without damaging the delicate structure of the dried flowers.
- Well, finally, let's talk about artificial stems. If you need to make them, then take the thickest diameter wire and wrap it as carefully as possible with satin ribbon or corrugated paper.
Ekibana of autumn fruits: a basket of cones or acorns
 Master class on making a basket
  Ready product
  Basket from the box
 In autumn, there is literally a lot of decorative material lying under your feet, which can be used to create an original autumn ekibana. For example, you can collect acorns or cones and make an original basket out of them, which can later be filled with dried flowers, fruits or autumn leaves. The easiest way to make such a basket is to take an ordinary small cardboard box and carefully cover it with pine cones or acorns of the same size.
You can use a piece of grapevine as a handle for this craft. As a rule, it takes a little over an hour to make all the parts of an ekibana, and after that they are simply connected to each other with wire. If you are willing to tinker a little, you can make a basket exclusively from autumn fruits.
So:
- To begin, collect cones or acorns of the same size and shape.
- If you wish, you can bleach some parts using commercial bleach.
- Next, start forming the bottom of the future craft.
- To do this, take 6 cones and combine them into a flower (if the basket is larger, then you will need 12 or even 18 cones)
- If you use acorns, you can connect them together at the butts and then twist them into a tight spiral
- When the bottom of the basket is ready, begin to shape its depth.
- First, connect two or three cones together, and then form them into the wall of your basket
- At the next stage, using wire we connect all the workpieces together
- Add a grapevine handle to the basket and fill it with autumn apples, pears and rose hips
Ekibana - autumn fantasy in a basket
 Ekibana idea #1
 Idea for Ekibana No. 2
 Idea for Ekibana No. 3
 If you don’t want to make a basket yourself, you can take a ready-made one and turn it into an original autumn decoration. Both fresh and dried flowers can be used as filling. If you use live plants, for example, asters or chrysanthemums, then you need to ensure that they need to create favorable conditions that will help them stay fresh for as long as possible.
In view of this, you will have to insert a plastic or glass container inside the basket into which you can place a floral sponge soaked in a nutrient solution. If you use dried flowers for filling, you will need to stick them into the sand or simply attach them to the walls of the basket with thin wire. Now let's talk about the compositions that are most suitable for ready-made baskets.
I would like to say right away that they do not look very nice on low and sparse bouquets. If you want your ekibana to be as beautiful and original as possible, then try to create an asymmetrical composition that will have two or three tiers. If it turns out that you have flowers with a small stem, then make a continuation of the bouquet on the handle, simply decorating it with buds. This little trick will help visually stretch your ekibana, thereby making it more noticeable.
Pumpkin ekibana for autumn holiday

 Pumpkin Ekibana
  Ekibana for the autumn holiday
  Autumn composition
  Pumpkin Ekibana
  Original Ekibana
 Pumpkin is better than any other fruit for creating autumn compositions. If you want to make a similar craft with your child, then opt for a vase. This type of ekibana is easy to do, but most importantly, it looks very impressive. If desired, you can additionally decorate it with bean flowers or simply make a very delicate and beautiful carving on a floral theme.
But, although such a craft is considered the simplest, it must be done taking into account some nuances. Firstly, you need to know how to choose the right pumpkin. Many beginning needlewomen mistakenly think that the larger it is, the more beautiful the ekibana will end up. In fact, the ideal option for creating an autumn composition are medium-sized fruits. As practice shows, they are the ones that have the most suitable shape for creating a vase. Secondly, you should never rush to cut out an opening that will imitate the top of a vase. First, you should think about what you will insert inside the fruit (a glass, a glass jar or a cut plastic bottle).
Once you understand what is most suitable for these purposes, take a ruler and measure the diameter of the container, and based on the data obtained, cut out a perfectly round hole. Yes, and if you want your vase to visually appear shiny, then cover its surface with glue, and then sprinkle it as thoroughly as possible with ordinary sugar. After it all dries, such a sugar coating will appear crystalline from afar.
Ekibana - autumn bouquet
 Bouquet of leaves
 Bouquet of dried flowers
  Ekibana on the table
 Bouquet of branches
 Most people associate a bouquet exclusively with flowers. But in the case of ekibana, you have the opportunity to deviate from the generally accepted rules and make it from beautiful autumn leaves, dried flowers and twigs. If you manage to arrange these decorative elements correctly, then in the end you will get a floral object that will delight you all autumn and winter.
True, you must take into account that in order for this to happen, first you will need to dry all the components of the ekibana as thoroughly as possible and only then assemble it. Yes, and remember, it is not advisable to combine flowers and dry leaves at the same time. Since these elements are very bright in themselves, visually they will look slightly extravagant. Therefore, it will be better if you supplement the twigs with either dried flowers or leaves.
Ekibana from rowan

 Autumn wreath
  Rowan wreath
 Autumn Ekibana
 Above, we have already told you how you can make original floral objects using autumn flowers and fruits. But while talking about them, we forgot, perhaps, about the most beautiful autumn fruit - the mountain ash. With its brightness and ideal forms, it can make any ekibana more attractive.
Therefore, if you think that your craft looks unfinished, try adding bunches of rowan berries to it. If you want rowan to be the main element of the ekibana, then try making an autumn wreath from it.
So:
- Cut the required number of rowan bunches, rinse them in water and air dry
- While this is happening, take a piece of vine and bend it into a circle of the desired size
- If desired, you can replace the vine with a ready-made circle from a florist store
- Be sure to prepare dried flowers, castings of different colors and thin satin ribbons
- When everything is ready, start making your Ekibana
- To begin, fix the rowan on the circle (it is better to place them all as close to each other as possible
- After this stage is completed, begin to fill the voids that have formed between the bunches
- Attach dried flowers, leaves and pine cones to them, and at the very end decorate the wreath with small satin bows
Video: Craft - DIY autumn bouquet (from leaves and cones)