Do-it-yourself wooden housekeeper project. Do-it-yourself beautiful and functional wall-mounted housekeeper: secrets of craftsmanship, interesting ideas
Keys have a habit of getting lost. This small object fulfills a great function - it closes and opens our house. Therefore, it is better not to lose them, as thieves can use them. It will be convenient if the keys have their place in the house or apartment. An interior item such aswill provide a place where they can always be found without difficulty. Also, this piece of furniture is an excellent option for a gift.... Moreover, you can do it yourself... This does not require special skills and abilities. There are many options for making such an interior item asdo it yourself. All of them have a simple technique of execution.
Key holder made of wood using boards

- In order to make it easier to work, it is necessary to make a drawing of the future housekeeper. To do this, you first need to decide what size it will have. A drawing of a key holder made of wood will be a kind of design project, according to which the work on its manufacture will take place. Here you can designate what decorative elements the future will have.
- Next, you should prepare the tools and materials that will be used in the work. For this project, you will need a wooden board, 6-8 keys, self-tapping screws, a drill and wire cutters.
- The unwanted keys will serve as hooks. Therefore, using pliers, it is necessary to bend their lower part so that a hook is obtained. This procedure must be done with all the elements of the future hooks.
- Then you need to take a wooden board and mark the saw lines on it in accordance with the dimensions that were indicated earlier in the drawing. Use a saw to make a board for the housekeeper of the desired size.
- Further, depending on the idea, the board should be decorated. I must say that there are a lot of design ideas. Alternatively, you can leave her as she is. Wood itself is a very warm and cozy material, so it looks good at home without any finishing.
- After the board is ready, we fasten the bent keys to it with self-tapping screws. In the future, they will be hooks. The distance at which these elements are attached should be chosen based on your preferences. Keys can be attachedat the same distance from each other, but you can group.
- Next, on the back of the board we make a hole with a drill, which will be needed in order to fasten the key holder to the wall. The holes should be blind, their number depends on the length of the board, usually two or three holes are enough.

When the housekeeper, made from wood with his own hands, is ready, you can use it for its intended purpose. One of the simplest ways to make a key holder from wood was described above. But he's not the only one.
Housekeeper using decoupage technique
There is another simple wayhow to make a piece of furniture like housekeeper, do it yourself from wood using This option requires the following materials.

- Wooden frame. The size of the frame depends on what size the key holder is needed. It is better to buy a frame that has special rings on the back wall for attaching to the wall.
- For decoupage, you will need a napkin with a picture or a picture or a special decoupage card.
- A special decoupage set, which includes glue, brush, primer, varnish.
- Hooks. They can be made from anything. For example, from buttons, knobs, rings, and more.
- T You will also need a knife, pencil, ruler, drill and screws.
Work on the manufacture of this piece of furniture mcan be divided into two stages... First, you need to make decoupage, and then collect the housekeeper.
How to make decoupage
In fact, decoupage is not difficult to do. To do this, you need to disassemble the frame, take its base and prime it, leave it for some time to dry. A hairdryer can be used to speed up the drying process. Next, a decoupage pattern is glued and left to dry for a certain time. Then the drawing must be varnished and also allowed time to dry.

Assembling a housekeeper
The next stage of work on the manufacture of a key holder is its assembly. To do this, first, all the details of the photo frame are collected. Then you need to outline the places on the wooden frame where the hooks will be attached. They are attached by means of self-tapping screws.
It should be said thathave many manufacturing options. For example, instead of decoupage, you can use embroidery. And instead of a frame, take an opening box. You can also approach the process of making a housekeeper with humor and focus on the owner's hobbies or hobbies.
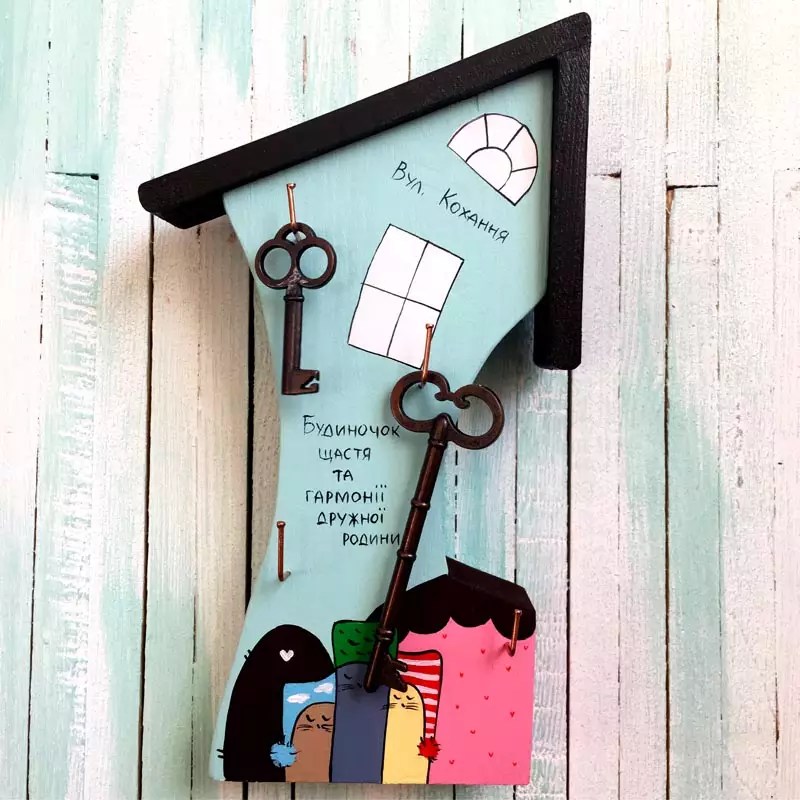
A lot of little things are kept in the hallway of every house. Housekeepers were invented to organize and arrange what can be hung on hooks. Today, a do-it-yourself wall key holder is not only a useful necessity at the entrance to a house, but also a pleasant looking unique souvenir. There are many varieties of products with hooks, but for most people, at least those who lived in the USSR, the housekeeper is associated with a house. Our master class is devoted to the manufacture of a key holder in the "house" form factor.
Materials and equipment
- Plywood or fiberboard;
- "Stain";
- Cloth and paper napkins;
- House door hinges;
- Key hooks;
First, we draw the figure of the house in real size on paper. For a housekeeper, sizes are suitable: 40-50 cm - height and 30-35 cm - width. However, if they are slightly different, it is not fatal at all. You can see one of the examples of such a house below:

Next, we apply the sample to a sheet of plywood and cut out the shape of a house with a jigsaw. At first, it is more convenient to cut out a square, and then form a silhouette of a dwelling from it. We cut out the side walls and the roof from the remnants of plywood so that the depth of the key holder is 9-12 cm. We grind the edges of all blanks with sandpaper and fasten them with the smallest nails. As a result, we get something like the following basis for a housekeeper:

Key keeper from the drawer
The above actions can be avoided if you find a shallow rectangular wooden box of a suitable size, slightly lengthen its walls and "build up" the roof. Of course, it will also have to "shine" with sandpaper or a file, and remove unnecessary partitions. The photo shows an example of using a box with a side wall moved into the space by 7-8 cm and a roof made of suitable-sized planks:

We process the surface of the workpiece with acrylic paint of a color you like. Then, if desired, we transfer the drawing from the napkin to the blank of the housekeeper, carefully cutting it out along the contour. Remember that the principle of "decals", familiar to us from childhood, works here: a picture from a napkin is laid "face down" on the surface to be decorated, which is then coated with PVA glue diluted with water. Adopting the decoupage technique, we can get, for example, the following pattern:

You can decouple absolutely all surfaces of the key holder, with the exception of the back one (since it is pointless), having selected the drawings you like in advance. For example, such as the one below in the photo:

The final stage of work is screwing on the hinges for the doors (if your house is "closed") and hooks. Do not forget about the loop on the back, so that the product can be hung on the wall.

Making a housekeeper with a child, you can easily make a "base", and entrust the decoration to him, delivering a lot of pleasant moments of creativity to both. The time spent on making this useful little thing will not exceed 2-3 hours (not counting the drying time of the paint), but it will become a unique element of the interior and will allow you not to lose the necessary things that are in the habit of getting lost.
A bit of video on the topic
The review of key boxes would be incomplete if there were no rollers in it and about other options for making key holders, albeit more "major" or costly. Today on the Internet there are many tips on how to make a wall key holder using the decoupage technique, from a strong tree branch, or even disassembling a wooden pallet with your own hands. In general, take a look and choose the version of the craft that you will like!
The most interesting articles:
DIY wall key holder: an example of making a cute souvenir
A lot of little things are kept in the hallway of every house. Housekeepers were invented to organize and arrange what can be hung on hooks. Today, a do-it-yourself wall key holder is not only a useful necessity at the entrance to a house, but also a pleasant looking unique souvenir.
There are many varieties of products with hooks, but for most people, at least those who lived in the USSR, the housekeeper is associated with a house. Our master class is devoted to the manufacture of a key holder in the "house" form factor.
As you can see from the previous photo, there are a great many hearth-shaped key keepers. Consider options that are not very expensive in terms of materials and do not require special carpentry skills from the craftsmen.
Materials and equipment
So, to make a house housekeeper, we need:
- Plywood or fiberboard;
- Acrylic paint in a spray can;
- "Stain";
- Cloth and paper napkins;
- PVA glue, diluted with water in a 1 to 1 ratio, and brushes;
- House door hinges;
- Key hooks;
- Coarse sandpaper.
- An electric jigsaw (ideally, but a regular one will work as well);
- A hammer and "boot" small nails.
First, we draw the figure of the house in real size on paper.
For a housekeeper, sizes are suitable: 40-50 cm - height and 30-35 cm - width. However, if they are slightly different, it is not fatal at all. You can see one of the examples of such a house below:
At first, it is more convenient to cut out a square, and then form a silhouette of a dwelling from it. We cut out the side walls and the roof from the remnants of plywood so that the depth of the key holder is 9-12 cm.
We grind the edges of all blanks with sandpaper and fasten them with the smallest nails. As a result, we get something like the following basis for a housekeeper:
Key keeper from the drawer
The above actions can be avoided if you find a shallow rectangular wooden box of a suitable size, slightly lengthen its walls and "build up" the roof.
Of course, it will also have to "shine" with sandpaper or a file, and remove unnecessary partitions. The photo shows an example of using a box with a side wall moved into the space by 7-8 cm and a roof made of suitable-sized planks:
The nuances of artistic processing
We process the surface of the workpiece with acrylic paint of a color you like.
Do-it-yourself wall key holder: 6 easy-to-implement ideas
Then, if desired, we transfer the drawing from the napkin to the blank of the housekeeper, carefully cutting it out along the contour. Remember that the principle of "decals", familiar to us from childhood, works here: a picture from a napkin is laid "face down" on the surface to be decorated, which is then coated with PVA glue diluted with water. Adopting the decoupage technique, we can get, for example, the following pattern:
You can decouple absolutely all surfaces of the key holder, with the exception of the back one (since it is pointless), having selected the drawings you like in advance.
For example, such as the one below in the photo:
Or such, if the key store also provides a small shelf in the upper part, and not just "hangers".
The final stage of work is screwing on the hinges for the doors (if your house is "closed") and hooks.
Do not forget about the loop on the back, so that the product can be hung on the wall.
In a small hallway, a housekeeper looks great with asymmetrical roof slopes or even walls, for example, this option:
If you have time and desire, you can retrofit the door of the house with a padlock or attach additional key holders on the side walls.
By the way, instead of decoupage, some copies of key stores, like the one in the photo above, are more aesthetically pleasing to simply cover with varnish-stain or paint with paints.
Making a housekeeper with a child, you can easily make a "base", and entrust the decoration to him, delivering a lot of pleasant moments of creativity to both.
The time spent on making this useful little thing will not exceed 2-3 hours (not counting the drying time of the paint), but it will become a unique element of the interior and will allow you not to lose the necessary things that are in the habit of getting lost.
A bit of video on the topic
The review of key boxes would be incomplete if there were no rollers in it and about other options for making key holders, albeit more "major" or costly.
Today on the Internet there are many tips on how to make a wall key holder using the decoupage technique, from a strong tree branch, or even disassembling a wooden pallet with your own hands.
In general, take a look and choose the version of the craft that you will like!
The most interesting articles:
2. The variability of housekeepers
Wall key holders:
Decorative wall key holders can be a wonderful gift that will delight those close to you with its originality and uniqueness. In addition, it is also an excellent assistant for putting things in order.
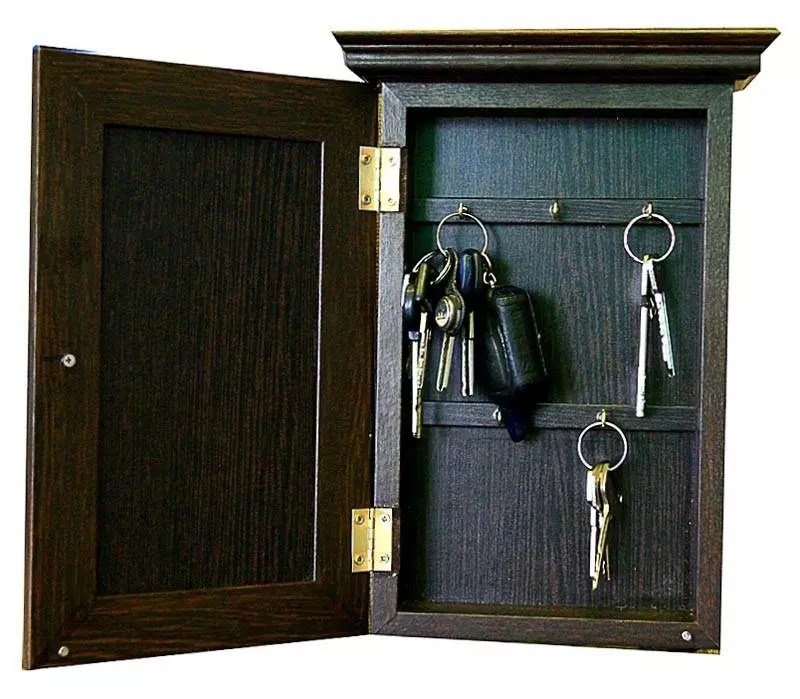
Conventionally, all wall key holders can be divided into two types - open and closed.
The first is, in fact, any suitable base with hooks attached to it.
The latter are somewhat more complicated in execution, since they represent a cabinet, very often with one or more shelves.
Open housekeepers
The easiest option for a novice designer is to make and decorate simple wall key holders with your own hands.  Anything easy to attach hooks to can be used to design an open "key store".
:
1.
a figurine of a fish, tree, house cut out of wood;
2. any tablet or old shelf;
3. Wire braided construction;
4. glass or mirror.
In general, absolutely any completely ordinary object can serve as the basis for creating such a thing as a wall key holder.
You can see a photo of such devices made of ordinary materials just below.
Closed key holders
Such a peculiar house (see photo) in the form of a locker will help to hide from prying eyes not only all the keys you have, but also some not quite attractive objects that are usually present in the hallway (an electricity meter or a doorbell box).
It is worth noting that a closed wall key holder is an order of magnitude more difficult to execute than an open one.  For its manufacture, both materials that can be purchased in handicraft shops and stores are used, as well as do-it-yourself cabinets of various shapes and sizes made of wood, plastic and even thick cardboard binding.
The closed wall key holder, the photo of which you see, is made using decoupage technique.
You can decorate such a storage cabinet in a variety of ways, techniques and styles - from painting to decoupage or ordinary applique.
How to make a wall key holder: photos, drawings
If you do not know how to draw and do not know other methods, just glass the cabinet and put colored decorative stones, shells or coins inside.
The clock installed in the housekeeper will not only add functionality to it, but also give it a special style and charm. 
But still, I decided to choose the option of a private key holder. Because it is more rational to use. Dust will not accumulate in it, the keys will not be visible. 
The door of the housekeeper, decorated with carved wood ornaments, gives a significant effect to the decoration of the product and the whole house as a whole.
Do-it-yourself wall key holder: design options, master class
How to make a housekeeper?
Ideas on how to make a housekeeper with your own hands, from what materials? Detailed master class with step by step description.

The key holder is convenient and functional. You never have to look for keys before leaving the house, you just have to get used to - when you come home, hang the keys in their place.
Here are several options for making key holders with your own hands:
Leather key holder, for a handbag or pocket
Wall key holder, in the form of a frame with a photo and key hooks
Key holders have three options: frame.
felt and ceramics
You can make a housekeeper with your own hands using decoupage technique.
Wall key holder: Original design ideas
To do this, we need a blank for a key holder, if there is no blank, then it will not be difficult to make it ourselves from plywood :), screw a couple of hooks and the key holder is ready.
I propose to make just such a housekeeper using decoupage technique

We need the following materials:

We cover the workpiece with two layers of acrylic paint, with intermediate drying


Trying on a decoupage card

Cut out the measured piece and apply

Put the card in water for a short time

cover the workpiece with glue and glue the card


We paint the roof and stick with hooks, color antique gold with acrylic paint.


After the paint has dried (2 hours), apply a generous amount of craquelure varnish.
You need to apply it in one direction!

After 3 hours, apply a layer of contrasting paint.
Read the instructions, each varnish has its own drying time!

After complete drying, we cover the work with acrylic varnish in two layers with intermediate drying.

Add some shine to our work


Add volume with 3D varnish

We cover everything again with varnish, our housekeeper is ready

Making a housekeeper yourself, with your own hands, is real.
To do this, you need to prepare a wooden frame (it will act as a base). It needs to be processed with sandpaper, removing all burrs and irregularities. Next, it is worth covering the base with light paint (it is better to use acrylic). The paint should be applied carefully so that there are no gaps, each layer should be well dried.
The patina is then applied with a piece of sponge.
A small amount of patina should be applied to the edge of the workpiece and to areas that require a different shade. The excess is removed by wiping the surface with sandpaper.
Then the base for the key holder is covered with matte acrylic varnish in one, or two layers. Each layer is thoroughly dried.
The housekeeper should also be decorated - it can be purchased decor elements (flowers, butterflies, bugs) or a decor made on your own by cutting out the same flowers or insects from cardboard.
This is how it turns out a very simple to manufacture, but an original key holder.
We take any photo frame. We take out the glass, paint it at will or glue some kind of picture inside, glue the hooks and you're done.

And also a good idea was in the program "Living well" - to take an old constructor and make a housekeeper out of it.
To do this, we cut through small, but preferably long parts of the designer in order to insert a key ring into them - we get a keychain. We hang the base on the wall, into which the part of the constructor will be attached

A housekeeper is a necessary and useful thing in the house.
Now there is such a variety and design of these key holders, eyes run wide.
You can try to make a housekeeper using this video, it's not very difficult and everything is shown.
To make the simplest housekeeper, you need:
- buy hooks with a thread in the hardware store

- take a tablet;
- sand the board with fine sandpaper;
- cover the board or plywood with varnish, or stain, pinotex;
- make small holes with an awl for the hooks;
- twist the hooks into the plank with your hands or pliers;
- the housekeeper is ready;
- we attach to the wall or furniture;
- to furniture for self-tapping screws;
- to the wall with plastic dowels;
- we use a puncher for holes in the wall.
For more information on how such a key holder looks and is used, see the attached video clip, at the end of the answer.
Also, the finished product can be decorated with wood burning, or wood carving, or it can be painted with artistic paints, as shown in the photographs. There are materials in art stores that allow such a key holder to be completely sculpted out of clay, and polished copper can be used instead of hooks.
Here I quote in full a quote from my answer about open and closed key holders:


I really liked it, such a housekeeper in the form of a cat.
 We draw a drawing on paper, then transfer it to plywood and cut it out, as in the photo.
  With a grinder, you need to grind the entire surface, and especially the edges, they need to be rounded.
 Well, now, you can paint with paint in several layers.
  we varnish, dry and fasten the hooks for hanging the keys, and that's it.
If you have an old frame for a picture or photographs, great, you can make a pretty housekeeper out of it with your own hands.
Which can be hung in the hallway. The frame can be painted in a color that suits the interior of this room. The frame can be coated with acrylic paint. To work you need a drill, several half-ring screws, a screwdriver. We drill several holes in the frame, screw in the screws so that they look in one direction. It remains to hang the key holder in the right place.

and where to get the frame?
Key holders are wall and pocket. Pocket covers are made of leather, fabric. There are key hooks inside the case. This type of key holders is more conducive to the convenience of carrying keys in a bag, teaches them to be neat and organized (keys in a case are inconvenient to carry in pockets).
Key holders that hang on the walls are open and closed designs. Closed key holders are not very convenient if they have to be used often (the doors of the structure will have to be constantly opened and closed).

Open key holder design
The shape of the key holder largely depends on the place where the key holder will be nailed. Perhaps it will be long and narrow, or in the shape of a square or a circle. For the first time, you can come up with a sketch of a simple model and feel free to get to work.

Wood planks are a favorite material at work
Wood planks are the most favorite material for crafts. First, they are easy to find. Secondly, planks of any length and thickness will do. Thirdly, the boards can be folded into any shape, connected in any sequence to each other. The fact that the tree is easy to handle will also be an important argument. For example, using sandpaper, you can sand the surface to a smooth state. You can cover the surface of the tree with paint, varnish, stain. Each time it will be a completely different appearance of the wooden surface. But still, the basis of the key holder will be in a strict classic style.

If you want to enhance the wood pattern, then you need to break the flat surface of the planks with a metal brush. After that, varnish, paint, stain is applied. Again, the pattern will be different each time, but the soft spots after coating become darker and this is how the wood pattern appears on the surface.

Hooks are nailed onto the treated wooden surface after it has completely dried. You can use the same hooks, but different in color, or shape, or the material of manufacture, the hooks will give your housekeeper a certain uniqueness.

Plywood is easier to work with
Using plywood will shorten the work time. The main task is to come up with an interesting figure for the housekeeper. You can cut a large key, a dachshund, a mouse, a sleeping cat. The surface of plywood, unlike wood, does not require processing. All you need to do is sand the cut points (the edges of the plywood). To make them smooth, they are covered with paint. The last step is to attach the hooks in a strict or random order.

An original way to use picture frames
An unusual housekeeper can be made using a picture frame. Hooks can be attached to the frame itself to the top bar from the back. It is also recommended to attach the base with chipboard on the back with staples. It can be decorated with wallpaper or small multi-colored mosaics, painted with paint or just glued on a picture. Hooks can then be attached to this base.

Key holder made of wood and without hooks
It will be unusual to see a housekeeper without hooks. Wood is used for its manufacture. The trick is that the keys are not hung, but inserted into the slot. It is not difficult to make such a gap in a wooden base. You can cut the gap exactly along a horizontal line, or you can do it with a slope of an acute angle to the wall. This requires a milling machine or circular saw. You can neatly achieve a good result with an ordinary saw. The cracks made must be carefully processed.

Key holder in youth decoration
If you have non-working panels of any devices, then they can be used to design an unusual avant-garde key holder. It is important that the panel has jacks for the plugs. A neatly cut panel from the device is screwed to the wall. The key is connected to the ring, a plug is attached to the ring, which can be inserted into the socket of the new key holder. So the key will be attached to its new place with the help of its unusual keychain-plug.

An interesting key holder will be in the form of a neck from any string instrument, for example, a guitar. If it is inconvenient to hang the keys on the neck pegs, you can additionally attach hooks.

Unusual options for housekeeper models
Nobody says that creating housekeepers is necessarily a long and painful process. You can take a non-standard approach to this issue. Then the housekeeper will be ready in 5 minutes.

- The connectors will act as a key holder, and the plugs will act as key fobs on the keys. The new key holder-connector is screwed to the wall at the selected place in the blank. By inserting the plugs into the sockets, the keys are hung in place. The work will take 20 minutes.
- Hooks are hung on a straight stick from an aluminum wire. The stick can be dyed or wrapped with multi-colored woolen thread. A rope is tied at both ends of the stick. The original housekeeper is hung on it, nailing a nail or a hook into the wall.
- A housekeeper is made quickly and in an original way from wine bottle corks. Wine corks are connected with glue. Wait until it is completely dry. You need to purchase screw hooks on sale. Such a screw is screwed into the cork surface together with the hook. Minimum costs and original design of the key holder.

The required number of hooks, the size of the structure depends on your wishes and, to a greater extent, on the number of household members. If the family is large, you need to take care that the model is durable. It is recommended to hang the housekeeper at eye level of the younger family member (not counting, of course, a tiny baby). You need to decorate the housekeeper so that it harmoniously fits into the interior of the corridor. Invite the children to develop a model for a housekeeper, let them show their creativity.
In order not to find yourself in a difficult situation when leaving the house, you should take care of a permanent place to store your keys. For this purpose, most use a housekeeper with a sufficient number of places. Having placed it in a convenient place, it is difficult to forget the keys when leaving for work or for a walk. When you return, you can quickly fasten the ligament in the place assigned to it. If a wall key holder is made with your own hands, it will definitely become a stylish element. You just need to show your imagination and carefully read the master class on the manufacture of a specific model.
Read in the article
Wall key holder: a photo will help you find an idea
Having decided to make a wall decorative key holder on your own, you should decide on the size and design. Numerous photos, presented by the authors of such a useful device, will allow you to find a suitable idea for subsequent implementation. You just need to decide which model deserves attention.

Various materials can be used for the manufacture of key holders. Depending on the stylistic design of the corridor or preference is given to metal, wood, plastic, leather, their combination, as well as a number of other materials. The shape and design of the product is selected individually.

Wall key holders for home have a beautiful design, and therefore can become a stylish element. You just need to show your creativity, come up with an interesting shape and choose a non-standard design.
Most often, the wall key holder is made open. In this case, you can quickly place the key in the designated place. Closed models require a special door that will have to be opened before picking up or hanging up the key. On the one hand, there is no need to fear an accidental fall of the ligament. On the other hand, you will have to spend a little time opening / closing the door.

The functional purpose of products can be broader than simple key storage. A wall key holder with a clock will allow you to control the time. If you are late for work, you can appreciate this opportunity. You don't have to waste precious minutes constantly checking the remaining time.

Product size may also vary. It all depends on their purpose. Key holders can be:
- Wall mounted. They are located on the wall closer to the exit;
- Pocket. Do not allow you to lose your keys inside the bag;
- Desktop. Closed models installed on the corridor;
- Closet. A suitable option for those who have installed in the corridor. By using the cabinet doors, it will be possible to more rationally dispose of the limited space of the hallway.
The purpose of the product affects its dimensions. As a rule, wall key holders are large, and pocket ones are small. This allows the latter to be carried not only in a purse, but also in a trouser pocket, reducing the risk of rubbing the fabric.

Various materials can be used for the manufacture of products of all types. Each of the options deserves special attention in the selection process. It is worth studying the features of each material separately in order to make the right choice later.

We make a wooden wall key holder ourselves
The do-it-yourself wall key holder made of wood is made of wooden elements connected by means of nails and screws, as well as hooks. The simplest option would be a small wooden plank with a certain number of hooks screwed into it. It takes a minimum of time to make such a product. You can make a beautiful product even if you have no experience in joinery work.

If you cannot make a product on your own, buying a wall-mounted wooden key holder can be the best solution. You can always choose the best option for a specific one by choosing an open model of an interesting shape.
Metal wall key holder for high-tech interior
Metal products are characterized by high strength and large capacity. They are in demand in offices, schools, business centers. In residential buildings, fixtures can add solidity and uniqueness to the interior. They look especially advantageous in those decorated in the Techno style, or.

It is quite difficult to make a beautiful metal product on your own. The lack of special equipment will not allow the formation of a strong connection of individual elements. It is best to buy a metal wall key holder in an online store. Here, the price, as a rule, is lower than in ordinary stores, and the assortment is larger.
Metal products have a number of advantages. They:
- Do not burn;
- Do not melt;
- They retain their shape well even with significant mechanical stress;
- Withstand fluctuations in temperature and in the presence of a special protective layer.
DIY plywood key keeper: simple and tasteful
It lends itself well to cutting. It allows you to form a product of any shape and size. It is enough to use it to become the owner of a stylish and functional product.
The advantages of plywood products include:
- Dimensional stability. The material is manufactured in the factory, and therefore its characteristics are known in advance;
- Light weight. The finished product can be mounted on any wall;
- Ease of processing that can be done at home;
- Smooth surface, which reduces the requirements for subsequent finishing.
Do-it-yourself wall key holder from can be made simultaneously with key chains. They can be used in place of hooks. It is enough to combine the keychain with the groove prepared for it.

To make such a product, you should:
- Purchase plywood less than 10 mm thick and rings with chains;
- Prepare a jigsaw;
- Cut to life size. The key holder itself will consist of an upper, lower part and key rings;
- Transfer the contours of the template to plywood;
- Cut out the elements of the future product with a jigsaw;
- Using sandpaper, polish the cutting line;
- Drill holes for rings in the key fobs;
- Connect the top and bottom of the key holder. As an adhesive, you can use PVA glue;
- Finish the product and key rings.
We make a housekeeper with our own hands from cardboard
In order for the finished product to keep its shape well, thick cardboard should be used for its manufacture. It does not have to be purchased on purpose. You can use a cookie box or any other product. This will significantly reduce the cost of making a key holder.
What kind of a wall key holder can be made with your own hands out of the box will allow you to understand the photo. Based on the presented images, you can develop a sketch of your own product. It will be possible to understand what materials will be required for the manufacture of the product. In addition to the cardboard itself, it is worth preparing hooks and materials that will be required for decorating. Considering the low resistance of the cardboard to mechanical stress, plywood overlays can be provided.

Examples from other materials: take advantage of the advice
Combined structures, in the manufacture of which different materials are used, enjoy a certain popularity. Plastic products are popular. They can be used in any conditions. When making wall key holders with your own hands, photos on the Internet, just as opportune, will allow you to choose a suitable design.

Do-it-yourself housekeeper: master class
The sequence of work will depend on the purpose, type of product, material used, as well as the desired design. Work should be done carefully, carefully following each point. Special attention should be paid to the design of the product. The decoupage technique will allow you to form a beautiful pattern on the surface, even in the absence of specialized education.
Making a pocket housekeeper
If the product is to be carried in a purse or pocket, its dimensions should be relatively small. It is worth focusing on the dimensions of the largest key in the bundle. The material from which the key holder will be made must be durable and soft at the same time. Most often, preference is given to natural or artificial leather.

Do-it-yourself pocket key holder is made in the following sequence:
- We prepare material and tools: leather, ruler, awl, strong thread, scissors, preferred fastener. We are working on a sketch of the future product. Attention should be paid to the smallest details. It is better to draw a sketch in full size;
- We cut out two parts: large and small. The larger width should exceed the dimensions of the bundle by 2 cm. In this case, it will be convenient to place the keys inside. The length should be twice the length of the largest key + 8 cm, of which 5 cm will fall on the parts of the one-piece valve. The small one will be the inner part of the flap, to which the counterpart of the fastener will be attached. It should be 1 cm narrower than the wider part, and the length is 4.5 cm. This is 0.5 cm less than the valve itself;
- Sew on the clasp. The length of the Velcro should be in line with the dimensions of the front part of the key holder. It should be fixed to a piece of thick cloth. To form stitches using an awl, we make holes in the skin. The Velcro should be 2 mm from the edge. The main and counter part is sewn on. The latter is to the inside of the valve;
- We apply decoration. The product can be decorated with embroidery or decoupage. The applique also looks beautiful;
- We connect the inside of the valve with the main part. We make holes along the perimeter of the product with a step of 3 mm. We sew from the inside on a sewing machine or by hand using a "forward needle" seam;
- Cut out a narrow strip of leather with which the keys will be attached. Sew one end to the bottom corner. Fold the other end in a loop and secure it. The ring will be used to attach the key ring.

Making a wall key holder
You can make a wall key holder with your own hands in different ways. One of the options may be to use a bitch of any tree. Preference should be given to oak, larch or other wood. It is advisable to choose a blank in the original form. The works are performed in the following sequence:
| Photo | Description |
 | Sand the piece of wood with emery. It is advisable to completely get rid of the bark, as it can cause insects to appear. |
 | We drill the required number of holes in the piece of wood, which will be used to attach the hooks and fix the finished product to the wall. The hole diameter is selected to be smaller than the hook thread diameter. |
 | With the help of stain, the finished product is given the desired tone. After the composition has dried, the raised fibers are removed from the tinted surface using fine sandpaper. |
 | The surface is covered with varnish, which gives the product its characteristic shine. Depending on the desired result, preference can be given to a matte or glossy composition. The choice will depend on the desired shine. We attach the key holder to the wall and screw in the hooks. |
The housekeeper in the hallway with her own hands from a piece of wood will look beautiful in or. For those decorated in a modern style, this option may not be the best choice. Various patterns applied by electric burning can be used as decoration. Other options are also possible. For example, drawing a picture.
We decorate using decoupage technique
You can decorate the wall key holder with your own hands using the decoupage technique as follows:
 | A table is being prepared on which the work will be performed. The tabletop can be covered with an old oilcloth or a standard trash bag. A blank of a decorated key holder, white acrylic paint, a sponge is being prepared. |
 | We dip the sponge into the paint and paint the workpiece with the help of blotting movements. Using a sponge instead of a brush allows you to give the surface a unique texture. If there are unpainted areas, you can use a brush. As a rule, the area at the point of attachment of the hooks is painted in this way. |
 | Let the workpiece dry. Do not leave paint on your hands. It takes about an hour for the painted surface to dry completely. Apply the second layer and let the garment dry for two hours. If the formed layer turns out to be heterogeneous, in some places the base is visible - another layer of acrylic paint should be applied. |
 | We prepare an adhesive composition consisting of an equal amount of water and PVA glue. With its help, the napkin will be glued to the base. |
 | Preparing a napkin. If it is three-layer, separate the top layer. The rest will not be required for work. Extreme care should be taken not to damage the decor. |
 | Using a fan-shaped brush, apply the adhesive to the key holder. Gently glue the napkin in the direction from the middle. Carefully tear off the excess. Apply an additional layer of glue along the edges. Leave it to dry completely. |
 | Apply a layer of acrylic varnish with a brush. Let the layer dry. To ensure a sufficient level of protection for the formed decor, a minimum of five coats of varnish should be applied. This will reliably fix the pattern on the surface and give the surface a characteristic shine. Black acrylic paint can be applied to the edges of the product to give clarity to the formed contour. After complete drying, the unevenness on the surface of the product can be removed with sandpaper, and then reapplied with several layers of varnish. |
Article
With the correct implementation of the appropriate project, you can provide convenient storage of important things and. A high-quality do-it-yourself wall key holder will be made quickly and at no extra cost after reading the materials of this article. There are general thematic data and photos of particularly successful solutions. Some of the manufacturing technologies are described in detail. Therefore, any person will reproduce them accurately, even without previous experience in performing similar work operations.
To formulate a list of requirements for this design, it is necessary to make several clarifications on the intended purpose:
- The decorative wall key holder is installed in the entrance area, in a visible place. Its aesthetic characteristics are a must.
- The direct loads from the keys themselves are not great. However, with intensive use, it is difficult to rely on very careful handling. Possible mechanical influences should be taken into account.
- The resistance of decorative coatings to changes in humidity and temperature will come in handy. The differences in these parameters are especially large in the hallways of private houses.
- Ensure good visibility of all objects. Install if necessary.
- In some cases, it is necessary to equip the structure with closing doors.
Taking into account the features noted above, various traditional solutions can be considered.

One glance is enough to check the location of objects in their places. An additional "plus" of this design is simplicity. The decorative design is chosen individually. But a base with several hooks can be created in just a few tens of minutes. Of course, you will have to provide a suitable fixing system on the wall. But this task is not difficult to solve using ordinary screws with dowels, other standard ones.

They provide some protection against theft during visits by courier workers and other unauthorized people. For a good view, a glass insert is installed in the door. Inside if necessary


In this modification, the free space inside the door is used in a rational way. A mechanism was installed there that performs decorative and practical functions at the same time.
For your information! Such a project is not too difficult to implement on your own. You just need to buy a watch that matches the size of the product. It is better to choose an electromechanical or electronic model in order to reduce the operational burden on users.

It must be remembered that such accessories must not interfere with free movement. To store a large number of keys, you can use the internal volume, or open shelves.


It is not difficult to make a wooden wall key holder at home
One of the main advantages of this material is its ease of processing. A beautiful and functional do-it-yourself housekeeper made of wood can be made using the simplest carpentry. To give the desired sizes and shapes, chisels are also used. An ideal flat surface is created using a planer, sandpaper. The interesting natural lines of the cuts are preserved with the use of clear varnish. If necessary, decoupage or other decorative coating techniques will be used.

In the example in the photo, you will need to find a birch log of a suitable size. After cutting and stripping the ends, hooks are screwed in from below. This completes the manufacturing process of the device.
This product aptly illustrates the disadvantages of simple solutions and the material itself:
- The primitive appearance imposes significant restrictions on the suitability of the interiors.
- Without treatment, the log will become a source of contamination.
- If the product is not treated with a deep primer, the structure will be quickly destroyed by changes in humidity and temperature.

It is not difficult to buy a wooden wall key holder in a store. But it is much more pleasant to create the desired product yourself. With the right implementation of plans, it will become a source of pride, which will be shown to guests.

This example shows that the key holder, with the appropriate equipment, can be used to store jars and smartphones, gloves and other small things.
Reliability and durability of metal wall key holders


Metal products are highly durable. They retain their functional characteristics over many years of use in excellent condition. Using special technologies, these materials are used to create parts of complex shapes. The only drawback is destruction by corrosive chemical reactions. To exclude such negative manifestations, various types of decorative and protective coatings are used.

Metal is harder to handle than wood. For the manufacture of some products, you will have to master welding, casting, and other complex technologies. We'll have to equip the home workshop accordingly. Even without careful analysis, it is clear that the total investment will be significant.
What is good about a do-it-yourself plywood housekeeper
For the following reasons, this material is better than the options discussed above:
- Plywood is created under factory conditions, therefore the thickness and other characteristics are precisely known.
- By purchasing a moisture resistant variety, damage can be prevented by appropriate external influences.
- The outer surfaces are quite smooth even without processing. They are well suited for imaging using a variety of techniques.
- Unlike metal, plywood is not difficult to process.
- Even large products from it weigh a little.


Important! When using plywood, take into account the relatively low hardness of the material. The attachment points for hooks and other additional parts may loosen over time. Also, one must not forget about the limited resistance of the tree to moisture and microorganisms. To protect against them, special impregnations are used.
Quick DIY do-it-yourself key holders from cardboard


These pictures illustrate the algorithm for creating functional. You will need a preliminary compilation of a list of required components. In order not to be mistaken, you should prepare the project in advance. It is enough to make a freehand sketch with dimensions and other design parameters. You should also choose and master the application of beautiful persistent images in advance.
This material itself is inexpensive, but additional costs for production technologies will have to be taken into account. We must not forget about the limited resistance of the cardboard to mechanical stress, high humidity.

In this photo of the do-it-yourself housekeeper, only a container for small things is made from the box. The sturdy base and decorative overlays are made of plywood. Metal hooks with the desired aesthetic characteristics were purchased from a store.
Examples from other materials
These examples clearly demonstrate the wide possibilities when using different materials. Quite often, craftsmen use combined designs. When preparing an appropriate project, you should pay attention to the following general recommendations:
- The load-bearing frame is calculated taking into account actual future loads.
- The dimensions are chosen so as to exclude obstacles to the free movement of people.
- All parts of the product must be designed for the respective operating conditions. If necessary, they are protected from adverse external influences.
- In any case, it is necessary to consider the whole range of works. Some complex components (hooks, locks) can be purchased in the retail network, or ordered from a specialized workshop.


Do-it-yourself housekeeper: master class and useful recommendations
Before making a pocket key holder with your own hands, you need to decide on the method of fixing objects inside it.


In this example, you can consider some of the accessories:
- button for locking in a closed state;
- a carabiner can be used to attach this useful accessory to your belt;
- rivet;
- device with rotary elements for keys;
- pads to prevent edge wear.
For manufacturing, you will need not only leather and the special metal fittings listed above. The workpiece drawing and cutting will not cause significant difficulties. However, a quality seam.


To make a do-it-yourself wall key holder from wood, you do not need to purchase expensive specialized equipment. A completely free driftwood of a special shape, found while walking through the forest, can be a suitable blank. When buying a small board, plywood in a hardware store, you will not need significant costs. You can also buy standard fasteners, hooks, varnishes and paints there.

The following description will help you create such a housekeeper in the hallway with your own hands without errors:
- After specifying the dimensions, you need to buy plywood (up to 10 mm), rings with key chains.
- Drawings of individual parts in full size. With its help, patterns of the lower and upper parts, key rings are cut out of thick paper.
- They are applied to a sheet of plywood and outlined with a pencil.
- Cutouts are made along the marked lines with a jigsaw.
- Surfaces are sanded with sandpaper. Drill holes in the key chains for the subsequent installation of the rings.
- "House" and the base are fastened with the use of PVA wood glue.
- "Hearts" and other decorations can be applied using burners.
- Products are varnished. After drying, they are fixed on the wall.

When creating a wall key holder with your own hands, it will help to improve the decorative parameters of the product without unnecessary costs and personal artistic talents. Therefore, this technology should be studied in detail:
- By preparing the surface, chips and irregularities are removed.
- Apply 2-3 layers of white paint, which forms a neutral color background and eliminates minor defects.
- The pattern you like is cut out of the napkin, the edges are made uneven.
- Attaching such a blank in the right place, apply (transparent PVA). With movements from the center to the sides, air bubbles are removed.
- After drying, they are varnished.
Article

