Do-it-yourself volcano model made of paper, polyurethane foam and plasticine: master classes with detailed instructions. How to DIY Volcano Experience at Home DIY Salt Dough Volcano Model
We offer an unforgettable experience for children "Volcano Eruption", which is easy to do with your own hands at home. The chemical experiment will be of particular interest to preschoolers and elementary school children.
You can purchase a ready-made kit for the experiment (on Ozon.ru, on My-shop.ru) or make a volcano from available materials that are in every home. Let's consider two experiments.
Attention! All chemical experiments are carried out under the strict supervision of adults!
Salt dough volcano
Necessary materials:
- salt dough (recipe);
- foil;
- plastic bottle;
- baking soda;
- vinegar;
- dishwashing liquid;
- food coloring (optional)
- a baking sheet with high sides or a container.
How to do
Source: jugglingwithkids.com
Cut a plastic bottle in half.

Place the top of the bottle on the tray with the neck up. Cut strips of foil, wrap around the bottle and create a volcano shape.

Prepare the salt dough, roll it out, divide it into thirds and carefully lay it on top of the foil.

For realism, paint the volcano's mouth with red food coloring.
How to conduct an experiment

Pour two teaspoons of baking soda into the neck of the bottle and add a tablespoon of dish soap.

Pour vinegar into a glass and tint with food coloring. Pour the liquid into the volcano and you will see a thick colored foam flow from the vent. Children will be delighted with the spectacular volcanic eruption!
Colorful soda and vinegar volcano
Necessary materials:
- baking soda;
- vinegar;
- water;
- dishwashing liquid;
- liquid watercolor or diluted food coloring.
How to do

Young researchers will certainly be interested in how to make a plasticine volcano with their own hands. A volcano craft can be either static or active. For a static one, it is enough to reproduce with the help of plasticine the appearance of a “smoking” mountain. The current craft will look much more spectacular and entertaining.
The model of an active volcano will interest not only schoolchildren, but also young children. Perhaps sculpting and testing the volcano will awaken an interest in geology, geography and chemistry.


Let's start crafting
It is very easy to make an active volcano at home. For the surface of the volcano, you can use not only plasticine, but also salt dough or paper. The main secret is the chemical interaction of soda and vinegar. To make the process of "eruption" more interesting, you can add a natural dye. But first things first. First you need to understand how a real volcano works.
Before starting the craft, it is recommended to consider pictures and diagrams of the structure of the volcano with the children, as well as documentary photographs. After all, such a project is not so much developing imagination and motor skills as cognitive. Children can learn for themselves a lot about the structure of the Earth and natural phenomena.
Here is the main sectional diagram of the volcano:

As you can see from the picture, magma rises up a thin vent before escaping and becoming lava. Therefore, in order for the experiment with the volcano to turn out at home, you need to create the same conditions: a wide reservoir for "magma" and a narrow neck as a vent.
It is most convenient to design a homemade volcano from plasticine and a bottle. In addition to these materials, you will also need:
- plywood or thick cardboard of a large format (about 50 × 50 cm or more);
- acrylic paints and brushes;
- Scotch;
- dishwashing liquid;
- soda;
- food coloring (red or orange);
- vinegar.
Plywood is needed for the base. It can be replaced with an unnecessary basin, pallet or tray. The main thing is that the size of the volcano does not exceed the size of the base. The mountain should rise about 20 cm from the edges of the plywood.

Consider the process of creating a volcano in stages.
- We form the "mouth" of the volcano. To do this, you need a bottle that can be used as a whole or reduced to the desired size (depending on the height of the future volcano).
To create a small model, it is better to cut the bottle, i.e. cut off the upper part with the neck and the lower part with the bottom and combine these two parts with adhesive tape. After that, the bottle can be fixed on all sides in the center of the base also with tape.
- We begin to sculpt the mountain. To do this, most likely, you will need a lot of plasticine. You can collect all the leftovers, include spoiled plasticine, old figures in the total mass. The color of the volcano should be brown, gray and black, so mixing several colors will just give the right shade. Before sculpting, it is better to knead it very well.
The formation of a mountain starts from the bottom up. First, the base is fixed, and then plasticine is gradually applied from above, in layers. The volcano does not have to be perfectly flat, as if taken from a potter's wheel. On the contrary, relief and irregularities will give more realism. You can even lay gutters, through which "magma" will then drain.
Here are some photos of plasticine volcanoes:


From above, when the plasticine mountain is ready, you can make an imitation of flowing lava. This requires yellow, orange and red plasticine. The pieces are combined into one lump, but not mixed so that multi-colored stains are visible.

At the end, the craft can be processed in stacks and, if desired, painted with paint.
- We paint plywood with acrylic paints around the volcano, we make a landscape. To do this, you can use ready-made models of dinosaurs, palm trees, trees.
- After the craft has dried, you can start testing. To do this, the following mixture is made:
- 1 st. a spoonful of dishwashing detergent;
- 1 st. a spoonful of soda;
- a few drops (5-10) of liquid food coloring.
Pour the resulting mixture into the volcano through a funnel. After that, vinegar is added to the “vent”, and a chemical reaction begins. Vinegar must be added gradually until the reaction begins (foam appears). With a bottle volume of 2 liters, it is necessary to pour ¾ cup of vinegar.

If there is no liquid dye, you can use dry, but then it must be dissolved in vinegar. This is an additional component to give the lava color to the foam. For a simple experiment, you can do without dye.
A model of a volcano would make a great project for a school fair or geography homework. It can be used to demonstrate the eruption or as an exhibition piece.

At home, children can play with such a volcano in the “Mesozoic era”, when dinosaurs walked the earth, and volcanic eruption was a common occurrence.
You can watch a volcano erupt at home not only on TV. With the help of a small chemical experiment, you will arrange a real eruption on a fabulous island.
From this article you will learn
All that is needed
For the experience, you will need some household chemicals and decorative items to create an island. The volcano island can be made from natural materials or you can use dinosaur sensory box sets.
Model of the volcano is molded from plasticine. The creation of a fabulous volcanic island for the experience is the main part of it and serves to develop the child's imagination and creativity. Such activities will help instill a love of chemistry and geography. Fine motor skills of the fingers, the child will develop during the manufacture of plasticine terrain and its inhabitants.
To make an island you need:
- cardboard;
- stapler or narrow tape;
- box with colored plasticine;
- small animal toys;
- multi-colored pebbles;
- a large plastic box or bowl in which the island will stand;
- glass or plastic container with a volume of 200 ml for the vent of the volcano.
For the experiment you will need:
- soda 20 g;
- food coloring:
- vinegar 9%;
- dish detergent 25 ml;
- water 100 ml.
Usually the experience happens until mom runs out of all the baking soda and all the vinegar, so please be patient.
Children cannot conduct experiments on their own without adults. If vinegar gets into the eyes or mouth of a child, a burn of the mucous membranes may occur, and if swallowed, a burn of the esophagus.
Making a fabulous island

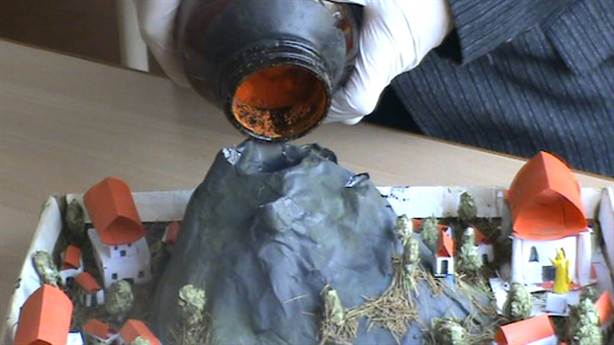
You can build an island in a large plastic container. Pour real water, lay out the bottom with round pebbles. Make a container for a volcano from a jar of baby food or an old glass. For the mountain, inside which the container will stand, you need to make a cardboard layout, his child will be happy to cover it with plasticine.
The sequence of making a volcanic mountain:
- cut out a circle of the desired diameter from thick cardboard;
- make an incision from the edge to the center of the circle;
- roll up the cone;
- the edges of the cone are fastened with a stapler or tape;
- cut off the upper part of the cone at a height equal to the capacity chosen for the volcano;
- place the container inside the cone.

From above, I coat the mountain with plasticine. To do this, roll out small brown plasticine cakes and stick to a paper cone, completely covering the cardboard. The top of the volcano can be made of red plasticine, which will imitate red-hot lava.
They set up a volcanic mountain on a dry island of pebbles. They sit around small rubber animals that are among children's toys. Colorful amazing dinosaurs or wolves, foxes, bunnies, bears and other inhabitants of the forest and jungle. Depending on which animals were planted, vegetation is selected for the island. Large tree ferns and horsetails for dinosaurs, and ordinary Christmas trees and birches for bunnies and foxes.
Plastic plants are also often sold in children's play sets. You can use a leaf of a live fern and twigs of plants if it's summer outside. Plants can also be molded from plasticine, made from threads and beads or ordinary cardboard.
You can make small houses out of cardboard for plastic Indians and soldiers. It is better to use cardboard for making plants and houses when the island is in a container with blue-colored sand instead of water or on a blue plasticine sea.
Conducting an experiment
Finally the island is ready. All toy animals and people froze in anticipation of an interesting event - a volcanic eruption. They know that the volcano is not real and therefore they are not afraid of it.
To conduct the experiment, pour a tablespoon of soda into the jar-vent of the volcano. Add a tablespoon of dish detergent. Red or orange food coloring is dissolved in 100 milligrams of water and poured into soda and detergent. The basis for the experiment is ready, it remains to add vinegar. Mom, you can let the child pour vinegar into the volcano on his own, under her supervision, so that he does not do it in her absence. It is better to repeat the experiment for an encore, pouring vinegar into the “mouth” of the volcano and pouring soda into it, while the child is interested and asks to repeat the experiment.
When vinegar is added, the soda will begin to foam, erupting from the “vent of the volcano”, like red or orange lava. The detergent will allow the “lava” to foam longer and more abundantly, overflowing from the vent and flooding the surroundings along with plants and animals that were inadvertently placed too close.
Afterword
The safest way to do a volcano experiment for young children is with baking soda and vinegar. It can be repeated many times, and getting the necessary materials for the experiment is not difficult.
The most interesting thing in the experience is the creation of your own fairy-tale island with the child, which can be used not only for the Volcano chemical experiment, but also for an exciting game.
With older children, you can conduct the Volcano experiment at home using  , potassium permanganate and glycerin. For the experiment, ammonium dichromate is poured into an evaporating bowl in the form of a slide, in the middle of which a depression is made. Add a little potassium permanganate and a few drops of glycerin to the recess.
After a few minutes, due to the interaction of potassium permanganate and glycerol, ammonium dichromate will ignite. Sparks will be thrown from the volcano in all directions, and a fountain of fire will begin to erupt. Before starting the experiment, the bowl must be placed on the foil so as not to burn the surface on which the experiment will take place.
Ammonium dichromate can simply be set on fire, and it will burn like a volcano, spewing sparks. The experience is exciting, but without the presence of adults, children should not be allowed to do it. Burns can be caused not only by sparks, but also by the chemicals used.
Good luck with your experiments!
Hello, friends! Today I want to tell you about how to make a home volcano with your own hands in just a couple of minutes.
The action is very exciting and truly bewitching, both for children and adults, so I highly recommend trying it 🙂
What you need to make a volcano at home
In fact, making a volcano is very simple. We collected it even without vinegar, because the smell of vinegar is not very pleasant for children.
So, for the simplest and most smellless 🙂 volcano, we need:
- bottle;
- plasticine for decorating the bottle and making the "mountain";
- soda;
- citric acid (in a ratio of 1 to 2);
- a container for mixing ingredients and a spoon;
- water and a little dishwashing detergent (so that there is more foam);
- food coloring (optional)
- a plastic container for creating a themed sensory box "Volcano";
- small figurines for the sensory box (if you make a volcano in a box);
How to make a volcano
Our goal was not only make a volcano, but also to embed it into the general thematic canvas, so we made a sensory box. It turned out just super and was able to keep Gleb busy for three hours for sure 🙂
We played a treasure island (the pirate theme has been prevailing here for a very long time :-)) and on our island, where the pirates sailed in search of treasure, a volcano erupted.

making a volcano
For volcano we took a bottle and to give it the appearance of a mountain, they covered it with multi-colored plasticine.


Of course, it was possible to make the mountain even more gentle, but there was no longer the strength to endure, I really wanted to see the volcano in action 🙂

Our island was rocky, so we put stones in a container, placed a volcano in the center, and around it were pirates and a treasure chest.
Magic powder
Now it's time time to make "magic powder", which at the right time will ignite the volcano. In fact, there is nothing magical here, just a mixture of soda and citric acid (in a ratio of 1 to 2), but the result of the reaction for the child will be truly magical, believe me 🙂

Conveniently immediately pour a lot of powder into a container and prepare a spoon (small), otherwise the child will go into a rage and it will be difficult to be distracted by making an additional portion of the magic powder.
Can be in powder add food coloring so that the foam is colored. We added red to make the lava red. It turned out really well 🙂
Eruption
And then everything is simple: you just need to pour the magic powder into the mouth of the volcano and it will turn out - magic!

For clarity - made a little video for you. I hope you enjoy our volcano 🙂
With love,
Marina Kruchinskaya
The proposed model of the volcano is easily made at home. It can become a spectacular imitation of the process that takes place in the depths of our Earth. The production of the object is divided into 2 logical parts. The first part is the manufacture of a volcanic cone. The second part is actually a demonstration of the magma eruption process.
1. Making a volcanic cone
To make a cone model, you will need:
1. Plastic bottle.
2. Plasticine.
3. Scissors.
4. Any building mixture - gypsum, putty mass, dry tile adhesive, ready-made plaster mixes.
First of all, cut off the top third from the plastic bottle.

We discard the lower part - we will no longer need it. With the left upper third of the nail scissors, carefully cut off the neck with a small plastic gap - it will play the role of the crater of our future volcano.

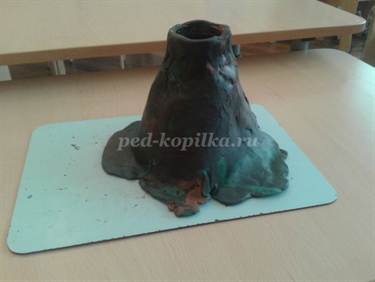
We cover the trimmed plastic cone with plasticine, simulating the shape of the future volcano.


On it we apply, mixed with water, any building mixture.


In the photo - a mixture of tile adhesive and acrylic putty, but gypsum, cement or ready-made dry plaster will do.

In a cone, densely and picturesquely smeared with putty, we insert an inverted top from a bottle with a tightly closed cap.

In order for the mass to harden, dry and strengthen, we leave the potential volcano for several hours in a dry place.

2. Demonstration of a volcanic eruption
To simulate a volcanic eruption, we need soda, 100 ml of vinegar and red watercolor paint.

With a brush, we wash the watercolor paint into a glass of vinegar.

The more dye there is, the more spectacular the eruption will be.
It is better to put the cone in a dish or bowl so that our “lava” does not stain the table, and pour 2 teaspoons of soda into the conditional crater.

