How to fix slopes on plastic windows. How to make slopes on the windows with your own hands? Window slopes and window sills, insulation of the walls of the opening
Reading 7 min.
As a rule, the replacement of any windows leads to the destruction of the adjacent section of the wall. The question arises: what to do to make the window structure look beautiful and reliably protect from noise, wind and other troubles of the street? The answer is simple: in this case, repair work is indispensable. There are various options for sealing slopes, but in order to choose the right option, you need to consider them in more detail.
About slopes
The sections of the wall adjacent to the window block are called slopes. They are internal and external. Strict requirements apply to the internal areas.
The following functions are assigned to slopes:
- giving the window design an aesthetic and attractive look. Is it possible to imagine a high-quality window that is docked with a broken wall;
- improvement of sound and thermal insulation. Window structures that do not have high-quality slopes do not have sufficient tightness;
- protection of mounting elements and seams from environmental influences. A high-quality slope not only protects fasteners from corrosion, but also reduces the likelihood of fogging and freezing of windows.
Thus, the repair of slopes is a list of works aimed not only at restoring damaged sections of the wall, but also at creating additional insulation.
Basically, one of the following repair options is selected:
For any repair of slopes, first of all, high-quality surface preparation is necessary.
Window opening preparation
Restoration of slopes is started after their surface is prepared. Preparation is carried out in the following sequence:

In order not to destroy the restored slopes, the window sill is installed before the start of the repair.
To protect against contamination and knocked down elements, the window and window sill are protected with paper or polyethylene. And also the protection of the window handle and the battery under the windowsill will not interfere.

The protective film on the window is removed only after all work is completed.
- Slope surfaces are thoroughly cleaned. Large dangling fragments are attached to the solution.

Slope plastering
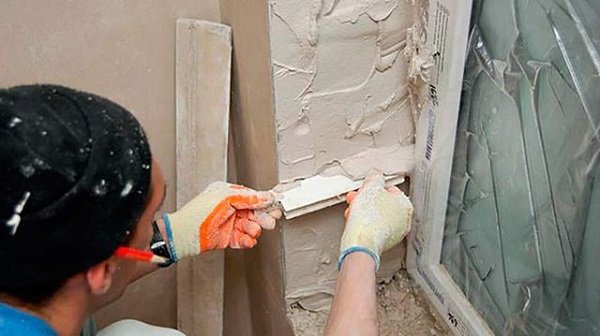
This option for repairing slopes is low cost. For sealing, it is enough to have: a finishing mixture, a set of simple tools and paint diluted with water.
Photos from the site:
Every man who was engaged in repairs in the house is aware that you can lay tiles with your own hands, install doors or paint the ceiling yourself and save a decent amount on this, and not give it as a payment to workers.
You may not be able to install a double-glazed window alone, but things are much easier with slopes. If you make calculations, then your savings will be about 25%, and this is a lot. Slopes are a necessary element of installation after installing new windows. Even with professional work, traces of damage to the window opening remain, and they must be repaired in order to maintain an aesthetically pleasing appearance. The best season for their installation is summer, since installation work in most cases must also be carried out from the side of the street.
The use of plaster
The cheapest option to get rid of the untidy and sloppy look of windows is plaster. It should be noted right away that it is best to use this method if you are engaged in a thorough renovation of the apartment and have not yet glued the wallpaper in the room. Otherwise, traces of plaster or putty will remain on the wallpaper and you will have to re-paste them. Think over this moment in advance, save yourself from unnecessary work.

Photos from the site:
In the choice of plaster materials, it is important whether the installation of slopes for windows will take place outside or inside. If the humidity in your house exceeds the norm of 30-60% (use a hygrometer to measure this indicator), then it is best for you to use a cement base or special plaster for facades (sold in any hardware stores). Use a gypsum, cement or lime-gypsum base if you are installing slopes from the inside.
If you use gypsum plaster, then you can do without reinforcing the upper slope. If you are using another poorly adhered base, then it is better to do it on a galvanized mesh, this way you increase the likelihood that the applied layers will adhere strongly immediately after application.
Use a small spatula when applying. When aligning layers, use the trapezoid rule.
It's important to know
Plaster is not a durable material. Over time, traces of cracks and destruction appear on it both on the upper layer and in the inner ones. Therefore, in a couple of years you will need restoration again.
Tips for finishing slopes with plaster
- Pre-protect the window frame from contamination by covering it with some material
- Nail a couple of strips on different sides to guide them and evenly apply the finished mixture.
- Prepare the plaster according to the instructions and recommendations on the package. Use a bucket partially filled with water at room temperature and a mixing tool on the drill to get a smooth paste.
- Thoroughly clean the window surface from traces of dirt and level the rough surface.
- Apply the plaster in several layers, each of which must first be left to dry completely. In this regard, the finishing time varies from 2 to 3 days.
- The last movements should go in the direction of the light: from the window deep into the room.
The use of drywall
This method is faster and less complicated than the previous one.
All work consists of several stages, which go one after the other sequentially:
- establishing a framework;
- laying drywall;
- priming before putty;
- putty;
- priming before painting;
- painting.
At its core, this material is a gypsum, which is enclosed on both sides between cardboard sheets.

Photos from the site:
How to make a drywall slope yourself:
- Take a profile corner and cut into segments according to the width and height of the window. Then form a rectangle from these beams and attach along the edge of the window profile using the required number of euro screws or self-tapping screws. Don't worry about the look, we'll hide them under the drywall a bit later.
- Pre-calculate all the same parameters we need, then cut out the drywall blank. Fill part of the slope with insulation (mineral wool is suitable). The inner edge of the panel with the cut corner will be attached close to the corner. Glue the other edge with special glue to the slope. Drywall is divided into three types: waterproof, fire resistant and ordinary. The best option when choosing a material is moisture-resistant drywall from Knauf or Gyprok. When you choose the thickness, please note that the best range is from 9 to 12 millimeters.
- Use sealant and attach a perforated corner at the junction of the side and top panels. Then seal the formed joint near the window, and carefully putty the entire area of \u200b\u200bthe slope. After sanding, prime it with a deep penetration primer and paint with waterproof PVA paint. Ready!
Use of plastic
The most optimal option today are slopes made of plastic. Why this particular material? The one-piece construction, which is obtained as a result of the work, fits into any interior and looks the most harmonious in comparison with other types of slopes.

Photo from the site: vopros-remont.ru
Advantages of plastic slopes:
- Inexpensive cost;
- Long service life of the material;
- You can choose a color scheme that suits the design of your room;
- Quick installation work. In 3-4 hours, you can easily cope with the installation;
- Plastic is easy to clean, so it's easy to care for and keep clean.

Photos from the site:
Plastic also has its drawbacks: if you have a hole or a crack in it, you will need to make a complete replacement of the slope. You should also be aware that this material is very easily affected by temperature, so extremely high thermal effects must be avoided.
After installing the double-glazed window, the mounting foam will harden completely within 36 hours. Once this time has passed, you can safely install window slopes.
When buying plastic slopes, pay special attention to the thickness. The minimum thickness should be 8 millimeters. Next, correlate and calculate all the parameters of the plastic (length, width, height), based on the data of your window opening.

What we need:
- F-band equal to the length of the plastic panel.
- Plastic panel. The parameters are calculated from the height and latitude of the slopes
- Insulation. You can choose any, but mineral wool is most often used.
- Small wooden block. We will mount it on the side and upper sides of the slopes.
- Dowel-nails and screws. You will need them in order to attach the wooden planks, as well as to fix the starting profile.
- Silicone. In order for it to look natural, it is best to choose it according to the color of the panels.
It is interesting
Polyvinyl chloride (PVC) is widely used in many industries: construction, toys, furniture, industrial products, etc. Its advantages in comparison with metal are that it is not subject to corrosion, and in comparison with wood - rotting. Compared to other materials, it is durable and, with careful handling, can serve you for decades.
- Calculate the parameters of your window and make bars of wood of the appropriate length. Once you secure them on each side, use a drill to drill holes into which you will screw the screws.
- Log off
- Mark the future holes with a pencil, into which we will then insert the dowel-nails. With the help of a level with two ampoules, it is easiest to set the bar evenly.
- After marking, we make the necessary holes and insert the plugs of the dowels and fix the bar, once again checking whether everything is exactly on the spirit level.
- Install the F-shaped (shaped like the Latin letter F) profile on the bar. To do this, use a sawing object (knife, saw, grinder). Cut out also the profile parts for the side slopes. In order for us to get even ends, use a tray for cutting boards, which is called a miter box. We will calculate the length we need according to the formula: the length of the plastic slope + the width of the part of the profile that will cover the slope + 20-30 mm we leave in reserve. Having measured the length that suits us, we cut the desired one.
- We measure from the lower profile the length corresponding to the distance from one edge of the slope to the other. From the part that remains with us, we cut off the strips intended for winding this profile. Next, we use a stapler (construction) and attach the strip to the bar.
- We measure the length of the upper strip in exactly the same way as in paragraph 4 and fix it again with construction brackets.
- We need to accurately calculate the 45 degree angle and cut it off so that we can later use it at the junction of vertical and horizontal stripes.
- One of the last moments before installing the slopes is the installation of the starting profile. Install it with self-tapping screws to the window profile. Mark up first to avoid bumps. With a pencil, draw lines at an angle that we need.
- According to our drawn line, again with the help of self-tapping screws, we attach the strip to the profile and correctly cut the ends. As a result, you should get a design, the joints of which are almost perfect for each other, you should not have any difficulty in linking them.
- We insulate the empty space between the F-shaped and starting profiles with mineral wool and also install the panels.
- At the end of the work, be sure to go through all the joints and coat them with silicone. Thus, we will kill two birds with one stone: 1) tightness will not allow air to pass through the holes, 2) external attractiveness will be preserved and brought into proper form.
note
If you have never done a slope installation before, then try for the first time to find a person among your friends who will help in mastering this business. So you protect yourself from failure as much as possible, and besides, together you will get the job done much faster.
Video “How to install slopes on plastic windows yourself”
If you nevertheless decide to take on your own and repair the slopes with drywall, plastic or putty, then we advise you to familiarize yourself with this video, in which you can clearly see how to make slopes on the window using improvised means.
After installing plastic windows, the window opening does not look the best: foam sticks out, pieces of plaster stick out, wall material is visible in places. All this “beauty” is closed in various ways, the most practical, quick and inexpensive of which is plastic slopes. It is better to make them from sandwich panels (two layers of plastic, between which is foamed polypropylene). They are dense, durable, made of good material.
There are two main methods for installing plastic slopes: with and without a starting profile. Both are given with step by step instructions and photos. Decide for yourself how to fix slopes on plastic windows. Both methods give good results.
Photo report 1: installation of slopes from sandwich panels without starting profiles
This method is suitable when the window is installed so that the distance from the window frame to the opening wall is too small. In this case, installation with a start profile (see below) is either very difficult or - usually on the hinge side - not possible at all.
After installing the plastic window, such a picture was observed.
The device of slopes of plastic windows begins with the preparation of the opening: we cut off the remaining foam with a clerical knife. It is cut off easily, just don't overdo it, cut it flush, but don't cut it out - the foam both holds and insulates the frame. Pieces of plaster that interfere and protrude are also removed. If they hold well and do not protrude beyond the plane of the future slope, you can leave them - less foam will slip.
Then, along the perimeter of the window, we nail (we put on dowels if the wall is concrete) a thin rail - 10 * 40 mm - with the wide side to the slope.
Rail nailed around the perimeter
Usually it is not leveled, it is nailed as is, but if you want, you can set it straight by placing pieces of plywood, thin planks, etc. in the right places.
Groove for plastic sandwich panel
Now you need to properly cut the plastic panels. Can be done as standard: using measurements, you can make a stencil. With a stencil, it seems to be easier. Take a sheet of paper, larger than your window (I had old wallpaper). Apply to the slope, squeeze, bending the excess. Cut along the curved lines, try on, adjust as necessary.
It is more convenient to start with the upper part of the opening. Having made a paper stencil, we outline it on plastic. Considering that about 1 cm will go into the groove of the foam, we add this centimeter along the edge that will be inserted there. We cut it out with a small margin - it’s easier to cut off than to cover up later.
We cut with a hacksaw with a metal blade, try on, adjust so that the plastic stands up evenly, without bending. Align so that the panel is flush with the plaster. The edge turns out to be almost even, where necessary, we work with a file.
Inserted plastic top
Having removed the tried and fitted strip, along the outer edge, which will be nailed to the bar, we drill holes along the thickness of the studs, stepping back about 0.5 cm from the edge. So it will be easier to fasten and do not damage the plastic.
We put it back in place, take a balloon with polyurethane foam and fill the gap with foam with short “puffs”. We try to get as deep as possible, but we don’t pour a lot: if it swells up, it can warp the plastic.
Fill it out like this
There are several points when working with mounting foam. If the plastic is smooth, the foam does not adhere very well to it. To improve it, or treat the surface that faces the wall with sandpaper, or / and prime it with something to improve adhesion. The second nuance: for the normal polymerization of the foam, moisture is needed. Therefore, before installing the plastic, the slope is sprayed with water from a spray bottle. Naturally, there should be no dust on the wall - it is swept away with a brush or removed with a vacuum cleaner. If the plaster or mortar is loose, the opening is pre-treated with a penetrating primer, which will bind the concrete particles together.
After we lift the panel, pressing down the foam, we insert the studs into the holes and fasten the outer edge to the bar. The inner one rests against the window frame.
Fixed upper plastic panel on the window slope
Using the same technology - we cut out a paper template, try it on, transfer it to plastic - cut out a plastic sidewall. Here you need to be especially precise so that the gap between the slope panel and the window sill (upper slope) is minimal. To do this, the edge will have to be processed with sandpaper. To make the edge even it was easier, it is more convenient to process it with sandpaper attached to a flat bar, a file or a whetstone (half of a circle, as in the photo).
Finishing the edge of the plastic panel
We adjust to the ideal (as far as possible) match at the top and bottom, put it in place, driving one edge into the groove near the window. When the result is satisfactory, we level the outer vertical edge on the same level with the wall plaster. You can do this with a clerical knife on the spot, or you can put a line on the panel (with a pencil, a thin marker, scratch it with something sharp) and then refine it with what is convenient.
Having removed, along the outer edge we also drill holes for cloves. We install the panel in place, take the foam, and fill the gap from bottom to top. Too much foam and here - not good, because the plastic can bend. Therefore, we fill in short portions, trying to fill as deep as possible.
On the vertical parts of the slopes, you can do it differently: on the panel ready for installation, along the far edge, which starts under the frame, apply foam before installation. The strip is made solid or applied with a small snake. Only you need to do this not from the very edge, but stepping back a little. Then the plastic part is inserted into the cut out groove, set as needed, the rest of the gap is filled with foam (do not forget to moisten the wall before installation). Having filled, press, level, fix with carnations into the bar.
The upper and lower joints are fixed with masking tape until the foam polymerizes.
So that during the polymerization process the foam does not move the edges of the slope, the joint is glued with masking tape at the top and bottom. No matter how hard you try to fit the plastic evenly, gaps, albeit small, remain. They can be covered with acrylic. It is sold in tubes such as mounting foam, placed in the same mounting gun.
Squeeze the strip into the slot, rub it, smooth it out, remove the excess with a damp soft cloth or sponge. You need to do this operation in small areas and wipe it gently - clean. As long as the acrylic has not hardened, it cleans up well. Then - with great difficulty. It is more convenient to start filling cracks from above - immediately - a horizontal slope panel, then joints, then move down, first along one side, then along the other. The last to cover up the joints with the window sill.
After drying - 12-24 hours, depending on the sealant (written on the tube), acrylic can be drawn into the seam - this is if the gaps are large. All these places go through the second time according to the same method. After the second layer dries, if there are roughness and irregularities, they can be leveled with fine-grained sandpaper, folding it in half. In general, it is better to carefully align while damp, otherwise you can scratch the plastic.
Installed plastic slopes
Everything, plastic slopes are installed. After the final polymerization of the foam, the bevels must be puttied, leveled with the surface of the walls. After that, you can remove the protective blue film. As a result, the window will look something like this.
Window with slopes made of plastic (sandchich-panels)
When installing these plastic slopes, sandwich panels were used. These are two layers of plastic, between which there is a layer of foamed foam. Using the same technology, you can make window frames from inexpensive plastic window sills or white PVC wall panels. The most unreliable material is panels: even wall panels are quite easily pressed through, besides, if the front layer of plastic is thin (cheap), then jumpers are visible in the light. There is no such thing in sandwich panels and plastic window sills. And it takes a lot of effort to push through, and even there are no jumpers to the clearance.
Installation of plastic windows is described here.
Photo report 2: we mount plastic slopes with a starting profile
The installation of plastic slopes and according to this technology begins with the preparation of a window opening. We cut exactly the foam, remove everything that does not hold well, clean off the dust, if necessary, we pass along the opening with a primer that improves adhesion.
Window opening preparation
Along the perimeter of the opening, but already near the frame, a wooden bar is attached. Choose the thickness depending on the distance: it should almost go on the frame. One side of the bar must be worked out with a planer, making a slope. The slope angle of this face is equal to the slope setting angle. It is possible to saw off, but it is even more difficult to do it, except that there is a circular saw with an adjustable angle.
We make a slope on one of the faces of the bar
We fasten the processed bar to the walls along the perimeter of the opening. The mounting method depends on the material of the wall. If the wall is brick, you can try on self-tapping screws, you need to put dowels in concrete.
We fasten the bar
You buy a starting profile in the store, install it with the long side to the bar, fasten it. It is more convenient and faster to fix it to the bar with staples from a construction stapler, if there is none, you can use small cloves or self-tapping screws with flat heads.
We fix the starting profile
When choosing a starting profile, take a tight one. It is more expensive, but you only care about three meters per window, maybe a little more. A dense profile will hold plastic well, a soft one will bend and look ugly. Another point - when mounting the profile, press it as tightly as possible to the frame so that there are either no gaps at all, or they are minimal.
At the top, when joining the vertical and horizontal profiles, you need to be especially careful and cut them off exactly at an angle of 45 °. If there are small gaps, they can be repaired with acrylic.
Installed start profile
According to this technology, it is more convenient to start the installation of reservoir slopes from the sidewalls. Insert the panel into the fixed start profile. They are also better to take from expensive and dense, with a thick layer of plastic. If you put cheap ones (ceiling ones), then the front wall is thin, and jumpers will be visible in bright light. In addition, such plastic can be pushed through even with a finger.
We insert a plastic panel into the profile
The width of the plastic panel should be greater than the slope. If one is not wide enough, two are joined. But then, at the junction, an additional vertical bar will be needed, to which the first strip will be fixed.
The panel inserted into the profile is usually longer than the opening. Holding it with your hand, mark the opening line. After removing, cut off along the marked line.
Cut to size
We install the panel again, move it a little away from the wall and fill it with mounting foam, trying to fill it without gaps, but without excess. To make it happen, we start from the far lower corner - we draw from the bottom up near the nailed bar. While we reached the top, the bottom of the foam expanded a little. Again we draw a line with foam, but closer to the edge. The closer to the outer edge, the less foam is required - after all, the panel is installed under a slope, so make the tracks thinner. Having reached the middle, make a snake on the rest of the surface and press the panel the way it should be. Align and check. Attach to the wall with masking tape. Also install the second part and then the top. It can also be cut out according to a paper template, and the edges can be adjusted to a perfect (or almost) match with sandpaper.
Installed plastic window slopes
Having installed all parts of the slope and secured with masking tape, leave until complete polymerization. Then, in order not to putty the gaps between the slope and the wall, a white plastic corner is glued to the liquid nails. The main task is to cut exactly at the corners. It is easy to glue: apply a thin strip of glue on both shelves of the corner, press it, passing your hand along it, hold for a couple of minutes. So they are installed around the entire perimeter, then, until the glue dries, they are also glued with masking tape and left.
Installed corners along the perimeter of the slope
After a day, we remove the adhesive tape, the plastic slopes are ready.
It looks like a window with installed plastic slopes
If there are gaps somewhere, they are sealed with acrylic, as described above. Don't use silicone. In the light, it quickly turns yellow. In a year or two, your windows will look terrible. Look for white acrylic sealant and mask it.
How to adjust plastic windows read here.
Video
See this video for the option of installing slopes with a starting profile screwed to the window frame.
Video option for installing slopes made of plastic without a starting profile.
And another way in this video. Here, pay attention to the finish of the panel joints. They were made using a special profile. Could be so.
As a rule, the replacement of any windows leads to the destruction of the adjacent section of the wall. The question arises: what to do to make the window structure look beautiful and reliably protect from noise, wind and other troubles of the street? The answer is simple: in this case, repair work is indispensable. There are various options for sealing slopes, but in order to choose the right option, you need to consider them in more detail.
- About slopes
- Window opening preparation
- Slope plastering
- Sheathing slopes with plastic panels
- Sandwich paneling
- Sheathing slopes with plasterboard
About slopes
The sections of the wall adjacent to the window block are called slopes. They are internal and external. Strict requirements apply to the internal areas.
The following functions are assigned to slopes:
- giving the window design an aesthetic and attractive look. Is it possible to imagine a high-quality window that is docked with a broken wall;
- improvement of sound and thermal insulation. Window structures that do not have high-quality slopes do not have sufficient tightness;
- protection of mounting elements and seams from environmental influences. A high-quality slope not only protects fasteners from corrosion, but also reduces the likelihood of fogging and freezing of windows.
Thus, the repair of slopes is a list of works aimed not only at restoring damaged sections of the wall, but also at creating additional insulation.
Basically, one of the following repair options is selected:
- Plastering the surface with subsequent painting. Widespread and inexpensive finishing option.
- Plastic sheathing. Plastic panels are combined with the material of the window profile, in addition, such repairs do not take much time;
- Plasterboard installation. The option is time consuming, as subsequent finishing is necessary. The material is convenient to use for windows of complex configuration.
For any repair of slopes, first of all, high-quality surface preparation is necessary.
Window opening preparation
Restoration of slopes is started after their surface is prepared. Preparation is carried out in the following sequence:
- The destroyed and protruding sections are knocked down with a chisel.
In order not to destroy the restored slopes, the window sill is installed before the start of the repair.
To protect against contamination and knocked down elements, the window and window sill are protected with paper or polyethylene. And also the protection of the window handle and the battery under the windowsill will not interfere.
- Excess foam is cut off, which seals the window structure. The dried foam is cut off with a knife. To do this, it is necessary to pierce the protruding excess from the top of the window, and then remove it with a downward movement. Foam glued to the wall is also removed.
The protective film on the window is removed only after all work is completed.
- Slope surfaces are thoroughly cleaned. Large dangling fragments are attached to the solution.
- To improve adhesion, the surface is primed. Usually a deep penetration primer is used before plastering, in other cases antiseptics are used.
Slope plastering
This option for repairing slopes is low cost. For sealing, it is enough to have: a finishing mixture, a set of simple tools and paint diluted with water.
The option also has disadvantages:
- to obtain a very even surface, it takes a lot of effort and spend enough time. An experienced installer performs such work much faster;
- cracks often appear after plastering. This may be due to the single-layer coating of the surface, when a thick layer slides down. In addition, cracks appear due to changes in humidity or poor quality of the mixture;
- low thermal insulation of the window structure;
- lack of adhesion to the plastic from which the window is made.
It is believed that plaster looks more aesthetically pleasing for internal slopes than plastic and drywall.
Plastering begins with the right choice and preparation of the mixture. In this case, the location of the slope must be taken into account.
- External slopes - are in special conditions: precipitation, wind, temperature fluctuations. It is recommended to use cement and heat-insulating mixtures with a water-repellent effect. This may be a Knauf product or a conventional mixture of cement and sand.
- Internal slopes - must have an aesthetic appearance. To make the surface smooth, gypsum mixtures are suitable. Starting and finishing putties of the Ceresit company are very common.
In any case, the drying time of the solution is taken into account, since further decoration work continues after it dries.
1. Do not dilute a large amount of the solution. This is due to the economy - the undeveloped solution dries quickly.
2. The solution is applied in several layers. The next layer is laid after the previous one has dried.
The repair sequence is as follows:
- The dry mixture is diluted according to the instructions on the package.
- The location of the corner is determined. With the help of the building rule and the level, a lighthouse is marked on the wall. Determine the location of the beginning of the corner Using a beacon and rails
View from above
- The solution is applied by spreading or throwing. The plaster starts from the bottom and moves up the slope.
- With a spatula, excess mortar is removed from the bottom up, and an angle is created.
- Decoration is done in any way. The easiest way to paint. It is performed after a two-layer application of a primer.
Sheathing slopes with plastic
As noted earlier, plastic is in demand due to its easy installation and low cost. In addition, there are other advantages:
- the material goes well with the window profile. The slope and profile have the same expansion, so there is no tension between them;
- performance is maintained up to 20 years;
- withstand temperature fluctuations;
- there is a protective layer that does not burn or melt;
- simple care. Dust and dirt are removed with a damp cloth.
The following sequence is selected for work:
- A wooden block is attached to the slope so that the window space does not close.
- We fasten the starting strip to the bar with a stapler.
- Cut out strips of plastic to size. They are inserted into the fixture of the starting strip.
- After everything is inserted, carefully move the panel away from the wall and fill it with mounting foam from the far corner.
- We fix the panels with mounting tape to the wall.
- After the foam dries, the ends of the panels are closed with special corners.
It is possible to install the corners immediately
Sandwich paneling
When choosing this option, please note that the minimum panel thickness is 20 mm.
Without auxiliary profiles, the slope is sewn up within a few hours. The plating order is as follows:
- Panels are cut to size.
- "Liquid nails" are applied to the panel, and it is tightly pressed against the surface of the slope.
- The gaps between the frame and the panels are sealed.
- From the outside, corners are installed on the glue.
Lining and sandwich panels cannot be repaired. As a rule, when damaged, they change. In this case, the choice of shade is of great importance, as it differs in different batches of material.
Drywall installation
A drywall sheet is a building material in which gypsum is placed between layers of cardboard. The material is indispensable for hiding various wall defects, so it is recommended for slopes.
Its advantages include:
- wide range of use. Suitable for windows of all types;
- can be used for finishing slopes of any size;
- low price;
- fast installation;
- environmental Safety;
- dyed in different colors.
There are also disadvantages:
- low strength. Traces remain from any mechanical impact;
- destruction at high humidity;
- rapid wear, requiring additional painting;
- inconvenient installation. When cutting, it is necessary to use protective equipment, since gypsum dust is harmful to health.
1. Drywall is the base that needs finishing.
2. It is better to choose a moisture-resistant version of the material that is not afraid of condensation on the windows.
There are several ways to sheathe slopes with drywall, but the simplest is the following installation on putty.
- The slope is measured from the wall to the frame. If the wall is uneven, then it is necessary to take measurements in several places.
- Measurements are transferred to drywall. For convenience, a pattern is made.
- The future slope is cut out of the sheet. The material is cut with a knife or sawn.
- Putty is applied along the edges and in the center of the workpiece.
- The workpiece is pressed tightly against the slope, and a spacer is installed. It takes a day to get a good grip.
- Very often, aluminum corners are installed to align the corners.
- The surface of the slope is puttied and, after drying, processed with sandpaper.
- The cladding is completed with a two-layer painting. At the same time, the window profile and the window sill are protected with masking tape.
In general, everyone independently chooses a method for repairing slopes. If the technology of work is not violated, then they will be beautiful and reliable.
The installation of plastic windows is not always accompanied by the finishing of slopes by representatives of the window company. However, this can be understood - if done wisely, the process can take several days. So it will be much better if you do this work yourself. Don't know how to make slopes on windows? Don't worry, we'll learn together.
How to make a choice of material for window slopes - looking for options
The functions of window slopes are reduced to protecting the window opening from moisture, as well as providing insulation and noise reduction. Without slopes, even the best windows will not be able to perform their functions efficiently, their absence can lead to serious problems in the future. Therefore, when choosing windows, think in advance how to make slopes correctly, and what material to choose for this.
The general requirements are:
- Durability and reliability;
- Resistant to weather conditions specific to your region;
- Tightness and environmental friendliness;
- Thermal insulation and sound insulation of premises;
- Ease of cleaning.
Stucco slopes - one of the most common options, which is suitable for both external and internal slopes. The option, by the way, is very budgetary, and the result is durable. A smooth surface and high strength are the undoubted advantages of plaster, moreover, it can be repainted. It should be taken into account that at low temperatures there is a risk of slope freezing due to poor heat-insulating properties. Mold formation and moisture condensation are other unpleasant consequences of using plaster. In addition, you must be confident in your abilities - working with plaster requires certain skills, or at least a clear understanding of the process.
Drywall for slopes is the middle option between plaster and plastic, both in price and durability. On the one hand, it is very good soundproofing and insulating, but when wet for a long time, it collapses. To avoid exposure to moisture, slopes are recommended to be primed and painted with protective compounds that repel water. But drywall is very easy to work with, and even for a beginner, the surface will come out smooth.
Wood trim is a very effective way that goes well with wooden windows. However, such products require considerable costs and very careful maintenance. The question of how to properly make slopes on wooden windows should only be dealt with by specialists, but it's worth it - this is an elite slope coating.
Plastic slopes have become widespread along with plastic windows. In many ways, this is the best option: you get a neat, clean surface that is quick to install, easy to clean, and retains heat very well. Even at frosty temperatures outside the window, with proper installation of slopes, condensation is excluded on the elements themselves and on the adjacent section of the wall. However, the impact of moisture on the plastic slopes themselves does not threaten them with anything. Over time, plastic parts may turn yellow - this is perhaps the only drawback of the material.
Slope plastering - how is it done?
It is worth using this method of finishing a window opening only during a major overhaul, when the wall covering changes. In the process of cosmetic repairs, it is better to change the plaster for something less easily soiled - you will definitely ruin the wallpaper. It should be noted that this method is the most time-consuming.
Before making slopes on the windows, it is necessary to clean the surface of the old coating and install beacons - wooden or metal. There are also ready-made plaster beacons, which are the best suited for beginners. So, the first mark is placed in close proximity to the window block, indicating a layer of plaster of at least 5 cm. Then the beacons are placed at the corners of the opening box and leveled with a level.
For internal window slopes, dry cement-gypsum plaster is best suited. Such a solution dries faster, which is important to save time, moreover, it can be applied in a thicker layer than the same cement-sand composition. It is necessary to knead the solution with a construction mixer, or use a hammer drill or drill with a special nozzle at low speeds.
For external slopes, it is necessary to use a cement mixture or a special facade putty - both materials adequately tolerate the effects of moisture and other atmospheric phenomena. Before plastering, it will not hurt to carry out thermal insulation, especially if the windows are plastic - this will prevent the windows from fogging up in cold seasons.
The plaster is applied in several passes - each layer requires drying. The first step is spraying - the plaster is diluted with plenty of water and with an ordinary broom soaked in the solution, the area for finishing is sprayed. This allows you to get good adhesion of the base and the plaster layer. The second layer should rid the surface of small irregularities, no more - it is absolutely impossible to apply a thick layer of plaster.
The next layer is applied after the first one has dried and primed. The last layer is applied finishing putty, which is polished after drying. The gaps remaining at the junction of the window block and putty should be covered with a special sealant that can be painted. For high-quality sealing, the joint is cut at an angle of 45 ° by 2-3 mm, the resulting recess is primed and, after a few hours, filled with a sealing compound.
The finished surface should be primed to prevent small cracks and ready for painting. Usually, enamel or acrylic paint is used for staining, which is applied in two layers. In total, it will take about a week to complete this set of works from the beginning to the drying of the last layer of paint.
How to make drywall window slopes - instructions for beginners
Drywall has one significant advantage over the same plastic - it can be repaired with minor damage, return a clean, aesthetic appearance. Special skills to create a slope of drywall is not required. First you need to create a frame from a galvanized profile - some window companies supply these complete with their products. In any case, a special groove must be provided in the window block, and the profile can be purchased separately.
The installation of slopes should be started no earlier than a day after the installation of the windows - during this time, the mounting foam is completely polymerized, and its excess can be cut off, and the spacers can be removed. The guide profile is screwed along the line of joining the drywall with the window block with self-tapping screws.
A heater is laid between the profiles, and then drywall is mounted to the frame. When it is installed, it is sanded and the gaps and irregularities are smoothed out with putty, and only after that they begin to work with the primer. Drywall corners should be protected with a galvanized metal profile that will protect them from delamination. As in the case of plastering, the junction of the window frame and the finished slope is sealed with acrylic putty. It will harden in no less than 12 hours, and only after that the slopes can be painted.
How to make slopes on windows in 2 hours - PVC panels
You already know how slopes are made on windows using plaster and drywall. Now let's figure out how to properly apply PVC panels. Finishing slopes with PVC panels will take no more than two to three hours. Not every material is suitable for work, but only panels that are invulnerable to ultraviolet radiation.
In the case of PVC, nothing needs to be primed or painted - the resulting surface will only need to be wiped with a damp cloth.
First, PVC strips are cut to the width of the slopes. Then a special profile with a snap-in corner is attached to the slope, which will fix the panels in the desired position. In addition, the panels should be fixed to the cleaned surface with liquid nails.
If the desired profile was not at hand, you can do it in a slightly different way - attach the panels to wooden slats. The rails are pre-leveled and fastened with self-tapping screws and dowels. Then the PVC panels are attached to the bars with a stapler along the edges, and the attachment point is closed with special plastic corners. At the same time, these corners also protect the wallpaper near the window, which is often peeled off by children or animals.
The installation of plastic windows is not always accompanied by the finishing of slopes by representatives of the window company. However, this can be understood - if done wisely, the process can take several days. So it will be much better if you do this work yourself. Don't know how to make slopes on windows? Don't worry, we'll learn together.
How to make a choice of material for window slopes - looking for options
The functions of window slopes are reduced to protecting the window opening from moisture, as well as providing insulation and noise reduction. Without slopes, even the best windows will not be able to perform their functions efficiently, their absence can lead to serious problems in the future. Therefore, when choosing windows, think in advance how to make slopes correctly, and what material to choose for this.
The general requirements are:
- Durability and reliability;
- Resistant to weather conditions specific to your region;
- Tightness and environmental friendliness;
- Thermal insulation and sound insulation of premises;
- Ease of cleaning.
Wood trim is a very effective way that goes well with wooden windows. However, such products require considerable costs and very careful maintenance. The question of how to properly make slopes on wooden windows should only be dealt with by specialists, but it's worth it - this is an elite slope coating.
Plastic slopes have become widespread along with plastic windows. In many ways, this is the best option: you get a neat, clean surface that is quick to install, easy to clean, and retains heat very well. Even at frosty temperatures outside the window, with proper installation of slopes, condensation is excluded on the elements themselves and on the adjacent section of the wall. However, the impact of moisture on the plastic slopes themselves does not threaten them with anything. Over time, plastic parts may turn yellow - this is perhaps the only drawback of the material.
Slope plastering - how is it done?
It is worth using this method of finishing a window opening only during a major overhaul, when the wall covering changes. In the process of cosmetic repairs, it is better to change the plaster for something less easily soiled - you will definitely ruin the wallpaper. It should be noted that this method is the most time-consuming.
Before making slopes on the windows, it is necessary to clean the surface of the old coating and install beacons - wooden or metal. There are also ready-made plaster beacons, which are the best suited for beginners. So, the first mark is placed in close proximity to the window block, indicating a layer of plaster of at least 5 cm. Then the beacons are placed at the corners of the opening box and leveled with a level.
For internal window slopes, dry cement-gypsum plaster is best suited. Such a solution dries faster, which is important to save time, moreover, it can be applied in a thicker layer than the same cement-sand composition. It is necessary to knead the solution with a construction mixer, or use a hammer drill or drill with a special nozzle at low speeds.
For external slopes, it is necessary to use a cement mixture or a special facade putty - both materials adequately tolerate the effects of moisture and other atmospheric phenomena. Before plastering, it will not hurt to carry out thermal insulation, especially if the windows are plastic - this will prevent the windows from fogging up in cold seasons.
The plaster is applied in several passes - each layer requires drying. The first step is spraying - the plaster is diluted with plenty of water and with an ordinary broom soaked in the solution, the area for finishing is sprayed. This allows you to get good adhesion of the base and the plaster layer. The second layer should rid the surface of small irregularities, no more - it is absolutely impossible to apply a thick layer of plaster.
The next layer is applied after the first one has dried and primed. The last layer is applied finishing putty, which is polished after drying. The gaps remaining at the junction of the window block and putty should be covered with a special sealant that can be painted. For high-quality sealing, the joint is cut at an angle of 45 ° by 2-3 mm, the resulting recess is primed and, after a few hours, filled with a sealing compound.
The finished surface should be primed to prevent small cracks and ready for painting. Usually, enamel or acrylic paint is used for staining, which is applied in two layers. In total, it will take about a week to complete this set of works from the beginning to the drying of the last layer of paint.
How to make drywall window slopes - instructions for beginners
Drywall has one significant advantage over the same plastic - it can be repaired with minor damage, return a clean, aesthetic appearance. Special skills to create a slope of drywall is not required. First you need to create a frame from a galvanized profile - some window companies supply these complete with their products. In any case, a special groove must be provided in the window block, and the profile can be purchased separately.
The installation of slopes should be started no earlier than a day after the installation of the windows - during this time, the mounting foam is completely polymerized, and its excess can be cut off, and the spacers can be removed. The guide profile is screwed along the line of joining the drywall with the window block with self-tapping screws.
A heater is laid between the profiles, and then drywall is mounted to the frame. When it is installed, it is sanded and the gaps and irregularities are smoothed out with putty, and only after that they begin to work with the primer. Drywall corners should be protected with a galvanized metal profile that will protect them from delamination. As in the case of plastering, the junction of the window frame and the finished slope is sealed with acrylic putty. It will harden in no less than 12 hours, and only after that the slopes can be painted.
Hello dear readers! I decided that it’s enough to write only about windows, it’s time to talk about the decoration near the windows.
Namely, we will talk about slopes and their finishing with plastic panels. Many will say that well, this plastic is one harm from it. But, in my defense, I will note that it is not at all harmful, looks aesthetically pleasing and does not require much maintenance and dirty installation work, unlike plaster.
So, let me tell you about slopes. For those unfamiliar, read on. Share your tips in the comments!
After installing plastic windows, the window opening does not look the best: foam sticks out, pieces of plaster stick out, wall material is visible in places. All this “beauty” is closed in various ways, the most practical, quick and inexpensive of which is plastic slopes. It is better to make them from sandwich panels (two layers of plastic, between which is foamed polypropylene). They are dense, durable, made of good material.
There are two main methods for installing plastic slopes: with and without a starting profile. Both are given with step by step instructions and photos. Decide for yourself how to fix slopes on plastic windows. Both methods give good results.
Installation of slopes from sandwich panels without starting profiles
This method is suitable when the window is installed so that the distance from the window frame to the opening wall is too small. In this case, installation with a start profile (see below) is either very difficult or - usually on the hinge side - not possible at all.
After installing the plastic window, such a picture was observed.
The device of slopes of plastic windows begins with the preparation of the opening: we cut off the remaining foam with a clerical knife. It is cut off easily, just don't overdo it, cut it flush, but don't cut it out - the foam both holds and insulates the frame. Pieces of plaster that interfere and protrude are also removed. If they hold well and do not protrude beyond the plane of the future slope, you can leave them - less foam will slip.
Then, along the perimeter of the window, we nail (we put on dowels if the wall is concrete) a thin rail - 10 * 40 mm - with the wide side to the slope.
Usually it is not leveled, it is nailed as is, but if you want, you can set it straight by placing pieces of plywood, thin planks, etc. in the right places.
Now you need to properly cut the plastic panels. Can be done as standard: using measurements, you can make a stencil. With a stencil, it seems to be easier. Take a sheet of paper, larger than your window (I had old wallpaper). Apply to the slope, squeeze, bending the excess. Cut along the curved lines, try on, adjust as necessary.
 It is more convenient to start with the upper part of the opening. Having made a paper stencil, we outline it on plastic. Considering that about 1 cm will go into the groove of the foam, we add this centimeter along the edge that will be inserted there. We cut it out with a small margin - it’s easier to cut off than to cover up later.
We cut with a hacksaw with a metal blade, try on, adjust so that the plastic stands up evenly, without bending. Align so that the panel is flush with the plaster. The edge turns out to be almost even, where necessary, we work with a file.
Having removed the tried and fitted strip, along the outer edge, which will be nailed to the bar, we drill holes along the thickness of the studs, stepping back about 0.5 cm from the edge. So it will be easier to fasten and do not damage the plastic.
We put it back in place, take a balloon with polyurethane foam and fill the gap with foam with short “puffs”. We try to get as deep as possible, but we don’t pour a lot: if it swells up, it can warp the plastic.
There are several points when working with mounting foam. If the plastic is smooth, the foam does not adhere very well to it. To improve it, or treat the surface that faces the wall with sandpaper, or / and prime it with something to improve adhesion. The second nuance: for the normal polymerization of the foam, moisture is needed.
Therefore, before installing the plastic, the slope is sprayed with water from a spray bottle. Naturally, there should be no dust on the wall - it is swept away with a brush or removed with a vacuum cleaner. If the plaster or mortar is loose, the opening is pre-treated with a penetrating primer, which will bind the concrete particles together.
After we lift the panel, pressing down the foam, we insert the studs into the holes and fasten the outer edge to the bar. The inner one rests against the window frame.
Using the same technology - we cut out a paper template, try it on, transfer it to plastic - cut out a plastic sidewall. Here you need to be especially precise so that the gap between the slope panel and the window sill (upper slope) is minimal.
To do this, the edge will have to be processed with sandpaper. To make the edge even it was easier, it is more convenient to process it with sandpaper attached to a flat bar, a file or a whetstone (half of a circle, as in the photo).
We adjust to the ideal (as far as possible) match at the top and bottom, put it in place, driving one edge into the groove near the window. When the result is satisfactory, we level the outer vertical edge on the same level with the wall plaster.
You can do this with a clerical knife on the spot, or you can put a line on the panel (with a pencil, a thin marker, scratch it with something sharp) and then refine it with what is convenient.
 Having removed, along the outer edge we also drill holes for cloves. We install the panel in place, take the foam, and fill the gap from bottom to top.
Too much foam and here - not good, because the plastic can bend. Therefore, we fill in short portions, trying to fill as deep as possible.
On the vertical parts of the slopes, you can do it differently: on the panel ready for installation, along the far edge, which starts under the frame, apply foam before installation. The strip is made solid or applied with a small snake.
Only you need to do this not from the very edge, but stepping back a little. Then the plastic part is inserted into the cut out groove, set as needed, the rest of the gap is filled with foam (do not forget to moisten the wall before installation). Having filled, press, level, fix with carnations into the bar.
So that during the polymerization process the foam does not move the edges of the slope, the joint is glued with masking tape at the top and bottom. No matter how hard you try to fit the plastic evenly, gaps, albeit small, remain. They can be covered with acrylic. It is sold in tubes such as mounting foam, placed in the same mounting gun.
Squeeze the strip into the slot, rub it, smooth it out, remove the excess with a damp soft cloth or sponge. You need to do this operation in small areas and wipe it gently - clean. As long as the acrylic has not hardened, it cleans up well.
Then - with great difficulty. It is more convenient to start filling cracks from above - immediately - a horizontal slope panel, then joints, then move down, first along one side, then along the other. The last to cover up the joints with the window sill.
After drying - 12-24 hours, depending on the sealant (written on the tube), acrylic can be drawn into the seam - this is if the gaps are large. All these places go through the second time according to the same method.
After the second layer dries, if there are roughness and irregularities, they can be leveled with fine-grained sandpaper, folding it in half. In general, it is better to carefully align while damp, otherwise you can scratch the plastic.
Everything, plastic slopes are installed. After the final polymerization of the foam, the bevels must be puttied, leveled with the surface of the walls. After that, you can remove the protective blue film. As a result, the window will look something like this.
When installing these plastic slopes, sandwich panels were used. These are two layers of plastic, between which there is a layer of foamed foam. Using the same technology, you can make window frames from inexpensive plastic window sills or white PVC wall panels.
The most unreliable material is panels: even wall panels are quite easily pressed through, besides, if the front layer of plastic is thin (cheap), then jumpers are visible in the light. There is no such thing in sandwich panels and plastic window sills. And it takes a lot of effort to push through, and even there are no jumpers to the clearance.
We mount slopes made of plastic with a starting profile
The installation of plastic slopes and according to this technology begins with the preparation of a window opening. We cut exactly the foam, remove everything that does not hold well, clean off the dust, if necessary, we pass along the opening with a primer that improves adhesion.
Along the perimeter of the opening, but already near the frame, a wooden bar is attached. Choose the thickness depending on the distance: it should almost go on the frame. One side of the bar must be worked out with a planer, making a slope. The slope angle of this face is equal to the slope setting angle. It is possible to saw off, but it is even more difficult to do it, except that there is a circular saw with an adjustable angle.
We fasten the processed bar to the walls along the perimeter of the opening. The mounting method depends on the material of the wall. If the wall is brick, you can try on self-tapping screws, you need to put dowels in concrete.
You buy a starting profile in the store, install it with the long side to the bar, fasten it. It is more convenient and faster to fix it to the bar with staples from a construction stapler, if there is none, you can use small cloves or self-tapping screws with flat heads.
When choosing a starting profile, take a tight one. It is more expensive, but you only care about three meters per window, maybe a little more. A dense profile will hold plastic well, a soft one will bend and look ugly. Another point - when mounting the profile, press it as tightly as possible to the frame so that there are either no gaps at all, or they are minimal.
At the top, when joining the vertical and horizontal profiles, you need to be especially careful and cut them off exactly at an angle of 45 °. If there are small gaps, they can be repaired with acrylic.
According to this technology, it is more convenient to start the installation of reservoir slopes from the sidewalls. Insert the panel into the fixed start profile. They are also better to take from expensive and dense, with a thick layer of plastic. If you put cheap ones (ceiling ones), then the front wall is thin, and jumpers will be visible in bright light. In addition, such plastic can be pushed through even with a finger.
The width of the plastic panel should be greater than the slope. If one is not wide enough, two are joined. But then, at the junction, an additional vertical bar will be needed, to which the first strip will be fixed.
The panel inserted into the profile is usually longer than the opening. Holding it with your hand, mark the opening line. After removing, cut off along the marked line.
We install the panel again, move it a little away from the wall and fill it with mounting foam, trying to fill it without gaps, but without excess. To make it happen, we start from the far lower corner - we draw from the bottom up near the nailed bar. While we reached the top, the bottom of the foam expanded a little.
Again we draw a line with foam, but closer to the edge. The closer to the outer edge, the less foam is required - after all, the panel is installed under a slope, so make the tracks thinner. Having reached the middle, make a snake on the rest of the surface and press the panel the way it should be.
Align and check. Attach to the wall with masking tape. Also install the second part and then the top. It can also be cut out according to a paper template, and the edges can be adjusted to a perfect (or almost) match with sandpaper.
Having installed all parts of the slope and secured with masking tape, leave until complete polymerization. Then, in order not to putty the gaps between the slope and the wall, a white plastic corner is glued to the liquid nails.
The main task is to cut exactly at the corners. It is easy to glue: apply a thin strip of glue on both shelves of the corner, press it, passing your hand along it, hold for a couple of minutes. So they are installed around the entire perimeter, then, until the glue dries, they are also glued with masking tape and left.
After a day, we remove the adhesive tape, the plastic slopes are ready.
If there are gaps somewhere, they are sealed with acrylic, as described above. Don't use silicone. In the light, it quickly turns yellow. In a year or two, your windows will look terrible. Look for white acrylic sealant and mask it.
Source: stroychik.ru/okna/okonnye-otkosy-iz-plastika
A newly installed window, whether plastic or wooden, has an unfinished look. And even after installing the window sill, almost nothing will change. And in order for your window to acquire an aesthetic appearance, it is necessary to install slopes.
Today, plastic slopes for windows are popular. Slopes are part of the window opening from the side and top of the window. After replacing the window block or installing a new one, finishing the slopes is an obligatory stage of work, along with the installation of a window sill.
This is, as it were, the final touch in installing the window and giving it a noble, light and bright look. Slopes are plastered, plasterboard, plastic.
Types of slopes
- Plastered slope - a rough layer is applied to the surface from a solution (cement-sand or gypsum), after drying, a finishing layer is applied and painted.
- Drywall slope - the surface is sheathed with drywall, primed, puttied and painted or wallpapered.
- Plastic slopes - the window opening is sheathed with plastic panels.
Plastic slope for windows can be of two types
- Hollow panels that have stiffening ribs inside;
- Sandwich - panels - two plastic panels interconnected by foamed polystyrene.
Advantages of plastic slopes
- aesthetic and finished look;
- installation of plastic slopes is an almost clean and fast procedure;
- long service life - slopes are made of the same material as plastic windows so that both windows and slopes have the same service life;
- steam and moisture-proof - plastic slopes can be washed without worrying that water will damage them;
- ease of care - they can only be wiped from dust, and the plastered slope has to be painted periodically;
- unlike plastered, plastic slopes do not crack;
- ideal for plastic windows, it turns out a monolithic design.
Of course, it is not without drawbacks. Plastic window slopes are often scratched, the same applies to plastic window sills. But if you treat them with care and care, the slopes will last a very long time.
As for the myth about the dangers of plastic products, as Shurik, beloved by all of us, said, “It’s easier to get poisoned with a sprat from a jar in our time.” PVC slopes are not much more harmful than varnish or paint. Plastic slopes have good thermal insulation, unlike plastered ones.
They have an air gap (plastic panels) or a layer of polyurethane foam (sandwich panel), and by installing PVC slopes they can receive additional thermal insulation. If the installation of plastic slopes is carried out on mounting foam, in this case the free space under the panel is filled, resulting in improved thermal insulation and protection against fungus.
They can also be installed with PVC adhesive. Liquid PVC glue helps to make an almost monolithic construction of slopes and windows.
Finishing window slopes with hollow plastic panels will cost less, but it has its drawbacks - a thin layer of thermal protection. The slope of the sandwich panels in this regard is the preferred option. They are more durable, warmer and they can be used to trim wide slopes - up to 1.5 meters.
The disadvantage of such slopes is the high price. Finishing window slopes is not an easy process, taking up this work on your own, without experience, you can ruin everything. And installation will cost you twice as much. Therefore, if you do not have confidence in your own abilities, it is best to turn to professionals.
The price of plastic slopes depends on the height and width of the product.
Laminated slopes (with a color coating) will cost more than usual. For example, the price of a plastic slope from a sandwich panel 150 mm wide will be around 150 rubles per linear meter, colored "sandwiches" - 1,200 rubles m / p., And the cost of panels 600 - 800 mm wide: 600 and 3,000 rubles, respectively .
The price for installing plastic slopes can be 400 - 500 rubles per linear meter, depending on the width.
If it still seems to you that it is more profitable to plaster window slopes than to sheathe them with plastic, remember the advantages of PVC slopes. Plastic window slopes will not turn yellow over time, will not crack and do not require periodic painting.
Source: proevrookna.ru/otkosy-na-okna/plastikovye-otkosy-na-okna.html
How to make slopes on windows with your own hands from plastic
A variety of modern building materials allows you to quickly and efficiently perform any work related to the construction of structures, as well as the finishing and repair of finished real estate objects.
Today, more and more people prefer metal-plastic structures (windows, balconies, terraces) due to their high technical and economic characteristics and due to their impeccable appearance. In addition, such designs significantly improve the performance of the walls of the house.
List of preparatory works
Measurement, installation and adjustment of plastic windows are carried out by specialized teams, which is the key to the correct implementation of all technological measures and entitles the customer to warranty service. But such operations as the installation of slopes of plastic windows, if desired, can be performed on their own.
Slopes are of various types, and may differ in color, shape, materials from which they are made. The most common materials used for the production of slopes are the following:
- drywall;
- plastic, mdf, sandwich panel;
- cement mortar;
- tree.
Also, a significant advantage of such slopes is their low cost, durability, high speed of installation work (3-4 hours), ease of maintenance, the ability to choose any color segment.
So, after a metal-plastic window has been installed and at least 36 hours have passed (the period of complete solidification of the mounting foam), you can install the window slopes.
First you need to decide on the list of necessary materials and tools required for such work. Firstly, it is desirable to purchase plastic, and it is best to give preference to high-quality and solid products.
The initial cost savings when buying a cheap product can turn into additional costs associated with the repair of damaged items.
The thickness of the plastic should not be less than 8 millimeters, and the lengths of the panels should be equal to the given dimensions of the opening in height and width. Accordingly, the depth of the slope should not be greater than the width of the plastic panel.
Secondly, the following building materials will be required: starting strip, F-shaped profile, mounting foam, cement mortar, silicone, small self-tapping screws (bugs), adhesive tape, paper clips, insulation.
From the tool you need to have a hammer, a drill with a bat for self-tapping screws, a screwdriver, a gun for silicone and polyurethane foam, a trowel, a spatula, a tape measure, and rags.
When all the necessary attributes are prepared, you can proceed to the procedure for finishing the slopes of plastic windows.
Manufacturing technology of plastic slopes
The first step is to remove the shipping tape from the profile of the metal-plastic window and seal the gaps formed from the side of the street with cement mortar. This procedure allows you to seal the outer assembly seam and hide the foam from direct sunlight, which have a destructive effect on this material.
In principle, any outdoor mortar can be used as a mortar, be it putty or a special cement-based mortar. The outer slopes of the windows can later be coated with any dye. After that, you can proceed to the internal work.
The starting strip is taken and cut to fit the window (height, width, height), and then drilled with self-tapping screws to the perimeter profile. This strip will be the base for the plastic panel. Then you need to prepare directly the panels for the slopes.
This is done in the following way. First, the top panel is made, for this, plastic is cut out according to the dimensions of the upper part of the opening and installed in the grooves of the starting strip, and then two side panels are made in the same way.
The entire installation is best done using a plumb line or building level. The resulting frame must be designed in such a way that the following conditions are met:
- between the plastic and the base base of the opening, a gap of at least 20 millimeters was obtained (for filling with foam);
- the angle of turn of the side elements of the slope was the same for the left and right sides (measured using a square applied to the window profile in the upper and lower parts on the right and left);
- if the elements of plastic panels protrude excessively above the plane of the opening, then it is recommended to correct their dimensions with a mounting knife;
- in the places where the panels are joined (in all corners), it is advisable to mount the trimmings of the starting profile, which will allow you to cover the unevenness of the cuts.
The next step is the manufacture of edging from the F - shaped profile. As with plastic, this process must begin with the top element.
The joints of the F-shaped profile must be cut at 45 degrees to each other. A very serious stage in the manufacture of plastic slopes is the foaming of the resulting voids.
The difficulty lies in not overdoing this process, so that the foam does not open the slopes during solidification. To do this, it is desirable to foam the area around the perimeter of the window at the very base and lay the foam with jumpers between the plastic and the old slope.
Another layer of foam is laid along the slope angle, and prepared F-shaped profiles are installed in the resulting space, and their fixation is best done using adhesive tape.
When the foam solidifies (15-20 minutes), the structure becomes rigid and sufficiently stable. The final step is to coat the cracks with a special sealant or silicone.
In order for the process of installing plastic slopes not to cause great difficulties for the contractor, it is advisable to adhere to the following recommendations during construction operations:
- Use PVC panels of good quality, in color, corresponding to the color shade of the window profile;
- Before using the panels, remove (cut off) the mounting spike from them;
- Trimming and cutting PVC panels with a mounting knife or electric jigsaw;
- In order to avoid deformation of the panels during the foam hardening, it is necessary to use mounting foam with a low coefficient of expansion, as well as provide mechanical fixation of the slope elements in a given position for the preliminary setting of the foam (5 - 10 minutes);
- If necessary, heat-insulating materials can be placed in the technological gaps between the wrong side of the PVC panels and the base base of the opening (before the foaming process);
- To quickly remove traces of adhesive tape, it is best to use a cotton swab dipped in acetone;
After making the slope, plastering of the part of the opening under the window sill should be ensured.
Everything is ready and your slopes will delight you for decades. That is, it became clear that do-it-yourself plastic slopes for windows can be made by almost any person with little or no knowledge in the construction industry.
After the installation of new double-glazed windows, the window opening does not look the best - foam sticks out from everywhere, fragments of plaster and wall material is visible in places. All this "beauty" can be covered with slopes, which are made from a variety of materials.

Peculiarities
Nowadays, it is quite difficult to imagine an apartment or house without plastic windows, but installing them is only half the battle. After installation, it is necessary to finish the slopes on the windows. Many believe that it is possible to save money on slopes - it is enough to foam them from the outside and from the inside and the insulation will already be effective. However, this is a common misconception.
The foam readily absorbs moisture, therefore, if it is not protected, then under the influence of water, as well as temperature changes, the sealant will begin to break down, nullifying the entire thermal insulation effect of plastic windows. In addition, after the installation of double-glazed windows, rather unaesthetic seams remain, which do not add attractiveness to the general appearance of the window opening - slopes successfully cope with this problem, which make the window neat and beautiful.


Properly equipped slopes provide effective heat and sound insulation, which contributes to the formation of a favorable microclimate in the room, and in addition, prevent glass from fogging and condensation inside the living space. However, this is only possible if the installation of windows and slopes was carried out correctly in compliance with all technological requirements. If the slopes were installed with violations, then up to 40% of the heat from the rooms will go through them.
From a technical point of view, slopes are called part of the wall opening between the window and the corner of the wall, and the inner part of the wall is called the inner slope, and the outer, respectively, the outer slope (low tide).


Until about the mid-1990s. of the last century, all the arrangement of slopes was reduced to their plastering and finishing painting. However, progress does not stand still, more modern materials appear every year, and windows are no exception. The usual plaster was replaced by plastic slopes and slopes from GKL.
The new materials are more efficient and durable, they are easy to install with minimal dust and debris, and they are affordable.


Kinds
As already mentioned, slopes can be indoor and outdoor, and it is very important to install them on both sides, only in this case the protective elements will be durable and wear-resistant.
After installing the external slope, it is imperative to carefully seal the gaps between the frame and the wall, otherwise moisture begins to be absorbed into the mounting foam, and through it it will pass to the walls, causing mold and fungi. This not only destroys the walls and worsens the appearance of the premises, but also causes dangerous diseases of the broncho-pulmonary system.
External slopes can be made in any shade, this allows you to focus on the original stylistic solution of the facade and emphasize the conceptual design. Internal slopes, as a rule, are made in a white version, this gives the premises a bright and sun-filled look.

materials
The installation of slopes is a whole range of finishing works, the neglect of which will lead to the fact that the windows will not be able to perform the tasks assigned to them by the manufacturer. Slopes are usually finished using a wide variety of technologies, which largely differ in the level of quality, degree of durability and cost.
To choose the best option, you need to take into account several recommendations:
- the slope should serve for a long time;
- the material must be resistant to high humidity and temperature extremes;
- special attention must be paid to the tightness of the structure;
- since the slopes are mounted inside the dwelling, they should be made only from environmentally friendly raw materials;


Slopes should be easy to maintain and should be easy to clean with the most standard detergents.
Consider the most common materials that are used for the manufacture of slopes.

Plaster
Now the popularity of plastering has declined, but, nevertheless, admirers of such slopes have remained to this day.
Advantages of plaster:
- low cost of materials;
- ease of installation;
- the ability to equip slopes in cases where the windows are installed close to the walls.


But there are many disadvantages:
- plastering is only part of the finishing process, in any case, this is not a finish coating, which means that you will have to spend extra money, effort and time on puttying and painting;
- any work with plaster leaves behind a large amount of debris and dirt, which is not so easy to get rid of;
- plastering does not make it possible to install additional thermal protection from mineral wool or foam;
- carrying out plaster work requires at least minimal skills in construction and decoration;
- such a coating has a rather short service life, after a few years it begins to crumble and leave a lot of dust around it.

It is obvious that the minuses of plaster as a base material for decorating slopes are much more than pluses, which is why it would be right to give preference to other materials.
Drywall
This is a fairly common facing material, without which it is difficult to imagine any repair work. It is used everywhere for interior finishing work due to its quality and durability, and because of the ease of installation, it has become widely used for slopes. Of course, a novice master may encounter some difficulties, however, unlike the variant with plaster, there will be much less of them.


Advantages:
- relatively low price of materials and works;
- a small amount of waste after installation;
- the ability to sheathe slopes on their own without resorting to specialists;
- the ability to equip additional thermal insulation from foam;
- any damage can be quickly repaired with your own hands;
- slopes installed in compliance with the technology can serve for many years.

Of course, nothing perfect has yet been invented, and drywall is no exception. GKL have disadvantages that need to be mentioned:
- drywall slopes require a large amount of additional materials, such as corners, profiles, wooden blocks and paint;
- GKL is sensitive to water, so you should not use the material to design window openings in the bathroom, bathroom, kitchen and other rooms with high humidity;
- GKL without fail requires insulation with foam, otherwise condensate will accumulate under the coating, which over time will destroy the slope structure.

Plastic

- ease of care - plastic is easily cleaned of household contaminants with the most standard detergents;
- no need for finishing;
- mold and fungi do not develop on plastic:
- walls maintain room temperature, which reduces the amount of condensate;
- wide selection of colors and textures of the material.


Plastic slopes finished with siding look very stylish and aesthetically pleasing, they organically fit into any interior, make the general appearance of the window opening neat and well-groomed.
There are also cons:
- installation without foam plastic will lead to rapid freezing of the slopes and their destruction;
- during the installation process, corners or a profile are used, in the second case, the installation is significantly complicated, since the panel has to be inserted into the profile, which is often not so simple;
- in case of damage, the entire slope must be replaced.
Obviously, the advantages significantly exceed the disadvantages, which is why the material has now become number one in the difficult task of arranging effective slopes.

Sandwich panels
Another popular modern option for finishing window slopes. At its core, the product is the same sheets of polyvinyl chloride, between which a layer of heat-insulating material is placed. That is why such slopes are considered a reliable obstacle to moisture and cold entering the house from the outside.


Metal
In recent years, metal panels have gained increasing popularity in finishing slopes, which provide maximum tightness of the entire window structure and thereby significantly reduce the degree of heat loss. The undoubted advantages of metal slopes include:
- aesthetic appearance;

- reliable waterproofing;
- resistance to temperature extremes;
- ease of installation and operation;
- durability.


The disadvantages include only a high price - such materials are much cheaper than their counterparts.
Wood
Wood is used as the basis for finishing slopes in the implementation of the eco-house concept, when all materials used for construction are of natural origin. Wooden slopes look very stylish and are in perfect harmony with wooden windows.
At the same time, this is a rather expensive material that requires constant care, and the installation itself is not as simple as it might seem - only specialists should be engaged in its manufacture and installation.

Quite rarely, but you can find slopes that are made of cellular plastic. This is an economical solution, but this fragile material has a low resistance to mechanical damage, and it also fades in the sun.


Slopes made of stone look rather non-trivial. Most often used artificial. As a rule, external slopes are trimmed with such material, which gives the facade a very expensive and truly luxurious look. However, it is impossible to carry out such work on your own, since the stone is difficult to process, and the cost of a stone, even artificial, will be several times higher than any of the materials described above.
Some do it much easier - they paste over the slopes with wallpaper. This option, of course, is good for its budget, but you can’t call it practical, since the wallpaper does not create the necessary heat and water protection, and such a coating deteriorates quite quickly under the influence of moisture. A laminate board is also often used for arranging slopes; with its help, you can get a rather non-standard finish that will easily fit into any interior.


Cork wood is very popular, it can also be used to create a stylish and modern window opening. In addition to exceptional decorativeness, cork has another important advantage - it has good sound absorption and high thermal protection. Cork panels can be fixed with any glue, but such material should only be coated with special varnishes with high elasticity.
The fact is that the cork is a springy material, which easily bends under mechanical action, and then returns to its original position, so ordinary varnish can crack quite quickly and become covered with ugly cracks.


And, finally, a mirror sheet is a modern trend of “window fashion”. The use of mirror tiles allows you to visually enlarge the windows, as well as improve the degree of illumination of the room. Therefore, the option is optimal for rooms with small window openings.


Device
If we talk about the structure of slopes, then the devices made of plastic and sandwich panels are the most complex. Their accessories:
- foam insulation;
- mineral wool;
- rail;
- self-tapping screws;
- plaster layer;
- PVC corner;
- slope panel.


External slopes consist of:
- plaster layer;
- foil vapor and waterproofing;
- silicone sealant.

How to choose?
Let's start with the fact that all types of slopes are conventionally divided into 3 categories;
- insulated;
- decorative;
- plastering.
Before you understand when each finishing method is used, you should dwell on the very concept of "quality slope". A good slope should be durable, its service life should be commensurate with the period of operation of the PVC window itself - you must admit, it is unlikely that anyone will like to redo them regularly.


Slopes should be designed in a single stylistic concept with windows.
High-quality slopes not only protect and preserve, but even significantly improve the consumer properties of PVC windows themselves and under no circumstances reduce them. Modern windows are distinguished by a rather thick double-glazed window - 40-47 millimeters, while its degree of heat transfer is 0.5-0.8, that is, they are quite warm, and in addition, new generation windows have efficient fittings and high-quality seals that reliably protect from wind and cold.
To date, the only weak point of windows is the junction nodes, so the slope should enhance the functionality of these same nodes. It is quite obvious that the plaster slopes do not meet this requirement. However, they do not meet any of these requirements.


Cracks and deformations always appear on the plaster near the frame, since it and plastic are completely different materials with different thermal expansion indicators, moreover, the industry has not yet created a single sealant that has the same high adhesion to both plastic and plaster, so cracks can be avoided it will not work, moreover, over time they appear not only near the frame, but also near the window sill.
The second point to remember is that even the highest quality plaster cracks, and there is no such master who will make slopes that can stand in their original form for at least 3-5 years, and the paint with which the plaster is covered will begin to turn yellow over time, and after three years, the coating will turn completely yellow. At the same time, it doesn’t matter at all what paint you used, its appearance will deteriorate in any case - the glossy one starts to glare and peel off, and the matte one gets so dirty that it will be impossible to wash it even with the strongest cleaning agent.


In addition, plaster slopes do not have a special plugging contour along the perimeter, so the inhabitants and guests of the house will see the cut edges of the wallpaper, and this very edge will constantly peel off whenever it occurs to you to clean the slopes.
Any plastic frame has two contours protruding from above and below, the main double-glazed window is “recessed” into them, and when the sash hits the slope during the wind, the main impact force falls on these two places. Thus, even a small wind will enough to damage at least both areas on the plastered surface.
And, finally, in order for the window frame to look aesthetically pleasing when using plaster for finishing slopes, it becomes necessary to reduce the thickness of the foam layer, otherwise it will protrude ugly and spoil the appearance. However, it is categorically not recommended to do this, since foam is already a weak link in the entire window structure.
In no case should the seam be made thinner, on the contrary, for greater tightness and thermal insulation, it should be thickened as much as possible, which is incompatible with the very principle of arranging plaster slopes.

Does it make sense to use plaster for slopes, only if you consider this option as a temporary option in a limited budget. Now let's focus on the decorative slopes. They do not improve the consumer characteristics of windows in any way, but significantly improve their appearance. Let's figure out when it is possible and even necessary to mount decorative slopes.
Firstly, they are used as frontal partitions. However, in this case we are not talking about windows in the full sense of the word, but about partitions with a compartment, for example, in an office. Well, the second option is the decoration of a balcony block or loggia. In this case, the use of decorative slopes is also allowed.

In all other cases, insulated slopes are mounted. They must meet the following requirements:
- they must be very firmly fixed so that they are not squeezed out by the pressure of the mounting foam;
- the slopes and profiles themselves must be made of plastic;
- without fail, there must be a plugging contour, which will give the coating a finished appearance, and also protect the edges of the wallpaper;


Insulated slopes are a more modern and practical option, it allows not only to decorate the window beautifully, but also to make it more durable and functional. The insulated slope contributes to the formation of a healthy microclimate in the room and increases the life of the walls.

How to install with your own hands?
Sheathing of slopes is the last, but obligatory step in the installation of plastic windows, immediately before it it is necessary to install a window sill, and if you are making general repairs, then in addition to finishing the latter, you should additionally complete the design of walls and ceilings, otherwise you risk damaging new slopes.
To do the installation work with your own hands, you need a set of tools:
- building level;
- roulette;
- pencil;
- hammer;
- pliers;
- tray and pliers;
- screwdrivers;
- screwdriver or perforator;
- construction stapler;
- jigsaw or hacksaw;
- putty knife;
- capacity.

In addition to tools for work, you will need consumables of various types, namely:
- Staples;
- drill;
- files;
- dowels and screws;
- nails of various sizes;
- polyurethane foam or silicone;
- L-shaped metal profiles;
- masking tape or protective film.


If you plan to make slopes from plaster, MDF or GKL, in addition to all of the above, you will also need mortar, drywall adhesive, grout mesh, perforated corners, and in addition, paint and wallpaper for finishing.
If wood is taken as the material for slopes, it will be important to treat it with special stains and protective compounds that give the coating strength and resistance to fire, moisture and pathogens. The technique for performing slopes varies depending on what material is used to equip them.


Plastering and painting is the cheapest and easiest option. For this, a ready-made building mixture based on cement or gypsum is taken, mixed with water (the proportions are indicated by the manufacturer on the package) - the material is ready to use! We pay special attention to the fact that the surface must be clean and free of grease.
Even before starting work, it is necessary to remove dust, dirt, foam and concrete residues. Then it is necessary to expand the fillet and slope joints, this is important to ensure maximum adhesion of the plaster to the brick wall. First you need to plaster the wall, and then proceed directly to the slopes.

During installation, it is imperative to make sure that the joints between the wall and the window are sealed. If cracks and gaps are found, then it is necessary to seal them with tow or felt soaked in a gypsum solution, and additionally process with mounting foam.
2-4 cm should remain to the sidewalls of the window opening - this space will be filled with plaster.
The first layer of plaster is laid in the groove of the future slope, then carefully leveled and left to dry, after hardening they move on to the second layer, etc. 5-8 mm of mortar can be applied at one go, the layers are leveled from bottom to top.
When arranging slopes, it is worth giving preference to moisture-resistant drywall - GKLV. There are two basic ways to install this coating: frame and frameless.


First you need to decide how you will fix the GKL - on glue or on a profile. If the distance from the window frame to the wall is too long, then it makes sense to install profiles, and with a small gap, you can safely use an adhesive mixture. Fixing profiles, as a rule, is made on dowels. It is very important that no air gap is created in the space between the wall and the drywall, as this can have a very bad effect on the thermal insulation of the living space.
That is why it is necessarily filled with insulation, most often mineral wool is used for this, but you can also use ordinary foam rubber. If the gaps are too narrow, then it makes sense to use mounting foam, but it must be handled with extreme care, since it tends to increase in volume when it hardens, which often causes breakage of the drywall coating.


An L-shaped profile is attached along the perimeter of the window frame. It is applied horizontally. Alternatively, you can take the profile in the form of the letter "F", it must fit in a vertical plane. After that, it remains only to cut out pieces of plasterboard of the required size and fix them in the profile.
With the frameless method, the GKL is fixed to the glue, while the solution must be diluted in such a concentration to ensure the fastest setting. It is very important to keep clearances under control. In this case, the GKL cut along the edges of the joints, which will later be the angles between the upper and side slopes, should be made at an angle of 45 degrees. This will make the fixation high-quality and airtight.
In order for the glue bays to be evenly distributed over the drywall surface and the fixation to be the same over the entire area of the material, the GKL sheet must be strongly pressed with a wooden bar, and spacers attached to the window sill are used for additional reinforcement.


Full fixation of the adhesive composition, as a rule, occurs in 1-2 hours.
The use of plastic for slope design has its own nuances and technical features. For work you will need:
- PVC panels directly - when choosing them, you should take into account the parameters of the future slope (length, width and depth);
- F-shaped profile - used for edging the outer surface;
- U-shaped profile will be needed for finishing adjacent areas;
- polyurethane foam - at least 2 cylinders;
- quick fix glue;
- acrylic silicone.


In addition, you will need tools with which the slopes will be sewn up:
- tape measure and triangle - for the most accurate measurements and drawing angles;
- gun for foam cylinders;
- gun for squeezing out sealants and silicone.
The manufacture of plastic slopes takes place in several stages step by step:
- If the gap between the wall and the frame is more than 2 centimeters, all the irregularities of the filled mounting foam must be cut off and a small groove made in it in the form of a groove, the thickness of which must correspond to the size of the plastic panel. Thus, they process all the box around the perimeter.
- If the gap width is less than 2 cm, then only those areas of foam are removed that may interfere with high-quality installation.


- The next step is to prepare the panels for installation. First of all, it is necessary to decide on the method of joining the panels - as a rule, they are mounted at a right angle or at an angle of 45 degrees, with the second option being more aesthetic in terms of design. At this stage, all the required measurements are carried out. Here you need a ruler and a pencil, and then with the tool at your disposal, the workpieces are cut in accordance with the measurements.
- Then the panels are directly installed. Usually they are mounted on glue, which is poured into a groove or inserted into a U-shaped profile fixed on the box.
- All the cracks that form between the slopes and the wall are filled with sealant, which will firmly and steadily hold the entire structure. The foam is applied in a thin strip, given that it has the ability to expand, so if overdone with it, it simply deforms the plastic.
- At the next stage, an F-profile is glued along the perimeter of the opening.
- At the final stage, the joints are rubbed with silicone, for this it should be carefully applied to the formed seams and smoothed with a moistened rag.


The installation of effective slopes from sandwich panels is carried out according to a similar scheme, the only difference is that there is no need for additional thermal insulation, since the composition already contains a heater. However, additional hydro- and thermal protection of the window will not hurt in any case.
Fastening slopes made of wood, mirror panels and stone requires special construction skills, therefore professionals should be engaged in such work. Otherwise, you risk wasting your time and money.


Installing plastic windows is a rather expensive task, therefore, after installing them, many owners of a house or apartment refuse it, arguing that the refusals are due to the high cost of such work. Someone believes that he can install the slopes on his own, and someone believes that the window will live for some time without registration. This position is rather erroneous, because, as practice shows, few people fasten the slopes on their own soon after the installation of double-glazed windows - either there is not enough time, then there is not enough materials, then money. Such an approach is fraught with the most unpleasant consequences, and they can come after a couple of years.


Any professional builder can immediately name several reasons why you should not put off finishing the slopes “for tomorrow”:
- Mounting foam rots quite quickly under the influence of moisture, which leads to the appearance of mold and fungi that are dangerous to human life and health.
- The foam does not differ in resistance to sunlight and collapses under its influence.
- Due to the influence of adverse atmospheric factors, over time, gaps and cracks appear between the foam and the window frame.
- Foam uncovered by any material quickly loses its thermal insulation properties.
This list is far from complete, however, these few facts are enough to understand that the delay in arranging effective slopes leads to a violation of the tightness, hydro and thermal insulation of new windows, which means that they will not be able to effectively protect the premises and its owners from wind, cold and extraneous noise.

- Plastic options are easier than others to use. Taking care of them is no problem.. To clean such surfaces from household contaminants, you should use simple soap and water, the use of abrasive cleaners, as well as acid-base solutions is unacceptable - only in this case the plastic will serve you faithfully for many, many years. Drywall slopes are most often coated with a latex-based paint, which gives them special resistance to abrasion. They can be washed and cleaned regularly without any damage to the decorative appearance and physical and technical condition.
- Moreover, Replacing or repairing such a coating is quite simple, and a nice bonus will be the ability to change the color at any time or when a complete change of the interior will be made. Slopes made of cork wood require almost no maintenance. The only procedure that needs to be carried out regularly is to wipe the coating with a soft, damp cloth, preferably a flannel.


- Plastered slopes cause much more trouble.. This is due to the fact that cracks often occur between the frame and the slope itself. This is due to the lack of plasticity of the material, so temperature drops act on the coating in a detrimental way. The maintenance of slopes of this type is reduced to the periodic restoration of the integrity of the coating. For this, sealants and special grouts and tinting are used. Such slopes should not be washed frequently, as this often leads to the appearance of unwanted mold.
- When arranging slopes, the joints are most often treated with silicone, which peels off over time, dirt and dust eat into it and, as a result, it loses its aesthetic appearance. Do not be upset - all minor repairs can be carried out at home on your own. To do this, you need to purchase white or transparent silicone and, in accordance with the manufacturer's instructions, apply it to the cleaned, damaged surface using a special gun.

