How to build a new bath. Stages of construction Baths: from the foundation to interior decoration
How much beneficial sauna, not yet to paint. And not only for the health of bodily and spiritual. Have a bathhouse on the plot - to purchase prestige and respect for neighbors. And the opportunity to invite the useful person will bring direct benefit. We will be realistic, many important issues are solved in the bath, and at the table of meetings, the document is signed. It is not necessary to look for corruption schemes here: after the bathhouse in the head brightened, the husk is unnecessary, and the essence of the case goes to the eyes. Villains, by the way, the "arrows" are not prescribed in the bath, there the conscience wakes up.
This article is devoted to the issue, how to build a bath with your own hands. Who said that only the strengths of this world have the right to a complete bunny benefit? But why, ask, build yourself? The construction seems to be unpaired, in demand. Maybe it's better to order a turnkey?
In demand, all and business. In combination with ma-a-linen circumstance: the bath is not an object of essential or vital. Hence, the cheating of the contractor is limited only by the contents of the customer's pocket, as well as for luxury items. Than builders and use - the market is the market, they also need to live, and want better.

Take a look at fig. Balke on the left will cost a turnkey somewhere at $ 8,000, and that on the right is $ 23,000-25,000. Impressive? About 2-3 storey baths with pools, billiards, banquet rooms and massage rooms modestly default. And if you build yourself? Independent construction of a bath on 2 compartments of 3x4 m from a bar (this is the one that the left) will cost about $ 1800, and a 4x6 m log of 3 separates somewhere in $ 4000-5000. Impressive, however, the difference is not only many times, but also fundamental: if the "turnkey" amounts in the average budget do not fit in any way, then samostroy has already been raised without ceiling consuming, because Mortgage with a smaller bet on the bath now will not be given.
The purpose of this article is primarily to show: not so terrible, how is his little. Bath - the building is serious, it must meet certain requirements. And the focus in the following is made on how to satisfy them, without mastering complex technologies and without spending excessively. If you can smoothly cut the board, directly drill a hole, drive the nail without beating and, after reading further, believe that the construction of the baths forces and means, we will consider our task made. Therefore, the material is built for a more complete lighting of key moments, but also the features of the construction of the baths from various materials paid due attention.
Russian or sauna?
The Finns themselves, and doctors, too, recognize that the Russian bath exceeds Finnish. In the Russian bath, you can create perfectly dry steam, as in the sauna, but it will not be possible to "cling" in the last poorer pair. But the sauna has valuable dignity - it is little demanding of the construction of a bathroom with a heat source. Compact electrosaun in the size of a wardrobe can be put in a city apartment, and nothing, there is a normal pairs there. But Russian requires necessarily a separate bath building and an oven for her. Therefore, it will be part of the Ban of Russian, and the saunas will leave for another case.
Rhodonachalnitsa
The original Russian bath consists of 2 branches: pre-bankers and steam room, see fig. on right; Dimensions - from 2.3x4 to 5x6 m. Fashion for such baths is now being revived, from called wild grounds. The indispensable features of the "wild" Russian bath:

- The foundation is unlightened from natural (also wild) boulders, without base.
- The structure is a log house from selectively chopped wild logs, i.e. Non-technical processing, except for chasing and drying.
- Construction - without a single nail.
- Canopate - only moss and packles.
- The ceiling is the flooring (see below).
- Floor insulation and ceiling - moss and peat.
- Waterproofing - resin or shoe var.
- Roof - Shot or Cherry.
- The oven is brick.
What are these archaisms in our time, guess it is not difficult. Wild key turnkey less than 1 million rubles. - Divo. To all, it is fire hazard; Peat, moss and non-impregnated wood wood - combustible materials. But then we will see how to build an independently safe bathhouse and easier, not inferior to the original. Help, firstly, modern materials and technologies; In addition to traditional wood, there are unexpected solutions here. Secondly, in the old days, the bath ovens were built of bricks only for the absence of suitable metal. Actually, a stainless metal stove with a long-standing, air convector and a properly arranged Kamenka for the bath is better in all respects. So, to business. The action plan is:
- Recognition with research - see if it is possible to put a bath on a plot, where exactly what size and layout;
- Selection of material for construction;
- Design and approval of the project;
- Building and equipment, from the foundation and runoff before installing the furnace.
Project
The project should be lined immediately. The order of its statement is the same as for other non-residential buildings. However, it is not recommended to climb samostroy and legalize it. Bath is the structure of not the essential. If, in its construction, harmful neighbors were pressed like: "And here I have become a carrot from the garden, it was built as they built!", I will prove your very problematic and expensive. On the other hand, for the same reasons (non-residential, not vital), the mutual walking on instances is simplified and facilitated. Based on this, 3 options are possible:- Order a turnkey project "turnkey" from local designers, i.e. Already approved and attached to the place will cost this for a small bath to 5,000 rubles. + state duty and fees;
- Designed by himself - undesirable, not being a builder, confused, and in the organs of arrogant amateurs do not complain;
- Download from the Internet Ready thumbnail, i.e. Not attached to the terrain, project, and bind it to themselves.
The last option is optimal if you are not afraid for 5,000 savings sit under the offices. He has, so to speak, the breeder - give the downloaded sketch to the designers for binding and design. In this case, the savings are twice as wide, but walking - on their soul, and she is there like fish in the water. You will also need to choose a suitable structure, estimate its location, make a copy from the planning scheme and show the projector where the bath will be. However, to download the first closing a beautiful 3D picture with some schemes should not be needed to check the Bani project to contain at least the following sheets:
- Floor plan with the necessary cuts and explication (technical specifications) of premises, like the fact that in Fig. below;
- The consolidated statement of the required materials, and keep checks on them, so that in the case of which to show - not from the stolen built;
- Recommended type of foundation and its plan.

An important point in building resolution is the consent of the neighbors. This is not a debt receipt, there are other laws. Simple paper with a signature as an argument will not pass, but if on it and other sheets, the stamp "approved" and a visa, then with that shorter the conversation is short: "You see the seal on your snapshot? Yes? So you went to my garden to break the carrot. "
And such a ma'a-lox remark. Consider the nails can and measure the project where to beat, not necessarily. The builders know perfectly well that the deviation from the project is far from the same that Samostroy. Therefore, having an approved project, the developers are more or less experienced build, if only it seems to be, and there suddenly, it is stupid. Flooding, dimensions in the plan, the location of the bearing walls must match (in a small bath there are already 4), the material from which the tree is built is so a tree, the brick is so brick - and the foundation, its type and material. Other, if it comes to a bath, will not be disruption, but by deflection from the project, which is solved. Any foreman on this topic of such stories will paint - winning and getting up.
Note: a question may arise - what is this liberalism to deviations? The point in the land of Mother, build something on it, and predict exactly how it will behave, while it is impossible. Therefore, grated builders give will, so that the risk to their fear can decide on the spot in circumstances - how to build up to stand.
Location, sizes, layout

Requirements for the location of the bath on the site shows Fig. on right. Of these, it is especially strict when approving, look at the distance to the source of water supply, at home, and draining from borders with neighbors. They should be followed with a margin, and the priority of the water supply is the highest. If, for example, on local conditions you need to take the distance from the well or well from 30 m to the nearest sources of pollution (and the bath is related to that), then we take this or other greater value. The same refers to distances to neighbors, carrots and really can get drone from the bath drain.
Other requirements are plastic based on local conditions. For example, the distance to the house is taken to leakage from the bath runoff not torture the foundation. If the sauna is below the slope, and the underground flow is directed from the house to it, then you can meet in 5-7 m, then only according to the results of the research in place.
A lot of "screens", when approving projects, the bath causes the entry orientation not to the south. There is already a cause of medical: suddenly the breakdown will be released on the seducing northern wind, long and before the inflammation of the lungs. But, let's say, in the predfaccise, the most evil wind is just southern, t. Naz. Slit from the mountains, and in the rose of winds in the north, the failure, so in this case the orientation of the entrance to the bath can be the opposite type. Well, and where it looks at the window, and it does not matter at all. Want when washing to admire the neutrition of a waste pit - your business.
On the usual household site the possibility of building a bath can solve the meter-one and a half of its size. At such a case we give informal standards of the area for 1 washing: 1.5 square meters. M of the pre-banner and 1 square meters. m washer (shower). Those., A sufficiently convenient domestic bath is possible by sizes from 3x4 m. Examples of layouts of such baths are shown in Fig. Below, with a parillery of a separate and combined with a washing. Their feature is that the entrance door can be on any of the pre-banner walls, which facilitates the location of the bath on the site.

On the pair you should linger especially. The fact is that the overall health of modern citizens often simply does not allow them to steam. In this case, a bath is needed from 3 separates with a separate steam room. In 3x4 m, such a layout can be laid on the right in Fig. With plans, but then the problem of heating the shower in the cold time. To start a shower for heating, spending in vain hot water is irrational, in the watering of the stove of it and so little, and there is no longer for a separate oven in the shower.
The output can be found by retreating from bath-planning traditions, especially if the area is available for building allows you to increase its size. For example, in fig. - Bath diagram from 3x5 to 4x6 m with a small pre-banner, actually changing.

A big washing is heated either a separate stove (designated?; There is a simple homemade bourgeitarian or something like), or the flow of air from the part of the convector of a modern bath in steam room. In the latter case, 2 solutions are possible: or non-combustible partitions and a part of the air convector goes into the washing, as in Fig., Or the fence of cold air over the floor of the washer and the feed is heated under the ceiling under the ceiling using tin boxes or metal. Thanks to the presence of a tambura, a common entrance can be focused as you like, but for lovers leaning, climbing in a fresh snowball or a pool in a steam room there is a separate output.
Note: about the second sign? In fig. And see the drain with the drain below.
Materials
The choice of material for the construction of the bath is due primarily to physical processes in it. More precisely, our ancestors based on the available and medical and hygienic requirements, understood at that time intuitively, but probably invented and the construction of a bath building. It turned out therefore quite conservative and tightly tied to the tree. Wooden buildings require very high skills and long technological breaks on the dermistem and their own shrinkage, if used inexpensive terrain forest. Replace the wood on the bath is possible, for example. The following foam blocks or arbolit, or opilk concrete. Therefore, before choosing the material, let's see what physics is valid in the bath.
Bath physics
 The first - the bath is not heated constantly, the sweating strongly warms up, and when you wash it off. The second - during the protest, the bath furnace must first give a powerful flow of thermal (IR, infrared) radiation, which will warm the walls and absorb them, and slightly weather - a strong stream of heated air, which gives a uniform temperature in a steam room. At the time of the wash, the furnace furnace relaxes so that the washes did not burn her directional IR. People in the Ban of IR from the heated walls and heat of air should be gently and evenly envelop; This, in addition to the saturation of air intake, the indispensable condition of the lung pair.
With the temperature, the lightness or severity of the bath is not tied so much. Couples at 45 degrees can be heavy, and at 70 - easy. The tolerability and benefits of the bath for people are different, as they say, the Constitution is expressed by the parameter that can be called the intensity of the effect of steam; In the people, he has long been known as "poorerity" of the bath. Also for a long time there is a classification of baths on this basis:
- Easy, for women and children - From the lime forest, the heat capacity of the walls of Mala, IR from them quickly "exhaled" and washable warm with more air.
- Normal, or Condim - Traditionally from the coniferous forest. Heating IR from the walls and air is approximately equally, depending on the fire mode is suitable for almost everyone. It can be built of any material suitable for the bath.
- Easy - From thick oak logs. Thanks to a long and powerful IR from the walls with a large heat capacity of everything at 50 in the pair, one single-haired broom is pierced, as they say, there is also a bone. But you can withstand the diverse pairs you can only having iron health. In general, the poorest bath is the Bogatyr, after it, figuratively speaking, fit the trucks, grabbing the car for the hinge.
Light baths built rich more for wives, daughters and other women's expensive: Easy bath has a beneficial effect on women's health and allows you to save beauty for a long time; Both sexes adds sexual activity. Dear Russian Cockobots of the past certainly before accepting, missed their visitors through a light bath, long before the Russian word denoting their profession became indecent.
However, the lime trunk forest and in the old days there was roads. Now all age-old lipnyaks under the protection, the billets of the lime businesswood are not conducted. However, approached by properties to the lightweight linden bath of foam blocks and the frame, which will be described in more detail. They are the cheapest and simple in the construction. But to ride after a light bath in the snow or poke into the hole is categorically contraindicated. Even before getting out of it to the street, you need to cool in a warm pre-tribades, and then, it's warmly dressed, quickly scatter into the house.
A poorest bath, on the contrary, very road and complicated, because It is possible to build it only from the logs of the highest condition. Longitudinal hollows between the crowns of the cut act as the captors of the initial IR furnace, driving heat into the walls; Bruce walls absorb IR not so greedily. The same applies to any log baths, so the bath "Almost the pointed" can be built out of a pine log with a diameter of 200 mm. We will further take advantage of the "normal" conders, as the most versatile and affordable.
Selection and rejection
The best material for the bath is a tree, because For him, she was created. On foam blocks and other suitable materials, let's talk later when describing the baths of them, because They go to date immediately without rejection. It is impossible to say about the wood: that that is quite suitable for the house, in the bath can not last long as the specific conditions described above.
Note: The brick sauna is inferior to wooden in all indicators, except for one - large, from 70-100 square meters. m In terms, the bath structure of the brick will be cheaper than wooden, and its bath qualities with such a large volume of the building will become acceptable. Therefore, brick baths built and build predominantly large public.
The best tree on the bath is a larch, and on the poorest - the moon oak, but the other is expensive. Most often, the baths are built of pine or spruce wood after pre-rejection of sawn timber. The first thing to pay attention is the complete absence of cracks (pos. 1 in Fig.), Then Chervotochin, pos. 2 and blue, blacks, etc. Signs of rotting, PP. 2 and 3. Syneva as a rule, it is accompanied by wormworms (pos. 2), but may manifest itself with separate spots, pos. 3. The third feature of the unconditional selection of this thing is drop-down swirls. If the forest is conditioned, the selection criteria come into force.

ROOM AND SURFACE

The coniferous string forest, especially pine, has 2 varieties - a grill and a dryness. The second is the usual build forest, chopped in quarters. The first impregnated with the resin, it smells like it, if you spend my finger on the heap, it will stick and dumps. Resolve Road. The trees are chopped by selectively during the Software that for the forest is generally not useful. Nevertheless, building a bath from a log or a bar, it is worth spending on the tar for 2-3 lower crowns: it does not rot, but under the influence of moisture, turning into the likeness of the moraine oak. For the frame bath bar of the lower strapping (carrier belt), it is also desirable to take a resin. And yet: on the draft floor of any bath, it is quite highly desirable to purchase a much less expensive semi-finished products and sawing resilts with a surveillance, first of all - the cheapest hill, see fig. We will have to sweat more, raking and configuring, but the floor will come out eternal and inexpensive.
Note: So far, someone else is still practiced predatory forest, when the trees of the sem are quarterly all year round. The surrounding builders of the bath is on the hand - the grinding can be taken directly from the leathering cheaper than then the dryness from the distributor's warehouse. But for nature, this approach is no place for nature, and you need to be able to evaluate crude wood on the item during drying, see further, about the bar.
Impregnation
All lumber for the construction of the baths must be impregnated with antiseptics, biocides and antipirens. In addition to the fruit, she does not rot, no impregnation will accept, and ordering, it will become very badly fuel. The impregnations for wood are sold and separately, i.e., if so cheaper it comes out, then you can buy an inexpensive impropy forest and process yourself.
Impregnation materials for armored wood are based on purified mineral oils and / or silicone. You can meet the recommendations to replace them with working out or fresh engine oil, but not necessary. Machine oils contain additives, useful mechanisms, not people. In the bath, they will inevitably enter the air and are impregnated with you through the steaming skin.
Breed
Raw, i.e. Wild logs are now sold rarely - it is more profitable to dissolve them on the measuring material, and waste will go into the case, on cellulose, etc. There are firms selling wild forest, but selected and prices - my respect. Therefore, suddenly you, after reading further, removed to build a log bath, then buying logs will be purchased.
The first choice criterion - the log must be a solid chamber drying; This is a very expensive material. Glued imitation, pos. 1 in fig., Perfectly go on a residential building, but not on the bath, because Due to the different labeling of lamellae (fragments, from which the log glued in the bath conditions, the operating conditions will soon be excreted and reinforced with any impregnation.

The second moment is cracked. T. Name. Healthy radial cracks, pos. 2, in the cuts of residential buildings are quite admissible, but in the bath will be collections of condensate with all arising; There are no logs of natural air drying without them, therefore, as above, only chamber is suitable. For the same reason, the log profile should not have reversed recesses, pos. 3. From the log of the Finnish profile and any of its modifications, excellent homes are obtained, but the baths are not built.
The brood log on the bath should be with the usual T. Naz. Lunar groove, pos. 4 addressed down. To do this, when building, you need to choose a suitable wagon scheme, see below. The best sizes for the bath - 190 or 210, noted in Fig. If the sauna is built from pine logs, then, besides the enlarged diameter, you need to choose a log with a dark core and a bright zabol, to the right in Fig. The logs with dark and bright belts of the annual rings, the groza will go to the usual bath.
Note: If the "rode" of the baths of great importance does not have, then the logs can be taken a few different diameter. When writing in the region (this is the optimal method for a small bath, see below) from the solid-caliber logs, it turns out quite suitable log house, see fig. left.

Bar.

The timber saucer will cost much cheaper than the log cabin and the look fits into the country nozzles, see fig. Cheaper and easiest to build it from a conventional pure-bruised timber (rectangular in cross section). The criteria for its rejection are the same as for the logs, but the check is added to the evenness.
A simple chamber of chamber drying now seems to be on sale at all - unprofitable. And the air drying is all in one degree or another. In general, this is not scary, in the construction of a log house always provide for a technological break on the dermisk and its own shrinkage of the tree. During him, the bars will stick together to each other and seternally, as they say, will be convicted with a pantry with a practically a whole array.
However, the shrinkage of the tree is not limitless and if the timber was dried incorrectly, it could be excessively vigorous, and the log house from it will remain with the slits. There are 2 procurement options: either from a proven supplier for live recommendations of reliable people, or with a stack inspection in a warehouse invited specialist - a carpenter, a furniture-friendly, forestry engineering, etc. To learn to evaluate the degree of blocking of sawn timber and their further shrinkage in designs on descriptions with instructions, Unfortunately, it is impossible.

Bathing Bathing Bathing
It is very attractive, but it requires particularly thorough rejection of the tree, the construction of a brusade bath from a triplicate timber with a reflection (pos. 1 in Fig. Right) or a 2-kanta, he is a half-circuit sleeper, pos. 2.
These are semi-finished products, i.e. It is inexpensive. There is not much more difficult for them than a simple timber and can be done not a carpenter. But the bathhouse from such a bar can be built on the species very similar to the "cool" log, and according to the properties - with intensive firebox close to the poorer.
As to the profiled bar, then he, first, roads. Then, the glued bar cannot be allowed on the bath, for the same reasons that the imitation of the log, pos. 2 in fig. A one-piece chamber broom is even more expensive, and only the chosen from the kernel will go to the bathhouse (pos. 1) or Collus. If the bell can be seen on the heap immediately, both, in the building it will be split. Finally, in the bar profile, as in the logs on the bath, there should be no recess facing, pos. 4. All this turns the choice in the daytime hell, especially since the sellers, knowing that their goods are quite good at home, such advocacy do not understand.
More about brick
Suddenly you want to build a brick bath, keep in mind that the brick is also subject to rejection. The bath is needed heavy and dark tiny, or moderately, without warming up and running, checked ironing, or clinker. Beautiful facial brick dry or semi-drying is not suitable unequivocal.
Building
Well, we will assume that the complex and responsible stage of the choice and rejection of the material by us passed. In the end, the cost of it is needed only time, knowledge and attention. Now - we build a bath! Here, too, there is nothing to pay attention to the usual construction workers. In general, the sequence of the construction of the bath is as follows:
- Foundation;
- Warming of the sample and drain equipment with drain;
- For frame bath - frame;
- For them, the technological break by 2-6 months. for shrinkage frame;
- Walls;
- For log and bar baths - cutting cut;
- For them, from air drying materials (non-philicated timber, wild and dyeing non-cylindered log) - technical operability for 6-18 months. for drying / shrinkage sruba;
- Opening, door, windows;
- Ceiling;
- Roof;
- Interior arrangement and, mainly - installation of the furnace.
Foundation
In old days, the baths were put on an undelated foundation from boulders (pos. 1 in Fig.), It made it possible to reduce the processing of the logist's logs to a minimum. For this, something like a lounge or centers, in which round logs did not ride, were gained from wild stones. The corners were especially valued by large boulders with crossed natural hopes; These are the most cornerstones. The initial meaning of this term is now forgotten. The currency foundation under the bath can also be laid in our days, but, alas, the wild stone is now far from throwing material.

Note: Do not be surprised to mention the cornerstone in the Bible and the Gospel. Now, almost brass lender was then rich in an excellent cedar tree. He was enough for construction, and fleets. The palace of King Solomon from what was built? "Thanks" the high value of the Lebanese cedar, it is now almost left.
The full replacement of the wound - undelated or low-profile, pos. 2. The first is suitable for any wooden bath, and the second is under foam block. By complexity and complexity, the commissioning of the newcomers is available, and at the price - the family budget below average. The lack of one: not suitable on unreliable soils. These include:
- Medium-digitally closer to the rapid and highly fucked (hearing over 6-7% by volume) - small dustless squeeses, dense loams, chubby clay, etc.
- Celebrating categories of category, over 5% by volume - loose lesid and clay.
- Weak, with a carrying capacity of less than 1.7 kg / kV. CM - humus, or color, peat, loose sandy.
In places with a consistently positive winter and low probability of flock freezing, a great, simple and cheapest, option of the foundation under a wooden bath - the columns undelated from the finished blocks of 200x200x400, pos. 3. A conscientious and attentive office citizen, holding to build, can lay it out for the weekend.
At the slope, which is very good for the drain device, and on unreliable soils, it is possible to put a bath on a column foundation from asbetic pipes, pos. 4. Under the wooden structure, it is approximately equal to the ribbon under cost and complexity. The insulation of the sample in places with frosty winter increases the other slightly. Under the box of foam blocks or bricks, the pillars headcils will have to be tied by randbalkas or painters, pos. 5, this is a rather complicated and expensive process, especially the overlay of the Turks. However, for the bath, most often you can doly do the randbalkas.
Finally, pile-painted foundation, pos. 6. It can be both metal welded, both in Fig. And concrete on boronobiling piles. It is quite difficult and expensive, and special equipment requires a high-quality metal pile foundation.
Pile foundations are laying under the buildings on the soils, as they say, no: or flowing, peat, weak strongly flooded; In general, "on the swamp." The bath on rotten wets do not put, but the clarification of the pile foundation is justified in special cases.
For example, the author had a chance to shake in a poorest bath on the Rutaire over the river. A staircase was played over the pool, a staircase was right into the water. From the bottom there they beat the keys - in summer, the water is ice, and in the winter she held a hollow. Feelings - unspeakable, if the paradise crashes, it is not different. But it is possible to build in such a place only on the piles, otherwise in a year or two, the earth will crawl, and the bath only bouffrencies or float, shaking. Here for such exclusive and the pile foundation under the bath is designed.
Insulation and label under the walls

Before the construction of any bath for any foundation, except for the boulder, you need to apply double waterproofing from bitumen and runnerdoor, see fig. It is superimposed after a set of the foundation of strength, except for metal welds.

If a wooden bath on a ribbon foundation is built, then before laying the 1st crown of the cut or the lower belt of the frame on the tape on isolation, the rails of 30x30 mm or 40x40 mm are laid out, as shown in Fig. left; With high-quality sawn timber, you can do the tolstoy, from 10 mm, gaze. The appointment of this crate is to prevent the tree dropping from under the bottom due to the capillary winding. The remaining gap then canopate together with the walls.
Note: In any case, no anchor bolts, etc. It is not necessary to attach walls to the foundation. With thermal shoe, which is experiencing the structure of the bath, the benefits of them, besides harm, will not.
Paul and Stock
The floor and the ball are inextricably linked and therefore are considered together. Together they constitute the most complex and responsible constructive node of the bath, in many respects defining its operational and sanitary and hygienic qualities.
In the old baths, the stock was right on the soil through a slit floor. Now dropping any designers on the surface of the soil is prohibited, but the shielding floor of the steam / washer is quite appropriate, see below.
The flow from the bath can be organized scattered through the entire surface of the floor, or point (concentrated) through the grille (ladder) in the floor. The first, as we will see below, more difficult, but much more hygienic. The point stock makes most often if the drain pit is under the floor. This saves the place and volume of earthworks, but sanitation with hygiene - by 3 with a minus. In addition, the drain holes that do not require cleaning and pumping, does not happen, and in this case it will take the floor for the plumbrend. Additional minus - due to the infiltration of wastewater directly under the building, the bath is sooner or later "will behave."
As an argument in favor of the pit under the floor often lead - they say, will not freeze. A, sorry, what are you hanging off your bath all winter? If you are on your pocket, then what then samostroy? Order a turnkey bath and worry. Unfortunately, add "on health" there is no reason, once a pit under the floor. The way to protect any waste hole from freezing is known for a long time: it is a wooden cover at 30-40 cm under the revision hatch. The flow from the bath is warm and under the double lid will have time to absorb soil before it will get the most bodied frost.
Note: Sometimes they say, they say, on the pit under the bath you need to put a gas cover. Clean water curiously in the spirit of black humor - any sealished waste pit sometimes be exploded as a poorly sterilized bank with home preservation. In the bath - mainly during the wash, because The thermal impetus for the protrusion will play the role of the initiator.
The device of multiple flow from the bath is clear from the pos. 1 Fig. Extremely desirable concrete drain to equip homemade hydraulic, pos. 2, this will ensure the compliance of the bath with the most stringent sanitation. Concrete on the screed take waterproof; When independently, a water-polymeric emulsion is added to the water at the rate of 200 ml per 10 liter, and the freckled and the durability of the screed is treated with bitumen mastics. It is necessary to do it in the warm season, and in front of the flooring of the floor to give technical versions for 5-7 days.
The bath must have a separate drain pit. The flow from the bath is large for the house sewage and volley, but much cleaner of the kitchen gray, not to mention the fecal out, and contains a bit of fat. If you run the bathing stock into the general correctly calculated and constructed, it will choose, and the active bacteria will die in it. If you build a big and expensive septic tank in the calculation of the volley reset, then the usual flow of bacteria is not enough for food, active Il will scatter, and the sewage will stop working again. The drain pit is digging at the rate of 50-100 l per washing at least 30 cm. Below is the estimated (regulatory) depth of freezing, subject to the maintenance in the mainland (under the fertile layer) the soil is not less than 1.2 m. In most regions RF These Conditions are maintained with drainage by 1.6-1.8 m.
The simplest and cheap drain pit is obtained from automotive tires in the clay castle, pos. 3. But in its side pockets will inevitably be seeded, and to disinfect such a pit will have much more often. Having in mind future expenses for antiseptics, cleaning and pumping, it is more profitable to buy a pair (60-70) -cm concrete or plastic rings for wells. These are the smallest and cheapest well rings. Their height is standard - 90 cm; 2 pieces just enough. When the diameter of the on 0.7 m, the volume of the pits turns out to be sufficient for 5-6 washes.
Suddenly, the pit is still under the floor (maybe on the site just there is no place for external), then the bath can be used no more than once a week. In this case, the drain is cheaper. There will be a spot, and its complex and expensive concrete catcher under the floor can be replaced with a tipped low wooden tent. Then around the mouth of the pit it is necessary to impose high-quality waterproofing with a removal of a waste grille of at least 0.5 m, pos. 4. However, this is also a bad way out: water under insulation will still be leaving, and what the biocenosis will work out there, it is better not to think about it. At least before meals.
Floor
The floor of the bath should provide, firstly, the fast and full flow of water, without posting. Secondly, give sufficient insulation and guarantee from drafts from below, provided that it is impossible to score with thermal insulation, it will have to be limited to a refining with a clay. For this floor baths make floating, pos. 1 in fig., I.e. Not connected hard with the building structure. Floor Paul by lags; Their ends in the log wall are injected into the cutouts of the lower crown, pos. 2. In the brusade bath, the ends of the lag are associated with the cross, so that it is a solid lattice, and in the frame, as in the frame house, lagows of the floor together in the lower belt form the main carrier frame.
Step Lag - 40-60 cm. Their height is 100-120 mm for span up to 4 m and 150 mm for a span of 4-5 m. With a larger span, it is necessary to provide intermediate pillars in the foundation or internal parts of the tape. Lag thickness take approximately 1/50 from the length of the span, i.e. 60 mm for 3 m, 80 mm for 4 m, etc.
In the gaps between the lags are stacked with a slop with a convex side. Because The boards of the hill are narrowed to one end, they are placed alternately with a narrow end, then in the other side. Between the boards leave the gaps from 5 mm, the same pos. 2 in fig. Such a design does not interfere with the drain, to some extent improves the thermal insulation, and together with the hubbles laid by hrybille, it protects against drafts.
On the lags and draft flooring from the porridge is very and very desirable to take a pine-fruit. To reduce the cost of Paul Lagi, it is possible to make their 3-kantic timber or a seashed sleeper spreading along the sun. But then they will have to be submitted from the side of the ozol so that the basis for the purity floor was even and horizontal.
The finishing floor with a scattered drain is laid out of the usual puzzle of the pure-cutting board, preferably - grinding, thickness from 40 mm. Substitution, again, will cost more difficulty: you can take a plank-resin unstored and unedged, "bring to mind" on the cironary and fugoval machine (very convenient for this old Soviet Desktop UDDS-1 and the like), and put in the flooring Opel residues down. Pure floor flooring with gaps between boards about 5 mm, for water drain.
To send the floor with a point drain, first between the lags above the pit or the hydraulic, they put the board from larch or resin with a waste grille. Fill the floor without cracks, with a neckline above the grille, pos. 3 and 4. The board should be taken not tipped, but with a castle quarter, pos. 5. After a gear shrink, the joints of the boards are poured with liquid nails or rub the waterproof wood with a waterproof.
With all the high costs, difficulties and labor intensity, this is far from the optimal option. On pos. 4 It can be seen that, judging by the general state of the floor and the lattice, the bath is still new, but the floor under the bench is already clarified. Apparently, the hostility of the builders to the scattered drain through the shavy floor is explained by prejudice and incomplete knowledge of the history of the Russian bath.
Walls and logs
The log cabin looks, is definitely chic, see fig. But we will not linger on them for a long time: these buildings are actually not for beginners. In any case, to build the simplest bathhouse, you will need to master 2 difficult technologies - a womb of logs with an oiled with the residue, pos. And in fig., And with a paw without a residue, pos. Bd The latter, by the way, is technologically simpler, but requires calibrated logs, because The proportions of the marking template (pos. d) are tied to the side of the square, inscribed in the log diameter, pos. G. In any case, the bottom logs of the first crown must be very accurate and smoothly pose, because Current foundation that can be adjusted under the logs is now unreal.
Note: Wide in the oiled and in a simple bowl (see Fig. Right) often consider the same operating operation because Configuration ready for laying in log cabin is the same. In fact, when writing in the bowl of the batch and the grooves turn out to be drawn up, which is unacceptable for the bath. When writing in the region, the fitted logs are transferred to a coup with a coup, it complicates and slows down a log assembly on the foundation.
From Bruus
Build a bath from a bar newcomer is already quite possible: curvilinear grooves and wells in the tree do not need to choose. It is enough to be able to handle the saw, hammer, bits and ax. For the construction of a small, up to 4x5 m, the bath, you need to master only 3, or only one, an easy operation: Wide in Poledev or in the hid with the residue or a wrist without a residue in the paw (in the end); Marked in Fig. "!".
A bar will go to the bath from 100x100 to 250x250 mm. The thicker, naturally, better and more expensive. In general, the "weaving" is enough south of Voronezh, 150x150 for the Moscow region, and the 200x200 - north of St. Pesleburg. At 1-3 lower crowns, you need to take a bar for size more, and again, it is extremely desirable, a fruit.
Actually, the process of assembling the brusade cut without a residue from a non-core pure-cut bar (the simplest and cheaper) wrist in the end is shown on the trail. Fig. First, on the template prepare the ends of the closed in the size of Bruusyev, pos. 1. If instead of the bar there is a conditioned for a bath (see above) a semi-rubber sleeper (pos. 1a), then you can get almost complete imitation of the log cabin.
When assembling a log, you need to prevent lateral displacement of the BRUSEV. The log house holds the lunar grooves, but for smooth bars in the corners not enough. Here are 2 options. First, pos. 2 - simple, but not the best, because Nails in Siruba are powered. The log house is brought immediately tightly, and a caul-ribbon tape (see below) impose immediately. The location and length of nails are the same as brazed in the next. variant. Nails are needed secret, with a fully blended cap, or a special tool - Dobochnik to the hammer; It looks like a locksmith cerner with a wedding end.
In the 2nd way, pos. 3, the bars fasten with round deaf ducts - brazen. Calibrated brazening is on sale, take better oak. The conjunction of the crowns by nakedness is done like this:
- The next crown is stacked next.
- The drill holes exactly along the diameter of the brazers through the upper bar on the floor height of the lower.
- Remove the upper crown.
- Putting a caul-ribbon.
- Insert brazening, sticking to puncture over the nests for them.
- Again, now we are again, put the upper crown, putting it on begging.
- The procedure is repeated until complete grazing assembly; Begroen are located in a checker order, see again pos. 3.
Note: When spanging up to 6 m, the bars fasten enough in the corners, as shown in Fig.
And if the bar is profiled?
One of the reasons why the profile timber was invented is the desire to get rid of a rather time consuming and requiring additional costs of fastening. However, to the bath, this consideration is not applicable: the profiles that hold one of the "iron" friend, do not fit for the bath. And those who will not "catch" condensate, bath temperature deformations will soon break the ridges. Therefore, the log house from the profiled bar is still needed to fasten.
Konopka
Log and brusade log cabins are caught. For the logs, there will be thorough skills of hobble work and a complete set of boil tools, see Fig.
Bar canopate easier: need a steel cavity curve - leboz, wooden straight narrow and molding, see fig. below. The bathhouse canopate with both ways shown there: when assembling a log, they lay the rotor to puncture a cornea for a cavropka, and at its end it is finally in the set.
Note: The Lebes is designed to pushing caracks between the logs. From her name there is a "timber" in the sense to rub in trust, rebel with the rear thoughts on the mind, in general, under the skin to climb. If you can drink jut (see below), and the log cabin, the Lebes is not needed.
It is impossible to do without cacopata with waterproofing, at least the most modern one, it is impossible: it is impossible to pungent just compacts the seams, but "comes out" with a tree into a single array and finally fastens a log house. Synthetics capable of replacing it until not.
In the old days, it was caught in a stretching moss, and in a set - washed or mounted linen pacular harness. Now most of all canopate with jute fiber, it is almost wood in the composition and content of lignin. Jutene can be better taken in the form of a set of ribbon and cord, see fig. Ribbon ribbon, under the arrogant it is easy to pierce your finger. Put the tape when assembling a log cabin, and it is not necessary to warm it, on the assembly of the log house immediately finished the cord in the set.
So that the log house did not believe, cavalidate strictly in the following sequence: the deaf long side of the lower crown inside, then outside, then the same opposite. Then - the short sides of the lower crown starting with the one where there are no openings, also first from the inside, then outside. In the same sequence, the rest of the wands are strictly in turn from the bottom up.
Outcome on Brus and Brevel
The rolling chamber of chamber drying can be considered a type of profiled timber. Bath of it and profarboys also can also use the chamber drying at once in the construction, because Solution and shrinkage these materials were under the processing process; This is the undoubted dignity of the "chamber" wood. The cost of 1 square. A bathroom of these materials in most regions of the Russian Federation exceeds the cost of the square of the living space in the new buildings of the middle class.
The most expensive, complex and time-consuming, but also the most prestigious, will be a bathhouse. Its bath qualities correspond to such a traditional Russian bath. According to the "steepness" and the cost is almost equivalent to the timber bath, but it is technologically easier for it and can be delivered by the builder-lover of secondary qualifications. By the quality of the pair, the brusal bath can be made almost indistinguishable from the log.
The use of the chamber profar for the construction of a bath can be justified if there is no possibility to reject the air drying material or raw pieces, for example, in the regions where there are no own logging and sales traders refuse to sell ordinary sawn timber selectively. Otherwise, it is possible that applying semi-finished products of business wood, put the bar of the bath, and on the view almost indistinguishable from the log.
In general, log or timber bath can be recommended to put those who are sufficient enough Watching his health, keeps the physical form, and has already built at least a country house or a barn. If you are not sure that the condual and the more important steam room will benefit you, it is better to build some of the lung baths described below. The same option is shown in case of lack of means and construction experience: light baths are easy and inexpensive, and their steam will not hurt anyone.
Techniques
After the assembly and cavinc canopate, it is temporarily sewn with boards, plywood, cardboard, etc., and covered with a film. Film is fixed in any way so as not to the wind. Cube leaves to dry and sit down at least six months; Best of all - from spring or early summer until the fall of next year. During this time, the tree will not only die and swell, but also will be convicted with the pantry.
Operactions, doors, windows
The methods of the device of door and window openings in the bars are used mainly 2. 1st, pos. 1 and 2 in Fig., "For lazy and uneconomic": In the size of the width of the opening, only 1 top of its timber is selected, and after processer, the opening is simply peaked. However, this method is not so wasteful: trimming can go on a shield ceiling (see below) and certainly - on the interior equipment of the baths, pollutes, etc. and lazy in this way it will not be particularly not possible: to avoid a sudden "game" when drinking intense After the shrinkage of the cut, the edge of the future opening is needed when assembling a log, backing the corners.
In the 2nd way, pos. 3, the bars in the size are cut in advance, and in the emerging in the opening their ends is chosen. The disadvantage of this method is needed special boxes of doors and windows, whereas in the first way they will go simple frames from the boards. In general, the "first" opening is better to do when the appearance of a big value does not have a lot, and "secondly" - when you want to "more abruptly".
Note: From the Brochi-Budget Class Bat, definitely the best. Therefore, we give in addition to the video about the details of the arrangement of the Bruce Bath:
Video: Bath construction from timber, proper device
Frame
The frame of the bath is built as. Immediately after assembling the frame, there are rafting beams, and the frame of its own roof will dry, in the center in Fig. Since the openwork is purged by all winds, drying equipment / shrink needed minimal. Typically, the frame is collected in the spring, the same autumn will be completing the bath and still so far soaring.
The second feature - the finishing floor is filling along with the walls of the walls outside, on the right in fig., In the usual sequence from the bottom up, i.e. Starting from the floor. Warming the walls outside, as they sometimes advise, do not need. In decorative purposes, there is enough of something like a siding covering, without laying foam in the cell of the crate. It is necessary that the walls are better to ventilate. But it is necessary to warm from the inside, it is thoroughly as in the foam block described below, excluding the underlying plaster.
A frame bath turns out to be the simplest and cheapest, even cheaper foam blocks. According to the "dustness" couple, this bath is only easy. However, it is very problematic in it in winter, north of Moscow is very problematic: well gives warmth, and warming measures used in skew houses make steam heavy. In general, skeleton bath - Typical summer day of the day off; Especially well serves as a country bath combined with Hozblock.
Note: There are no restrictions on the outer covering of the frame bath, therefore imitation under the bar, log and others are possible.
Foam block
Bath of foam blocks is the only view of a bath structure in our time, which allows you to put a light bath in any climate due to the high thermal insulating properties of the wall material. Baths from aerated concrete can also be considered the cheapest and simple technologically: their cost is lower than that of the brusade, by 25-30%, and even up to 50%, see below. The number of measurement and accurate fit operations during the construction of a foam unit is several times less than that of the frame, and the curvilinear surfaces are not required in the material.
It is also important that, with generally considerable costs of working time, physical effort when building a bath from foam blocks requires a little. You don't need to wave a saw and an ax, as a whole, the construction technique - I put it, put it, pinned. For unusual physical work, citizens this circumstance can be decisive. And for Dachnikov - the fact that the construction of the construction is needed minimal to curing the building solutions. The usual in the summer of the week is enough for this, and during the next weekend you can continue the construction site. Which, working on the weekends together, it is possible, starting in April, to complete by July and until the winter will still get across.
Foam concrete, from which foam blocks are made - the material is lightweight, it floats water. Therefore, on stable and well-bearing soils, the construction of a foam block can still be easier and reduced. In general, a belt foundation is recommended for a bath from foam blocks, pos. 1 in fig. But on reliable soils, it can be replaced by unlightened columnar from the finished concrete blocks, as for a frame bath, and the walls are erected on a frame from a bar from 200x200 to 300x300, impregnated with an antiseptic, a hydrophobizer and waterproofing, as a concrete tape.
However, the ease and, especially, the porosity of the aerated concrete is set to work when building; True, not heavy and simple. It is especially necessary to protect the walls from the winding from the inside and outside: reuses aerated concrete not something that is easy, but even with pleasure, but dried very hard and long. Therefore, running forward, immediately say that, covering the roof, the bath must be pulled by a ventilated facade with a gap of about 5 cm. For any other method of outer insulation / isolation, the drop point in the porous greedily absorbing moisture wall is inevitable.
Next, when erecting walls, pos. 2, on the usual cement-sandy solution only the first 2-3 rows, and then go to a special adhesive for aerated concrete, it looks like a conventional masonry solution. Here the ease of material is already playing a role: cement masonry seam, being weakly loaded, badly resist shift loads, and the wind can simply fill the structure.
The most features relate to internal isolation. It is made with this order:
- Waterproof plaster walls (lime; water-polymer emulsion is added to the water for the solution);
- According to the fully dried plaster, paint water-repellent paint, better than polymer facade, as a last resort - iron umbrellas, zinc or titanium herbs;
- In the dried paint, waterproofing with an allen from 15 cm, fastening it with horizontal slats;
- Between the rails, mats are placed from long-fiber minvati, pos. 3;
- The mineral insulation is coated with a rolled follicate with a glass of 2 sides, also long-fiber, pos. 4 and 4a, with an overlap from 25 cm;
- On foil isolation, vertical rails are stuffed and an internal trim is already conducted;
- Upon completion of the finishes and installation of doors / windows, all the cracks are carefully fought, pos. 5: Foam concrete all the same, where to clutch, moisture in it spreads instantly. Breakdown from the steam room in the pre-banner cloud can destroy the bath.
And once again, running forward, but already slightly: due to the features of the construction visible to pos. 1, the ceiling in the bath from foam blocks make only the tail.
Ceiling
The ceiling of the bath is made of flooring, inner or shield. The first is an inequate ceiling of the Russian bathhouse of a small size. For its device, the established log houses are used on top of the boards, it canopate the slits moss into a set of the attic and poured with a resin. Then impose terropyl beams (see below, about the roof) and the gaps between them fall asleep peat; Sometimes the entire ceiling will be shown before falling down. Paul attic that whether they fill, or not. Now, of course, it is better to hide the jute, before installing the beams, coat the coat of waterproofing, and insulate the long-fiber mining.
Figure ceiling, see fig., Suitable for any bath, because It is stronger - ceiling beams at the same time and rafter, besides, they are mechanically connected with a firebone / structure. The shield ceiling is a combination of a fastener with stitched: on the ground they collect shield with insulation and insulation, and then the whole gurb is pushing, or a crane, or a mini-excavator manipulator, laid it on a log house. The shield ceiling is good because it can be "blind" from cropping, but is suitable for a brusade bath with a size of up to 4x5 m.
Roof
The roof for any of the bands described is suitable. Stropil farms are simple triangles with one rigle-golk, in the center in Fig.:
Fronttones are sewn by boards; Be sure to need auditory windows opened for the summer and at the time of use + hour and a half after it in winter. For the brusade bath, hanging rafters are suitable, on the left in fig. For the rest - a full farm with a beam-tie, right there. The lattice under the roof flooring is sparse, with slits from 30 mm, for ventilation. The most flooring is any except iron, it does not keep warm and quickly rust at the bath.
Arrangement
To finishing materials for the bath requirements, except decorative - moisture resistance, hygienicity, complete chemical neutrality. According to their aggregate, wooden lining from the array is often taken. MDF and laminate are not suitable, will be swollen and risked! The profile of the lining at any orientation of the boards must comply with the requirements described above: no pockets facing up, for example, as in Fig. on right.
In the pair, naturally, we need polluts. They are made by 2-3 tousing, with a vertical step 50-60 cm, even if only one person is batted all the time. Cause - You need the ability to choose the height of the location when carefully looking at a general state so that the bathhouse does not come out.
Poland width - 60-80 cm; The flooring is necessarily with the slits of 10-20 mm, on the left in Fig. Clean floor under the reservation do not fit, will eat! The length of the climb takes 180-200 cm for a sacking in a lying or 80-100 cm for a guy sitting. "Economical" cavities in 150 cm for a walker, crouching the knees - the option is not from the best. Raise the knees when sailing in the bed sometimes you want and need, but if all the time so steam, health will not benefit due to the constant outflow of blood from the legs to the heart and head.
The decoration of the shower / washer is better made from the boards, on the right in fig. So less likely to drop - water from the grooves it is easier to flock. Also in the washing, there are or peeled out of the gang, you need benches - sit, sprinkling, go to go, do not risk slipping, for children.
About partitions
Capital partitions are not needed in the bath. On the contrary, they need to be easier to be taken to make the heat of the furnace soon dispelled throughout the bath. Partitions put in front insulation, insulation and trim. Material - boards or wooden lining on the wooden frame; The total thickness is 50-70 mm. Moisture-resistant plasterboard, plywood, etc. Do not go, in the bath for a long time will not last.
Bake
The requirement is common to all bath furnaces - the elongated channel of the furnace so that the flue door can be derived to the pre-banner. Tradition tradition, but in the old days, they are most often as in the baths: the susceptibility of a person to the carbon monoxide grows sharply with an increase in air temperature.
For a bath with a common steam-washer, an inexpensive bath oven without a air convector, like "heat" and its homemade copies. A bourgeitarian for a bath with a water was also going - in the smallest pair you can provide the length of the horizontal part of the chimney from 2 m, which will make the burzhuyk economical.
To withstand in a small bath required by PB the distance of the furnace from the walls of 60 cm is unrealistic, and special fireproof, as in a steam room at before. Fig., It is very expensive. Therefore, the furnace for an oven in the bath is needed, first, to stroke a vermiculite or mineral cardboard, pos. 1 in fig. on right. An ordinary refractory litter from asbestos and a steel sheet for a bath is not suitable - about heated to 60-70 degrees of iron can be strongly burning, stepped up, because The severity of the burn depends on the amount of thermal energy that passed into the body, and the metal is good and quickly gives heat. Therefore, by the way, the ferry burns are so dangerous - there is a very large hidden heat of condensation of water.
Secondly, the walls in the furnace need to be covered with refractory trim. On the same pos. 1 Builders did not shake on a chammed brick for her. In physics - excellent, but, constantly moisturized, the shaft will soon turn around, and the trim will have to change. The same high-hearted (dark) ceramic worker brick, which went to the top of the trim, would be used to the Niza himself.
A little more about the form of a bath furnace. In the collective pair, it is best to put the oven round, pos. 2 on the same rice, or a stove-basket with a fiber part, hidden in Kamenka. Then all soaming will receive equal stakes of health.
Unusual difference
The root of the Russian baths - the dust bath, see fig. For its construction, dry sandy (better), sandy or loamy cloth needed. Walls, oven, chimney - from boulders or large boot; The roof lies with the turf. On the earthen floor they put a wooden lattice-slan, which then leans to the wall so as not to start. Stoke in the ground that in our time it is possible only by the sneaking, but Par - Ilya Muromets only woven and woven.
But even something else - a hiking mini-bath, see the next. Fig.
The design on the same principle repeat many, and in mobile, and in a stationary version, see at least a video:
Video: Mini Bath
But we take a look at Fig. Is there a construction on ...? If you take a milk, not translucent? Is that the owners are inclined to exhibitionism, and then the neighbors are pressed. In general, at the cottage to try.


Not everyone has a desire and the ability to invest a lot of money in the construction of a bath. And for the most part of our country, it is sometimes necessary to warm up, just necessary. The only way out is to build a bathhouse inexpensively, with your own hands. There is a sufficient number of building materials and technologies that can be called budget.
If we talk about the erection of full, though small, but separate baths, then the budget technologies are considered frame and monolithic. Cheap baths are more often on a wooden frame, we are plywood, osp, boards - who has something. Inside, a heater is laid between two trimbs.
One of the framework options - with a plaster
When monolithic construction, the arbolit is the most popular to build a mixture of cement with sawdust. Sawdust can be generally a gift or cost very little. The cement in the arbolit requires little, so this type of construction in the pocket is unlikely to hit greatly. A removable formwork is installed around the perimeter, the mixture is loaded into it, tram. The next game is mixed. That's so simple. The disadvantage of this material is to be combustible, but the wooden and skew baths are also combustible. So this is not an argument.
 Opolk concrete or arbolit - warm, natural material, which consists of sawdust, sand, cement and water
 The polystyrene polybetone is most expensive (granulated foam in a mixture with cement and water), but not everyone likes the use of "chemistry" - foam - when building a bath. However, this material itself allows you to get cheap and easy building, which, with the right finish, will only please the owners.
All three technologies give a combination of low prices and good heat engineering characteristics, that is, for heating such buildings, some fuel needed, which in the baths - the main performance indicator.

There are regions in which the forest is still the cheapest material. They may be cheaper than all will put a chopped bath. From the roundabout or from the bar is already at will. Plus this solution is a natural material (although it should be soaked in chemistry to preserve the appearance and protect against disease and insects). But the chopped baths have their own minuses - you can start steaming no earlier than a year after the construction of the walls and installation of the roof. We must wait until the main shrinkage goes and only then begin insulation and finishing work. The second minus - it is necessary to regularly update the protective coating, otherwise the construction will become gray and unsightly. But the wooden baths themselves are very good with a special atmosphere.
Inexpensive foundations
Inexpensive technology of the construction of walls is not all. Sometimes the construction of the foundation is almost half of the funds required for the construction of the building as a whole. The technology listed above is good because they can do lightweight foundations. Somewhere quite columnar, somewhere pile or pile-screened. Any of the above walls can well coexist with them, leveling their disadvantages (the possible uneven shrinkage of different points of support).

The foundations listed above can be implemented not on all soils. Sometimes there may be a ribbon foundation of small or normal downstream, and a monolithic plate may need to be needed on particularly bunched or unstable soils. On such grounds, it is possible to add more construction blocks on the above technologies of the walls - foam concrete, slagoblock, ceramzite concrete. All of them have their own characteristics (mainly a thorough protection against high humidity is required), but the construction technology is also inexpensive, although the foundations are already required more solid.
Compact or temporary
If you want to build a mini-bath at the cottage, a cabinet is completely small, then you need to look at the construction technology or. If there is a desire, even the usual construction trailer, barn or cabins can be turned into a more or less normal steam room. It is only important to inspire and put the right oven. Everything else is not so important.
Cheap skeleton bath stages - photo report
The initial data are as follows: the bath is not more than 4 * 5 meters, a small budget - no more than $ 200-300 per month. From the source data - clay pumped ground, 4 meters from the fence - a break. Without all this, it was decided to build a skeleton bath on a column foundation.

The bath itself turned out 5 * 3 m, plus along the long side of the terrace of 1 meter width. Under the pool of the poles, it was decided to make 34 cm from asbestos-cement pipes in diameter, under the terrace of 15 cm. In the center of the plan, another 4 additional pillar was marked - this is a foundation for a brick furnace.

Crave below the drainage depth - for a given region 140 cm. Pipes, by the way, cut more by 20 cm - the total length is 160 cm so that 20 cm the bath was above the ground.


Inside each pillar, a frame of 12 mm reinforcement is installed in diameter. 4 rods are connected, release from the pillar - by 10-15 cm so that you can quietly welcome the strapping.

Concrete was ordered ready, Mark M250. On the perimeter between the colums, the formwork was put up and the boot was immediately poured, which will close the gap between the floor of the bath and the ground.
After a week, concrete scored quite strength, continued work. From the corner of 70 * 70 mm with a wall thickness of 6 mm, the blockage was welded (the corner was in the economy). To tie pillars and metal, weld the reinforcement of reinforcement to the corner shelves.

Immediately I must say that this foundation is excessive on the bearing ability. You can build a two-story heavy building, and not a light one-storey skeleton. But, since they did "for themselves", and there is also a clay breakdown nearby, it was decided to reinstate.
In the washing and rest room, it was decided to make warm floors - sometimes you just need to wash, without a guy, and it is much more pleasant to do it on the warm floor.

Therefore, the insulation (polystyrene foam) is laid on the draft floor, the waterproofing, the reinforcing grid, the pipes are tied to it and all this household is filled with concrete. Under the furnace, naturally, the warm floor was not poured.

A week later, when concrete scored enough strength (not sheltered, but regularly irrigated), work began on the construction of a carcass. For the racks used the ram 150 * 150 mm, the struts - a board 50 * 150 mm (again a solid stock for strength, but this is from the desire to build a good bath).

A bath was built mostly alone, therefore a sequential installation method was selected - the racks are installed first at the corners, then - in those places where the door window will be installed or adjust the simpleness. If as a result of somewhere there are more spaces than 1 meter, additional racks are put. But in this case, since all the racks were made of a very powerful timber, the intermediates were not put, and the stiffness of the design was given by hide.
Next, so that when flooring the floor, it is not drowned, started making the roof of the bath. It is made the fastest - single-sided, with a minimum lift - 15 °. To ensure this slope, the rack for racks was made in advance of different lengths.
On one level, the board of the upper strapping is nailed, the ceiling beams are attached to it. The same racks are attached rafters with the required slope. From above, a solid doomle under roofing material is stuffed.
 Single Single Roof System is very easy to manufacture
 After the roof is ready, the walls were shed, and then the floor was used on the rest of the bath.

The next step is the masonry of the furnace. This business is long - left a whole month. The furnace is composed with a closed heater. In the formation zone of the chimney, a cast-iron box is built into which stones are stacked. The door leads the door, which goes to the steam room.
Also in the furnace there is a built-in register, which warms the water for a warm floor (exits on the side of the furnace). It is not always necessary to warm the floor, therefore there are two modes of operation - summer without heating of the floor, and winter, with the "inclusion" of the register heating. Translation from one mode to another - with the assignment.

Then follow the finishing works, and they will be different in various cases. The only thing that will be more general is insulation. With the insulation of the walls and the ceiling used mineral wool. The thickness of the layer on the walls in the "cold rooms" is 100 mm, in the steam room and the ceiling - 150 mm. The steamer over the insulation is still covered with a foil on kraft paper.

After insulation, vaporizolation is attached. In the living room, the walls are covered with an OSP, a plug is pasted on top. In the shower on the osp, the tile is pasted, the "dry" part is crumpled by clapboard (horizontally).
 Washing - dry zone and shower
 In the steam room, first the lamp under the trunk trim, then wide lining. The steamer turned out quite small, also the stove takes a lot of space. Two are placed with comfort, three is already more complicated, but it is also quite convenient. To regulate the number of! Sexual places in the steam room, the shelves made the retractable.

The whole construction process took two years, the work was carried out mainly "in one hands." The assistants were only at the stage of fillings of the foundation, and then at the stage of installation of the frame - to set the racks (should stand 100% vertically).

Video example of construction Baths from monolithic arbolit
Inexpensive bath 3 * 6 do it yourself - step-by-step photos
The log for the future bath is harvested and the skyrin in advance, covered from the rains it was dried about 5 months. The structure will consist of two halves: the steam room and the car wash is composed of a log, and a rest room on a wooden frame. It turns out two rooms 3 * 3 m. Construction began with markup: in terms of 6 * 3.

Sandy soil, therefore we make a small breed. ROOM trench depth of 60 cm, exhibit a formwork. The ribbon width is taken with a good stock - 35 cm.


We make the doors - from the frame, on which, on the one hand, OSP is packed, on the other - the lining. About how to make

In this form, we leave to winter - the log house should "sit down". In the spring, we warm the framework of the construction, we are tightening the insulation of a vaporizolation membrane.

We proceed to the ceiling finish. It was decided to make the bidder of the ceiling - to fill short boards between the rafters. You can buy them quite inexpensively. We proceed, cut the desired length. Rock up the supporting bars, which are cut into the size of the board below.


Outside, Yuan was sidding - and a frame side, and a log house. It turned out far from perfect. And between siding and wall there is a ventzor, so there is no problems with the elimination of moisture.
 Budget Bath with your own hands - one more inexpensive solution - siding
 We started the trimming of interior. Put the crate, on it lining.
 Inside the rest room was chosen by clapboard
 Go to the finish of the steam. At first, overtook all the foil. The room itself will consist of a zone of the steam room separated by a glass door, and the "washing" zone. In the washing wall, we share moisture-resistant plasterboard, which then glue the tile, and in the steam room.


 Zone Parling We are wearing lining and
 In the wall cut out the opening of the furnace. It will be treated from the rest room, and the "body" will be in the steam room. Under the furnace put the brick base, install it. Fuel removal we look with chamoten brick.


Separate a tile washing.


According to the main works, everything remained decor and all sorts of things - buckets, buckets, thermometers and the rest of the "filling.
For a Russian man, a bath is not a luxury, but a vital necessity. Even historians are convinced that the love for a bath broom and good heat we have literally in the blood, and even in the poorest villages near the smoked dilapidations, new pairs (old burned) were regularly built every five years. And Peter I, during a trip to France, could not stand without a native couple and two days, urgently ordered to build a Russian bath right on the shore of a foreign river than a very shocked natives. But what to do if it is so expensive today, and public pairs are not all soul? And if rest in the steam room is not just useful procedures, but also valuable communication with friends, kebabs and the opportunity to breathe fresh air? Then we will learn the cunning tricks of modern Russian masters who manage to build their pairs literally for vacation.
So let's consider the most successful projects of building a bath and their embodiment, where the main task was to save as much as possible, but at the same time not to lose the comfort of bath procedures. After all, as they say, the budgetary bath is a vestibule of a summer suburban train.
What can and cannot be saved when building a bath?
Agree, no savings are worth losing health, property or life. But the saddest situations occur when the question is suitable for cheapness, it is immenticated: such baths first slowly etch their owners the release of hazardous substances, and then either burn, or quickly deteriorate. But this does not mean that it is better to lower your hands to give all the blood on the conscience of a construction team - it is better to refuse to refuse dangerous use from the very beginning:
- Unattended materials and fakes for which unscrupulous sellers are assessed at times less. And at the same time, they convince the buyer that "there is no difference with expensive material, there is simply no cheating for the brand, my brother / matchmaker / son-in-law is already half a century worth it, and nothing."
- Materials are categorically not intended for construction and trim. So, if it is impossible to insulate the walls in the sauna, it is impossible, and this is not a whim of the manufacturer. Again, a neighbor, which at his own fear and risk insulated in this way and now boasts - not an example.
- Unsuitable components for electricity in a bath (wires, sockets), unprotected lamps or cheap Chinese products.
- Homemade furnaces and water heaters, which no one checked for fire safety.
- Combustible materials and those that are not indicated that they can be used in conditions of high humidity and heat.
If you build a bath with your own hands and are forced to save the materials as much as much as possible, try well every step, advise with experts and leave nothing without attention "seems to work." And finally, save with a limited budget better on the cubic meters of steam room, but not on the materials of its finishes. Such a board.
Let's figure out a little with affordable insulation. So, basalt cotton wool makes stone (basalt). Its main advantage is that the fibers inside the insulation are not connected by a chemical method, and another technology, and therefore, hazardous substances will not be released to the steam in the steam room. This insulation is not a fuel and well isolates the furnace. For a bath - the best option. If you want to save, then on the ceiling, put one layer of basalt wool and a couple of the layers of another, cheaper material.
Used as an economical version also foam-porous propylene with polyethylene film and foil spraying. You can buy it in a roller form, and secure immediately on a bare wall. This material is a good bridge of heat between the wall itself and insulation.
- The furnace is purchased without remote furnaces - so on the heating of the wage will leave much less than firewood, and there is such an assembly inexpensive.
- For sure to install the water tank is the fastest and most economical way.
- Foundation for a bath Make a cheap removable: it is much cheaper and easier to carry out repair work and change to another.
- Pay a maximum of attention to the insulation of the bath - the less you will "warm the street", the more economically the heating itself will be.
- On the window in the living room in the winter, cover the packaging film with bubbles - this is at least 50% will retain heat.
- Instead of an ordinary soul or shower, put the traditional Russian ears. And it is more useful for health, by the way. And it is not necessary to pour only icy water at all.
- By purchasing the lining, take the brushes of short sizes - they are cheaper and look no way worse.
- The roof at the bathhouse build a low, no more ratio of width and height 1: 3. There will be much less materials on such a design, and the chimney will not need to be high too.
Project # 1 - Compact Bath at a minimum cost
So, step-by-step process:
- Step 1 - Foundation. Foundation will be tally. To do this, you will need to get a screw car for 2 meters. As a casing, take the usual cheap sewer tubes by 110 mm. Insert the reinforcement of two connected rods.
- Step 2 - Vent. Under the strapping lay the studs with a length of 500 mm. Collect the strapping of 150x150, and prepare frame racks with a height of 2200 mm. Treat the frame to the neomide 440 or other suitable for the same purposes.
- Step 3 - walls. Walls can be refined directly on the strapping, and just raise them. We are trimmed. For this, the plates are pre-drilled, and then screw them with a semicircular head screw.
- Step 4 - Roof. The roof is covered with eightwall slate. Save after all!
- Step 5 - insulation. Now put any inexpensive insulation that is suitable for the bath. In this project - Lainrock Light.
- Step 6 - oven. We put an inexpensive oven, can be self-made. But under any necessarily additionally lay out the brick angle.
- Step 7 - Finishing. Fresh lining, plinth, detection.
That's ready compact and inexpensive pair.


If the walls in view of the savings are not too strong, the smaller the sauna will be, the better - so its structural properties will be higher.
Project # 2 - Arbolit
But a good example of building a budget bath from Arbolita is not much more expensive than a frame technology. So, the outer walls of the pair will be 20 cm thick, inside - the brick partition from the furnace.
Here's what the process of construction is:
- Step 1. Pump the drain pit with dimensions of 1.2x1.8x1.4 m. From two sides, we fall asleep OCGS with stones, we make a formwork, pour.
- Step 2. Copier the foundation 30 cm wide, a depth of 50 cm. I fall asleep sand and trambra.
- Step 3. We put a formwork, reinforcing two rods on top and bottom. Vertical rods put through the meter. Fill the foundation.
- Step 4. We put the EPPS in the washing and steam room, the grid and pour floors. In the washer additionally organize drain.
- Step 5. We put the blocks, check the evenness of the walls with the level.
- Step 6. We make a roof using boards 50x100. The optimal distance between rafters is 55-80 cm. Covered.
- Step 7. Cook the oven or buy a budget ready. The ventilation scheme is suitable for this: outside the air goes to the gap between the stove and the brick wall, where heats up.
- Step 8. Install the shower tank in the attic.
- Step 9. We finish the walls from the inside. If you have the opportunity, use the FB isesan - a special material for baths, plus heat-resistant tape. For the ceiling is good isolon, which can withstand temperatures up to 150 ° C.
Such is the budget and quite successful, the bath turns out.
When choosing Arbolit, pay attention: in its density it is thermally insulated and structural. The first has a density of 400-500 kg / m, the second - 500-850 kg / m. This material is used to erect self-supporting walls and has good heat and sound insulation.


Project # 3 - Miniature Banke of Bruus National Style
And if you do not imagine the Russian steam room from another material, like a bar, you can build this relatively budget option.
- Step 1. Align the site under the foundation from the dropout, pinch the "formwork" and leave only the opening for draining water from the washing room.
- Step 2. Put the EPPS, knit the reinforcement frame. Fill with concrete, we make a scat for water and the foundation is ready.
- Step 3. We put the log house. Under the first crown, we put the blackboard processed by the antiseptic, which is closing the rubberoid from three sides. You can put moss on the board itself - it has antiseptic properties, and therefore the crown of the bath will serve even longer.
- Step 4. We build walls and leave so for several months to shrink.
- Step 5. Breeping rafters and cover the roof. Through the overlap we make the passage of pipes - it is easy to make from a metal corner and a sheet of stainless steel.
- Step 6. Between the steam room and the pre-tribades, we make a frame partition, insulate it with mineral wool and we are wearing with clapboard on both sides.
- Step 7. Putting the floor to the floor strain in front of the stove. We leave a special hole in the floor - for supply ventilation.
- Step 8. Take the pipe from the furnace through the roof. Passage from rubber Master Flash, which is a rack to temperature. Box with roofing coating seal MS polymer.
- Step 9. Krepim shelves in the steam room and carry out electricity.
Remember: the first step to a huge savings during the construction of your own bath is to build it yourself!


Project # 4 - steam room on a light frame of girlfriend
Brux for a bathhouse can be made even from the collected firewood, if desired. The main thing is only to choose from them without defects and bitch, and be sure to handle the antiseptic.
So, we build a budget bath from the remedies:
- Step 1. We make bars for the frame, process and envy.
- Step 2. We are building a pile-butt foundation: we break the grommet on the meter, we forget the thick pine colas there and on top we make a shelter from concrete and stones. Next, fill the poles already before the top.
- Step 4. Collect the frame.
- Step 5. ROOM Yamu under the drain, insert inside the barrel with broken brick and rubble, we take the ladder there. This is a summer non-insulated option, and for the winter you can pave a insulation or warming cable.
- Step 6. And the ceiling, put the film over the insulation. On the walls and the ceiling, let the Finnish foil paper for the sauna.
- Step 7. We put the oven. Take with the register, because We need water heating for washing - in order not to acquire a separate boiler. So, well proven itself - inexpensive and warm well.
Such a sauna is surprisingly for a long time, the couple pleases and spend time in it - one pleasure. And the cons will always find.


Miniban: cheap and angry
But if there is no pair of steam tool at all, it is not worth a despair - today there are a lot of options to build a steam room literally from nothing. Let's consider in more detail.
Banya-barrel
This is the most common, only more solid sizes. Some of it overlaps a wooden grid screen, followed by a furnace. In front of the screen - a small bench. Starting at the same time in such a bath can even three people. But this option is only summer: rolled out on the site, put horizontally, they abandoned firewood into the oven and you can pour water on stones. But as a low-cost version - it is very different.
Hiking bath
Such a bath is taken predominantly hiking, but in the absence of another alternative can be used in the site. It will cost inexpensively, because it represents a conventional tent in which a stove or electric is no longer the mild Russian bath, but as a temporary phenomenon also has the right to exist.
Built-in mini sauna
It also appeared fashion to do in the bathroom. So, we transfer the washing machine into the kitchen, and in its place we build something similar to the closet. This is a small design, 1.5 m height, made of frame and fastened by clapboard. Inside - one seat shelf and built-in steam generator. A man sits down, closes the door, turns on the device. But his head remains outside - for the sake of security. When using special aromatic oils and other SPA elements - a good way to improve. You can say it is the smallest and cheap bath in the world.
Baths in cars
If you have the opportunity to get a non-working minibus or a car with a body, you can constitute a small bath right in them. On our site there are even detailed master classes, how to do this, and this idea will turn out much more profitable than the construction of a steam room start with the fill of the foundation. Experiment!
Almost every owner of the land plot, sooner or later, thinks about the construction of a bath. After all, the bath is not just a washing room, but also an important element of the country's holiday. The construction of the "turnkey" bath can be ordered from professionals for a round sum, or try to build a bath with your own hands.
After reading this article, you can choose a project, learn the sequence of the construction process, get acquainted with the boilers models and find the best option for your cottage.
Because to proceed with construction, it is necessary to develop a banani project. To do this, it is not necessary to contact the architect, a simple project you can develop and ourselves, especially since there are many computer design programs.
Think what size bath will be optimal for your family. What premises will be inside the bath. From which materials to make the foundation, walls and roof, do not forget also, about the trim. An important point in the design is the placement of the boiler and the method of its firebox.
Below you can familiarize yourself with the popular Ban projects:

- Bath project size - 4x4 meters.

- Bath project - 4x6 meters.

- Bath project - 5x6 meters.

- Bath project - 6x3 meters.

- Bath project - 3x3 meters.
After you have determined with the sizes and materials for the bath, you must create an estimate of expenses.
Foundation
For the construction of the bath, use several types of foundations. Depending on the weight of the walls and the characteristics of the soil, the foundations of the following types are manufactured:

- Foundation from plates.
- Foundation columnar for light walls.
- Pile foundation.
- Concrete belt foundation.
As practice has shown, the most reliable foundation is almost for all types of soil, is a concrete belt foundation, reinforced by reinforcement.
For the manufacture of a ribbon reinforced foundation for a bath you will need:
- Cement.
- Sand.
- Gravel.
- Armature.
- Formwork.
- Ruberoid.
- Wire.
- Shovels.
- Concrete mixer.
- Harness.
- Stakes.
- Tools (pliers, hammer, roulette and others).
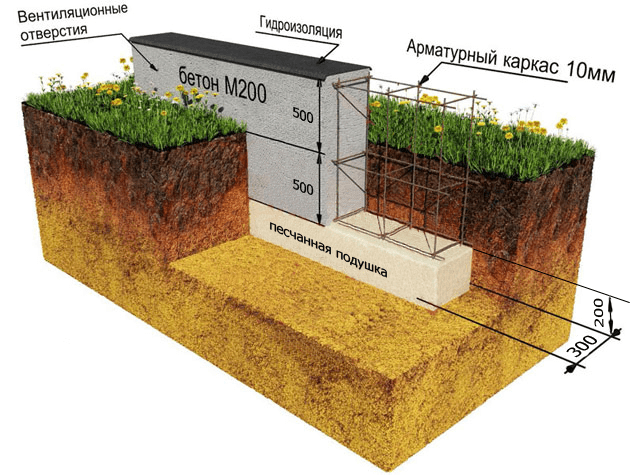
In the place selected for the construction, make the marking of the trench for the future foundation. For marking use the harness, stretched between the pegs. Trench width is based on the weight of the material for the walls. For a single-storey bath of wood or brick, it is enough to make a trench width of 30-40 centimeters. By setting markup, make the following:
- Focusing on the markup, haul a trench with a depth of 50-80 centimeters.
- Failure the bottom of the trench and fill it with water to shrink soil.
- Ship the bottom of the tale tale for waterproofing.
- Put the trench by gravel by third of its depths.
- Install the formwork at the edges of the trench.
- Make a fountain-enhancing framework, from reinforcement rods connected with a wire.
- Install the reinforcement frame in the formwork.
- With the help of concrete mixers, make a cement solution in proportion: one piece of cement per part of the sand and two parts of gravel.
- Fill cement to formwork, trying to prevent air emptiness.
- After drying the concrete, remove the formwork.

The foundation for the bath is ready!
Walls
The following materials are used to build walls:
- Wooden timber.
- Brica.
- Boards.
- Brick.
- Blocks from various building mixes (slag block, aerated concrete, arbolit and so on).
Since the construction of a bruis or brick bath is already quite widely described on the Internet, let's consider the construction of a frame bath from a bar 15x15 and 5x10 centimeters and a cross-section of 2x15 centimeters:

- Make the bottom strapping, for this, take the bars with a cross section of 15x15 cm. And install them on the foundation, connecting with special metal plates and corners. There is another way to connect bars, by drinking on their ends of spikes, grooves and subsequent fastening with screws or nails. Doing the strapping, do not forget to put waterproofing under the bars.
- Install the vertical racks from the 5x10 vertices. The distance between the racks is usually made 50-60 centimeters. First, determine the position of the window and doorways and install the framing racks.
- In the process of work, fix the temporary struts already installed racks so that they do not bother.
- Make upper strapping, securing it at the ends of vertical racks.
- Making the final fastening of the upper strapping, take care of the position of vertical racks, checking their levels levels.
- Be sure to strengthen all the angular connections with diagonal racks, it will help to avoid carcass throwing.
- Make a ceiling cut.
- After the framework of the frame, make the outside of the walls of the wall with a cross section of 2x15 centimeters. If you do not want the appearance of the gaps between the boards, then make the skin - "flashes", laying the bottom edge of the boards on a nithe board. In appearance, this method resembles the walls of the walls by siding.

- Saving a bath from the outside, go to the installation of the insulation. Foam or mineral wool sheets are installed along the vertical frame racks.
- On top of the insulation, it is necessary to install a layer of vapor barrier which is attached to vertical racks with thin regions.
- After installing vaporizolation, make the internal trim bath with clapboard or slats.
- Heat the ceiling by setting on the inner covering sheets of vapor insulation, then the insulation. Cut the ceiling from the outside, plywood sheets.
Note that the manufacture and insulation of the ceiling can also be performed after mounting the roof.
Roof
The roof for the bathhouses is three species:
- Single.
- Double.
- Complex - consisting of four and more rods.
Usually for the baths use the first two options. Let's look at a variant of a bartal roof covered with metal troops: 
The manufacture of the roof begins with the installation - Mauerlat. In cases of frame walls, the role of the Mauerlat performs the upper stroke.
- Install the vertical stands on the layer.
- Connect the racks using runs and tightens.
- Install the rafter legs by attaching them to Mauerlat, run and connecting the upper ends. The distance between the rafters should be 50-60 centimeters.
- Install metal tile sheets.
- Cut the frontoths with wooden slats or leaf iron.
For more visual acquaintance with the roof mount, drawing is shown: 
All sizes of roof elements are listed: 
Please note that the less you take the root slope, the more snow loads will have to have snow. Also, a small tilt of the roof can lead to poor water plum and leaks.
Floors
Floor design depends on the type of room. In the room of rest, ordinary wooden floors are manufactured. In the waxing and steam rooms, the floors make out of two levels:
- The first level is made of concrete, it has a bias towards the drain hole.
- The second level is the purple floor of the boards with gaps for draining water.
If you want to make floor stonework or tile, then they simply fit to the first level under a slope to the drain hole. 
In order to make concrete floor and draining in the bath you need:
- In the center of the steam and wetting, install plastic pipes with a diameter of 5-10 centimeters with a field at the end. Pipes should pass into the street through the foundation and connect to the sewage system.
- Put the layer of waterproofing material.
- Throughout the area of \u200b\u200bthe rooms, pour a gravel layer 10-15 centimeters thick.
- Make a cement solution and fill the floor with a bore slope mounted on a plug-up pipe.
- Reinstall the grille to the drainage of garbage in the sewer.

In the second stage, wooden floors are made:
- Install wooden lags in all rooms. Distance between lags Make 30-40 centimeters. As a lag, you can use the bars with a cross section of 3x5 cm. Or 4x6 cm.
- On the lags, approach the board with a cross section 2x15 cm. Or 5x20 cm.
- In the rooms, where water drain is assumed, leave the gaps between the boards at 0.5-1 cm.
Do not forget, before installing wooden floors, handle all the parts impregnated for wood. Maching floors, note that they must be higher, or at the level of the top edge of the foundation.
Boiler
The boiler boiler model will largely depend on your financial capabilities and fuel that you will use for heating. If you know how to use welding, then a simple boiler can be made from thick sheet iron. If you prefer more advanced colas on gas or electricity, they can be purchased in specialized firms.
The boiler in the steam room is installed in such a way that loading the combustion chamber with fuel, was carried out or from the street, or from the rest room (pre-banker). The boiler itself, for the purpose of fire safety, is located in 10-15 centimeters from the nearest walls. Walls on the height of the boiler are closed with iron sheets. A successful solution will make the boiler brick, there you most reduce the time of cooling and secure the walls from fire.
Having arrange the chimney for the boiler, pay special attention to the place where the pipe comes into contact with the ceiling. Hole for chimney, it should be isolated with refractory material. Also, pay attention to the place where the chimney pipe goes through the roof. Usually, this place is subject to leakage, so it should be carefully smeared. Below are options for boilers for a bath:

- Homemade metal sheet boilers.

- A gas boiler.

- Electric boiler.

- Boiler on hard fuel.
Bath arrangement
After the sauna is built, it is necessary to equip it:

- Move to the bath all available on the site - electricity, sewage, plumbing.

- Place inside the sink, shower cabin, light sources, leisure furniture.

- Finish the walls with curly slats and make stepped shelves.

- Buy wooden tubs, hayk, buckets and brooms.
After the arrangement, you can safely invite guests, shake in your personal bath!
Miniban assembly instructions for giving without foundation, you can also look in the video:
Options for beautiful and unusual baths
In addition to traditional materials and designs for the bath, there are many alternative solutions. Below we will give photos of the most unusual bath:

- Mobile bath from "Lining", built on a car trailer.

- Bath in a huge wine barrel.

- Bath of plastic bottles.

- Bath dug, built straight in the ground.

- Bath arranged in an iron container.
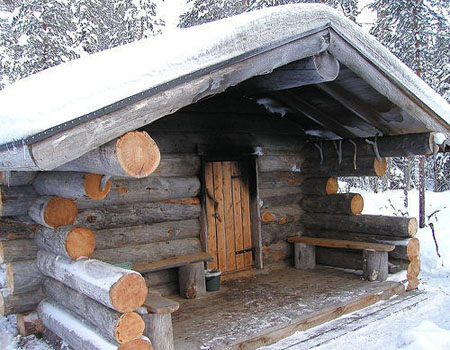
- Forest bath from raw logs.
![]()
- Beautiful sauna sauna.

- Bath of non-edged board.
At the end of the article I would like to remind you that the heating of the bath is associated with fire and high temperatures. Therefore, building a brick bath, brica, slagoblock or boards, pay great attention to fire safety. This warning also concerns the electrical wiring device, since indoors inside the bath have increased air humidity and the risk of closing the power grid due to condensate is very large. 
We hope that reading our article will push you on an independent building of the bath!
A trip to the cottage is a joyful event, as you can go to the garden or landscaping of the site, and then relax, falling in the bath, provided that it is there. We will tell you how to make a bath in the country with your own hands, demonstrate drawings, schemes and photo instructions. We will have a lot to work hard, but it is worth it.
In your imagination, you are probably already seeing how to fit to the bath, open the door and get into a warm and cozy pregnant, and then in the pair. Yes! That is how everything will be, but a little later. First you need:
- choose a suitable project;
- familiarize yourself with the stages of construction;
- purchase construction material;
- build a bath and bring all communications;
- perform an internal finish and only then steam.
If, after reading the entry, you did not lose the desire to make a bath at the cottage, then continue the topic, considering all the stages of construction.
Choosing a place for the construction of a bath
Often, summer cottages do not differ in large sizes, but besides personal preferences and convenience, there are norms that need to be followed. First consider preferences.
- It would be better to put a bath on an elevation, which will significantly simplify the organization of the drain of water.
- Well, when the bath is located next to the reservoir or river.
- The rays of the setting sun, penetrating the pair through the window, will remove stress, but it is necessary to simultaneously make it so that the entrance to the bath is well visible from the dacha house window. So you can observe the crossbath and children, especially when the pool is built before entering the entrance.
- The bath can be made in the form of an extension to the house.
In order not to have conflict situations with the authorities or neighbors, it is necessary to comply with the prescriptions of SNiP 30-02-97. By paying attention to Section 6, paragraphs 6, 7 and 8, you will find comprehensive information on the placement of the structure on the site, but we only give those numbers that you need to choose the best place for the bath.
Considering the fire safety measures for the buildings located on opposite sides, you need to stick to the distances specified in the table:
|
The material from which carriers and enclosing structures are made |
Distance that directly depends on the material used in the construction of the structure |
|||
|
The same buildings using wooden elements |
||||
|
Wooden and similar buildings |
||||
As for the requirements relative to the distances to the neighboring site, they are also unambiguous.
It is also important to take into account the requirements of the location of buildings on its site - from the Garden House of the shower, the bath and sauna should be at a distance of at least 8 m.
By the way, non-compliance with these rules can lead to a court proceedings with a neighbor and demolition or transfer of a bath to another place.
Project Bani.
Choosing a banner project, it is important to take into account the material from which it will be built. There may be several types of structure:
- Frame bath.
- Wooden bath (from a bar or a rounded log).
- Bath of brick, stone or blocks.
- Building from Arbolit.
Deciding with the material, when choosing a project, make sure that it fits you in all criteria.


Selection of material
So choosing a suitable project, in accordance with its requirements, building materials should be prepared.
- Most often, summer residents prefer to build frame structures, as they are cheapest and with their task successfully cope. In addition, due to the small weight of such a design, the foundation also does not have to spend a lot.
- The most favorite buildings are wooden. The cost of such a building will be somewhat higher, and the foundation will need to be done stronger, in contrast to the frame structure. Built in the country a good wooden bath does not need insulation.
- Stone and brick are infrequently used to build a bath in the country. This is due to the fact that for such a heavy structure, a strong foundation is needed, and the walls are needed during long absence and such a bath must be warm up for a long time. The exceptions are the buildings of foam and gas blocks. The strength of the foundation requires not such high, the walls are warm, but it is important to consider that this building material is very hygroscopic, so it needs to be protected from moisture.
- Arbolit is also often used in the construction of baths. Walls can be monolithic or elevated from blocks. The structure is warm, durable and inexpensive.
Materials for walls
Since our article talks about several possible options for using various building materials, consider them separately.
Frame structure

The walls of such a bath are manufactured in the lattice design. For frame walls, it will be necessary:
- Bar of various sections, the size and number of which is indicated in the project.
- Insulated material with high thermal insulation qualities for filling the frame. Again, you need to adhere to the requirements regarding the use of one or another insulation, but here you need to take into account that in the documentation it is often indicated by one type of material, but not all possible. If the specified material is too expensive, you can refer to the forums to clarify what is acceptable in your region.
- Material for the frame of the frame outside and from the inside. Most often, OSB plates, cutting board, siding or block houses use the outdoor building of the building, while the lining is used from the inside.
Wooden bath

For the construction of walls can be used:
- Natural chopped tree.
- Edged timber.
- Profiled timber.
- Glued bar.
- Rounded log.
Brick Bath, Stone or Blocks
Walls of such a bath can be made of such materials:
- Brick (ceramic or silicate).
- Stone (Booth, Limestone, Rakushnyak).
- Block (foam, slag, gas blocks).
Building from Arbolita

If you have the possibility of inexpensive, get the sawdust (and maybe there is yours), then at home it is quite possible to make arbolite blocks of quite high quality. Also, this building material in the form of finished blocks is on sale. Walls are erected very quickly. Another advantage of using arbolit is the possibility of manufacturing monolithic walls by filling into the formwork of the cement-chip solution.
Materials for the ceiling in the bath
The pre-equipment and rest room are warm rooms, so it is recommended to use materials with low thermal conductivity - aspen, a lamp or alder.
To cover the ceiling, the steers are preferable to use wooden lining, as it can withstand high temperature. In this room, it is impossible to use products from pine or ate, with heating from this wood, resin begins to stand out. Also, you can not hed up the ceiling by Fiberboard and chipboard sheets, since moisture and high temperature contribute to the release of vapors capable of harming human health.
Materials for insulation and vaporizolation
It is advisable to perform outdoor insulation only under the condition that the bath is heated. It is unlikely that someone will make such a luxury in the country, so we consider the materials for the inner insulation of the unheated bath.
A frame bath does not need to be insulated, since the thermal insulation is laid inside the design. In a wooden bath, you need to make a crate in which the insulation will be inserted. Other types of baths need insulation made by more complex technology.
To perform work, a mineral wool will be required, the thickness of which is selected depending on the material used in the construction of the bath and climatic conditions. It is usually placed a layer of at least 50 mm. The insulation can be in the form of mats or rolls.
As for vaporizolation, it is important to know that this is not waterproofing. Each has its own purpose. Even inexpensive vaporizolation will fulfill its role, while the waterproofing used is not for its intended purpose, it is possible to reduce all the works.
What you especially need to pay attention is that it is not to purchase a fake.
Decoration Materials
Because it is about the bath in the country, we will not talk about chic finishes. The optimal option will be the use of a tree: lining or similar facing materials.
As for the outer decoration, it can be any material that is used to cover houses. If the bath is made of a rounded log, it would be unreasonable to close the already beautiful facade of something else.
Bani construction
Now consider how the construction of the bath can be completed in the country with your own hands. It is clear that the work will be easier to fulfill with the assistant who can be someone from family members. In the initial stage of work, some orders can be given to children. Of course, they will do not all and not as fast as they would like, but if they feel that they need them, then they will then be more careful to refer to the bath built with their participation.
But we will be realistic, small children will help a little, and if you build alone, it will be a long definition, especially since some work to perform alone simply will not work. In the course of reading the article, you will see when and how many assistants may need - it will help everyone to plan.
Marking
So, the plan is selected, the location was determined, now we will proceed to markup on the ground. For this, it is necessary in accordance with the scale specified in the project, transfer the contour of the bath to the area. In the place where the angle of the building will be, a long peg (or fittings) will be clogged, and the lengths of two walls located at an angle of 90 ° are measured. The following peasants are clogged there, and the distances of other walls are measured. Finally, the last - the fourth peg is clogged.
Now that there is a marked perimeter of the future structure, you need to check how straight the angles turned out. To do this, you need to check on the axes - measure the distance from one knife to another. The data obtained must coincide. If this is not the case, the plane needs to be shifted, "rooting" the longest axis. After that, it will be necessary to check not only the axes, but also other sizes, and, if necessary, re-correct.
If the foundation is a ribbon, then a small discrepancy can be left, but for the pile or bar foundation, the markup must be very accurate.
So we marked the dimensions of the bath in accordance with the design data. Further markup is performed depending on which foundation. You can learn more about this from the table.
|
Type of foundation |
Where applies and how the markup is performed |
|
|
This type of foundation due to its high cost is made only in cases where it is not necessary without it. Marking is performed by the size of the structure or a little more when it is necessary that the foundation is wider and longer than the bath. |
|
Tape
|
A very common type of foundation. Comparatively inexpensive and durable. The markup is performed in such a way that the tape poured concrete passed through the perimeter of the building and under the redesters. |
|
Columnar
|
This kind of foundation also often can be found. Maintaining wooden buildings on it is mainly used. Depending on the size of the bath, the markup is performed by the number of manufactured supports. |
|
Screw
|
It is believed that this kind of foundation is new, but this is an erroneous conclusion made on the basis that it has become recently used in civil engineering. The screw foundation passed the test of time, since the military had long started using it. The advantage of the foundation device on screw piles is the speed and easy installation. The second advantage is that there is no need to perform earthworks, so the site will remain clean. In addition, with its help you can build a bath even on a plot that has a significant bias. Marking is done by the number of piles and no deviation to the side is allowed. |


Weigh everything in advance, and then take a final decision regarding the choice of the foundation type.
Pouring foundation
The manufacture of fine-breeding belt foundation is acceptable under such conditions:
- Soil on a plot of dry and incomprehensible.
- The level of groundwater is quite low.
- In winter, frost is not very strong.
- Buildings are not heavy.
Do not seek to guess the type of foundation for a hard structure. If not sure, you invite specialists who, by performing the appropriate checks, will give an accurate answer.
Let's start with a simpler and most frequently manufactured for the bath of a small-brewed foundation.
- We have an outdoor markup, now you need to perform internal, taking into account the fact that the width of the foundation should be at least 50 cm, and it should be beyond the structure of 5-10 cm on each side. Therefore, if the bath is 3 × 4 m, then the greatest size on the outer perimeter will be 3.2 × 4.2 m.
- It is important to take into account the place of installation of the furnace and at the same time make the foundation and under it.
- For convenience at the corners you need to install structures made of wood, similar to benches. They must be set in one plane at the height of the future formwork and to attach the measuring cord to them. How to do it, shown in the illustration.

- It is necessary to remove the fertile top layer of the soil and remove it to the side, then dig a trench, clay from which it will be possible to use as a subtype.
- As for the depth of the trench, then in some cases it can be 35 cm. Much depends on the depth of the freezing and the soil itself. It is necessary to get to the durable clay layer and in no case should not stop on the ground. Therefore, the depth is most often within 50-60 cm.
- The bottom of the trench should be aligned by checking it horizontal level.
- Now the turn of the sand isfeit. You need to pour the sand layer inside the trench, a thickness of at least 15 cm, moisten with water and well tumped. To do this, it would be more convenient to use vibrotambovka, but it is possible to manually manually, with the help of a handle brushed to it.
- The next layer is poured with a rubble of the middle faction and also thoroughly tram.
- Now it has come a timber series, the height of which should reach the stretched cord. You can make it from girlfriend or forest, prepared for other purposes, since this temporary design is shortly after the foundation will be dismantled. Finished shields need to be installed along the trench and fasten well, otherwise the bolted concrete can move them off the place.

- In order not to stain the boards, and so that the concrete does not flow through the slots, from the inside the formwork is closed by a polyethylene film that needs to be secured by a stapler or thin nails.
- Now it is necessary to make a frame made of metal or plastic reinforcement, bonded knitting wire.
- The manufactured frame must not reach the edges of 5 cm. It should be carefully omitted into the trench so as not to break the protective film film. To raise the frame over the subfolder, you need to put pieces of granite under it, since it, unlike brick, does not crush under the influence of moisture.
- If there will be any communication through the foundation, then for them you need to leave holes, which will help the sleeves, as done on the photo from above. The same applies to the manufacturer.
- Place your time so as to pour the foundation by concrete per day, since the breaks are unacceptable here - then the tape will not be monolithic. Conveniently concrete to deliver a mixer and pour directly from it, otherwise it will have to be kneaded in the concrete mixer, at the rate of the cement M400 grade 1 bucket, sand - 3, crushed stone (or gravel) - 5 buckets.
- Concrete flooded foundation should be sealing a vibrator or stack. After the shrinkage, you need to add some concrete and align the platform. If there is a foundation for a wooden house, then in a non-frozen concrete, you must fix the foundation bolts.
- Not earlier than in a week you can remove the formwork.
It should be remembered that the concrete has not yet gained full strength, so it needs to be treated carefully or wait 28 days, and only then build a bath.
Video: Bani Foundation
Laying wall
When building a bath from blocks, stone or brick, it is necessary to level the foundation for cement-sandy solution in terms of leveling the foundation, and put on it the rubberoid folded twice. The masonry begins with the corners. By installing the first blocks on the cement-sandy solution, you need to make sure that they are in the same plane and only after that the top outer edge is stretched by a twine, which serves as a masonry of a number of construction material.
When laying the following row, the masonry mixture may differ: on cement-sandy solution, a wall of brick and an enclaring is erected, whereas for masonry of lightweight blocks, mixtures recommended by the manufacturer are used.
By installing jumpers above the doors and windows, you need to install on top of the formwork and manufacture armoomas, securing the foundation bolts in it for the subsequent mounting of the Mauerlat board. After solidification of the concrete, it will be possible to start the roof.
Construction of a frame of a bath
The basis of such a bath is a frame of wood, which is insulated and trimmed by various types of finishing materials. You need to choose high-quality materials and comply with the sequence of their installation.
For the manufacture of the frame, boards from well-dried larch, aspen or linden, because this wood has low thermal conductivity. Made shields will be resistant to deformation.
The foundation is made frame of lower strapping from a bar 100 × 100 mm. At the ends of the bars, it is necessary to make cuts in half thickness and bore with each other self-drawing. If the bars are used 50 × 100 mm, the framework can be used to make online with metal corners. The dimensions of the bar depend on the type of foundation, design and size of the bath.

- At the next stage, an end strapping board is installed, and the lags of the floor are attached to it. Used timber 50 × 100 mm.
- On the opposite side of the lags are trimmed with such a calculation so that the second ending board can be installed.
- Lagi should be placed so that the insulation is close to the close-up between them, then the end strapping boards are nourished.
- The wall frame is assembled from a bar of 50 × 100 mm, and then installed in its places, all parts are fastened into a single design.
To ensure steamed frame bath, you need to use a vapor barrier film, which will avoid the accumulation of humidity inside the frame. Mineral wool or fiberglass is used as thermal insulation material. They are able to provide a high level of sealing, without disturbing the natural air exchange.
Warming and the walls of the walls are preferable to perform after mounting the roof. This approach will protect the tree and insulation from wetting.
Floor

If only the flooring remains in the frame bath and the sex board is left, then for other buildings you will have to work more - you need to install lags, make a draft floor, secure steam barrier, lay the insulation, to perform waterproofing, to determine the gender, which in a few years have to be changed. Given that the cottage in the country will not be thorough to dry out due to the lack of time for this, because after the weekend it will be necessary to take advantage of the city, if there is such an opportunity, it will be preferable to make a concrete floor and bold it with tiles. Wooden shields are stacked on it, which can be taken out for drying in the barn and calmly go home.

It is clear that for a skeleton and other building installed on a bar or pile foundation, only a wooden floor with insulation is acceptable. In more detail about this process, it is described in the two following rollers.
Video: how to install floor beams, make insulation and ensure the plums in the bath
Roof construction
Above any bath must be a reliable roof, but its creation options can be different. In any case, it is necessary to put waterproofing, and then thermal insulation, think about the type of roof and the choice of suitable roofing material. Without waterproofing, the pairs will freely penetrate into the attic, and, settling on beams and rafters, will contribute to their rapid destruction. In addition, the condensate forms on the roofing material will begin to drain on the insulation, which will affect the properties and durability of the latter.
A large influence on the choice of type of roof is the type of terrain, as it is necessary to take into account the technical parameters of the structure.
- So, in the country village, especially when it is located among high trees, you can safely make a high batch roof.
- If the cottage is located in the steppe zone, blurred by all winds, the bias for the roof must be made minimal.
- With small sizes of the bath and minor snow, the roof load can be made single. The same roof is most often made on the bath attached to the house.
Video: how to make a roof of a bath
Internal and outdoor
Although the inner finish is most often used wood, not all wood is suitable for this purpose. It is necessary to correctly pick up the material, especially for the steam room, in which a high temperature is created with a high humidity. Immediately it is worth saying that it is impossible to use lumber from pine, as well as dvp, chipboard and linoleum. Therefore, you need to acquire licens or linden lining.
As for other premises, there are no such extreme conditions there, therefore, there are no such high requirements for the material used - which cannot be used in the steam room, it is perfect for a relaxation room and a pre-banker. Pine lining in the pre-banker will have a pleasant fragrance and create a feeling of comfort.
The finish of the wooden and brick bath can be carried out almost the same. Initially, the lamp is attached to the wall, and the lining is attached to it. The exception is the pair, in which the crate must be a heat transfer foil.
The outer decoration is performed not only to make the bath beautiful, but also for its protection. Materials can be used to finish the bath on the outside:
- Imitation of timber.
- Siding.
- Lining.
- Block house.
- Facade tile.
- Paint.
You have left to choose the appropriate material and separate the facade.
Ventilation in the bath
Sometimes it is also found that such an opinion is that good ventilation in the steam room has nothing to do, as it turns out everything through it, and it is done very weak, or it is absent at all. But there is another extreme when the ventilation process is not controlled, and the heat is disappeared from the bath. In such a steam room above it is very hot, and the feet flas down.
In fact, during the adoption of bath procedures, the air in the room should be updated 2-3 times an hour, but this is not enough, since the ventilation must be correctly made. Usually the inlet is located below near the boiler, and the exhaust under the ceiling from the opposite side. At that time, while the pair warms up, the exhaust window is closed. Then it opens, and warm air begins to rapidly leave the room. As a result, the pair becomes cool and uncomfortable. You can make ventilation as in the diagram.

Such a device allows you to restrain the warm air under the ceiling, and the outward comes out half cooled through the hole below (b), so it will be comfortable in a steam room. When you need to thoroughly check the pair, the upper vent hole opens (a).
In addition to the wage, ventilation is necessary in each room of the bath. In order not to lose the precious warmth, it can be done so that it is possible to close the ventilation holes in those hours when there is no need for ventilation.
Furniture
Canopy and all furniture for the country bath can be made independently. If there is no desire to make something else, then the network has many offers for the sale of all necessary for the cottage.
With a great desire to save on the furniture, you can reconsider old stocks. Maybe there is something that needs to be repaired, but no hands do not reach it? After a small restoration, such furniture can last a considerable period. The main requirement is not to use furniture from chipboard, as this material will very quickly deteriorate from the big humidity.
Schemes


Photo: Original Baths


