How to install a stretch ceiling with your own hands. We install a stretch ceiling with our own hands: calculation, installation and built-in lighting
Many of us would like to know how professionals install stretch ceilings in order to do the installation of such ceiling structures at home with their own hands. Our article will help you acquire such knowledge.

Briefly about stretch ceilings and their advantages
To understand how stretch ceilings are installed, you first need to figure out what they are and why they are so popular. Stretch ceiling structures consist of a mounting kit and the stretch fabric itself made of a film or fabric made of impregnated synthetic threads. The material is attached to the structure around the perimeter of the room and stretched. Film webs are stretched after preheating using a heat gun, and fastened without heating.
Advantages of stretch ceilings:
- High aesthetic values. A wide range of colors and textures allows you to choose a canvas for your interior. And thanks to photo printing on the panel, it is possible to achieve originality and even greater beauty of the ceiling.
- There is no need to prepare the base ceiling. The installation itself is quick and easy, without a lot of debris. Furniture during installation is not required to be taken out.
- PVC film can withstand large volumes of water, which will save your apartment from being flooded by neighbors.
- Coatings can be mounted in any room (bathroom, kitchen, living room or bedroom), humidity does not matter.
- Ceilings can be installed after finishing the room without fear that your wallpaper or panels will be damaged.
- Cloths do not attract dust, do not support combustion, are harmless to humans.
- The stretch ceiling can be washed and cleaned with detergents.
- The durability of fabrics. The service life of such a ceiling leaves 15-20 years.


Ways of fastening stretch ceilings
When answering the question of how stretch ceilings are installed, it is impossible not to mention the various ways of attaching canvases. There are the following mounting options:
- harpoon;
- clip-on;
- wedge.

The differences in the method of fastening are in how the canvas is fixed in the wall fastener - baguette. Moreover, a certain type of fastener is suitable for certain types of canvases.
Harpoon mount
Using a harpoon mount, stretch ceilings made of pvc film are installed. This is due to the fact that only on PVC films can a small thickening around the perimeter, called a harpoon, be made at the factory. For installation by this method you will need:
- aluminum or plastic profiles for wall mounting with a groove for a harpoon (baguettes);
- pvc canvas with a harpoon at the edges.
Fastening occurs as follows: first, baguettes are attached to the walls along the perimeter of the room at the desired height. Then a harpoon on a film is inserted into the groove of the baguettes and snapped into place. It turns out a reliable fixation of the canvas. By the way, the baguette can be mounted on drywall constructions.

Clip fasteners
Do you want to know how fabric stretch ceilings are installed? Yes, using a clip connection. The difference between a clip baguette and a harpoon fastener is that it is a single element without additional clamps. Plastic for such a baguette is very durable. It is able to withstand heavy loads. The method is named in the same way as the well-known brand of Clipso canvases, for which the baguette was invented.
The canvas is inserted into the fasteners and securely fixed thanks to the clip lock. Such a fastening scheme has one indisputable advantage - the canvas can be inserted into the fastener and pulled out as many times as necessary. This is especially useful for fabrics. After all, they are mounted without heating, which requires a good stretch and straightening of the panel.

wedge fastener
To understand how stretch ceilings are installed using a wedge connection, take a look at the photo below. For fasteners we need:
- U-shaped baguette made of aluminum;
- wedge;
- wooden or plastic fixing bar.
The essence of the method is as follows: the canvas is inserted into the groove of the baguette and fixed there with a wedge. Then the excess web is cut off, and the groove with the wedge and the baguette are closed with a plastic insert. This insert performs additional fixing functions. This installation method is the easiest and most affordable for self-execution.

Taking measurements
Before stretch ceilings are installed, measurements of the room are performed in order to determine the required dimensions of the canvas. To properly perform this procedure, you must adhere to the following recommendations:
- If your room is rectangular in plan, then you need to measure not only its length and width, but also any of the diagonals of the room. This is necessary for the reason that the angles in the room are not always equal to 90 degrees.
- If the room has a complex polygonal shape, then in addition to measuring the lengths of the walls, the distances from any corner to all other corners in the room are measured.
- Before installing curved stretch ceilings, they build a diagram of the room on paper. There are two options for drawing a diagram. 1st: the ceiling is broken by a conditional grid with the same cells. Then, on these squares, a curved ceiling line is drawn on paper on a scale. 2nd: conditional chords are built to the curved ceiling line. Then all sides of the resulting triangles are measured.

Taking ceiling measurements
Tip: if the room has a very complex shape, it is better to measure distances not from one corner, but from several. Thus, the diagram will turn out to be a room divided into many triangles with measured sides.
Surface preparation
Although we wrote a lot about the fact that before installing stretch ceilings, preparation of the base ceiling is not required, there is still something to be done:
- Remove loose plaster from the surface of the old ceiling so that it does not damage the new stretch ceiling after falling.
- If stretch ceilings are installed in rooms with high humidity, it is better to treat the base ceiling with an antiseptic solution. This will prevent the formation of fungi.
- Take care in advance of the new wiring for the lamps, as well as places for their attachment.

How to install stretch ceilings: sequence
After we figured out the fasteners, it remains to find out how stretch ceilings are installed, or rather the exact sequence of actions. As you already understood, there is some difference between the installation of fabric sheets and PVC film sheets. The most difficult installation process occurs with pvc films, since their preheating is required.

To install the ceiling, you will need the following tools:
- heat gun;
- gas cylinder;
- drill;
- screwdriver;
- laser level;
- roulette;
- putty knife;
- square.

Stretch ceilings are installed in the following sequence:
- First you need to decide on the place of attachment of the baguette. To do this, it is necessary to indent from the base ceiling at a certain distance (for fabric sheets 1.5 cm, for PVC film sheets 4-5 cm). We work with a laser level.
- Then, along the marked lines, baguettes should be fixed for the fastening method we have chosen. To do this, we drill holes along the line on the wall and hammer dowels into them. We fasten the baguettes with self-tapping screws. We install fasteners every 20 cm.
- Do not forget to lay the wiring and make the attachment points for the light sources.
- Next, we lay out the canvas in the center of the room and, using special clamps, fasten one of its edges in any corner of the room.

- In the same way we hang other corners of the canvas.
- Warm up the heat gun. The canvas should warm up to 40 degrees.
- After that, they begin to insert the canvas into the baguettes. Stretch ceilings are installed from the middle of the baguettes, moving towards the corners.
- When the canvas is completely fixed in the baguette, ceiling plinths are mounted, which cover the installation site of the baguette.

How to install the canvas
Interesting information: a canvas with a harpoon mount in a rectangular room can be installed in 2 hours. It may take 6 hours to install a fabric web in a large room. The installation time of a two-level ceiling may be longer, because the amount of work is significant.

Cutting the canvas
Rules for fastening baguettes
How to install stretch ceilings, we have already figured out. However, there are some nuances that will be useful to you in the process. In addition, our tips will help you during the installation of profiles:
- When choosing between aluminum and plastic profiles, give preference to a more durable aluminum baguette.
- If you want to get the minimum distance from the base to the stretch ceiling, you can mount the baguette to the ceiling. Otherwise, the mounting profile is mounted on the walls.
- If you want to install built-in lighting fixtures, then at least 7 cm should be retreated from the base ceiling.
- The largest allowable pitch of self-tapping screws when attaching a baguette to solid walls without plaster is 20 cm. If the walls are thin and have a thick layer of plaster on them, the pitch is reduced to 80 mm.
- Since the cooled pvc sheet gives a load on the walls of 70 kg / r.m., you should not fasten baguettes to thin partitions. In this case, you should choose a ceiling mount.


Rules for mounting canvases
Usually, before stretch ceilings are installed using a heat gun, flowers and animals are taken out of the room. This is due to the fact that the air warms up to 40 degrees. In addition, during installation, you should adhere to the following rules:
- For mounting canvases with harpoon fastening, it is convenient to use a special spatula or spatula with rounded corners.
- During the installation of PVC, the canvas must be constantly heated with a heat gun. Otherwise, it will quickly cool down and lose its elasticity.
- Stretch the PVC fabric from the middle of the baguettes to the corners of the room.
- When installing fabric sheets, a heat gun is not needed.
- Fabric canvases are inserted into the baguette from the corners to the center.

Rules for installing luminaires in stretch ceilings
How stretch ceilings are installed, you already understood. But what ceiling will do without lamps? The process of installing lighting fixtures in a stretch ceiling is as follows:
- On the base ceiling, places for fixing fixtures are pre-made.
- After that, reinforcing rings are glued to the film in the area of the places where the fixtures are attached.
- The canvas is neatly trimmed along the inside of the rings.
- The wires are taken out into the resulting hole and connected to the lamp.
- Then the lamp is fixed on the site and adjusted.
- Heavy lighting fixtures are mounted on special hooks in the base ceiling.

For high-quality installation, knowing how to install stretch ceilings is not enough, because one inaccurate detail can ruin the whole thing. A certain experience and skill in handling a gun is needed, which give knowledge of many nuances that are useful in this matter. However, with our tips and helpful tips, you can act like an experienced craftsman. So, before installing stretch ceilings, take into account the following tips:
- The cylinder for the gas gun used in the process of installing a stretch PVC ceiling must be with an unexpired expiration date.
- Make sure that the heat gun does not blow into the place where the cylinder is.
- Do not fill the cylinder more than 80%.
- Give preference to translucent composite cylinders. It is easy to see the gas level in them.


An interesting video on how stretch ceilings are installed:
T Now you know how stretch ceilings are installed. However, if there is some self-doubt, choose fabric canvases for installation. They are denser due to the texture of the fabric, so they are more difficult to damage for inexperienced craftsmen. In addition, the installation of fabric sheets is carried out without the use of a heat gun.
Stretch ceiling technology was developed in Europe for interior decoration. In fact, a stretch ceiling is a thin membrane-panel stretched over a solid frame-profile. The shape of the installation is determined by the profile, the general appearance depends on the panel itself, which is made in any color, finish and degree of gloss.
Advantages of a stretch ceiling
The installation of a stretch ceiling consists in fixing a lightweight, durable film or fabric made from high quality material in a framing structure that will keep the panel taut. According to the material of the panel, stretch ceilings are fabric or made of polyvinyl chloride (PVC) film.
- Plain weave fabric looks like a canvas and can be made using seamless technology up to 5 meters wide. B O Larger widths will require stitching the canvases or using a special dividing profile. The fabric is made from polyester and treated with a special polyurethane coating. Such material is lightweight - one square meter of a fabric panel weighs from 180 to 250 grams. The thickness of such a canvas is 0.35–0.44 mm.
- At PVC films many more color options, it can be matte or reflective, layered and include decorative lighting elements. The thickness of the film membrane reaches 320 mm, the width is less than that of the fabric web and reaches 2.5 meters. Wider panels are welded, forming an almost imperceptible joint. Often a printed image is applied to the material. An illuminated ceiling can give the impression of a starry night, a stained glass window, or a southern sunny sky. Such a panel is modern and high-tech, it will retain a fresh glossy look for many years.
Stretch ceiling is an environmentally friendly design with waterproof, dustproof, anti-allergic properties. The material is non-combustible, easy to clean, allows repainting in the future and the additional installation of sound-absorbing materials.

Mounting profiles for membranes are created in various shapes, including rectangular, oval, curved, three-dimensional. The web tension profile is usually made of rolled aluminum or PVC with a special fastening system that ensures a smooth, wrinkle-free tension of the membrane. A 3D ceiling will require the installation of a specially designed curved frame. The flexibility of mounting such a ceiling gives freedom for the realization of creative abilities, allowing you to create an arbitrary design.
Stretch ceilings are suitable for installation in rooms from living rooms to large commercial centers. Such ceilings have a thermal insulation function, forming a layer of air insulation in the ceiling space, thereby reducing the heating and cooling needs of the room. Modern technology improves indoor air by preventing dust and bacteria from settling on gypsum or concrete ceilings, justifying the demand for such ceilings in medical facilities.
Another advantage of this design is that it improves the acoustics of the room.. The canvas after installation can withstand significant loads without breaking - up to 100 kg per square meter. If the membrane is stretched by an external force (for example, water has accumulated from a broken pipeline), it will completely restore its shape after the external load is removed.

Characteristics of stretch ceilings in comparison with other types of ceilings are shown in the table. Given the short installation time and the lack of specific installation equipment, the stretch ceiling can be installed by hand.
Table. Comparison of stretch ceilings with other types of ceiling structures.
| Characteristic | Stretch ceiling | Paneling | Suspended ceiling | Plasterboard sheathing | Boarding |
|---|---|---|---|---|---|
| moisture resistance | Yes | Not | Not | Not | Yes |
| Installation time (20 sqm) | 2 hours | 4 hours | 15 hours | 20 hours | 5:00 |
| Room height loss | 2.5 cm | 1.5 cm | 10 cm | 5 cm | 5 cm |
| Update | Not required | 2–3 years | 3–4 years | 2–3 years | 3–4 years |
| Life time | 10 years | 3 years | 2 years | 15 years | 3–4 years |
| Multi-level capability | Yes | Not | Not | Yes | Not |
Choice of fixing profile for PVC film
The choice of frame for stretching PVC film is determined by its size and thickness. Several different profile types can be used.
Stretch ceiling prices
stretch ceiling


Types of profiles for the frame under the stretch ceiling: 1 - Universal aluminum profile, 2 - Wall-mounted aluminum profile, 3 - Ceiling aluminum profile, 4 - Dividing aluminum profile
The listed profile types use the so-called harpoon fastening of the panel, which requires preliminary welding of the ceiling membrane with a special clamp.
When installing a stretch ceiling yourself, you will have to use other types of mounting profile with wedge or bead fastening or order welding with a harpoon fastening from a PVC film manufacturer.

When choosing the dimensions of the panel, it should also be taken into account that the PVC film stretches up to 6% during installation. This ensures that the ceiling remains flat and does not sag.
Prices for fabric stretch ceiling
fabric stretch ceiling
Read on for all of this. You may also be interested in material about which ceiling is better -.
Choice of fastening profile for fabric web
The fabric ceiling is produced in the form of a wide-format panel, the weight and elasticity of which differ from the properties of PVC film. Therefore, to install such a ceiling, a different type of frame is needed. Most often, two types of profiles are used for fabric stretch ceilings.
- Plastic AP profile used for linear perimeter sections and provides a very thin air layer between the membrane and the ceiling slab (1 cm). This profile guarantees the stability of the panel in case of drafts and gusts of wind. The profile is attached with the wide side to the ceiling and may have a thin plastic part on the wall side of the profile, which seals the space and prevents the accumulation of dust, moisture and bacteria.
- Plastic AM profile used when extra space is required between the membrane and the ceiling. The height of such a profile is 30 mm. One of the most common uses for this profile is for additional acoustic isolation of a room using sound-absorbing materials.

The fabric web is prepared 10-15 cm larger than the ceiling width and fixed in the grooves of the profile without a harpoon using a special plastic wedge or glazing bead. Excess fabric is carefully trimmed after mounting the entire panel.
Preparing for installation
Installing a stretch ceiling does not require much effort. The only prerequisite for the preparation of premises - electrical wiring must be completed prior to ceiling installation. The location of the fixtures can be marked with a marker on the floor below the corresponding position of the lamp on the ceiling.
Stretch ceiling kit prices
stretch ceiling kit

The ceiling slab, which will be located behind the membrane, does not require additional processing. Finishing work after installation is also not needed, since the ceiling does not require the use of adhesive materials, plaster or painting. If there is furniture in the room, it is better to remove it when installing a PVC ceiling, since the room will heat up to at least 40 degrees, which can adversely affect the condition of some materials.
Installation of a stretch ceiling will require the use of some construction equipment.
- Spatula or spatula for attaching the ceiling panel to the profile - you may need several spatulas of different shapes.
- Mounting profile along the length of the perimeter of the room.
- Clamps according to the number of corners in the room for the initial stretching of the panel.
- Perforator, screwdriver and self-tapping screws for fixing the profile on the wall or ceiling.
- Stepladder providing height access to the ceiling.
- Level, water or laser, for marking the location of the mounting profile.
- Air heater (only for PVC ceiling) - ceiling installers bring a heat gun and a gas bottle to work it. When installing the ceiling yourself, you can use a room heater to heat the room and a hot hair dryer to smooth out wrinkles on the canvas.
- Mounting PVC rings are used to strengthen the ceiling panel around pipes, fixtures and other utilities.

It is recommended to provide ventilation grilles in the stretch ceiling panel, which will provide ventilation in the interceiling space and protect this area from condensation and mold development. The location of the ventilation grill is usually chosen in an inconspicuous corner of the room.
Profile and panel preparation
Before direct installation of the ceiling, it is necessary to prepare a profile for attaching the panel.


Video - Preparing the room before installation
Installation process
As a rule, the entire installation process takes about two hours and leaves no debris. The essence of the installation is to tension and fix the membrane to the attached profile.

Installation of fixtures
Light fixtures, fans and other objects hanging from the ceiling should have an independent suspension mechanism that is attached to the ceiling plate so that it does not rely on the support of the tension web. A stretch ceiling is an interior design element, not a structural component.
To decorate the lamp you will need:
- mounting PVC ring;
- cyanoacrylate glue;
- sharp knife.
After installing the ceiling, it is necessary to make holes for lighting fixtures. If there are several lamps, it is better to make projection markings on the floor directly under the lamps in advance. Apply glue to the mounting ring and stick it to the film in place of the lamp so that the centers of the ring and the lamp coincide.
Prices for ceiling lights
ceiling lamp

Installation of fixtures in a stretch ceiling
After the ring has bonded to the film, carefully cut the film inside the ring. Adjust the height of the lamp so that it is at the level of the ceiling panel and screw in the lamp. Use conventional lamps with a power of not more than 60 W or halogen lamps up to 35 W to avoid strong local heating and deformation of the panel in the luminaire area.
Video - Installation of a stretch ceiling
They have long ceased to be considered a luxury, but five or six years ago it was an expensive pleasure. In addition, the installation technology was kept secret by the masters. Today, almost any beginner in this business can do it with his own hands.
This article details the rules for the calculation and installation of polyvinyl chloride film (PVC). Glossy and matte ceiling paintings have an affordable price, and a wide color palette of the produced material will help transform the interior of any home.
In addition, the PVC ceiling membrane will protect the room in case of flooding from above. It is easy to remove water from under the ceiling, and the canvas, after warming up, will take its previous shape.
Stretch ceiling installation technology
With my own hands determined by the following action plan:
- Measurement and calculation of the ceiling canvas and accessories
- Installation of wall profile - baguette
- Installation of lighting wiring and installation of fasteners for chandeliers and spotlights
- PVC fabric stretch
- Installation of lighting devices

PVC ceiling will protect the apartment from the flood
Do-it-yourself measurement of stretch ceilings is a very responsible operation. It will require maximum precision and diligence from you. First of all, take a blank sheet of paper and draw a plan of the room (top view) on it. Be sure to display all the protruding parts (pilasters) and recesses (niches, bay windows).
Label each corner with a letter of the Latin alphabet, starting from the lower left corner (A, B, C, D ...). Measure all the walls of the room and transfer the dimensions to the drawing. Be sure to measure the diagonals. Also list them on paper.

PVC stretch ceiling fasteners are made on a special profile or harpoon-type baguette. A flexible harpoon is welded to the edge of the ceiling cloth. Getting into the groove of the baguette, the harpoon clings to the protrusions of the walls (like a harpoon or a fishing hook).
The baguette is made of aluminum or plastic. The length of the rail is 2 m. To calculate its quantity, you need to add the length of all the walls of the room.

Baguette installation
This procedure is no less responsible than measuring the ceiling. It depends on how firmly the fastening is made, whether it can hold the tension of the web or not. Before installing the wall profile, the walls are marked.
It's important to know! The stretch ceiling can be lowered 3 cm from the existing ceiling. If point lighting devices are used, then the level of the canvas is lowered by at least 12 cm.
Marking is conveniently performed using a laser level. If it is not there, then the usual water will come off (a transparent hose with two graduated flasks filled with water).

According to the marked marks on the walls, the horizon of the future ceiling is beaten off. This can be done with a painter's tape (a cord with blue in a plastic case). The marking is over, the baguette is attached to the walls with dowels and self-tapping screws. The fastening interval should be no more than 10-15 cm.
At the joints of two baguettes, the fastening step should be no more than 2 cm. If a baguette was trimmed, then this place must be cleaned of burrs with a file or sandpaper.

Important to remember! It is impossible to dock a baguette in the corners. All joints are transferred to straight walls. In the corners, the baguette is cut on one side and bent at the required angle.
Wiring and lighting fixtures
To install the chandelier in the center of the room, you can use a mounting hook. To do this, a hole is punched in the concrete floor with a perforator and a piece of reinforcement with a diameter of 10 mm and a length of 20-30 cm is inserted into the void of the slab. A chandelier hook will be hung on it in the future.
You can also use self-tightening anchor bolts with a hook. If the chandelier is a consignment note, then a plywood embedded part must be placed in the place of its fastening. On a rectangular piece of plywood 10 mm thick, direct hangers for a plasterboard ceiling are attached at the corners.

The hangers are bent in the form of the letter L to the desired height and fastened with dowels to the ceiling. Then, after stretching the fabric, the chandelier is mounted, but more on that later.
The wiring is placed in a plastic corrugated sleeve and fixed to the ceiling with clamps. At the points of connection of lighting points, loops of wire 25-30 cm long are released. Adjustable racks of spotlights are also mounted to the ceiling with dowels.
Stretch ceiling sheet
The room is heated with a special gas (propane) gun. The temperature is controlled by a household thermometer (it must be at least 60 degrees C). It is recommended to remove fusible plastic products, live plants and an aquarium from the room.
Previously, the canvas is laid out on the floor, and then it is fixed with clips (crocodiles) in two opposite corners. The first corner is basic (it is marked in the instructions that come with the canvas). The heated canvas is filled with a spatula into the groove of the baguette until the harpoon clicks, catching on the protrusions of the walls. Below is a diagram of the filling of the ceiling cloth.
When the canvas cools down, it will stretch and it will be possible to mount lighting devices. The location of the chandelier or the anchor hook is groped by hand and a plastic thermal ring is glued in its place with special glue. After 4-5 minutes, a film is cut out inside the ring with a sharp knife and a loop of lighting wire is removed.

The chandelier is hung on a hook and connected to the power supply. After that, the chandelier cup is fixed under the stretch ceiling. For an overhead chandelier, a large thermal ring is glued, and after removing the film, the mounting plate of the chandelier is fixed to the plywood with self-tapping screws. The installation is completed and if you have any questions, then in this video the installation of a stretch ceiling with your own hands is shown in great detail.
The first thing you need to learn is that you can’t do without preparatory work. However, if you plan to spoil the canvas, and at the same time the fine finish of the walls, furniture and other contents of the room, we cannot forbid.
In the event that such a development of events is not included in your plans, we suggest proceeding as follows.
- 1. Be sure to remove furniture from the room- it can be damaged during air heating with a heat gun;
- 2.
Carry out preliminary work with the walls. Depending on what kind of fine finish you want, level and plaster them or install drywall boards.
Attention: In the latter case, the corners at the top of the room should be even, not rounded. - 3. Carefully clean the ceiling from the old finish: remove whitewash or traces of wallpaper, remove dirt and dust.
- 4. Required treat the floors with a primer- it will prevent the development of fungus and mold even in case of high humidity in the room.
- 5. Wire.
Careful observance of all recommendations will allow you to quickly and efficiently install a stretch ceiling, without spoiling anything. After making sure that the room is ready, make a list and go to the hardware store - it's time to stock up on tools!
Tool selection
It is best to take care of everything you need in advance - there is less chance that something will be forgotten and you will have to hastily look for the item in the surrounding shops. To carry out work on the installation of a stretch ceiling, we use the following tools:
- Roulette;
- Pencil;
- Hammer;
- File;
- Hammer drill with a vacuum cleaner (read more about it below);
- Screwdriver (or better even two);
- Holder fasteners on hand;
- shoulder blade;
- Hacksaw for metal (or grinder);
- Pasatizhi;
- Ladder;
- Laser axle builder with a bar to which it is attached;
- Suspensions for the ceiling canvas (“crocodiles”);
- Thermal gun (+ propane tank).
Draw your attention to: You can replace the gas heat gun with an electric one. Focus on which device is more convenient for you to work with.
We have decided on the tools, now let's study the installation of stretch ceilings from “A” to “Z” in our step-by-step photo instructions with video explanations.
Stage 1. Marking
If you want to get a smooth canvas, then you cannot do without this item. Marking - a preliminary outline with a pencil of the desired level of stretch ceiling. We suggest using laser axis builder- it is the most accurate and virtually eliminates errors. Shall we start?
1. First of all, decide where you plan to place the baguette. Everything is quite simple, given two nuances:
- The height of the laser from the ceiling should be at least 5 centimeters. If you leave less, then the work of the puncher will be difficult.
- Step one centimeter down from any of the protruding ceiling elements. In our case, this is a junction box.
2. Set up an axle builder to a certain height.
You can do without a telescopic rod. For example, your partner will hold the axle builder, and at this moment you will circle the laser beam with a pencil. But, frankly, this method cannot be called convenient and accurate.
Having finished with the markup, we begin the next stage of work.
Stage 2. Installation of a baguette
It can be called one of the key ones - if you make a mistake in installing the baguette, fix it unevenly, then the canvas will deform or even tear.
Let's look at an example on the outer corner:
- 1. To begin with, we take a measurement with a tape measure.
- 2. Set aside it on an aluminum profile.
- 3. Hacksaw or grinder in a special way cut baguette. How exactly to do this, see this video.
Note: The inner corner should have one undercut, and the outer corner - three, with a distance of 10 mm from the measurement line in both directions.
4. We clean all cut edges with a file. This is necessary for the preservation of the canvas.

5. Bend the corners. In the end, you should end up with something like this:


Tip from an experienced: a rotary hammer paired with a vacuum cleaner is a really practical and very convenient solution for repairs. Simultaneous drilling and suction of construction dust will save you a lot of cleaning time and your health.
7. It remains to drill holes, insert dowels there and fix the baguette itself with the help of screwdrivers and self-tapping screws.
8. We continue to work in the same spirit, installing a baguette around the perimeter of the room.
We pay special attention to the joints, they should turn out to be as even as possible, like in the photo:

Attention: Before starting work, you need to decide on electrical wires. You need to know exactly where they are. Usually the wiring goes strictly vertically along the walls to the sockets from the floor, and to the switches from the ceiling.
But there are exceptions. Therefore, the places where you assume that you have wiring, the baguette should be made approximately according to this pattern:

One little secret: If you are unable to secure the baguette in the standard way, then you can resort to a trick that will help you press it against the wall. Fix a small bar (10-15 centimeters) on the ceiling, perpendicular to the baguette. Then carefully attach it to the joints.

In order not to damage the ceiling fabric during tension, tape all joints as follows (see photo below). You will need a spatula. Gently glue the adhesive tape to the joint, and then align it with the flat side of the spatula, removing the smallest air bubbles. We fill the edges under the baguette.

Let's look at the result of the second stage. You should end up with something like this around the perimeter:

- The high flexibility of PVC baguettes complicates installation;
- They can be deformed when the web is heated with a heat gun;
- If the profile is rigid, then there is a risk of breakage during installation;
- Durability is questionable: if an aluminum baguette will serve you for 20 years, then PVC will have to be changed along with the canvas in 5 years.
Stage 3. Preparation for lighting installation
After fastening the baguette, we proceed to install platforms for chandeliers or lamps. Plastic platforms look like this:

And you need to make the following structure out of them:

To do this, you will need the so-called pawns, which are often used in the installation of plasterboard ceilings.
We drill a hole with equal indents and fix the platform.

When you install all the structures, it's time to move on to the most important thing - the installation of a stretch ceiling.
Stage 4. We stretch the canvas
It’s worth starting with the installation of “crocodiles”, which are hung at the four corners of the room,

to cover them.

When unpacking the canvas, pay attention to the location of the harpoon (a solid strip along the perimeter of the canvas, which will be attached to the baguette). It must be placed folded into the room.

Thereafter start warming up the room using a heat gun - this is done to stretch the canvas, as well as to soften the harpoon (which is also made of PVC, only more dense).

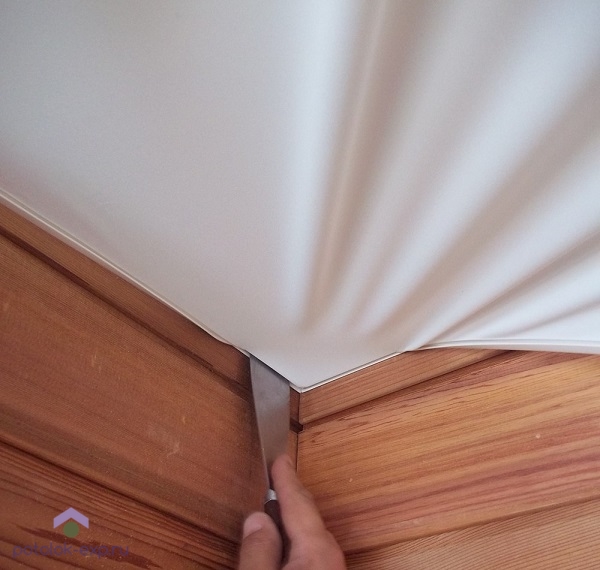
When the room is warm enough, with the help of a spatula, we begin insert the harpoon into the baguette.
Attention: you need to start from the corners (!), And then go around the perimeter.

This technology of fastening stretch ceilings is called harpoon baguette.
Let us clarify that in addition to it, there is another type of installation - beading, when the strips are initially made larger than the ceiling area. In this case, preheating is not needed, but...
- 1. If the master did not hold on to the canvas during installation, after six months the coating may wrinkle.
- 2. Operation of the ceiling. In the baguette-harpoon technique, you can always remove the ceiling to get to the same unsoldered box or wipe the stain after the flood from above. In a glazing bead, if you remove the ceiling, you will have to buy a new canvas. More differences can be read in this.
As you can see, there is nothing particularly complicated. Let's move on to the final stage.
Stage 5. Final work.
After the canvas is stretched and fixed, you only have to deal with two points:
- cut through openings for chandeliers or lamps;
- arrange a decorative insert around the perimeter of the room (this is not about a ceiling plinth, but about a masking tape that allows you to hide the joints near the walls).
Let's start with lighting. To make a hole in the ceiling, you will need special plastic rings that must be glued to the canvas.
For this:
- 1. find the center of the hole of the previously fixed platform;
- 2. coat the surface of the ring with glue;
- 3. and glue it so that the marked place on the ceiling is exactly in the center of the ring.

When the glue dries, cut a hole around the inner perimeter.

Important: Keep in mind that rings and platforms can be of different diameters. Their choice depends on what type of chandelier or lamp you want to hang.
It remains only a decorative insert around the perimeter. There is nothing complicated - carefully lay it along the joints with a construction spatula.

The only thing to add here is: insertion corners would not hurt to glue with white silicone. This will ensure a secure grip on the canvas.
By the way, you can see the whole process described above in this cool video. Be sure to look.
Features of the installation of fabric stretch ceilings
Fabric webs have a different structure and, accordingly, this affects the technology of their installation.
If we talk about what is the difference between the process of installing fabric stretch ceilings from PVC, then there are a number of features:
- Clip fastening system. Fabric stretch ceilings are mounted on special plastic profiles - “clothespins” or “clip”. In these profiles, a narrow groove is provided, into which the canvas is tucked with a special spatula. At the same time, after refueling, there are always extra ends of the “fabric” that are cut off. Nuance: if you need to remove such a canvas, then you will not be able to install it back.
- The canvas is stretched without the use of a heat gun or any room heating. On the contrary - fabric ceiling shrinks when heated. Therefore, it is better to have a building hair dryer on hand. It can be useful for smoothing out small folds that sometimes form in the corners during installation work.
- Filling order. Unlike PVC, the fabric web is first tucked in the center of the wall (usually the one by the window), gently straightened and fixed in the center of the opposite wall. This technique makes it possible to center the canvas, which is especially important if it has patterns or photo printing. The process of maximum stretching itself may involve repeated “tightening” of the web (during installation, and not subsequent operation).
- Since under the “fabric” in most cases plastic rather than aluminum baguettes are used, it is recommended to additionally glue them with liquid nails before installation.
- Cutouts for lights can be done without reinforcement (strengthening) with glue. Such a ceiling is an order of magnitude stronger than PVC in terms of the rigidity of the stretched surface. The products of Descor (cheaper, Germany) and Clipso (more expensive, France) have proven themselves especially well.
Preparatory stage, marking and fastening of baguettes - All these actions are performed on the same principle. and the sequence that we described above for PVC ceilings.
How to independently install fabric stretch ceilings is well shown in this video.
Security measures
Despite the ease of installation of stretch ceilings, it must be borne in mind that working with a heat gun requires extra care. Especially if you decide to choose a gas model.
- On each gas cylinder you will find two dates. The first - the date of its manufacture, the second - indicates when it is necessary to take the cylinder for inspection. This can be done at most repair services for such equipment. Remember that failure to meet these deadlines can result in an emergency.
- Before starting work, check the integrity of the connection of the cylinder, hose, terminals and heat gun. This must be done to prevent gas leakage into the room.
- If refueling is necessary, in no case do it yourself - contact special workshops where this will be done in compliance with all technical standards.
- Check the correctness of the equipment. At the slightest suspicion of a breakdown, it is better to take it for inspection.
- Important: Never leave gas cylinders near heating sources and do not point a thermal gun at them.
- Even if you do not have enough length of the hose, do not try to increase it yourself - this may violate the tightness of the structure. It is better to spend the extra money and buy a new one.
We are sure that our visual instruction helped you figure out how to install a stretch ceiling with your own hands - there really is nothing complicated about it.
If you have any questions or want to read about the installation of structures more complex than a single-level canvas, study this one.
Even if an impeccable repair has been made in your house, taking into account all fashion trends, and the ceiling has remained twisted and crumpled with uneven whitewashing, the entire aesthetic appearance of the room will approach zero. By installing stretch ceilings, you will get rid of the annual obligation to whitewash them, and they can also become temporary insurance against a small flood caused by upstairs neighbors. Do-it-yourself installation of stretch ceilings is quite realistic to implement without hiring specialists for this.
Preparatory stage before installing stretch ceilings
Before starting work, it is necessary to carefully examine the ceiling. Everything that pours from it or can crumble, fall off, must be eliminated in order to avoid deformation of the new coating in the future. Unlike fixing ceilings in an apartment, their installation in private houses can be complicated by the presence of wooden floors, due to which some irregularities are formed. So that the stretch ceiling does not inflate and the wind does not walk in it, all holes and cracks should be covered with mounting foam. Also carefully check if there are empty spaces between the ceiling and walls, if they are still present, they must also be eliminated.
The ideal conditions for installing stretch ceilings are an empty room without furniture. If there is no possibility to completely free the room, then at least small household items and household appliances must be taken out. Make access to the walls as free as possible by moving the furniture closer to the center. Everything that remains must be covered with a protective film. We put sheets of cardboard on the floor to avoid scratches.
The wiring must be attached to an existing ceiling so that it does not touch the new one.
Before warming up the room (required when installing a PVC ceiling), it is advisable to remove the sloping corners from the plastic windows (if any).
Necessary tools and accessories for ceiling installation
These include:
- screwdriver;
- perforator;
- measuring device (tape measure);
- level (laser or water);
- a heating device (a heat gun or a special hair dryer designed for construction work);
- shoulder blades (angular and straight);
- ceiling sheet and profiles (plastic or aluminum).
Additional accessories for stretch ceilings: decorative inserts (can be of different colors); special clothespins-clips; glue, plastic rings for lamps, various clamps.
So, we go directly to the question: "how to make a stretch ceiling."
Installation technology of stretch film ceilings
With the help of a level, we make markings, immediately applying a special thread. Thus, even lines around the perimeter should be formed, to which pre-drilled profiles are applied. When choosing a material for profiles, aluminum should be preferred, as they will last longer.
Next, we make marks on the wall, focusing on the drilled holes in the attached profiles. According to the marks, we begin to drill holes with a puncher (drill diameter is 6 mm). Then we attach the profiles with a screwdriver and self-tapping screws.

basic installation steps
Then the film for stretch ceilings is carefully unpacked in a preheated room (40-50 degrees). At the same time, make sure that there are no sharp objects nearby that could damage it. There is no need to panic if you see creases on the film, after a maximum of six months they will straighten up and disappear. The ordered canvas must already be adjusted to the size of the room, it must have a so-called base angle, from which the installation of the ceiling begins. We hang the canvas on hanging clothespins-clips pre-installed at the corners. It is important to make sure that the clips do not damage the film, for example, you can wrap them in some kind of soft material.
 We direct warm air from a gas gun onto the hung ceiling, warming it up to 70-80 degrees to make the vinyl film more elastic. Then, one by one, removing the clothespins, we fix the canvas in the profiles at the corners of the room using a special spatula. Only after the above procedure, we proceed to fix the straight sections along the walls. In order for the installation process to proceed evenly, it is recommended to first fix the places with seams, then divide the remaining unfixed sections in half and again attach them to the profiles. It remains only to pull and fix all the other pieces. We complete the process by attaching a special decorated rubber insert to the profile or gluing a foam baguette to the wall.
When the ceiling is installed, we glue a plastic ring to the place for installing the chandelier (or other types of lamps) and carefully cut a hole in it.
Features of installation of seamless fabric ceilings
A seamless ceiling, as you already understood, is characterized by the absence of seams on the canvas during installation. A huge plus of this type of installation is that you do not need to warm up the room. When installing a seamless ceiling, high-strength profiles are used, which are installed in the same way as for foil ceilings.
Installing a fabric ceiling is slightly different from installing a film coating. If it is desirable to start stretching a PVC ceiling from the corners, then a seamless ceiling, on the contrary, from the middle of the wall. Thus, at first some kind of cross should form, guided by which, it is necessary to stretch the remaining pieces - from the center to the corners. When stretching, you need to use a special spatula. We cut off the hanging edges with a knife.
Advice: If wrinkles have formed on the canvas, they can be easily smoothed out with a building hair dryer.
Video: instructions for installing a stretch ceiling in an apartment
The procedure for dismantling the stretch ceiling
Good reasons for the temporary removal of the ceiling covering can be faulty wiring, the accumulation of a large volume of liquid as a result of a flood "from above", damage to the canvas.
Dismantling the ceiling with your own hands will not be difficult. You just need to be extremely careful if you want to reuse the material. Before removing the ceiling itself, it is necessary to remove the decorative plinth.
To remove the PVC ceiling, you will need a familiar device - a heat gun. With its help, again, we warm up the film. Then, carefully and slowly, with pliers, we pull the harpoons out of the profiles, starting from the corner. It will be necessary to warm up the film coating all the time in different areas, while the dismantling process lasts, so that it does not lose elasticity and does not tear.
The dismantling of the fabric-based ceiling is simplified by the fact that it is not necessary to maintain a high temperature in the room. But there may be difficulties with the direct "pulling out" of the canvas from the profiles. Since the adhesion of plastic glazing beads to the profile will be much stronger than in a PVC ceiling.
With proper care, stretch ceilings will serve for a very long time, satisfying all the aesthetic whims of the owner of the house.
Video: installation of a stretch ceiling of complex shape

