Do-it-yourself gable roof for a bath. Roof for a bath: types, designs, roofing materials, construction technologies How to make a roof of a two-story bath
Depending on the linear dimensions of the bath and the wishes of the developer, the roof in the bath can be single or double sloped, flat or inclined. Most often, the version of an inclined gable roof is used; in terms of its operational characteristics, it is suitable for all climatic zones of our country, under such roofs it is possible to equip living attic spaces.

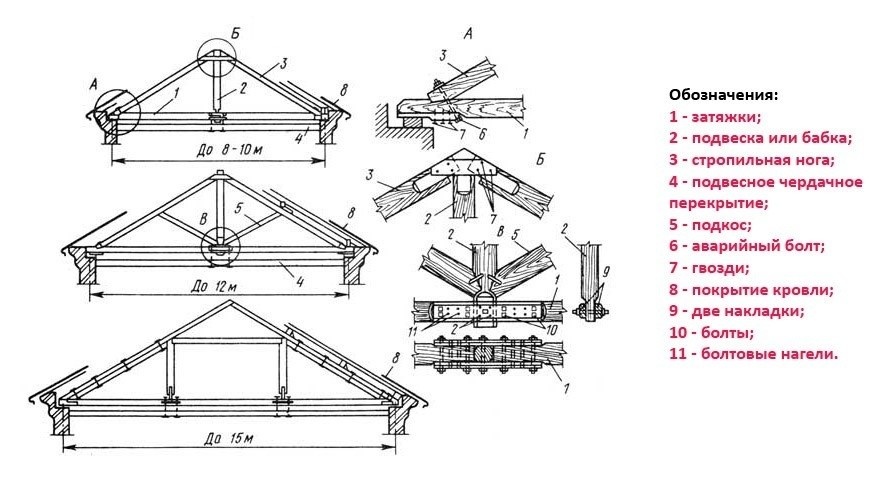
Gable roofs can be layered (often used on buildings more than six meters wide) and hanging. To increase the stability indicators, the layered type of roofs has additional rafter stops, hanging rafter systems have an emphasis only on the Mauerlat or ceiling beams (the option is rarely used), in the upper part of the rafters are held by crossbars. For example, let's take the most common option - hanging gable roofs.
 Hanging rafters
  Hanging rafters, spans from 13 to 17 m
  Types of layered rafters
  Types of hanging rafters
  Design diagram of hanging rafters
  Eaves node solution options
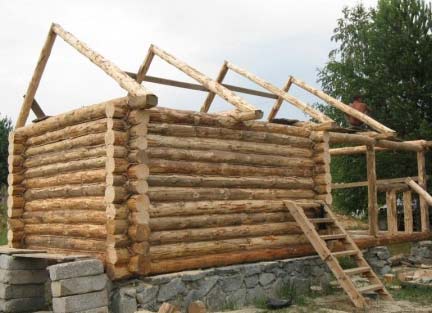
We will take into account that the dimensions of the bath are 5 × 5 meters, the bath is made of sawn timber, the upper row plays the role of a mauerlat. Hanging gable roof, no insulation.

Before starting the manufacture of rafters, you need to make preliminary calculations, with their help we will determine the angle of inclination and the parameters of the rafter legs.
The following loads act on the rafter system:
- permanent. The weight of the rafter system, battens and roofing. The weight of the roofing depends on the specific roofing material and is indicated by the manufacturer;
- temporary. Wind and snow loads, workers' weight;
- spontaneous. Earthquakes, hurricanes, etc. Natural loads during the calculations of the rafter system in our country are not taken into account due to the low probability of their occurrence.
When calculating the thickness and width of the rafters, the sum of the maximum values of all types of loads must be taken into account. In order to make the calculation technology clearer, you need to understand a little about the loads acting on each individual roof node.

The lower part of the rafter legs sits on the Mauerlats, the knot must take vertical and lateral loads. Crossbars work only for breaking, they perceive horizontal loads. The upper (ridge) part of the rafter legs must absorb horizontal compression forces. The spans of rafters under load work in bending. We hope that this knowledge will help you choose the most reliable methods of fastening architectural elements to nodes.


If the weight of the roofing material is indicated by the manufacturer, then the wind and snow load must be calculated independently.
The figures depend on the maximum depth of snow cover in each region. A specific area of residence is determined from the map of snow loads, and the maximum effort is determined using the table.


 Correction factor table A - for open areas. B - for terrain with obstacles.
The region of residence is determined on the map, with the help of the table a correction factor is recognized, which depends on the height of the bath and its location.
To determine the load, the standard value must be multiplied by the correction factor.
For the Moscow region, the parameters of the rafters can be found in the table.

Practical advice: if it is difficult for you to make calculations on your own, remove the dimensions of the rafter system on already existing buildings of this type. During the calculations, an inclination angle of 20 ° was assumed.
Instructions for the manufacture of a gable rafter system
First, a few tips for choosing a material. For rafter legs, you can take boards of 50 × 150 mm, the step between the rafters is 90 centimeters, the slope of the slopes is 20 °. Choose only high-quality material, without deep cracks and bends.

It is very important - do not allow the presence of even healthy knots in the joints. To select a rafter system, you will need to carefully examine the lumber, the workpieces should be taken of increased length, taking into account the sections of unsuitable sections from the ends.

For rafters, use only the highest quality material
The maximum amount of preparatory work should be done on a flat piece of land; ready-made structures should be lifted onto the roof for fastening.

Temporary fixation of the rafter system should be performed with various substandard boards, they also need to be raised to the roof in advance.
Step 1. Check the Mauerlat parameters. Check the parallelism of the opposite beams of the Mauerlat, the deviation in parallelism should not exceed ± 2 ÷ 3 cm. Make sure that the fixing pins of the Mauerlat are installed correctly and at the required distances. Check the verticality of their position.

Step 2. Making rafter legs. For the size of our bath, six pairs of rafter legs are enough.
Important: if you have to make a large number of identical elements, be sure to make one template. Each individual marking gives small errors, which in total can amount to a significant amount. In addition, using a template greatly speeds up the work process.

For the rafter leg template, take 20 × 100 mm edged boards approximately 3 meters long. At the top, overlap them with one nail (the knot must be movable), nail a horizontal piece of the board to one board, it will serve as a crossbar template. The distance of the crossbar from the ridge is within 40 ÷ 50 centimeters. Fix the crossbar only on one board, it is nailed to the second after the angle of inclination of the rafter legs is selected.

Lift the template to the roof, temporarily place it on the intended place of installation of the rafters. Change the angle of inclination and the amount of removal, carefully watch that the skate is located exactly in the middle of the bath. Found the optimal place - nail the crossbar to the second board, strengthen the fastening of the boards and the ridge part with a few more nails.
Put the prepared template on the Mauerlat again and mark the place of the rafter joint. You can connect them in various ways, we chose the simplest one - using a support bar and metal corners.

Attach the strip to the template in place of the support bar.
Step 3... At the edges of the bath (in the place of the gables), nail in vertical bars 50 × 50 mm.


The height of the bars should be equal to the height of the rafter system, check their verticality, pull a strong rope or thread between them. Now a very important job - checking the template along the entire length of the bath. Install it in approximately one meter increments and observe the slope and position of the support bar. It goes without saying that the ridge should be on a thread. There were problems in size within one centimeter - it doesn't matter, these irregularities will be eliminated during the installation of the lathing under the roofing. If the variation in size is greater, you need to adjust the template in such a way as to achieve its optimal average performance. Everything is fine - carefully remove the template to the ground, if necessary, further strengthen all the nodes.
Board prices
construction boards
Video - Assembling the rafters
Step 4. Place the template on a flat surface with one rafter foot on it. Pay the main attention to the position of the ridge; if there are knots, cut them off. The overhanging part of the rafters can be leveled at the last moment before installation or after the complete installation of the rafter system.
The rafters in the ridge part can be connected in several ways.

The tenon is the most reliable, but in our case it is not suitable - the boards are too thin. We recommend using the joint at the half-tree ridge.

It will be easier for you to use this option for connecting rafters with a stop at an angle of 90 °. To exclude displacements on both sides, the assembly must be fixed with metal plates on the self-tapping screws, make sure that the self-tapping screws are not opposite each other, place them evenly over the area of the rafter legs.

You can make the top join even easier - butt-joint. But this is quite risky, too unstable design will eventually turn out. It is still suitable for climatic zones with a warm climate, but if in your zone the snow covers reach large values, and even there are often strong gusts of wind, then this method is not recommended.

Step 5. Make marks at the top and bottom of the rafters. In the upper part, you need to cut off at an angle, the connection will be butt. The cutting line must connect the upper and lower junction points of the template. It is very important - do not cut off two legs at once symmetrically, you need to remove the drawing on each leg from the corresponding side. This unit is connected on both sides by metal plates with a thickness of at least 2 mm. Make sure that the screws are not opposite each other, place them as evenly as possible over the rafter area.

Step 6. Using the template, determine the place where the rafter leg rests on the Mauerlat, fix the board that is stubborn to the Mauerlat in this place. It can be fixed from the bottom of the rafter leg on the edge of the board or from the side. This unit must withstand significant shear forces; use powerful self-tapping screws or bolts to fix the stop.

Step 7. Place the two prepared rafter legs on a level place, check their position and knot placement again with a template. Everything is fine - carefully remove the template from the boards to the side, fix the deadbolt in place.
 Components of a truss truss
  Assembling the truss
Pay attention that the upper ends of the rafters abut against each other over the entire cutting area. The upper (ridge) knot is considered the most loaded, it is affected by the greatest squeezing forces. Small gaps can still be trimmed, there are gaps of more than 3 ÷ 4 mm - you did the markup carelessly, you will have to cut the ends again. It is for such unpleasant cases that we recommended taking boards with a margin in length, otherwise we would have to use new material, and this increases the cost of the rafter system.
Fix the crossbar with an overlap to the rafter legs, for fixing you need to use long bolts or pins, the nuts are tightened on both sides. Two such bolts are enough for each leg.

Do not forget that the deadbolt works in compression, do not allow vibrations in the connections. In order to eliminate the risks of cracking the rafters during the installation of hardware, drill holes for them with a diameter smaller than the diameter of the stud (or bolt) by 0.5 ÷ 1 mm. The pin must be forced into the holes. The protruding part of the stud, the tightening field with nuts, must be cut off with a cylindrical grinder (grinder).
Prices for self-tapping screws
self-tapping screws
Video - How to cut the rafters at the right angle and the right dimensions
Step 8. Use the same scenario to prepare and assemble any remaining rafters. Place them in a stack on top of each other, check the sizes. Inspect all bearing assemblies carefully. Found problems - fix them immediately, do not postpone until later. Firstly, it is much more convenient to do it on the ground. Secondly, “later” can be forgotten.

The set of rafter legs is assembled, feed it to the roof and start assembling the rafter system.
Installation of the rafter system
All work must be done with the utmost responsibility, violation of technology or poor-quality connections will certainly make themselves felt. Repairs will have to be complicated and expensive.
Step 1. Fasten the outermost (gable) rafters. Temporarily fix them with scraps of boards. Carefully expose each leg along all the anchor points, take your time, check each size. Stretch the ropes over the skate and sides. It is better to pull the side ropes on the rafter overhangs, in this position they are easier to install.

Step 2. Mark the installation locations of the remaining rafter legs on the Mauerlat; the distance between them should be within one meter and the same.
Step 3. Carefully lift each rafter leg in turn, line it up and temporarily secure it with planks. The boards arrive both at an angle to each leg and between the already installed rafters.
Step 4. All rafters are pre-installed - check the correctness of their location and start fixing the nodes with metal corners and strips on self-tapping screws. The thickness of the metal is at least 1.5 mm. Do not skimp on corners, install them on both sides of the rafter legs. As a result, you should have a structure that is resistant to multidirectional loads. Trim the length of the lower part of the rafter legs, they should protrude beyond the perimeter of the bath by 30 ÷ 40 centimeters. The dimensions should also be adjusted to fit the stretched rope.
 Metal plates for joining rafters
  Fasteners for rafters
Step 5. Quite often, inexperienced builders make minor mistakes; during the installation of the rafter system, they take on a mutually reinforcing effect. This leads to relaxation, the structure weakly resists longitudinal ridge loads, the rafter system is a little wobbly. This problem is solved by installing corner stops from boards under the extreme (pediment) legs. The thrust boards, by the way, will further serve as a frame during the trimming of the pediments.

Diagram of the racks, which are the frame of the pediment and an additional jib
Depending on the type of roofing, lathing is made. For soft surfaces, you need to make a continuous crate of plywood, OSB or cheap unedged boards. You can also take edged boards, but such a crate will be very expensive.
Connecting plate prices
metal connecting plates
How to make a crate of a rafter system

Consider two options for the lathing: solid and slatted.
| Sheathing type | Description | Illustrations |
|---|---|---|
| Lathing from slats | Use slats 20 × 50 mm, you can also take unedged boards. The second option is much better: higher load-bearing characteristics, easier to nail the roof covering. The lathing must come from the bottom up, the distance between the slats depends on the specific type of roofing material. For ondulin, it is slightly larger, for profiled sheets or metal tiles, the distance can be made within 40 centimeters. Make two templates to control the distance between the gratings, use them along the edges of the battens. At the ridge, beat the crate into the bowl, the ridge part and the roof sheets will be fixed into it. From the side of the fronts, you need to beat off a straight line with a rope with a blue (chopping cord). The protruding ends of the rails are cut with a hand or electric saw. |
|
| Solid crate | Before starting work, you need to think about the optimal arrangement of plywood or OSB sheets. You need to choose such a position to minimize the amount of cutting and waste. Take your time, make a layout plan on paper. See how best to lay them on the rafter system - along or across. You need to start laying from the bottom, near one of the fronts, immediately align the position of the sheets. If the position is slightly different, move the sheets, a one centimeter gap between the sheets does not negatively affect the strength and tightness of the roof. From the side of the second pediment, the edges of the sheets will also have to be leveled under the rope with blue. |
|


The lathing is ready, you can start covering the roof with roofing materials.
It is not worth repeating how important the roof of the bath is and what consequences mistakes during its construction can lead to. We will give some advice to "novice" carpenters, this will help them feel calm during the entire period of the bath's operation.
The more complex the type of connection of the individual elements of the rafter system, the more reliable it is. For example, a tenon joint supports both vertical and horizontal loads, while a lap joint only works with vertical loads.
We described only the simplest methods of connection in the bearing nodes, taking into account that many developers do not have enough experience to perform complex connections. For such connections "feel free" to use additional fasteners (metal plates and corners, homemade wooden supports, etc.). Let you slightly "worsen" the appearance of the rafter system, but significantly increase its stability. In addition, no one but you will see the roof of the bath from the inside. And everyone will see the emergency.

Choose the lumber for your rafter system carefully. Try to avoid longitudinal connections of short rafters. The tree always dries out / swells a little, which leads to changes in linear parameters. And this, in turn, gradually weakens the connections.
If you have the slightest doubt about the stability of the hanging rafter system, install vertical headstock, struts, tightening, etc. The specific type of additional stops does not really matter, the main thing is that they give a positive effect. An ordinary ridge beam greatly increases the resistance of the rafter system to longitudinal loads.


Two boards with a thickness of 25 mm in bending strength significantly exceed the strength of a board with a thickness of 50 mm. Of course, with the same width. These are the laws of strength of materials, use them. Connect the boards to each other through spacers made of board scraps of any thickness. By the way, such "double" rafter legs are characterized by increased stability characteristics. As for the cost of the rafter system, it hardly changes.
 Overlapping rafters
 Self-tapping screws are excellent hardware. But only on one condition - they are not made in China. These "craftsmen" use very low quality alloys for their manufacture. Even a large diameter substandard hardware has very low physical strength characteristics. It is easy to check the quality of self-tapping screws - bend it at right angles, high-quality material must withstand at least three bends. The Chinese will crack, at best, on the second try.

If you haven’t come across a roof before, seek help from more experienced acquaintances. It is not necessary to call an "expensive" mother for help, it is enough for your assistant to work for him as an assistant. And the last thing. Always consider getting under the roof. This can be an opening from the dressing room or an opening window on the pediment. With their help, you will be able to carry out periodic audits of the condition of the rafter system and roofing. The sooner leaks or problems with the geometry of the roof are found, the easier and faster they are to fix.
 Roof lathing (supported by rafters) and gable window
  A window will be inserted into the opening. You can get to the roof by placing a ladder
 Staircase to the sauna attic
Video - Do-it-yourself roof for a bath
Video - Installation of rafters
Video - Installation of gables
Video - Installation of the roof (part 1)
Video - Installation of the roof (part 2)
The construction of a roof for a bath is one of the last stages of construction, which is designed to protect the building from climatic influences. The roof of a bathhouse can give a structure a personality, but more often than not, it is a simple structure that can be made with your own hands.
The finished project of a bathhouse with a gable roof
For those who wondered how to build a roof of a bath, it is necessary to carefully study all the nuances of construction, and then the bath will not only become an adornment of the personal plot, but also allow not to fear for comfort when taking water procedures.
The bath roof has two main elements:
- The rafter system, which is the power part of the roof.
- Decking, which is designed for the installation of protective elements (insulation and roofing materials).
It should be noted that some baths are built with an attic or attic. The presence of this element is optional, because there are options for the execution of baths with flat roofs without usable space under the roof. Whatever bathhouse is planned on the site, it is most likely that it will have a single-slope or gable roof.
 Wooden sauna project with a pitched roof
 In addition, there are roof options with four slopes, as well as more complex versions with multiple kinks.
Surely those who are thinking about how to make a bathhouse roof with their own hands are tormented by a choice: which is better, a single-pitched roof for a bathhouse or a gable roof. Let's figure out in which cases this or that option will be preferable.

Roof slope angle
As a rule, the angle of inclination of the slopes is in the range of 2.5 - 60 degrees. The steeper slopes help to better remove sediment from the roof surface. However, it is worth considering carefully the choice of tall structures if the construction is carried out in an area for which strong gusts of wind are the norm.
 Diagram of the structure of a gable roof for a bath
 For steppe areas, with a characteristic strong wind and little precipitation in winter, it is preferable to build a flat roof of a frame bath. In the northern regions, which are characterized by a large amount of snowfall, a high roof with a slope angle of 45 degrees is best for a bath. It should be noted that with an increase in the height of the roof, the cost of the structure being built increases, as well as the complexity of its installation.
Roof base
The support for the gable roof structure is the top floor or Mauerlat, fixed at the top of the building. Mauerlat is usually mounted on brick walls and walls of all kinds of blocks. When installing a roof for wooden baths from a profiled bar or a log house, recesses are provided in the upper crown of the structure for mounting floor beams.
 An example of a roof base for a timber bath
 It is worth noting that the floor beams can go beyond the boundaries of the log house, however, there is a rule: the beam extending more than half a meter should rest on a reinforcing structure or pillar.
The construction of baths with a lean-to roof type assumes that the roof frame will hold on to walls with different heights.
In order to fix the trusses on such a structure, it is necessary to use girders and rafter bars.
Methods for mounting rafters
The rafters are a link of the rafter structure, which rests on the Mauerlat or the upper crown, depending on which bath is being built: from bricks and aerated concrete blocks, or from profiled beams and a log house. Taking the load on the roof, the rafters work in compression and bending.
In order to assemble the structure with your own hands, you can purchase ready-made parts or make them yourself from the following material:
Installation of a truss truss will be simple if you use ready-made parts or material from a bar or board. For fastening the elements, you can use screws or nails.
We will analyze what rafters can be, and what is best suited:

Gable roof truss
The truss consists of identical rafters installed at a certain distance. The resulting structure is necessary for the location of roofing material, insulation, as well as other types of insulating coatings (waterproofing, vapor barrier) on it. Usually the roof is made in the form of an isosceles triangle. Because of how complex the structure of the future roof will be and what the step of the rafters is provided for, the presence of overlays, struts, beams and other details necessary to strengthen the roof will depend.
It is possible to assemble a truss on the ground.
It should be noted that assembling the structure directly on the floor is not so convenient and carries a certain danger.
The disadvantage of assembling a truss on the ground is the need for its transportation upstairs, which will entail unnecessary expenses in the form of renting special equipment.
 Various rafter designs for a bath roof
 Whether a choice will be made towards safety or towards saving money is up to everyone to decide. However, if the construction of a frame bath, exactly like the construction of other types of baths (from blocks, bricks), is done by hand, it is best to choose a safer option.
For the convenience of building a roof, it is recommended to complete a template. In this case, all elements of the farm will be completely identical. The template is made as follows: two rafters are fastened at the top point, and their lower points are placed on a support and fixed with a crossbar.
After installing two rafter trusses at opposite ends of the bath, a level is stretched between them. At this level, the rest of the elements are installed with a certain step. It is very important to observe the verticality of the installation of the rafters; for this it is best to use plumb lines.
 Installation of roofing material on the rafter system
 Shed roof truss
In cases where the distance between the supports of a pitched roof is less than four and a half meters, additional support legs are not used. Rafters are recommended to be laid at a distance of half a meter from each other. For reliable fastening of rafter trusses, a groove is cut out in the Mauerlat, on the one hand, and in the timber on the other, with the expectation that the rafters fit tightly there. The rafters can extend beyond the perimeter of the building by 500 mm, thereby creating cornices.
Roof lathing can be done with beams or planks. Depending on what type of roofing material will be used, the cross-section of the material for the lathing and the step of its installation are selected. A soft roof involves the installation of a lathing with gaps of one centimeter.
 Schemes of roof trusses of single-pitched roofs for a bath
 If sheet material is used, then you can save on the crate, because the gap between its individual parts can be up to half a meter. The installation of the battens should be started from the ridge of the roof, followed by movement to the cornices using self-tapping screws or screws.
The construction of a bath is a difficult and time-consuming task, since many little things need to be taken into account, on which the comfort of its use will depend. Particular attention should be paid to the roof, as through it the most heat escapes from the room.
Types of roofs suitable for sauna buildings
When building a bath, the choice of a suitable roof option is of great importance. The bathhouse is a special building, its roof must have non-standard characteristics.
Some of the roof types can be equipped with an attic space. By design, the roof can be divided into the following types:
- single-slope. Its popularity is due to its low cost and ease of installation. If the bath is made in the form of an extension to a private house, then it is recommended to choose this particular option. It is important to take into account the slope of the pitched roof. The appearance and strength of the structure depends on this characteristic. The angle of inclination is chosen in accordance with the amount of precipitation - the more there are, the more the slope of the slope should be;
A pitched roof is quite suitable for a bath due to its simplicity of design and low cost
- flat. This design is suitable for areas where strong winds prevail and there is little or no rainfall. If a lot of snow falls, then the roof may break, so a flat roof is erected only in warm regions. The upper part of the building can be used as a terrace attached to a private house. This design is cheaper than the others;
A flat roof is rarely used when building a bath, because it is designed for specific operating conditions.
- multi-slope. A roof with several kinks gives the structure a beautiful appearance, but its construction is expensive. Such a structure is difficult to design and build, therefore, baths with a multi-pitched roof are practically not found. To make such a roof with your own hands, you need a lot of experience in performing construction work;
- gable. This is the most popular bath solution. The design parameters allow it to be erected in any region. A roof of this type can be built with your own hands. A big advantage of a gable roof is the presence of an attic. In it, you can arrange a separate rest room (if the height allows) or a warehouse for storing bathing tools. The attic space must be insulated.
The gable roof allows you to equip the attic and removes snow well in winter, so it is the most popular option for a bath
Advantages and disadvantages of different types of roofs
Advantages of a pitched roof:
- high construction speed;
- low cost;
- ease of installation.
Disadvantages of a pitched roof:
- the absence of an attic, respectively, will not be able to store inventory;
Materials for the coating are selected based on the design features. For example, slate is not suitable for roofs with a pitch of less than 30 °.
Advantages of a gable roof:
- great appearance. The bath building will look more like a small house than an outbuilding;
- the possibility of arranging an attic, which will become a place for storing inventory and an additional barrier for the outflow of heat from the premises.
A roof of this type also has disadvantages, but they are insignificant against the background of the advantages:
- the cost of the structure is higher than one-pitched or flat;
- the attic will need to be additionally insulated and trimmed.
The pitched roof looks more interesting than the others, but the cost is very high. The feasibility of its construction should be determined by the owner of the bath .
A bathhouse with a hip roof and a broken canopy above the entrance looks very nice, but it is expensive
The choice of roofing option should be based on personal preference and operating conditions. If there are no restrictions that are associated with the climate, the main criteria may be the cost and complexity of installation.
The most popular type of roof for a sauna building is a gable roof.
Gable roof device
The roof structure for a bathhouse is simplified from two components: a load-bearing rafter system and a flooring with the lathing and waterproofing required for its installation. An important structural element is the ceiling of the attic. The gable roof truss is a triangle, the base of which is the ceiling tie or beam.
At the apex of the triangle, the rafter beams converge, which are fixed by cutting in half a tree. Fastening of planks or timber, which is used as rafters, is done with screws or nails. If it is necessary to increase the rigidity of the truss, a jumper is installed below the fixing point of the rafters - a crossbar.
There are different options for the device of the rafter system for a gable roof.
For the device of a gable roof, different schemes of rafter trusses are used, depending on the size of the span between the walls and the material from which the house is built
The type of construction will depend on the size of the span between the load-bearing walls, as well as on the material from which the walls are made. A gable roof can be layered (most often used in buildings more than 6 m wide) and hanging. To increase the stability of the roof, the layered truss can have auxiliary stops.
With a large span between the walls, additional stops are added to the structure of the trusses
The hanging structure has an emphasis exclusively on the Mauerlat or ceiling slats.
When building a bath, preference is often given to a structure with hanging rafters, because the distance between the load-bearing walls is usually small
In the upper part, the rafters are fixed with crossbars.
Most often, a roof with hanging rafters is arranged in the baths.
Scheme and calculation of the roof based on the area of \ u200b \ u200bthe bath
As an example, we will consider a 4x5 m bathhouse. The structure is being built in the Moscow region and is made of timber. The top row is used as a Mauerlat. The roof will be gable hanging, without laying out insulation material. The slope of the slopes is 30 o, the height in the ridge is 6 meters.
Before the construction of the rafters, you will need to perform a calculation with which the slope and characteristics of the roof parts are determined.
Types of loads acting on the roof
The following loads affect the roofing system:
- Constants - the weight of the frame and roof covering. The weight of the cover will depend on the selected roofing material.
- Periodic - loads from snow and wind, as well as the weight of the builders performing the work.
- Unforeseen - earthquake, hurricane and others. In most regions, such loads are not taken into account due to the low probability of their occurrence.
In the process of calculating the thickness and width of the rafters, it is necessary to take into account the sum of the maximum values of the possible loads. To perform the calculation correctly, you need to understand the loads that act on each node separately.
The dimensions of the rafters are selected based on the nature and intensity of the loads in each node of the roofing structure
The lower part of the rafters is attached to the Mauerlat. The node will take vertical loads from snow and the weight of the roof itself. Spans under load work in bending.
Each point of the roof has its own loads, which are calculated according to certain formulas
Calculating snow load
The snow load on the rafter leg is calculated by the formula S = S g ∙ μ, where S is the snow load, S g is the specific gravity of the snow cover in a given region, μ is a correction factor, the value of which depends on the angle of inclination of the roof:
- less than 25 o - μ = 1.0;
- from 25 to 60 o - μ = 0.7;
- more than 60 o - μ = 0, i.e. snow loads on such steep roofs can be ignored.
The S g value is taken from a special table. For the Moscow region S g = 180 kgf / m 2. Therefore, for our example, the value of the snow load is S = 180 ∙ 0.7 = 126 kgf / m 2.
Table: specific snow load depending on the region
| Region No. | 1 | 2 | 3 | 4 | 5 | 6 | 7 | 8 |
| S g, kgf / m 2 | 80 | 120 | 180 | 230 | 320 | 400 | 480 | 560 |
The region number is determined by the map of distribution of snow loads, which is issued by Roshydromet.
Each region of our country is assigned a number depending on the average intensity of snow load
Wind load calculation
The wind load is calculated in a similar way: W = W o ∙ k, where W is the snow load, W o is the standard indicator, which is determined from the table for each specific region, k is the correction factor, the value of which depends on the type of terrain and the height of the building ... For areas such as urban development or forestry, the values of this coefficient are as follows:
- with a house height less than 5 meters - k = 0.5;
- from 5 to 10 meters - k = 0.65;
- more than 20 meters - k = 0.85.
For the Moscow region W o = 23 kgf / m 2. The value of the wind load for the bath we are considering is W = 23 ∙ 0.65 = 14.95 kgf / m 2.
Table: specific wind load depending on the region
| Region No. | 1a | 1 | 2 | 3 | 4 | 5 | 6 | 7 |
| W o, kgf / m 2 | 17 | 23 | 30 | 38 | 48 | 60 | 73 | 85 |
The region number is determined by a special map, also drawn up by the Hydrometeorological Center.
According to the parameters of the wind load, each region also has its own number.
For Moscow and the region, the roof parameters have already been calculated using the above formulas. Therefore, to select the size of the rafters, you can use the ready-made table.
Table: the dimensions of the rafter legs, depending on the step between the rafters (for the Moscow region)
| Step between rafters, cm | Rafters length, m | ||||||
| 3,0 | 3,5 | 4,0 | 4,5 | 5,0 | 5,5 | 6,0 | |
| 215 | 100x150 | 100x175 | 100x200 | 100x200 | 100x250 | 100x250 | – |
| 175 | 75x150 | 75x200 | 75x200 | 100x200 | 100x200 | 100x200 | 100x250 |
| 140 | 75x125 | 75x175 | 75x200 | 75x200 | 75x200 | 100x200 | 100x200 |
| 110 | 75x150 | 75x150 | 75x175 | 75x175 | 75x200 | 75x200 | 100x200 |
| 90 | 50x150 | 50x175 | 50x200 | 75x175 | 75x175 | 75x250 | 75x200 |
| 60 | 40x150 | 40x175 | 50x150 | 50x150 | 50x175 | 50x200 | 50x200 |
If there are difficulties in carrying out the calculations on your own, then it is recommended to remove the dimensions of the rafter system on similar buildings that were erected earlier.
When calculating the roof, you need to adhere to the following recommendations:
- For a detached building, it is recommended to make 2 slopes. The optimum tilt angle is 50–65 °.
- A gable roof is suitable for a building with an area of more than 12 m 2. For smaller rooms, a pitched roof can be used.
- For regions with large gusts of wind, the slope should be at least 40 °.
The choice of material for the roof
Roof covering materials can be sheet or roll. The roof should be of high quality and budget. Each material is suitable for a different roof slope.
Table: main characteristics of roofing materials
To save money, the bathhouse can be covered with ordinary slate or roofing material. If a bath building is being erected near a private house, then the material for covering the roof is best used the same as on the roof of the main building.
Each roofing material has its own characteristics. They should be taken into account when choosing a roof covering.
Ondulin and soft tiles
Ondulin and soft tiles are very similar in composition, properties and installation methods. The materials have the following advantages:

Disadvantages of ondulin and soft roofing:

Decking and metal tiles
These two types of roofing are also very similar in properties: they are made of the same material, they are installed in the same way and have similar characteristics in terms of weight and service life. Their advantages are as follows:
- wide range of colors;
- long period of service;
- ease of installation;
- high fire resistance;
- light weight;
- resistance to temperature extremes, mechanical and chemical influences.
Metal tiles are currently the most popular type of roofing in individual construction.
Disadvantages of profiled sheet and metal tiles:

Slate
Slate is one of the longest-used roofing materials. Some time ago, there was practically no alternative to him. Its advantages are as follows:
- low cost;
- resistance to damage;
- high fire resistance.
Slate is cheaper than many other roofing materials. but does not look very modern and weighs a lot
Disadvantages of slate:
- large weight, in connection with which it is necessary to arrange a powerful rafter system;
- low strength at sub-zero temperatures;
- outdated appearance;
- short service life.
Roofing material
Roofing material is usually used to cover the roofs of sheds or outbuildings. You can use it for a bath if you want to save on roofing.
The main advantages of roofing material:
- low cost;
- ease of installation.
However, the material has many disadvantages. The main ones are the following:

The necessary actions for the installation of the sheathing structure depend on the choice of roofing material. The most popular for a bath are metal and corrugated board, since these materials are durable and reliable. In some cases, ondulin is used. It has a low cost and is excellent for the construction of a beautiful and durable structure.
Calculation of the amount of material
To calculate the area of \ u200b \ u200bthe roof slope, the Pythagorean theorem is used
Let's take the parameters from the example we have already considered as a basis. Suppose that we want to make a roof from a profiled sheet with an overhang of 200 mm relative to the boundaries of the house. Then:
- Dimension A will be equal to 4/2 + 0.2 = 2.2 m (the width of the bath is 4 meters).
- The height from the ceiling to the ridge is determined by the angle of inclination of the roof: H = A ∙ tan (30 o) = 2.2 / √3 = 1.3 m.
- The length of the slope is calculated according to the well-known Pythagorean theorem: C = √A 2 + B 2 = √2.7 2 +1.3 2 = 3.0 m.
- The area of one slope is calculated by the formula S slope = C ∙ D = 5.2 ∙ 3.0 = 15.6 m 2.
- The total roof area is S = S slope ∙ 2 = 31.2 m 2.
Next, you should calculate the area of the visor above the entrance, if it is provided for by the project. Usually it is made 0.9 m wide and 1.7 m long. Let us also take into account the overhang of 0.2 m: S visor = 1.7 ∙ 0.9 + 1.7 ∙ 0.2 = 1.9 m 2. Then the total surface area for the roofing will be 33.1 m 2.
With a standard sheet size of 2x1.1 m (the useful width is indicated after deducting the allowances left for the overlap of the sheets), 33.1 / (2 ∙ 1.1) = 15.04 sheets will be required to cover the roof. Rounding up, we get the required need for roofing material: 16 sheets 2x1.1 m in size. It is better to buy with a margin of 2-3 sheets in order to foresee possible losses and errors when cutting the material.
For further calculations, you will need a roof plan.
To calculate the material required for the manufacture of rafters, a plan is drawn up for their location on the roof
Determine the number of rafter legs:
- for the main roof, you need to prepare 19 bars measuring 140x40x2810 mm, the total volume of the board will be 0.3 m 3;
- for the visor above the door you need 4 bars measuring 140x40x1700 mm, the total volume is 0.04 m 3.
In total, the rafters will require 0.34 m 3.
It is also necessary to prepare 2 wind boards measuring 140x30x5800 mm. Their total volume is 0.05 m 3. In addition, you will need a roughing bar with a volume of 0.15 m 3:
- 4 slats measuring 40x50x900 mm;
- 4 bars measuring 40x50x6200 mm;
- 8 slats measuring 40x50x5800 mm.
The amount of material for waterproofing corresponds to the roof area - 33.1 m 2.
Required tools
To erect a structure, you need to prepare the following tools:
- scissors for metal;
- electric jigsaw;
- screwdrivers;
- axe;
- hammer;
- spanners;
- building level;
- roulette;
- meter;
- plumb line;
- corner;
- construction cord;
- pencil.
Step-by-step guide to building and erecting a bath roof
Planks 140x40 mm are suitable for rafters. The optimal distance between the rafters is 90 cm, the slope of the slopes is 30 °. The material must be of high quality, without cracks or other damage.
For the construction of the rafter system, it is allowed to use only high-quality boards without cracks and damage
There should be no knots in the fixing points of the parts. It is important to carefully examine the building material. The workpieces should be slightly longer, as it is important to take into account the trimming of unusable parts from the ends.
Preparatory work
Before covering the roof, you will need to build a supporting structure, as well as mount a crate on which the finishing material will be attached. At this stage, it will also be necessary to insulate the structure and waterproof the roof.

The ceiling in the bath, which is built using this technology, will save heat much better.
Construction of rafter legs
For a medium-sized bath, six pairs of rafters are enough. To make it easier to make identical parts, it is better to build a wooden or metal template. The marking of each structure separately gives small flaws, which, as a result, can amount to a significant amount. In addition, the template allows you to speed up the work process several times. You can make a template in this way:
- The first step is to prepare edged boards 20x100 mm 3 m long. At the top of the rail you need to overlap with a nail. There must be one fastener for the structure to be movable.
- A horizontal segment must be attached to one rail, which will be used as a crossbar template. The distance from the crossbar to the ridge should be approximately 45-50 cm.
- The crossbar should only be fixed to one rail. It must be nailed to the second after the slope of the rafters is selected.
- The template should be lifted to the roof and temporarily placed at the planned installation site of the rafters.
Template configuration is definitively defined and fixed in place
- Next, you need to change the slope and increase the offset. It is important to ensure that the skate is placed in the middle of the bath.
- When a suitable place has been chosen, you will need to nail the crossbar to the second rail, strengthen the fastening of the slats and ridge with several more fasteners.
- The manufactured template must be placed on the Mauerlat and the place of the rafter fastening unit must be marked. Fixation can be done in different ways, the simplest of which is the use of a support rail and iron corners.
It is convenient to attach the rafters to the Mauerlat using metal corners
- After completing the fit, the template is finally fastened at all points and lowered to the ground.
The resulting template will be used as a sample for the manufacture of all truss structures.
Video: marking and assembling rafters
Construction of the rafter system
The sequence of actions will be as follows:
- In the middle of each of the gables, vertical slats of 50x50 mm should be nailed. The height of the slats must match the height of the rafter system.
- It is important to check their verticality. To do this, you need to pull a strong thread between the parts.
- Next, you need to check the template along the entire length of the sauna building. It must be installed in increments of 1 m, and then look at the slope and placement of the support bar. The ridge part should be located exactly along the thread.
If errors are found within 1 cm, then don't worry. Such irregularities can be eliminated during the installation of the lathing under the roof covering. If the difference in size is more than 1 cm, you will need to adjust the template to obtain the optimal average. When the process is successful, the template should be removed to the ground. If the need arises, the nodes can be additionally strengthened.
- The template must be installed on a flat base, then attach one rafter leg to it. It is important to pay attention to the location of the ridge section. If knots are found, they must be trimmed.
- The hinged part of the rafters can be leveled immediately before installation or after installing the system. The rafter legs in the ridge part can be fastened in several ways. The most reliable option is to fix it in a thorn, but this method is not suitable for a bath, since the rafters are made of thin boards.
If the rafter boards are 100 mm thick or more, then they are connected into a spike
- To eliminate displacement on both sides, the unit must be fixed with metal plates on self-tapping screws. It is important to ensure that the self-tapping screws are not positioned opposite each other.... They must be placed evenly over the surface of the rafters.
The junction of the rafter legs is reinforced with a metal plate fixed with bolts or self-tapping screws
In our case, we need to use a half-tree commit. The rafters are connected to the stop at an angle of 90 °.
Rafters for a bath are usually assembled from edged boards 40 or 50 mm thick, so they are connected in half a tree
Top connection can be made butt joint. However, this is dangerous as the structure will be unstable. For regions with a warm climate, this type of connection is suitable, however, if a lot of snow falls in winter, then this method cannot be used.
At the next stage, the rafters are fixed to the Mauerlat. Sequencing:
- Marks are made in the extreme parts of the rafter legs. The cut must be made at an angle. Fixation method - end-to-end.
The rafter leg is cut at an angle so that it fits freely on the Mauerlat
- It is not allowed to cut off both legs symmetrically. A drawing should be removed on each part from the corresponding side.
- The knot is fastened on both sides with iron plates with a minimum thickness of 2 mm. It is important to ensure that the fasteners are not opposite each other. You need to try to place them evenly over the surface of the rafters.
The rafters are fixed on both sides with steel plates
- Further, stops are placed. For their fastening, it is recommended to use powerful self-tapping screws or bolts.
Video: how to cut the rafters at the required angle
Roof rafter installation sequence
The work must be carried out with the utmost responsibility. If the technology is broken or the connections are of poor quality, then in the future you will have to make complex and expensive repairs.
The sequence of steps for installing the rafter system on the roof of the bath:
- The first step is to fix the pediment rafter legs. At this stage, they are temporarily fastened using stops made of board scraps. It is important to carefully expose every detail across all nodes. Do not rush, you should check each size.
- Next, the rope is pulled along the ridge and in the side parts. The side rope is stretched over the rafters. They are easier to mount in this position.
Ropes are pulled along the ridge line and on the rafters, along which all other structures will be exposed
- The installation locations of the remaining rafters are marked on the Mauerlat. The step between them should be 90 cm. This distance must be kept strictly, errors are not allowed.
- At the next stage, each part is raised in turn, put it along the rope and temporarily fixed with stops and struts. The battens should be nailed both at an angle to the roof components and between the mounted rafters.
- When the rafters are temporarily fixed, check the correctness of their installation using a building level and a plumb line.
- Further, the final fixation of the nodes is performed using iron corners and plates on self-tapping screws. The minimum metal thickness is 1.5 mm. You should not save on corners, it is recommended to mount them on both sides of the rafters... The result should be a structure that is resistant to loads in different directions.
In the attachment points of the rafters to the Mauerlat and the ridge, it is recommended to leave a little freedom of movement, then the roofing system will not experience increased loads during seasonal deformations of the bath
- The length of the lower parts of the rafters is leveled. They should protrude 35–40 cm beyond the building. The ends of the rafters are set along a stretched rope.
From time to time, builders without work experience can make minor mistakes that, during the installation of the rafter system, can reinforce each other's action. This can lead to a weakening of the structure, as a result of which it will not be able to resist the longitudinal load on the ridge part. The rafter system in this case may begin to stagger. This problem can be solved by installing corner stops made of rails under the gable rafters.
With insufficient stability of the rafter structure, it is strengthened with the help of the braces of the frontal trusses
In the future, the stops can be used as a frame in the process of covering the gables.
Video: simple installation of rafters for a gable metal roof
Sheathing of the truss system
The lathing can be solid or sparse.
The type of roof lathing depends on the used roofing material
The latter option is most often used. Step by step guide:
- Reiki is nailed from bottom to top. The spacing of the elements will depend on the type of material for the roof. For corrugated board and metal tiles, the optimal distance is 40 cm.
If the roof will be covered with metal tiles, the crate is stuffed with a step of 40 cm
- Near the ridge, the crate should be nailed more often. At this point, the ridge part and roofing sheets are attached.
- From the side of the pediment, draw a straight line with a thread with blue.
- The protruding parts of the planks must be cut off with a saw.
After the installation of the lathing is completed, it is trimmed from the side of the gables to form a flat line of the roof overhang
After that, waterproofing and insulation of the roof of the bath building is performed.
Waterproofing and roof insulation
All wooden parts must be treated with antiseptic agents. It is recommended to use a membrane film as a material for waterproofing. With its help, you need to equip a hydro-barrier. To do this, you need to lay the film on the rafters before installing the sheathing. For the vapor barrier, install a film between the lining and the insulation material of the ceiling.
You can insulate the roof with mineral wool.
Mineral wool is laid in the space between the rafters in two layers
The material must be placed in the roofing cake in a layer of 10 cm. The mineral wool is stacked in two rows in a checkerboard pattern.
Video: self-construction of a roof for a bath
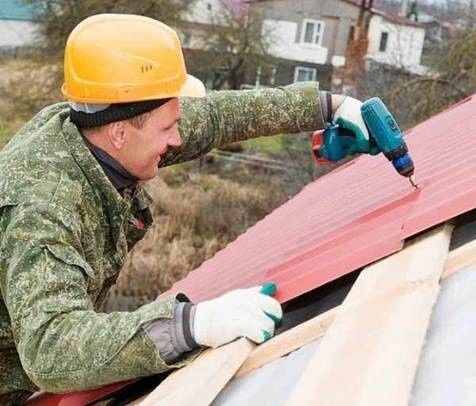
Finally, the roof cladding is performed with the selected material. If you plan to use corrugated board or metal tiles, then first of all you will need to install the initial sheet of the first row, followed by the initial sheet of the second row. Further, the sheets are attached in turn. In one direction, you need to make a longitudinal overlap. The material is fixed with self-tapping screws with thermal washers.
Add a comment
Even at the planning stage of the bath, you need to think about what the roof will be. Its main functions are protective, but do not forget about the aesthetic side. For the simplest structure of a bath, you should not take a complex roof structure. The fewer bends and skates, the more practical the system. For a bath, a gable or single-slope is usually used, which can be easily assembled with your own hands. If you do not know how to assemble a roof for a bath with your own hands, then this article will become a real helper. We will tell you how to complete the work quickly and correctly, introduce you to some of the intricacies and tricks of installation, and help you choose a practical design.
Roof for a log bath, gable.
 The roof rafter of the bathhouse assembled from a bar
There are many roof structures for a bath, but the standard of 2 elements is always taken as a basis: a rafter supporting base and a roof, which is attached to a crate with waterproofing. By functionality, roofs can be divided into: with and without attic overlap. The first option is more difficult to assemble, but the bath will become functional. The presence of an attic floor does not in any way affect the choice: single-slope and gable. Of course, you can find more complex hipped ones, but these are rarely assembled by hand.
Which roof is better shed or gable?
When choosing a roof structure, you need to build on the following factors:
- The location of the building on the site. For attached baths, this is, as a rule, a lean-to system.
- Material opportunities. The one-pitched one is built mainly in order to save money.
- Features of the layout of the bath. For a structure with an attic, it is better to choose a gable.
 Scheme of a shed roof for a bath
 A single-slope design is chosen mainly for a bathhouse at a summer residence, when you need quick assembly with minimal costs. Basically, pitched roofs are made low, at a slight angle.
 Diagram of a gable roof for a bath.
 More often you can find gable structures with a high ridge. If you equip and insulate the roof, you can get an additional room. Conveniently located in such a recreation room or billiard room. Not insulated is used as an attic for storing brooms and dry herbs for a steam room.
What to consider when choosing the height of the skate or the steepness of the slope
When choosing the height of the skate, you need to consider:
- Features of the climatic conditions of the region (windiness, precipitation).
- Aesthetic aspects.
- Features of the construction of a bath.
 The roof is gable for a bath from a bar with a slope of 45 degrees.
 The angle of inclination of the roof can be from 2.5 to 60 °. A sloping roof can be used in a region where the average annual rainfall is low. A steep one is done when an attic or an attic space is provided in the design. But in regions with strong winds, a skate that is too high cannot be used. For example, in the steppe regions, where the amount of precipitation in winter is minimal, a flat roof with a maximum angle of 10 ° is used, in the northern regions with a large amount of snow - from 45-60 °.
The flatter the roof, the less material and physical resources are spent on its installation.
Bath roof support system
 Mauerlat from a bar with attached rafter legs.
 The gable roof has a base of ramps that rest on the floor beams or are connected to the top of the Mauerlat strap. Mauerlat is a beam that is mounted on two walls of a bath. The floor beams of the gable roof on wooden baths are fastened with the help of special nests, which are made in the upper crown. The nests should have a strict horizontal line, where the support elements are laid.
Floor beams can protrude beyond the walls of the bath. If the support beam protrudes beyond the walls by more than 1 m, then an additional support in the form of a column is installed for it.
For a bath with a pitched roof, the beam system is made so that the emphasis on both sides has different heights. Roof trusses are fastened with girders and rafter bars.
Rafter leg system
 Roof truss scheme: rivel, legs, base.
 A rafter truss consists of rafter legs that rest on the top link of the wall or Mauerlat. The rafter legs in the structure are influenced by two forces at once: compression and bending. Therefore, they need to be made from wood with a diameter of at least 120 mm or a bar of 60x60 mm. You can make the legs of the rafter system from boards 40x150 mm and more.
It is easier to assemble trusses from glued or edged timber with your own hands. If you do not have such materials at hand, you can take the boards and splic them with nails or self-tapping screws. You can mount the cuts in such legs only at the support points.
According to the method of fastening, the rafter legs can be layered or hanging.
Hanging rafters
 The design of the hanging rafter system: fastening diagram and elements
 This system consists of rafter legs that rest on top of each other. At this point of the joint, the ridge is mounted. The anchor points of the hanging bar is the outline of the roof. Hanging systems are subject to horizontal pressure, which can be resisted by special tightening. The nodal joints of the hanging rafters can be reinforced with regiments, but they can be omitted in a light structure.
For the construction of a lightweight system from a bar of a small section, it is necessary to perform additional runs. They will strengthen the structure.
The rafter system of the hanging structure should be as rigid as possible, since during operation it is subject to heavy loads. The slope planes are connected by additional diagonal beams, this is especially true in the windy regions of the country.
Rafters
 The design of the layered system of rafters under the bath.
 Structures of layered roofs are often used in pitched types. The system does not use additional puffs, it is as simple as possible. The rafters are supported by a Mauerlat, which is mounted on one of the load-bearing walls. They can be fastened with a knitting wire or through the Mauerlat with screws or metal pins. The step of the rafters of the layered system is calculated depending on the total roof load and winter precipitation. In this case, the selected angle of inclination of the bath roof must be taken into account.
Features of the installation of the gable roof truss system
 A gable roof on a bathhouse made of logs, covered with slate for shrinkage
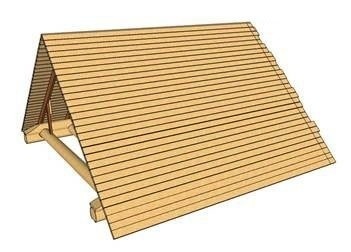
 The gable roof system of the bath consists of rafter trusses, which should be mounted in series. They must all be the same size and fit in one step. The rafter system is needed for laying roofing material with hydro and thermal insulation.
The easiest way is to put together a farm system on the ground with your own hands, and then raise it with the help of technology. The rafters should resemble an isosceles triangle in shape. If the roof is complex, then you can strengthen the structure with additional overlays and ties. To simplify the work, you can make a farm template, substitute it in the manufacture of each subsequent one.
First, it is worth installing the two outer rafters and connecting them with a regulator. The regel is a cross bar that connects the trusses to each other. You can fix the regulator with metal screws. To do this, you need to cut it out and drill holes for the mount.
Roof trusses must be installed strictly vertically. To do this, they are checked with a plumb line. Disadvantages are leveled by cutting off excess or lining that does not reach under the rafter.
A short video will help you understand the installation in more detail:
Features of the installation of the rafter system of a shed roof
 A pitched roof for a bathhouse made of bricks, covered with corrugated board.
 If the distance between the bearing walls of the bath is less than 4.5 m, then additional support is not needed. a Mauerlat is laid on one of the walls, in which grooves are cut out for the rafters. On the opposite wall, in the upper link, the same ones are cut. Their size should correspond to the rafter so that it fits snugly against the cut. Do not use all possible gaskets.
The rafters should be of such length that they extend beyond the contour of the walls by 30-50 cm. This will make it possible to mount a cornice that will protect the walls from rain. The rafters are attached to the Mauerlat and the upper beam with iron pins or screws.
Roof lathing
 An example of various roof battens for a bathhouse for a soft and hard roof.
 Further, with any design, a crate is made. Its step must be calculated depending on the material with which the structure will be covered. If it is a soft roof, for example, andulin, then the lathing is made of wide boards, leaving a gap of 1 cm between them.For hard sheets, for example, slate or corrugated board, the lathing is made of bars with a section of 50x50 mm. The attachment step can be from 15-50 m.
The installation of the lathing should start from the ridge downwards using a screwdriver and self-tapping screws. Along the ridge, the installation of the lathing begins with two boards, which should be attached to it. Next, the roof is waterproofed and covered with the selected material. The ridge and cornices are sewn on.
For roofs with an attic, additional insulation must be performed. You can read about how to insulate the roof of a bath in the next article.
If you do not rush and do the work correctly, then the bath roof will serve more than one generation of your family. And its appearance and shape will delight for many years.
A reliable roof protects the building from bad weather and hot sun. Naturally, the bathhouse should also have a roof - sound and practical, built in accordance with all the rules of the construction business. What type of roof to choose, what materials to pay attention to, what are the main stages of construction - this is what will be discussed in our material. The purpose of this article is to give you simple instructions for building a roof for a bathhouse with your own hands.
Roof - the upper part of the building, insulating, enclosing and protecting it from the adverse effects of precipitation, wind and ultraviolet radiation.
Shed and gable roof for a bath
Before starting the design of the bath, it is necessary to decide which type of roof to choose for the bath (single or gable) and at what angle of inclination to erect.
Shed roof
A pitched roof is the simplest type of roof. The roof rests on opposite walls and, depending on the difference in the height of the walls, forms a slope angle - the greater this difference, the sharper the angle. At the same time, the cost depends on the drop - the less it is, the cheaper the roof construction will cost.
Advantage: a simple and fast way to erect a roof, which is notable for its low cost.
Flaw: if the slope angle is small, water and snow are retained on the roof surface after precipitation, which damages the coating. Roof decay can be prevented by choosing the right material to cover the surface.
A pitched roof is an optimal solution for small baths, including buildings adjacent to one side of the main building. It is desirable that the roof area does not exceed 15 m2, since with large parameters, its construction becomes economically unprofitable.
The angle of inclination of a pitched roof is selected depending on weather conditions or on the characteristics of the landscape. So, in a region with heavy rainfall, it is recommended to put roofs with a roof slope of 35-45 ° so that snow or water, without lingering for a long time, flows down. In the steppes with strong winds, it is better to put a bath with a sloping roof.
A pitched roof can be made with an attic, pre-installing an attic floor, or without it, combining the roof with the ceiling of the room. A structure with a pitched roof without an attic is a good option for a summer bath, moreover, it is cheaper and faster to build. A bath with a solid insulated attic can be operated at any time of the year, and the attic is often used for storing bath brooms and for drying herbs.
Gable roof

The gable roof has two inclined slopes, which in the lower part rest on the walls of the building, and in the upper part they adjoin each other. This type of roof is suitable for all weather conditions and almost any landscape.
Advantage: the roof is attractive in appearance and functional.
Flaw: unlike a pitched roof, this option is more expensive, since it takes more materials and time to install.
A bath with a gable roof looks like a solid cozy house, and if you provide good thermal insulation, it can be used at any time of the year. A gable roof with an attic space is easy to use, in addition, in a bath with such a roof it is cool in summer and warm in winter. The angle of inclination of such a roof is given taking into account the climatic conditions and the roofing material that they intend to use.
The choice of the slope angle of the roof is done at the stage of building design. The calculations take into account the coating material, snow load, wind pressure. For example, with a slope of 45 °, snow can be ignored in the calculations, since it will roll off the roof, but with such a slope, the wind load and windage of the roof sharply increase, which means that the wind resistance decreases.
Bath roof construction technology
The main elements of the roof are the Mauerlat, the rafter system, the lathing and the roofing material.
Mauerlat

At the first stage of roof installation, a Mauerlat is installed, which connects the rafter system to the building frame. Mauerlat is laid on finished walls using special anchors. If the building is built of timber, then the upper rim is used as a support beam.
Considering that the Mauerlat is most often made of wood, and rot under the influence of steam and moisture, it must be carefully insulated with any waterproof material. It is enough to put several layers of roofing material between the wall and the Mauerlat.
Rafter system
The rafter system is the main element of the roof, the main task of which is to hold and withstand all types of loads. Correctly calculated rafter parameters will make the roof reliable and durable.

Gable roof rafter system.

The rafter system is a structure of beams interconnected in such a way as to evenly distribute the external load exerted on the upper part of the building. Depending on the slope and the roof area, in addition to the beams, jumpers, crossbars, spacers and other building elements are additionally used.
There are two types of rafters:
Hanging: when the supporting supports are connected to each other on one side, and on the other they abut against the walls;
Hanging rafters diagram

Forced, when the rafter legs rest against the Mauerlat and the inner walls of the building.

Lathing
The lathing is represented by beams or boards laid on the rafter legs. Roofing material is attached to the structure, which is laid perpendicular to the rafter legs. The lathing is mounted from edged, unedged or grooved boards, OSB-3 (oriented strand board) or FSF (high-strength plywood).

Roofing material
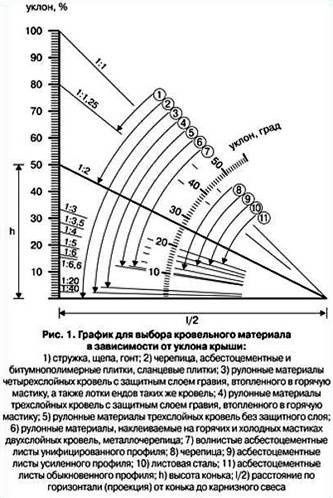
In the figure, you can see which type of roofing is suitable for a certain angle of inclination.
After preparing the lathing, proceed directly to the installation of the roofing material. What type of roof to choose, everyone decides depending on their material capabilities, on weather conditions, on the type of bath.
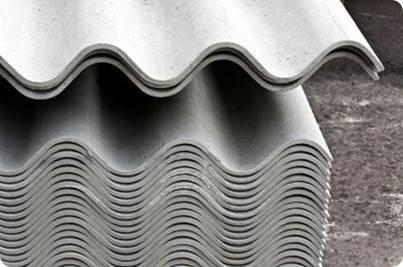
Slate is a traditional material, time-tested and tested in practice. The slope of the roof for slate is 12 °. The material has high strength, fire resistance, quick and easy installation, and also has a low cost. Over time, the slate becomes covered with lichens and moss, so it must be periodically cleaned of overgrown plants.
Ondulin is lightweight and easy to install, installed under a roof slope of 5 °, has a warranty period of up to 15 years. The main advantage of the material is lightness, but over time it changes its color, has an extremely low frost resistance (25 cycles), and at too high a temperature it can deform.

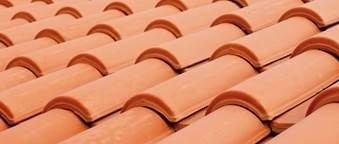
Roof tiles are a natural material, installed at a roof slope of 25 ° and have a very long warranty period, up to 30 years. In fact, the shingles have a lifespan of 150 years. Shingles absorb sound well, have increased fire resistance, are resistant to low temperatures and are striking in a variety of shades and shapes.
Cement-sand shingles with their characteristics are similar to natural shingles and are laid at a slope of 20 °. The material can last up to 100 years, has good soundproofing and frost-resistant properties, and is resistant to high temperatures. From time to time, the surface of such tiles must be cleaned of overgrown moss.

Bituminous shingles are a popular material with excellent sound absorption properties. The roof slope for such a material is from 12 °, and it can be installed on any type of roof. Does not break, does not break during transportation. At the same time, it has some disadvantages: the material cannot be established at temperatures below 5 °, the cost of the roof and its installation are expensive.

The metal tile is installed at a slope of 15 °, serves from 15 to 50 years, is characterized by quick and easy installation. Among the advantages of metal tiles are a large selection of colors, a simple design, and increased fire safety.

The corrugated board has a warranty period of 15 years, is characterized by convenient and simple installation, has a simple design and good fire safety. You can choose unusual and bright colors.

Stages of erecting a roof for a bath
The roof is erected after the walls of the bath are fully built. The principles of erecting the roof of a bath are the same as for ordinary buildings: first, the Mauerlat is laid, then the rafter system is installed, then the crate is attached, and at the final stage of work, the structure is covered with roofing material.
Mauerlat and rafter system
At the first stage of work, the protruding ends of the Mauerlat should be aligned, because it is these logs that will serve as a support for the rafter legs. The more carefully the measurements are taken and the smoother the logs are cut, the faster and easier the rafter system will be erected.

It is necessary to measure all protruding parts of the Mauerlat and determine the smallest value. On the logs located at the edges of the structure, mark the lowest value and drive nails in there. Stretch the cord between two logs at opposite ends, mark all other pieces, and cut off any excess logs. Then you can safely proceed with the installation of the rafter system.
Before installing the rafter system, a rough flooring should be laid on the Mauerlat, on which you can walk. The flooring can be made from any planks.
The rafter system is made according to the roof parameters specified in the bath project. Those parts of the rafters that rest on the Mauerlat beams are impregnated with a special waterproofing agent, then wrapped in roofing material, inserted into pre-prepared grooves and securely attached to the walls using metal brackets or studs.
Roofing structure
An under-roof structure is mounted on the finished rafter system - it helps to reliably attach the roof directly, transfers external load to the rafters and provides good ventilation in the space under the roof.
The roof structure consists of the following elements:
Rough flooring;
Waterproofing;
Counter grilles;
Lathing.

Rough flooring carries a huge functional load. A waterproofing material is applied to the flooring and a counter-lattice is attached. In addition, together with the lathing, the flooring forms gable overhangs with a length of 60 cm.
Rough flooring is made from plywood, boards, OSB or unedged boards. The gaps between the boards should not exceed 2 cm, therefore, when laying the flooring, it is necessary to adjust the protruding sections and minimize the possibility of gaps.
Additional rigidity to the roof can be provided by nailing the subfloor boards to the junction with the rafter leg with two nails.
Waterproofing is laid on the rough flooring. Any roll waterproofing material with sufficient moisture resistance is suitable for an attic roof. Strips of waterproofing material are laid horizontally on the flooring with an overlap of 15-20 cm. It is recommended to choose a material that allows steam to pass through insulated attics.

A counter-lattice is stuffed onto the waterproofing layer. For this, bars are used with a length of 70 cm and a section of about 30 mm by 70 mm. On the counter lattice, starting from the very bottom, a crate is stuffed - bars with a section of 50x50 mm or 40x60 mm. The lathing scheme for all types of roofing material is the same, the main difference between the structures is in the distance between the individual bars. So, for example, under the slate, the bars are placed at a distance of 50 cm from each other, under the ondulin - up to 60 cm, under the corrugated board or metal tile - 35 cm.
The final stage of the bath roof installation is the installation of roofing material. When choosing a roof covering, the following factors should be considered:
Strength and reliability: the material must be sufficiently resistant to wind and atmospheric precipitation;
Functionality and durability: a high-quality coating protects the structure from snow and rain, extends the life of the building walls; the longer the service life of the material, the longer the roof will lie, requiring only continuous maintenance and intermediate repairs;
Good thermal insulation: competently selected waterproof and thermal insulation materials, as well as their correct installation, keep the heat inside the building in winter, prevent the walls from getting wet and rotting.
Competent roofing work is a reliable roof for a bathhouse for many years. If during the construction all important points were taken into account, then further operation will not require significant material costs, it is enough to periodically clean the roof of overgrown plants and small debris.
Video on the features of the construction of a roof for a bath
We also recommend you:

