Glazing: covering cakes and pastries with mirror glaze. Colored mirror glaze Glasage color recipe
A mandatory holiday decoration is a cake. Many people want to amaze and surprise guests with the stunning appearance of this delicacy. Not everyone can afford to order a cake from professional pastry chefs. Then a new, stunning decoration option will come to the rescue, which even a simple housewife can handle. Mirror glaze for a cake will turn ordinary homemade cakes into a work of art and will definitely delight your guests.
Making mirror chocolate glaze at home is easy, the main thing is to approach this process correctly. Products required are ordinary and affordable.
In order for the glaze to turn out flawless, the temperature regime must be observed. Mousse cakes that need to be frozen are suitable for coating. Thanks to temperature changes: warm icing and ice cake, the coating will be smooth and even.
Ingredients:
- water – 30 ml for gelatin;
- cocoa – 80 g;
- sugar – 240 g;
- cream – 160 g, fat content 30% or more;
- molasses – 80 g;
- gelatin - package;
- water – 95 ml.
Preparation:
- Pour gelatin into a bowl and add water. Set aside.
- Pour the remaining water into the pan and add sugar.
- Add molasses, stir. Boil.
- Remove from the stove.
- Heat the cream separately.
- Mix sweet, hot water with cream.
- Mix.
- Add cocoa. Stir.
- At this time, the gelatin should become swollen. Heat. Mix.
- Pour into saucepan with cream. Mix.
- Take a high container. Pour mixture.
- Prepare the blender.
- Place in container. Beat.
- The temperature regime should be strictly followed. For the mass to be ideally distributed, 37 degrees is required. If the temperature is lower, it should be heated, if the temperature is higher, it should be cooled.
Color mixture for decoration
Try making the mirror glaze colored. It will perfectly decorate your baked goods. A simple decoration will make the dessert look delicious.


Ingredients:
- sugar – 150 g;
- gelatin - pack;
- water-soluble dye – 5 ml;
- molasses – 150 ml;
- condensed milk – 100 ml;
- white chocolate – 150 g;
- water – 75 ml.
Preparation:
- Soak the gelatin according to the instructions on the package.
- Pour sugar into a saucepan and add water.
- Add molasses and stir.
- When the sugar has dissolved, pour in the gelatin.
- Place the chocolate, broken into pieces, into another pan and melt. You should use a quality product; a cheap type of chocolate will not work. The appearance of the glaze depends on the quality.
- When the chocolate mass has melted, pour in condensed milk. Next is the resulting syrup. Stir.
- Pour in the dye and beat with a blender.
- While whipping, you need to watch for bubbles, there should be few of them.
Caramel gloss
There is nothing more beautiful than a cake that has a mirror image. The glaze, evenly distributed over the delicacy, is mesmerizing and eye-catching. This dessert does not require special decoration.

Ingredients:
- gelatin – 10 g;
- instant coffee – 1 tbsp. spoon;
- sugar – 360 g;
- cream – 290 g;
- water – 290 g.
Preparation:
- Pour water into the pan, add sugar.
- Boil until the syrup acquires a caramel color.
- Boil the cream in a separate container and pour into the caramel. Mix.
- Boil for a couple of minutes.
- Gelatin must be soaked according to the recommendations indicated on the bag.
- Combine with caramel mass, the temperature of which is 60 degrees.
- Mix. Strain.
White cake icing
Ideal for mousse cake that has been in the freezer for at least 12 hours.


Ingredients:
- glucose – 150 g;
- white chocolate – 150 g;
- sugar – 150 g;
- gelatin – 10 g;
- water for gelatin – 60 ml;
- condensed milk – 100 ml;
- water – 75 ml.
Preparation:
- Pour water into the pan, add the amount of sugar, add glucose. Boil. The sugar should completely dissolve.
- Melt the chocolate separately and mix with condensed milk.
- Mix gelatin with water and leave. Melt. Pour into syrup. Mix.
- Pour into chocolate mixture. Beat. A blender will handle this task.
- Cool to 38 degrees so that the icing fits perfectly on the cake.
Honey based recipe
Many people are afraid to take on the task of preparing glaze, believing that it is a complicated process and that nothing will definitely work out. It is very easy to make glaze at home using simple ingredients.

Ingredients:
- sugar – 150 g;
- any dye can be used;
- condensed milk – 100 ml;
- water – 60 ml for gelatin;
- water – 135 ml;
- white chocolate – 150 g;
- liquid honey – 150 g;
- gelatin – 12 g.
Preparation:
- Pour gelatin into a container and add water. Let stand according to instructions.
- After this, you cannot melt or bring to a boil.
- Pour sugar into the pan.
- Pour in honey. Fill with water, you will need 75 ml.
- Boil.
- Melt the chocolate separately. You can't overheat.
- Pour chocolate into a tall container. On top - condensed milk.
- Pour in honey mixture.
- Stir.
- Pour in gelatin.
- Add some dye and stir.
- Turn on the blender, beat.
- Take a sieve. Spill the mass. This will help get rid of the bubbles.
Mousse cake with mirror glaze
This is a dessert that is delicate on the inside, delicious and elegant in appearance.

Ingredients:
For the strawberry confit:
- fresh strawberries – 260 g;
- water – 35 ml;
- lemon juice – 1 teaspoon;
- rum – 4 teaspoons;
- gelatin – half a pack;
- sugar – 80 g.
For the chocolate mousse:
- water – 60 ml;
- gelatin – 10 g;
- white chocolate – 85 g;
- sugar – 4 teaspoons;
- cream – 250 ml (first portion);
- vanilla sugar – packaging;
- cream – 150 ml (second portion);
- egg yolk – 2 pcs.
Glaze:
- dye – 1.5 g;
- white chocolate – 150 g;
- condensed milk – 100 ml;
- invert syrup – 150 ml;
- sugar – 150 g;
- gelatin – 10 g.
For the almond brownie:
- sugar – 90 g;
- white chocolate – 50 g;
- ground almonds – 30 g;
- butter – 90 g;
- dark chocolate – 50 g;
- egg – 2 pcs.;
- wheat flour – 50 g;
- dark chocolate – 90 g.
Preparation:
- First you need to make the brownies by melting the butter.
- Melt the chocolate separately.
- Pour sugar into a container. Pour in the oil. Mix.
- Add chocolate. Beat.
- Pour in the eggs.
- Add almonds, then flour. Stir.
- Pour into mold.
- Place in the oven. 160 degree mode.
- After cooking, cool.
- Now it's the turn of the confit. Place strawberries in a saucepan and add sugar. Cook.
- Soak the gelatin.
- After swelling, combine with strawberry mixture.
- Pour lemon juice.
- Add rum. Mix.
- Pour the mixture into a silicone mold and freeze.
- Prepare chocolate mousse. To do this, pour two types of sugar into the pan. Pour in the yolks.
- Grind.
- Heat the cream (the first portion), it should become hot.
- Pour over sugar. Boil until the mixture thickens.
- Soak the gelatin.
- Cool the thickened mass slightly. Place the gelatin, which has already swelled by this point.
- Place the chocolate pieces.
- Turn on the blender, beat.
- Separately, pour the second portion of cream into the container. Beat.
- Add to mixture. Mix.
- Use a pan larger than the brownie size. Place half of the mousse. To freeze.
Cake assembly:
- Place strawberry confit on top of the frozen mousse.
- Pour in some of the remaining mousse that has not been frozen.
- Cover the brownie.
- Fill the free space in the mold with the remaining mousse. Place in the freezer for 12 hours.
Glaze:
- Pour glucose syrup into the pan.
- Add sugar.
- Pour water. Mix. Boil.
- Pour the grated chocolate into the pan.
- Pour in condensed milk. Mix.
- Soak the gelatin in advance. When it swells, melt it.
- Pour into the pan.
- Add dye.
- Beat.
- Remove frozen pastry from pan.
- Place the cake on a wire rack.
- Place a baking sheet underneath.
- The glaze should have a temperature of 33 degrees.
- Drizzle over the cake.
- When the mass has set, decorate with sheet chocolate.
- Place on a plate.
Cooking secrets and tricks


- Bubbles can ruin the whole look. To ensure that there are few of them, you need to hold the blender correctly, the mass should be drawn into one stream. To do this, place the device at a slight angle. If it was not possible to beat correctly and a lot of bubbles have formed, you can remove them with a spoon or pass the mass through a sieve.
- The glaze does not completely harden on the treat. Therefore, it is not very convenient to cut; the mass drags behind the knife. To avoid cutting problems, you need to heat the knife and keep the cake cold.
- To make it easier to move the drenched treat onto the dish, use a spatula or kitchen spatula.
- For the glaze to be perfect, the temperature must be maintained. If the mass is cold, it will roll off the surface and the mirror effect will not work. If the heat is too high, you will get drips that will ruin the appearance of the cake. Always use a food thermometer to help you reach the desired temperature.
- The finished glaze can be stored in the refrigerator for several days. Before use, warm the composition to the desired temperature.
Hello, my dear friends! You probably guessed from my absence for a month that something was going on. Even the absence of events is an event when it is outside the norm. Oh how I twisted it!
I twisted it - I unwind it.
For several years I thought about moving my brainchild to a “new home”. There were many reasons for this, and at the end of last year I decided: New year - new beginnings. And this is not only symbolic. January is the ideal time for this: while you, I’m sure, were enjoying the holidays, pleasant meetings and delicious food, I dived into the wilds of a world unfamiliar to me and worked on creating a new website. I believe that you will love it!
With pure culinary mania
and sincerely delicious wishes,
Galina Artemenko

Source https://vku.life/zhizn-vkusnaja/

Hi Hi! I continue my series of pre-New Year selections, and today it’s time for... snacks! Again! There just can’t be too many of them...
So, today we are preparing the cutest mini muffins with cheese, a snack cake with olives, onions and nuts, as well as a deliciously served liver cake.

How to prepare a lot of snacks for the holiday table and not get wasted? Snack butters! This is one of my favorite table themes, and today we are preparing as many as six types!

Hi Hi! The crazy time continues when you want to manage everything at the same time and be able to relax. In December, the topic of finding balance is more relevant than ever: what you still want to do, but not at any cost, and what is better to leave (either for later, or in the past year).
Eventually the New Year will come! So I offer you two recipes to complete your snack table. Fish snacks are always a thing, right? 
My definite top thing that I always leave (for later or in the past year, depending on the mood) is spring cleaning. Honestly, I never do spring cleaning! The traditional top time for this “joy” is either before the New Year or before Easter. The risk, as they say, is maximum! But it’s not for nothing that I put the word “joy” in quotes, since I don’t like to devote any long time to putting things in order, even if I do everything that needs to be done little by little over a period of time. So I’m not much of a “hostess” (one of my least favorite words, by the way!), and I try to maintain cleanliness with regular routine cleaning. But I still decide to do something rare at this time of year. For example, this year I washed the curtains.
You can judge me for this approach to housekeeping or not – in this matter, as in food, everything can be expressed in just one word: TASTE. Someone loves sparkling cleanliness and is ready to restore it, devoting time to this throughout the week. Someone is completely ready to live in complete chaos. Some people want to do everything themselves, but for others it is better to entrust the care of cleanliness to a professional. The main thing, in my subjective opinion, is the sanitary measures necessary for a normal life, peace of mind and a satisfied state at the end. I believe that if the lampshades are not washed, but the brain does not let it go, you need to either accept the reality and calm down, or wash the lampshades. The example about lampshades is not accidental - I just plan to accept them as they are.
Cleaning is cleaning, and the New Year will come, as I already said at the very beginning. The two recipes that I am sharing today are from my book (where these recipes are presented in a step-by-step version).

Homemade sprats
I'll start with them. This recipe was amazing for me: when I prepared them, I couldn’t believe that the capelin from which they are prepared in this case could actually taste exactly the same as sprats from a jar! And you can call sprats a thing of the past century, “you need to move forward, not back,” but in my head a sandwich made of black bread with sprats and pickled cucumber is something amazing!
800 g fresh frozen capelin
2 tbsp. l. black tea (medium or small leaf is better)
2 tbsp. l. vegetable oil
2 tbsp. l. soy sauce
1 tsp. natural liquid smoke
1 tsp. mustard seeds
1 tsp. salt
0.5 tsp. Sahara
5 black peppercorns
3 allspice peas
2 clove buds
1 bay leaf
Thaw the fish, remove the heads and entrails.
Pour 1 cup of boiling water over the tea leaves and leave for 10-15 minutes, then strain. Next, I will describe the process for a multicooker, but the same thing can be done simply on the stove, or in the oven! So...
Pour the tea leaves into the multicooker bowl, add salt, sugar, soy sauce, liquid smoke, vegetable oil and all the remaining spices. Place the capelin in the resulting marinade with their backs up, trying to position the fish tightly to each other.
Select the “Extinguishing” operating mode, time – 1 hour. At the end of the program, switch the multicooker to the “Simmering” mode, if your model has one, and cook for another hour. If there is no such mode, select the heating mode for 1 hour. When the multicooker is finished operating, turn it off and leave the capelin under the closed lid until it cools completely, and only then can the fish be transferred to a convenient container.
For cooking on the stove just simmer the capelin on the lowest possible heat for 2 hours and leave to cool under the lid.
For cooking in the oven send the container with the fish there and cook at 150° for 1 hour under a lid or foil, then turn off the oven and leave the capelin in it until it cools.

Mackerel rillette
This is a wonderful and very easy to prepare snack! Try replacing standard lightly salted or smoked mackerel with it on your holiday table - it’s much more interesting.1 fresh frozen mackerel
1 onion
150 g dry white wine
80 g smoked fish (I used salmon)
2 tbsp. l. fish sauce (if you don’t have it, replace it with soy sauce)
1 tbsp. l. vegetable oil
2 bay leaves
6 green onions
salt, pepper - to taste
Thaw the mackerel and cut off the head, thoroughly clean the entrails and rinse the carcass. Cut the onion into rings and place into the multicooker bowl along with the bay leaf. Place mackerel on top. Season with salt and pepper. Pour in the wine, close the multicooker lid and cook in the “Baking” mode for 15 minutes.
Using forks, cut the fish carcass into small fiber pieces, removing the backbone and bones. Add smoked fish, cut into small cubes, to the mackerel. Chop the green onions and mix with the fish base. Season the rillette with salt and pepper, pour in vegetable oil and add fish sauce. Mix thoroughly.
This pate is best served on pieces of toasted bread.
***
Let me remind you about my book with recipes for a multicooker - this is a whole hundred of a wide variety of recipes, among which you will find simple and quick recipes for every day, as well as recipes for special occasions. Everything from soups to baked goods and drinks. You can buy it
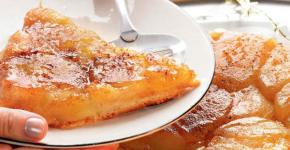
Mirror glaze- an impressive glossy coating for modern mousse cakes and pastries. However, you can also cover traditional cakes with it, but not completely, but only the top, so that the icing drips down in beautiful drips.
To get the perfect colored mirror glaze you need to follow some simple rules:
- The temperature of the cake itself is very important: it must be well frozen and you need to take it out of the freezer immediately before pouring the icing. If you take it out earlier, condensation will form on the surface and will negate all your efforts.
- To prepare the glaze, glucose syrup is required, but it can be replaced with corn syrup or invert syrup; liquid honey is also suitable, but it gives a strong aftertaste. How to prepare invert syrup?
- Natural dyes such as beet juice or berries are not suitable for mirror glaze; if you don’t have any dye, there seems to be only one way out: make a glaze simply based on chocolate, but an inventive mind suggests that this is not the only solution. The glaze can be colored using sugar syrups for cocktails; they come in very bright colors (blue - Blue Curacao, green - mint, pink - raspberry, etc.). We will analyze this recipe below, but the color will not be so bright, because... adding too much extra ingredient can ruin the consistency of the glaze.
- The glaze has a working temperature at which it is poured onto a cake or pastry; this temperature is from 28 to 35 degrees, depending on the recipe. It is very important to observe it, because plus a few degrees - and the glaze will drain too much, gaps will form, and minus - it will set before it has time to cover the cake, leaving a greasy layer on top.
- If the icing is used for drips on the cake, its temperature should be lower - about 28 degrees.
- Some people cool the glaze until it thickens, and then bring it to the desired temperature in a water bath or in the microwave - making their life more difficult for some unknown reason.
- After covering the cake with mirror glaze, you should put it in the refrigerator, not the freezer.

Below we will look at how to prepare glossy glaze for cakes and pastries using different recipes, depending on the available products, because glucose and dyes are not available in all cities.
Feel free to ask questions in the comments.
The most common recipe for mirror glaze.

For a cake with a diameter of 20 cm.
Have taken…
- glucose or invert syrup - 150 g
- sugar - 150 g
- water - 75 ml + 60 ml (for gelatin)
- condensed milk - 100 g
- chocolate (white, milk, black) - 150 g
- gelatin - 15 g
- food coloring - to taste
- Pour 60 ml of water into the gelatin and set it aside until it swells.
- Place sugar, syrup in a saucepan and add 75 ml of water. Place on the fire and bring to a boil, stirring constantly. Then set the heat to low and continue stirring until the sugar and syrup are completely dissolved.
- In a mixing bowl, put chocolate broken into pieces, swollen gelatin and pour in condensed milk. It must be chosen correctly, good condensed milk contains only milk and sugar, there should be no plant components.
- Pour hot syrup over everything, add coloring and start blending with a blender until smooth.

Advice:
The blender must be held at a slight angle and not rise above the surface of the glass, otherwise a lot of bubbles will form. If bubbles still form, then the whipped mass must be passed through a sieve.
Our mirror colored glaze is ready. Now you need to cover it with cling film and put it in the refrigerator to cool it to operating temperature - 35 degrees.

Advice:
If you do not have a special thermometer, then you can be guided by tactile sensations, because 35 degrees is almost the temperature of the human body. If you feel warm, your frosting has not cooled enough yet; it will be ready when you feel neither cold nor warm.
Colored mirror glaze without dye.

This recipe will be useful for those who could not find food coloring, as well as for those who did not find ready-made glucose syrup, but found the powder (in the store on the diet food shelves) and do not know what to do with it.
For a cake with a diameter of 25 - 30 cm.
Have taken…
- Glucose powder – 200 g
- Water – 70 ml + 60 ml + 80 ml
- White chocolate – 250 g
- Gelatin – 20 g
- Sugar - 250 g
- Condensed milk - 160 g
- Colored syrup for cocktails - 60 g
The principle of preparing this glaze is no different from the previous one. If you have ready-made syrup, but no dye, then this recipe will also work. You will need 230 g of finished syrup.

Having created a delicious dessert, you want to decorate it somehow, transform it.
We already know how to prepare mirror glaze, as well as do creative things with it . Today we will try to make a mirror glaze based on berries using two simple recipes.
A universal glaze made from berry puree will be a real boon for a skillful housewife:
- prepare the cake coating for 20-30 minutes;
- the product is absolutely natural, has no artificial colors;
- will delight you with its appearance, rich taste and aroma.
So, let's look at the two most common recipes for berry glaze.

Ingredients
To prepare berry puree:
200 grams of strawberries (you can use any other berry)
400 grams of powdered sugar
3-4 tbsp. spoons of drinking water
To prepare the berry glaze:
390 grams of berry puree
290 grams of drinking water
180 grams of granulated sugar
30 grams of glucose syrup (invert syrup)
16 grams of pectin NH
15 grams of crystalline or leaf gelatin
Inventory
hob
deep capacity
saucepan
tablespoon
How to make berry puree cake frosting
Soak gelatin in water in a ratio of 1:6. Set aside until we get to the berries.

Rinse the berries thoroughly under running water.

Let's clear the stalks.


Ingredients
100 grams of berry puree (the recipe for making puree is presented above)
70 grams of milk
45 grams heavy cream (33%)
25 grams granulated sugar
45 grams of glucose syrup (invert syrup)
320 grams of white chocolate (porous can be used)
7 grams of crystalline gelatin (or leaf)
Inventory
hob
tablespoon
saucepan
How to make white chocolate berry puree cake frosting
Let's start with the gelatin right away. Pour the product crystals with clean water and leave to swell.

In a separate bowl, which can be used in an open fire, mix our ingredients: milk, berry puree, granulated sugar, and glucose syrup. Place the mixture on the fire and bring to a boil.

Melt the white chocolate slices in or over a water bath.

Let's combine two ingredients: milk-sugar and chocolate. Mix everything well. Add gelatin to the mass. We break through the composition using a blender.
When the composition becomes homogeneous, strain it through a sieve. And we will send it for storage until the culinary dessert is poured for serving.

We use it for filling frozen desserts. The operating temperature of the composition is 28°.
Once I saw on TV how confectioners decorated cakes with incredible glossy icing that reflected their appearance - it was a glaze: chocolate mirror glaze for cake. A spectacular glossy finish has become very fashionable today - it simply attracts the eye. And I decided to try to make the same mirror glaze at home: with chocolate flavor. The result exceeded all my expectations. Try it too.
Ingredients:
- gelatin - 8 grams;
- sugar - 250 grams;
- cocoa powder - 80 grams;
- cream 33% - 80 milliliters;
- water - 150 milliliters;
- dark chocolate - 50 grams;
Chocolate mirror glaze for cake. Step by step recipe:
- It is necessary to soak the gelatin in water according to the instructions on the package. But if you don’t have instructions: pour dry gelatin with cold boiled water (calculating 1 tablespoon of gelatin per half a glass of water) and leave it for 1 hour to swell. If you have instant gelatin, then it will swell in 25-30 minutes.
- Then place the gelatin in a water bath to completely dissolve, stirring occasionally. Within 10 minutes it will dissolve. Advice. It is very important not to let the gelatin boil, because at 100 degrees the collagen protein is destroyed. And such gelatin loses its gelling properties. This process is irreversible and such gelatin can no longer be used for cooking.
- After complete dissolution, the gelatin liquid must be cooled slightly, to approximately 50 - 60 degrees. And now the gelatin is completely ready for further use.
- It is equally important not to overfreeze gelatin: that is, you should not put it in the freezer. When frozen, gelatin crystallizes and will separate when thawed. Which is also unacceptable for preparing dishes using gelatin.
- Pour sugar and cocoa into a separate pan and mix everything thoroughly. Then add cream and water alternately.
- Place the mixture for the future chocolate glaze on the stove and, stirring constantly, bring to a boil. It is very important to stir constantly with a whisk because the glaze burns quickly.
- Remove the chocolate mixture from the heat and add pre-crushed dark dark chocolate to it.
- When the chocolate glaze has cooled a little, make it “mirror”, that is, add soaked gelatin. Once again everything needs to be mixed.
- Strain the finished chocolate mirror glaze through a strainer and cool to room temperature. Read more:

For white gloss:
- 100 grams of white chocolate;
For dark gloss:
- 100 grams of dark chocolate 72%;
- 100 grams of invert syrup or confectionery glucose;
- 70 grams of condensed milk 8.5%;
- 10 grams of gelatin + 60 ml of cold water.
For the syrup:
- 100 grams of white sugar;
- 50 ml cold water.
How to make mirror glaze for a cake:
- We start making glaze by preparing gelatin. Soak the gelatin and leave it to swell.
- Pour condensed milk, invert syrup or confectionery glucose into a mixer bowl or a wide-necked cup and break the white chocolate into small pieces.
- Pour sugar into a thick-bottomed pan and distribute it over the entire bottom. Carefully pour water into the very center. It's better to do this with a tablespoon. From the center, the water itself will distribute throughout the sugar. Let the syrup boil on the fire. We forget that in the house there are spoons, whisks and all sorts of other utensils that can be used to mix the syrup. The only thing that is allowed is to rock the pan a little from side to side to ensure even boiling. Bring the syrup to 121°C and remove from heat.
- Place the swollen gelatin into a bowl of chocolate and pour the prepared syrup over the entire mass.
- We take an immersion blender, lower it into the bowl at an angle of 45° and begin to punch through the entire mass without lifting the blender up. If you hold the blender level and periodically lift it, the glaze will be filled with oxygen and the coating on the surface of your finished cake will not be smooth, but will contain bubbles and will ruin the appearance of your dessert.
- As soon as the mass has become completely homogeneous, cover with cling film in contact with the glass. If you simply cover the glass with film, condensation will form on the surface of the mirror glaze.
- We follow exactly the same procedure when preparing chocolate glaze. To do this, simply replace white chocolate with dark, bitter chocolate.
- When the colored mirror glaze for the cake is ready, leave it to cool on the table. After cooling completely, put it in the refrigerator.
- Before use, the glaze must be melted in a water bath. The operating temperature is 36°C, but nothing bad will happen if your thermometer shows 34°C-37°C. The main thing is that there is no less and no more (!). The mirror glaze should be applied to a well-frozen product.
- If you need a colored mirror glaze, then use prepared white chocolate glaze as a base. To do this, simply add fat-soluble food coloring to it just before adding to the dessert.
- If you need to get a pure white color (like a sheet of paper) - add ½ tsp. isomalt. My photo shows the addition of gold kandurin to give the glaze a pearlescent hue.
- For convenience, I always prepare a double volume of white chocolate glaze. This mirror glaze for the torus can be stored in the refrigerator for no more than two weeks.
Ingredients:
- gelatin in the form of sheets - 12 grams;
- white chocolate - 155 grams;
- drinking water - 85 ml;
- condensed milk with sugar - 115 ml;
- granulated sugar - 155 grams;
- glucose syrup - 155 ml;
- food coloring - as needed.
Preparation:
- We begin preparing the mirror glaze for the cake, according to the recipe presented with photos step by step, by preparing the gelatin. We will need gelatin plates, as well as cold water. The plates are placed in a bowl and then filled with water. If you don’t have sheet gelatin at home, you can use granulated gelatin; fill it with 72 milliliters of water and leave for one hour.
- Now you should take a tall glass or a large bowl; it is very convenient to use a special glass for a blender. The required amount of condensed milk is poured into it, and white chocolate, which has previously been finely chopped, is also placed there.
- Take a saucepan, pour water into it, and then add glucose syrup and granulated sugar. The mass is transferred to the fire and gradually warms up; the syrup will be ready when the granulated sugar is completely dissolved in water. Some confectioners advise not to stir the syrup with a spoon; just move the saucepan slightly on the stove. This will speed up the sugar dissolution process.
- As soon as the mixture begins to boil, it is necessary to measure its temperature, so it is better to prepare a thermometer in advance. At this stage, the mixture is stirred with a spoon and brought to a temperature of 104 degrees. This temperature is necessary for the reason that it is at this moment that the mass will be ready.
- If you don’t finish cooking the syrup, the future decoration for the dessert will simply drain. But you can’t overcook the mixture over the fire, since eventually the multi-colored mirror glaze for the cake, according to the recipe given in the photo, will become thick and it will be difficult for it to cover the cake.
- The hot syrup can be immediately poured into a blender glass that already contains condensed milk and white chocolate. The mass is left for a while, you need to wait until the chocolate melts and the syrup cools to 85 degrees. At this time, you can pour prepared gelatin into the mixture.
- If gelatin is used in powder form, then first you need to melt it using a steam bath, or use a microwave oven. The resulting composition is thoroughly mixed with a spoon to obtain the most homogeneous consistency.
- Four drops of any dye are added to the resulting mass, and then the blender is immersed in the glass and the device is turned on at minimum speed. The color of the future glaze will immediately begin to change. If it is necessary to obtain a more saturated shade, then the dye can be used in larger quantities. After cooling, the glaze may have a slightly different shade, if you want to see it, then put a spoon in the freezer and then dip it into the resulting mass.
- It is very important to hold the blender at a 45-degree angle and blend at low speed. If you do not follow these rules, then eventually there will be bubbles in the mixture that will ruin the appearance of the glaze. When small bubbles do begin to form, it is quite easy to get rid of them by straining the finished mirror mass.
- As soon as the multi-colored mirror glaze for the cake, according to the proposed recipe with step-by-step photos, is ready, it is covered with cling film. The film must be placed directly on the surface of the mixture, since glucose syrup can create a thin film on the surface of the mixture. The finished glaze is placed in the refrigerator for twelve hours; it is best to leave it in the evening and overnight. This is necessary to stabilize the composition.
- After the specified time, we can see what we ended up with. To do this, press the product with your fingers; if the mass is springy and elastic, then we have the ideal design for the cake.
- It is impossible to use the mass in this form, for this reason it is heated using a microwave, or you can also use a steam bath. The temperature of the heated mass should be no higher than 35 degrees.
- Cover the cake with the finished mirror mixture, but it is important to do this quickly and then put the dessert in the refrigerator.
- If you leave for even five minutes, the icing will become warmer and small drops of water will form on the surface of the cake. This will cause the decoration to simply drip off the treat.
In the previous version, we prepared multi-colored mirror glaze for the cake; in this recipe with a photo, white glaze is presented step by step. To prepare this decoration, we need to prepare white chocolate or powdered sugar. This recipe includes chocolate, but it can be easily replaced if necessary. It is a bar of white chocolate that will help make the decoration smoother and silkier.
Ingredients:
- high fat cream from 35% - 115 ml;
- vanilla powder - 1 package;
- plain white chocolate - 145 grams;
- gelatin granules - 1 pack;
- cow's milk - 115 ml.
Cooking method:
- About 55 milliliters of water is poured into a small container, and then gelatin powder is poured into it. The mass is left aside for a while so that the gelatin granules have time to swell well.
- Now we need cream, in this case it is important to use only a fatty product, otherwise the glaze will turn out to be of the wrong consistency. The cream is mixed with milk in a saucepan and then transferred to the fire. The mass is brought to a boil, and then removed from the heat and cooled slightly.
- Chocolate is added to the still hot milk mixture, which is first broken into small pieces. The creamy mass is stirred until the chocolate pieces are completely dissolved in it. Now the already swollen gelatin is poured into the same mixture and vanilla powder is added. Mix everything so that the gelatin disperses.
- The finished mass is filtered through a sieve so that there are no small bubbles left in it, this is important when creating a mirror surface on the cake. The product can be used to cover dessert only after it has cooled to 35 degrees. You can also store this glaze in the refrigerator for some time, but before use, the mass is heated in a water bath.
Required Products:
- heavy cream no less than 33% - 315 ml;
- gelatin granules - 1 pack;
- milk chocolate without additives - 85 grams;
- molasses - 1 glass;
- granulated sugar - 265 grams.
Cooking process:
- To create a mirror glaze for a cake with your own hands, according to the proposed recipe with photos step by step at home, you need to prepare gelatin. It is filled with water and left for forty-five minutes. In the meantime, the gelatin is infused, you can start preparing the glaze.
- To begin with, combine granulated sugar and a glass of liquid molasses, from this mass sweet caramel is cooked, but you cannot stir the sugar, otherwise the caramel will quickly harden. The readiness of the syrup is determined by its shade; as soon as it turns caramel, you can remove the mass from the heat.
- Add heavy cream to the still hot syrup in a thin stream; first, the cream is also brought to a boil. When adding cream, the mass is constantly stirred so that the glaze is homogeneous. First, grate the chocolate, so it will dissolve faster. Once the caramel mixture is ready, it is gradually added to the grated chocolate, while the icing is continuously stirred.
- Finally, dissolved gelatin is added to the cake decoration, and then the mass is thoroughly beaten with a blender. If you want to get a mother-of-pearl effect, you should add five grams of golden kandurin to the glaze.
Ingredients:
- granulated sugar - 245 grams;
- gelatin in sheets - 13 grams;
- glucose syrup - 82 ml;
- cocoa powder - 85 grams;
- purified water - 110 ml;
- heavy cream - 175 ml.
Cooking method:
- To prepare chocolate mirror glaze for a cake, according to the recipe presented with photos step by step, you need to prepare gelatin by placing it in cool water. Then the heavy cream is heated, for this it is poured into a small ladle.
- We begin to cook the syrup, consisting of glucose syrup, granulated sugar and drinking water. Cook the mixture until it reaches a temperature of 109 degrees. Boiling cream is gradually poured into this syrup, the mass is removed from the heat and everything is thoroughly mixed.
- The last step is to add cocoa powder, mix everything again and put it on the fire until it boils. Add squeezed gelatin to the hot mixture and beat everything with a blender.
A very important detail: the cake must be well cooled. The glaze that flows through the wire rack can be strained again through a strainer and covered the cake with it again. The finished cake with chocolate mirror glaze should be placed in the refrigerator for 2 hours. Transfer from the wire rack to the dish or cake stand quickly, with a sharp and precise movement.
Chocolate mirror glaze is suitable for cakes such as Bird's Milk and Daniella. I love making mousse cakes and covering them with different types of mirror glaze. White glaze turns out great if in the recipe you replace cocoa with milk powder, and dark dark chocolate with white. If you want to surprise your guests and pamper your family with something new and unusual, decorate your product with chocolate mirror glaze. There will be no limit to surprise and delight.
Mirror glossy glaze can be of different colors, which are achieved using food coloring, but there are also some changes in the recipe: for example, condensed milk, glucose syrup and others are added. And the combination of different colors of glaze on one cake, decoration using a pastry bag, combination with different sprinkles and even candied fresh flowers looks very beautiful, impressive and unusual: the image of which in mirror glaze is especially captivating.
Even if you are a novice pastry chef, with the help of the secrets that you will find on our website “I Love to Cook”, your dishes will be able to compete with the best chefs of fashionable restaurants.