Garden lights - a variety of uses and nuances in the manufacture of your own hands (115 photos). Country lighting
Country lighting plays a major role in landscape design. But the main problem is the high cost of decorative lamps and electrical appliances. Today we will give each of us a chance to improve the lighting of the cottage and create stunning illumination with our own hands, practically at no cost.
Lamps for summer cottages made of plastic, glass and forging are very expensive., even more so when it comes to an exclusive version. But there is a solution to the issue - creating country lighting with your own hands, and even from improvised items, which will not only help to equip the site with high quality and illuminate it, but also significantly save money.
We considered many interesting and original ideas, had a conversation with leading lighting technicians and made the TOP 7 best offers from amateurs and professionals. So, this list is already in front of you!
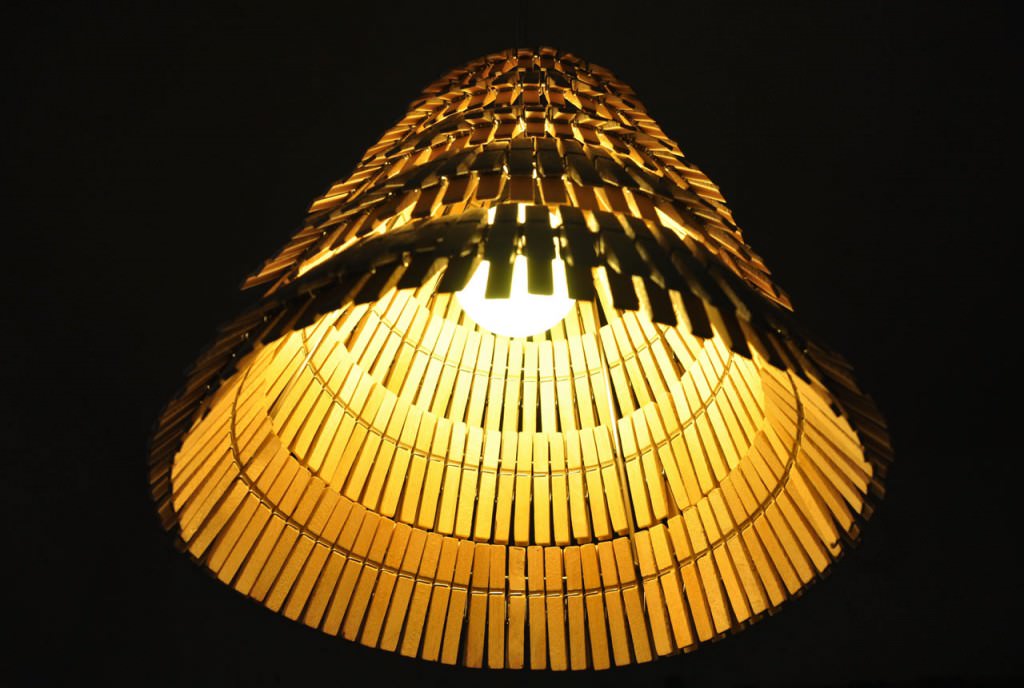
Light made of skewers or chips
To make such a lamp, you will need about 5-6 packs of standard wooden skewers, or thin chips. The whole design of the luminaire is that each small element is tied with an adjacent thread. This is necessary to create the shape and fix the so-called plafond.
Alternately, folding the skewers, we tie each one and tighten one or two knots, apply the next one to it and repeat the manipulation. Having folded one side of the lamp, sequentially, one skewer at a time, we begin to assemble the second side. To do this, we take a skewer, fix it between two skewers of the finished side, and tie them all with a thread, carefully braiding them. We continue to collect until the second side is ready.
Note that such a lamp can be not only rectangular, but also in the form of a triangle, or vice versa, increased to 5, 6 or more sides. This will complicate the job a little, but beauty always requires sacrifice.

To make the lamp even more decorative, use colored thread for tying. To strengthen the structure, lubricate all ties with a thin layer of glue. To reduce the cost of the project, instead of skewers, you can use thin parts of old bamboo blinds or napkins that have become unusable.
After the production of an interesting shade for the lamp, we install a light wire frame inside it and tie it to the lamp. This can be done without a frame, just on a wire or a dense thread.
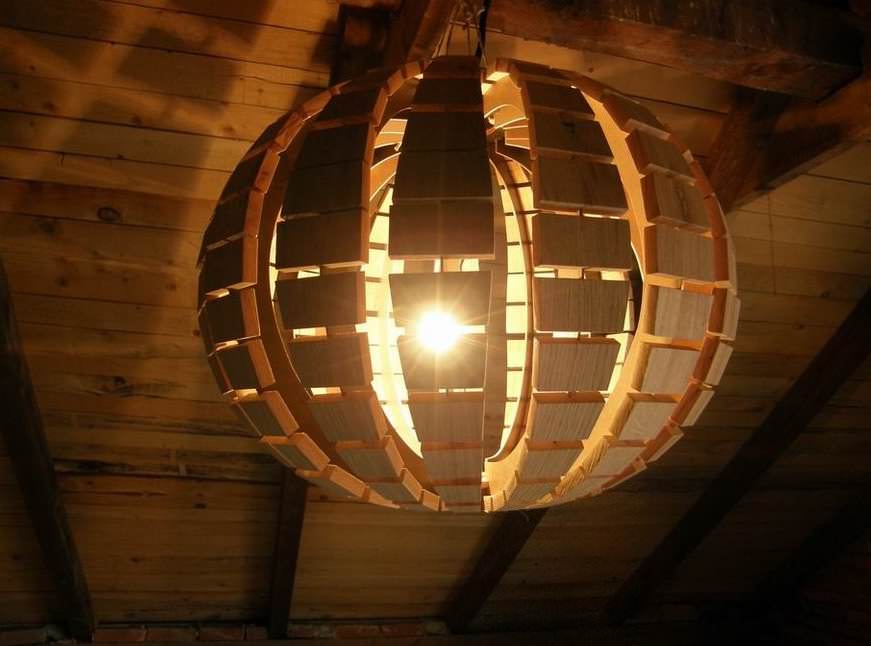
Lamp for giving from clothespins
It is worth starting the production of such a lamp by creating a frame for clothespins. It can be made from steel wire or thicker aluminum wire.
It is necessary to make 3 circles of different diameters from the selected material, and then fasten them into one common frame. In the upper part, you need to come up with a mount for the cartridge.
When the frame for creating the lamp is ready, you can start decorating it. As you can see from the photo below, it's pretty simple. One has only to use clothespins and different angles of inclination. Also, you can choose not only wooden, but also plastic clothespins, among which you can find almost any color.
Be careful, every detail of such a lighting device must be reliably protected from fire. To do this, you can use a special wood treatment, or simply install the lamp at a greater distance from the "lampshade" and choose a low power.
DIY bottle lamp (video)
LED outdoor luminaire
The installation and connection diagram of individual LEDs may seem like a complicated and lengthy process for many summer residents. Therefore, we suggest using a standard LED strip. Choose the quality and color yourself, and we will tell you about the design features right now.
The LED strip can be placed on almost any base, but we chose a plastic tube for the production of the country lamp. It is an inexpensive and easy-to-use material that can be cut, bent into the desired shape or installed in the required place.
The tape is wound around the pipe from one end to the other. It would be more correct to start from the edge opposite to the setting one. The tape can be fixed on special clamps, glue or self-tapping screws, if such fastening is provided.
After that, the lighting tube is installed on a wall, a tree branch, a house ridge, or even under the roof of a gazebo in the country, and the tape is connected to the network.

Thanks to the low cost, you will get a unique kind of country lamp. Of course, it won't give out as much light as a standard lighting lamp, but it can easily create a pleasant and quiet, perhaps even romantic environment.
DIY decorative lighting
The simplest type of lighting was suggested to us by our regular reader, who described the process of its production.
Immediately we present the image so that it is easier for you to decide on the shapes, sizes, production technology.
To create a lamp, we need jam jars of different sizes, various glass containers with handles, for which we will fix it.
When you have found the right number of cans and other containers, you need to make the main body of the lighting fixture. We assemble it on the basis of a wooden bar, equip it with hooks for hanging cans, and chains on which the main assembly takes place.
Now all that remains is to hang the original country lamp in a gazebo or under a canopy, in a garden, on a tree branch, or near a house, but at a low height, since all the lighting will take place with the help of candles, which will need to be changed periodically. Agree, a great offer!

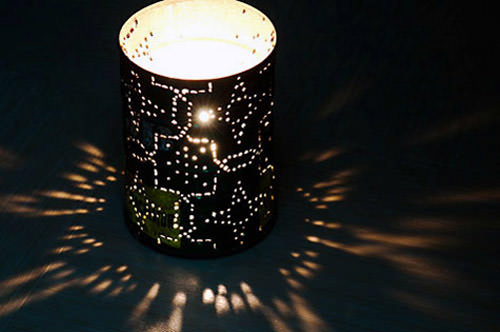
Country lighting from cans
A favorable and cozy atmosphere in the evening in the country can be created with the help of dim and diffused lighting. You can achieve the desired result using simple tin cans with holes, inside which ordinary candles are installed.
You can create a pattern on the cans - the holes through which the light passes gently, you can yourself, with a nail or a self-tapping screw. But it will be much more convenient and accurate to work with a drill. Having installed a drill of the required diameter, place a small round log in the jar, into which the drill can be resting, and drill the holes according to the preliminary drawing outside the jar.
You can hang such lamps anywhere, and put candles inside and light them in the evening. Only an hour or two for a hand-made, and your gazebo or resting place is illuminated with an original device designed and created by yourself.

Fabulous illumination of the territory of the cottage
This is truly a fabulous lighting, because it is made on the basis of natural materials to create the foundations of the lamp, and can also be placed in the garden, on the lawn, along the paths and so on.
Such lights can be electric or run on kerosene, but electric ones are more functional and more practical, since you do not have to turn on and off the lighting one by one.
To create exclusive lanterns, you will need to prepare logs with holes. It can be fresh stumps, tree cuts that you need to decorate in some way.
A decorative lantern is installed inside the hole, which can easily be made with a chainsaw. If the lighting is powered from the mains, you will need to make high-quality wiring and connection.

You can even create not soft, but bright and directional lighting. To do this, you will need to install more powerful lamps in the lanterns, as well as equip them with reflectors directed in the right direction.
Lighting made of garland and plastic
And again, plastic bottles come into play ... remember the greenhouses made of plastic bottles, trash cans and various decor items for the summer cottage? Isn't it very interesting to work with this material?
But today we propose to use plastic not only from bottles, but also from cups. Choose different colors, cut into thin strips and create small cone shades. They fit comfortably on any garland, which will now work not only for a couple of weeks a year, on New Year's holidays, but even in the summer in the garden, creating cute glare and beautiful lights in the garden or gazebo.

When arranging lighting in the garden, do not forget about safety precautions:
- It is worth remembering about high-quality wiring, insulation and precautions when installing electric lamps in the country;
- For the production of lamps, it is worth choosing non-combustible materials, or making low-power lighting so that the temperature of the lamps cannot warm up and set fire to the product;
- When working with kerosene lamps, periodically monitor the fuel level, and also extinguish the lanterns at night;
- Use good quality fixtures to mount the fixtures so that they do not fall and cause inconvenience.
How to make a lamp with your own hands (video)
Original country lamps (20 photos)


Reviews and comments
Inna 07/01/2014
All the options in the photos are really very original, I was especially impressed by the lamps made from cans, in my opinion, very beautiful and inventive, in addition, everyone can certainly make them. In general, lighting plays a colossal role, it can radically transform the appearance of a garden at night, turning it into a magical, cozy corner.
Sasha 11/06/2014
I liked the last version of the garland and plastic most of all. It looks really gorgeous and I think it shines just as cool) In general, how will the forces be, I will definitely try to do this)
Yana 09/19/2015
I think that home-made lamps are no worse than ready-made ones, and even better, they definitely cannot be denied in originality, and how much money can you save! Beautiful lamps can be made from literally everything, even their garbage: old plastic, tin or glass bottles, pots, boxes, or anything, you just need to call your imagination for help. These photos are proof of this.
Ksenia 11/27/2015
How many ideas! And I thought, where do I collect old discs, I don’t throw them away. But light bulbs can be made in different colors. Everything, I will persuade my husband, let him help. And the can lamp is cool too. Only I'm not sure that the talent will be enough to cut such beauty.
Julia 05/09/2019
For the first time I see a lamp made of clothespins, it looks original and beautiful, you can make it not so big. You can also fix the clothespins with glue, then this design will last a long time.
Add a commentAlmost in any hardware store you can buy lanterns for country houses for every taste, but their price is far from the most affordable. That is why many summer residents prefer to make street lamps with their own hands. We will tell you about the features of self-production of lamps for the home below. You will also see a photo of samples made by yourself.
Types of street lamps
Street lamps that you plan to install on the territory of a country house or summer cottage, should perform the following functions:
- illuminate the adjacent territory so that residents are not afraid to move around it at night;
- fit into the overall design concept of the yard and the house.
Lamps for street-type summer cottages are divided into the following types:
- wall lights. They are best suited as lighting fixtures at the entrance to the house and in the area in front of it. Alternatively - lighting next to the gate or wicket. They can be different in form and design, most often they choose "antique";
- floor lamps - they are installed directly on the ground or on the veranda. A classic floor lamp is a flat stand with a round ball at the top, but there are more modernized models that differ from each other in height, shape and number of shades;
- ground lamps - they are mounted directly into the ground, and they can serve as a backlight for green spaces, as well as illuminate pedestrian walkways at a summer cottage. In addition, they well complement swings, summer pavilions and other buildings on the site. Lanterns of this type are most often rectangular or circular;
- hanging lights - they are attached on verandas to ceiling beams or even to trees, if this does not make it difficult to connect to the network. As a rule, they are a long and strong chain that ends with a shade.
In the photo you can see some types of country lamps that can be purchase ready-made, but you can do it yourself.
Light sources for street lamps
For country lamps can be used different light sources, for example:
What can you make your own lamp from?
Very often homemade street lights made of plastic, but this solution is not the most successful, since the plastic product easily breaks and breaks. It is best to make a metal lantern with your own hands:
- brass;
- copper;
- bronze.
It is worth noting that the steel model will be maximally resistant to precipitation and other external influences, but its appearance leaves much to be desired.
And here copper lamps hand-made ones will harmoniously complement the retro-style exterior, but do not forget that over time, copper on the street oxidizes and acquires an ugly greenish tint. And the bronze lamp tends to darken, so it will have to be cleaned regularly.
The most optimal material for the lamp is brass, which is durable and attractive.
Making a homemade lantern
To make a lantern based on metal raw materials with your own hands, you will have to prepare tools:
- drill;
- drills;
- screws and so on.
Very often do-it-yourself lights made from scrap materials, for example:
- wood chips;
- glass and tin cans;
- clay;
- plastic bottles and cups that serve as shades for garlands;
- PVC pipes;
- cardboard packages from drinks;
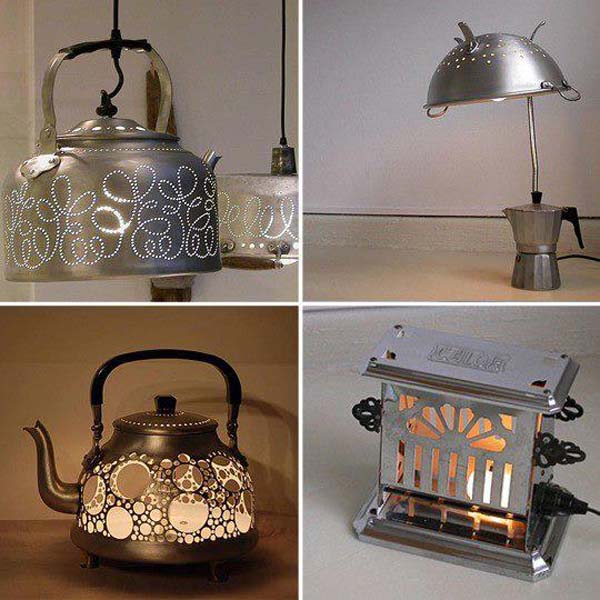
- old kitchen utensils;
- unused building materials.
Such products will be especially original, and making them with your own hands will not be difficult. However, they will be fragile and short service life.
When making a lamp for a summer residence with their own hands, many do not hesitate to use their imagination to the maximum. At the same time, modifications can be very diverse. Below we will consider the manufacturing features of some options.
DIY glass bottle lantern
 It is very easy to make a plafond based on a glass bottle or jar with your own hands, while transparent glass will allow light to easily pass through the walls and create wonderful special effects.
To work you will need:
- bottle or can;
- pliers;
- cartridge;
- insulating tape;
- insulation stripper;
- indicator;
- decor elements.
The work progress is as follows:
- we install the electrical wiring, connect the wires in the socket and screw in a light bulb there;
- we take a bottle with a narrow neck, preferably of an original shape and color, and put small beads, transparent balls, reflecting the color, or cut glass on its bottom;
- we wind a thin colored wire on our finger so that it takes on a spiral shape, and we also put it in a bottle;
- we lower the cartridge with a light bulb into the plafond and fix it with silicone.
DIY forged lantern
Forged lamp for a summer cottage - more reliable and durable option... To make it you will need:
- steel rods;
- corner;
- stripes;
- welding machine.
Manufacturing work will look like this:
- from 4 steel frames we make a body in the form of a rectangle or a trapezoid;
- we close the outside of the frame with gratings. They are boiled from steel rods;
- we cover the case from above with an iron cap;
- we make a bracket from a steel bar of a square shape, which will serve as an attachment to the wall;
- the lower curls are made of thin steel strips;
- the ends of the curls are welded and connected by hooks.
Features of connecting the flashlight to the network
 When you make lights for a summer cottage, you need to pay due attention to the procedure for connecting the wiring. To connect the lamp to the network, we need:
- electric cable VVG;
- terminal blocks for fixing connections;
- metal hose or corrugated pipe for protection.
For homemade devices, they most often use cable with two cores 1.5 mm thick... It is better to purchase a coil immediately, where the length of the wire will be 100 meters. And the diameter of the corrugated pipe should be from 18 to 25 mm. It will be needed to protect the cable from rodents or damage when digging the soil.
The holes in the terminal blocks must have a diameter of 2.5 to 4 mm and consist of one or two strips, it all depends on the number of connections and shades. The pads must be selected based on a current strength of 5 to 10 A.
Installation involves the following actions:
- we dig a trench for laying a cable with a depth of about 80 cm and a maximum distance of 60 cm from the ditch to the house;
- when installing floor lamps, you first need to put metal knives and then, in turn, pull the cable through them. In the place of its placement in the trench, we put it in a corrugated hose. After passing through all devices, the cable is cut so that the length of its tail is a maximum of 15 cm;
- we prepare the second piece of wire and also pass it through the pipe and connect two cables with terminals at the top of the device;
- if the lanterns are mounted on a wall or façade, the junction boxes must be securely insulated. It is best that in the boxes the wires are connected with clamping nuts, you can also use pliers, but then each connection must be soldered. Wrap the twisting points with electrical tape;
- we install the wiring diagram. Since it has two wires, one is "zero" and the second is "phase", then you need to see that the switch can open the phase wire. Then in it in the off position during the change of the burned out lamp there will be no risk of electric shock. The phase wire is determined by means of a special indicator;
- a simple outlet is also suitable as a connection point, then the entire system can be de-energized quickly only by pulling out the plug. Also, the cables can be connected directly to the terminals on the board, which is equipped with an automatic fuse, which in the event of an emergency disconnects the voltage;
- when installing the switch, you need to check whether its indicated power corresponds to the load in this network;
- Before digging the trench, make sure all lights are working and reinforce the posts by ramming around clay or fine gravel. If the soil is light, then it is better to fill the instrument supports with concrete.
Street lamp as an element of the exterior
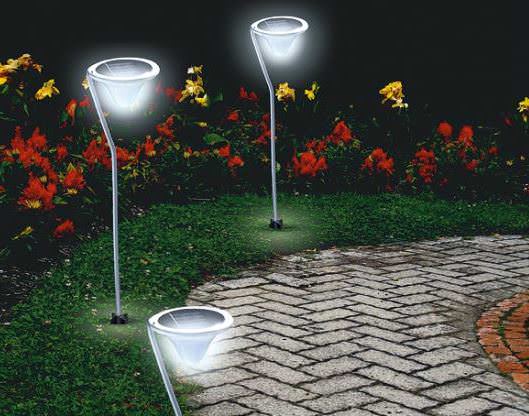
 To make your site more attractive in terms of design with the help of a lamp, choose different shapes for them. For example, you can install devices in the form of fungi with domed shades at the top along the tracks. Thus, the light will be reflected downward and an unusual lighting effect will be created.
Another original design solution is floor lamps in the form of cylinders or floating balls, if there is a pool on the site. Also, luminous vases, benches, flower pots or sculptures are used as sources of illumination of the site. All this is achieved through the use of halogen paint, which gives fluorescent light in the dark.
There are a lot of ideas for decorating lighting solutions on a suburban area. As well as many options for the devices themselves, which can be made by hand, saving hundreds and thousands of dollars on expensive designer lamps. If you have a fantasy, you can easily think over the original lighting for the site without huge costs.
For garden decor the combination of plants is key, additional elements also play a significant role, which contribute to the completion of the ideal image. But this condition is valid only for the daytime, in the evening you will need additional lighting.
By equipping your plot with appliances, you will be able to enjoy a wonderful extravaganza that places accents in the right places and turns the courtyard into a fabulous country where you want to endlessly enjoy harmony and solitude. In this article, we have collected for you the most relevant ideas that will help you highlight the delightful flora.
A garden like a jewel shining with bright lights
Even if you have low voltage lamps at your disposal, you can use them to highlight your flower beds and create a unique atmosphere. Notice how the spotlights are positioned under the trees and bushes, making them more visually appealing. And the illuminated pool will create the effect of an exotic lagoon.

Garden & Yard Design by QAL Surroundings
To your attention there is a cozy seating area. In addition to the elegant and luxurious headset, tall trees draw attention, which, when illuminated, turn into a decorative wall, providing a relaxing background for a calm conversation.

Unique chic from Oak Leigh Manor
In a comfortable area, you can place not only upholstered furniture, but also a dining area. And believe me, dinner in such an enchanting environment will be unforgettable, especially if you have a romantic nature.

Multiple strategic flashes for a beautiful minimalist look
Wonderful displays of light and plant combinations can be found in exhibitions from renowned landscape designers. The combination of shades and textures largely depends not only on the intensity of lighting, but also on the angle from which these streams come to the riot of greenery.

Light Positive (formerly Nancy Goldstein Design): the magic of a flower garden
Garden gazebo should be the star of the show. Outdoor luminaires are a good way to showcase a unique design that you can place furniture underneath. Also, do not ignore the selection of trees and other plants, so that the surroundings are no less spectacular.

Timeless classics enveloped in soft streams of light

Laconicism can become no less attractive
if supplemented with curly greenery and a lamp
The feeling of celebration will be present in your yard every evening!

Festive atmosphere, The Gardens at Great Oaks
A stunning option, designed in the best traditions of official style.

Below is an option when the direction of illumination can radically distinguish palms that are identical at first glance.

You can also get some ideas from nature reserves that have their lights on for visitors. Pay attention to the competent placement of accents, it is especially visible among the thickets of bamboo, where bright red flowers emerge among the stems. Welcome to Clearwater Outdoor Lighting that delivers these nuances, highlighting them in a way that makes them visible in the palm of your hand.

Exotic palms in the rays of monotonous lighting

Bamboo decorative wall
VOLT manufactures bespoke architectural grade lighting and they have some fantastic ideas on how to transform garden landscaping into a fairy-tale world after dusk.

Impressive Asian-style arch for a luxurious lot

Highlighting a chic fountain and decorative trees

Impeccable layout, highlighted by intense lighting

Cozy place to stay
Just imagine a quiet and peaceful evening in the garden, sitting in a comfortable armchair ... in front of the TV. Your Technology Advisor simply could not resist and combine the harmony of nature and modern technology.

Stunning terrace with all the amenities
Shining bright light striking the trees gives them an original surreal look. S.A. Grows created a creative atmosphere in the garden not only with spotlights, but also with unusual additions such as a restored cart.


The light emanating from the flowering shrubs can give amazing results. Outdoor Lighting Perspectives of Wilmington uses this technique quite effectively, as well as other tricks.

Sometimes an open living room needs an accent with lighting. The peripheral area of light allows you to visually touch the garden.

Unique Gardens UK
Landscaping using colored lights can provide extra drama. For outdoor lighting, applying a blue tint, whites and muted greens are great ideas for expressing personality.


In New Zealand, the garden surrounding the road has been filled with colorful lanterns that transform the street into a fairytale action. The simply festive vision is complemented by multi-level spotlights that paint a stunning landscape. Just imagine how useful this solution will be for your site.

Wellington Botanical Night Street Creative Decoration
But Piedmont Park in Atlanta is decorated with lanterns twisted around the trees and bushes themselves. The different colors create an interesting effect that illustrates the very fairy tale that lives in our imaginations.

Complementary colors like red and green can be an effective way to dilute greens. Buffalo & Erie County Botanical Gardens have turned exotic thickets into an unrivaled masterpiece Garden Walk Garden Talk in the evening.

White shades highlight tall trees, and a subtle blue tone is used to initialize the pool. The perfect combination is the work of DIYFUSE representing this enchanting garden.

Features of reservoirs
Probably, few people will not be able to ignore the temptation of creating a small reservoir. But we will talk not only about ponds, but also about artificial waterfalls... Water features are a good solution for any garden. And you can radically transform the decorative cascades into an enchanting show, which you will get to know later.
St. Louis Homes presents us with a kind of lighting that colorfully highlights trees, stone steps and water.

The next example is truly eye-catching. A huge pond with installed lamps that well highlight the boundaries and islets. It is especially breathtaking when fog hangs over the surface.

The fountain is the perfect addition to a well-lit garden. Shrubs and trees are almost literally shrouded in streams of light, and one cannot fail to notice how correctly and harmoniously the illumination intensity is selected and fair prioritization with their potential.

VOLT also has some bold ideas for water bodies, the splendor and splendor of this garden defies description!


In addition to the lights from the front, illuminating the edge of the infinity pool, we see three more levels of cascades. Two of them are backlit, which adds drama to the overall picture. Landscape Archives have gone to great lengths to transform this garden into a dreamlike oasis.

Dennis' 7 defies standard landscaping by allowing great lighting to look good enough. As you can see, in the light streams there is not only an artificial waterfall, but also large stones and grasses around them.


Expand imagination and reveal all aspects of non-standard solutions in relation to design and garden lighting possible not only on a large plot, but also on a compact terrace.

As an original way to express your individuality, there will be a variant of creating a pond with carp. This pure pleasure will allow you in the evening, after a hard and eventful day, plunge headlong into an endless world of tranquility and tranquility.

A fountain or waterfall in the yard will play a decorative role to decorate your personal space. They go well with a pool or dining area.


The Garden Environments example is an original showcase featuring the delights of monochromatic paintings interspersed with a green hue.

Ashland Berry Farms has developed a model of an ideal pool with a beautiful shimmering effect on the surface provided by the backlight.

Our garden acts as a quiet and cozy harbor where we prefer to spend time during warm seasons. If you like to spend long evenings outdoors, then you simply cannot do without decorative garden lamps.
In this way, you not only provide good lighting, but also add an incredibly beautiful effect to the luxurious landscaping with the help of correctly installed spotlights and lanterns. The creative possibilities for you are endless, and you can draw inspiration right from your garden.
Categories:How nice it is to have a house with a garden! After all, in the morning, putting on a robe, you can go out into your yard and take a breath of fresh air.
It is also nice to have a cup of tea or aromatic coffee, enjoying the view of the beautiful garden, or sit comfortably in an armchair on the terrace, reading the morning newspaper.
In the evening, as soon as the shadows begin to lurk in different parts of the garden, you can add light fabulous lighting with the help of lamps, which will help create a relaxed, calm and romantic atmosphere. Today we will tell you how, using the materials at hand, to make an original garden lamp with your own hands, and also show 50 photos with their various options.
DIY garden lamp - lighting options

Do you want your garden to be beautiful not only during the day, but also in the evening? Then take care of lighting it. After all, it is it that will help you see the beauty of trees and flowers hidden in the dark, give them unexpected fascinating forms, and also help you move around your domain without obstacles.
Alternatively, you can buy a lamp in a store, but if you are a creative person with a good imagination, then the best solution would be to make a garden lamp with your own hands. Firstly, it will help you save your budget, and secondly, you yourself choose the shape, color, material and lighting option. Do-it-yourself garden lighting fixtures can be:
- garden lamps and cans;
- garden lamps and lanterns made of glass jars;
- solar-powered garden lamp;
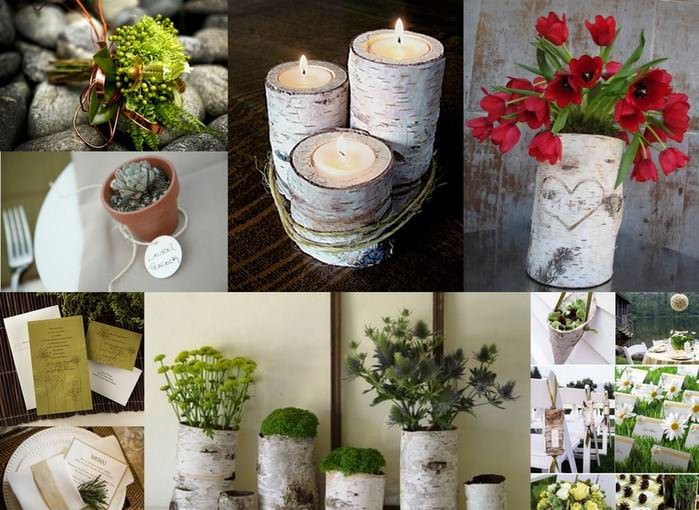
- wooden garden lamp;
- concrete garden lamps;
- thick thread garden lamps;
- other possible options for garden lights.
DIY tin can garden lamp
And so, how to make a garden lamp with your own hands from a tin can? To do this, you will need cans, nails, a hammer, fastening clamps, two rectangular wooden beams fastened together, small candles.
In the first step, prepare the work surface: fasten the beams and, using the fastening clamps, fix them. This is necessary in order to protect the tin can from deformation during drawing.
In the second step, select and apply a pattern to the paper that will decorate the jar. Attach it to the tin (or you can use a felt-tip pen to dot the pattern directly onto the jar) and put it on the piece of wood. Then, using a hammer and nails, transfer it to the lamp. The third step is to place the candles inside the tin. It will help to delicately scatter light through the holes.
Experiment with different nail sizes to create a unique pattern. Note that making a lantern out of such a garden lamp is as easy as shelling pears. To do this, you need to attach a simple metal wire to the bank.


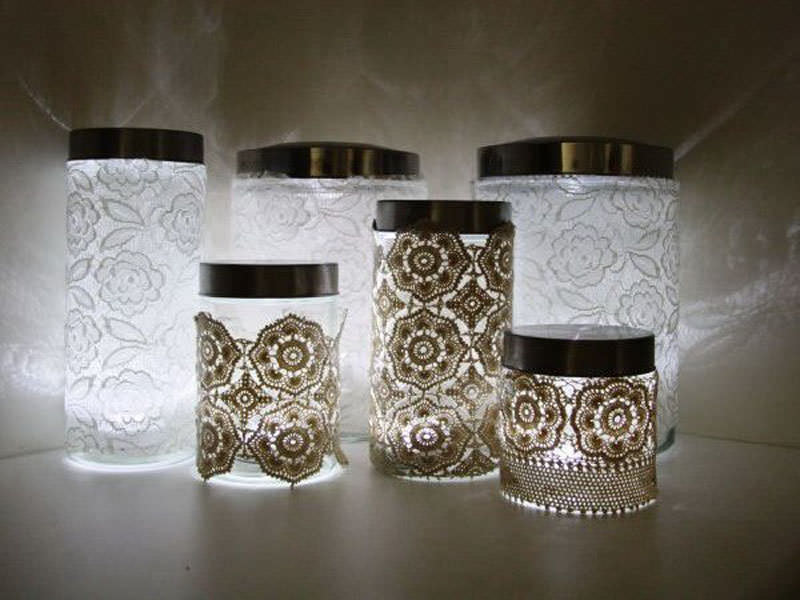
DIY street lamp from glass jars
If you have unnecessary ordinary glass or Masonic jars at home, then you can use them to make an original street lamp with your own hands. To do this, you will need candles to be installed inside these jars, light bulbs or LEDs. As a decoration, you can use beads, ribbons, flowers and other decorative elements.
Note that with the help of glass jars, you can create street lighting with your own hands in the form of a chandelier. To do this, you will need to place them in previously made holes in a wooden board, or, by making lanterns out of them (by attaching a metal wire), hang them with hooks on the slats.


DIY solar garden lamp - do it yourself
To make a solar-powered garden lamp with your own hands, you need to:
- purchase solar-powered storage lamps;
- remove its upper part;
- cut a corresponding hole in the lid of the can;
- wrap with duct tape around the lamp;
- place it in the hole in the lid;
- twist.


If you wish, you can make an attractive lamp decor. For example, in the form of a mushroom or a nautical-style house.
To make a DIY outdoor lamp, you will need an old chandelier and the top of a light bulb that uses solar energy. Below you can view 10 stunning photos.


How to make a garden lantern with your own hands from wood
There are many options for garden lamps made of wood that you can make yourself. For example, from a stump and an LED strip. To do this, you need to make 4-5 small vertical cuts around the circumference of the stump and clean them. Then insert the LED strips into them.
Alternatively, you can cut a hole in the center of the stump and insert a storage lamp or candle into it.
A do-it-yourself garden lantern can be made from branches or small planks, hammered together in the form of a standard lantern. Optionally, you can make a lantern with cut out cool faces. Candles are installed inside such lanterns.


DIY concrete garden lantern - spectacular garden lighting
Concrete can be used to make a lot of things, including spectacular garden lighting fixtures. To do this, you will need a balloon, concrete, paints and candles. The photo below shows the manufacturing process of this instance.


Garden light lamp made of thick filament
Lamps made of thick filaments look simple, but original. They can transform the exterior of your home and add a touch of flavor to your garden. The photo below shows the options for the manufacture of such lamps.


We decorate the garden and courtyard with hand-made lamps - 7 photos
In this section, your attention is provided with 7 photos of other (not discussed above) options for making garden and street lamps with your own hands.


Save so as not to lose!

