How to lay tiles on a wooden floor. How to lay tiles on a wooden floor
- Tiles should be laid in wooden buildings. Most of these structures have wooden beams of interfloor floors, various types of wooden floors were laid on them: natural boards, parquet boards, etc. It is technically impossible to replace a wooden floor with reinforced concrete, you have to use a different technology to create a solid foundation for ceramic tiles.

- It is not possible to completely dismantle the old coating. The reasons for this situation can be different, from problems with the disposal of construction waste to the impossibility of dismantling worn-out coatings due to the peculiarities of existing engineering networks. In such cases, only the unsatisfactory condition of the old wooden coverings can be a limitation, it has lost its bearing capacity and cannot withstand the additional load.

- The need to complete construction work as quickly as possible with a minimum amount of debris and dust. If in a residential apartment there is a need to replace the floor only in the bathroom or toilet, then the work should be done as quickly as possible. People live in the rest of the premises, it is impossible to worsen the conditions of their stay in the premises for a long time.

Modern building materials and technologies have greatly simplified the process of laying tiles on wooden bases, but even in this case, such work is extremely sensitive to the slightest violation of the recommended technologies.

Tarkett floor tiles prices
tarkett floor tiles
Process complexity
Wood is a natural building material that has its own specific characteristics and the resulting requirements for operating conditions.
- Hygroscopicity. With an increase in relative humidity or in direct contact with water, wooden structures absorb moisture. With a decrease in humidity, they give it away. Laying ceramic tiles leads to the fact that one side of the lumber is hermetically sealed, the process of natural ventilation deteriorates significantly, and in some cases stops completely. As a result, wooden structural elements remain in a wet state for a long time, as a result of which decay processes are accelerated. Even the most modern waterproofing impregnations and antiseptics are not able to stop these negative processes completely and for a long time. As a result, wooden structures critically reduce their original physical characteristics, the floor collapses, and there is a need for urgent, complex and expensive repairs.

- Significant linear fluctuations. With fluctuations in humidity, lumber noticeably changes its dimensions. The tile is fixed on cement adhesives, they do not have plasticity and cannot compensate for such changes. As a result, the coating comes off the base. To minimize such phenomena, it is necessary to take special construction measures that exclude the contact of the adhesive with expanding surfaces or create strong screeds that work regardless of the vibration of the wooden floor.

- Big extra weight. Wooden floors are laid on wooden logs, their cross section, pitch and total number are calculated according to the weight of the boards and maximum loads. Not always lags can hold increased efforts, and the increase can be very significant. Under ceramic tiles, you need to make a separate base, to which you need to add the weight of the tile and glue. In total, the new loads are much larger than the existing ones.

Can ceramic tiles be laid on a wooden floor? Possible, but highly undesirable. At the same time, you should always be aware of the problems that will appear after laying the tiles on the tree.

Revision of the state of the wooden floor
This is where work should begin after a decision has been made. How to technically correctly assess the actual state of the structure, because the strength and durability of a ceramic tile floor largely depends on this?

Work on laying tiles is allowed to begin only after a quality repair of the base. Boards in the future can not be changed and not used, but the logs change without fail.

Important. If the wooden floor is affected by putrefactive processes, this indicates gross violations of the technology of its arrangement. Most often, there is no or ineffective natural ventilation. Be sure to correct the detected technological errors, otherwise the new floor will quickly become unusable.

Foundation preparation
The quality of preparation of the base for the floor has a significant impact on the technology of laying ceramic tiles. Currently, builders use two methods of subfloor preparation, each with its own strengths and weaknesses.
Table. Foundation preparation methods.
| Foundation preparation method | Technical description and performance characteristics |
|---|---|
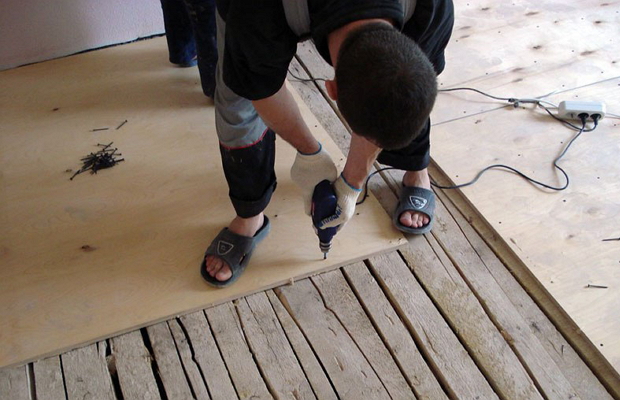
| The fastest and cleanest method of ground preparation. Old wooden floors are covered with plywood, OSB or special plasterboard. All materials must be moisture resistant. The slabs are laid in a horizontal position, all possible measures are taken to increase their stability. Ceramic tiles are mounted on this base with glue, the laying technology does not differ from the usual one. The advantages of the method are the speed and the minimum amount of construction waste. Disadvantages - relatively low mechanical strength, negative reaction to prolonged contact with water. |
| A cement-sand screed is made on a wooden floor. The solution is semi-dry, due to which the volume of water decreases. Waterproofing must be installed between the wooden structures and the screed. You can use expensive modern special membranes, or you can take cheap plastic film. The effect of these materials in this case is the same, and the cost of installation differs significantly. The thickness of the screed is approximately 5 cm, to increase the strength it is recommended to use a metal or polymer reinforcing mesh. The advantages of the method are high strength. Disadvantages - a lot of weight, duration of work, a lot of garbage. |


The choice of a particular method depends on many factors and must be done by the foreman on site.

Tiled tiles are, without a doubt, the most popular, practical material for cladding wall surfaces in bathrooms, kitchens, baths and other rooms with high humidity and requiring special sanitary control. But if on ordinary plastered walls, it is easier than ever to install it, then not even all masters know how to lay tiles on wooden surfaces correctly.
What is this article about
Why you can not put tiles on wood
First you need to figure out whether such an installation is possible at all.
As you know, these are 2 completely different materials with very poor adhesion to each other. And although there are finishers who consider such work acceptable and there is even a special mastic for laying tiles on a wooden base, it is still unreasonable to do this.
There are several reasons for this:
- The structure of wood even with minimal humidity and an increase in temperature expands. Ceramics and mortar for its installation also have these properties, but with a much lower coefficient. Tile needs a more static base;
- Tiles without additional processing can last for several decades. A tree, with constant exposure to moisture (and it will still penetrate through the tile seams), cannot do without regular care. Therefore, it will begin to simmer and rot, most likely in a few years. So laying tiles on such a short-lived base is impractical;
- Wood-bearing surfaces are prone to significant drying and shrinkage, so the seams will begin to crack soon after installation, with all the plasticity of the adhesive mixture, and then the glued material will begin to lag behind altogether.
Solutions
As can be seen from the facts provided, such an installation is still impractical, but how can you put tiles on a wooden wall, if necessary?
To do this, it is easiest to adapt the surface than to try to stick the material on all kinds of innovative mixtures little studied in practice.
There are 2 easiest ways to prepare a wooden surface for a tile:
- Plastering;
- Wall cladding with GKL panels.
Plastering under tiles

This is a simple process that is suitable for those who are thinking about how to glue tiles to wood with a minimum of loss of squaring space.
For this you need:
- Prepare the wall. To the maximum, if available, knock down the old plaster, clean the paint, dirt, degrease, treat with antiseptics and additionally primed;
- On the wall, fill a crate of wooden slats (shingles) with mesh sizes of 4 × 4 cm, observing an angle of approximately 45 degrees. For this, it is also advisable to take a similar chain-link mesh. Such reinforcement is necessary to hold the subsequently applied plaster;
- Then a spray (throw) of the cement-sand mixture is carried out. After drying, it is recommended to prime the laid starting layer, and apply another layer of the solution, thicker;
- The finishing layer, called a coating, is applied again on a pre-primed surface and carefully aligned with a level.
The base is ready. After applying cement-sand plaster with battens, it is possible to lay tiles on a wooden wall, without problems with adhesion.
GKL base

It is easiest to lay tiles on drywall. It is better to fasten it to a tree directly with self-tapping screws (gluing panels, in this case, is impractical) or build a separate frame for it.
The frame is the best solution. Firstly, in this case, the natural shrinkage of the tree will not damage the surface, secondly, it can be used to level the plane quickly and efficiently, and thirdly, this design allows the laying of high-quality thermal and waterproofing.

If we talk about how to glue a tile product to such a base, in this case it is better to choose a specialized adhesive solution, since the cement “on dry” will be extremely unstable.
The work on the construction of such a structure is divided into several stages:
- Marking taking into account surface differences;
- Cleaning, priming the plane, sealing holes, cracks;
- Installation of steam, waterproofing membranes. They can be planted on glue, but it is better to screw them on umbrellas or invoices;
- Screwing on the marking guide metal profiles;
- Installation of suspensions;
- Fixing rack profiles;
- Winding GKL panels;
- Chamfering of corner and joint edges of sheets;
- Puttying the plasterboard is desirable, although you can do without it, since the tiled carpet, then carefully removed from the drywall, anyway, will not work. In any case, reinforcing the seams with a sickle, grouting the screws with putty is a must;
- After applying the putty, the surface should be primed and after 24 hours, ceramic tiles should be applied to it. Installation is carried out according to the standard scheme.
It should be noted right away that tiles on wooden walls can only be laid a couple of years after the construction of the building, giving it the necessary time for major shrinkage.
The service life of the tile depends on how well the tile laying works are carried out. Tiles and tiles are laid on a concrete base, as a rule. But sometimes there is no possibility of arranging a concrete screed. Therefore, many are interested in: is it possible to lay tiles or tiles on a wooden floor?
Ceramic tiles in the kitchen in a wooden house - the dream of the hostess
Preparing a wooden floor for tiling
To lay tiles on a wooden floor, the first step is to prepare it. At this stage, the defects of the plank base are corrected, given strength and protected from moisture.
 Laying tiles on wood is possible
 The key to a reliable ceramic tile floor is the foundation, so you should start by checking the condition of the old wooden floor:
- Remove the old floorboards to get to the joist system.
- If the logs are outdated, rotten, then replace them, and treat those suitable for further operation with antiseptic agents.
- Check for evenness.
- On top of the lags we put old floorboards, those that are not deformed. Replace warped floorboards with new ones.
- Do not forget that there should be a damper gap between the subfloor and the wall.
- To protect the floorboards from rotting, treat with an antiseptic.
- Boards to the logs need to be screwed with self-tapping screws, not sparing the fasteners. A secure fit of the boards will keep the tiles from damage.
Attention! Moisture-resistant plywood 12 mm thick is placed on the logs, which will provide a reliable and durable foundation.
Surface leveling
Laying tiles directly on plank boards will not work. The floorboards can start to play with time, so a leveling layer must be used. Various materials can serve as this layer.
"Dry" leveling
For wooden floors, an effective way to level the surface is to use moisture-resistant plywood or other similar material.
 Cover the old plank floor with sheets of moisture-resistant plywood
 Sheets of wood materials allow you to distribute the load across several subfloor boards at once. This protects against the failure of old plank structures.
To provide a reliable base under tiles or tiles, various dry-based leveling methods are used:
- complete adjustable floors with plastic screw regulators. With the help of such structures, laying tiles and preparing a smooth and durable surface is facilitated many times over.
- a duplicating plywood layer on an existing moisture-resistant plywood flooring;
- OSB sheet, etc.
Using a plywood base for installing tiles is convenient and financially beneficial. Chip-based wood derivatives are not as susceptible to dimensional change when exposed to moisture, so laying tiles on them is an option.
It is worth noting that tiles on top of plywood sheets must be laid on a special two-component polyurethane adhesive, and not on ordinary tile adhesive. Polyurethane adhesives have the proper elasticity to maintain a secure fit of the tiles with an unstable base.
After the plank floor is covered with plywood sheets, their joints must be sanded and filled with a special sealant or adhesive. Then the seams are primed.
The advantages of using the "dry" method of leveling the surface is that:
- it allows you to make an additional soundproof and heat-insulating layer under the plank floor from mineral wool and other types of insulation;
- distribute the load on the individual floorboards over the surface;
- fast laying deadlines that do not require technical breaks.
But this does not mean that this method does not have disadvantages. Leveling a plank surface will require the use of additional room heights, which will require decorating and joining various coatings with the help of thresholds.
Given this fact, it is necessary to provide that in the bathroom the floors should be a couple of centimeters lower than the level of other rooms. In the event of a water leak, it should not be distributed along the corridor and other rooms, but should remain in the bathroom. Therefore, a plywood base plus the thickness of ceramic with adhesive can seriously elevate the floor above others. In this case, the use of the "dry" method is not a desirable solution.
"Wet" screed
Wet leveling methods can also be used over plank floors. We are talking about sparing volumes of use of the screed, which will ensure a flat surface with small loads on the wooden base.
 Laying tiles on a concrete screed is easier
 The floor screed for ceramic tiles in a wooden house should be cut off from the wooden base, including from the walls. It turns out that it is necessary to make it in a "floating" way with damper gaps around the perimeter. A similar method is necessary so that the wooden floors can change dimensions without harming the tile coating, and the leveling layer retains a strong, unchanging structure.
Attention! According to the advice of experts, it is undesirable to cover a wooden floor with a screed with a thickness of more than 3 cm, because this can cause deformation due to weight gain. But you can not do less, so that the screed does not lose reliability. It turns out that the optimal thickness is 3 cm with slight deviations.
The procedure for preparing the base for a screed on a wooden floor is as follows:
- the old plank floor is being dismantled, the lag system is being revised. If there are bars whose strength is in doubt, they must be replaced.
- the distance between the lags should not exceed 50 cm. With a large step, strengthen the floor with additional bars.
- we must not forget about the damping gap between the ends of the log and the wall 1 cm thick;
- antiseptic treatment of wooden bars is carried out;
- a wooden floor is laid over the fortified system of lags. You can use old boards 4 cm thick. Deformed and lost strength should be replaced with new ones.
- boards are laid with a ventilation gap between them of one and a half centimeters;
- on top of the boardwalk, make a layer of moisture-resistant plywood with a thickness of at least 12 mm. Other boards made of pressed wood shavings are also suitable. The sheets should be overlapped, and fixed with self-tapping screws in increments of no more than 20 cm.
- gaps of 3-4 mm are left between the sheets;
- then lay a layer of waterproofing. Paraffin or bituminous paper, glassine can be used as a material insulating from moisture. Is it possible to use thick polyethylene - the answer to this question is yes.
- waterproofing should be a monolithic structure. To do this, the rolls are overlapped on top of each other by 15-20 cm and fixed together with adhesive tape. Waterproofing should go on walls with a height of at least 10 cm.
- stick a damper tape 8-10 mm thick and 10 cm wide around the perimeter of the wall.
After the work on preparing for pouring the solution is completed, they start pouring the leveling mixture. It is not necessary to level the self-leveling floor, because it itself is leveled on the surface, it is necessary to direct the mixture in the right direction and maintain the required thickness.
You can use another leveling compound. To prepare such a composition, you will need:
- 2 parts coarse sand;
- 2 parts of liquid glass;
- 1 part water.
After the solution is ready, it is poured, leveled and left to dry completely. Only after it has completely hardened can tiles be laid on the floor.
Express option
There is another option for leveling the surface of a wooden floor - the use of moisture-resistant drywall, which is fixed to the surface of wooden floorboards with a two-component polyurethane adhesive.
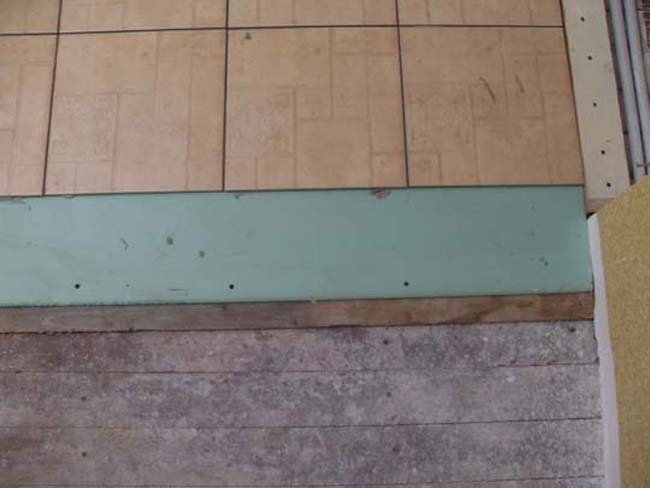 Laid drywall will allow you to stick tiles even easier than on a plywood base
 Carrying out a coverage revision and updating the necessary lags has been described in other alignment methods, so you do not need to dwell on it again.
To give reliability to the coating of drywall sheets, they can be laid in two layers. Moreover, the seams of the upper layer should not coincide with the seams of the lower one, because the layers are overlapped.
Attention! Laid flooring on a non-moisture resistant drywall base can be deformed. You can recognize moisture-resistant floor drywall in the store by the blue color of the plates.
A damper gap is left around the perimeter of the room, so leveling with drywall has common features with a “floating” floor system. The joints between the sheets are filled with sealant. The entire area of the drywall surface must be primed to ensure a secure fit of the ceramic tiles.
 A tile on a wooden floor will look the same as on a concrete base.
 It is possible to lay tiles on a wooden floor, while taking into account the characteristic of wood for dimensional changes due to changes in humidity and insufficient strength.
In order for the tile laying to be successful, it is worth watching this short video on how to properly glue ceramics on a plank base:
The ardor of those who want to cover the wooden floor with ceramic tiles is usually cooled by the “ice shower” of the incompatibility of the base and cladding materials. Wood tends to expand, contract, changing dimensions due to the instability of the humidity-temperature background. Floor tiles that are too sensitive to linear movements will be rendered useless by the zealous movement of lumber. Cracks, chips will appear, seams will crumble, elements will detach from the base if the independent performer does not know how to properly carry out the work. The listed troubles will not threaten the craftsmen who have learned the secrets and rules of ceramic flooring.
Why is it undesirable to combine ceramics and wood
Cladding wood floors with ceramic coating is justifiably considered not a very reasonable undertaking, because:
- covering a “warm” tree with a “cold” tile does not make much sense;
- under water-repellent floor ceramics, planted on tile adhesive, the tree hardly breathes, which is why it begins to rot and collapse;
- the service life of building ceramics significantly exceeds the service life of the timber and boards of the rough base;
- strong, slightly abraded ceramics are easily pricked with linear expansion of neighboring elements;
- the wooden floor is not static, which is required for laying ceramic products.
Wood can lose to tiles in terms of aesthetic parameters, but this is not a very convincing argument either. After all, tiles are mainly used not because of the beauty of the pattern, but because of the sanitary and hygienic advantages. Its use as a protection of wooden floors from moisture is a moot point, although it can be the cause of ceramic flooring in a wooden bath, in a shower room, in a kitchen or in a combined bathroom. In general, where constant wet cleaning is needed.
Suppose there is a reason, there is a material and a desire to lay a ceramic coating on a wooden base. It remains to find out how and in what ways this can be done, and to choose a rational technology.
Laying floor tiles in a new house should be absolutely abandoned, as well as arranging floors with new wooden floors in any other building. It is necessary to wait for the end of intensive shrinkage. It's 2-3 years at least.
How to lay ceramic tiles on a wooden floor
A wood floor is a multi-layered sandwich created partly or entirely from lumber. The enumeration of all the variations on its theme would be unnecessarily lengthy, we will consider only frequently encountered types. To carry out work on arranging a wood floor, home craftsmen mainly get:
- only logs left after the dismantling of worn floorboards and damaged substrate;
- flooring made of moisture-resistant plywood, OSB or chipboard sheets, of course, with lags under it;
- plank floor in good condition, i.e. not new (!), but slightly worn construction with flooring.
The number of repair operations, and not the choice of arrangement scheme, depends on the condition of the floor, which was inherited. Because the process of attaching ceramic components to any type of surface is carried out according to a standard algorithm, all the differences are in the preparation.
In any case, it will be necessary to create an even, solid and relatively static base suitable for laying ceramics. Let's see how.

The wooden floor must be prepared for laying tiles. In the next article we will tell you several ways:.
First method: dry leveling
The most common and technologically sound way to level floors. At the same time, a relatively stable sublayer of moisture-resistant plywood or similar sheet material suitable for laying flooring is formed. There are many different methods for implementing dry leveling, such as:
- ready-made sets of adjustable floors with screw plastic supports, thanks to which you can install logs or plywood sheets right away in a matter of hours;
- independent construction of a system of logs or point supports on top of a “strong” boardwalk, followed by laying sheet material;
- laying a duplicate layer of plywood on an existing plywood substrate;
- fastening of quartered plywood, GKLV, OSB with self-tapping screws directly to the leveled floorboards.
It is clear that the final touch of dry preparation will be chipboard, plywood or similar, thanks to which it can be done on a wooden floor.
Sheet products of pressed veneer or wood waste cannot be considered absolutely non-susceptible to linear movements. True, they do not show agility equivalent to wood. However, for fixing tiles over leveling sheets, it is necessary to purchase a two-component polyurethane adhesive that is elastic, and not ordinary tile adhesive.

Before fixing the ceramic elements, the created plywood coating is sanded along the seams. Then the joints between the elements are filled with sealant or glue purchased for the upcoming work, the surface is treated with a primer impregnation compatible with it.
The advantages of dry methods of creating a substrate:
- the ability to improve the insulating qualities by: foam, mineral wool, expanded clay backfill between the lags;
- minimum load on wooden floors that do not differ in reinforced concrete strength;
- the speed of execution, the absence of technological interruptions, significantly "delaying" the repair.
There are downsides. Dry leveling will definitely "eat" part of the height of the ceiling. A difference will appear between the finished and unfinished part of the floor, which will have to be decorated under a step or a small threshold.

Please note that according to building regulations, the floor in hygienic rooms must be lowered by at least a couple of cm, so that in case of emergency or accidental leaks, water does not flood the floors in adjacent rooms. So, if after dry leveling, to which the thickness of the ceramic coating should be added, the surface will rise significantly above the surrounding floor, the use of dry technology is undesirable.
Video: adjustable floor system
Method two: "wet" screed
Or a lightweight version of the traditional alignment type. Filling the screed in an easy-sparing form is required because the bearing capacity of wooden floors is not enough to create a full-fledged leveling layer. There is another specific feature: the screed on wooden floors must be cut off both from the underlying base and from the walls. Those. it must be arranged as a floating floor with a deformation gap around the perimeter and around the communications crossing the ceiling.
Thanks to the use of a floating scheme, the wooden elements of the floor will be able to move as much as they like, and ceramics with monolithic preparation will lie motionless.

The standard thickness of the screed poured onto a wooden floor is 3 cm. It is undesirable to increase the power, because at the same time the weight will increase. It is also not worth reducing, otherwise it will be quite reliable. Minor deviations in both directions are allowed.
The process of pouring screed on a wooden floor in steps:
- We disassemble the floor to the beam for a detailed diagnosis. We dismantle all the wooden components of the floor that cause the slightest doubt about reliability, and replace them with analogues. If the step between the lags is more than 50 cm, we strengthen the system by installing an additional beam. There should be a gap of 1 cm between the ends of the log and the walls of the building. All floor parts must be treated with antiseptic impregnations before reassembly.
- We are constructing a flooring for future pouring. Old boards, 4 cm thick, are suitable if they are suitable for further use. The grooved material does not need to be rallied. Between the boards should be left about 1 cm for ventilation. We do the same with an unedged board in case of replacing worn floorboards. If the boards are laid tightly, then ventilation holes will have to be drilled in the flooring.
- We fasten quartered moisture-resistant plywood to the boards across their direction at least 12 mm thick or other boards made from pressed woodworking waste. The elements are arranged according to the principle of laying bricks, fastened with galvanized self-tapping screws every 20 cm. There should be no cruciform joints. Between the sheets, gaps of approximately 3 mm must be left.
- We cover the constructed flooring with waterproofing. It is better to use bituminous or paraffin paper, parchment or glassine. Thick polyethylene is not prohibited. To form a monolithic insulating carpet, roll materials are laid with overlaps and fastened with adhesive tape. Along the perimeter, you need to create something like bumpers with a min. 10 cm approach to the walls. For convenience, we also fasten them with pieces of adhesive tape to the walls.
- We lay damper tape along the walls, 0.8-1.0 cm thick, 10 cm wide, we put sleeves on the pipes.
- We fill the screed with the factory leveling mixture or homemade leveling compound. To prepare it, you will need 2 parts of sifted and washed coarse sand, liquid glass in the same amount. You need to close the home-made mixture with one part of the water without biogenic and man-made pollution.
As soon as the poured layer hardens, the tiles can be laid on the wooden floor with a preparation created on top of it, independent of the overlap.

When carrying out facing works of any premises with the help of tiles, it is necessary to lay not only whole tiles, but also their parts. This raises the question of how to cut the tiles so that the edges are even. About the special tools with which you can do this, we will tell in the material:.
Method Three: Express Option
It consists in attaching sheets of moisture-resistant drywall to the plank floor using a two-component polyurethane adhesive, the elastic structure of which is not disturbed by wood movements.
Previously, the master needs to revise the design and repair, if necessary. In order to increase the rigidity of the floor, GKVL can be laid in two layers so that the seams of the top row do not coincide with the seams of the bottom.
It is constructed by analogy with the previous schemes as a floating floor, according to which a technological gap should be left around the perimeter of the room. The joints are filled with sealant, then the entire area is primed with a universal primer.


It is recommended to fill the expansion joint left along the perimeter after laying the flooring and trimming the excess insulation with sealant and close it with a plinth on top. This is necessary so that water does not leak out during wet cleaning, does not accumulate there and does not spoil building materials.
Expert opinion
Viktor Kaploukhiy
Thanks to my versatile hobbies, I write on various topics, but my favorite ones are engineering, technology and construction.
The best way to lay ceramic tiles on a wooden floor is considered to be a two-layer construction of gypsum fiber boards, which are installed with overlapping seams and mounted to the base using wood screws. In this case, you should pay attention to some important points:
- The subfloor must be waterproofed. To protect against moisture in this case, bituminous waterproofing is best suited. Unlike various polymer films, this type of water-repellent composition is applied in liquid form and penetrates into the upper layers of wood. Thanks to this method of processing, it is possible not only to protect the wooden base from various kinds of leaks, but also to prevent the appearance of fungi.
- If glue in the form of a dry mix will be used for laying the tiles, then the gypsum fiber sheets must be impregnated with a deep penetration primer (for example, Artisan Primer No. 6). Since cement-containing adhesives are diluted to the desired consistency with water, we have one negative factor: penetrating into the structure of the gypsum fiber board, moisture changes the linear characteristics of the GVL - due to the swelling of the material, its dimensions increase, and after the liquid evaporates, they decrease. These movements can lead to cracking of tile joints, and in some cases, damage to ceramic tiles. A thin layer of primer will just serve as a barrier that will prevent moisture from being absorbed into the GVL. If you decide to use a ready-made two-component epoxy-polyurethane composition, then additional processing is not required.
- It is possible to improve the technical characteristics of even the most inexpensive tile adhesive with the help of a latex additive, for example, the Latexcol-m brand from the manufacturer Litokol. The plasticizer is suitable for any cement-based compositions and allows you to increase their elasticity, strength and water resistance.
Many questions from our readers relate to the arrangement of a warm floor. If it is necessary to mount it on top of a wooden one and cover it with ceramic tiles on top, then proceed as follows. GVL is protected with a waterproof film, on top of which a building mesh with a cell of 100 × 100 mm is laid. Floor heating pipes are attached to the latter, a wet screed is made at least 3 cm thick and ceramic tiles are laid. When installing an electric floor heating system such as a concrete screed, you can refuse - in this case, the cable is embedded in a layer of tile adhesive. As for the requirement that the floor in sanitary facilities should be below the level of other rooms, in our time it can be considered irrelevant. By using the Leak Prevention System, which automatically shuts off the water supply when sensors placed on the floor become wet, you can reduce the risk of flooding to a minimum.
The above three preparation device methods are just a hint that needs to be improved, taking into account the technical specifics of the object. There are many more variations on the theme of building a kind of fixed "tray" over a freely moving wooden base. It is important to take into account the principle: a rigid substrate should not destroy the floor and vice versa, the subfloor should not destroy the screed with tiles attached to it.
On a wooden floor will require considerable effort in the preparation phase
How to lay tiles on a wooden floor yourself: the complexity and features of the process
Generally speaking, ceramics are far from the best option for combining with wood. This is due to the different characteristics of these two materials:
- wood tends to change its dimensions as a result of external factors: when the humidity rises, the tree expands, and when it decreases, on the contrary, it can dry out. In many cases, this leads to deformation of the tiled coating and the appearance of cracks;
- unlike tiles, wood is highly susceptible to various kinds of destructive processes and is much inferior to ceramics in terms of service life. Therefore, it is often possible to encounter a situation where, due to the destruction of the wooden substrate, it is necessary to dismantle the tile;
- tile coating, together with water-repellent glue, blocks the access to wood of oxygen, which is necessary for the full service of the tree. As a result - a significant reduction in the duration of the service life of the base;
- only the lightest tiles can be used for laying on top. Otherwise, its weight will be too large for a wooden base and over time the tile will fail.
So, can you tile on a wooden floor? Can. But this is a rather complicated process. If you are still confident in your decision to put ceramic tiles on top of a wooden floor, be prepared that you will need to put in a lot of effort. But the result is worth it, so let's move on to preparing the foundation. Consider step by step how to lay tiles on a wooden floor.
Useful advice! It is strongly not recommended to lay tiles on top of a wooden floor, from the moment of installation of which at least two years have not passed. This is fraught with the fact that in the process of shrinkage the tile will crack.

The main requirements for these construction works are as follows:
- ensure oxygen access to the lower layers of the coating (wood);
- evenly distribute the allowable loads over the entire surface;
- ensure the stability of the base.
In order for all these points to be observed, it is necessary to plan the order of work and follow the plan. It will also be useful to watch various videos on how to lay tiles on a wooden floor.
Assessment of the state of the coating: is it possible to lay tiles on a wooden floor?
The first stage involves a thorough inspection and assessment of the condition of the wooden base. To do this, it is best to remove the top boards and carefully examine all structural elements: beams, logs, each board on both sides, insulation, etc.

If there are any signs of damage, it is imperative to replace or repair the base section. What you should pay special attention to:
- the presence of decay. There are a lot of types of rot, so you need to carefully examine the surface. Regardless of the type of fungus that generates this process, the wood softens, changing its color or structure. Checking for the presence of rotting elements is carried out as follows: you need to stick an awl into any fragment that causes you suspicion. Easy entry is a reliable indicator of destructive processes in wood. All affected elements must be eliminated, and adjacent parts treated with special antiseptic agents for wood;
- woodworm larvae. These insects destroy wood, gnawing through many passages in it. To solve the problem, the same approach is used as in the first case - replacing the damaged area and careful treatment with a special compound.
Most of the destructive processes for wood develop as a result of high humidity. Therefore, the installation of tiles on a wooden floor in the bathroom requires special attention. In dry rooms, the development of fungi can occur as a result of a violation of the integrity of the heat-insulating layer. Given these factors, it is worth carefully checking the waterproofing materials for damage. You may need to add an extra layer.

Useful advice! Fungal spores are found in almost any wood. The only way to prevent them from ruining the floor is to carry out high-quality antiseptic treatment and create the most unsuitable living conditions for them.
If none of the above deficiencies were found on your floor, or you have already eliminated all existing defects, then you can lay tiles on a wooden floor.
How to lay tiles on plywood: preparatory stages of work
Before you start preparing for laying ceramic tiles on a wooden floor, you need to make sure that the distance between the lags does not exceed 50 cm. Otherwise, additional supports must be installed, otherwise the structure may not support the weight of the coating and fail. As a useful source of information, you can use the videos presented on the network: how to lay tiles on a wooden floor is discussed in them in sufficient detail.
Useful advice! Do not forget to treat all new wooden elements with antiseptic agents.

Next, you need to check how smooth the lags are, for which the building level is used. As a rule, during the shrinkage process, irregularities appear due to uneven subsidence of wooden parts. All these defects must be eliminated by scraping off excess elements with a planer, or vice versa - additional lining of small pieces of bricks or any other material. If it is not possible to push the missing element under the bottom, you can fill an additional board from above, trimming it to the required height.
After leveling, it is necessary to treat the coating against fungus and bacteria. To do this, use the tool with the longest possible break between re-treatments and follow all the recommendations specified in the instructions.
The most common surface treatment before laying ceramic tiles on a wooden floor is hot drying oil. For high-quality protection, it must be reapplied several times (up to five). The tool is a completely natural, environmentally friendly impregnation. Each next layer of drying oil is applied after the previous one has completely dried. You can verify the drying by touching the surface - it should not be sticky.

The main thing in the process of processing with drying oil is not to let it cool down, because its antiseptic effect directly depends on the temperature: the hotter it is, the better it destroys larvae, spores and bacteria. In addition, in the hot state, drying oil is more liquid and can penetrate deeper into micro-crevices.
Useful advice! Heating drying oil is an unsafe process. Its vapors can ignite, therefore it is strictly forbidden to put the container on the stove. When heating the septic tank, hold it over the stove and, just in case, prepare a piece of tarp with which you can put out the source of ignition.
How to lay tiles on a wooden floor: the necessary cleaning of the boards
If all the previously removed boards are in a satisfactory condition, they can be reinstalled, having previously cleaned them of the old varnish or paint with which they were covered. This can be done while you are waiting for the antiseptic solution to dry completely.

To remove varnish and paint residues from the surface of the boards, you can use the following methods:
- building hair dryer, set to a temperature of 200-250 ° C. A stream of hot air must be directed to the paint, as a result of which it will begin to swell with bubbles. To remove it, use a spatula, knife or scraper. In some sources, you can find recommendations for using blowtorches, but this is not a good idea. There is a high probability of wood overheating, and, as a result, deterioration of its technical characteristics;
- chemical washes are a gel-like mass and are sold in almost all hardware stores. Such a wash must be evenly applied to the surface and after a while removed with a spatula along with softened paint. The only drawback of this method is the considerable cost of the material when it comes to processing a large floor area;
- mechanical cleaning involves peeling off paint from the surface with a spatula or sandpaper without the use of auxiliary materials. It's cheap but takes a very long time. A sanding machine will help speed up the process at times.
If, after removing the coating, you find any defects that were not noticed before, it is better to replace the damaged areas. In addition, all boards are subject to mandatory antibacterial treatment. After the impregnation is completely absorbed, you can start laying the subfloor under the tile.
How to lay ceramic tiles on a wood floor: Subfloor decking
The process of laying a subfloor begins with the laying of an insulating layer. The material you choose must be non-hygroscopic. This will keep the under tile dry and prevent bacteria and fungus from growing there. Also, the material should have a minimum weight in order to create as little load as possible.
Extruded propylene foam can be considered a suitable option. Due to its synthetic origin, it prevents the development of any living organisms on its surface. True, this material also has disadvantages: it does not pass air well and has a considerable cost.
Alternatively, expanded clay can be used. It is natural and highly breathable. However, it has more weight and a more hygroscopic structure.
Whatever insulation you prefer, it must be laid out on top of the layer
Mineral wool was used as a heater for the floor
If you want underfloor heating under tiles on a wooden floor, then in this case it is better to seek help from professionals. Installation of the system is quite complex and requires a certain level of skill.
When all the boards are laid and fixed, they can be puttied and then leveled using a grinder. All cracks must be sealed with mounting foam. It is elastic enough to allow the wood to expand, yet able to bear the weight of the tile and adhesive.

