Making a screen with your own hands from plastic pipes. We make a screen of plastic pipes for a kindergarten with our own hands
Plastic pipes faithfully serve as elements of heating systems, sewerage systems, plumbing, and so on. However, this does not exhaust their field of application. Lightweight, easy to process, hygienic and versatile material is widely used as a source for a variety of crafts.
A screen for a puppet theater made of plastic pipes is one of such unusual solutions.
Why do you need a screen
This is a folding structure of different heights, designed to temporarily fence something, not to prevent access, but only to hide what is happening from the eyes. Partitions are extremely convenient in large rooms where you need to zone a small corner of the space for a while. This option is most often used in the nursery, or rather, in the family bedroom, to fence off the crib while the baby is sleeping.

The screen is also in demand in a nursery with children of different sexes: changing clothes behind the protection of colored fabric is much more convenient than trying to do the same behind the cabinet door.
Well, in the end, the partition serves as an excellent way of zoning a common room - to allocate a working area, for example, during the preparation of a project.
However, a do-it-yourself screen made of plastic pipes often turns out to be necessary in a variety of creative activities - in a kindergarten, in a preschool educational institution.
Theater for children and adults
Perhaps adolescents and children a little younger are more attracted to computer games, but experience shows that those whom Melpomene has managed to touch cannot be left behind. And there is nothing to say about kindergarten: the simplest puppet theater attracts kids much more than drawn fictional characters.
The partition in this case becomes an urgently needed item. And if in the preschool educational institution, perhaps, there is money to buy a screen, then in kindergarten, and in the lower grades of school, devices for a puppet theater have to be made with their own hands.

The design of this multifunctional device is very simple, so there is no need to complete a master class for it. The photo shows a sample of the product.

Materials and tools
The following are used in the manufacture:
- polypropylene pipes with a diameter of about 25 mm;

- plastic fittings;
- dense fabric, leatherette is used as a filler;
- scissors for cutting plastic pipes, you can do with an ordinary hacksaw.

Master class on a screen made of plastic pipes
How to make a multifunctional theater screen?
Plastic products have firmly entered our life, imperceptibly displacing many of their counterparts. And the most common among all such products are PVC pipes, which, due to their low cost and practicality of use, are found everywhere. And today we will talk about how to use them outside the box and what interesting things you can do with your own hands.
It is difficult to list all the products that you can do with your own hands, having only fragments of building materials at hand, as well as fasteners for connecting them. Using such raw materials, you can create incredible and necessary things.
There are really countless ideas for making crafts from simple hollow objects. It can be both ordinary organizers for organizing a workspace and stands for a laptop or tablet, as well as designer masterpieces (chairs, beds, coffee tables and other furniture) that emphasize a person's individuality.
DIY objects and products made of polypropylene pipes are the most suitable activity for people with a rich imagination. At the same time, they do not need to purchase specialized equipment and tools for the production of homemade plastic crafts, because such materials can be joined quite simply.
Such constructions can be:
- Collapsible, the installation process of which is simplified through the use of fittings, connectors, angles and tees.
- One-piece, for the assembly of which you will need special assembly adhesive for plastic or bolts.
And, if the second method is more suitable for stationary interior products, then masters who are interested in the production of seasonal items turn to the first method of installation. For example: a folding fishing chair, a greenhouse, a shed and a gazebo, a garden swing, etc. Such structures can be easily assembled on the eve of the season, and then put away for storage, without worrying that they will deteriorate in winter.
Crafts from hollow PVC pipes have a huge number of advantages. Among the main ones are the durability of raw materials and the aesthetic appearance of finished products. The relative cheapness of materials is also important, which is a great temptation for many who want to try their hand at creating universal plastic items.
Other benefits include:
- Practicality of installation and operation.
- Structural strength due to the high density of raw materials.
- A variety of options for crafts (configurations, sizes, appearance).
- The ability to create exclusive copyright items that can later be put up for sale or presented as a gift.
- Absolute safety and non-toxicity of raw materials, allowing the use of crafts in a variety of rooms and conditions.
Whatever you decide to create a structure, you should remember that the main raw materials (pipe trimming) can be obtained quite easily, but you will have to prepare fasteners and tools in advance. The same bolts, plugs and fittings - you will need to first calculate how many parts you need.
In addition, it is also necessary to prepare auxiliary tools that can be useful in the process of creating an exclusive:
- pencil and ruler / tape measure;
- drill and screwdriver;
- glue or screws.
If you decide to bend materials to obtain a product of a certain shape, first think over how you will be able to achieve the desired result. In general, crafts from fragments of plastic pipes are made easily and simply, as you can see by reading this article to the end.
Preschool Ideas
Very often, PVC pipes are used as the most optimal raw material for the manufacture of furniture and household items for children. For example, small chairs, low tables, screens for playing areas, football goals for outdoor games, etc. are very popular. There are many more useful and interesting things for the manufacture of which inexpensive PVC pipes are suitable.
For example, in order to organize leisure time for children in kindergarten, you can make a mobile puppet theater yourself. Moreover, you only need a few pieces of pipe and connecting elements to create a frame-frame, as well as material for the curtain. The result can be a very attractive, and most importantly, an invention necessary for a kindergarten.
The frame can be made in the form of a screen of two bearing supports, two lintels and a floor frame of four tubes, as shown in the photo below on the left. You can also do a more complex structure with your own hands - a screen of three sections, for the manufacture of which it will take a little more consumables and time.
 No less relevant devices made of polyvinyl chloride pipes for organizing children's leisure time in kindergarten:
- developing stand (business board);
- washing for hands or toys;
- crib for dolls, etc.
Another PVC pipe construction necessary for kindergartens is a bicycle parking. It is easy to make such a stand with your own hands, even if you have never had to deal with the installation of pipelines before. In order to build such an installation, you will need two long and two short fragments for the base, as well as several more pairs of identical lengths for the stands holding the wheels.
Accessories that are relevant for any season are a towel dryer, a laundry basket and a plastic pipe hanger. Such structures will be indispensable not only in kindergartens, but also in ordinary residential buildings. Made of fairly lightweight and cheap materials, they can serve their owners for a long time.
The best ideas for country houses
The lucky owners of private houses outside the city can also use PVC pipes with benefit. For those who come to rest and relax in nature, chic gazebos and awnings can be made from such materials. And for lovers of cinema, you can realize a homemade cinema from a canvas stretched over a frame made of PVC pipes. What could be better than a pleasant company and an open sky, under which you can organize a home evening with friends at the big screen. By the way, the remains of other building materials can be used as a canvas. For example, pieces of stretch ceiling remaining after repair.
The same garden furniture can be made with your own hands from pipe sections. Tables, folding chairs, comfortable garden chairs and even sun loungers - these products can be easily made by yourself, having looked at the drawings on the Internet or by developing your own project.
For example, you can use images and diagrams of garden furniture: 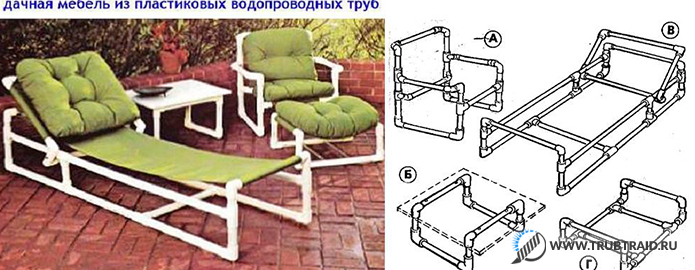
Benches and swings are incredibly beautiful, reliable and comfortable PVC tubes. And the most important thing is that the production of such structures does not require significant investments. Yes, they will serve for a very long time, delighting not only the owners, but also their guests.
For those who come to the dacha not only to relax, but also to work, there are also several ideas for arranging their personal plot. What can be done from the scraps of plastic pipes that remained, for example, after replacing the pipeline? Yes, a lot of things! This can be not only the necessary improvised installations and devices, but also decorative structures to decorate the territory adjacent to the house.
For example, if a hose is bothering you, and there is no suitable place to store it, make a stand from pipe scraps with your own hands. Those wishing to quickly design a fence for a flower bed or to protect themselves from neighbors can use the same material. As you can see from the photo, plastic will perfectly fit into any environment and will help keep your vegetation free from animal encroachments.
For lovers of domestic animals, plastic hollow structures can be used to create pens and cages of various configurations and sizes. Cheap mobile structures are obtained, which at the same time look very aesthetically pleasing. It is worth noting that materials with a large hole can immediately come in handy. Homemade handicraft feeders made from sewer pipes allow farmers who keep birds (quails, chickens, etc.) not to worry about food for their wards. The feed poured into the chute from above will flow itself to the feeding area.
Another do-it-yourself product made of polypropylene pipes that is relevant for the summer season is a shower arch and a frame for irrigation. These are such banal designs that you don't even need a diagram to create them. All you need is a few scraps from PVC collectors, fittings for connecting them and, of course, a drill for making holes for water. Next, you need to connect the hose to one of the ends of the pipes, and put plugs on the rest (except for holes for water). And, voila - you have a portable shower and a frame for watering beds, lawns or flower beds.
Lovers of gardeners cannot do without a greenhouse in the country. By the way, it can also be done by having at hand only trimming of building materials: pipes with a diameter of 25 mm (or 32 mm), rods, boards, film and fasteners. A detailed master class on how to make a greenhouse from such a set of materials with your own hands is shown in the video clip:
You can't do without a stepladder in your summer cottage. And in the apartment, such a design would not be superfluous. How to make such a miraculous staircase can be seen in the following video review:
You can also use this building material when erecting a temporary carport. Such a design will be very light, it can be very easy to assemble and disassemble if necessary. Moreover, given the durability of the raw materials, a plastic canopy with a pipe frame can be made on a permanent basis if other building materials are available.
Methods for connecting pipes in structures
Plastic pipes can be used to make not only convenient household items, but also pieces of furniture. In order for such a homemade product to last a long time and be reliable in operation, you need to take care of the correct connection of individual segments. Since it has already been said about the connection of polypropylene pipes, we will consider joining only PVC pipes.
PVC plastic pipes can be connected in the following ways:
- in a bell with a rubber seal;
- using an adhesive composition;
- bolted, drilling holes.
The first connection method is characterized by simplicity, but insufficient rigidity. Before connecting, it is recommended to clean the inner and outer surfaces of the pipes at the joint from dust particles and to treat the inserted part of the pipe with silicone grease. First, the pipe is inserted into the socket until it stops, after which it is carefully pushed back by 0.7 - 1 cm. The structures assembled in this way can be further dismantled, which is convenient for seasonal products.
The second method of pipe assembly is characterized by reliable fixation and greater labor intensity. Joining work begins with sanding the mating surfaces of the socket and pipe for better adhesion. Then they must be degreased with methylene chloride. The adhesive is applied along the entire length of the prepared outer surface of the pipe and 2/3 of the length of the inner surface of the socket. Finally, the pipe is inserted into the socket until it stops and turned a quarter of a turn. For gluing, you need to press the parts for 1 minute. For good fixation, all operations to connect two segments must be carried out quickly enough. The connected elements are left for several hours until the adhesive is completely dry.
The third method is more laborious, since it requires marking and preparation of holes, but it allows you to get collapsible structures with a reliable connection.
It is convenient to use a variety of fittings for corner joints and the connection of several segments at once in one node. Plastic pipe structures can be of any complexity using numerous tees and fittings. Consider useful homemade products in ascending order of complexity.
Original and functional little things for interior decoration
Our overview of interesting ideas is opened by the simplest products from a plastic pipe, which even novice masters of homemade art can make. In addition, such crafts will require a minimum amount of material, and in some cases even the shortest cuts can be used.
Large and medium-sized pipe scraps can be used to make a convenient and practical organizer for a study or workshop.
Two versions are possible here:
- fastening with self-tapping screws to a wall or table, for which one end of the segment is cut off at an angle - a stationary option;
- gluing the segments together to form a stable figure - a portable option.
The sections can be left white or gray, or painted in your favorite color. Such an organizer is indispensable for schoolchildren and people involved in creativity and needlework. With him, everything will always be at hand, and the table is in perfect order.
Additional comfort on the desktop is provided by a drawing tablet and a laptop stand, which can be made from small diameter polypropylene pipes.
Bookshelves are a special feature of the interior. Their presence in a certain way characterizes the owner of the home. The hi-tech corner shelf will not go unnoticed.
From numerous short cuttings of different diameters, you can make a patterned frame for a mirror or photograph. It is enough to glue the cut rings according to a previously prepared layout, which can be applied to a sheet of cardboard. It could be floral patterns or something abstract. The dimensions of the frame will depend on the amount of suitable material.
Large cuts can be used to create a comfortable shoe rack with multiple compartments. This design does not take up much space in the corridor and will ensure that the shoes are stored properly and quickly find the right pair. The connection of the elements is carried out using glue or self-tapping screws. To fix the shelf to the wall, you can use a plywood sheet to which the assembled shelf is first glued.
Some crafts made from PVC pipes will really appeal to lovers of fresh flowers. A reliable flower stand is easy to design and looks cute.
Small cuts of sewer pipes are well suited for making flower pots for transplanting or breeding indoor pets. Having shown imagination, such pots can be decorated with colored paper, paint or bright stickers.
It is easy to make a stylish vase for artificial flowers and dried flowers from elongated cylinders of medium diameter. If you approach the implementation of this idea creatively, then an original gift for a significant event can come out.
Another extraordinary idea for the interior is homemade techno lamps. There are a lot of options, but they all adhere to the principle of minimalism: no unnecessary details.
With the help of unused scraps, you can also make useful things in the hallway or corridor: a hanger for clothes and bags and a holder for trash bags.
The ways in which pipes are connected in a structure
Plastic pipes are good not only for making all kinds of household items, they can also be used to design all kinds of pieces of furniture. In order for the resulting object to serve for a long time, all the details of its structure must be correctly connected to each other. Consider the assembly of structures from segments made from PVC pipes.
Methods that can be used to connect such pipes:
- connect the segments by means of a socket and a rubber seal;
- by means of special glue;
- using bolts, drilling holes for them.
In the case of a socket, the connection is not laborious, but not rigid enough. Before the procedure, you should thoroughly clean the pipes at their joints from dust and other contaminants, and then apply a special silicone grease to the inserted edge of the pipe. At first, the pipe must be inserted all the way, but then it is recommended to push it back one centimeter. This is done so that later the structure can be easily disassembled on occasion.
The next method is more reliable, but also more time consuming. But in this case, the product will turn out to be strong, reliable and durable. For good adhesion, before installation, the parts at the joints for better adhesion are processed with sandpaper. After the treated areas are degreased with methylene chloride and ready for glue application. The glue is applied both to the treated external surface and to the internal one. After the pipes are docked, and having brought the pipe to failure, it is worth turning it a quarter of a turn. The parts should be pressed tightly to each other for a minute, and in order for the fixation to be maximum, it is best to do the gluing procedure very quickly. After the glued segments should dry for several more hours.
The most time consuming way is the third. In this case, you will have to mark and drill many holes, but this option will provide the future product with excellent strength and reliability. In addition, you don't have to fiddle with glue and sandpaper, and after assembly, you don't have to wait until something dries up there.
In order to create corners, all kinds of branches, etc., you can use a variety of fittings, due to which a structure of any complexity can be assembled even by a person ignorant of these matters. So, let's get down to considering useful products that were designed by the same private craftsmen as you and me.
How to connect pipes together?
For the manufacture of ordinary household products and even furniture, you can use cuts of plastic pipes of different lengths and diameters. Corner fastening is done using tees and fittings. The connection of plastic elements can be done in different ways:
- In a socket with a rubber seal. This is a simple but not very durable option. The joints must be cleaned and degreased. It is advisable to use a silicone lubricant. The tube is inserted into the socket until it stops, and then it is pulled back 1 cm.
- Using glue is a more laborious, but also reliable method. Bonding points are sanded and degreased. The surfaces to be glued are covered with glue, the pipe in the socket is turned and clamped for better fixation.
- Using bolts through drilled holes is the most time consuming but most durable method of fastening.
Household products made of plastic pipes
The office or garage can be decorated with a practical organizer made of pipes of medium diameter. They can be fastened with self-tapping screws on the wall and stand, or glued by equipping a portable model. Also, a laptop stand or a convenient shelf for books, mounted on the wall or made in a corner version, will be very functional and useful.
If you glue rings of small diameter together in the form of a flower, a pattern, you get an excellent frame for photographs, as well as mirrors on the wall. But cones of large diameter, connected with glue or self-tapping screws, can be used in the form of a shoe cabinet. A sheet of plywood should be used as the basis for fastening. A good use of pipes would be to make a lightweight hanger or trash bag holder.
Lovers of home flowers will love original pot stands or interesting seedling pots, as well as vases for dried flowers.
Furniture for home and garden
With the help of scraps of plastic pipes, interconnected and covered with fabric, lightweight and comfortable portable sun loungers and chairs for children and adults are created. It will be more difficult to make a mirrored coffee table or shelving for the living room or bedroom. But the appearance of such a product will be simply amazing.
Interesting ideas for flower beds (photo)
Old furniture can make wonderful flowerpots. It will emphasize the natural charm of the suburban area, give it a sense of style and a noble look.
If you open the dresser drawers and put pots of your favorite plants inside, you can get economical vertical landscaping next to your house or gazebo.
A wooden pallet, a dilapidated bed or an unnecessary cart will also serve as an original stand for a flower garden, the main thing is that all these items harmoniously fit into the overall landscape.


Interesting! They create flower arrangements using as pots: watering cans, teapots, pots, bowls that have served their time. For decoration, their outer planes are painted, painted, pasted over with stones or shells.
Garden decor from improvised means (photo)
- A compact vertical garden can be easily built with plastic pipes or gutters. To do this, it is enough to hang them on a vertical plane so that they are located one above the other, thereby creating a natural living wall of flowers and plants.
A composition of vertically placed wooden pallets and pots of flowers fixed on them will look no less beautiful. As a result, you get a stylish green trellis that will look impressive in your garden.


- Very often, a cheerful hanging garden of flowers is made from unnecessary buckets. To do this, each bucket is painted in bright colors and hung along the fence using plastic or metal hooks.
Wooden boxes nailed to the walls in the form of shelves, on which flower arrangements are installed, will help to give the old gazebo a new image.


A large flower bed will look quite unusual, the perimeter of which is decorated with decorative flower pots, which will serve not only as a fence, but also as a kind of creative border if low-growing flowering plants are sown in them.
Also, the role of a fence for a flower bed is perfectly performed by tree branches, plastic or wooden dies installed vertically into the ground.


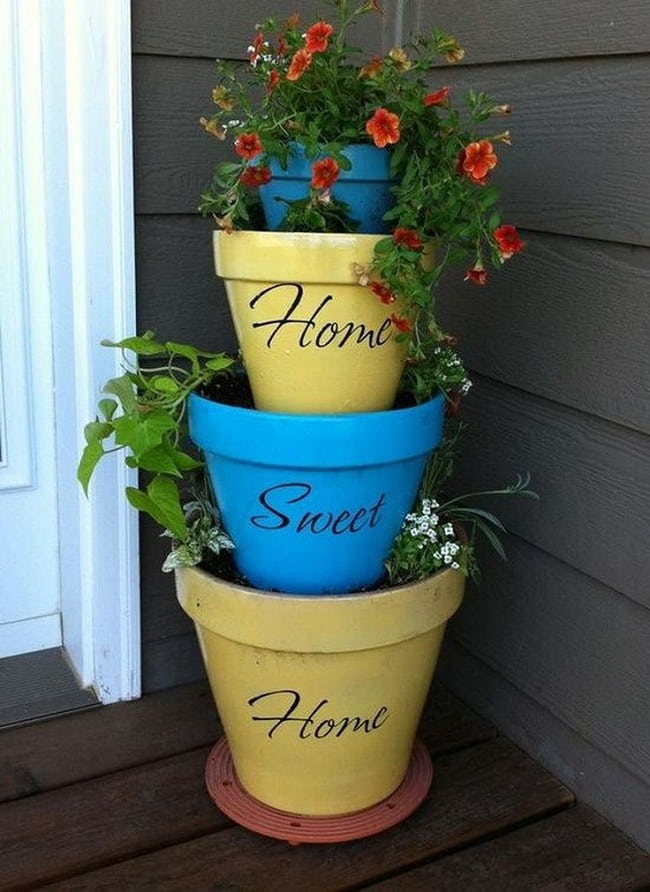
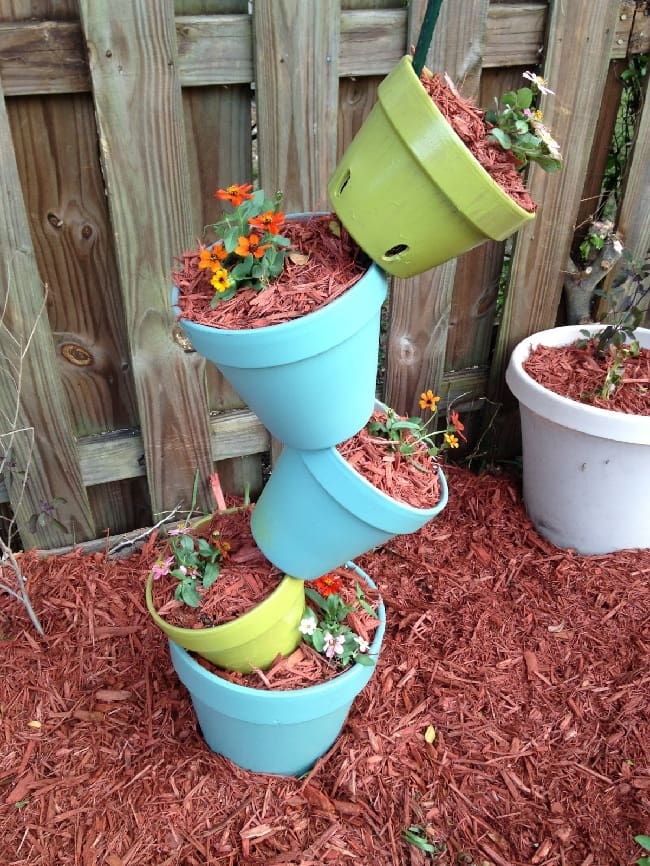
The small garden will comfortably accommodate a multi-storey flower bed made of vertically stacked flower pots of different sizes.

Advice! The stumps remaining after cutting the trees can be easily turned into stylish flowerpots if you make a depression in their center for containers with greenery.


Crafts from plastic bottles (photo)
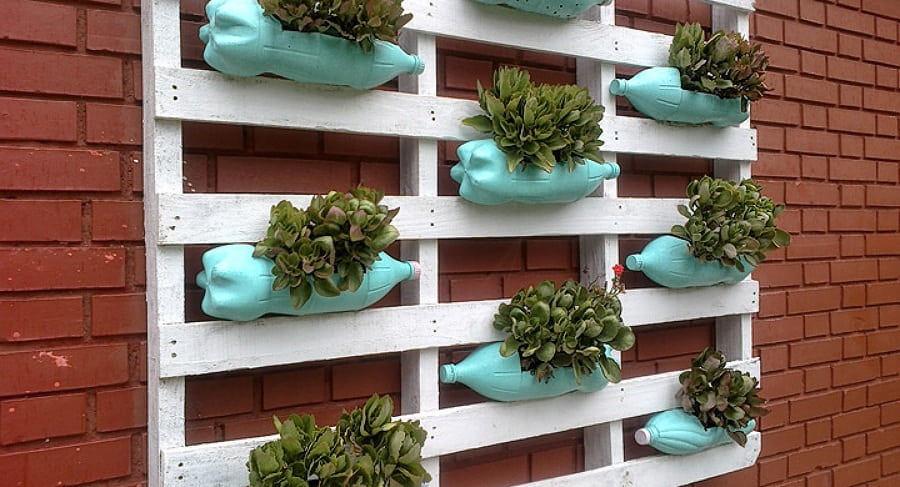
Plastic bottles of various sizes and colors are a convenient material for the embodiment of ideas for making crafts that serve as a decoration for a garden landscape.

What can be made from plastic bottles
- Luxurious palms, beautiful spruces and pines, lush and bright flowers are often made from this waste recycled material for a summer cottage.
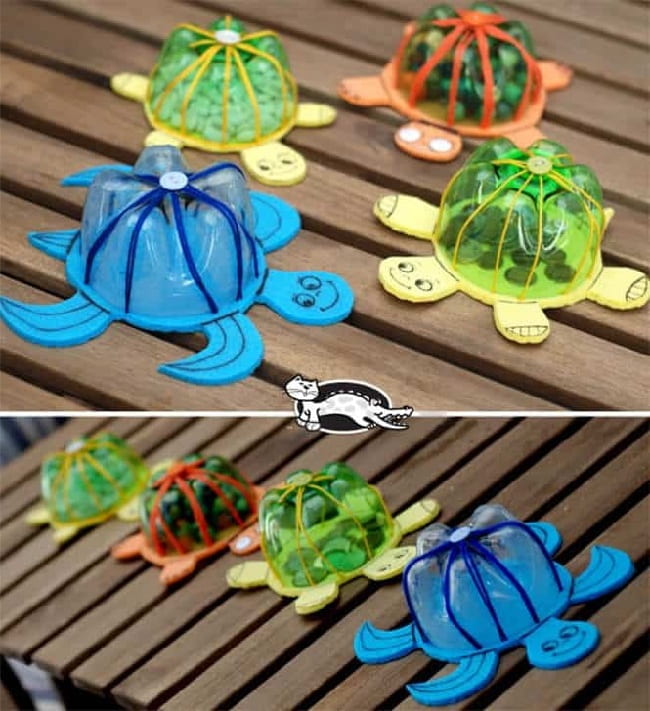
- By adding the necessary details, craftsmen turn plastic containers into funny piglets, fancy hedgehogs, exclusive butterflies, beetles, bees, dragonflies.
- Hand-made masters create from bottles large and voluminous images of various animals and birds, such as horses, donkeys, giraffes, peacocks, ostriches.
- Self-made compositions of frogs, swans and water lilies will help to turn the garden and the space around the decorative ponds into a favorite place for relaxation.
Important! Before you start making crafts from plastic bottles, we strongly recommend that you read the step-by-step guide on how to create them.


Plastic bottles, attached horizontally to a vertical wall, create an amazingly beautiful waterfall of greenery. It is done very simply. Using a clerical knife or scissors, the upper part is cut out in each bottle, then the container is filled with earth into which your favorite flowers and plants are planted.
Bottles flipped upside down and buried at half their length around shrubs, flower beds, playgrounds or playgrounds create a graphic catchy flavor and make for wonderful fencing. There are even gazebos and greenhouses made from plastic bottles. They are also used for making sofas, armchairs, ottomans.


Crafts from bottle caps
- An exquisite mosaic is created from bottle caps that are glued or nailed to the base with small nails and varnished. These can be wall panels, picturesque paintings, cute rugs and other decorative items that decorate your garden.
Bottle caps are even used as miniature paving slabs, laying out mosaic patterns on a layer of carefully leveled and compacted sand. Garden paths paved with cut-off bottoms or whole bottles, which are pre-filled with earth, look no less impressive.
Interesting to know! By stringing the covers onto the line through the pre-drilled holes, you can create a bright screen or curtain that covers the doorway.


Crafts from car tires (photo)
Crafts for the garden made from improvised material have always amazed with their diversity. Absolutely any material that was once used for a completely different purpose is used. One such material is an old car tire.
Interesting to know! From car tires, local craftsmen have long learned to make real masterpieces of art, which, with their beauty and original appearance, cause admiration and delight.
A large car tire easily turns into a miniature pond when covered with plastic and filled with water. Pebbles, sand, bricks, tiles or cobblestones are laid around the edges, which can be painted in any color.

Very often, resourceful summer residents use car tires to equip sports grounds. They make excellent obstacle courses with obstacles and game elements on which your children can not only have a good and fun free time, but also develop their agility and endurance.


Children should definitely appreciate the unusual sandbox made of a tire, organized in the form of a flat-laid tire with washed river sand filled inside.
To protect from the sun over the sandbox, it is advisable to build a small shade canopy made of polycarbonate or a piece of thick fabric.

From car tires, stairs are equipped in areas with elevation differences, and their side parts serve as durable material for laying out garden paths. With a large number of small tires, a solid original fence can be assembled.
Using the tires as a bench and table base makes it easy to create a garden dining area. Even poufs and comfortable chairs are made from old tires; this material is easily converted into a suspended children's swing.


In just a few hours, from tires, craftsmen will be able to make an original flower bed or vase for flowers, which will certainly become a decoration of your garden.


Unusual garden figurines and sculptures for the garden (photo)
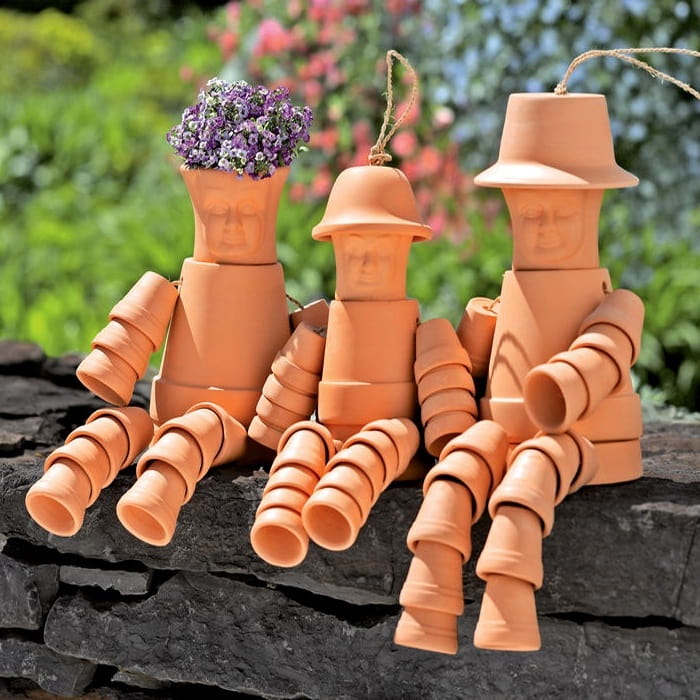
To make garden figurines yourself, use a variety of materials. They are cast from polyurethane foam, concrete, gypsum, they use bizarre forms of driftwood and tree branches, they are made from car tires and unnecessary bowls, pots, containers for mayonnaise, eggs and other food varieties.


You can make unusual figures of ladybirds, roosters, chickens or chickens from ordinary balloons and concrete mortar. Here's what you need to do this:
- Air balloons;
- Water, seeded sand and cement;
- Paints and brushes.
Step by step guide
- Pre-inflate a balloon and dilute a thick solution of equal parts of sand and cement with the addition of a small amount of water.
- Next, the ball is carefully covered with a solution, forming a flat and smooth surface.
- After drying, it remains to pierce and remove the ball, and paint the resulting spheres and use as a material to create delightful figures.


Having impregnated a textile rag or burlap with concrete solution, they can be put on any cylindrical object, draping the hanging edges beautifully.
After drying, the cement product is removed, turned over, painted in bright colors or decorated with various decorations (stones, shells).


- By wrapping any plastic container with a reinforcing mesh and applying a layer of cement to it with the addition of a small amount of gypsum, you can create any image you like.
- After complete drying, the stucco products are painted and placed on alpine hills or in flower beds. They can take an equally worthy place in a gazebo or a recreation area near a pond.
Beautiful figurines are created using the same technique. These can be old dolls, rubber or plastic figurines of birds or animals. All you need is to coat the ready-made templates with cement mortar and paint.


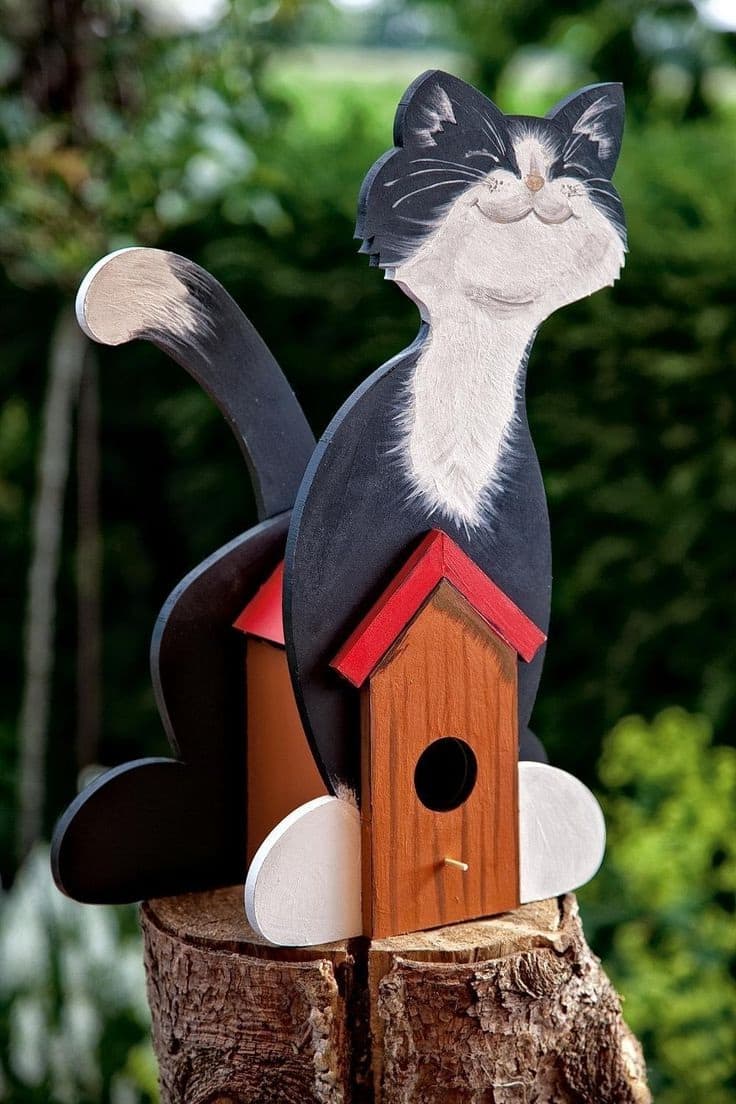
Original bird feeders and birdhouses
A bird feeder or birdhouse will become an additional design element of the garden landscape if made in an interesting and unusual style.
They are made from wood cuts, cardboard boxes, plastic containers, the rest of the boards and other improvised material. If you show imagination, you can even weave a birdhouse from branches.
- By attaching the glass to a wooden board with a slight tilt back, we get a simple and practical bird feeder.
- All that remains is to hang the finished product on a tree and fill it with food (seeds, crushed nuts, bread crumbs.
Important! In order not to arrange competition among the birds, you can make several such wonderful feeders in the garden.


If you do not have the opportunity to pour food every day, then the feeder is best made from a plastic bottle, using a little ingenuity.
- For this, a plastic container is filled with cereals to the very top.
- Then they are fastened with the neck down above the horizontal shelf, leaving a small gap.
In this design, the grains will spill out as they decrease, and when the food runs out, you just need to fill it up.

Garden decor from scrap material
Hand-made crafts for the garden with your own hands will not only bring pleasure from the process of their creation, but will delight you for a long time creating an aesthetic addition to the garden, and will certainly become the subject of your pride.
Anything can be useful to create a garden decor, here the main thing is to give free rein to your imagination and tune in to the creative process.
Tin cans, for example, make attractive flower pots when painted in vibrant colors and hung from a string. Such a flower arrangement will undoubtedly decorate your soda area, as well as add bright and rich colors to where they are lacking.

Children get a special pleasure from participating in the independent production of something new; they are the ones who are able to inspire to create amazing things from scrap materials.


The final detail of any design is the decor. Simple, but incredibly beautiful crafts made from river or sea stones will decorate any garden and focus on themselves.
There is nothing difficult in creating such a decor, everyone can cope with coloring the stones, in addition, there is an excellent opportunity to attract the whole family to an exciting activity that will simply become a fascinating pastime, and bold ideas will inspire new crafts.


You should not be upset and abandon your venture in creating a decor if something did not work out the first time. A little time and effort spent will help achieve the desired result, and hand-made crafts for the garden will bring incredible pleasure for you and surprise your loved ones with their unique design.
The use of decorative partitions to delimit space and decorate the interior has been known since ancient times. Lightweight, compact and mobile screens were used many centuries ago in China, Greece, Egypt, and the Roman Empire. They were made from simple and lightweight materials and could be of different sizes and shapes. Wealthy owners decorated the partitions with rare fabrics, inlays, precious metals and stones. We invite you to learn how to independently create beautiful, original screens with your own hands.
What are the screens
When choosing a screen model, not only stylistic orientation is important. It is necessary to take into account the space in which the product will be located, its mobility and even its functional purpose. Therefore, we turn to theory and consider what types of screens are.
- Swing sliding. Consist of several interconnected frames, from 3 to 8 or more. If necessary, they can be folded into an accordion and removed.
- Single-screen screens consist of one wide sash. It can be a frame made of any material with a stretched fabric or paper, a sheet of plywood, chipboard, plastic or glass fixed on a stand. It is advisable to equip such a screen with wheels so that you can roll it to the right place.
- The screen-book consists of two wings of the same width (although asymmetry is allowed). Fold it like a book and rearrange it where there is less space. Depending on the decoration, such a screen can be used for dressing up and even for holiday photo shoots.
- Flexible screens. They are made from many long thin sections: pipes, plates, laths, connected to each other. The peculiarity of this screen is that you can put it in a wave, in a spiral, or even twist it into a roll and set it aside - it does not take up much space.
- Blind screens can consist of a different number of shutters, their distinctive feature is complete opacity. It can be a solid board (plywood, chipboard, plastic, sheet of metal, frosted glass), thick fabric stretched over the frame or cardboard inserted into the frame. Such screens are used not only for zoning rooms, but also as partitions for changing clothes.
- Transparent screens. Most often it is a transparent fabric stretched over a frame - organza, tulle and even starched gauze; it is very convenient to use a mosquito net. Also popular are metal models made using the technique of air forging, or wooden screens with openwork through carving. Such products are decorative in nature, they are often used for wedding and holiday photo sessions or to decorate rooms and gardens.
What materials are better to make a decorative partition for a room
Traditionally, screens were made of wood: a solid board or slats on which the fabric was stretched. Nowadays, a creative approach and the use of a variety of materials are more in demand. Let's consider them in more detail.
- Tree. As before, it can be a board - smooth or with a pattern carved on it, or a structure made of beams or slats. Plywood is in demand for creating screens due to its low cost, lightness and ease of processing. Designers also offer great ideas for using objects that have come out of use. For example, you can build a screen from old doors, having previously restored the panel, giving it a fresh look. A screen made of wooden elements can be installed both in the house and in the garden.
- Metal. Most often, metal frames of a given shape are used, which can be ordered from a familiar welder or at a specialized enterprise. Panels made of wood, glass, plastic are inserted into these frames, or fabric is stretched. A sheet of iron will look bulky and will not add comfort to the room, but an ornament forged from rods will revive the product very much. Often, small-diameter metal pipes (up to 5 cm) are used to create such a frame. This screen looks great in a garden or yard.
- Plastic pipes are also used in the creation of frames and frames for screens. They are much cheaper, and most importantly, lighter than metal ones. A screen made of plastic pipes is easy to assemble and disassemble if necessary, and it is very simple to maintain: it is enough to brush off dust from the surface in time. If necessary, you can hide under it outside on a hot sunny day.
- Plastic panels are a very easy-to-use material, often already ready to create a screen out of it. It is enough to pick up several panels with the same pattern, connect them - and now you no longer need to think about fastening the fabric drapery. You can also insert the panel into a frame made of wooden slats or metal. Such screens are not afraid of the sun and rain; they can be used to decorate a garden plot.
- Cardboard is a cheap material that can quickly turn into an original, creative screen. Working with cardboard is very simple: just cut out the parts according to the scheme and fasten them into a single canvas. Often such screens are placed not only straight or at an angle, but also in a wave-like manner. True, they are completely unsuitable for the street: they deteriorate from moisture, wind and sun.
- Branches: bamboo, willow twig, reed. Screens from these materials are very popular due to their lightness, portability and visual simplicity. Fashion for them never goes away, they are combined with many styles in the interior: classic, tropical, eco-style, empire style. True, the manufacture of such a screen requires the skills of weaving from a vine. But the finished product will look appropriate in the garden and will not deteriorate from weather conditions if the material is processed correctly.
- CDs, vinyl records. They can be connected to each other with threads or staples, you get a stylish openwork fabric. It is hung anywhere in the room in a straight line, in the form of a wave or semicircle. Most often, screens made of plates are used in the house, but even on the street such an element of decor looks original.
Unusual handmade screens - gallery
Decorative cords stretched vertically over the frame - simple in execution and very effective screen-partition  Vinyl records linked to each other in a canvas are an excellent decoration for a music lover's room
  Reed or bamboo is a great material for a flexible screen
  The screen can be made from ready-made door leaves that are sold in hardware stores.
  You can make a simple screen of smooth boards yourself
  Do not rush to throw away old doors - they will make an excellent decor element for your home.
  Wooden slats and fabric stretched over them with an interesting pattern - a bright accent in any room
  Cardboard butterflies collected in a voluminous canvas will decorate your room
  From cardboard rectangles, you can build an original high-tech screen
Necessary materials and assembly diagrams
There are many ideas for making screens. We tried to find for you those that are not very difficult for beginners. The materials and tools used in the master classes are readily available.
Classically shaped screen made of wooden beams and fabric
The traditional version of the screen provides for a fabric stretched over a wooden frame. The product can be made in the form of a book, dressing table or accordion, the shape depends on the number of frames. And the pattern on the fabric and its colors determine which room your screen is suitable for.
Required tools:
- drill;
- screwdriver;
- construction stapler;
- 12 door hinges;
- hacksaw;
- sandpaper;
- 96 screws.
In addition, you will need materials:
- wooden blocks;
- varnish and paint;
- the cloth;
- universal glue;
- decorative elements (ribbons, beads, appliques, and so on).
For a full-fledged screen, you need to take 24 bars 6 cm wide and 2 cm thick, of which 12 pieces. length 170 cm and 12 pcs. length 60 cm.
- The basis of the screen is a frame, it is not difficult to make it. First of all, you need markup. Take a bar, measure 6 cm from its edge using a ruler and draw a line with a pencil. Repeat for each plank.
- Now, with a hacksaw, make cuts along the markings. Their depth should be up to half the width of the plank.
- Make cuts from the edges of the plank: attach a chisel to the bar and, hitting it with a hammer, remove the layers of wood to the cut.
- Apply universal glue to the inner surface of the cut. Assemble the planks into the frame and press firmly.
- Wait until the glue is completely dry, then sand the surfaces with sandpaper, especially at the joints. Cover the frames with wood varnish.
- For fastening, door hinges are needed (you can replace them with metal corners). Fasten them to the frames with screws using a screwdriver.
- The base for the screen is ready, now you need to decorate it with fabric. It can be of any color and texture; when choosing, be guided by the main colors of the interior and your preferences. First of all, make a pattern to fit the frames, in which take into account the folds. That is, on each side of the frame you need to add 5 cm. You can use fabric of different colors or even the remaining large pieces of different fabric by stitching them on a sewing machine.
- Use a construction stapler to attach the fabric to the frames. First of all, fix the upper part, then, pulling the fabric well, fasten it to the lower bar of the frame. The tension should be very good so that the fabric does not begin to sag later. Fasten the sides last.
- When you have finished tightening all the frames, proceed to assembling the screen on the door hinges. You will need 2 loops for 1 connection, so that later it will be convenient to fold the product.
We make a screen from wooden slats and fabric - video
Portable screen made of cardboard tubes: creative, unusual, environmentally friendly
Eco-interior design has not gone out of fashion for several years. Its feature is the use of natural materials and ease of manufacture. From the usual improvised things that are often sent to the trash as unnecessary (packaging, wrapping materials), you can create real masterpieces with maximum imagination and minimum effort.
We offer you to make a light screen from the simplest material - cardboard tubes for winding linoleum or fabrics. In specialty stores, they are discarded like waste, so you can buy them for literally a penny. And if you're lucky, then get it for free.
This screen is very stable due to its wavy shape and its own weight. For manufacturing you will need:
- 16–20 cardboard tubes for winding fabric;
- a skein of durable decorative rope;
- roulette;
- scissors;
- pencil;
- drill
- if desired, paint in a color that matches the interior.
If you are using pipes for linoleum, take 8-10 of them. Since they are more than 3 meters wide, you need to cut each in half.
- Cut the pipes to the height you need. You can alternate between different heights and widths, so the screen will look more fun. Lay all pipes in a row, aligning along one edge: it will become the bottom of the structure.
- Measure 20 cm from the bottom edge and make a mark on each pipe at this level (point A). Measure a line 1 m upwards, mark again (point B). Mark point C strictly in the center of the segment. Repeat this step for all the pipes.
- Using a low speed drill, drill through the holes at the marked points.
- First, at points A, then B and C, thread a decorative rope through the holes.
- Slide the pipes tightly and tie the ropes on the sides of the screen with strong knots.
That's all, the screen is ready. Outwardly, it resembles bamboo or reed.
If desired, such a screen can be moved to any point in the apartment in order to block a bed, a workplace, or simply to delimit the space.
Modular cardboard partition
Even such a simple and unpresentable-looking material like cardboard boxes will serve us well. And if there is an opportunity to get sheets of cardboard - generally great! In order to make a cardboard screen yourself, prepare the following materials:
- sheets of cardboard 4 mm and 7 mm wide;
- ruler;
- pencil;
- scissors or a utility knife.
Use the diagrams below to create modules.
- You can redraw these diagrams by eye or print them on a printer, keeping the proportions. The size of each side is indicated in centimeters. You will get 5 parts, in the diagrams they are indicated by the letters A, B, C, D, E.
- Cut out the diagrams. Attach each detail to a sheet of cardboard and carefully trace with a pencil, taking into account all the slots. For sample, join two pieces of cardboard to determine the width of the slot.
- Cut out parts A-D from thinner cardboard, from the thicker one - parts E: they will serve as the legs of the screen. You end up with 16 A parts, 80 B parts, 70 C parts, 64 D parts, and 5 E parts.
- When you have cut out all the parts, start assembling the individual modules. Parts C and D will become connectors for larger A and B.
- Use connectors C to fasten the curtain modules together.
- Fix parts E, which serve as legs for support, on the bottom of the screen.
- The size of such a screen can be adjusted by making it higher or lower, forming a cascade or ladder.
Simple cardboard partition: an option for novice craftsmen
If the process of creating a screen from complex multi-part modules seems difficult to you, use the simpler option. You will need:
- sheets of cardboard;
- pencil;
- scissors.
You can take cardboard of the same color, or "play" with the gradation of shades.
- On thick cardboard, redraw the outline of the part from the picture. You can choose the required dimensions yourself, depending on your own preferences or the parameters of the room where the screen will be located. You will need a lot of such parts, but there should be a pair of them. Cut carefully with scissors taking into account all grooves.
- Prepare the modules by connecting 2 pieces perpendicular to each other in the central grooves.
- Line up the finished modules, securing them to the side grooves; build the second row in the same way, and so on. You will get a light and original screen of the required size and shape.
Using the same scheme, you can create a screen out of cardboard butterflies. Cut out the insect parts for the modules. Use different colors, so the screen will turn out brighter and complement any interior.
In the same way, connect 2 parts to each other, and then add the modules to the screen size you need.
Do-it-yourself cardboard dressing screens - video
Mobile screen made of metal or plastic pipes
A screen-partition made of metal pipes helps to zone a room or hide from the sun on a hot summer day. And the peculiarity of this design is that it moves easily on wheels.
To make such a screen, you will need:
- 3 metal pipes for the frame;
- 1 metal pipe for weighting the base;
- 4 furniture wheels;
- 2 corners for connecting pipes in the upper part;
- a board that will serve as the base of the screen;
- 2 flanges for fixing the pipes to the board;
- self-tapping screws and washer nuts;
- screwdriver;
- brush and paints.
Metal pipes can be replaced with PVC pipes of the same length and thickness. But to make the base heavier, you still have to take an iron pipe or other heavy load.
- Draw a markup on the board, indicating the attachment points for the furniture wheels.
- Fasten the wheels with self-tapping screws to the board using a screwdriver.
- Now you need to fix the weight on the underside of the screen base. Fasten the load with self-tapping screws using the holders. This is necessary so that the screen does not fall during operation. Unfortunately, the higher such a structure, the less its stability, so one cannot do without weighting.
- Fasten the flanges from the upper side of the baseboard, insert the pipes into them.
- Connect two vertical pipes on top of one horizontal one, inserting their ends into the connecting bends. When finished, paint the structure.
- Now is the time to get creative. If you plan to use the screen solely as a partition, hang a thick fabric on the frame. Even an old curtain can serve as it; the main thing is that the size of the fabric corresponds to the width of the frame, and the color and pattern correspond to the main notes of the interior.
And also such a screen on wheels can be temporarily used as a mobile wardrobe. Place it in your bedroom and hang your clothes on a hanger.
Opaque wooden sliding structure
If you need a dense screen that can even muffle sounds, then you need something more serious than a piece of fabric fixed to the frame. Use wood.
The wooden structure will serve you not only as a partition. Thanks to the dense lining, you can attach family photos, children's drawings and crafts to the screen.
The case for the screen can be thin wide boards made of any available wood. The easiest way is to use MDF panels.
You will need:
- 3 thin boards 45 cm wide and 180 cm long;
- 3 cuts of padding polyester 50 X 200 cm;
- 3 cuts of dense fabric 50 X 200 cm;
- primer or sealant;
- construction gun;
- acrylic paint;
- screwdriver;
- scissors;
- upholstery tape;
- hinges for doors;
- decorative construction nails.
If you have an opportunity to find boards of greater width, use them. Just do not forget that the synthetic winterizer and fabric must be adjusted to size.
- First, prepare boards or MDF panels. Cover one surface with a primer - this will be the back. When the primer is dry, open this side of the panel with acrylic paint.
- Cut a strip from the padding polyester with a width slightly larger than the panel, taking into account the allowance. Place the material on the board and secure with a construction gun. Cut off the excess synthetic winterizer on the sides with scissors.
- It was the turn of the fabric. The cut should be the same size as the padding polyester. Attach the fabric to the panel, pull it tight, fold the edges and secure with a construction gun over the padding polyester layer.
- Use glue to secure the upholstery tape around the edges of the panel. Additionally fix with decorative nails, driving them at a distance of 5 cm from each other. Repeat these steps for all panels.
- Now is the time to connect the structure. Lay the two panels face down; make sure that the bottom edges are level. At a distance of 10 cm from the bottom and top edges, attach the furniture hinges, attach them with a screwdriver. Fix the third panel in the same way.
If you wish, you can additionally decorate the finished screen with a pattern of decorative nails, giving the surface volume and texture.
Screens for creating spectacular photos
If you are a professional photographer, then you probably know how important it is to have beautiful, spectacular screens for thematic photo shoots. Most often, such orders are made for a wedding, but other celebrations are also in demand. Therefore, a beginner in the photo business needs to consider any possibilities just in case. We will help you create beautiful, light and airy screens for different photo sessions.
Painted screen for wedding photo shoots
A master class on making a wedding screen is based on the same principles by which such products are made from a wooden frame and fabric. True, it will be a little more difficult: you have to implement your skills in painting.
To make a screen for photo shoots, you will need:
- mosquito net;
- wooden blocks;
- corner brackets;
- long self-tapping screws 5.7 cm;
- short self-tapping screws 1.27 cm;
- loops;
- scissors;
- acrylic paint (white);
- sequins;
- stapler;
- drill for tightening self-tapping screws;
- water-based protective coating;
- brush;
- white paint for wooden surfaces.
First you need to decide what size the screen will be. It depends on the size of the room in which the photo sessions are held, the number of participants, and additional decor items. Having determined the height and width of the future product, you can easily calculate the amount of materials needed. For example, you can use the dimensions presented in the previous versions of the manufacture of screens.
Manufacturing and assembly instructions.
- Cut the bars to the specified dimensions, collect them in a frame. Connect the elements with self-tapping screws and angle brackets. To do this, it is easier to use a screwdriver or drill with a screwdriver attachment.
- If you decide to paint the frame white, do so immediately after assembly. You can do without this, leaving the wood with its natural color, but then it is advisable to open the surface with varnish.
- Now you need to secure the mosquito net. Cut it into pieces according to the size of the frame, leaving small allowances. Lay out the mesh on the back surface of the future screen and attach it with a construction stapler.
- Cut off the excess mesh with scissors.
- Using a brush, spread the water-based coating onto the mesh. This will help the paint adhere better as you paint. Wait for the mesh to dry.
- The time has come for creative work: drawing a pattern. You can choose any floral and fantasy motifs. Apply acrylic paint with light strokes using the same brush as for the protective coating. To create shadows, you can add a little gray or black paint.
- To give the screen for photo shoots a festive brightness, coat some places on the surface with PVA glue and sprinkle with sparkles. Let the product dry well.
- It remains only to connect all three frames with door hinges - and the screen for the solemn photo sessions is ready!
Screen for creating a photo with fabric drapery
A simple master class from the famous Moscow decorator Elena Teplitskaya will help you make a cute, funny and original screen, which will certainly come in handy for photo shoots.
Materials and tools you will need:
- frame made of metal rods;
- cuts of well-draped fabric, such as organza;
- threads and needles;
- decorative cord;
- markers for textiles.
As a decoration for the screen, you can take balls of thread, decorative braid, ribbon or bows - whatever your imagination tells you. In addition, the fabric can be either one color or different colors on each screen frame.
- Cut the fabric to fit the screen. The width should be the same, and the length of the cut should be 20 cm more than the height, in order to make a fold later. Organza or other light translucent fabric can be pre-treated with a solution with the addition of starch - this will make it tough and pliable. Form folds by squeezing the cuts vertically to make the fabric look like crepe paper.
- Spread the fabric over the frame from the top, securing it with pins. Do not pull it horizontally; it should lie in folds. Now use neat stitches to sew the pinned spots.
- Use a fabric marker to paint some simple ornament onto the drapery. This stage is a great way to realize your artistic talent.
- The applied drawing must be dried with a hairdryer. If you are working with a special hair dryer for embossing, observe safety precautions and do not bring the instrument too close to the fabric: it may catch fire. Use a regular hair dryer to dry your hair at a maximum of the second speed.
- Paint the visible metal parts of the frame with a marker to match the color of the fabric and the pattern on it. Decorate the top of the screen: string balls of thread, bows or other elements of your choice on a decorative cord, and fasten to the fabric with a stapler or sew.
Do-it-yourself partition for a room - video
Share with your friends!If you consider in more detail the surrounding objects and add a little of your own imagination, then everyone can turn it into something interesting and unusual. PVC pipes are no exception.
A do-it-yourself plastic pipe screen is one of the most common uses for old or defective PVC pipes. In everyday life, such products are used to equip sewage, heating and plumbing systems, but with the right approach, they can be used in a different way. If a craftsman takes up the job, then the pipes are transformed into amazing things.
It is customary to use decorative partitions to delimit large rooms into separate zones or hide certain areas of the room from prying eyes. Designs such as plastic pipe screens that you can make with your own hands have been used since antiquity.
Screens can be mobile, stationary, transparent and compact. For their manufacture, a wide variety of materials can be used, which can be of different shapes and sizes. If there is a substantial budget, the partitions can be decorated with precious items and rare materials.
Screen made of PVC pipes
It was these structures that were used in the arrangement of wealthy houses during the times of the Roman Empire, Egypt, Greece and China. For their manufacture, it is recommended to use lightweight materials that will make the decorative element mobile.
Modern businessmen make partitions even from plastic pipes with their own hands. In addition, you will not need any special expenses, but only a little free time and a desire to create.
There are several types of modern screens, and they will be used depending on the type of building used, its purpose and the available material. The overall style of the room is also taken into account.

By functional purpose, there are:
|
Description |
|
| Transparent | They represent a solid frame, around the perimeter of which fabric or any other material is stretched. It is even possible to use gauze, which is pre-starched. Openwork wooden or metal models are used somewhat less often. |
| Deaf | There are many flaps for such models, but opacity should be attributed to the characteristic features. In this case, a board, strong and dense material, cardboard can be used. |
| Flexible | In this case, thin and long sections will be needed, which will be interconnected. The result is a monolithic wall. If the material is flexible, then the screen can be installed in the form of a spiral, roll or wave. |
| Screens in the form of a book | The leaves can be either the same or different widths. If desired, the flaps are folded into a compact book and moved to another place. They are distinguished by their mobility, therefore they can be used as a place for changing clothes or in photo sessions. |
| Single screen designs | They have one, but rather wide sash, which will be presented in the form of a strong frame, which will be tightened with paper, cloth or any other available material. It is recommended to use casters for easier movement. |
| Sliding structures with sashes | Such partitions have been used since time immemorial, and until recently were the only way to delimit the available space. A rigid frame was made on which a dense fabric was stretched. Several rams were made, but no more than ten. If necessary, such structures can be easily assembled and moved. A little later, the metal was replaced by a lighter one - aluminum. |
Plastic pipes vaguely resemble individual elements of a large construction set. With the right combination of individual segments (different angles and connections), almost any structure can be assembled. For a start, you can try your hand at creating a small clothes hanger, and some manage to put together sturdy bunk beds. The main thing here is the implementation of the correct connection, which will allow you to create almost any piece of furniture and modern interior.

Polymer pipes are used in the arrangement of heating, water supply and sewerage systems, for the manufacture of which polymers are used. Polypropylene and PVC pipes are in the greatest demand.
After the next repair, small pieces of such pipes often remain in the country and lie in storerooms or garages for a long time. Craftsmen have found a worthy use for them, and due to their high strength, reliability and low weight, they are completely safe and durable. To connect polypropylene products, you will need special equipment - a welding machine. If not, then you should think about renting. Fittings can also act as connections, but such products will be non-separable.

If desired, the frame of the structure can be easily repainted, and the canvas is replaced. If the screen is used in the bedroom, then as an interesting and unusual idea, you can use a translucent fabric, and install the backlight at its base. Thus, in the process of changing the person's clothes, it will not be visible, and only the material will be highlighted. It can also be used as a wardrobe screen.

Instructions on how to make a PVC pipe screen
You can see more details about the process of making a PVC pipe screen with your own hands in video:
Maria Bikeeva
In November 2015, in our kindergarten, a seminar of the Scientific and Methodological Center of Kemerovo was held on the topic "Building a developing subject-spatial environment - a condition for the readiness of the transition of preschool educational institutions to FGOS DO". Preparing for the seminar, the teachers of our group brought the developing subject-spatial environment (RPE) in accordance with the requirements of the Federal State Educational Standard for preschool education.
We remember that the RPPS should be:
Transformable;
Multifunctional;
Affordable;
Safe.
The listed requirements are met by the "Multifunctional screen", which was purchased for our group. I suggest you take a closer look at our screen and then, perhaps, you will have a desire to make the same one for your kindergarten. Moreover, the "Multifunctional Screen" is made of inexpensive materials and is generally simple to perform.
The purpose of the master class: to show the possibilities of using the didactic manual "Multifunctional screen" in various types of children's activities.
So, first, let's look at the screen from all sides. The screen consists of three parts.
Central part:

Side parts:


And now all the pieces are on the other side:


Other angles:


The base of the screen is made of polypropylene pipes (yes, from the very pipes that plumbers use to mount the water supply in the apartment, polypropylene fittings are used for the connection.
A fitting is a connecting part of the pipeline, installed at the places of its branches, turns, transitions to another diameter, as well as, if necessary, frequent assembly and disassembly of pipes.

The fitting used here is a square fitting.

This fitting connects the frames to each other.

A single support is used as legs.
The diameter of the pipes used to make the screen is approximately 2.5 cm.
Side frame measurements:
width - 79 cm, height - 118 cm.
Central frame measurements:
From the bottom to the middle pipe - 72 cm.
Leatherette panels are attached to the frames, polyester curtains are attached to the upper tube at the central frame.
Measurements of leatherette panels:
side panels - 112 cm by 65 cm.
Measurements of the lower central panel made of leatherette:
65 cm by 65 cm.
Measurements of one curtain:
length - 48 cm, width - 42 cm.
Both the leatherette panels and the curtains are attached to the frames with a wide elastic band and buttons.

The length of the elastic is 12 cm.
This is what a curtain with mounts looks like:

The multifunctional screen has transparent pockets where an A4 sheet can be placed:

The pockets are attached to the leatherette:

The screen is decorated with a beautiful leatherette applique. Applique details are stitched on:

We examined the screen of the factory production, and now let's look at the screen, which was made by the craftsmen from our kindergarten. Nothing worse, and even better!

If the sample screen is made of leatherette, then FETER is used here, which makes the screen even more functional. A felt screen is used both as a flannelegraph, and as a basis for a soft designer, and there is much more you can do with it, if the teacher had a fantasy!


They also pulled on cords with decorative clothespins.

This screen is used in the nursery, the pockets were made larger for them, for large pictures.
Another interesting "attachment" to the screen: a rectangle was cut out of the garden mesh and processed with a cloth, which can be fastened to the buttons on the screen. With the help of decorative clothespins, you can attach children's works or photographs, or you can tie ribbons, strings. There are a lot of options.

The child has completely retired:

The child has partially retired:

We show the puppet theater:

If you cover it with a cloth, you get a tent:

You can sit together:

Can be used as a stand:

We create a space for the role-playing game "Guests".

We divide space and play according to interests:

Noisy games do not distract other children from reading, for example.

I hope that my post will be useful, thanks for your attention!
Related publications:
Every time I admire the creativity of educators of any age. Give us a task, out of nothing we will make something worthy of admiration.
Dear colleagues, I want to tell you how quickly and easily, without special costs, you can make a fascinating manual. After all.
In order to form correct breathing in a child, a correct, smooth exhalation should be formed. This didactic guide will allow.
Purpose of the game: to develop the idea of children about the composition of the number within 5; to consolidate the ability to correlate a number with a digit within 5; Materials.

