How to make a clay cup with your own hands. Do-it-yourself ceramics: recommendations and video lesson
Suppose there is such a situation that you are left alone with nature, civilization is either somewhere far away, or does not exist at all anymore (the plot is not so important, the need is important). And now you decide to make the simplest dishes from clay! How to do it in terms of survival?!
If you are not an experienced potter, and you don’t have a potter’s wheel at hand (perhaps yet), try making a simple vessel. In ancient times, our ancestors simply scraped out a whole piece of clay or sculpted them by hand. And even in our time in Central Asia, in some villages, the manual method of sculpting vessels is still preserved.
Before sculpting earthenware, you should find the material for its manufacture! Look for clay along the banks of ravines and rivers, next to streams and springs. There are many deposits of clay in wetlands, where there is a low level of groundwater. In this case, clay is usually located under other rocks. Therefore, before you get the clay, you need to remove their layer.
Also keep in mind that the extracted clay may contain impurities (small pebbles, sand), it would be nice to get rid of them, if possible, fill the clay with water and let it settle. Impurities should settle to the bottom, and clean clay should be taken out and dried in the sun, after which you can start sculpting. Clay and water are all we need.
To mold the vessel by hand, first fashion the bottom in the form of a round plate. Then small pieces of clay should be rolled into flagella of approximately the same thickness. Now we make the walls of our vessel: the flagella should be laid one on top of the other, in rings, starting from the bottom, giving the shape we need (see picture). When laying the flagella, simultaneously rub the gaps between them and smooth out the bumps.

After the resulting vessel should be burned, since apparently we do not have a furnace (perhaps so far) we will use a fire.
Remember turning clay into ceramics going on at a temperature 500-900 °С. The lower the temperature, the longer the firing should take. Experiments have shown that temperatures up to 750 °C can be reached in a fire. It should be noted that Burning in fires has not outlived its usefulness in our time. It has been preserved in Central Asia, Africa and America. The shortest bonfire time from 8 to 12 hours but sometimes it lasts several days. As you remember, Robinson burned his dishes overnight.
You can also benefit from centuries of experience. Do this: pieces of bricks are laid on a flat area (in theory, flat stones will also work). Place the vessel on the stones. If there are a lot of products, first of all, large things are placed on them, then medium-sized products and capsules (a refractory box for firing, for example, a tin can) with small things (Fig. 2). The resulting pyramid of clay products is carefully covered with firewood and a fire is set on fire. It must burn for at least 8 hours. Although, as already mentioned, the longer the firing lasts, the stronger our ceramics.

Small items, if there is a need for such, can be fired in capsules in another way (Fig. 1). Dig a shallow hole in the bottom of which you will lay firewood with a grate and place capsules from cans. Fill the hole with charcoal left over from the old fire. When the coal completely covers the jars, it is sprinkled with a thin layer of earth and a fire is made on top, on which you can cook food or use it for any other needs: the firing will go on automatically. If the fire is stopped burning late in the evening, it is extinguished, sprinkled with earth and left until the morning. In the morning, capsules are dug out of the ashes and burnt items are taken out of them.
© SURVIVE.RU
Post Views: 3 316
DIY earthenware
Have you ever watched how a swallow makes its nest? In addition to blades of grass, used by all feathered builders, clay is also used. Moreover, clay is the main building material for swallows. No wonder the people say: "The bee sculpts from wax, and the swallow from clay." Softening the clay with a liquid secreted by special glands, the swallow, like a real potter, clump after clump sculpts a deep bowl. When it dries, it becomes so strong that if it accidentally falls, it will not break. It is quite possible that in very distant times, observations of swallow work led a person to the idea of building adobe dwellings and hut-huts. Until now, according to the “swallow technology”, raw bricks are made from unbaked clay, used for the construction of various buildings, not only rural, but also urban. As you know, heavily compacted clay does not allow moisture to pass through, therefore, in folk construction, not only walls were made from it, but also floors with roofs. To increase the strength of the adobe floor, it was sprinkled with salt water from time to time.
Clay has become so firmly established in the construction business that even in our reinforced concrete age, a third of the world's population lives in adobe dwellings. And that's not counting the houses made of burnt bricks.
In ancient times, people wrote on thin clay tablets in the same way as they write on paper today. (By the way, white clay is necessarily a part of modern paper. So, to some extent, we still write on clay.) Among the clay tablets found during excavations, there are all kinds of documents: laws, certificates, economic reports. Clay tablets became the pages of the very first books written by ancient authors. Epic poems, religious hymns, proverbs and sayings, composed in those distant years, were immortalized on them. Some tablets, after making the inscriptions, were only dried well in the sun, while others, more valuable, intended for long-term storage, were burned. Since time immemorial, people have been sculpting objects necessary for everyday life from clay, especially dishes. Only here is the trouble: dishes made of unbaked clay are very fragile and, moreover, are afraid of moisture. In such dishes it was possible to store only dry products. Raking up the ashes of an extinguished fire, the ancient man noticed more than once that the clay soil in the place where the fire burned became hard, like a stone, and was not washed away by rains. Perhaps this observation inspired the man to burn dishes at the stake. Be that as it may, but clay burned in a fire was the first artificial material in the history of mankind, which later received the name of ceramics. With the development of technology, molded and dried clay products began to be fired not in fires, but in special furnaces - forges. In Rus', the very word "potter" comes from the name of kilns. In the old days, craftsmen working with clay were called potters, but over time, the letter “r”, which made pronunciation difficult, was lost. Ceramic products are the most common finds of archaeologists. Indeed, unlike wood, clay does not rot and does not burn, does not oxidize, like metal. Many clay objects have come down to us in their original form. This is primarily a variety of dishes, lamps, children's toys, cult figurines, molds, weights for fishing nets, spindle whorls, spools of thread, beads, buttons and much more.
In the hands of talented craftsmen, ordinary things turned into true works of decorative and applied art. The art of ceramics reached a high development in ancient Egypt, Assyria, Babylon, Greece and China. Many museums around the world are decorated with dishes made by ancient potters. The old masters were able to sculpt dishes, sometimes gigantic in size. The Greek pithoi, vessels for water and wine, reaching a height of two meters, amaze with their high technical skill. It was in the vessel-pithos, and not in the barrel, as is commonly believed, that the ancient Greek philosopher Diogenes lived.
In our time, many secrets that were owned by the ancient masters have been lost. Despite the high development of production, modern ceramists have not yet managed to solve the secret of the preparation of the glaze that covers two large vases discovered during excavations by Chinese archaeologists. When water was poured into the found vases, the glaze immediately darkened and changed color. As soon as the water was poured out, the vessels regained their original whiteness. Ho
Although these amazing chameleon vases were made by Chinese potters more than a thousand years ago, they have not lost their amazing properties. Famous for ceramics and Ancient Rus'. From the workshops of potters came out bowls, dishes, jugs, capsules, rukomoi, oven pots and even jugs-calendars. Each calendar was a jug on which certain characters were stamped in a rectangle assigned to each month. In addition to calendars designed for the whole year, there were agricultural calendars covering the period from April to August, that is, from sowing to harvesting grain. On such a calendar, special signs indicated the most important pagan holidays, the dates of field work, and even the days when it was necessary to ask the sky for rain or a bucket (sunny weather). Consecrated water was poured into the jug-calendar, which was sprinkled on the fields during the prayer service. Russian potters painted tableware with special ceramic paints or engobes (liquid colored clays), covered with vitreous glaze - glaze. Especially a lot was made of black polished courts. Slightly dried items were rubbed to a shine with a polisher (smooth stone or polished bone), and then burned in a smoky flame without oxygen being allowed into the hearth. After firing, the dishes acquired a beautiful silver-black or gray surface, at the same time they became more durable and less moisture-permeable. There is earthenware in every modern dwelling, although it is hard to believe that sparkling white china cups and plates are relatives of smoky stove pots, gourlets and all kinds of rags molded from dark clay. But dishes made of white and dark clay are not rivals, each is good for its purpose.
The most fragrant tea can only be brewed in a porcelain teapot, and the most delicious cow's milk varenets can be made only in an earthen pot and even in a Russian oven.
In a modern urban dwelling, clay is also present in the form of all kinds of facing slabs, bathtubs, and sinks.
In a word, clay is always a modern material, without which it is impossible to do either in the present or in the future. Since ancient times, clay has served man not only as a raw material for ceramics and construction. Traditional healers used clay as a kind of healing agent. For example, stretching of the veins was treated with a plaster made from yellow clay diluted in vinegar. In order to relieve pain in the lower back and joints, a patch of clay diluted in hot water with the addition of kerosene was applied to sore spots. Healers preferred oven clay, using it for divination, whispering from the evil eye and treating fever. Various pottery was used as medical equipment. Drugs were prepared in some vessels, dried herbs and roots were stored in others. And the smallest pots, which were called mahotkas for their small size, were used for colds as ordinary medical jars. Probably the first medical heating pad was also clay. At first, a jug with a narrow neck was used as a heating pad, into which hot water was poured. Then, on the orders of doctors, potters began to make special medical heating pads in the form of a low vessel with a flat, wide bottom and a tight-fitting neck. Even the ordinary red brick is said to have been put to the service of health. It was heated in a furnace, then onion peel was poured on top, inhaling the smoke that appeared at the same time. Modern medicine confirms that such inhalation helps with colds. With the help of a red-hot brick, you can also disinfect the room, expel mosquitoes and flies from it. Only in these cases, instead of onion peel, wormwood and juniper branches were used.
Few people know that the inhabitants of the North - the Chukchi and Koryaks - used clay ... for food. Of course, not any clay, but white clay, called "earth fat" by the northerners. They ate ground fat along with deer milk or added it to meat broth. Europeans did not disdain “edible” clay either, preparing a delicacy like sweets from it.
I was on topan…”
I was on a digger, I was on a topan, I was on a circle, I was on a fire, I was on a fire. When he was young, he fed people, but when he became old, he began to swaddle. Everyone could guess this riddle in the old days. The hero of the riddle is an ordinary oven pot. Using his example, one can trace the entire path that clay goes through before becoming a ceramic product. Village potters called a pit or quarry where clay was mined "Kopants". From the digger, the clay fell on the "topanets" - a flat place in the yard or hut, where it was trampled underfoot, carefully kneading and picking out the pebbles that got into it. After such processing, the clay came to the "circle", that is, to the potter's wheel, where it took the form of a pot or some other vessel. When the pot finally dried up, it was sent to the “fire”, or rather, to the furnace, where after firing it became hard as a stone. But in order for the pot not to absorb moisture, it had to be “on the burn”. To do this, it was dipped in hot form into leavened thick or liquid flour mash.
The second part of the riddle figuratively and briefly shows the further fate of the finished pottery. It is hardly worth specifically explaining how the stove pot “fed people”, but why it “began to swaddle” in old age is hardly clear to a modern person. The fact is that in the past, housewives were in no hurry to throw away old cracked pots. They were wrapped around with narrow steamed birch bark ribbons, as if they were swaddling. Pots and other earthenware entwined with birch bark could serve for many more years. We will have to remember this old Russian riddle more than once, but for now we will talk about diggers and “living clay”.
"Living clay" potters called the clay, which is in nature in its natural state.
The clay found in nature is so diverse in composition that in the bowels of the earth you can actually find a ready-made clay mixture suitable for making any kind of ceramics - from sparkling white faience dishes to red oven bricks. Of course, large deposits of valuable types of clay are rare, so factories and factories for the production of ceramics appear near such natural pantries, such as, for example, in Gzhel near Moscow, where white clay was once discovered. Every self-respecting village potter also had, although small, but his treasured deposits, or, more simply, digging pits, where he got clay suitable for work. Sometimes it was necessary to travel many miles for the required clay, extracting it from deep pits with incredible difficulties. Moreover, one deposit was not always enough, since different products required a different composition of clay. So, for example, greasy ferruginous clay is best suited for black-polished ceramics. It is highly plastic, perfectly molded on the potter's wheel, and after drying it can be ironed to a mirror finish. The ware from such clay does not pass moisture and differs in high durability. One problem: greasy clay cracks easily during drying and subsequent firing. Products made from thin clay containing a significant amount of sand have a rough surface, and besides, they strongly absorb moisture. But when drying and firing, lean clay cracks very rarely. For good clay, the golden mean is preferred when it has an average fat content.
Oily clay is considered to contain less than 5% sand, while lean clay includes up to 30% sand. Medium fat clay contains 15% sand.
You can find suitable clay for modeling and pottery almost everywhere, there would be a desire. In addition, a small amount of clay can always be “fixed” by elutriation and other methods. Clay can occur immediately under the soil layer at a shallow depth. In garden plots, it can be found during various land works. Layers of clay quite often come to the surface along the banks of rivers and lakes, in the slopes and slopes of ravines. There are areas in the Non-Chernozem region where clay is literally underfoot and in wet weather on country roads it turns into a continuous mess, causing indignation of passers-by. Even from such “dirt” collected on the road, small decorative items can be molded and then fired. But, of course, this should not be done. Even where there is clay soil all around, you need to dig at least a shallow ditch to get to cleaner and more uniform layers.
Clay suitable for modeling can be successfully prepared even in a big city. After all, builders are always digging pits for a new house somewhere nearby, or a water or gas pipeline is being repaired. At the same time, clay layers, lying at great depths, are on the surface.
Determining the suitability of clay for modeling can be done in a fairly simple way. From a small lump of moistened clay taken for a test, roll a tourniquet about the size of your index finger between your palms. Then slowly bend it in half. If, at the same time, cracks do not form at the bend or there are very few of them, then the clay is quite suitable for work and, in all likelihood, it contains 10-15% sand.
Each type of clay at a certain stage of modeling, drying and firing changes its color. Dried clay differs from raw clay only in a lighter tone, but when fired, most clays dramatically change their color. The only exception is white clay, which, when moistened, acquires only a slight gray tint, and after firing it remains the same white. The color of "living clay", usually in a wet state, is most often deceptive. After firing, it can suddenly change dramatically: green will become pink, brown - red, and blue and black - white. As you know, craftswomen from the village of Filimonovo, Tula Region, sculpt their toys from black and blue clay. Only after being dried in a kiln, the toys become white with a slightly creamy tint. The miraculous transformation that happened to the clay can be explained very simply: under the influence of high temperature, organic particles burned out, which gave the clay a black color before firing. By the way, similar particles are found in the black soil, where they also determine the color of this soil. The color of clay, both in the raw and in the fired state, is also affected by the various mineral impurities and metal salts in it. If, for example, clay contains iron oxides, then after firing it becomes red, orange or purple. According to the color that the clay acquires after firing, they distinguish between white-burning clay (white), light-burning (light gray, light yellow, light pink), dark-burning (red, red-brown, brown, brown-purple). To determine what kind of clay you have to deal with, mold a plate from a small piece or roll a ball, which, after thorough drying, fire in an oven. Put the prepared clay in wooden boxes, fill it with water so that its individual lumps protrude slightly above the surface. It is advisable to immediately prepare as much clay as possible. With an abundance of clay, only a small part of it is consumed, and the rest will be constantly aged. The more wet the clay is, the better. Previously, potters kept clay in the open air in the so-called clay pit - a special pit, the walls of which were made of logs, planks or thick boards. The clay had to lie in the clay pit for at least three months, but sometimes it was in open storage for several years. In spring and summer, it was burned by the sun's rays, in autumn the winds blew and rained, in winter it froze in the cold and thawed during the thaw, then melt water penetrated into it. But all this was only beneficial for the clay, since it was loosened from numerous microcracks, while harmful organic impurities were oxidized and soluble salts were washed out.
The centuries-old practice of folk craftsmen has shown that the longer the clay is aged, the better its quality...
Clay, which has an optimal fat content and is well aged, just needs to be washed thoroughly and pick out the pebbles that accidentally got into it. In the past, clay was kneaded in a pottery or hut on the floor, sprinkled with sand, which in the riddle about the pot is called "topanets". Quite often, the whole family, including children, was engaged in the washing and cleaning of the clay. Clay was trampled with bare feet until it turned into a thin plate, which was immediately rolled into a roll. Then the roll was folded in half and trampled again. When the clay again took the form of a plate, a new roll was rolled up. This was repeated up to five times, until the clay turned into a homogeneous mass, soft and pliable, like pie dough. By the way, well-washed and cleaned clay, ready for pottery, is called clay dough.
Sifting clay
If you decide to sift the clay, then lay it out in small lumps on a wooden deck and dry it in the sun (Fig. 1.1). In winter, clay dries well in the cold, spread out under a canopy where snow does not fall. A small amount of clay can be dried indoors, on a warm oven or on a central heating radiator. Of course, the smaller the lumps, the faster the clay will dry. Pour the dried clay into a thick-walled wooden box and break it with a rammer - a massive piece of a tree trunk with handles (1.2) reinforced on top. Sift the resulting clay dust through a fine sieve and remove all kinds of impurities from it in the form of pebbles, chips, blades of grass and large grains of sand (1.3). Before modeling, clay powder is kneaded in the same way as bread dough, adding water from time to time and thoroughly mixing the clay mass with your hands. It is advisable to store a part of the clay powder in case the clay dough needs to be quickly made thicker, but there is no time for drying and evaporation. The required amount of powder is poured into the liquid clay dough, and then kneaded well.
Elutriation of clay
When elutriated, the clay is not only cleansed, but also becomes more oily and plastic. Therefore, clay containing a lot of sand and having low plasticity is most often elutriated.
Elutriate the clay in a tall vessel, such as a bucket.
Pour one part of clay with three parts of water and leave overnight. In the morning, stir the clay thoroughly with a whorl until a homogeneous solution is obtained. Then let the solution settle for a long time. As soon as the water clears from above, carefully drain it with a rubber hose. But it is not so easy to drain the water without muddying it. Therefore, even in ancient times, a simple and ingenious device was invented, which is still used by Japanese potters (Fig. 1.4). Several holes are drilled vertically in a wooden tub at a short distance from each other. Before filling the tub with a liquid clay solution, each hole is plugged with a wooden plug. Heavier grains of sand and various kinds of pebbles settle to the bottom in the first place. Then, after settling, clay particles fall down. Gradually, the water from above brightens and finally becomes transparent (1.4a). As soon as the level of light water seems to be slightly below the upper hole, the cork is pulled out, and the clarified, settled water is poured out of the barrel (1.46). After some time, the cork located below is removed. So gradually all the settled water is drained. To speed up the process of clay settling, bitter Epsom salts are first added to the solution (about one pinch per bucket). Instead of a wooden tub, you can use a suitable metal bowl. At different levels, short tubes are soldered into it, which are plugged with stoppers.
.jpg)
After removing the settled water, carefully scoop out the liquid clay, leaving the bottom layer intact, in which the pebbles and sand settled to the bottom are located. Pour the clay solution into a wide wooden box or basin and place it in the sun so that excess moisture evaporates faster from the clay (1.5). As soon as the dried clay loses fluidity, mix it from time to time with a shovel. After the clay acquires the consistency of a thick dough and stops sticking to the hands, it is covered with plastic wrap or oilcloth and stored until the start of stucco work.
Skinny Supplements
In the manufacture of large products, so-called thinning additives are introduced into oily clay, which help to reduce shrinkage during drying and firing, thereby preventing cracks and warpage on the product.
Even in ancient times, in the manufacture of large vessels intended for storing food, gruss was added to clay dough - coarse sand obtained by crushing sandstone. But the most common wasting material has always been fine sand. To remove foreign inclusions from the sand, it is washed several times with clean water and then dried. Other thinning materials are sometimes added to the clay to give it additional properties. Ceramics will become lighter and more porous if a little sawdust is introduced into the clay dough. Folk craftsmen of Central Asia, instead of sawdust, add to the clay the fluff of poplar and marsh plant - cattail, as well as crushed animal hair. The admixture of so-called chamotte makes ceramics more refractory. Chamotte can be made from refractory bricks, which are first crushed and sifted through a sieve, removing ceramic dust. The crumbs remaining in the sieve no larger than a millet seed are chamotte. It is added to clay dough no more than 1/5 of the total mass.
Along with chamotte, to obtain fire-resistant ceramics, crushed and sifted ceramic utensils are used.
"Interruption" of clay
Immediately before modeling, in order to remove air bubbles from the aged clay and increase its uniformity, the clay dough is “interrupted” and kneaded. "Interruption" of clay is indispensable in cases where the clay, for some reason, was not well cleaned and small pebbles and other foreign inclusions are found in it. Processing begins with the fact that a bun is rolled from a piece of clay (Fig. 2.1), which is then lifted and thrown with force onto a table or workbench. At the same time, the bun is slightly flattened and takes the form of a loaf. They take a potter's string in their hands (steel wire with two wooden handles at the ends (2.2)) and cut the "loaf" into two parts (2.3). Lifting the upper half, turn it cut side up and throw it on the table with force. The lower half (2.4) is also thrown at it with force, without turning over. The stuck halves are cut from top to bottom with a string, then one of the cut pieces of clay is thrown on the table, and the second is placed on it (2.5). This operation is repeated several times. When cutting clay dough, the string pushes out all kinds of pebbles encountered on the way, opens voids and destroys air bubbles. The more cuts are made, the cleaner and more uniform the clay dough will become.

You can also process clay dough with a carpenter's plow or a large knife (Fig. 3). The lump of clay is carefully compacted with a massive wooden mallet (3.1). Then it is pressed with force against a table or workbench and cut with a plow (3.2a) or a knife into the thinnest plates (3.26). All kinds of foreign inclusions falling under the blade are thrown aside. The thinner the cut plates, the cleaner and more uniform the clay dough becomes. The plates obtained after planing are again assembled into a single lump and compacted with a mallet until it becomes monolithic (3.3). The lump of clay prepared in this way is planed again. These techniques are repeated until the clay dough becomes homogeneous and plastic.

Clay break
This is the last stage in the preparation of clay dough intended for modeling. They take a lump of clay in their hands (Fig. 4.1) and roll it out so that an elongated roller is obtained (4.2). Then the roller is bent in half (4.3) and crushed so that again a round lump is obtained (4.4). From this moment on, all the operations of the mine are repeated in the same sequence several times.
The plasticity of clay dough depends not only on the uniformity of its structure and composition, but also on its humidity.

If the clay is too dry, it is sprinkled abundantly with water before each subsequent change.
Determine the plasticity of clay in a way already known to you. A small lump of clay (4.5a) is rolled between the palms (4.56). The resulting tourniquet is bent in half. If the clay has high plasticity, then not a single crack will appear on the bend of the bundle (4.5c).
The presence of cracks indicates that the clay is too dry and needs to be moistened (4.5g).
There are many popular ways of preparing clay dough. In some regions of Russia, toy masters crush and then separate the clay into separate blanks in the following way. The clay ball (Fig. 5.1) is flattened with a wooden mallet (5.2). The resulting plate is rolled up (5.3). The roll is crushed with a hammer and molded from it the same lump as it was at the very beginning (5.4). The molded lump is flattened again (5.5) and the plate is rolled up (5.6). Having done all this several times, the roll is carefully kneaded and a tourniquet is rolled from the resulting lump, which is cut with a knife into “chunks” (5.7). Each "chunk", depending on the size of the future workpiece, is cut in turn into two or four parts (5.8). Each half and quarter is rolled out in the palms, obtaining blanks in the form of balls of the same size (5.9). The blanks are placed in a wooden box, first covered with a moistened cloth, and then with oilcloth or plastic wrap. Sometimes they are put in some kind of metal vessel, covered with a lid on top. In this form, blanks can be stored for more than a month without losing their original plasticity.

Drying of clay products
Before getting to the “fire”, each clay product must go through a preparatory stage called drying.
Drying is a rather lengthy process. Haste can nullify all previous work: with quick drying, the product is covered with numerous cracks and warps. In the first stage of drying, the moisture from the product should evaporate as slowly as possible. In the early days, craftsmen dry dishes and toys indoors or under a shed in a quiet, windy place where there are no drafts. It takes two to three days to pre-dry. After that, the products were dried in a heated oven. The better the clay dries, the greater the hope that marriage will not occur during firing.
A product that has a complex shape with many details must be dried with extreme care, for example, by lowering it into a metal dish or box, covering it with a newspaper sheet on top. A large product can be covered on top with a dry cloth. On the second day, the rag is removed, but the product continues to dry in the shade. Approximately on the fourth day of medium size, the product can be dried on a stove or on a central heating battery. Dried clay acquires a sufficiently high strength necessary for further processing. Before being fired, each product must be carefully inspected. If cracks are found, they must be carefully repaired. The crack is moistened with water and covered with soft clay. In addition to cracks, the product may have all sorts of irregularities, random layers, clay chips adhering to the surface and minor scratches. Damaged areas need to be processed with cycles and cleaned with fine-grained sandpaper, and then clay dust should be removed with a wide brush or brush.
To give the product shine, polishing is used. One of the ancient methods of polishing is very simple. The surface of the dried product is rubbed with any smooth object, compacting the top layer of clay until it shines.
After firing, the brilliance becomes stronger. Polished dishes can be safely used in the household, as it is quite moisture resistant. In Rus', polished dishes with a decorative purpose were additionally subjected to blackening. To do this, at the end of firing, some fuming fuel, for example, var, was thrown into the furnace. By absorbing the smoke, the vessels turned black, retaining their luster. There is another way to blacken dishes. Hot pottery is thrown into sawdust or chopped straw.
Clay firing. Building a traditional pottery kiln
Old Russian potters drove their forge into the hillside. How it looked, you can see in the figure, in which the bugle is drawn in section.

Forge for firing ceramics

Old Russian pottery kilns: one-tier from Belgorod (general view) and two-tier from the Donetsk settlement (section).

Handicraft forges of open and closed types.
Clay for the forge will require a lot. First, it must be carefully prepared. Clay should not be too greasy - three parts of sand should be added to one part of clay. After adding water, knead the mass in some large trough. Make sure it's not too liquid! For kneading, cut a large wooden spade out of the board.
Having chosen a place for the furnace, lay a layer of clay on it and compact it well. On this layer, make a platform of bricks or boulder stones (use only granite stones, limestone is not suitable for this). Fasten the stones with clay mortar.
On this site we will lay out a round oven with a diameter of about 1 m. It is made like a very large pot of tows. The bundles are needed thick, with a diameter of at least 20 cm. The thicker the walls of the furnace, the better it will keep heat.
After laying out the first circle, continue to lay out the bundles in a spiral. After laying every three rows, align the walls and tamp them down with a wooden mallet.
Having erected the walls to a height of 30 cm, the lower chamber of the furnace is ready, firewood will burn in it.
Now you need to install the grate-grids on which you will put the fired products. For the grate, you need to find iron bars, grates, nets in advance.
Lay the rods across the stove at a small distance from each other so that the clay products do not fall between them. If the rods protrude slightly beyond the edges of the forge, this is not a problem.
Now continue to build walls, reducing the diameter of the spiral with each turn. So the second chamber is ready, in which the fired products will be placed. At the top we leave a round hole - a hatch for loading the forge.
A hole for the firebox through which firewood is placed, cut with a large knife or a sapper's shovel immediately after the walls have been erected, until the clay has dried.
Near the "entrance" to the stove, make clay gates from bundles. You can decorate the stove with sticky patterns - let it be, for example, a fire-breathing dragon.
Depending on the weather, the finished forge dries for 10-15 days. For one or two days it is better to cover it with burlap, and then dry it in the open air. If cracks form during drying, fill them with clay mass. From the rain, cover the horn with a piece of polyethylene, or even better, build a small canopy over it.
When the forge dries, it must be burned. Well, if by this time you have accumulated products for firing, then you will save both firewood and time. The horn is loaded through the top opening. First, large products are placed on the grate, then smaller products are placed between them and on them. The hatch is covered with a sheet of iron and covered with shards and dry earth. But leave a small gap at the top for the smoke to escape, otherwise there will be no air movement and the fire will not flare up.
First, the stove is heated over low heat, and then more and more firewood is added.
The firing starts in the morning and ends in the evening. At night, the forge will cool down, and in the morning it will be possible to “unload” it, that is, to remove finished products from it. If you don't have enough clay on hand to make a forge, you can build it using the same pattern with bricks. The temperature in the pottery furnace reaches 900°C. Products in the hearth are heated evenly.
Scalding of clay products
Obvar is the last stage in the processing of pottery in rural potteries.
After scalding, earthenware becomes less permeable and, moreover, more durable.
The scald is made immediately after the still hot dishes are taken out of the hearth. Holding it with tongs, it was dipped into a pre-prepared liquid paste solution made from rye or oat flour. Pottery was also scalded in kvass thick, which usually remained at the bottom of the tub with kvass. The potters of Central Asia used whey for the same purposes.
Flour decoction and kvass thick penetrate deep into the walls of pottery, scald and reliably clog its pores. After scalding, the appearance of the dishes also changes: it is covered with numerous dark spots, giving it a unique originality. In addition, the stains, according to the belief of the village potters, protect the contents of the vessel from the evil eye.
Gradually, scalding began to be used less and less, potters increasingly use glaze or glaze - covering products with the thinnest layer of glass.
-
Choose clay. After choosing the method you will use, you can choose the type of clay. Most clays require kiln firing, but most newer grades can be kiln fired. If you just want to play with wet clay, don't even bother firing it. Rule of thumb: Wet and dry clay won't work together - make sure the clays are the same consistency.
- If you are going to fire clay, choose between high temperature and low temperature firing.
- Low temperature firing is best for bright colors and detailed ornaments. Glazes at this temperature are very stable, the colors remain bright and do not shift during the firing process. The disadvantages include that the pieces are not fully vitrified (clay does not fully fuse), so you will have to rely on the glaze to make the piece waterproof. This makes such products less suitable for use as dishes or for storing water. Since the glaze has not interacted with the ceramic, as happens with high-temperature firing, there is a high probability of glaze chipping. However, with the right clay and glaze, the latter can be quite durable. The clay used in low-temperature firing is called pottery clay.
- At medium and high temperature firing, clays called fine-stone or porcelain are used. Vibrant colors can still be obtained in oxidizing atmosphere (electric) ovens, and to a lesser extent in reducing atmosphere (gas) ovens. After firing at temperatures where the product itself is waterproof, greater strength is achieved and such products can be used as tableware or ovenware. Porcelain can be made very thin and still have sufficient strength. At these temperatures, the glaze interacts with the clay shard, resulting in colorful and unique pieces that many people find interesting. Usually the glaze is shifting (significantly or slightly), so the detailed design will be blurry.
- If you are going to fire clay, choose between high temperature and low temperature firing.
-
Prepare yourself and prepare your workspace. Working with clay can be a mess, especially if children are involved. Cover areas you don't want to get dirty: lay a tarp or newspaper on the floor, or work out in a garage or non-residential area.
- Never work in clothes that you are afraid to get dirty. If you have long hair, tie it back. So they are less dirty and will not get into the eyes.
Molding on the potter's wheel
Prepare the clay. Air bubbles in an otherwise perfect product can be disastrous, so get rid of them before you start. Knead or roll the clay with your hands in small portions - start with a portion that fits in both of your palms.
- Knead the clay like dough, form it into a ball and hit it on top of the plaster (it absorbs moisture well). Repeat the operation several times until the bubbles disappear. If you're not sure if there are any bubbles left, split the balloon in half with wire and inspect it.
-
Run a circle. With a little effort, throw the clay into the center of the circle. Since you are just starting out, use no more than a large handful of clay for the time being. Moisten your hands in a bowl of water, which should be placed closer, and begin to mold the clay.
- Start pulling the clay mass up. Grab the clay with your hands and start squeezing upwards.
- At each step of the clay work, make sure your elbows are pressed against your inner thighs or against your knees, whichever is more comfortable for you. This will help you keep your hands firmly in place as you work.
- Start pulling the clay mass up. Grab the clay with your hands and start squeezing upwards.
-
Center the clay. According to this method, the clay is untwisted to a perfectly smooth state, without bumps and beats. Once you have your cone, you will be ready to move on.
- Press the tower with one hand and hold it with the other. If you are right-handed, then press the tower with your right hand: the main effort is directed from above.
- Once the clay looks like a wide chunk near the surface of the circle, start flattening the sides by applying pressure to them. Some clay may collect on your left hand - just set it aside.
-
Build the product. Specific instructions end at this stage - each item (plate, pot, etc.) needs to be molded differently. But regardless of the type of product, perform deliberate and slow movements - before you complete each movement, the circle should make about 5 revolutions. All 360-degree clay must receive the same treatment in order for the product to be round. Remove accumulated water with a sponge.
- When you're done, clean the piece with a wooden knife and smooth the surface with a scraper.
- Please note: if everything goes awry, and you confuse the clay mass, then you should not try to make a lump out of it and try to repeat everything. Clay will not take the desired density a second time and will not lend itself to molding in the future.
Sculpting by hand
-
Make sure there are no bubbles in the clay. If you put a blank of clay with bubbles in the oven, then there is a chance that it will explode. As outlined in Shaping the Potter's Wheel, strike the clay on top of the plaster (it absorbs moisture) and roll it out like dough.
- If, to be sure, you want to check the mass from the inside, then take the wire and cut the mass in half. If the bubbles do not disappear, continue working.
-
Use pinch, tape or plastic technique. Three techniques can be used to sculpt ceramics. Products obtained by each of the techniques have their own characteristic appearance. The layered method is best suited for large items.
Glaze application
-
Fire the clay at least once. After that, you can apply glaze on it! Get access to a kiln if you don't have your own and let the professionals take care of the rest. If you have your own oven, be sure to double check that you can operate it properly and find out what the requirements of your product are.
- Different clays react differently to heat. Read the directions on the clay packaging and do some research online. Also take into account the dimensions of your product.
-
Choose frosting. As with any step, there are many options. Each type of glaze will have its own distinct look.
- Slip: You can buy glazes and underglazes in slip form, which are usually made for brush application. All you need to apply this frosting is a brush. Some glazes are difficult to apply with a brush to achieve a smooth finish; as a result, marks will remain on the product. Others will melt well enough to make brush marks disappear.
- Dry: You can purchase glazes in powder form, which are usually made for dipping, pouring, or spraying. In addition to the brush, you will need a bucket, some water, something to stir, and a mask to avoid inhaling the dust. The advantage of dipping is that you can get a more even glaze, and you can do interesting tricks that you can't do with a brush, like double dipping, which allows you to get different colors on the same piece. Spraying is applied by more advanced people, as it requires good ventilation, a spray gun, a compressor, an application booth, etc.
- Do It Yourself: This is the most advanced form of icing. Guided by the recipes, you buy the raw materials yourself and mix them. Among other things, you will need recipes that can be found in books and websites. You will also need the chemicals that make glazes, scales, sieve, and experimenter's spirit. Sometimes your frostings won't come out quite right. You will need to learn how to modify these glazes in order to solve problems that stand in your way. Sometimes the results will be amazing.
-
- Be sure to dry the clay completely before firing it. Otherwise, it may crack or explode.
- When carving patterns in clay, wait until it becomes as hard as leather. Also, don't "scratch" by making deep and thin cuts. Make the cuts wide enough for their depth.
- If you are working on a piece for several days, then store it overnight under a plastic bag to avoid drying out too quickly.
- Clay forgives flaws, but from working with it with prolonged contact with water or with significant manipulations, you can get tired and lose your mood.
- Always dry the clay completely before firing. The moisture in the clay turns into steam, which, when released from the clay, causes the pot to explode.
- An easy way to make small animals is to make small balls and put them together, then smooth down the attachment points.
- Sometimes universities will give you enough clay to play with a little. You may even be allowed to work in their studio.
- Ideally, you need to find someone with at least some experience to teach you. This is a very hands-on process, so it's important to have someone around who can lead by example and interact with you. This manual is intended as a reminder or rough instruction, but in reality, the position of the hands is different for each sculptor.
-
- When you're done, clean the piece with a wooden knife and smooth the surface with a scraper.
Choose a method. It's important to do this first, as the method determines the type of clay you'll be working with. Don't rule out the choice of clays that require a kiln - if you're serious about pursuing this hobby, then you can buy a small home oven. The following is a summary of the methods and their respective clay varieties:
CERAMICS
Clay is one of the most common natural materials mastered by man in ancient times. The high plasticity of the material made it possible to make many household items from it - mainly dishes, jewelry and all kinds of cult figurines.
The earliest products were fragile, they were afraid of moisture, and only dry products could be stored in clay vessels. But, raking the ashes of an extinct fire, a person noticed more than once that the clay soil in the place where the fire was burning becomes hard as a stone. These observations, apparently, led a person to the idea of firing clay products for strength.
Things made of fired clay are commonly called ceramics.
Ceramics was widely used in Egypt, Assyria, Babylon and Greece. Many museums around the world are decorated with the famous Greek amphorae vases, painted with traditional ornaments and scenes from ancient Greek mythology. Ancient Rus' was also famous for highly artistic ceramics. Terracotta and glazed tiles, dishes, toys came out of the workshops of Russian ceramists. The well-known, modern ceramic crafts of our country - Gzhel, Skopin, Balkhar, Oyat and many others - continue the traditions of the old masters. At international exhibitions, their products were repeatedly awarded with medals and diplomas.
Modern ceramic production has sophisticated technical equipment, uses more advanced technology and new materials. But you can also create ceramic products in a school circle, using quite affordable materials and equipment, using a relatively simple technology.
The basis of any ceramic product is clay. By color, it is divided into two main types: red-burning, which turns red after firing, and white-burning, which turns white after firing. To determine what kind of clay you are dealing with, you need to make a test: burn a small piece of clay. Even some black clays turn white when fired.

Rinse the prepared clay and remove various impurities from it. To do this, put the clay in a bucket or basin, fill it with water and mix thoroughly until a homogeneous mass is obtained. After a few hours, stones and sand will settle to the bottom, and all sorts of light impurities will float. Transfer the clay to a wide bowl, let dry, then knead thoroughly. Clay ready for work should resemble dough and easily fall behind the hand. Clays containing a significant amount of sand are called lean. Skinny clays are suitable for making larger things with generalized shapes. Small products with fine details are molded from oily clay that does not contain sand.
To give the clay some additional qualities, all kinds of impurities are introduced into it. Ceramics will become lighter and stronger if a little sawdust is introduced into it. Folk craftsmen of Tajikistan, instead of sawdust, add reed-cattail or poplar fluff to the clay. The addition of iron oxide or chamotte to the clay significantly speeds up firing. Fireclay is made from crushed shards or red bricks. Crushed brick is sifted, ceramic dust is removed, achieving a crumb that does not exceed the size of a millet seed. Chamotte in clay should be no more than one fifth of the total mass, otherwise the quality of the ceramics will deteriorate.
For modeling, you need to prepare special sculptural tools - stacks. Stacks are cut from hardwood boxwood, pear, apple, beech or birch. For moisture resistance, the stacks are rubbed with linseed or any other vegetable oil. For the first case, it is best to make three stacks. The working part of one of them is made of steel wire, strengthening it, as shown in the figure. This stack is convenient to cut off excess clay.
But the main tools for modeling have always been fingers. Fingerprints bring man-made into the ceramic product, give a special softness to the forms. Therefore, do not get carried away with working with stacks and remember that their main purpose is to work out small details and remove excess clay.
To begin with, try to make a simple vessel. In ancient times, the simplest vessels were simply scraped out of a whole piece of clay or sculpted by hand. In Central Asia, in some villages, the hand-made method of sculpting vessels is still preserved. To make a vessel by hand, first sculpt its bottom in the form of a round plate. Then roll small pieces of clay into flagella of the same thickness. Flagella, starting from the bottom, build up turn by turn, making the diameter of each turn larger or smaller, depending on the required configuration of the vessel. When building flagella, simultaneously rub the gaps between them and smooth the surface of the vessel.
For the manufacture of vessels of a more complex shape, a potter's wheel is used.
The history of pottery knows two main types of potter's wheels - hand and foot. Both work due to the inertia of rotation.
The most ancient circle is manual. The first mention of it refers to the end of the fourth millennium BC. Its working disk is much more massive than that of the foot disk, since it simultaneously serves as a flywheel. The potter spun the circle with his left hand, and in order to maintain uniform rotation during work, he constantly twisted it. With his right hand, the master molded the vessel, laying pre-prepared clay bundles in a spiral. On such a circle it is difficult to sculpt vessels of complex shape alone, therefore, in ancient Egypt and Greece, when molding complex vessels, the master instructed his apprentice to rotate the potter's wheel. The sequence of modeling a vessel from flagella.

The foot potter's wheel appeared much later and quickly supplanted the hand wheel. Now the master has both hands free to mold the vessels. The increased power of the machine makes it possible to produce large and complex vessels, moreover, from a whole piece of clay.
The foot circle consists of a wooden frame, a vertical metal axle and two wooden discs. In the upper part of the axis, a small disk is fixed, on which the master forms the product, and in the lower part there is a flywheel in the form of a large wooden circle. The lower end of the axle rests against the thrust bearing. The potter rotates the flywheel with his right foot, periodically pushing it, not allowing the uniform rotational movement to fade.
Now many potters work on an electric potter's wheel. You can make such a circle on your own, using an old table or a carpentry workbench instead of a bed. The circle device is shown in the figure. Electric motors can be very different, but it is better to take the engine from a sewing machine - it is equipped with a pedal to control the speed of rotation. Such motors are sold in spare parts stores for sewing machines and cost about eight rubles together with the pedal.
The diameter of the working circle is 25-30 cm. Turn the circle from bronze, aluminum or plastic. You can make a circle from plywood, board or chipboard, but then you have to soak it several times with hot drying oil to make it moisture resistant.

1 - manual, 2 - foot and 3 - electric potter's wheels.
Calculate the ratio of the diameters of the pulley of the electric motor and the pulley of the circle so that the circle rotates at a speed of 300-350 rpm. Note that the rotation must be counterclockwise.
To learn how to work on a potter's wheel, you need to stock up on patience. Only after a good training will you be able to make the simplest vessels of relatively small sizes.
Before starting work on the circle, prepare a jar of water to spray the clay and wet your hands. You will also need a sponge to remove excess water from the bottom of the vessel, calipers and wire, to the ends of which wooden handles are attached. All these devices are shown in the figure.
Clay must be placed on a circle strictly in the center - potters call this operation centering. Having given a piece of clay with your hands a shape close to a ball, with a slight but sharp movement, throw it as accurately as possible in the middle of the circle. The piece of clay should adhere well to the circle. To facilitate centering, you can draw concentric circles on the circle.
Having fixed the clay mass, turn on the motor and, moistening your hands with water, finally center the clay ball so that when the circle rotates, it seems to be stationary. Then the clay must be thoroughly washed on a rotating circle. To do this, then pull it into a high cone, then again give it the original spherical shape. Repeat this operation several times. Air bubbles will be removed from the washed clay, and it will become dense and uniform.
An intermediate form in the manufacture of most vessels is a tsi-lindr, so first of all learn how to sculpt it. In the middle of the clay mass, gently press with your thumbs and make a cylindrical recess. Gradually expand it, bringing the diameter to the required size. With the rest of your fingers, form the outer wall of the cylinder. Then pull out the cylinder. Large cylinders are pulled out with two hands, one of which is inside the cylinder, the other on the outside of the side surface.
Move the hands between which the wall of the cylinder should be from the bottom up, achieving a thin wall by gradually bringing the hands closer. Hands are turned with palms to the surfaces of the cylinder. Repeat this process until you reach the desired height of the cylinder. If you are making a small cylinder, you can work with one hand, gradually bringing the thumb sliding on the inside surface closer to the other fingers sliding on the outside surface. So that your hands glide well and do not tear the clay, moisten them with water.
From the finished cylinder, form the vessel you have conceived. Lay out the base first. Then, gently pressing with your fingers on the walls of the cylinder from the inside, gradually expand it. The hand inside the cylinder and the hand on the outer surface must move in sync. As a result, you will get the body of the jug. In the same way, only now pressing from the outside, shape the shoulder and neck. Complete the manufacture of the jug by sculpting the whisk. Remove the water accumulating in the vessel with a sponge, which, on a wire hook, is lowered to the bottom.
When making several identical vessels and when copying, use different templates made of wood or plastic.
Cut off the finished vessel from the stopped circle with a wire with handles.
Now the product needs to be decorated. There are many ways to finish ceramics. One of the ancient methods - polishing - is very simple. The surface of the dried product is rubbed with any smooth object, compacting the top layer of clay until it shines. After firing, the brilliance becomes stronger. Polished dishes can be safely used in the household, as it is quite moisture resistant.
In Rus', polished dishes with a decorative purpose were additionally subjected to blackening.

1 - wire with handles, 2 - templates, 3 - sponge, 4 - crown compass, 5 - elements of an earthen vessel.
To do this, at the end of firing, some fuming fuel, such as var, was thrown into the furnace. Absorbing smoke, the vessels turned black, retaining their luster. There is another way to blacken the courts. Hot pottery is thrown into sawdust or chopped straw. As it cools, it turns black.
Widely used in ceramics is the method of decorating with liquid clays - engobes. If the item to be decorated is made of red-burning clay, engobes are made from white-burning clay. Clay is diluted to the density of sour cream and applied to the product with a brush or rubber pear. By adding metal oxides to clay, you can get multi-colored engobes. Cobalt sulfate gives a blue color, manganese peroxide - brown, chromium oxide - green, nickel oxide - yellow, iron oxide - red, a mixture of oxides of chromium, manganese and cobalt - black.
Ceramics can be painted directly with metal oxides without the addition of liquid clay. The control of different shades of color in ceramics is a difficult task, and only numerous trials can solve it. Make your own-shaped palette out of ceramic tiles. Apply smears of different engobes on it, write down in what proportions and what oxides you added, then burn it in a furnace. Several such tiles can be made. They will be a necessary reference material when choosing the right colors.
A bright decorative effect is given by the sgraffito technique. A slightly dry clay product is completely or partially covered with a layer of engobe. After the engobe thickens, but does not lose plasticity, the desired pattern is scraped off with a stack, exposing the lower, darker layer of clay.
Until now, archaeologists have found individual shards and even entire vessels in the settlements of ancient man, decorated with so-called textile ornaments - prints of coarse fabrics and nets.
You can try to make a stamped ornament using wooden dies, after cutting out various elements of the pattern on the tree.
It is convenient to burn clay in a muffle furnace, which is sold in teacher-lecturers and is available in almost every school. Products pre-dried for five to six days at room temperature are loaded into the oven. In the kiln, under the action of high temperature, the clay loses the water associated with it and becomes moisture resistant and durable. The clay is fired for about three hours. Fired but unglazed clay is called terracotta. At the end of the firing, the furnace is turned off, and the products cool down directly in the furnace.
Glazed ceramics are called majolica. Glaze, or glaze, covers a ceramic product with a thin vitreous layer, making colors and engobe bright and juicy, completely protecting them from moisture. Known folk way of making glaze. Heat bottle glass on fire and throw it into cold water. Glass is covered with tiny cracks and easily crumbles. In a mortar, glass is ground into powder, diluted with water and paste is added. Products are watered with this composition and allowed to dry, after which they are again loaded into the oven, where they are kept for about three hours.
In some cases, the glaze on pottery can be imitated. All kinds of decorations, small decorative sculptures and wall plates can be covered with various varnishes instead of laborious glaze. Outwardly, they almost do not differ from glaze, but they greatly simplify the work without reducing the artistic merits of ceramics. This is confirmed by the Abashev toys, painted with oil enamel with great taste, the famous Bulgarian black-lacquer vessels.
Experienced potters create such beauty in just ten minutes that you are amazed. But is it possible to make beautiful ceramics yourself?
What kind of clay is needed
To make ceramics, you need natural clay - this is the main ingredient. Glazes, varnishes, pigments and enamels will be required to cover the finished pottery and color it in the desired color.
Natural clay is:
- White - after firing, the product acquires the color of ivory, in the initial state of the clay it has a grayish tint;
- Red - the color is due to iron oxide. Clay is well molded, it is convenient and easy to work with, after firing it becomes red.
- Blue - used in medicine and cosmetology.
There are also porcelain and dark brown clay, but we will focus on the first two types.
Basic methods for making ceramics
There are different technologies for making clay products:

Clay crafting
The section will be of interest to parents who want to engage their children in a useful and developing activity. And clay modeling develops motor skills, imagination, and will be able to occupy the most restless child.
For adults, clay modeling will be an interesting and refreshing hobby. 
Helpful Hints:
- Cover your work area with plastic wrap.
- Nearby should be a container of water, a dry towel and a wet sponge.
- The main condition for successful work is plastic clay. If you see that cracks have appeared on your product, cover them with liquid clay. If the clay crumbles, smear it with a wet brush until the material becomes plastic.
Polymer clay is popular - it consists of PVC and plasticizers.
There are two types of polymer molding material:
the first requires firing at a temperature of 110C;
the second is self-hardening, products do not need heat treatment.
Pottery all the way
To make round pottery, you need a potter's wheel. There are circles with foot and electric control. Various modifications are manifested in the dimensions of the faceplate, rotation speed, power and type of engine.
Working on the potter's wheel requires basic skills and dexterity. For beginner potters, sculpting and pouring the slip mass is suitable. What we will talk about next.
slip casting
Clay of a liquid consistency is used, it is poured into plaster molds. In words, everything is simple, but in practice, ceramic products crack, resulting in uneven thickness. Let's consider the technological process in more detail using the example of pouring a simple mug. 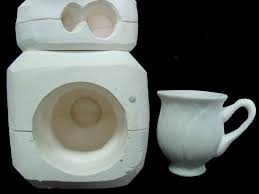
Why plaster molds?
Gypsum absorbs moisture, it will draw excess moisture from the clay slurry. It is convenient to work with plaster, you can make a home-made form, giving it the necessary pattern and size.
Whole or collapsible forms?
The configuration and type of mold does not affect the quality of ceramics, only the ease and convenience of removing the product from the mold. It is easier to remove the finished product from the collapsible form. 
Requirements for clay slip:
- A liquid solution without impurities, large particles and debris is used. Before cooking, sift dry clay, remove debris, etc.
- Strain the finished slip through an old nylon stocking.
- The thicker the solution, the thicker the walls of the mug will turn out.
Pour the solution into the mold
Attention! Problem! Air bubbles in the clay solution affect the strength of the product. You need to pour the slip along the wall of the mold, like beer.
Now we are waiting. You will see how the walls of the future mug appear along the contour of the plaster mold. The optimal wall thickness is 5-6 mm. If you see that the slip has become less, add more. When the walls are of the required thickness, you need to drain the remaining solution.
How to do it right?
Carefully pour the remaining slip from the mold. Cut the sides of the mug flush with the mold with a knife. You can’t just turn the mold over and put it upside down: a drop forms at the bottom. You need to leave the mug at an angle.
When the clay has set and become hard, remove the product from the mold. The fact that the mug is ready is evidenced by the fact that it began to peel off from the plaster mold. If this is a collapsible form, then remove the bottom and separate the parts of the form.
Not only mugs and cups are made by the shlinker casting method, but also souvenirs, gift ceramics. 
In hardware stores or on the Internet, you can buy ready-made molds for pouring.
Ceramic tableware
There are good reasons to do your own pottery making:
- Uniqueness - original dishes that you would like and suit you in all respects can be bought to order or made by yourself. That's just homemade options will be many times cheaper.
- Quality and environmental friendliness. Not all purchased ceramics please with quality and durability: cracks, chips appear, and the pattern becomes not so bright and clear after a month. Some manufacturers use harmful substances such as lead and cadmium. Lead glaze looks beautiful, but you can’t call it environmentally friendly.
- Savings and even the possibility of additional earnings. A beautiful service costs money, but you can do it yourself.
There are different technologies, a simple way is to mold plates or bowls with bundles. As shown in the photo below, a lot of interesting things can be fashioned with bundles. 

The main thing is that the clay must be plastic, any cracks are smeared with slip. Securely glue the fragments of the future plate to each other.
- After that, remove the excess with your fingers or a stack, give the bowl the desired geometry.
- All cracks and irregularities are smeared with slip.
Finishing decoration
Decoration is done according to your imagination. The pattern can be cut with a toothpick or a needle. With the help of improvised means, you can make an interesting print on clay that has not yet set.
Basic requirements for such modeling
The bottom should not be too thick, otherwise it will crack during firing. The edges of the bowl should not be thin: chips and damage are inevitable.
All cracks and crevices are covered with a liquid solution.
Jewelry ceramics
Have you heard of ceramic jewelry? Can you make them yourself? Jewelry ceramics is a material consisting of crushed and compacted particles of non-metallic materials from inorganic chemistry.
In furnaces, the material is fired at a temperature of 1600 degrees, after which the material becomes durable, resistant to scratches and mechanical damage. Light weight and strength are the advantages of jewelry ceramics.
No matter how much you want to make a durable ceramic jewelry using technology, it will not work.
Outcome
Making ceramics with your own hands at home is a feasible task. The main thing is desire and a little patience.
How to make pottery from ceramics with your own hands, watch the video lesson - courses on ceramics