Cool apron for the kitchen as a way to revive and decorate the interior. How to choose a kitchen apron: designer tips Making an apron for a kitchen set with your own hands
And the gas stove must be covered with a practical screen that is resistant to moisture and high temperatures. The appearance of this area is also not in last place, it is the wall above the working area that is often used to place the accents of the kitchen interior. If you plan to install the apron yourself, then the complexity and duration of installation play a big role. To make the right choice, you need to choose an option with the optimal ratio of all these qualities.
The surface of the wall above the countertop is the most loaded area of the kitchen. Here are household appliances, a work area and a gas stove. Not every type of finish is able to adequately withstand all types of impacts associated with the operation of the kitchen for its intended purpose. Therefore, a number of requirements are imposed on the kitchen apron:
- Resistant to high temperatures. Since the heating of the screen surface is uneven, the material should not expand significantly. Flammability and low melting point are also not the best qualities for an apron;
- Moisture resistance. The impact of liquids on the surface can manifest itself in different ways: direct contact, splashes, steam. Therefore, the apron must be chosen from materials that do not absorb water;
- Ease of cleaning. The surface of the screen in the kitchen is exposed to various types of pollution: dust, grease, food particles. It is important that the material does not change its appearance, even after prolonged contact with dirt;
- Mechanical strength. Since the surface of the apron will have to be cleaned frequently, and sometimes intensively, the coating must be resistant to abrasive substances and hard brushes. Micro-scratches and areas of worn paint will definitely not decorate the kitchen;
- Safety. Ecological cleanliness and the absence of harmful fumes is one of the most important qualities of a kitchen apron, because it can come into contact with food.
There are many materials on the market that fully or partially meet these requirements. Nevertheless, this is a difficult choice that requires taking into account all the features of the installation, the advantages and disadvantages of different types of aprons.
Types of materials for an apron
It is better to decide on the choice of material for the protective screen in the kitchen before installing the headset, as some types of finishes are mounted on a free wall.
Aprons made of solid or large fragments can also be fixed after placing the furniture, if they do not require "wet" types of work.
Before installing any apron, it is necessary to prepare the surface of the wall, check its integrity and reliability. It will not be superfluous to treat with primers with an antiseptic to protect against moisture and its inevitable companions - fungus and mold. It is important to pre-wire the wiring and make outlets for sockets.
When the wall plane is prepared, you can measure the area for the apron and proceed with the selection of the most suitable materials. To do this, you can compare their advantages and disadvantages, and also evaluate the possible difficulties during installation.
Tile
The classic version of the apron lining is tiles of various shapes, sizes and designs. She is practical and accessible. Combinations of different shades and designs of tiles allow you to create unique and beautiful protective screens for the kitchen. 
Material Features
Tiled tiles are a win-win option for decorating an apron. It will always be in fashion and will ensure comfortable and safe operation of the kitchen. The popularity of tiles is due to a number of advantages that distinguish them from other types of materials:
- Resistant to mechanical stress. Minor blows will not harm her, and the glaze with which the front surface is covered endures intensive cleaning;
- Does not absorb moisture. No wonder it is used for laying in the wettest places at home in the bathroom and toilet. In the kitchen, it will perform the function of protecting the wall from splashes and steam flawlessly;
- Easily tolerates uneven heating. The expansion is compensated by the presence of a small distance between the individual trim elements. But it is important to choose a good adhesive base and grout;
- Durable. The service life of a tile apron, subject to high-quality installation and glue, is at least 15 - 20 years;
- Safe. The material is environmentally friendly and non-flammable.
Among the shortcomings of the tile, the most significant is the seams, which are difficult to clean from dirt, and prolonged exposure to moisture can provoke the appearance of mold and fungus. But if you do not be stingy and choose a quality grout, these inconveniences can be avoided.
Installation of a tile apron
In order for the tile to adhere well to the wall surface, it is necessary to provide all conditions for high-quality adhesion. Check the plaster for voids and weak spots. Prime and notch if the base is covered with a layer of paint that cannot be removed.
For laying tiles with your own hands, you will need special tools and materials:
- Glue;
- notched spatula;
- Crosses for seams;
- Grout;
- Tile cutter.
Installation can be done in different ways. The simplest - horizontal or vertical, it is best to choose for self-laying, if there are no professional skills. More complex types will require the hands of a specialist: herringbone, offset, diagonally. 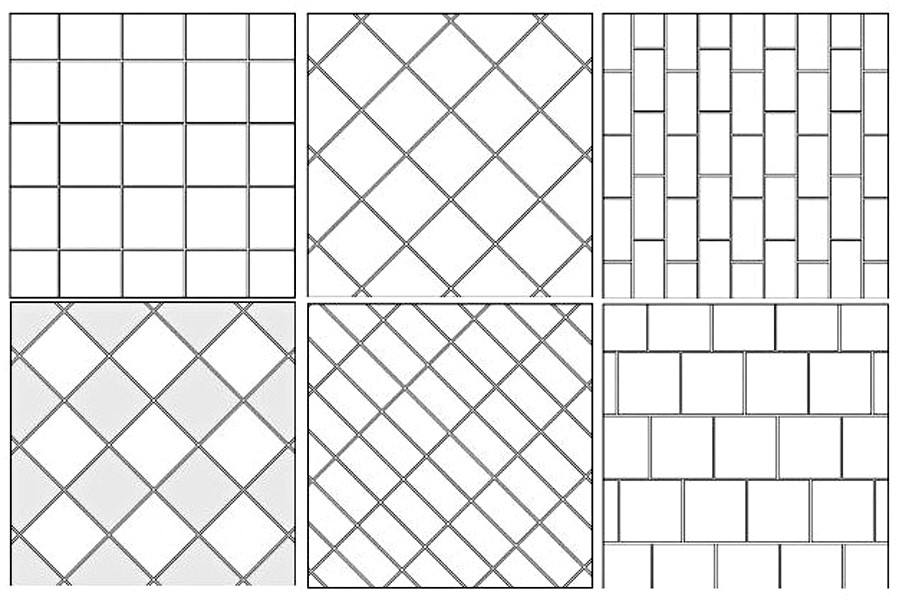
Laying must be done before the installation of the kitchen set. And since the first row of tiles will not start from the floor, but from the middle of the wall, it is necessary to temporarily install a guide rail.
Ideally, if the size of the tile is matched exactly to the size of the apron, then it does not have to be cut. But if there are outlets on the plane of the wall, you will need to work with a tile cutter. A guide to using this tool is provided in the video.
By changing the thickness of the adhesive composition, small irregularities of the wall can be corrected, but not more than 10 mm. A layer exceeding this value is not allowed for wall cladding. The tile may "float" or fall off due to uneven drying of the adhesive.
It is imperative to insert crosses into the space between the individual fragments, and do not remove them until the composition seizes. Grouting is done only after complete drying.
Mosaic
A mosaic apron will become a bright accent of the entire kitchen. The variety of laying options and element materials can ensure harmony with the design and individuality. But working with this type of finish requires patience, skills and the selection of high-quality glue and grouting compound. 
Material Features
Mosaic has all the advantages of tile, it is not afraid of moisture and pollution, resistant to temperature and mechanical damage, while it has a number of features:
- It is easier to lay around ledges and rosettes;
- To work with the mosaic, white glue is required;
- Differs in a wider choice of materials for the production of elements: ceramics, glass, stone, metal, mirror.
The disadvantage of a mosaic, the same as that of a tile, is the seams, which in this case are much larger. Only epoxy grout is suitable for sealing them.
Mosaic installation
Elements can be placed in a variety of ways. Designers use the game with color and shades, creating real works of art that will definitely be unique.
Types of mosaic laying:

For installation, you will need the same set of tools as for tiles. Glue is applied to the wall and to the mosaic panel. The fragment is installed on the apron and pressed a little. If the tile has a protective paper layer, it must be moistened a few minutes after fixing the fragments to the wall and carefully removed.
After 48 hours after installing all the elements, you can start grouting. Raster is applied with a rubber spatula and evenly distributed over the surface. After 20 minutes, you can remove excess grout with a soft cloth.
Glass
Aprons for the kitchen are made from tempered glass. It is stronger than usual and can withstand high temperatures. On such a screen, you can place any image, drawing or imitating texture. 
Material Features
A glass apron is a practical and safe option. Contaminants are easily removed from its surface. Tempered glass or triplex (two glasses glued with a film) are resistant to mechanical stress. If, nevertheless, the screen breaks, then in the first case it breaks up into small fragments with non-sharp edges, in the second - the fragments are held on the film.
To mount the apron, a glass panel is made according to the exact dimensions of the site, so it remains only to fix it. Seams are most often absent.
The image can be applied in different ways, they differ in cost, complexity and practicality.
- Pasting transparent glass with photo wallpapers is inexpensive and fast, but if moisture gets under the glass, the image will be damaged;
- Printing on vinyl film is a more reliable option, the film is not afraid of moisture, but over time it may peel off the glass;
- UV printing on glass is a durable and high-quality image that is resistant to any kind of external influence;
- UV printing inside triplex is the most reliable and expensive option, the image is protected on both sides.
There are practically no drawbacks to this type of apron. This is a beautiful and functional solution. In production, the necessary holes can be made in the glass for kitchen utensils and sockets. Stop in the choice of this material can only be its high cost. The life of the product depends on the quality of the printed image. Clear frosted glass or printing inside the triplex can serve for an unlimited time.
Installation of a glass apron
Installation of an apron made of glass is carried out after the installation of a kitchen set. Therefore, when measuring the length and width of the section, greater accuracy is required. Fixing can be done in different ways:
- Through holes (the most reliable mounting option, it is used by professionals, but when fixing with bolts, it is important to be extremely careful not to break the panel; decorative caps can be purchased to mask the fasteners);
- Canopies (do not require drilling of the glass surface, suitable for small aprons);
- Liquid nails (the easiest do-it-yourself installation method, but the wall surface must be perfectly flat).
It is better to seal the joint of the apron with the wall with sealantso that moisture does not get into it. All openings in the panel must be made at the manufacturing stage. You cannot drill the screen yourself.
MDF (medium density fibreboard)
A compromise design option for a kitchen apron is MDF. Plates are affordable and attractive in appearance. But their use is limited, therefore, before choosing this material, it is worth comparing its advantages and disadvantages. 
Material Features
MDF is widely used in home decoration and furniture assembly. It is also suitable for the kitchen. It does not require perfect alignment of the wall surface for its installation.
The possibilities of the material are unlimited: it can have any shade and texture, imitate other types of finishes, such as stone and tile, any image can be applied to the surface using photo printing technique.
Installation is simple and fast. The service life of the material is only a few years, but given the low cost, such an apron can be changed frequently, which will not only get rid of the damaged screen, but also update the familiar kitchen.
Aprons made of MDF are not suitable for a kitchen that is heavily exploited. This option is appropriate for busy people who rarely cook and keep the room perfectly clean..
The material has some disadvantages:
- Does not withstand high temperatures;
- Frequent direct contact with water leads to deformation and peeling of the protective coating;
- Abrasives and solvents are not suitable for cleaning MDF;
- The screen surface is less durable than glass and tiles.
Despite the presence of all these disadvantages, the material is often used for kitchen aprons. It looks beautiful and expensive, while the cost of MDF is much lower than other types of finishes.
MDF installation
Perhaps there is nothing easier than installing an MDF apron. Its dimensions can be adjusted on the spot, but the cuts will need to be trimmed. It is easy to cut holes for sockets with a jigsaw and drill a plate to accommodate hooks.
Installation consists in fixing the panel with self-tapping screws or liquid nails to the wall plane. If the main surface is uneven, you can pre-place the slats on it and create an ideal plane with them.
PVC panels
The most budget option for decorating a kitchen apron is PVC paneling. They are offered on the market in large quantities, have a wide selection of colors and designs. 
Material Features
Panels have many benefits. If we compare them with a material from the same price category - MDF, then the plastic has excellent moisture resistance, but also, like a particle board, it does not tolerate high temperatures and cleaning with abrasives.
In addition to deformation when heated, plastic ignites easily, releases toxic substances when melted, so it has no place above a gas stove. It is good for a work area where people often cook, as contact with water and dirt does not affect its appearance. The service life is also short - a maximum of 5 - 7 years with proper care.
Panel mounting
For installation you will need: guide elements (crate), self-tapping screws, a screwdriver, a clerical knife. The panels are fastened together according to the tenon-groove system, while forming absolutely tight joints.
The panels can be mounted on any wall with irregularities and defects, the main thing is that there is where to screw the screws for the guides.
The crate is set according to the level. Above and below - guide elements, then vertical crossbars with a step of no more than 60 cm.
The panels are fixed with self-tapping screws to the crate, each subsequent one closes the place of fixation of the previous one and the caps of the fasteners. Therefore, outwardly, the apron looks quite presentable. You can cut plastic with a clerical knife or a hacksaw with a fine tooth. All holes must be prepared before installation. The edges of the finished apron in height and width, if they are visible, must be decorated with decorative elements, they are sold in the same department as the panels themselves.
Stone
Natural and artificial stone is one of the best materials for a kitchen backsplash in terms of practicality. He has all the necessary qualities. Durable and looks expensive and prestigious. 
Material Features
Such an apron requires the appropriate design of the kitchen. An expensive countertop and exquisite facades will make him a worthy company. Different types of stone are used for the production of screens. Most often - granite, less often - marble, basalt, slate, quartz. It is best if the surface is polished, it is easier to remove dirt from it.
Artificial stone is much cheaper than natural, while it has the same properties. But it is devoid of pores, therefore it does not absorb moisture and is better cleaned of dirt. It is lighter and can be made thinner. The durability of these materials is unmatched by any other.
Installation of a stone apron
Stone products are most often made to order according to individual sizes. Installation must be done after the installation of furniture.
If the stone looks like a tile, then it can be laid with your own hands, in the same way as the ceramic one. It is better to entrust the installation of a solid panel to professionals, since the material is expensive, and if you install it yourself, without working skills, you can damage the product.
The installation of an apron made of solid panels - stone, MDF, PVC and glass is carried out after the installation of the kitchen set, so there will be no problems with taking measurements and the height of the screen. It is more difficult to determine the location of the apron, which is installed before the headset is installed, it is important to take into account the height of the lower cabinets, the flooring and the layout of the furniture. How to do it right is shown in the video.
When choosing an apron for the kitchen, it is still more important not its appearance, but the price category and practicality. And the problem of aesthetics has long been solved by manufacturers - all types of materials are presented in various colors and design options.
When questions arise, what is better to make an apron on the wall in the kitchen, you should first of all pay attention to the materials used. They differ in cost, shade, dimensions. At the same time, there are a number of other parameters, but the main ones are such characteristics as wear resistance and strength. When choosing an option, the quality of the wall surface is taken into account. The rougher it is, the better the adhesion with the adhesive will be. This is taken into account when choosing tiles, MDF plastic panels, stone (natural, artificial). 
Similar articles:
What is a kitchen apron for?
This element of the interior performs 2 main functions:
| Decorative. | Kitchen apron will decorate any room. It is made of attractive materials, which additionally allow you to hide the defects of the draft wall. Thanks to the creation of accents, the interior acquires originality, brightness, and completeness. Finishing the working area in the kitchen is carried out in different variations: pattern, photograph, drawing, relief surface of the coating. The choice is made taking into account the color scheme and style direction of the interior. |
| Protective. | To exclude the possibility of moisture affecting the draft surface of the bearing wall, near which the work area is often equipped, you can make an apron for the kitchen. In this case, materials such as concrete and brick are adversely affected by water, while ceramics, natural stone or plastic are moisture resistant. For this reason, the walls near the sink and stove are lined. In addition, the apron tolerates the effects of chemicals (detergents) well. The use of this interior element helps to increase the service life of the load-bearing wall. |
Requirements for kitchen aprons in terms of combining functionality and beauty
Choose a material that is suitable in terms of properties and appearance for the room. For example, it is inappropriate to use wallpaper for this purpose, because. they serve for a short time and poorly cope with their main task. If the question is being decided what is better to make an apron in the kitchen, you should pay attention to whether the selected material meets the requirements for this type of interior item:
- Moisture resistant. If you install an apron made of hygroscopic material on the wall, it will not last long. The appearance of finishing the working area is largely determined by such a property as moisture resistance.
- The material from which the apron is made must withstand exposure to high temperatures. This is due to the fact that the coating is located in close proximity to the stove, the source of hot water, which means it will be in contact with steam. The apron must withstand not only high temperatures, but also sudden changes in the value of this parameter, which leads to the appearance of condensate.
- Ease of care. It is not necessary to use materials with a smooth surface. Limescale, grease, water drops are easily removed from them. However, this section of the wall gets dirty pretty quickly. If the question is decided which is better to make an apron, you should pay attention to materials characterized by a finely porous structure. Dirt lingers on such surfaces less intensively.
- Resistant to mechanical stress. A durable apron lasts much longer.
- Attractive design. With the help of this element of the interior, you can decorate the room, affect its visual perception.
Features and Benefits
The sizes of the apron can be different:
- a large-sized interior element occupies a section of the wall from the level of the hood to the floor;
- a standard apron is characterized by a height in the range of 55-75 cm.
The second option is more common, because. material in this case is spent more economically. If the kitchen cabinets are located at some distance from each other, it is recommended to make an apron from the hood to the floor. The choice of material is determined by the requirements for it, personal preferences and financial capabilities.
Often, ordinary ceramic tiles are used for this purpose. More expensive analogues are natural / artificial stone, mosaic, glass. Wood-based materials are used less often. Of this group, MDF is most often used. Economy class materials include plastic panels. If the user is limited in funds, or there is a desire to create an original apron, any available options should be considered, for example, a canvas from wine corks, which you can make yourself from improvised materials.
When choosing an apron for the kitchen, you should decide whether it is appropriate to finish the working area and take into account the positive qualities of this element of the interior:
- low material consumption - you do not have to close the entire wall, but only part of it;
- protection of the partition, which is more exposed to aggressive factors than other surfaces;
- improvement of interior design;
- multivariant execution;
- provided that it is correctly selected, you can count on a long period of its operation;
- relatively simple installation;
- ease of care.
We select the color and design of the finish
There are such solutions:
- With the help of finishing the working area, they create a background for the kitchen set. Here the color of the apron should match the shade of the furniture. Often they finish the wall in light colors, and the front panels in darker ones. There is also the opposite option: the apron is a dark shade, and the headset is light.
- Focus on the apron. In this case, the finish of the working area stands out in color, contrasts with the coatings of other interior elements. The wall is decorated with a bright pattern, photograph.
- Original design. You can make an apron in the kitchen with your own hands, using improvised materials. The unusual design of the working area attracts attention, decorates the room, makes the interior unique.
If you use a neutral range (beige, white tone), such an apron is suitable for a kitchen in any style. Finishing with black material is performed if the room already has design elements in the same design. To visually enlarge the space, the design of a small kitchen and work area is done in light colors.
What are kitchen aprons?
Finishing the wall section near the stove / sink is carried out in different versions, different in design, colors and materials. The last of the parameters is the most important, because the type of coating determines the properties of the apron. Today it is possible to finish with laminate panels for the kitchen, and you can do it yourself. There are options from glass, tile, plastic, porcelain stoneware, stone, use sheets of polycarbonate, plywood. If wood-containing materials are taken, then they must be moisture resistant. The second most important parameter is mechanical strength.
Plastic
Panels of this type endure the impact of water. They withstand moderate mechanical stress. However, intense pressure on plastic of small thickness is fatal - the product cracks and cannot be restored. The advantages of this material include low cost. In addition, do-it-yourself plastic kitchen apron is relatively easy to mount. It can be glued on liquid nails or other adhesive composition suitable for the type of material.
In addition, plastic panels hide surface imperfections well. They can be installed even on a curved wall. This possibility is due to the flexibility of the material. However, he is not attractive. The panels lose color in the sun, are exposed to high temperatures, so they are not recommended to be installed near the stove.
Budget from MDF
If the question is being decided how to make an apron from MDF, the positive qualities of this material should be taken into account:
- low price;
- attractive appearance;
- a wide range of options;
- simple installation;
- it is possible to replace the coverage area;
- environmental friendliness.
At the same time, MDF boards are not resistant to high temperatures. Although slightly, they are still susceptible to moisture. The service life of the material in conditions of high humidity will be short.
But in this case, there is no need to purchase special glue for installation. If the question is how to install an MDF apron in the kitchen, you should know that for this it is enough to fix the panels on the wall using self-tapping screws / dowels.
From ceramic tiles
The material is durable, non-hygroscopic, withstands ultraviolet radiation, moderate mechanical loads. Due to these properties, tiles are often used for finishing an apron. The disadvantage of this option is the need for careful alignment of the wall. When installing tiles, surface flaws will be visible.
In addition, you need to choose an adhesive mixture. If the question is how to properly lay the tiles, you should pay attention to the universal compositions. To finish the working area, you can use glue that can withstand high temperatures, because. the apron will be in close proximity to the hob.
From mosaic tiles
Such material is represented by different types, which differ in the method of installation, dimensions. There is a small tile. If you plan to make an apron for the kitchen from a mosaic with your own hands, you need to take into account that the installation process of small-sized products will take a lot of time.
An alternative option is to lay tiles in standard sizes with a mosaic finish. Such products are mounted quickly, and in appearance it is difficult to notice the difference. The material is characterized by similar properties as a tile, but requires more careful maintenance. This is due to the presence of a large number of grooves (seam joints) between the mosaic. The main advantage of the tile is the ability to perform any pattern or pattern.
From glass
Panels made of this material are called skinals. Plain or tempered glass can be used. The second option is preferable, but it costs more. Installing a glass apron made of tempered material will provide a reliable coating that is resistant to high temperatures. Panels of this type are not afraid of aggressive agents, damage.
Simple glass is cheaper, but does not last long, because. subject to mechanical stress. The main disadvantage of this type of panels is the need for frequent maintenance. Do-it-yourself glass apron for the kitchen is not easy to install, because. you need to make holes for fasteners. The pluses include an attractive appearance, which is due to the possibility of inserting a bright photograph, a picture between the glass panels.
Made of artificial stone
Porcelain stoneware is included in this group of materials. This also includes acrylic stone. The last of the options is characterized by a sufficient level of strength, moisture resistance. The material of this type is not exposed to high temperatures, ultraviolet radiation, and is characterized by a long service life. If the question is being decided how to lay out an apron made of artificial stone, you should know that with its help you can get a seamless coating. In addition, there are a large number of finishes of this type, excellent in color, texture.
From natural stone
This is the most expensive option, so it is not used as often as its counterparts. This group includes granite, marble. According to the properties, natural stone corresponds to porcelain stoneware. Panels of this type differ in shade. Today, a wide range of products is offered in black, pink, red, yellow, blue, gray, brown and white. The disadvantages include the complexity of installation. The fastening of the apron made of natural stone is carried out using a special glue.
Do-it-yourself installation
First of all, you need to remove the old coating. Then the surface is leveled. If necessary, the wall is re-plastered. In the case when the surface is not smooth enough, and there are obvious defects, they are eliminated by filling with putty. Then the wall is treated with a primer. At the next stage, the actions may differ, it all depends on the type of material that is used:
- a mounting grid is attached or notches are prepared on the wall, which will allow you to securely fix the tile;
- holes are made in the wall for dowels.
Installing an apron in the kitchen requires the use of a building level, with its help they check the quality of the coating. Holes for sockets in the kitchen apron are made before installing the finishing material. If it is planned to conduct lighting, wall chasing is performed at the stage of preparing the rough surface.
What do you do with old furniture?
The section of the wall between the floor and wall cabinets of the kitchen set is quite small, but it must be protected to a greater extent than the rest of the walls. Vapors during cooking, dampness near the sink, splashes during cooking and cutting food - all this literally destroys ordinary plaster, whitewash or wallpaper.
At the same time, it is this area that is constantly in front of the eyes of the hostess, which means that it must be aesthetically attractive to some extent.
That is why so much attention is paid to the question of how to do it.
traditional materials
Today, these include a lot of finishes, some of them are impossible to do with your own hands, but basically the installation is quite simple.
- Ceramic tiles - of any size and even configurations, if we are talking about a mosaic version. Such a kitchen apron is traditional, popular, decorative and successfully copes with the functions of protection, since it is fire resistant and resistant to water and steam at the same time.
Installation can cause some difficulties. You can lay out the tiles in horizontal rows - the most economical and most boring way, diagonally - which already requires some skill and careful calculation, or decorate the kitchen with mosaics. The last method is the most time-consuming, but it allows you to lay out the tiles with a pattern or even in the form of an image. In the following photos - the design of the apron in the kitchen.

- A steel apron is less decorative and, moreover, is not suitable for every kitchen set. However, this material is without a doubt hygienic, waterproof and fire resistant, and also extremely durable. Available in different forms: long panels, tiles and mosaics.
The first and second options can be laid out with your own hands, as well as tiles. Only the adhesive composition is used differently. Large steel plates are first applied to a sheet of waterproof plywood or MDF, and then fixed to the wall.

- Undoubtedly, it will decorate the interior. A wide variety of decorative effects are possible here - from toning and photo printing to engraving and sandblasting. At the same time, the kitchen apron can be both solid panels - and glass tiles.
requires experience and physical strength, since a glass sheet of this size is very heavy, and the fragility of even tempered glass is still high.
With their own hands, they install glass tiles of medium or small size. The panels are inserted into the aluminum profile and joined together. Textured glass tiles - for example, in the form of bricks, need to be glued to the wall.

Non-traditional materials
The following options are much more interesting, as they allow you to create a completely unique interior. You can use whatever comes into your head, as long as it can be glued or fixed in some way.
Apron protection
In the vast majority of cases, the last step in laying improvised materials is the installation of a protective screen. There are 2 possibilities here.

Pictures and photos
All such a work plan is carried out after the wall is fully prepared for installation - plastering and leveling. Many things can be used as a decorative material:

Unusual solutions
Literally everyone can decorate a kitchen apron. Moreover, at first glance, the materials are very far from decorative.
- Laminate trim is not the most common solution. The decorativeness of the laminate is higher than they imagine: the material imitates not only parquet or laying boards, but also stone and ceramic tiles. Finishing from a laminate of the appropriate class will not be afraid of water and splashes, and this material is no less resistant to temperature extremes than MDF.
The ability of the laminate to create a flat surface is also used here: the dies are connected very tightly to prevent the appearance of cracks. Laminate is fastened with liquid nails. Here, no other options are allowed. Laying the laminate, of course, is done by hand, since such models are not found in production.


Finishes that do not need protection
With your own hands, from the most popular materials, you can make any apron from the following. And by the way, it's not as difficult as it seems.

A truly unusual kitchen apron can only be created with your own hands. Own imagination and unexpected material will provide complete individuality, and the fastening methods of the materials are standard.
The interior of any kitchen can be diversified with a beautiful apron with interesting and cool drawings or photo printing. Install skinali on the strength of their own hands.
Any kitchen has a special place that effectively complements the installed set and is a connecting component between the main details of the decor of the room. This mandatory element is known to everyone under the name "apron". The origin of the term is due to an analogue of the fabric attribute of the hostess's clothing, which protects against pollution. The main purpose of this part is to protect the surface of the walls from splashes, drops and dirt. In addition, beautiful aprons become one of the elements of the whole room, giving it a special chic and expressiveness.
Do you need an apron?
Modern kitchen aprons are not monochromatic, boring tiles, but a special, modern piece of decor. They carry out the function of decorating the room and meet the following requests:
- protection of the surface from contamination;
- resistance to chemicals, ease of cleaning the surface;
- invariance of external data under mechanical influences;
- coating stability, independence from temperature fluctuations.
Taking into account its aesthetic principles, such a detail becomes an important part of the room, as evidenced by the photo. Therefore, you should choose an apron in the kitchen with all responsibility, focusing on the main features:
- high quality of raw materials used;
- external attractiveness;
- coating strength.
In order for the kitchen to always be clean, well-groomed and attractive, an apron is necessary. The main problem in this is the choice of the optimal material. The photo below will help you evaluate all the pros and cons of aprons.

Decoration of kitchen aprons
- Before choosing a material for it is important to find out its purpose for the interior of the room. To highlight the headsets against the general background, the overlap should acquire neutral colors. A set of furniture, designed in light and calm colors, is set off by a bright apron insert.
- The white tone of the wall harmonizes well with almost any set. Mosaic compositions, tiles in color, decorating elements with photo printing will help get rid of monotony. A good analogue can be shades of milky, beige, champagne and ivory.
- An apron of rich colors should be complemented by the external design of the interior: the repetition of the ornament on the walls, curtains.
Attention! Any part of the wall of bright colors requires impeccable cleanliness, on such a basis, even a slight pollution will turn into a visible stain.
How to determine the dimensions?
The height of a standard kitchen apron ranges from 48–60 cm, but these data may vary depending on the nuances: the height of the hostess and the features of the stove. So, low cabinets will be convenient for short women, therefore, the front part of the wall should correspond to these parameters. For gas stoves, the distance between the cooking surface and the hood must be 80 cm.

The desire to mount an apron with your own hands is associated with the observance of the following rules:
- The dimensions of this element should be such that the base goes under the wall cabinets and floor tables by 2 cm.
- To prevent water from leaking behind the countertop, fastening in the space between the two coatings of the protective plinth and its treatment with silicone sealant will allow. So, the back of the chipboard will not get wet, and the fungus will not start in the cracks.
- Spongy materials, such as unglazed tiles, should be avoided when designing an apron. Fat is deposited in its pores, and it is not easy to wash it off: such soil is favorable for the growth of bacteria and the appearance of mold.
- An ideal option for an apron would be a seamless coating without joints.
You can save your own money on the purchase of a kitchen set by choosing a simple set, with smooth facades, wallpaper and flooring in neutral colors. In this composition, the apron is given special attention: its coating must certainly be of high quality, and must have attractive external data. The photo clearly shows an example of such a design, which will make the interior more elongated, voluminous and highlight this part against the general background.

Acceptable finishing materials
Tile
This material is practical, beautiful, durable, individual samples can be seen in the photo. Modern industry produces a wide variety of models of different shapes and colors of tiles. On them you can see not only small drawings, but also extensive panoramas and compositions. Beautiful pictures, realistic and voluminous, shimmer in the light, show different shades, and give the kitchen a special chic. Laying tiles with your own hands is not difficult, you just need to study the basic technique and understand its principle.
Important! The installation of tiles must be preceded by a preliminary leveling of the wall surface. The fastening of these elements begins from the bottom point, after a deviation from the border of the countertop by 1–2 cm. The gap that appears is closed with a corner corresponding to the color of the main coating.
Plastic
The cheapness of the material, ease of installation, strength makes it used by a large number of consumers. Plastic is easy to clean and has a fairly attractive appearance, it is used exclusively as a budget option for finishing and can be installed by hand. By choosing the right tone of the material, you can achieve overall harmony with the design of the walls. Individual models of this material are shown in the photo.

MDF
Despite the fact that such plates are practically not used to decorate the walls of this room, they allow you to create a nice apron in the kitchen. The material is distinguished by impeccable strength, low cost, ease of installation, however, it does not tolerate high humidity and temperature changes. Often, as a simplified version, a single finish of the headset and the MDF wall is carried out. Undoubtedly, the thickness of the material on the working surface of the table will be greater. What are the benefits of this design option?
- low cost;
- ease of installation and dismantling;
- ease of cutting holes for sockets.
Weaknesses of MDF:
- Rapid warping of the surface from constant contact with water and chemicals;
- High degree of fire hazard, the ability to release toxic substances during combustion.
This void is closed with a corner corresponding to the color of the fittings or panel itself, the photo clearly demonstrates this.

photo tiles
This finishing method is distinguished by its special aesthetics and attractiveness, as evidenced by the photo. It allows you to give the kitchen space brightness and personality, focusing on your taste. The pattern on the tile, as well as its size, can be any. With it, you can create a cool apron in the kitchen with an image of comical situations, funny fragments from life. When creating such panels, the decal technique is used, which makes the coating most resistant to daily household influences.
Mirror compositions
This type of cladding is not used very often, however, in some cases, the mirror allows you to correct the flaws in the geometric shapes of the kitchen due to special visual effects. In confirmation of this - beautiful photos.
Positive aspects of using a mirror:
- ideal for small kitchens, creating an illusory representation of a spacious room;
- reflection of light makes the room brighter;
- original visual effects.

Disadvantages of the mirror surface:
- Discomfort from constant perception of one's own reflection.
- Difficulty maintaining exemplary order. Any splashes of water, smudges will clearly appear on the surface, which is not easy to clean.
- The coating requires constant order and cleanliness of the countertop. Otherwise, the reflected mess will only double as an ugly "still life".
- The mirror surface does not accept the installation of roof rails and various. Such a design does not decorate the room at all.
Glass
This material is used mainly in a transparent version. The glass cloth protects wall-paper, paint from pollution. The coating does not need any processing, besides this, such aprons do not make the space heavier, but, on the contrary, fill it with volume. Matte and colored surfaces can be decorated with colored film or stained glass.

Installing a glass kitchen apron
Once the glass apron is ready, you can install it yourself with your own hands. First of all, the method of fastening is chosen: mechanical or adhesive. The use of silicone as the main fixative requires preliminary leveling of the wall surface. Otherwise, the unevenness of the base will be visible in the form of ugly spots on the surface.
The reverse side of the material is treated with silicone, and the apron is pressed against the wall until the glue hardens. (The selected method of fastening does not leave marks on the surface). Mechanical fixation is associated with the involvement of appropriate fittings. In this case, the glass is installed by hand with special fasteners using a certain gap used as a decorating beginning.
As soon as the installation comes to its logical conclusion, the apron is checked by slight pressure for fastening strength and the presence of possible deformations. At the end, sockets, accessories, lighting are installed. The last element provides additional lighting needed for cooking. In the photo you can see examples of such finishes. Any apron in the kitchen is subject to increased use, therefore, it quickly becomes inappropriate. However, its hard coating is not afraid of such influences.
Finishing a kitchen backsplash with ordinary ceramic tiles, tempered glass with a standard photo print from the catalog or a plastic wall panel seems too boring to you? In this selection of photos you will find unusual, bright, stylish, but quite real and practical design ideas for aprons that are easy to implement in your kitchen. The material was prepared by the site Krasivayaplitka.ru.
1. Handmade ceramic tiles
The use of unique finishing materials is one of the fashion trends in interior design. Decorate the apron with tiles made and painted by hand. It will bring special warmth to the design of the kitchen, make the interior unique and emphasize your individuality.

Custom-made tiles are different - painted and plain, smooth and embossed. In terms of strength and practicality, it is in no way inferior to the factory one. But you can bring your ideas to life or choose an idea from the catalog.
This finish can be made to order in a ceramic workshop. But if the repair budget is limited, take a closer look at the factory collections of ceramics. Many large manufacturers can find ready-made tiles that are difficult to distinguish from handmade in appearance. Of course, there are fewer design options, you will have to choose from what is available, but the cost is much lower.
- WE RECOMMEND:


2. Tile with painting
The most budgetary way to add zest to a standard ceramic finish is to paint an apron with your own hands. With the help of special paints for ceramics, you can transform an inexpensive plain tile if you decorate it with an interesting pattern. Now imagine how much joy your inner child will get from the process!
Can't draw? Use a stencil. It is easy to make by printing the picture you like from the Internet. You can fix the drawn image by applying 1-2 layers of transparent acrylic varnish on top. If you do everything right, you can admire the updated apron for at least two to three years.


3. Photo tiles
Photo printing on tiles looks much more interesting than standard decors, not to mention a smooth plain surface. If the assortment of photo decors from ready-made collections does not inspire you, consider making custom photo tiles. There are several ways to transfer an image to a ceramic surface. The most reliable and durable - with the help of decal technology. It will cost more, but it will last much longer than an apron with a pattern applied by sublimation.


4. Artificial stone
The relief textured surface of the decorative stone looks very impressive. But practical housewives who love to cook a lot may doubt the practicality of such a finish. Dust and greasy deposits easily settle on the relief surface. You can avoid cleaning problems if you install a powerful hood and cover the surface of the stone with a clear acrylic varnish.
The best solution is to decorate part of the wall behind the stove with a small panel of tempered glass, and decorate the rest of the apron with stone. Another good option is to use stone-look ceramic tiles, which have a less porous surface and are easier to keep clean.


5. Clapboard and wood
Wood imitation looks great both in laconic modern interiors and in cozy country-style kitchens. If you want a kitchen with a modern design, take a closer look at the MDF wall panels with a plastic finish, the structure of which resembles wood not only in appearance but also in touch. In the "rustic" interior, lining can also be used to finish the apron. The main thing is to treat it with an antifungal solution and cover it with a waterproof protective varnish.


6. Decorative plaster
Walls finished with this material are not much inferior in practicality to aprons made of tiles or glass, but only if you choose the right type of finish and strictly follow the technology of its application. In addition to the popular "Venetian" and "bark beetle", decorative plasters have many different design options. For example, for loft-style kitchens, concrete-like stucco finishing is ideal, and for country or Provence, a coating under an old wall with craquelure is ideal.


7. Mirror panel or tile
The mirror surface has a super-ability to visually enlarge a small space, giving it volume and depth. The mirror on the backsplash perfectly reflects the light and brightens the dark kitchen. But there is an obvious minus - this type of finish is suitable only for neat people. With such an apron, any mess on the work surface will double, and fingerprints, water drops and grease splashes will be conspicuous.


8. Brick or clinker tiles
The textured surface of the red brick looks fantastic in combination with the smooth glossy facades of white, beige or gray kitchen units. Thanks to the contrast of colors and textures, such an apron will add texture and expressiveness to even the most concise interior. The recommendations are the same as for finishing with artificial stone - cover the surface of the apron with a transparent varnish, it will become easier to wash it. Another option is to protect the brick wall with a clear tempered glass panel.


9. Stainless steel wall panel
The steel on the apron fits perfectly into the design of kitchens in loft, minimalism and hi-tech styles and complements a kitchen set with a modern design. If you don't like the look of all-metal aprons, look at the photo below for what small metal panels look like. Most often, they cover part of the wall behind the hob (this solution is especially practical for kitchens with gas stoves). The rest of the apron can be decorated with artificial stone, plastic, tile, glass, or painted with moisture-resistant paint.


11. Wallpaper
Wall coverings with a catchy pattern or naturalistic imitation of wood, stone, fabric, brick are good for creating an apron with an original design. In kitchens without upper cabinets, you can decorate the wall all the way to the ceiling in this way. Transparent tempered glass will help prolong the life of the wallpaper. Optiwhite is best - it will cost about a third more than usual, but it does not have a characteristic greenish bottle tint that can distort the color of the pattern on the wallpaper and spoil the whole impression of the apron.
- WE RECOMMEND: