Embroidery design in the form of a pillowcase. Cross stitching on pillows
Cross stitching of pillows has long been famous in Ukrainian culture. According to the traditions of the Slavic peoples, such pads were considered a talisman of a home from evil spirits. At the present time, cross-stitching of pillows is relevant, which decorate the interior of a residential building.


Ukrainian embroidery combines all kinds of colors, illuminating the surrounding space with brightness and unusual beauty. Professional needlewomen decorate all home textiles with a cross, thus decorating their apartments. Cross stitching is a simple embroidery technique. Learning to create elements of such creativity is not difficult. The main thing is that novice needlewomen have a great desire, patience and perseverance. With a stock of such professional qualities available, you can embroider a pillow and decorate your room with it.

Required materials
Before starting the workflow, you need to study the techniques used when embroidering and prepare the work material:
- thick fabric for the pillow
- sintepon
- canvas for the back wall of the pillowcase
- ornament scheme
- outline
- sewing thread
- embroidery thread
- wooden embroidery hoop
- darning needles
- tailor's and small scissors


Embroidery can be done on different fabrics, the structure of which resembles squares:
- canvas
- cotton
The threads are selected at the request of the embroiderer. Having prepared everything you need for creative ideas, we will study the step-by-step execution of the cross.

Cross stitch techniques
There are several ways to apply crosses to fabric.
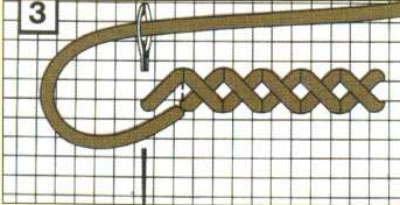
The first method is to embroider the entire cross. This method applies crosses both vertically and horizontally. Let's get acquainted with vertical stitching.
Vertical stitching method
- The procedure begins by inserting a needle and thread into the upper right hole.
- Then it is sewn diagonally to the lower left point.
- We go up the wrong side.
- We descend diagonally into the lower right hole.
- We go up through one point.
- The thread runs diagonally into the lower left hole of the next square.
- The following steps are repeated.

On the seamy side of the work, two straight, parallel straight lines are obtained.
Horizontal stitch method
Crosses are horizontally embroidered in the following stages:
- The stitching starts from the upper right hole to the lower left hole.
- From the lower left corner, it goes to the upper left point.
- Next, the needle with thread is inserted into the right, lower hole.
- The needle comes out diagonally at the top right point.
- The procedure is repeated anew.

In the process of work, we observe the direction of the stitches - they should lie in one direction, then we will get an aesthetically beautiful and correct pattern. The wrong side of horizontal embroidery is characterized by slanting lines.
Step-by-step execution of oblique stripes in one direction, then in the other. This method is performed in the following steps:

The seamy side of this embroidery is distinguished by small stitches.
Having learned how to sew with a cross, we begin to embroider wonderful sofa accessories. Cross-stitched products look original in any room of a residential building. Cushions are selected to match the furniture, wallpaper or curtains and represent a bright accent that attracts attention.

Sofa cushions are decorated with a variety of ornaments chosen by the needlewoman. Often, craftswomen use a pattern of embroidered chains closed among themselves. It is in such a product that the main, central area of the pattern is combined with a border on the side. Also, embroiderers depict flowers in the center, and the edges are decorated with border ornament. The combination of various images looks pretty good and attractive.

How to create a pillow
To create a unique pillow with original patterns, we immediately make a pillow, and then sew an embroidered pillowcase on it.
Sewing the pillow itself is easy. Consider a detailed step-by-step instruction on the creative process.
Step 1
We take dense material, cut out two lengths of our product with seam allowances.
Step 2
We sew three and a half sides of the future product on a sewing machine.
Step 3
We cut out a synthetic winterizer of the required size.
Step 4
Place the artificial filler in the sewn pillowcase.
Step 5
Sew up the remaining hole with a blind stitch.
The interior piece is almost ready. All that remains is to decorate it with a delightful cross-embroidered pillowcase.
Before decorating the product, we think over what kind of fabric we will use. It is possible to use the same fabric for the entire pillowcase, it is possible to reproduce the ornament on the canvas, and decorate the back with a different structure of the material. It all depends only on the wishes and creative fantasies of the needlewoman.
Getting Started Cross Stitching the Pillow
The schematic drawing on paper is divided into ten by ten squares. To make the ornament perfect, draw with a special marker on the canvas the same squares as in the selected scheme. Mark the center of the pattern by folding the canvas in half twice, and start embroidering from the mark.

Having finished the embroidery process, we prepare the back of our pillow:
- To do this, using sharp tailor's scissors, a piece is cut out of the selected fabric, identical to the embroidered canvas with allowances for basting.
- We apply the canvas and fabric, we sew three parts on a sewing machine - the top and two sides.
- Sew a snake into the remaining lower part of the pillowcase.
- The product is turned inside out. The exclusive pillowcase is ready. The final step is to put the pillow you made into a new and beautiful pillowcase.
- I would like to note that the pillows for the interior are embroidered on denser fabrics and completely sewn with a cross.
- Sleep pillows are usually made of soft fabrics and embroidered with simple patterns.
- The cushions designed to decorate the apartments are complemented with a soutache cord or tassels.

Satin ribbon buttons and ties are often used instead of zippers. Craftswomen use their own interesting and unusual ideas that never repeat themselves. Such a hobby as cross-stitching of a pillow brings joy and great mood. Hand-made gizmos are perfect as a gift for significant dates, because they convey warmth and tenderness to the person being presented.
Everyday life of a person is adorned with little things, often useless objects that do not perform any practical function. For example, candlesticks, paintings, fabric toys, garlands. But without these things the apartment looks gloomy, boring, too strict.
An element of decor such as a pillow embroidered with a cross will bring warmth and comfort to the decoration of the room.

In a thing made with his own hand, the master put a piece of his soul.
The most unusual decoration of the room is the embroidered pillows. This accessory is also used by restaurant designers to give a catering place a special homeliness and atmosphere. Cross-stitching of various pillows is not only a cute hobby, but a real art.

Embroidery of pillows in Russia was one of the favorite activities of Russian women.
You can choose threads for creating an ornament so that they are in harmony with the color of other things. For example, with the color of the sofa. Despite the hard, stressful city life, people try to find a cute hobby for themselves that will make their life more romantic.

The cross was considered a talisman against the evil eye and evil spirits, it protected and cleansed from all evil.
The creation of a beautiful interior item is a kind of outlet, an opportunity to go into your own world. It is believed that embroidery with threads is a very painstaking work that takes up a lot of useful time. But, if you calculate how much time we spend buying groceries, surfing the Internet, reading useless news (scandals, gossip), watching useless TV shows, traveling by transport, you come to the conclusion that handicrafts do not take very much time. You just need to abandon the "useless" time wasters and spend them on art.

Shirts and sundresses, as well as towels, tablecloths and pillows were embroidered with a cross.

It was difficult to find a house that did not have embroidered pillows.
Ideas and patterns for cross stitching sofa cushions
Ornaments, schemes are selected based on the style of the room. There are several techniques for making a pillow pattern. The most popular technique is hand cross stitching.

There is a belief that a cross-embroidered pillow brings good to everyone who uses it.
Monochrome ornament does not lose its popularity. For example, a landscape on a winter theme, embroidered with one thread.

Now you can embroider a pillow with a cross using absolutely any pattern.
A fashionable direction is also "Modern" or "Art Nouveau". Ornaments in the Art Nouveau style are used for processing pillows, sachets, interior paintings that adorn the shelves, greeting cards. For inspiration, see the Art Nouveau encyclopedia. Cross stitch ”.

You can choose just a neutral theme, for example, patterns, ornaments, flowers.
It is not necessary to embroider a multicolored landscape with complex color transitions, and buy a lot of thread. You can create a drawing of four, or even three shades, and it will look no less impressive. Using less thread is also good because it makes it easier to count the crosses. By the way, the selection of threads that are in harmony with each other is the most difficult stage of the work if you are embroidering (no matter what technique, cross stitch or satin stitch).

If you want to add something new to your interior without noticeable expenses? Original handmade pillows will come to the rescue!
An ordinary cross is the easiest element to perform. There are several sources on which they rely if they want to create drawings with threads. For example, ready-made beautiful schemes are sold for beginners, so that they do not bother with which threads and how much canvas to buy.

Cross-embroidered pillows will look great in the nursery.
At first it may seem like they are expensive. But if you take into account how much time a person spends on the selection and calculation of all components of embroidery, then you come to the conclusion that ready-made schemes allow you to save money. The ornament embroidered on the canvas can be easily used when sewing a pillow.

For beginners who think they can't afford cushions yet, you can start by making a needle cushion.
The second option is to create an original pattern using a special program on the Internet that converts an ordinary picture or photo into a pattern for cross stitching. Such a program is available to everyone, absolutely free and easy to find. She not only "translates" the picture into a scheme, but also selects the shades of threads that should be bought to create this picture.

Decorating your baby's nursery, you can add a drop of care and warmth by embroidering original accessories for children.
Simple pillow cross stitch pattern: ornament
If the creator does not know what kind of ornament to choose, he can resort to a universal option: a red ornament on a light background of a pillow. A light pillow with a neat red ornament looks almost luxurious, and it can be presented to a friend for the New Year. The red and white ornament looks dynamic and cozy at the same time. Such a chic pillow will cheer you up, but it doesn't look clumsy. Plus, repeating patterns are easy to create.

Do-it-yourself embroidered pillow can decorate your interior and make your home more comfortable.
To give the design a more effective and neat look, you can process the edge of the product with a two-color or one-color ornament, creating an embroidered frame. If the drawing is rather simple and uncomplicated, it will “play” in the frame and will look quite expensive. This trick was used by craftsmen who created postcards and interior gizmos in the Art Nouveau style.

Do-it-yourself things are considered much nicer and more expensive for us.
Botanical cross stitch - patterns of embroidery on the theme of wildflowers
Flowers are a universal option for embroidery at all times. They can be created in winter to cheer yourself up and give the room brightness, summer warmth, in the fall - so as not to get depressed. There are many schemes on the Internet dedicated to colors. Various weeds, grasses, and dandelions, both ripe and April, are popular.

Such things contain internal energy, which is a strong amulet for our home.

Self-embroidered pillow speaks of the skills and tastes of the craftswoman, her skill and desire to create something beautiful for her interior.
Beautiful and bright sofa bolsters with flowers transform the gray interior. Hand-made things protect from everything bad that you can bring from the street with you to your home. Therefore, before the embroidered pillow was in every home. If the pillow was small, then it was called a dummy. Linguists still cannot agree on why the accessory was called that way. Perhaps because on the pillow, which was embroidered with your own hands, it was pleasant to rest, relieve the psyche, and when the brain is relaxed, it is easier to think.

Our ancestors had a kind of embroidery cult. The girl had to learn this art from childhood.
Fashionable patterns of pillows embroidered with a cross
A popular trend in embroidery is the "heavenly" theme, for example, stars, planets. Even shiny lurex elements can be seen in the works of 2018. They decorate not the whole picture, but only small, separate details. For example, the eyes of a unicorn, horse, fairy.

Hand-made embroidery still enjoys a certain demand and value, so its cost is also overstated.
A monochrome pillow is also in trend. Needlemen do not want to spend a lot of time counting and selecting threads of different colors, so they came up with monochrome paintings, for example, in beige or pale blue, which look very beautiful, but are easy to create. Cross-stitching a monochrome pillow does not have to be accompanied by only one color of thread. You can decorate the picture with a splash of color. For example, make a gray character orange eyes.

In order to master this skill, you need to have a certain desire, make the maximum amount of effort and find a lot of free time.
Cross stitch material
How beautiful the finished thing will look depends not only on the pattern that the embroiderer chooses. First you need to buy a good canvas and quality thread. Those who embroider without a hoop should take a closer look at the dense canvas treated with a special substance. You can find this kind of fabric at a craft store. In principle, you can embroider on any canvas or fabric purchased, for example, in a linen store. But on a special, dense fabric with a large canvas, it is undoubtedly more comfortable.

When handicraft is just beginning to be studied, you can use ready-made kits for embroidery products, which are sold in special sewing stores.
You need to be especially careful when choosing threads. If the choice of fabric is more a matter of taste, then almost everything depends on the quality of the threads: both the pleasure of the creative process and the look of the finished thing. You shouldn't buy the cheapest threads. They get confused in the process of work, gather in knots. It is better to purchase high quality "Maderina" or "DSM" threads.

They are silky, resilient, durable, and have a rich color spectrum.
Assembling the pillow after embroidery
Cross-stitching of a pillow consists of two stages: creating a pattern and sewing the pillow itself.

The pillow, which is decorated with cross stitching, can be an excellent gift for relatives and friends.
Making a sofa cushion is not fundamentally different from sewing an ordinary living room accessory without embroidery. You just need to cut out a silhouette of a round or square shape from the fabric, overcast the edges, and then fold the two elements of the fabric with each other and sew them, turning them inside out, leaving a free gap for the filler. This procedure is easy to do by hand if the pillow is small (smaller than the standard 40X40). After the rag parts are sewn together, the pillowcase must be turned on the front side, filled with a fiberteck and the remaining edge of the pillow must be sewn up.

Handicraft has a special value, so such gifts are kept with you for a long period of your life.
If the embroidery was created on a special linen material, then you do not need to sew anything extra.

Today, beautifully designed embroidery becomes a unique and unusual component in absolutely any interior.
VIDEO: Pillows with embroidery in the interior.
Content
Embroidered pillows are often called dummies. it is pleasant to lie on them, reflect, organize your thoughts. Such a product is not only beautiful, but also carries the warmth of the hands and the positive thoughts of the craftswoman who embroidered the pillow.
For a long time in Russia, pillows embroidered with a cross were in every home to drive away evil and human envy. They served as a kind of home amulet against the evil eye. Other household items were also embroidered with a cross: towels, shirts, icons, etc.
Nowadays, the tradition of cross-stitching is returning, so embroidered sofa cushions can often be found in modern homes. They are an original author's element of the interior. They create a cozy, homely atmosphere.

- We make the embroidered fabric for the pillow dense, so we embroider with Mouline threads in several folds (4-6 times). And to make the drawing look even and neat, we make the upper visible stitches in one direction.
- We wash the finished embroidery in warm soapy water, rinse it thoroughly, dry it on a flat surface. Then we iron with an iron through two layers of gauze.
- Choose a dense fabric for the pillowcase, not translucent. We make the pattern in the form of a square or rectangle equal to the size of the embroidery. If the dark fabric of the pillowcase is visible through the embroidery, sew on a lining made of light fabric.
Cross stitch pillowcase
A cross-embroidered pillow looks especially attractive on a sofa or ottoman. For a decorative pillow, we make dense embroidery with thick thread, and for a pillowcase we use a dense fabric that is resistant to wear. The main stitches for cross stitching can be found here.
For work you will need
- Canvas;
- Marker for marking;
- Scheme;
- Threads;
- Needle;
- Scissors;
- Textile;
- Padding material;
- Lightning;
- Sewing machine.
Work process
We start the work by fixing the thread on the canvas. To make the wrong side look neat, and the nodules do not show through, it is not recommended to do them. It is better to secure the thread as follows. We thread the double folded thread into the eye of the needle with two free ends so that the tail-loop remains at the bottom. We introduce the thread from the seamy side, leaving a small loop-tail. Then, having made an oblique stitch, we bring the thread back to the wrong side, thread the needle through the left loop. Tightening the loop more tightly, we get a reliable, inconspicuous fastening of the thread. We bring the needle to the face, we embroider the first cross.


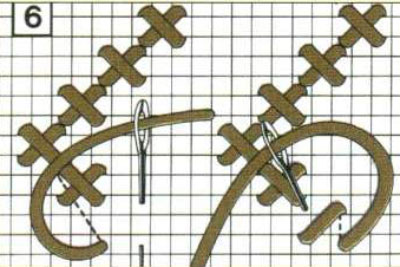
Any pattern for sewing is divided into squares (usually 10x10 crosses). To quickly navigate, mark the canvas on the same squares with a special marker. Because it is best to start work on the embroidery from the center, define the center point. To do this, fold the canvas in half and again in half. The point at the intersection of two bends will be the center, from which we begin to draw the markup.
We start embroidering the pillow with small elements or patterns. And only then do we move on to filling in large single-color fragments of the picture. If you need to move from one place to another without breaking the thread, then we do the constriction by passing the thread under the stitches. But it is not recommended to do too long constrictions. Because they can show through, and the thread consumption increases slightly. We do not trim elements with small stitches, but we produce large ones from point to point.
We wash, dry, and iron the finished embroidery.
Assembling the pillow after embroidery
After embroidering the pattern, we proceed to cutting and sewing the pillow itself with a pillowcase. The inner pillowcase is made of light dense fabric. We cut out two parts to the size of the embroidered canvas, fold them face to face, make a basting with a thread of a contrasting color or pins, making a centimeter seam allowance.

We sew the seams, leaving a small section of the seam (10-12 cm) unstitched, remove the basting, overcast the seams. We turn out the pillowcase, fill it with any stuffed synthetic material. Sew the left gap with a blind seam.

Now, according to the size of the embroidered canvas, cut out one piece of the outer pillowcase from a beautiful dense fabric. We fold the embroidery with the second piece face to face, sew, also making a seam allowance. If the embroidery is translucent, then we undermine the lining of light fabric under it, only then we sweep away two parts. We leave one side free for sewing in a zipper. Sew the parts on a typewriter according to the outline, overcast the edges.

It is necessary to make sure that the seam runs strictly along the border of the embroidered pattern, and that a clean canvas does not peep out on the sides. If this does happen, then this defect can be easily masked with a decorative tourniquet by sewing it over the seam along the entire perimeter of the pillow. We sew a zipper of a suitable color into the fourth not sewn seam so that it does not catch the eye. We turn the pillowcase over the face, touch the pillow through the open zipper, and fasten it. The pillow is ready.

To make the product more original and elegant, you can additionally decorate the corners of the pillow with pompoms, bows or tassels, sheathe the edges with a beautiful decorative plait, canvas or lace.
You can also sew a pillowcase larger than the embroidery itself. In this case, we attach strips of fabric with a width of 3 or more centimeters to the embroidery. We cut the back of the pillowcase taking into account the enlarged upper side. The further sewing process remains unchanged.
Embroidery patterns
Separately, I would like to say about the choice of pattern, because each image has its own special meaning. For example, an embroidered pair of wolves, pigeons or other noble animals symbolizes family well-being, loyalty and love. Angels are a good amulet for children, the vine is a symbol of abundance and joy. If you want more material benefits, you should choose schemes depicting mountains or spikelets of wheat.


Cross stitch pillows in a tutorial (photos and diagrams)
Nowadays, embroidery on pillows is becoming popular again, and therefore we want to tell you how you can make wonderful embroidered sofa pillows with your own hands. As a rule, it does not take much time for an experienced craftswoman to cross-stitch pillows, however, for novice needlewomen, we would still advise simpler schemes with which they can easily and quickly decorate their home. 


Cross stitch patterns or designs on the pillow
Our small master class is designed primarily for novice craftswomen, so we will not describe the embroidery of a complex scheme, but take an ordinary heart as an example and embroider such a cute image on a pillow. But, before starting work, we advise you to prepare everything you need. You will need:
- checkered paper with a printed color image (in our case, the drawing is monochromatic, so a black and white scheme is suitable for us);
- pins;
- pillow;
- knitting threads of the desired colors (for the pattern we have chosen, only red ones are needed).
Let's get to work!
First, take the paper that your diagram is printed on and gently pin it to your pillow with pins. In order for the embroidery of the pillow to be even and beautiful, you need to make sure that the sheet lies flat and does not bulge anywhere. After making sure of this, you can get to work. 
Usually, cross-stitching of pillows takes a lot of time, but since the image we have chosen is very simple, you will cope with this task quite quickly. 
When the embroidery of the pillow is finished, you will need to remove the now unnecessary paper. You can carefully cut the edges with scissors, but the middle will have to be "cleaned" by hand. 
As a result, you should have such a wonderful cross-embroidered pillow. 
As you yourself have probably already noticed, embroidery of pillows is not always a troublesome and painstaking business. Even the most common drawing will help you decorate the cushions, which will later "revitalize" your interior and bring fresh "notes" into it.
Original embroidery for sofa cushions
If you want your living room to be transformed, but at the same time you do not have the time or money to make repairs, you can add some bright accents that will "liven up" this room. Embroidery of pillows can be an excellent solution because these small "accessories" not only serve to decorate the room, but also provide you with the proper level of comfort.
So, for work we need:
- pencil;
- ruler;
- hole puncher;
- scissors;
- needle;
- synthetic winterizer;
- yellow knitting threads;
- a piece of black fabric (32.5 * 32.5 cm);
- green fabric from which we will sew the pillow itself.
Let's start embroidering the pillow!
First, you need to make the lines on the black fabric. In this case, you should get a neat grid consisting of squares, each side of which is 1 cm. 
Then, stepping back 2 cm from each edge, you will need to make small holes at the intersection of all lines using a hole punch: 
We do not need a pattern for embroidery, since we will be embroidering 2 large English letters: "Hi". In order to make the embroidered pillows brighter and more unusual, we have chosen yellow threads, which will go well with the black base. 
After we finish working on the embroidery, we will need to attach the base to the green fabric and cut 2 parts according to its size.
Then we just have to sew all three parts and fill the pillow with padding polyester. 
It is worth noting that embroidery of pillows is a creative process, so you can feel free to experiment and create your own unique patterns and original inscriptions. Such cute embroidered pillows will undoubtedly grab the attention of your guests and make the interior of your room special and exclusive.
Interesting patterns for embroidery of sofa cushions
Pillow embroidery is divided into several types according to the level of complexity of the work performed. Of course, experienced craftswomen will be able to embroider almost any pattern without any problems, but at first it is better for novice needlewomen to give their preference to simpler drawings or patterns.
To make embroidery of pillows take less time and effort, you can buy ready-made sets with canvas, patterns and threads in advance. But if you do not have such an opportunity, then you can easily choose the scheme yourself and embroider a pretty sofa cushion on it.
Butterflies 
Butterflies fluttering around a flowering branch 
Two tiger cubs 
Floral shoes 


"First guy" 
Kitten with a heart 
Lovers in the rain

"Couple in love"

Hieroglyphs 


Regardless of the level of complexity of the pattern for embroidery of pillows you choose, the main thing is that your work is done with love. Indeed, in this case, you will put a piece of your soul into it, and each time admiring your creation, you will plunge into the atmosphere of comfort and home warmth.
Selection of schemes


Comments
Related posts:
 Cross stitch houses diagrams of interesting buildings
Master Class. Decorative pillow with embroidery
Admit it, who would not like to receive this cozy pillow as a gift? Especially with such cute hand-embroidered bears!
Elena Sabitova from Moscow will show a master class on creating this cute decorative pillow. Her work won a prize at the 2007 master class competition, which Osinka held last year.
The main detail in such a pillow is embroidery, which sets the mood for the whole work. Now in stores there is a wide variety of scenes made on canvas of different sizes. The size of the embroidered canvas will determine the size of the pillow, and the embroidery motif and its color will determine the fabric and decoration of the future product. By the way, if you plan to make such a pillow as a gift, select all the elements in the style of the interior of the apartment of those people for whom it is intended. Then your gift will be doubly appreciated!
Elena Sabitova: Before starting work on embroidery design, take a close look at it. It is very important to determine the style of the painting in order to choose the right design for it. In my case, the picture is very homely and I see it in a kind of “rustic folk” style, so I settled on an unpainted linen cloth for a pillowcase, braid imitating hand-woven weaving, as well as buttons and beads made of wood.
All stages of work with a detailed description can be found on the following pages of this publication.
Master class overview
01.
To work, I needed:
- finished embroidery
- a piece of teak for a pillow
- a piece of natural linen for a pillowcase
- decorative braid
- buttons and wood beads for decoration
- synthetic winterizer or other filler for the pillow
- non-woven
- threads of the required colors + monofilament
02.
I cut out the details of the pillow and pillowcase. I calculate the details according to the following scheme: I add the width of the braid to the width and length of the embroidery and another 1-2 cm additionally. In my case, the total increase was 5 cm.
For the pillow: I draw rectangles of the desired size on the teak, mark the allowances. I cut it out.
03.
Scheme of cut out parts. For a pillowcase, the details will be slightly different, since a clasp is assumed for a pillowcase. Therefore, I will have the front part, where the embroidery will be sewn, and the back, where the fastener will be. To the rectangle of the front part, I draw a flap for buttons in width, I have an increase of 20 cm + hem allowances. To the back part, I draw an additional 5 cm in width on the strip for the hinges.
04.
I sew the pillow details on three sides, leaving the fourth open for filling with padding polyester. I cut off excess allowances, cut the corners close to the seam.
05.
I turn out the stitched parts and use scissors or another pointed object to straighten the even corners of the pillow.
06.
I straighten the seams and iron them with a well-heated iron. Then I iron the whole part.
07.
I fill the pillow with padding polyester through the unsewn side. For this, trimming is suitable. If the synthetic winterizer is not cut, it is better to cut it into small pieces, so that later you can evenly distribute it over the entire volume of the pillow.
08.
I split the open cut with pins across ...
09.
... and spend it neatly on a typewriter. The pillow is ready!
10.
Now I turn to the pillowcase. Since the embroidery placed on the pillow will be subject to frequent physical stress, I advise you to reinforce it from the inside with non-woven fabric. This will keep its shape for a longer period.
11.
I also reinforce the strap for loops with non-woven fabric and the area on the flap where the buttons for the fastener will be sewn.
12.
I mark the fold lines on the plank with stitches. I bend it on the wrong side of the markings and iron it.
13.
I bend the cut on the valve and spend it on a typewriter.
14.
I spend the ironed bar on a typewriter. Since the upper thread lays down smoother and more beautifully in the stitching, I recommend stitching from the front side. To do this, you can sweep the part and lay a line along the outline, or use the existing markings and, departing from it a few millimeters, lay a line.
15.
At the embroidery, I cut off the extra canvas, leaving only allowances for the hem. The allowances, in turn, I bend to the inside out and sweep.
16.
On the front part of the pillowcase, I mark the corners with stitches to align the embroidery.
17.
I combine the embroidery with the marked corners and pin it with pins across the future seam.
18.
I attach embroidery to the canvas.
19.
Along the edge of the embroidery, I pin the braid around the entire perimeter. I carefully fold and combine the sections of the braid, thus creating the impression of the continuity of the braid.
20.
I carefully attach the braid to the edge.

