Do-it-yourself compost pit from a barrel. Compost barrel, pit or pile: do it yourself How to make compost in an iron barrel
Cultivated plants and trees require a regular supply of nutrients, and the soil is gradually depleted. Therefore, it is required to regularly apply top dressing to the soil - organic and mineral. Chemical preparations have not only a positive effect on green spaces, therefore, modern vegetable growers prefer not to use such products for fertilizing vegetables and fruits, but prefer dressings made from natural ingredients.
One such fertilizer is compost. It can be made from vegetable waste that remains after weeding in the garden or in the garden, as well as from food and other components. To get a complete top dressing, the necessary elements must rot.
Pits are dug under the compost in the plots, where they put plant waste, from which in the future an excellent tool is obtained to improve soil fertility. But some gardeners do compost dressing in old boxes, an iron barrel, and in any other containers that are no longer used for their intended purpose.
Below we will talk about how to make compost in a barrel, about the main advantages of natural fertilizer, as well as about the nuances of preparing organic matter in this way.
Top dressing, obtained by decomposition of organic elements, has a positive effect on the composition of the soil, increases fertility, and there are practically no costs for its preparation. As a basis for the compost, they dig a hole (or make a container in which organic garbage will overheat), and then put all the plant debris from the site there.
If there is no place in the garden for a hole (or there is no way to dig it), then an ordinary barrel is suitable for preparing organic fertilizer. So that the process of fermentation of plant waste is not accompanied by an unpleasant odor, a lid is attached to this container.
Advantages over a compost pit
Barrel advantages:
- 1) it can be placed in any free corner of the site;
- 2) installation does not require much space;
- 3) the appearance is more aesthetic (compared to the pit);
- 4) small holes can be made in the neck of the barrel for oxygen to enter, which is necessary for beneficial bacteria for life;
- 5) it is possible to make a hole in the lower part of the structure through which ready-made compost can be taken;
- 6) in a barrel, organic fertilizer will not dry out or be washed out by melting snow or other precipitation;
- 7) in a container with an already ripe dressing, you can grow cucumbers or zucchini.

But there are benefits to composting in a pit too:
- no need to start large-scale construction, it is enough to dig a square recess with sides of 1.4 m and a depth of 0.5 m;
- the pit can be filled throughout the season without thinking about a possible lack of space;
- plant components are put into a hole and after filling it, if it is not possible to dig another one, then a compost heap will grow from above.
But such recesses without covers with clusters formed on top spoil the view of the site, spread an unpleasant smell around.
What to put in a barrel?
Making compost in the country with your own hands is easy. A barrel of any size is suitable for this, but a large one is better - more waste will fit in it. The only caveat is that in the container for the decomposition of organic residues there should not be metal parts in contact with decay products.
Put into the barrel:
- weeds, plant debris, small tree branches;
- grass, fallen leaves, straw, sawdust and shavings, peat;
- food waste and slop;
- wood ash, chicken manure.
You can not add weeds with seeds, diseased parts of plants, as well as animal manure to the compost: with it there is a risk of bringing pathogenic microflora into the preparing organic matter.
The order of laying raw materials

It is necessary to lay all plant and food residues in a container in crushed form so that they rot faster. Layers of organic matter are sprinkled with earth, peat or chicken manure.
The process of composting waste is faster if water or slop is added to the barrel daily (for such irrigation, weed infusion, drunk tea leaves, coffee grounds are used).
It is best to alternate the following layers of organics and other substances:
- plant remains;
- bird droppings;
- wood ash;
- priming.
Compost maturation in a barrel
To get rotted organic fertilizer, you have to wait: the process of decay in a compost barrel lasts 2-3 seasons. The time interval depends on the degree of grinding of raw materials and the presence of favorable microflora, under the influence of which decay occurs.
If you start using manufactured top dressing at the end of the first season, then it will be better than simple land from the site, but less valuable in terms of nutrients than 2-3 year old compost.
Signs of compost maturation
It is easy to determine the degree of readiness of organic matter:
- in high-quality fertilizer, all plant residues have rotted;
- it is homogeneous and friable (no sieving is required before entering into the soil);
- you can calmly take it in your hands - it will be soft and dry;
- Completely rotted compost smells pleasantly of forest, mushrooms and fallen leaves.

You can prepare such a high-quality organic supplement in any container, the main thing is to put only plant residues and food into it, and also regularly add moisture for better decay.
Fully matured compost is an excellent fertilizer for garden plants, flowers, shrubs and trees. It is used to prepare a nutrient substrate when growing seedlings of vegetable crops, added to the soil when transplanting indoor flowers (those that benefit from organic top dressing).
This nutritional supplement is applied in large quantities when digging the garden and vegetable garden in the fall, when during the season the plants have taken a large amount of nutrients from the soil.
Making compost in a barrel is a simple and inexpensive way. Despite the duration of maturation, top dressing can compete with artificial fertilizers due to its effectiveness and safety for plants.
Compost heap for the lazy
11/20/2009 Labels: humus, compost, compost box, manure, DIY
In summer cottages, a compost heap is a mandatory attribute. After all, compost is a unique organic fertilizer that enriches the soil with humus. Compost can partially or completely replace manure, which has now risen in price, as well as mineral fertilizers and specially fertile soil brought in. In addition, by collecting organic debris throughout the site, we simply clean up the area around.
Of course, you should place a compost heap or waste composting boxes in secluded places so that they do not catch the eye and do not spoil the view. Nevertheless, they should always be at hand. In the case of a classic composting solution, three sections are needed for the production of compost: in one, the process of laying waste is in progress, in the other, the compost matures, and in the third, the finished fertilizer is ready for removal to the beds. In terms of size, many converge to the following proportions: width -1.5 m, height - 1-1.2 m, length - up to 3-4 m. These dimensions are given in many reference books, they are considered the minimum necessary to ensure temperature and stable humidity for the normal course of the composting process. According to the same theory, it is advised to shovel the contents of the compost heap annually to supply air to the ripening compost, i.e. to speed up the process of waste decomposition. This task requires serious physical effort.
How to speed up the composting process?
But progress does not stand still, composting technologies are being improved and the compost production process has been accelerated by 2-3 times. For example, to preserve moisture and to increase the temperature in the compost heap, they began to cover it with plastic wrap with holes for air access. Also, to speed up composting, various accelerators of this process have been developed, for example, the drug “Tamir”. To speed up the process, you can also choose a certain composition of organic and other components of the compost heap being laid so that composting will be significantly accelerated. This suggests that today it is not necessary to follow the rigid recommendations developed in the last century.
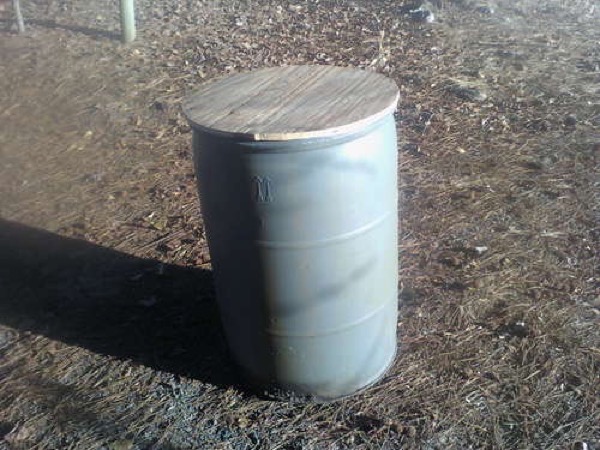
Composting in an iron barrel
1 - holes in the barrel wall;
2 - green mass;
3 - manure;
4 - ash;
5 - earth;
6 - polyethylene.
So a modern compost heap can be made compact or, for this purpose, waste can be folded into a small container with a capacity of about 1 cubic meter. meters, making it from boards.
But, as you know, laziness is the engine of progress, so it may not cost anything to build. Let's just take an old metal barrel without a bottom and modify it a bit:
Firstly, to ensure air access in the lower part of the barrel along its perimeter, we make 20-30 holes with a drill with a diameter of 8-10 mm, or you can punch them with a punch. We place the holes at a height of 20-30 cm from the base of the barrel. And no insulating gaskets are needed between the barrel and the ground - microorganisms and moisture must move freely in both directions.
Secondly, we paint the outside of the barrel in a dark color for better heating in the sun, which will ensure a high temperature inside and speed up the composting process.
The process of making compost in a barrel is very convenient and simple. Several of these barrels can be placed around the site, placing them in places where waste accumulates most quickly. It can be a summer kitchen, garden beds, etc.
Layers for laying compost
To speed up the production of compost, the fertilizer components should be laid in a certain order, forming layers of a certain thickness:
First, we place green plants or carbon-rich substances, making a layer of them 15-20 cm thick.
Then we put 5 cm of manure or substances rich in nitrogen.
After we break everything with a centimeter layer of earth.
So we fill the barrel to the top, continuing to lay the layers in the same sequence - weeds, manure, ash, earth.
We cover the filled barrel with a piece of plastic film with holes, which we tie with twine so that it is not blown away by the wind. From time to time water the prepared compost with water so that it does not dry out. You can water at the same time as watering the beds. But it is not necessary to overmoisten the compost mass. In terms of humidity, it should correspond to the squeezed sponge.
If there are ants in the barrel, then the compost heap has dried up and the composting process has been interrupted. To automatically maintain the desired humidity in the barrel, plant a zucchini, pumpkin or cucumber there. In this case, the film is no longer needed. Watering these plants will keep the compost heap moist. The complexity of the last method is only to immediately fill the barrel with all the layers of compost to the top.
In this design of the compost heap in the form of a barrel, there is a significant acceleration of the composting process. And you do not need to wait 3 years, as in the classic version. No need to shovel the compost. In one summer, you can get several hundred kg of excellent fertilizer.
It takes about 9-10 months to prepare compost in the usual way. In a rotating closed plastic barrel-drum, the cooking time is reduced to 15-20 days.
 Loading - from the cylindrical party. The cover clings to the hinges and is fixed with two screws. From the sides - openings for air intake, blocked by fine-mesh nets. The barrel is placed on the frame. There are toothed rollers at the corners of the frame, they are connected to the toothed rim of the drum, and it can be turned by hand to mix the compost. The smaller container is structurally made somewhat differently and rotates on an axis passing through the center. To obtain compost, ordinary plant and household waste is used.


We use:
Used barrel (with lid)
A galvanized pipe on which the composter will rotate (a bar of smooth reinforcement is also suitable)
Bolts with washers and nuts
4 latches
Door hinges
1. We drill two holes in the barrel in the center of the ends for the pipe - the axis. The axle will rest on a wooden frame


2. Cut out the door in the barrel, fasten it to the hinges. We fasten the latches. An impromptu pen was made from a cord that fell under the arm. 
3. We punch or drill many holes in the barrel for ventilation. In several places we drive long nails into the barrel - dividers for better mixing of the contents (instead of nails, you can use a shlilk, tightening it with bolts).

3. We make a frame for the composter from the boards. We install the barrel on the frame. 

4. We launch the finished composter into work

For quick composting, it is enough to load the waste into the composter and spin it every few days.
Variations on a theme
Vertical arrangement of the barrel:

Two-level composter (for it, the wooden frame posts were concreted into the ground): 
To connect plumbing fixtures to the water supply network, a flexible water supply is used. It is in demand when connecting faucets, showers, toilets and other points of water intake, and greatly simplifies the installation process. Flexible piping is also used when installing gas equipment. It differs from similar devices for water in manufacturing technology and special safety requirements.
Characteristics and types
Flexible hose for plumbing is a hose of different lengths, made of non-toxic synthetic rubber. Due to the elasticity and softness of the material, it easily takes the desired position and allows installation in hard-to-reach places. To protect the flexible hose, the upper reinforcing layer is designed in the form of a braid, which is made of the following materials:
- aluminum. Such models withstand no more than +80 ° C and retain functionality for 3 years. In high humidity, aluminum braid is prone to rust.
- Of stainless steel. Thanks to this reinforcing layer, the service life of the flexible water supply is at least 10 years, and the maximum temperature of the transported medium is +95 °C.
- Nylon. Such a braid is used for the manufacture of reinforced models that can withstand temperatures up to +110 ° C and are designed for intensive use for 15 years.
Nut-nut and nut-nipple pairs are used as fasteners, which are made of brass or stainless steel. Devices with different indicators of permissible temperature differ in the color of the braid. Blue ones are used to connect to a pipeline with cold water, and red ones - to hot water.
When choosing a water supply, you need to pay attention to its elasticity, reliability of fasteners and purpose. It is also mandatory to have a certificate that excludes the release of toxic components by rubber during operation.
Features of gas connections
When connecting gas stoves, columns and other types of equipment, flexible connections are also used. Unlike models for water, they are yellow and are not tested for environmental safety. For fixing, end steel or aluminum fittings are used. There are the following types of devices for connecting gas appliances:
- PVC hoses reinforced with polyester thread;
- synthetic rubber with stainless steel braid;
- bellows, made in the form of a corrugated stainless steel tube.

Holding "Santekhkomplekt" offers engineering equipment, fittings, plumbing and fixtures for its connection to communications. The assortment is represented by products and materials of well-known foreign and domestic manufacturers. Discounts apply for bulk purchases, and product quality is confirmed by standard certificates. For information support and assistance, a personal manager is assigned to each client. The ability to arrange delivery within Moscow and to other regions of the Russian Federation allows you to quickly receive the purchased goods without any hassle.
Drainage is a hydro-reclamation measure to remove excess groundwater.
If water does not leave the territory of the site for a long time, soil gleying occurs, if shrubs and trees quickly disappear (wet), it is urgent to take measures and drain the site.

Reasons for waterlogging the soil
There are several reasons for waterlogged soils:
- clay heavy soil structure with poor water permeability;
- an aquiclude in the form of gray-green and red-brown clays is located close to the surface;
- high occurrence of groundwater;
- technogenic factors (construction of roads, pipelines, various facilities) that impede natural drainage;
- violation of the water balance by the construction of irrigation systems;
- the landscape area is located in a lowland, a beam, a hollow. In this case, precipitation and water inflow from higher places play an important role.
What causes excess moisture in the soil
You can see the results of this phenomenon yourself - trees and shrubs are dying. Why is this happening?
- the oxygen content in the soil decreases and the content of carbon dioxide increases, which leads to a violation of the processes of air exchange, water regime and nutrition in the soil;
- oxygen starvation of the root-forming layer occurs, which leads to the death of plant roots;
- the intake of macro and microelements by plants (nitrogen, phosphorus, potassium, etc.) is disrupted, because excess water washes out mobile forms of elements from the soil, and they become inaccessible for assimilation;
- there is an intensive breakdown of proteins and, accordingly, the processes of decay are activated.
Plants can tell at what level groundwater occurs
Take a close look at the flora in your area. The species inhabiting it will tell you at what depth the groundwater layers are located:
- top water - in this place it is best to dig a reservoir;
- at a depth of up to 0.5 m - grow marigold, horsetail, varieties of sedge - blister, holly, fox, Langsdorf reed grass;
- at a depth of 0.5 m to 1 m - meadowsweet, canary grass,;
- from 1 m to 1.5 m - favorable conditions for meadow fescue, bluegrass, mouse pea, rank;
- from 1.5 m - wheatgrass, clover, wormwood, plantain.
What is important to know when planning site drainage
Each group of plants has its own moisture needs:
- with a groundwater depth of 0.5 to 1 m, vegetables and annual flowers can grow on high beds;
- the depth of the water reservoir up to 1.5 m is well tolerated by vegetable crops, cereals, annuals and perennials (flowers), ornamental and fruit and berry shrubs, trees on a dwarf rootstock;
- if groundwater at a depth of more than 2 m, you can grow fruit trees;
- the optimal depth of groundwater for agriculture is from 3.5 m.
Do you need site drainage?
Record your observations at least for a while. You yourself will be able to understand how much drainage is needed.
Maybe it makes sense to simply redirect melt and sediment water along a bypass channel, and not let it flow through your site?
Perhaps it is necessary to design and equip a storm drain and improve the composition of the soil, and will this be enough?
Or is it worth making a drainage system only for fruit and ornamental trees?
The exact answer will be given to you by a specialist, whom we strongly recommend calling. But after reading this article, you will gain some awareness in this matter.
At the end of the technological and production tasks associated with the arrangement of the sewer system in an apartment building, an industrial building, as well as in a private household, it is required to test the system involved using the forced spill method. This task was applied to identify possible defects or improper installation of the entire sewer part involved, and the act of testing the internal sewerage and drain systems will be material evidence of work on the acceptance of the facility.

A visual check should be accompanied by entering into the test report of internal sewerage and drain systems according to SNIP, which is currently represented by the current regulations of the appendix of the D series, which corresponds to SP 73.13330.2012 "Internal sanitary systems of the building", recently a new one has been applied updated working version according to SNiP 3.05.01-85.
13.03.2017 1 409 0 ElishevaAdmin
Gardeners can receive free of charge environmentally friendly fertilizer - compost, collecting and processing organic waste into it - leaves, grass, and so on.
Some make a compost heap, others make a compost pit, where the components rot and gradually form compost.
But this process can be accelerated, optimized, having the ability to mix the components often and actively. To do this, create a compost barrel.
You can make it easily and simply, having the minimum of tools that the gardener and gardener always have at hand. Yes, and the materials are not God knows what, they can also be found in your own shed or pantry. A barrel only needs to be purchased, maybe rollers.
Instruments
Drill driver
A hammer
Electric jigsaw
Saw (reciprocating, table or ordinary hacksaw)
Cross bit and screwdriver
Pencil
materials
4 rollers;
Wooden bars of different lengths 50 x 100 mm (other sections are also possible)
Screws and nails
Plywood 6 mm thickness
Rubber bands

Making a compost bin
Having prepared tools and materials, let's get down to business.
1. The barrel should be closed, we will make a plywood lid. To do this, putting the barrel "on the butt", we will outline the circle of the neck. Take a jigsaw or saw and cut out a circle.

2. On the inside of the lid, nail a few bars to the plywood. To do this, we will inscribe a square in the circle of the lid (by eye), and place the bars at its corners. They must be fastened with nails (bend the ends) or screws.


3. The lid must be firmly fixed so that all the contents do not fall out of it during rotation. It is convenient to make a latch from rubber bands, providing them with hooks. The hooks will be threaded into the neck of the barrel, for this we will drill several holes.
Particular attention should be paid to the selection of the correct length of the bundles. After all, they should be removed and put on without problems, while reliably holding the lid closed.


4. Let's make a frame from the bars on which the barrel will rotate. This is a rectangle, the long side of it slightly exceeds the length of the barrel, and the short side is about ¾ of the width of the barrel.
We take the bars and knock down a rectangle from them, in the corners for rigidity we fix the braces, cutting them out of the remnants of plywood.

How to make a compost pit or pile?
5. We will install rollers on the long sides of the frame, it is on them that the barrel will rotate. We fasten 2 rollers with screws on each long side, pushing them closer to the ends of the barrel. In this case, it is easier to rotate and more stable.
If the rollers are located close to the middle, the barrel may jump off during rotation.
However, the screws will allow you to adjust the position of the rollers, if necessary.


6. When rotating, the barrel tends to slide off the frame along the length. To prevent this, we will install an emphasis on one of the end sides of the frame. This is a simple board that will hold the barrel in place.


7. In order for the contents of the barrel not only to slide along the walls during rotation, but also actively mixed, it is worth fixing several bars inside the barrel.
That's it, the compost barrel can now be used. Note that all operations to create it are done by eye, no precise measurements are required.

Compost heap: video on how to make it yourself