We make our own garage panels and tool stands. What is the best way to store tools at home?
Practical storage systems for the garage or workshop.
For many, the garage is not only a place to store a car, but also a real car, locksmith and carpentry workshop. Therefore, it is important that everything is always at hand and in the right place. But sometimes it is so difficult to understand the variety of screwdrivers, pliers, scissors, drills and other utensils that are stored in the "male Eden". In this review, simple yet effective ideas will help you create almost perfect storage systems in your garage.
1. Magnetic tape

Magnetic tape for storing small metal parts.
Magnetic tape pasted on the wall in the garage can be used to store drills, scissors, bolts, nuts and other small metal parts. Such a magnetic holder is very convenient to use and will help prevent the loss of small but important spare parts.
2. Plastic containers

Rack made of plastic containers.
From large plastic containers and blocks of wood, you can build a large rack for storing tools, wires, spare parts and any other things. The organization of such a rack will allow you to put things in order and significantly save space in the workshop or garage.
3. Roof rails

Rails for trash bags and paper towels.
On one of the free walls of the garage, you can place several small rails, on which it will be convenient to place rolls of garbage bags, paper towels, sandpaper, adhesive tape, coils of rope and much more.
4. Furniture brackets

Brackets for furniture storage.
Many summer residents use the garage to store folding outdoor furniture. So that it does not stand in the corners and does not take up much space, make a vertical rack for it with wooden or metal brackets and screw it to one of the free walls.
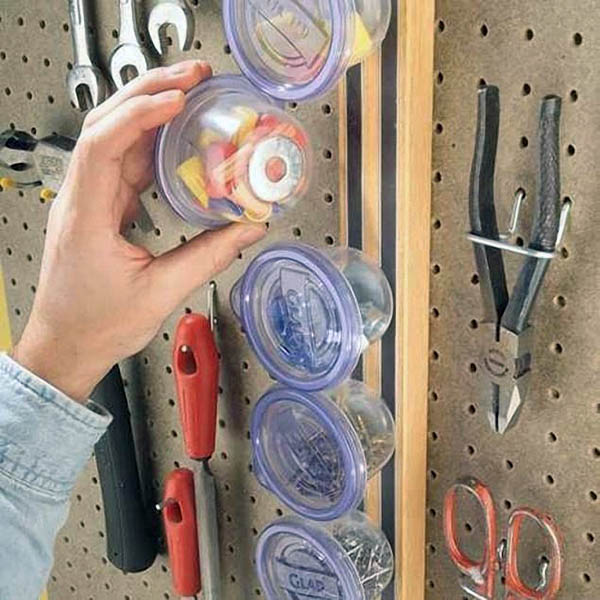
5. Jars

Storage of nails, bolts, screws and other small things.
Bolts, nuts, nails, screws, screws and other little things do not take up much space, but it is extremely inconvenient to store them mixed. Putting things in order will help jars with lids screwed to the bottom of a wall cabinet or under the desktop top.
6. Grid under the ceiling

Lattice for storage of pipes and plinths.
A plastic grate screwed into the corner of the garage under the ceiling is ideal for storing leftover water pipes, skirting boards, profiles and other long items. Such a storage system will help to significantly save space in the garage and prevent possible breakage of fragile building materials.
7. Organizer for screwdrivers

Wooden organizer for screwdrivers.
A small practical screwdriver organizer that any man can make by simply drilling the right number of small holes in a block of wood. Such a product can be hung on one of the walls of the garage or workshop to keep all the screwdrivers in one place.
8. Vertical storage systems

Vertical panels for storage.
Several perforated metal or plywood panels under a table or in a cabinet provide an ergonomic and comfortable place to vertically store small hand tools.
9. Plastic pipes

PVC pipe storage systems.
The remains of PVC pipes of different diameters can be used to create a variety of storage systems. For example, pieces of wide pipes screwed to the bottom of the cabinet are suitable for storing a screwdriver, drill and other tools of this type. From pieces of PVC pipes of medium diameter, you can make cells for storing various sprays, foam, paint tubes and other containers.
10. Tassels

Hanging brush storage.
It is very convenient to store paint brushes and spatulas suspended on a thin wire or on a thin steel rod.
11. Rack for garden tools

Wooden rack for garden tools.
So that garden tools do not take up a good third of the garage space, store them on a special rack screwed to one of the walls. Such a rack can be made with your own hands from wood blocks, a wooden pallet or pieces of plastic pipes.
12. Multifunctional rack

Pallet rack with shelves.
A wooden pallet, complemented by shelves made of pieces of wooden slats, will become a functional component of the garage and will help to place a huge amount of hand tools and small ones in one place.
13. Rod holder

Rod storage.
A regular wire rack can be used to create a handy rod holder. Such a storage system can be fixed under the ceiling so that it does not take up space below and does not get underfoot in the autumn-winter season.
14. Pegboard

Garage tools are indispensable items for every car owner. Quickly unscrew the bolts that secure the wheel, and then change it, drain and fill in fresh oil and antifreeze, even just clean the car windows from snow or ice - all this will be done with a tool that should always be at hand.
It includes garden and construction equipment, often stored in such premises. This article offers recommendations on how to store tools in the garage competently, how to make some products with your own hands.
What tools are needed in the garage
Equipping the garage with everything necessary is made based on the preferences of its owner. Features of the performance of repair or other types of work determine the presence of various equipment and tools in the garage. Despite the wide variety of jobs, it is desirable to have some garage tools in every room.
These include:
- Keys set, better with a special ratchet.
- Set of heads.
- Screwdriver set.
- Pliers.
- Wire cutters.
- Round nose pliers.
- torque wrench, which allows you to choose the right tightening torque and ensure high-quality wheel fastening, this is especially important when replacing it on a car.
- A set of mounts.
- Universal clamp.
- Retaining ring remover.
- Chisels.
- Set of magnets.
Various electric and pneumatic tools also facilitate the performance of repair work.
It can be:
- Electric drill.
- Impact wrench.
- Bulgarian.
- Grinder.
- Electric lift.
- Welding machine for complex repairs.
Motorists purchase many tools and devices at their own discretion, and some even make them themselves.
How to make a pipe bender
Homeowners often need to bend pipes or strips of metal, for example, when making their own greenhouses or laying a plumbing system. There are many solutions to this problem. One of the options is shown in the photo.

To make a pipe bender you will need:
- Wood.
- Three polyurethane keel rollers for a boat trailer, which are fixed with tougons on the shafts from scrolling.
- Steel angles that hold the rolled pipe in a perpendicular position and prevent it from bending into a spiral.
- Stud and nut or threaded plate. These elements are needed to tighten the roller from below. Each time the pipe is rolled, the nut or threaded plate is tightened by half a turn. If you need to make a bend of not a large radius, and the circle turned out to be of the correct shape, it may be necessary to make from 50 to 100 runs.
- Handle with bracket, to rotate the pressure roller.

Pipe bender - bottom view
The order of work has the following sequence:
- Wooden blanks are cut out.
- Holes are drilled for axles.
- Axles with rollers are assembled.
- Bearings for the axles are inserted into the vertical racks.
- The assembled nodes are mounted on the base of the pipe bender, guide corners are attached.
- Guide plates are fixed on top of the base rack.
- The upper part of the tool is assembled. A shaft with a roller and a handle is inserted, a stud or a long bolt is installed from below for the clamping nut.
Particular attention in the manufacture of tools should be given to the distance between the rollers. Each pipe has a minimum bend radius. The greater the distance between the rollers, the larger it will be.
In this case, less bending force is required, and the end of the pipe will remain unrolled. The stroke of the pressure roller must be made as long as possible.
These points must be taken into account at the design stage and it is necessary to provide for the possibility for the rollers to change their position if necessary. Therefore, in order for the pipe bender to be used repeatedly, the dimensions of the tool must be taken with some margin.
How to make a screw clamp
To attach the pipe bender to the workbench, as well as to perform other work, you will need various clamps. The price of a large number of products of different sizes is quite high. Therefore, if there is a desire, such designs can be made independently.
To make a screw clamp you will need:
- Profile metal sheet, approximately 10 millimeters thick.
- Metal rod with a thread on one end M10.
- Several nuts M10.
The manufacturing process includes:
- A bracket is marked on a sheet of metal. To do this, you can use the finished product or prepare a template yourself, at your discretion, taking into account the requirements of operating conditions and the required dimensions.
- The workpiece is cut out. In this case, it is better to use an acetylene torch or a gas cutter.
- The edges are cleaned with an angle grinder and the burrs are removed.
- On the smaller side of the bracket, several M10 nuts are welded or a hexagonal bar up to 50 mm long with an M10 thread for the entire length in the center of the part.
- An M10 thread of the required length is cut on a round bar with a diameter of 10 millimeters.
- A protective coating of all elements with oil or nitro paint is carried out to protect against corrosion.

A homemade garage tool can also have a more complex manufacturing process that requires special equipment and skills.
Tip: Before using a homemade garage tool, you need to make sure of its quality, and most importantly, its reliability when working with it.
How to properly store tools in the garage
If it is quite difficult to make a garage tool with your own hands, then each owner of the premises can perform the correct and convenient placement of the tool in the garage.
In this case:
- To properly organize the space where small parts will be placed, you can equip several rows of long shelves along the wall (see), where you can then place garage tools.

- Large items are placed in plastic containers, large-capacity boxes or special boxes.
- Small fastening tools can be stored in makeshift blocks using small food containers. A metal washer is glued to the bottom of it with superglue, and attached to the wall through a rail with a magnetic strip.
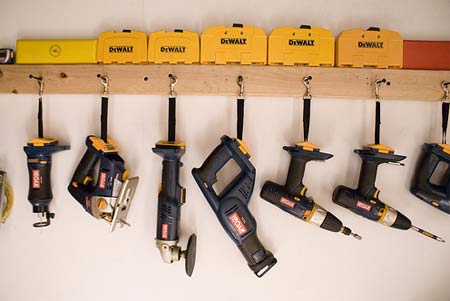
- It is convenient to hang a small tool in the garage on hooks that are attached to a long wooden strip fixed on the wall.
- A special stand on the wall is perfect for storing frequently used tools.

- For hacksaws and bow saws, metal brackets are made that can be nailed to the doors or screwed with small screws.
- Power tools in the garage are perfectly stored on racks (see) or shelves.

Tip: Store power tools in the winter in the packaging in which they are sold, these can be portable plastic boxes with a handle, which will protect the product from the negative effects of moisture and mechanical damage.
- Garden tools with long handles can be attached to special metal hooks.
Tip: For mowers, wheelbarrows, concrete mixers and other large-sized equipment, special racks should not be made. And metal hooks should be placed closer to the garage door.

- It is convenient to store a semi-automatic welding machine or another type of apparatus on a special trolley. Its use has the following advantages:
- welding equipment is easy to deliver to the place of work;
- it is possible to fix a gas cylinder for welding, which does not have good stability;
- saving space in the room.

It is not at all difficult for a garage owner who knows how to handle welding to make such a design himself.
How to fix the tool in the garage, place different shelves, racks and other equipment correctly to ensure convenient use of it, the video will tell. Convenient, serviceable and always at hand the right tool - comfort in the garage for any car owner.
In the garage box, there is always not enough space not only for storing unnecessary things, but also for the equipment that you are used to using on an ongoing basis. A do-it-yourself shield and a tool stand in the garage will allow you to quickly organize the order in the room and keep all the items in the right places. Let's take a closer look at each of the options.
Tool stand in the garage

A stand made of any material will be a convenient way to fix equipment on the wall in a garage box. The most important thing to understand is that heavy spare parts and tools cannot be placed on such a panel. But it is ideal for storing small items that you want to always have on hand. Moreover, any of the owners of garage boxes from improvised materials can make a stand for keys in the garage with their own hands.
Now all stand designs are divided into the following types:
- horizontal stands,
- vertical panels,
- inclined structures.
The most convenient garage owners are standard vertical stands. With their help, you can provide a tool on the wall in a personal garage directly above the workbench and workplace.
Dashboard in the garage

In order to build a panel for a tool, you do not need to have professional skills. This problem is easily solved by purchasing perforated panels (the material can be tin or HDF) or economy panels (an MDF frame with a groove along the entire perimeter of the product).
Since we are talking about the independent manufacture of tool mounting options in the garage, we will analyze the option of making a panel from an MDF sheet or plywood. Here, first of all, you need to measure the place above the workbench and determine the size of the product itself. Then lay out a piece of plywood on the floor and lay out on it everything that needs to be laid on the selected panel. The last step is to drill holes in the selected mounting points and secure the hardware with screws. As a result, professional panels with tools in the garage are made quickly and simply - all that remains is to place them on the wall in the room.
It's important to know! Often, hooks are installed on the toolboard panel in the garage without rigid fixation. For garage owners, this raises many questions, because it is difficult to fix any things on them. You can only use hooks on the wall for junk in the garage.
Do-it-yourself tool shield in the garage

Garage shield is another easy way to stow all the necessary equipment in the room. If you want to place only a few sets of keys or nozzles on the shield, then you will need to cut 2 sheets of plywood, which will become the frame of the structure. It is best to place the entire tool at a distance of 3-4 centimeters between each other, so that it is easy to get all the carpentry equipment.
Having decided on the final size of the frame, you need to make auxiliary options for the holders. Their width should be no more than 5-7 centimeters. The next step is that the holders need to be marked according to the standard sizes of the tool handles. It remains only to cut out the corresponding cells and fix the holders horizontally to the frame.
This is where the most convenient and simple options for arranging tools in the garage end. Watch the video below on this topic.
No matter how large the garage is, the problem of compact placement of all the equipment necessary for the household is always relevant. Storing the tool on the wall will help in many ways to solve the issue of limited space - so the right one will be at hand, and useful meters will not be used in vain. By organizing a tool storage system on the wall, you can solve many problems overnight. Each type of repair gear must be placed separately, this will further facilitate the search for a particular item. Next, let's get acquainted with the most popular and simple ideas for mounting the tool on the wall.
Organizers from cans for tools on the wall
If you don’t throw away canned food cans for some time, then you can build a wonderful organizer for storing tools on the wall with your own hands. Pliers, secateurs, scissors, brushes will be organically and conveniently placed in tins attached to the walls of the garage. Such a simple idea will allow you to use the space of the workshop to the maximum and keep all the necessary tools at hand.
Screwdriver holder
A screwdriver is a very useful household item. But finding it becomes a frequent problem, since it is small and inconspicuous. So that all screwdrivers are at hand, and the efforts to find the item of the desired model are minimized, you can build a holder. To do this, just drill holes in a wooden block and attach it to the wall.

Shelf with saw cuts for tools
Drills, jigsaws and screwdrivers love no less order than any other household assistant. It is convenient to store them on a shelf with sawn holes.

garden tools
How to hang tools on the wall in the garage? Nobody wants to step on the same rake day after day, however, if they lie anywhere in the garage, this will happen more than once. A smart solution would be to remove them from the aisle and securely attach them to the wall. Holders cut from an ordinary PVC pipe can help with this.

Shelving with containers
Useful little things are conveniently placed in containers on the shelves. You can use pallets to build a rack, you may have left them after building a garage or house.
Important! If you want the rack to be more mobile, you can attach wheels to it.

Organizer for small parts:
- Small useful things, such as screws, nuts and nails, are conveniently stored in bottles or jars made of transparent plastic. In order to save space on the shelves, the containers can be attached to a hanging holder.
Important! The place of attachment is more profitable to make on the lid of the container.
- Empty cropped cans can also be used to store the same tools.
Important! In order not to look for the necessary parts for a long time, it is better to mark the containers.

Storing band saws
It is dangerous to store bandsaw blades rolled into a ring, because in the process of unrolling them, you can get serious injury or injury. To safely store such tools on the wall, office clips can be used. With the help of them, a sharp canvas is fixed, hung on a hook or placed on a shelf.

How convenient to store drills and keys?
Another type of small household utility are various keys and drills. The tool mount on the wall can be made from magnetic tape. Thus, the drills will not get lost and will always be in order.

Tape storage:
- It is very convenient to store adhesive tape or electrical tape in a box with a metal strip distributor. This way you can easily tear off the required amount of tape without losing its ends for convenient later use.
- Another convenient method for storing duct tape is to use a coat hanger. By cutting the bottom of the hanger, you can hang some tape and tape on it. The hanger itself can be hung on a hook driven into the bottom of the rack shelf.

A garage is not only a place for a car, but also a source of invaluable additional space that can be used truly rationally if you construct useful devices with your own hands.
DIY garage accessories
Since the garage is intended to be a home for cars, care should be taken to ensure that the place for tools is well organized. Also, there will probably be several square meters in the room in order to take out some of the items from the apartment, so as not to clutter up the living space.
When installing various devices in a room, it is important to consider that all available equipment is at hand. To do this, you can use the following recommendations:

The rational organization of space in the garage creates many tangible benefits:
- it becomes possible to independently carry out small-term repairs of auto parts and other mechanisms, due to which you can significantly save money;
- convenient placement of tools significantly speeds up the progress of work and saves time;
- the creation of additional places for storing tools, old things, clothes makes it possible to unload the apartment from things that are rarely used in the household;
- finally, the well-thought-out internal logistics of the premises allows it to maintain its attractive appearance and avoid clutter.
NOTE. At the stage of project development, it is important to proceed from the area of \u200b\u200bthe room, as well as take into account several mandatory utility compartments - for storing summer and winter tires, canisters, a jack, etc.

Video TOP of the best ideas for arranging a garage with your own hands
Garage rack: step by step instructions for making
Since the garage always contains quite a lot of items, ordering their location is a fundamental requirement for proper storage. The simplest and at the same time convenient option is to create a rack with shelves.


Preparatory stage
Before proceeding with the installation of the structure, several important requirements should be considered:
- The total weight of the rack should not be more than 4-5 centners - otherwise the structure will be very difficult to move if necessary. It will also significantly press on the floor, which can degrade the quality of the coating.
- When choosing materials, it is important to proceed from considerations of strength and durability of the structure. Metal is optimal, as well as wooden products made of beech or oak. Plastic shelves are not suitable - they are not durable and, moreover, may not withstand temperature changes.
- Choosing between a metal and a wooden structure, you should proceed from your specific needs. Metal is more durable and stronger, but wood is more affordable. If you need to place a few tools, it is enough to make a small wooden rack.
- Since all tools are very heavy, you should immediately calculate the strength of the structure so that it can withstand at least 100-150 kg on one shelf.
Installation of a wooden structure
To make such a device for a garage with your own hands, you will need the usual working tools:
- hacksaw for wood and metal;
- hammer, nails;
- screwdriver, self-tapping screws;
- roulette construction;
- construction level;
- electric drill.


Before assembly, it is important to treat all wooden parts with a primer and varnish. In the garage, there may be increased humidity or temperature differences - therefore, without treatment, the tree will not last long.
Video - Do-it-yourself wooden rack manufacturing technology
Installation of a metal structure
Metal structures are exceptionally durable and strong. In addition, they do not need to be treated with special materials to prevent decay.

From metal, you can make both a rack and separate structures, for example, for storing rubber.

In this case, the rules for storing tires, which are schematically shown in the figure, should be taken into account.

At the design stage of a metal shelving, it should be taken into account that all the necessary items can be freely accommodated in it. You can take this drawing as a basis.

Or this option.

The easiest option is to purchase a modular design and assemble it yourself. But you can make this device for the garage with your own hands. The sequence of actions is as follows:


The heaviest equipment is best placed on the lower shelves for optimal load distribution throughout the rack. In this case, the best option is when the lower floors are made of corrugated metal, and for the upper floors it is quite acceptable to use durable chipboard.
Hanging shelves: fast and practical
Not in all cases there is a need to create a rack, since it will take up a lot of space. On the other hand, in a garage of any size, there is always an unused upper space that can be easily occupied by hanging shelves.

Structurally, it is quite realistic to do with your own hands any version of such a device for a garage:


Of the tools you will need a standard set, described above. The sequence of actions is as follows:

If the shelf is mounted to the ceiling, you can strengthen its connection to the wall using metal corners - then the product will not sway and will last much longer.
Schematically, the whole technology is shown in the figure.

Making a shield shelf
The do-it-yourself manufacturing technology of such a device for a garage has its own differences compared to the installation of conventional shelves:
- The shield itself is made of durable plywood, the parameters of which are selected according to the situation. Visually, the shield should completely cover the surface of the desktop.
- A place is allocated on the shield for all the shelves and appropriate notes are made.
- Further, all holes are made in the surface of the structure, into which dowels enter. It is on them that the hooks will be attached, on which all the tools will be placed.
- The shield is fixed to the wall using brackets. Corresponding holes are made using a perforator.
Schematically, all steps are shown in the figure.

Do-it-yourself toolbar above workbench in garage
Garage workbench: step by step instructions
Another design that will probably be needed for repair, plumbing and other types of work is a workbench. It can be purchased at the store, but if you have a certain skill, then it is quite possible to make such a device with your own hands and put it in the garage.

Before carrying out the actual installation work, it is important to clarify a few important details:
- Where will the table be located?
- What kind of work will be mainly carried out on it.
- Which work surface material is suitable - metal or wood.
All these questions are closely related to the purpose of the product. If the work is supposed to be done often, then it is better to choose a durable metal. And for standard household tasks, a durable tree will do.
It is important to understand that a workbench is not just a work surface. Often it combines the function of a cabinet, a small chest of drawers and even a metal safe - a similar set of parameters depends on the specific configuration of the product.

Varieties of workbenches
The key classification of workbenches is based on the types of work that are supposed to be carried out on it:


At the same time, these functions can be combined, so such a classification is largely conditional. The best option for such a garage fixture is a metal frame structure with a wooden table surface and drawers. It is more reliable than a wooden counterpart, and allows you to save on manufacturing due to the fact that some parts will be made of wood. The surface of the table can be reinforced with a metal sheet - then the workbench will last a very long time.

Manufacturing technology of a workbench from a metal frame
For installation of the structure, you will need a standard set of tools and materials:
- welding machine;
- grinder for metal;
- building level;
- jigsaw for wood;
- screwdriver, drill;
- self-tapping screws, anchor bolts;
- hammer and nails;
- metal corners with parameters 5 * 5 cm;
- pipes are square 6 * 4 cm, total length is about 24-25 m;
- steel strip 4 cm thick, up to 8-9 m long;
- paint for wood and metal processing.
Such parameters are intended for the manufacture of a finished product with table parameters of 220 * 75 cm, as shown in the figure.

The sequence of actions is as follows:


Even at the design stage of the workbench, it is important to decide whether the device will be collapsible or whether it will be stationary in the garage. In the case of a collapsible version, all parts are fastened with self-tapping screws, and the principles of technology will be different.
Manufacturing technology of a wooden workbench
A wooden workbench is less durable than a metal workbench. It is well suited for those cases where the work is supposed to be done not so often - several times a year.
To make this do-it-yourself garage fixture, you can use the same drawing that was given above, or take the diagram shown in the figure as a sample.

The algorithm will be something like this:

Do-it-yourself garage tipper: step-by-step video instruction
Along with the creation of the considered devices for the garage, you can also take care of making your own working tools that will be needed directly for car maintenance.
One of the most useful installations is a tipper for inspecting the bottom of the machine. The need for such a product is most relevant for Russian realities, since not in every case there is a real possibility of building a viewing hole.

Detailed video instruction with a step-by-step manufacturing scheme
Before making such an installation, it is extremely important to consider the issue of safety. Even a light car, if dropped, can cause an accident and at least get severely injured. Therefore, it is possible to undertake the creation of such a structure only if there is sufficient skill.
Self-manufacturing of garage fixtures allows you to rationally organize the interior space and, in fact, get your own workshop in which you can perform any ongoing repair work.
Original ideas for organizing space in the garage
And finally - a photo selection of visual ideas for creating capacious structures from a variety of items that are sure to be found in any garage.