DIY flower stand: the best ideas from what and how to make a stand (75 photos). Do-it-yourself planters for indoor flowers from scratch, decor of flower pots, stands and shelves for flowers DIY chipboard flower stand
General issues
Indoor plants are living interior decorations, without which it is difficult to create a really cozy apartment or house. Passionate florists, accustomed to replenishing their collection with new, unusual specimens, soon begin to notice that for some reason there is a sorely lack of space for their beloved green friends. However, these pets require a well-lit, cozy, comfortable place, and in this case, a practical do-it-yourself flower stand from an improvised material saves the situation. An unusual item, which cannot be found in any store, can itself become a decoration of a room or garden, and will make it possible to successfully “quarter” a large green “army”.
Varieties of flower stands
Such a design is able to solve several problems at the same time: to provide indoor plants with sufficient lighting, but at the same time not to take away a lot of "precious" space from the room, to revive and transform the interior. The stands can be made floor-standing, wall-mounted, table-top, located on the windowsills, but only the owners can choose the ideal model based on their preferences and the characteristics of the rooms. Free space is another criterion.
Floor structures
In this case, there are no limits to fantasy. The stands can be high, low, narrow, or wide. Popular places for flowers are multi-tiered shelves, original ladders, single stands designed for large plants. Multilevel designs are convenient because they allow different plants to feel perfect: the most light-loving ones are placed at the very top, those that are accustomed to partial shade are placed below.
The same floor stands include the original tall, but narrow, mini-racks that are attached to the floor and ceiling at the same time. This solution is now very popular, as it makes it possible to place many flowers in the space, but save space in small apartments. At the same time, each plant will not lack freedom.
Wall, table

This kind of objects allows you to "fill" with flowers an empty part of the wall. You can make a stand that is attached to another surface - to a section of the ceiling located against the wall. This type of product is optimal for ampelous plants. Often such structures can be seen on terraces or balconies.
Long and narrow stand-boxes will be a salvation for the same window sills. Small tabletop items placed on furniture in close proximity to the window opening are another way to successfully place a large number of plants that prefer light.
Materials at hand
There is quite a lot of room for activity here, since these furnishings are often still compact and do not differ in large dimensions. Do-it-yourself racks are usually made from:
- gypsum;
- wood, chipboard, plywood;
- metal profile;
- plastic (and the same containers);
- wire;
- glass;
- bamboo, vines, rattan.

Materials are often combined. The most popular combination of metal with wood or glass, although the latter is much more difficult to process. Frameworks for large plants require the use of durable metal, small, light flowers can withstand even thick wire without problems.
What can you do yourself?
A do-it-yourself flower stand made of improvised material is an operation that can be "cranked" in a few hours. The main condition is the availability of a tool and an inviolable stock, where something useful for such an activity can be found. There are completely simple designs, for the manufacture of which you will not have to empty your wallet or card.
Drawer construction

In this case, you don't have to tinker with anything. Several boxes of any size (the same or different) are painted in a suitable color. After the composition has dried, the objects are placed on top of each other in random order (large ones below, smaller ones on top).
For greater reliability, all elements are fastened with self-tapping screws. Flower pots are placed in the resulting niches and on the very top of the structure. Such a wall-floor stand will take a minimum of time, but it will look quite interesting.
Pallet flower rack
This type of stand is more suitable for a summer residence, but after careful processing of pallets, it can become “fit” for an apartment. Even one pallet is suitable here, which is placed vertically, with the help of self-tapping screws, the crossbars-shelves for flowers are screwed to it.

The wood is treated with antiseptic impregnation, polished with sandpaper, covered with stain or paint, several layers of varnish are applied. Such structures can not only be placed on the floor, but also hung on the wall.
Elementary wooden stand

This is the easiest way to get a single indoor flower stand. For manufacturing, you need a drill, screwdriver, chisel. And materials:
- wood (timber, boards, chipboard);
- pVA glue;
- edge.
First, three parts are cut out - the base of the structure, the leg and the shelf for the flower pot. For the stand to stand securely on the floor, the minimum base diameter of the stand must be at least 30 cm.
A groove is made in it and the shelf for a vertical element. The leg and hole are coated with glue, connected, the bottom of the product is fixed with self-tapping screws. The shelf is fixed in the same way. The final stages are sanding, gluing the edge and applying several layers of varnish, each of which must be completely dry.
Well stand or woodpile

The simplest option, for its manufacture you need the following materials:
- rolls left over from paper towels (12-16 pieces);
- pVA glue;
- paint: acrylic or oil.
A "woodpile" is folded from the bushings: the rows of elements alternate, each of them is attached to each other with glue. After the composition has dried, the resulting well is covered with paint.
Tree trunk for the benefit of flowers

Eco-style enthusiasts will love this natural stand made from a tree trunk. Its length is 100-150 cm, but the final decision is for the owners of the future model.
- All branches are cut off from the trunk with a grinder, getting a cylinder.
- 15-20 cm recede from the ends, then cuts are made to half the diameter of the tree.
- A hole is hollowed out between them. After processing the wood, pots with indoor flowers are placed in the resulting stand.
Such a “flowering tree” will look spectacular in any room - both in the country house and in a city apartment.
Large candlestick made of wood

In this case, you will have to look for two blanks - one wide for cuts, the other for the candlestick itself. For a stand, that section (or several) of the tree where the branching begins will be ideal.
- The bottom of the second workpiece is cut down so that a flat and stable surface is obtained.
- Several cuts are made from a wide log - according to the number of branches, the width of these discs is 2, 3 or 4 cm.
- The top of the branches is cut parallel to the base of the candlestick, then discs are attached to it with self-tapping screws.
For a longer service life, wood is pre-treated with an antiseptic. The finished product can be painted, varnished or left without any protective and decorative coating.
Suspended plywood structure

Instead of plywood, you can take ordinary boards, trimming a chipboard sheet. You will also need a strong rope - two identical lengths.
- Several shelves are cut out of a sheet of plywood. Several holes are cut in each workpiece - wide for fixing flower pots, and small (in the corners) for threading the rope, so their diameters must match. There should be four of the latter - one for each corner.
- Ropes are threaded through the corner holes, on which knots are tied at the bottom of the shelves for a secure fixation.
- A hole is drilled in the wall for a hook attachment. The stand is fixed on it using a reliable knot, assembled from 4 rope ends, and its horizontal position is checked.
A large number of "floors" will make the structure very heavy, so an overly complex stand may not be very reliable.
Rack of plastic bottles

For this masterpiece you will need a large set consisting of:
- 14 milk plastic bottles;
- golden paint-aerosol;
- decor - jewelry, beads, beads;
- pVA glue;
- scotch tape;
- construction cord;
- roll of toilet paper;
- packing napkins.
The process itself looks like this:
- First, washed and dried bottles (right with labels) are glued together in pairs with tape necks.
- They put one double element in the center. Others fasten around it.
- The whole figure is wrapped with tape until all visible defects - irregularities, folds - disappear.
- After applying glue, wrap the future stand with napkins, then several layers (2-3 - at least) of toilet paper. Each of them is given time to dry.
- A cord is used for decoration. Beads and any other decorations are glued to the resulting pattern. A cheap alternative is cereals (millet, buckwheat, rice) or peas.
- Paint is applied to the resulting pattern from a spray can.
A do-it-yourself flower stand from an improvised material can be made from familiar things. Bicycles, chairs and stools often act as such a piece of furniture.
The next video will tell you how you can make a ladder stand:
Let's see how you can transform your favorite indoor flowers? For example, if you create a planter for flowers with your own hands, then this decor will delight the eye and add zest to the interior. In addition, by equipping stands and / or shelves for flowers with your own hands, it will also become convenient for you to take care of your pets.
Design options for pots for indoor flowers
What is the difference between a planter and a regular flower pot? Translated from French cache-pot means to hide the pot. Thus, the pots are a decorative "wrapper". Of course, a clay pot will be the best home for flowers, but it quickly loses its attractive appearance, since ceramics let water through and stains appear on its surface that cannot be removed. Often, glaze is used as a protective film, but it also cracks and crumbles over time, and then the pot will either have to be replaced or decorated. In this case, the pots come to the rescue - with its help you can easily hide unsightly places and create decor in the same style.
If you have a couple or three pots, then the easiest way is to arrange them beautifully on the windowsill. But if there are more than a dozen colors, then placement can be a problem. The most common way to hang the planter is to use ready-made hanging hooks or to make holes for the rope. But you can make the attachment method creative.
You can organize a simple crossbar or build a whole structure under the ceiling, on which, for example, hang several.

The design of the one-piece pots does not provide for drainage holes, and the openwork does not retain excess moisture, so this must be taken into account when watering.
Or here is such an idea for hanging a pots, it can be implemented even by those who do not know how:
If you need to place a lot of flower pots in a small space, then this idea is for you!

Using simple techniques from wooden bars and rope, you can make a whole shelf for flowers with your own hands by equipping hanging structures. More detailed instructions in this video:
Imagine, combine different ways, the more flowers you can place, the more comfortable your home will be.
Making pots with your own hands from scratch: materials and master classes
In this section, we will consider options for independent "cases", which are made separately, and then a flower pot is "populated" in them. For indoor planters, the choice of materials is unlimited and relates only to the overall design and your preferences. The most common and used for hand made:
- cardboard,
- paper tubes,
- felt,
- recyclable materials.
From felt
From simple materials for needlework and children's creativity, wonderful things are obtained, you just have to use your imagination. Here's a look, a charming flower pot made of.


DIY stands and shelves for pots
Making a planter or decorating a pot is not all. This beauty must be put somewhere! You can't do without special shelves and stands. You can build a structure on the wall.

Or you can order a whole bookcase on the floor.

Or just such a ladder.

And you don't have to ask someone. If you buy in the store cut-to-size parts-blanks, then even a gentle female hand can cope with the assembly. Here's how in this video:
But it is much more interesting to turn on imagination and adapt unusual items to the shelves for placing pots. For example, pallets. Paint it with wood stain or dark paint and now - an excellent shelf is ready.

And in this tool trolley, various plants get along well, creating a mini.

"Cross" will not advise bad! :)
Categories,To save space, use flower stands for more functionality. Such a solution will perfectly fit into any stylistic solution, it will allow you to place more plants with minimal use of space. There are several options that you can do yourself. You just need to make a little effort and desire.
DIY product
In the photo of the flower stand, you can notice the differences between the products. Models of the same type will be a great addition to your apartment. Other options are suitable for the home, because they will take up a lot of space.

Don't forget about the appearance of the product. It is necessary to decide on a specific model, prepare appropriate materials. There are different types of products:
- wall products;
- floor stands for flowers that perform different functional loads. Despite the size of the room, such a product will harmoniously fit into the overall atmosphere.


Their differences lie in the maintenance of different types of plants. You should decide in advance which plants you want to place on one or another stand.

The first type can be divided into stationary and mobile, they have wheels for movement.

Each variety has its own advantages and disadvantages. You should choose the option that is suitable for a particular plant.

The advantages of the mobile type are the ability to move the plant, the uniform distribution of sunlight, air, which has a beneficial effect on their growth.

The stationary type has the advantage of being able to withstand heavy loads. Therefore, more pots can fit on the stand. High supports are often used, which occupy the entire section of the wall, or windows, for example.

Additionally, you can use light bulbs that will evenly distribute the light. The pallets will help make cleaning easier.

Floor type
A wide range allows you to choose the option you need. The design allows you to easily fit all plants, taking into account their individual characteristics.

It is important to know how to make a do-it-yourself flower stand, where to start. To begin with, you should develop a specific model, drawing. After that, you will decide what type you need, size, plants that can fit on such a product.


It is believed that the minimum permissible height between tiers is 40 cm. After all, regardless of the size of the plants, you should take care of the supply of fresh air and the right amount of light. With this distance, they are convenient to water, care for and clean.

One of the simplest options is a metal flower stand. In order to make a product, pipes or metal profiles will be useful to you. The main thing is that the product fits into your home.


The main elements are connected using standard fasteners. Often the top is made of wood. To embellish the final result, paint should be applied. The monochromatic coating will complement the interior and help the stand last longer.

For the Provence style, a wood flower stand is considered the most optimal. Another style is vintage artwork. It is important to pay special attention to the legs, because the service life and functional load depend on the quality of their manufacture.

The curved shape is considered common, which is a characteristic feature of the vintage style. At the final stage, the product can be painted white, rubbed with sandpaper. Thus, you artificially age the thing. Decoupage involves the use of patterns, pictures, depending on your wishes.

Materials
It is worth noting that flower stands are often made from scrap materials. In this case, free space must be taken into account.

With a minimum square footage, there should be a tall, compact design. Having supplemented it with additional elements, it is turned into an excellent decorative item.

conclusions
Plant stands are often used for houses, apartments. Hand-made products are especially valuable. They differ in type, material of manufacture, color.

Consider the basic parameters, surface features and plants for a harmonious combination of the product and the style direction of your home.

For self-fake, use the advice of designers, do not forget about the preparatory stage of work. You need to do planning, create a drawing.


The most optimal model is considered to be where the plants are arranged in a checkerboard pattern. This arrangement will provide the required amount of air, light for plants. Caring for them, cleaning is greatly simplified.


DIY flower stand photo


Household stands for flowers are required if there are many plants in the apartment. Thanks to their design solutions, these devices are functional and beautiful. You can make them yourself, with a minimal set of tools at hand.
In order for the stands for indoor plants to be convenient, fit into the design of the room, and do not interfere with free access to the windows, it is important to consider a number of criteria when choosing in an online store or when making it yourself. Consider:
- how many indoor plants are in the room;
- lighting level - how far is the window, configurations and sizes;
- the mass and diameter of the flower pots themselves;
- the direction of plant growth - some of them grow in breadth, while others increase only vertically, to the sides or hang down in lashes.
It is important to make such a plan for placing the stands so that no plant is left without a sunny color. This takes into account that some plants are photophilous, that is, the sun's rays fall at a right angle, while others can grow in the shadow of others.
Also, requirements are imposed on safety. No matter how modern the stand is, it is important that it gives a reliable support to the flower. It is better to give preference to options whose ends are rounded rather than sharp. This is true if there are small children or pets in the house.
Manufacturing rules
Manufacturing rules depend on the type of flower. Large stands are made for single flowers that do not like being close to other plants. Single stands are made in a round or oval shape, stable or mobile (equipped with wheels for moving around the apartment).
The production of whatnots will take more time, but in this case the plants will be placed depending on their photophilousness and craving for watering. Convenient for a small apartment, as they save space.

The countertops are also easy to manufacture, they are suitable if there are 2-3 plants in the house that are not dense and not prone to strong growth.
By placing plants on different levels on the countertop, you can ensure that each of them receives the required amount of light, it will be convenient to water them.
Vertical stands with different-sized planes, popularly called towers, will also allow you to conveniently place your favorite flowers and save free space. The advantage of such options is also that you can additionally install rings under the pots. But proportionality is required, otherwise the tower will collapse under the weight of one side.

The slides resemble towers, but the pots are on vertical stripes. The slide can be easily pulled if more light is required. However, the design is unstable, so it is not suitable for families with small children.
DIY options
Take one of the following as an example.

A-shaped
The shelf, in which the two sides are connected at the base, and at the bottom form a wide angle, is very popular both in urban areas and in summer cottages. The advantage of this option is that with the help of several racks, at least five colors can be placed on one stand.
This model moves, so if the plants do not have enough light or winter has come and they need insulation, then they are simply rearranged. The shelf is made quite simply, and you can use it not only for storing flowers, but also for placing shoes, as a stand during summer cottage work.

For seedlings
Window flower stands for seedlings are convenient because of the large free space inside them. The shelves are located directly inside the stand by levels. This makes it possible to store many plants, but small ones.

From pipes
Pipes are often used as shelving material. You can take ordinary ones that have remained after repair, or have already been used, but only if there are no requirements for appearance. If the shelves are at home, then, of course, beautiful, textured pipes are chosen, they can even be painted to decorate the room.

Simple
Such a rack can be made even by a person who is little familiar with the construction business. The peculiarity of the stand is that the shelves are located directly on the pipes, no cutouts are required.
Dense shelf
The thick stand is stable and spacious. Pipes surround the shelves, they are inserted through special cuts. If you put the wheels at the bottom, then the shelf becomes mobile.

With flying shelves
This type of shelf looks aesthetically pleasing, so it will fit into the design of the hallway, hall, children's room. The peculiarity of the stand is that the shelves are not located directly on the pipes, do not lie on them, but are attached through special supports. One gets the impression that they are literally flying over the structure. This type of stand goes well with flowers that have vines.

Plug
It looks pretty simple, but it's not easy to make. The advantage is that only two types of metal elements are used to attach the frame. The shelves themselves are located either in a standard way, or as for a flying sample.

Wall
Four types of metal structures are used. The shelf is wall-mounted. But in any case, you should not load it with heavy colors, no matter how high-quality the metal parts are.
Wooden for bathroom flowers
A wooden shelf is suitable for a bathroom, but in order for it to last longer and not become a breeding ground for harmful bacteria in the room, you need to varnish it.

To create, you need self-tapping screws and any wooden plates that can withstand the weight of the flower pots. Hooks are attached to the bottom of the shelves, on which you can hang beautiful accessories, or small pots of flowers.
From the stairs
It will be absurd to put a ladder shelf in its usual form, in no case will the solution fit into the design of the home.
But if you refine the ladder, then it becomes quite a stylish stand for several pots of flowers.

First you need to sand it, and then take out the planks intended for walking. They are fixed inside the structure.
Sliding rack
It is quite difficult to create a sliding rack with your own hands. To do this, you need to cut out various square elements, connect them in the form of a snake. It is important that the structure does not settle after assembly (this happens when using wooden elements).

Corner semicircle
The corner stand in a semicircle, which is fixed on the wall, will save the useful space of the room. You will need several meters of MDF and a milling machine. Three elements are cut out: two sidewalls and the bottom, and the shelves after. If you stick the tape on the ends of the product, the stand will become more beautiful.

On belts
The wall shelf with straps is not very durable. But it can become a stylish decoration of the interior of the room. To make it, you only need two boards and two belts. The shelf is simply put on the belts, and they are fixed with self-tapping screws on the wall.

Glass
The glass shelf will fit into the interior of any room. Glass strips are attached with wooden blocks, you can make a flying version.
Combined
The combinations can be very different. Often made from driftwood and metal, wood and pipes. There are even options from glass bottles and ice cream sticks. The main thing is to take into account the requirements for sustainability.

Driftwood theme
Real works of art are made using a stand from snags. The driftwood is fastened with four props, using wooden shelves.
Floor stand on casters
It is not difficult to make multi-tiered floor stands. The standard option is the same as for a staircase. The wheels will make the shelf mobile. A high stand can also reach the ceiling, in which case all plants will be evenly illuminated by the sun's rays.

Hinged
The hinged shelf is made using ordinary wooden beams and several brackets. If you add chains, you get a stylish designer piece to decorate the living room.

Made of metal
Metal stands will withstand the heaviest plants. But for their manufacture you will need special tools, which are not always available. Metal stands are made free-standing, since their large weight does not allow hanging from the wall.
Wrought iron stands
Forged are a real work of art. Usually they are also performed standing alone in order to draw maximum attention to the flower.

Bookcase
The flower stand resembles a regular staircase, only of a smaller size. It is done by using several building parts and shelves of different widths.
Decorative
Original and beautiful shelves are obtained using a variety of materials. It can be thick fabric, pieces of plywood or MDF, glass bottles and much more. Decorative stands are not always functional, but they will be just right to support one plant.

Spacer
The spacer requires a minimum of elements. Several shelves are attached to one metal line. Decorate a bathroom, a summer cottage.

Examples of the work of craftsmen
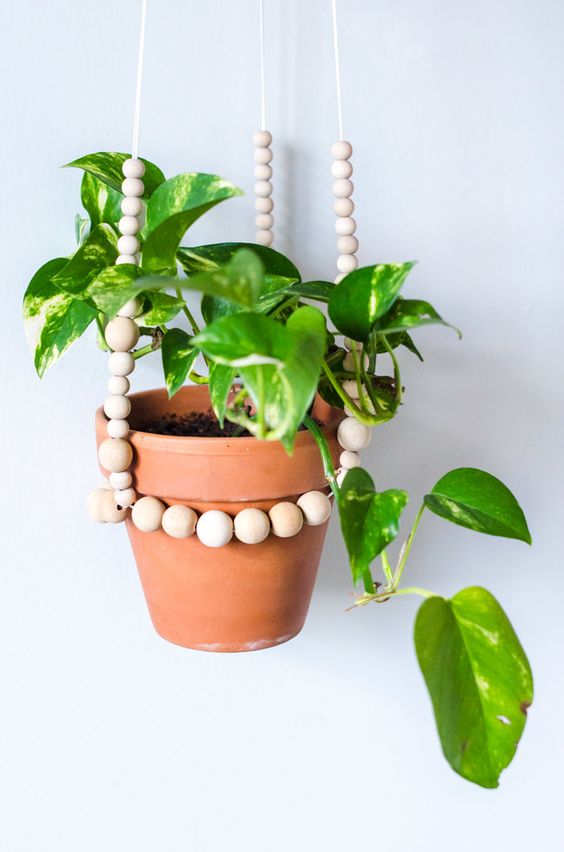
Simple wooden shelves that are attached to ropes are popular. A distinctive feature is the recesses for the size of each pot. Fits perfectly into eco or country design. In order to make a stand, you will need:
- take three wooden shelves of the same size;
- drill the same holes in them;
- make beams or brackets;
- fix the rope knots after leveling the boards.

Small shelves are often used to decorate the house. The plus is that the length of the ropes can be adjusted, so put as many wooden shelves as you like. You will need:
- pick up several shelves and make 4 different holes in them;
- pull with ropes and make knots to maintain;
- connect the ropes at the top and secure them.

You can decorate such an unusual piece of furniture with different details. For example, choose a thick beautiful rope, learn how to weave it in the macrame style. Or shade the brushes below, paint the boards themselves in different colors.

Garland stands are in demand for decorating small modern rooms. They look beautiful with high ceilings. The peculiarity is that the shelf is narrow, for one pot. Each plank is made square, a circle is cut in the middle, four holes on the sides. Ropes are passed through them, fastened with knots. Tied from above and attached to the ceiling.

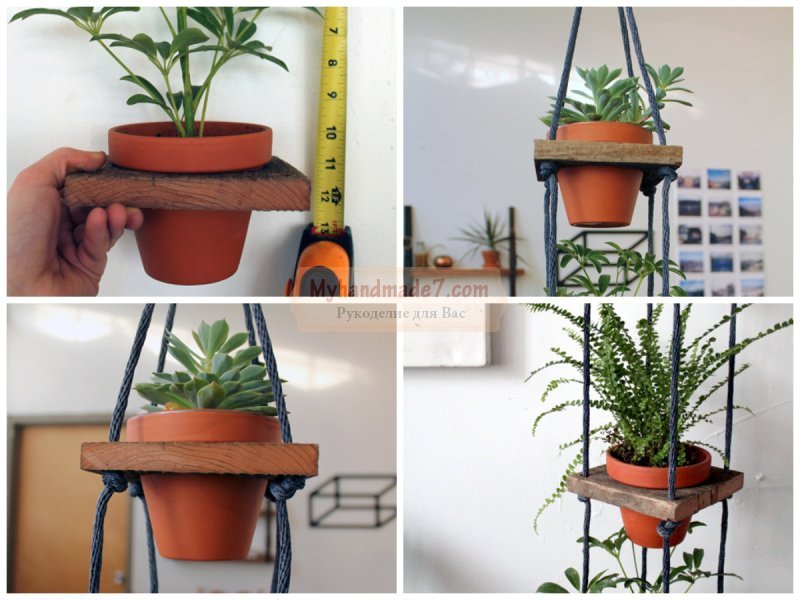
But the simplest option that will decorate any room is a floor stand for one flower. It consists of a base, a leg, a thrust bearing and the stand itself. Any self-made shelf will cost significantly less than bought in a store.
In addition, the process is simple, so even a person who is little familiar with the nuances can cope with it.

- pay attention to where the window sill is - the shelves will increase its functionality, since you can put them directly on it;
- take into account the amount of incoming light - if its minimum or the level of illumination varies greatly from the time of day, then vertically located variations of flower stands are suitable;
- if they are collected from scrap materials, then their quality is carefully assessed - decrepit wooden planks, cables and ropes that have already been used cannot withstand the weight of the flowers and can collapse, thereby destroying expensive furniture or the floor;
- choose the material of manufacture depending on the weight of the pots - there can be wooden, metal, pipes, glass and others;
- complete with interior items - decorate with laces, beads, paint shelves.
DIY flower stands will add charm to the room. And if you take into account the nuances, then they will help reduce the time it takes the hostess to care for her favorite plants.
Fresh flowers decorate houses and yards, bring joy to hostesses. Flower stands will help you place the pots in the right place. Do a useful thing with your own hands and surprise guests with originality. Such a stand is more budgetary than a store stand, and the appearance can be anything.


Types of stands
You can make a stand for any colors yourself. Products differ in functionality and method of application. Before starting work, you should decide on the type of stand.
Floor standing
Designed for large flowerpots and pots. They are usually made from durable materials. Such structures can be used as an original screen for room zoning.
The design can be multi-tiered or designed for one flower.


Wall mounted
The optimal solution to free up space. Small or medium flower pots are usually placed on such a stand. Structures allow hiding wall defects. For manufacturing, metal or wire is often used. Can be placed in a corner to use extra space.


Mounted
They are a variation of the previous version. The planter looks spectacular and stylish. The main drawback is that it is difficult to move the stand from place to place; holes are made for mounting in the wall.
Most often, the design is used on a balcony or terrace.


The structures are presented in the form of slides, whatnots and racks, they are stationary.Used for ampelous flowers with large, hanging leaves. They can be used in an apartment, but more often serve as a garden decoration. With this stand, you can create additional shadow or compensate for the small area of \u200b\u200bthe flower bed.


Non-standard designs
Such coasters are made by hand only. Outwardly, they may resemble some interior items, vehicles, shops and much more. Decorated with shiny paints of gold, copper, silver. Forged products or welding wire stands look very impressive and expensive.
Can be installed both indoors and in the garden. Usually stands are for small pots.


Outdoor stands must meet special requirements.The material must be durable, durable and wear-resistant. Usually, original forms or multi-tiered structures made of metal, wire, forging are used. Home coasters can be of any kind. Usually used when growing light-loving plants. These designs are designed for small to medium sized pots. Install home coasters on a windowsill, balcony or hung on the wall. If the size of the room allows, then floor views can be used.


Tools and materials
The stand can be made of completely different materials. They use metal and wire, wood, glass, plaster, plastic bottles and much more. Metal structures are durable and can withstand heavy loads. The stand requires special care or it may rust.
Wooden products are very popular.It is better to cover the stand with varnish. Frequent splashing of water when watering plants can lead to swelling and rotting. Working with glass at home is quite difficult, so it is more often used as an additional material.
Glass shelves on a metal or wooden frame look great.


The combination of materials is used in order to combine practicality and beauty. The frame and shelves for large flowers are made from the most durable materials. Shelves for large pots can be made from the same. Places for small and light pots can be made with finer glass or wire.
The required set of tools directly depends on the selected material.For metal or wire products, cold welding will be required. Use a screwdriver, drill and saw when working with plywood. If you use improvised materials (plastic bottles), then construction tools are not needed at all.

Manufacturing methods
You can make a functional and attractive stand for your favorite flowers with your own hands. With the help of a structure, you can decorate a window or wall. If the homemade stand will stand on the windowsill, then be sure to make preliminary measurements. Manufacturing options depend on the selected material. Some coasters will require materials at hand and a little time. To make complex structures, you will need special skills in working with tools.


Made of metal
A simple and convenient option looks like several parallelepipeds with 2 common faces. The work is laborious and requires special skills. It is better if a man is engaged in manufacturing. Draw the drawing first and mark all dimensions. For vertical supports, you need to make 4 equal segments, and for horizontal edges - 8. From the short parts, you need to make squares or rhombuses by welding. It is important that they are the same, otherwise the stand will skew. It is necessary to connect geometric shapes with long racks. Then proceed as follows.
- Weld the metal cross bar between the uprights. It should be at the height of the next shelf.
- Make a rectangle out of metal. The dimensions are easy to calculate. The width should correspond to the distance between the vertical parts of the tall stand, and the length is calculated from the previous measurement.
- Cut 8 more small and 4 large pieces. Repeat the procedure. Connect 2 tiers to each other by welding.
- Depending on your needs, you can make as many blanks as you want.


From plastic pipes
The flower stand turns out to be quite attractive and easy to make. You can do manufacturing with children. The product is appropriate not only in the apartment, but also in the garden. It is necessary to take plastic pipes, lining trims, 2 pieces of ordinary hose, self-tapping screws (6 pcs.) And a screwdriver. Do this.
- You need to make rings. Twist the pipe in a spiral so that 2 hoops are formed. An empty barrel can be used to facilitate the task.
- Remove the spiral from the mold and cut. You should get 2 rings.
- Connect the edges with a hose.
- On one ring, make 3 marks at a 120 ° angle. Insert self-tapping screws into the holes.
- Make similar marks on the other ring.
- The legs are made from pipes. Cut it into 3 pieces, 40 cm long.
- Make 3 plugs from the scraps and insert them into the legs.
- At the final stage, you need to collect all the details. Fold the first ring under the legs and screw it with a screwdriver to each of them. On the back of the pipes, put on the second ring and screw it to the legs with self-tapping screws.


Plywood
The classic stand is well suited for apartments and houses. You need to take a chipboard or PVC shelf, plywood, thick rope, screws, plugs, paints and varnish for decorating, a screwdriver, a drill, a saw, a hammer and a screwdriver. A level, tape measure, ruler and pencil are useful for comfortable work. Make the product like this.
- Prepare the material. Calculate the size based on the free space. The width should match the size of the pot. Additional bars in the middle will help make the distance between the shelves the same.
- Drill 2 holes in each shelf with a drill. They need to be placed in parallel. The size of the hole must be such that the thick rope can pass freely.
- Pass the rope through all the holes. Form a hanging loop at the top, and make a secure knot at the bottom.
- Install the stand. Drill a hole in the wall in the desired location, install the mount. Fix the stand firmly. The wall-mounted design is ideal for indoor flowers.


From wire
Even a woman can make a structure, the main thing is to have experience in handling cold welding. For work, use a welding wire with a diameter of 1 cm. Stock up on tools for cold forging and a hammer (800 g).
- Draw a sketch, divide it into simple parts. Calculate all sizes. Be sure to think about the diameter of the round blanks for the pots.
- The first step is to make a stand and stands. Duplicate the drawn details with wire and fix with cold welding.
- Make decorative items. These can be various curls, spirals, leaves and flowers. If desired, you can use pre-made metal shapes to create these parts. It is enough just to drive the wire with a hammer into the template and get the desired element.
- Attach all decorative parts to the main homemade structure using cold welding.


From driftwood
Lovers of natural materials can make a stand out of wood. A felled trunk or branch can be used, depending on the size desired. Do this.
- Cut off the extra knots from the driftwood to form a cylinder. It is convenient to perform the procedure with a grinder.
- Step back from the ends somewhere ¼ part of the total diameter of the deck. Make deep cuts to the depth of the flower pot.
- Saw or gouge a piece of wood between the cuts. Place the pot. This floor stand looks great in the interior.


From plaster
It is easy to make a product from such a material, it does not take much time. Gypsum is durable and versatile. The main thing is to purchase or make a form for the stand. The product is best placed indoors and handled with care. A suitable flower pot can be used as a shape. Pour the plaster mixture into the container, and install another pot on top. Inside, you will get a hole into which you can insert a flower. Work with the solution like this.
- Pour water into a container and add gypsum in a ratio of 10: 6, respectively.
- Add 1 part hydrated lime to all ingredients. The mixture will be more elastic when liquid and more durable after drying. The component can be found at any hardware store.
- Pour the solution into the mold and wait for it to dry. The exact time is indicated in the instructions, on average it will take 24-48 hours.
- Color the stand. If desired, you can make the plaster of Paris already colored. To do this, add gouache to the water while mixing.


From bottles
This stand can be placed even in the garden, it is not afraid of bad weather. A product from scrap materials can be made together with children. Take scotch tape, PVA glue, a roll of toilet paper and a pack of tissue paper, 14 plastic milk bottles, a skein of medium-thick twisted lace. You also need to take thick cardboard, spray paint with gilding and beads or beads. Make the stand like this.
- Roll up 12 bottles in 6 pairs with duct tape.
- Use 3 pairs to make the bottom. Fold the bottles in the shape of a flower and secure with tape. Place 1 bottle in the middle so that the neck is 5 cm higher than all the bottles.
- Make another flower from 3 pairs of bottles, but without filling the middle.
- Put the second flower on the bottom of the bottle neck so that the middle wide part protrudes into the role of the rod.
- Wrap the structure with toilet paper, pre-coating it with PVA.
- Lay several layers of napkins in the same way. After each layer, you need to wait for the glue to dry.
- Leave the construction for 24 hours.
- Make an ornament on the surface in the form of flowers or something similar.
- Make leaves from a sheet of cardboard, glue to the product.
- Decorate the flower stand to your liking. Finish with a layer of gold paint.


