Cloakroom under the stairs in the private. A profitable and convenient solution in a private house - a wardrobe under the stairs
If the living space is too small, then the importance of rational use of every centimeter in the house comes to the fore.
And, of course, the space under the stairs is no exception.
![]()
Using the space under the stairs in the house
To start preparing for the arrangement of the under-ladder space, like any serious enterprise, one should start with the layout. To do this, you need to take into account the following nuances:
- dimensions of the flight of stairs. Often its size allows you to equip an entire room, but sometimes, it turns out to fill the space with only a small cabinet;
- the subtleties of the structure of the stairs and its shape;
- where the stairs are. If this is a hallway, then most likely you need to use this place as a dressing room, and if the reception area - as a room for relaxation or reading;
- the possibility of conducting communications to the under-ladder section. The reality of these events will allow you to arrange a bathroom or toilet under the stairs;
- rational use of space under the flight of stairs should be accompanied by technical safety and taking into account the number of people living in the house, as well as their age and the real need for potential buildings. Do not overlook the design of the space, because its appearance should correspond to the general interior.
![]()
![]()
![]()
![]()
![]()
![]()
![]()
![]()
![]()
![]()
Room under the flight of stairs
An unused space under the flight of stairs can be converted into a full-fledged room.
![]()
Even if the area does not allow making a large room there, the correct approach and design of the space under the stairs will make it possible to arrange there, albeit a small, but cozy and functional room.
![]()
Kitchen equipment
If the flight of stairs is located in the area of \u200b\u200ba small-sized kitchen, then this is where the answer to the question of how to use the space under the stairs lies. It is worth admitting that such an arrangement of the stairs is a rather rare phenomenon and is most often found in an interior decorated in a loft style.
![]()
In this case, the maximum use of the floor space has an important aspect. Therefore, by moving some equipment under the stairs, you can significantly unload a small kitchen and make it more spacious.
![]()
Perhaps the photos of the space under the stairs, equipped for the kitchen, presented to you, will help you decide on such a crucial step. After all, enterprises of this kind require taking into account many nuances.
![]()
It is necessary to take into account the shape and angle of inclination of the march itself, so that, in the future, you will be comfortable using the functional area for its intended purpose.
![]()
Do not forget to consider the question of how heat and steam will affect the staircase itself if a stove is placed in this area. What is the situation with the provision of this site with ventilation.
![]()
Is it possible to carry out communications there: gas, water pipes and light.
![]()
If, nevertheless, you prefer a more convenient place in the kitchen for furniture and sinks, then household appliances can be placed on the area under the stairs.
![]()
Closed space under the stairs
If the kitchen equipped under the stairs was an open area, then placing a toilet or bathroom there is considered a closed space.
![]()
It is worth starting to equip a bathroom under a flight of stairs with the installation of enclosing walls.
Do not forget about the nuances of this use of the room: temperature drops and high humidity. You also need to take care of ensuring good ventilation, steam, heat and sound insulation.
![]()
Pantry under the stairs
A pantry for storing various utensils, cans with preservation and other items can be made both open and closed areas under the flight of stairs.
![]()
Of course, from the point of view of aesthetics, it is better to enclose this area with partitions and install the door in a place convenient for you. The shelves in the closet can be located along or across the fenced area.
![]()
It all depends on the location of the stairs and the possible installation location of the door.
![]()
The space under the stairs; hallway decoration ideas
If the hallway has empty space under the flight of stairs, then this is a great opportunity to arrange a dressing room there, equipping it with a clothes hanger and shelves for shoes.
![]()
If space permits, then a bench for a convenient process of taking off shoes will not interfere.
![]()
As you can see, you should not ignore the unused area under the flight of stairs and overhaul it.
![]()
With a little effort, ingenuity, building materials and the space under the stairs will not only be functional and will give comfort, but also become a highlight in your home.
![]()
Photo of the space under the stairs
![]()
![]()
![]()
![]()
![]()
![]()
![]()
![]()
![]()
![]()
![]()
![]()
![]()
![]()
![]()
![]()
When designing or even already building a two-story or two-level house, it is recommended to immediately think over the questions of how to arrange the space under the stairs. The lead time will be especially important in cases where the useful use of this area will require the summing up of various engineering communications, the installation of which is carried out at the stage of foundation construction.
The features of the arrangement of the under-staircase space depend on several factors: on the location of the staircase itself, on its dimensions - width, height and length in the plan, on the possibility of bringing water supply and sewerage to this section, and, of course, on the planned general interior design.
There can be a lot of interesting solutions for the useful use of such a seemingly "lost space" - it can be a built-in kitchen set, bookshelves, a sleeping or work space, various wardrobes, dressers, a pantry, an entrance hall and even a bathroom.
Types of stairs, and what space is formed under them
Before determining how you can use the space under the stairs, you need to choose its design, which will determine how much space it will take in the house, and what area is formed under it.

There are many types of stairs, and the choice of a specific one depends primarily on what area for it can be allocated in the house. It should be understood that the more compact its structure is, the less space is formed under it.
- it is necessary to provide for a rational arrangement of elements of kitchen furniture for comfortable processing of food and cooking, as well as for convenient washing of dishes.

In order to determine all these nuances, it is recommended to draw up a detailed drawing indicating the place of placement of each of the elements, and put down all dimensions to scale. Even if it is a simple drawing, of the type shown in the figure, it will still be easier to navigate with it when drawing up a detailed plan of your kitchen under the stairs.
- Bathroom.
Another rather difficult, but solvable task is the arrangement of the bathroom under the stairs.

If the staircase is located on an external wall, then there should not be any special problems with bringing the sewage and water supply to the area under it.
In the event that there is a lot of space under the stairs, then it must be organized in such a way that a toilet bowl, a sink can be placed on it, as well as a mirror and towel racks can be fixed on the wall. Ideal if it also fits.
The increased complexity in organizing a bathroom in the under-stair space is also due to the need to construct a well-fitted door. In addition, it is very important for this room to provide and install effective ventilation, since condensation must not be allowed to accumulate on the walls, which will negatively affect the wooden elements of the stairs.
It is better to decorate the bathroom in light colors and not choose large tiles, since it will visually make the room smaller. In addition, it is recommended to fix a sufficiently large mirror on the wall - it will also contribute to the visual expansion of the room. An important point in this case is the correct lighting - it is desirable to make it sufficiently intense.
- Other options for arranging the space.
When arranging a hallway, sleeping place, wardrobes, dressers, pantry, workplace or other options under the stairs, a number of other nuances are taken into account:
- it will be necessary to carry out power supply and install a switch and a socket, organize sufficient lighting of the space;

- accessories of the necessary functionality, suitable in size, must be thought out;
- very important is the requirement that the ceiling of the room or area under the stairs does not have cracks and gaps. The fact is that dust will inevitably collect under the steps, and when vibrating from steps, it can fall from above into the equipped space.
Video: several original solutions for the rational use of the under-ladder space
We do it ourselves - an original spacious wardrobe in the space under the stairs
One of the most popular ways to use understairs space is by installing shelves or pull-out cabinets. An example of how you can perform similar work under an existing staircase, with a space under it covered with drywall, will be discussed below.
Prices for wardrobes
closet
Manufacturing and installation of the cabinet frame structure
| Illustration | |
|---|---|
 | In this case, the space will be arranged under a small staircase, which means that the area under it will not be too spacious. But even such a small area can be used quite rationally. Earlier, during the construction of the stairs to the second floor, the space under it was sheathed with sheets of plasterboard, some of which, by the way, can be used with benefit to create the future design. |
 | The first step is to mark up previously installed sheets. On them, using a ruler, a building level and a pencil or marker, lines are drawn to define the area to be removed. When making markings, it is necessary to take into account the height of the steps of the stairs, since they must remain closed with plasterboard sheathing. In addition, the location of the guides of the frame structure, on which the drywall is fixed, is also taken into account. The areas where these elements are installed can be identified by the screwed in self-tapping screws. The vertical side lines are drawn with an indent from the screws by 25 ÷ 30 mm. The upper line of the future cut should pass along the lower points of the steps and be parallel to the cut line of the drywall fixed at the upper points of the steps. |
 | The middle part of the plasterboard sheathing is cut along the drawn lines - an electric jigsaw is perfect for this operation. Here you need to take into account the fact that in places where drywall is adjacent to the frame guides, it is cut off with a sharp construction knife, and the screws are unscrewed with a screwdriver. |
 | After the excess drywall is removed, the remaining edges are trimmed with a hacksaw around the entire perimeter of the opening. The vertical sides are cut exactly along the inner edge of the side vertical guides of the frame. In addition to removing excess material, the edges of the resulting triangle, with a truncated bottom sharp corner, will be aligned. |
 | When the finishing material is removed, a space will open that needs to be equipped for installing a cabinet in it. The cut drywall is temporarily removed for now, as it will now interfere with further work. |
 | In addition to the empty space, a wooden frame structure will also open under the stairs, which must also be carefully partially dismantled. |
 | The frame bars are cut along the top line of the drywall at the same angle as the remaining drywall cladding. The work is carried out using an electric jigsaw or a reciprocating saw. |
 | The vertical supports of the battens cut off in the upper part are detached from the lower horizontal beam, which must then also be carefully removed without damaging the floor covering. |
 | Further, in the lower part of the truncated triangle, at its upper apex, the angle is measured (in this case, it was 49 degrees). This parameter is required for the end cut of the board, which will become one of the parts of the opening frame. The board is taken 150 mm wide and 25 ÷ 30 mm thick. |
 | The finished board, cut from the end at the desired angle, is tried on to the place of its attachment. It must be installed exactly flush with the cut drywall. |
 | Further, in the same way, with exact fit in the corners, the entire perimeter of the cut space is framed. The boards are fixed between the vertical racks remaining after dismantling. As a result, the installed ones should get a solid inner surface, on which the external boards will then be fixed, which will create a "finishing" frame of the cut out opening. |
 | This illustration well shows the resulting structure at this stage, after fixing the internal wooden lintels. Then it is necessary to fix the cut edge of the drywall to them using self-tapping screws - this will achieve the maximum strength of the edges of the opening. |
 | If necessary, one more wooden rail is fixed from below to the stringer of the stairs in order to add thickness to it to the general level of the drywall line and the boards fixed immediately behind it. |
 | Further, a board is fixed to the beam, installed vertically on the high side of the triangular opening, from its rear part. It will be necessary to fix the finished shelf structure. |
 | The next step is to finish the cut-out opening. To do this, along its entire perimeter, to the previously fixed internal boards, boards are installed and screwed, which should completely cover the unsightly picture of the drywall cut. |
 | In order for the frame to look neat, the end parts of each of the boards are carefully adjusted at a certain, pre-measured angle. Only in this case they will fit snugly against each other. |
 | Before fixing these structural elements with self-tapping screws, their ends are coated with wood glue, and glued together at the corners. At the same time, the vertical boards are set according to the level - if a skew is found, then small gaskets are made between the inner and outer boards from thinner wooden wedges. |
 | The next step, at the place of future installation, is the frame of the front part of the shelf structure. The boards intended for this are temporarily fixed to the boards of the opening framing already fixed to the stairs. In addition, the frame boards are fastened together at the corners. |
 | Further, on the temporary frame, the installation of the middle vertical bars is marked. The markup is carried out using a building level. These elements will be the facade for the walls of the shelf structure. |
 | Then, the bars are cut at an angle of inclination of the stairs. Their height should be equal to the distance between the top and bottom, horizontally installed board. There should be two such jumpers, and they are installed at the same distance from each other and from the side posts, that is, the length of the opening is divided by exactly three. |
 | Further, the temporarily fixed bars are removed from the opening, and from them the front frame structure for the shelves is laid out on a flat surface. Then they are finally, according to the marking, fastened together. |
 | For the convenience of gluing individual parts into a single structure, short wooden blocks are evenly laid out under the mating parts. They will also help to level the frame. This is how vertical bars are exposed and fixed, and then horizontal bridges. |
 | The cross members will determine the number of shelves or drawers. They are stacked between vertical rails so that the shelves installed in different sections of the structure are on the same level. Of course, it is important to observe the perpendicularity of the parts to be connected. |
 | The connection can be carried out in different ways - it can be wooden chops (dowels, pins), saws and the installation of special fastening parts, for example, wooden dowels, on the glue. After the entire structure is assembled and glued, it is clamped in clamps until the glue is completely dry. |
 | This photo shows one of the elements with the help of which individual bars are fastened into a common structure - a wooden dowel installed in the place of the connecting unit. |
 | While the front of the structure frame is drying, you can start making partitions that will be installed between the rows of shelves. They are made of plywood 10 ÷ 15 mm thick, on which a frame made of strips cut from the same plywood is fixed with glue. These elements are needed to strengthen the rigidity of the partitions. |
 | Glue is again applied to the fixed planks and another sheet of plywood is glued on top of them. The whole structure is additionally fixed with brackets or self-tapping screws, and is compressed in thickness with clamps. There are three such walls, in this case - they have different heights, equal to the vertical bars of the front part of the structure frame, which was assembled earlier. Their width should be equal to the depth of the space under the stairs |
 | The next step is to cut out the back wall, which will hold the partitions together. In order not to be mistaken, the finished front frame is laid on a sheet of plywood, then outlined with a pencil, and then the necessary figure is cut out with a jigsaw. |
 | Vertical partitions are held together by a common jumper - a board that will fix them in the front part from above. All planes must be set at the building level. Then, the back side of the walls is also fastened along the top with a wooden strip. After that, the rear plywood wall is tried on and fixed to the structure. |
 | The structure turns and fits on the back, just fixed, wall, and the end sides of the front part of the dividing partitions are coated with glue. |
 | The next step is to lay the wooden frame of the front of the structure on top of the missed end sides. It is carefully leveled and then secured with self-tapping screws. |
 | Now, with the help of glue, and then with self-tapping screws, you can fix the lowest wall, that is, the side wall on the truncated side of the triangle. All glued parts of the structure are again fixed with clamps. |
 | Further, on the inner walls, the location of the roller guides for the shelves is marked. |
 | Two guides are temporarily fixed on both sides of the partition with a special lock, which allows them to be set exactly in the desired plane and screwed perfectly evenly on the surface and in relation to each other. |
 | In the next step, the guides are fixed on the walls with self-tapping screws 15 ÷ 17 mm long. |
 | After the roller guides are fixed, a wide board is dismantled from the upper part of the structure, which provided temporary fixation of the frame, as it was unnecessary. Instead, a prepared-sized plywood sheet with a thickness of 8 ÷ 10 mm is placed on the upper end sides of the partitions. |
 | Plywood is fixed on the end faces of the partitions and side walls using brackets or self-tapping screws. |
 | In this photo, you can see the assembled structure in full, and evaluate its quality. |
 | Then the finished frame is gently pushed into place - in the opening under the stairs. |
 | Before finally fixing it, it is necessary to check the verticality of the installation again. It's not too late to make small adjustments by placing thin wooden wedges in the right places. |
 | After the structure has been installed perfectly evenly and fixed, the gaps around its perimeter can be closed with a neat narrow glazing bead, and a decorative plinth can be fixed at the bottom. |
Manufacturing of drawers
Now you should consider several important points for the manufacture of drawers.
In this version, the master chose plywood 20 mm thick, but high-quality 10 mm material is also quite suitable for this purpose. Chipboards with a standard thickness of 16 or 18 mm are quite suitable for these purposes.
The main nuances in this process are the preparation of parts and their bonding, which will be discussed below.
The first step from the opening in which the box will be installed, the dimensions are removed - width, height and depth - according to which it will be made. In addition, you need to accurately determine the place of fastening the guides along which the shelf will walk.
| Illustration | Brief description of the performed operation |
|---|---|
 | According to the dimensions obtained, all the elements of the box are marked and drawn on the prepared plywood sheet. It is very important to ensure that all corners are right. In the next step, all the details of the box are cut out, and their edges are processed until smooth. |
 | To ensure that the assembly of the parts is even and strong, first the side walls are installed on the edges of the back, and their place of fastening is drawn. The same is done with the front wall. |
 | The next step in the marked places is drilled through holes with a diameter of 8 mm for furniture confirmations (euro screws), through which the back and front walls will be screwed to the side ones. There should be two such holes on each side. |
 | The centers of the holes at the end of the side wall are marked along the drilled holes, with a diameter of 5 mm and a depth of about 50 mm. The walls are assembled, confirms are inserted into the holes, and then they are screwed using a screwdriver with a hexagon bit. |
 | The other junction boxes of the drawer are assembled in the same way. Confirmates will provide good structural rigidity. True, if plywood with a thickness of 10 millimeters or less is used for the manufacture of a box, then confirmations will not work, and you will have to use ordinary screws with a diameter of 3.5 ÷ 4 mm. |
 | To find out whether the box is evenly assembled, it is necessary to measure and compare its diagonals - they must be of the same length. |
 | Next, a hole is drilled in the front of the box through which a handle should be fixed to the panel. It must be said that very often an additional panel made of thinner plywood, but slightly larger than the main wall, is attached to the front wall. It is first glued, and then fixed with self-tapping screws from the inside of the box. The size of the screw must be chosen so that it is 5 mm shorter than the total thickness of the front wall together with the front panel. |
 | After fixing the handle, the bottom part is fixed to the box - usually this is done using self-tapping screws. The bottom panel will finally fix the box in the required rectangular configuration. After that, the finished box can be subjected to the necessary finishing treatment - cleaning with fine-grain sandpaper, polishing, painting, varnishing, pasting with laminating film, etc. Sometimes this operation is left for the very completion of work. |
 | The next step on the side walls of the box is marking, along the roller guides that were previously installed in the cabinet structure. A careful fitting is made, and if it goes well, but the guides can be fixed with self-tapping screws, the length of which should also not exceed 15 mm. All boxes are assembled in the same way, and, as we have seen, their front panel can have a more complex shape, and the height of the side walls can vary. But this does not significantly affect the technology of their manufacture and assembly. After that, it will already be possible to carry out the general assembly of the cabinet and its final finishing with all the components to the ideal. As a result, a beautiful and very functional piece of furniture appeared in the space under the stairs. |
For the space under the stairs, cabinets can be made of another, simpler, or vice versa - complex design, which, for example, slide out of niches on wheels, and the division into separate sections and shelves is already made inside. The advantage of this option is that the cabinets can always be fully pulled out of the under-ladder niche in order to perform general cleaning inside it.

Even if there is enough space in the house for all the premises necessary for comfortable living, the space under the stairs will never be superfluous, and it must be used to the maximum rationally. The farm will always find a lot of useful things that their owners do not use every day, but they must have an established storage place. An equipped under-ladder niche is also perfect for this.
Therefore, when planning the construction of a two-story house and wiring communications along it, it is advisable to determine in advance whether and how the area under the stairs will be used. Well, with the final finishing, all this can be decorated in the same style as the room in which the staircase structure will be located. And then a competently equipped and beautifully designed useful space will organically, without burdening the interior, fit into the overall design, and sometimes even become an eye-catching "highlight" of the room.
When planning the construction of a second floor or an attic in a house, the question always arises of how to optimally use the space under the stairs. We offer you the best modern options to help you make practical space under the stairs. Which one to use? It all depends on your technical (and financial) capabilities and the needs of your household. It is also important at what stage you start thinking about what to place under the stairs: as usual, the earlier you plan, the more options you have.
Storage of things: we use the space under the stairs.
The most common practical way of organizing space under the stairs is to use it to store things. These can be closets, closets, walk-in closets, or just open shelves.
Storage systems under the stairs.
The main problem of organizing storage under the stairs is the significant cost of furniture, which must fit into the bevel of the staircase. Therefore, this option, using standard rectangular cabinets and dressers, will allow you to arrange the space under the stairs relatively painlessly. This technique works very well for a studio apartment, where the most efficient use of every centimeter of space is required at minimal cost.
 Another option for placing a cabinet under the stairs on a budget is to use standard cabinets by complementing them with beveled facades for doors. In this case, an additional fee will be charged only for the manufacture of facades of an individual form.
 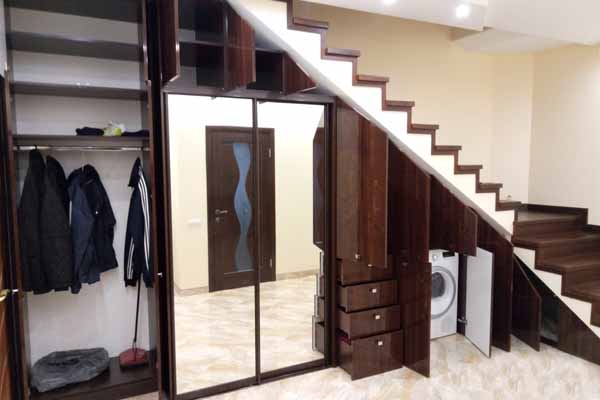 Open storage is the cheapest. Using standard shelf profiles and inexpensive storage bins, you can quickly and inexpensively set up understairs space.
Hallway under the stairs.
It is very convenient to use the space under the stairs as part of the hallway. Storage space can be at the top of the high part of the stairs - in a cabinet with a mirrored door.
 Or you can use the entire staircase - tall cabinets for outerwear, low ones for shoes.
  It is not necessary to hide all outerwear in closets. Under the stairs, you can easily equip an open hanger for clothes and place shelves for shoes.
Wardrobe under the stairs.
If the staircase in the house is in a room, then in the space under it you can arrange a wardrobe. These can be simple open storage systems - with rails for clothes and sectional drawers.
 Or you can equip a real dressing room on the back of the staircase. This storage option is the dream of every hostess.
 If the location of the stairs does not allow for an entrance, then the traditional option with built-in wardrobes under the stairs is also quite practical.
How to place a wardrobe under the stairs.
The staircase is not always located in a secluded corner of the house, if the staircase goes through one of the main rooms, then the organization of convenient storage of many things needed for the bedroom or dining room can be decorated with a beautiful mirror cabinet in combination with mirrored dressers. This use of space under the stairs not only does not spoil the room, but also decorates it.
 It is not necessary to use special furniture for a stylish design of the place under the stairs. You can always achieve a harmonious effect by complementing standard furniture with shelves. Such shelves visually fill the space under the stairs more fully without cluttering it.
  If the task is not in beauty, but in the ability to place as many things as possible under the stairs, then using a corner wardrobe will help to effectively solve this problem.
How to make shelves under the stairs.
As we saw above, the shelves in combination with standard rectangular furniture will help you organize the space under the stairs in a neat and practical way. Correctly selected finishing materials, a fashionable accent wall - and you have an excellent result at a low cost.
 For storing things under the stairs, you can do with only shelves. It is important to understand here that the depth of the shelf can rarely take up all the available space, because it will be inconvenient for you to look for things in the back of the shelf in a bent state. But beating some part of the staircase as a shelf is quite a practical option.
  If the style of the space under the stairs is important for you, then such spectacular contrasting shelves, in harmony with the design of the stairs, are an effective and fashionable solution.
How to make a pantry under the stairs.
The main approach to arranging a pantry under the stairs is easy access to the entire space. Therefore, it is convenient to make double-leaf doors here, so that it is convenient to work with the lower part of the pantry.
 Alternatively, front drawers can be made under the stairs. But this option is suitable for rarely used things, because has limited storage space in terms of the size of things and such access to things can hardly be called comfortable.
How to arrange the kitchen under the stairs in the house.
In an ordinary apartment, there is no problem organizing a kitchen in a separate room, but what about studio apartments or small private houses? There, this task from the category of exotic develops into an urgent problem. First of all, the kitchen needs communications, so such placement is planned at the construction stage.
![]() For the arrangement of furniture in the kitchen, the general rule is this: no matter how small the kitchen is, they try not to place work surfaces and dining tables under the stairs. It is very convenient to equip kitchen cabinets and built-in appliances under the stairs.
For the arrangement of furniture in the kitchen, the general rule is this: no matter how small the kitchen is, they try not to place work surfaces and dining tables under the stairs. It is very convenient to equip kitchen cabinets and built-in appliances under the stairs. ![]()
The kitchen under the stairs is not always the prerogative of small houses; even in a large house, the space under the stairs can be used as a storage room for storing food or as a wine bar. ![]()
How to make a toilet under the stairs.
For all the exoticism of the idea, the task of placing a small toilet or a bathroom under the stairs has a completely practical solution. ![]()
Indeed, in an attic room with a sloping roof - a bathroom is not uncommon, but a rule. And here we are playing with a similar configuration of the space under the stairs. ![]()
Of course, the availability of the necessary communications plays a key role here. But the very placement of a shower stall or toilet under the bevel of a flight of stairs is quite acceptable. ![]() If the idea of \u200b\u200ba bathroom under the stairs still seems fantastic to most of us, then placing a washing machine under the stairs is a great solution. Equip a small pantry under the washing machine and put an ordinary fan heater in it - you will be an excellent dryer for clothes. Wet things are hung on a hanger, the heater is turned on and the door is closed: in half an hour the things are almost dry. They turn on the hood and leave them to dry on a hanger - things don't even need to be ironed after such drying. This approach to washing is a common method in Scandinavian countries and Japan.
If the idea of \u200b\u200ba bathroom under the stairs still seems fantastic to most of us, then placing a washing machine under the stairs is a great solution. Equip a small pantry under the washing machine and put an ordinary fan heater in it - you will be an excellent dryer for clothes. Wet things are hung on a hanger, the heater is turned on and the door is closed: in half an hour the things are almost dry. They turn on the hood and leave them to dry on a hanger - things don't even need to be ironed after such drying. This approach to washing is a common method in Scandinavian countries and Japan. ![]()
How to organize the space under the stairs under the office.
It is logical to use a secluded place under the stairs as a small office. These can be ordinary open shelves with a work surface and storage space. ![]()
Or you can play up the space under the stairs, like a large built-in wardrobe, where the cabinet is located in its highest part. So, you will have the opportunity to close your workplace without worrying about its safety. ![]()
How to occupy the space under the stairs?
In addition to the above traditional approaches to arranging a place under the stairs, other options are no less interesting and everyone can estimate them to suit their needs. So you can make a dog enclosure under the stairs. ![]()
If the four-legged friend is small, then you can put a cozy sofa nearby. ![]()
Or take a seat under the stairs for your library. ![]()
If reading books is not fun for you, you might like the idea of \u200b\u200ba home theater under the stairs more. ![]()
What can be done under the stairs in a wooden house?
A private suburban wooden house often has two floors or plus a cellar. A staircase in such a house is not only a functional, but also often a luxurious decorative element of the entire interior. How to arrange the space under the stairs so as not to spoil, but only to enhance this beauty?
The simplest solution is to make the entrance to the cellar under the stairs. ![]()
Or set up a stylish bar. ![]()
It is possible to place a boiler room under the stairs. Such a decision is made at the project stage and is tied to the wiring of all communications in the house and the location of the stairs. ![]()
A stylish and fashionable solution is to place a small wine cellar under the stairs. ![]()
Because this approach must guarantee the right microclimate for storing wines, such a cellar is made closed with its own microclimate system. Usually, a small part of the collection of wines is placed in this way, but the main stocks, after all, are stored in. ![]()
What to place under the stairs in the country.
A house is not always a luxurious country residence, a small one - no less cozy and loved by its owners. If the country house is made on the loft principle - with a sleeping place in the attic floor, then even a small staircase can eat up a lot of space. Therefore, the ladder must be used in full. You can make storage boxes on the side of the stairs. ![]()
Or directly from the side of the steps. ![]()
In addition, the option with a kitchen built under the stairs - works great for a country house.
What else can you think of under the stairs?
The options are endless: such an entrance to the secret room can be made under the stairs. It might just be the entrance to the cellar, but it looks intriguing. ![]()
Do you like to craft, but there is no place in the house? A workshop under the stairs is one option. ![]()
Light enters the workshop from the side of the steps. As we all understand, there is never too much of a workshop, and there will not be much under the stairs, so at the back of the stairs you can connect this part of the workshop with the main workshop or garage in the yard. ![]()
If adults need their toys, then children need them doubly - give a place under the stairs for a children's playhouse. ![]()
How to decorate the space under the stairs.
And although all the ideas before that, also tried to carry a certain aesthetic load, they still cannot compete with the placement of such a wonderful one under the stairs. ![]()
And if, admiring the stove, we understand that such a solution is not for everyone, then it is possible to equip this cozy place under the stairs with the help of an electric decorative one: so to speak, a budget option for a winter fairy tale. ![]()
The garden under the stairs is a favorite part of using this space. Add lighting, put the appropriate indoor flowers - and you no longer have a dark, dull corner under the stairs, but, practically, a living oasis in your own home. ![]()
An option for the busy: Buy a piece of fake lawn, gravel it with simple geometric shapes, add potted flowers or fake flowers. Cute attributes in such a mini-garden will create a cozy magical atmosphere. ![]()
If you are a fan of indoor plants, there is a chance to realize your dreams: by glazing the space under the stairs, you can create the necessary microclimate in it and use it as an amazing winter garden. The same approach can be used to set up a terrarium or large aquarium under the stairs. In any case, it will be a fantastically beautiful solution. ![]()
In order to surprise everyone with its beauty, you can do without glazing by placing a small bubbling home fountain under the stairs. They say, in Feng Shui - with such an amazing arrangement of the darkest corners of your home, you simply have to become happy! ![]()
We hope you enjoyed the practical and modern ideas for decorating the space under the stairs, and we managed to surprise you!
More great ideas on how to use the ladder in our video:
Write in the comments what you liked and what you didn't - we are always glad to hear your opinion.
Even though there is a lot of free space in country houses, saving space will never hurt. In these cases, the space of the window sill is converted into a place for storing small items, and a cabinet is made in a free space under the stairs. The wardrobe is an integral item in any home, therefore, it is necessary to have a complete understanding of the process of its installation.

Before starting the installation work, it is necessary to prepare the space, freeing the space under the stairs from all foreign objects, accumulated rubbish and, if there is a partition, disassemble it.

After completing all the preparation work, stock up on the necessary tools and materials. These tools and materials include:
- finishing material for the interior of the cabinet;
- drill;
- roulette;

- electric grinder or jigsaw;
- bars 5 * 5 cm;
- material for the manufacture of facades.
Then think about how you can protect the flooring from possible damage that may occur during the installation work. After that, you can start making a cabinet under the stairs with your own hands.
Finishing from the inside
There are a lot of options for finishing the cabinet from the inside. The wardrobe can function as a pantry with a variety of shelves, a wardrobe, or without any doors at all. It all depends on the flight of your imagination. Let's take a closer look at such a cabinet design, in which there is a wardrobe at the bottom of the stairs, and a pantry at the top.

The first step is to finish the interior space of the future product and delimit it with a partition. The partition can be made from a sheet of plasterboard and beams with a cross section of 5 * 5. This is enough for the shelves to be reliable enough.
The bars are fixed with self-tapping screws, after which drywall is attached to them. Before making a cabinet under the stairs, stock up on a sufficient amount of drywall, as they should trim the partition on both sides.
It is advisable to purchase the material from which the shelves will be made at a hardware store. These can be finished products, regular planed boards, or baskets.
Fasteners of beams under the shelves
It is impossible to imagine a wardrobe without shelves inside. The main thing is to know how to make them correctly:
- Prepare the blocks and shelves, and then measure the width of the cabinet. Saw off the required number of beams, the length of which should be equal to the width of the cabinet.
- The number of finished bars should be twice that of future shelves. That is, to mount 5 shelves, you need 10 beams. The blocks are attached to the cabinet walls with self-tapping screws. Choose the distance between the shelves based on what you plan to put on them. Then place the shelves on the fixed blocks. To make the shelves more reliable, they can be screwed on with self-tapping screws.

You choose the installation parameters yourself, starting only from your own convenience of future stored things.
Having finished fixing the shelves for the wardrobe, proceed to equip the second half of the space under the stairs. Since the height there is much less, the work there will be more laborious.
There is nothing to fix the shelves on, so another partition will need to be made.
You should not try to use the space to the very bottom. At the minimum point of the ladder, you still cannot store anything, so your efforts will be wasted.
Make an indent from the very first step at least 70 cm and make a partition for fasteners.
Installation rules for sliding doors

Your product is in two halves, so you will need to install doors for each. The sliding wardrobe is equipped with two sliding doors, and the pantry with one swing door.
You will greatly simplify your task if you invite a professional in advance, who will take the necessary measurements and customize the door facades and the frame for you. Since each cabinet under the stairs is different in size, it will not be possible to simply purchase doors in the store.
Of course, you can try to make everything yourself, but the result is unlikely to please you, since it is difficult to achieve perfect evenness.
The installation of the door frame should not bother you: all the details of the frame are fixed with self-tapping screws, and the platbands are fastened with construction glue or nails without caps. After that, hinges are put, and the door is hung.
Sliding doors are a little more difficult to assemble: first, the upper and lower rails are attached, then the rollers are screwed to the facades, and only then the doors are installed.
With an idea of \u200b\u200bhow to make a cupboard under the stairs, there is nothing difficult in bringing your idea to life.
Photo


Many owners of country cottages, multi-level townhouses, private houses and summer cottages are faced with the problem of arranging the space under the stairs in the premises. It is a pity to lose some of the usable area if a marching or screw structure with platforms and steps is installed in the room. To use the free space wisely, you can install a cabinet under the built-in type stairs, made according to an individual project and drawing. Any design and design ideas are available for implementation, so the owner wins twice - he receives functional furniture and effectively uses the space under the stairs.
Currently, built-in wardrobes mounted under the stairwells in a two-storey cottage, multi-level room, the architecture of a country house are no longer considered an exotic design option and belong to pieces of common furniture. Built-in structures organically complement the interior, effectively combining with the stairs and room decor. The purpose of the furniture is the competent use of the free space under the stairs. At the same time, the cabinet located under the stairs is a functional structure for the ergonomic use of furniture in everyday life. Features and benefits of original furniture:
- rational use of free space for compact installation of furniture for various purposes - a library, a mini dressing room, a storage module, an entrance hall, a workplace;
- the absence of unused and inconvenient areas - the cabinet, made strictly according to the dimensions of the space under the stairs, is distinguished by its ergonomics and functionality;
- installation of a built-in type structure - it is irrational to install a stationary model under the stairs, since the walls, roof, floor will take up useful centimeters of the area;
- implementation of non-standard design solutions, the ability to mount a cabinet model of any design in an empty area under the stairs - a sliding compartment, swing, cabinet, pedestal, shelving;
- an aesthetically attractive addition to the interior of the room, the visual effect of a holistic tandem of a cabinet and a staircase (marching, spiral, on bolts or kosoura);
- the versatility of products in the living space - it is important to install cabinets under the stairs in a private house, cottage, townhouse, in the country.
Furniture enterprises are engaged in the manufacture of cabinets according to individual customer projects after measurements of the free space for the installation of the product. Alternatively, you can make a simple cabinet in the understairs area yourself - it is easy to equip a rack with open shelves with your own hands. In built-in models, the supporting elements are the walls of the room, the roof is stair steps, the floor in the room serves as the bottom of the cabinet, but you can install a separate slab made of modern chipboard materials.


Kinds
In a private house, cottage, in the country, two types of stairs are installed - marching with straight spans of steps, intermediate platforms and screw, the design of which is made in a spiral around the supporting axis. It is problematic to build a wardrobe into the space of a spiral staircase - it is easier to limit yourself to creating a small corner for rest with a compact table, install a chest of drawers or a curbstone. Spiral structures are equipped with the main support on which the degrees are hung, the staircase to the attic or floor looks attractive as an independent element of the interior, takes up a little space, so the cabinets are built under the marching steps. The main types of cabinets:
- compartment model - fits perfectly with all interior styles, takes away a minimum of free space. It is attractive that the doors can be finished with various options for facades, used for decoration with photo printing, sandblasting, mirror panels. The internal filling of the cabinet depends on the size of the space under the stairs. A compartment with a sliding door system can be conveniently installed under stairs with small and medium turn of steps;
- a built-in wardrobe with swing doors is the optimal solution for spacious rooms. When developing a project, you need to take into account the free space for opening doors. You can use this option for equipping the hallway, completing the furniture with a mirror, devices for storing outerwear, baskets for shoes, drawers for small items, accessories, housekeepers, stands for umbrellas, hats. If there is a small usable area, a pantry is equipped here;
- a pull-out wardrobe according to the principle of a roomy chest of drawers - furniture sections can be mounted in horizontal and vertical design, as in the photo below. Structural elements (boxes with sloping top) move on roller casters, therefore they do not leave mechanical damage on the floor covering. It is convenient to store bulky items, things, sports equipment (skates, skis, golf sets) or household appliances for cleaning premises in spacious pull-out modules;
- open shelving - often used for understairs library equipment. Shelves of different sizes are built into a free niche, fixing the details on the back and side walls. Open shelves look organic in a home living room - they can be used to equip a cozy corner with memorabilia, souvenirs, family photos, and books. It should be taken into account that dust settles faster on open shelves, therefore, it is necessary to often put things in order in the rack;
- the combined version of furniture is an interesting design solution, which combines open sections with closed modules. It is convenient to store outerwear for everyday use behind the doors in the high part of the cabinet, and open shelves are suitable for placing original interior items - vases, figurines, fresh flowers and other things. If the interior space permits, a TV is built into a niche, audio and video equipment is placed on the shelves, as in the presented photo.
The space under the stairs can be equipped with a wardrobe for any purpose, the area under the steps can be equipped with a bar counter, shelves for storing a collection of wines. The main condition is that the material of the furniture, decorative fittings, and the finish of the cabinet must be combined with the staircase in style and color in order to obtain a solid structure that complements the interior of the room.


Swing

Retractable
Facade decoration
What gives the wardrobe a design twist? The original design of the facades, for the manufacture of which you can use a variety of materials. There is no need to make a case for a built-in wardrobe, but as an option, the staircase to the attic can be supplemented with a case model. The main materials used in furniture production are MDF and chipboard, less often natural solid wood. You can implement and design facades in several ways:
- mirror panels - visually expand the space of the room, look appropriate in the hallway, dressing room. Behind the mirrored doors, you can hide hangers under outerwear, shoe racks, shelves for hats, accessories;
- facades with photo printing - with the help of professional equipment, a drawing is applied to the base using the technology of laser engraving, ultraviolet printing. The photographic quality of the finish gives the images a realistic look;
- sandblasting on tinted glass. Very interesting design ideas - matte images that give the space by the stairs a luxurious and sophisticated look. Sandblasting drawings are not erased, do not require complex maintenance;
- glossy plastic facades - this design visually enlarges the room space, looks spectacular in contrast to the floor and carpet. Plastic is affordable, facades are presented in a wide color palette;
- rattan or bamboo doors. The decoration is relevant for interiors in ethnic and oriental style. The material is light, it looks simple, natural. Rattan and bamboo can be incorporated into a minimalist interior style.
In addition, decorative leather is used to decorate the facades - it goes well with furniture made of natural wood. If the staircase to the attic is made in a simple style, with minimal decor, you can equip a modest storage room, and use vertical blinds as front panels. Such a wardrobe looks inconspicuous under the stairs, does not focus on the niche under it.
The bookcase is equipped with open shelves, so all things and objects will be in sight. If you need to close part of the sections, it is preferable to install combined furniture.
Popular design ideas for furniture structures are an open section and shelves with rounded edges, a middle compartment, a compartment with a hinged door, or a drawer with a decorative panel. You can choose any design of the cabinet under the stairs, but the finishing of the facades should be in harmony with the design of the steps, the rest of the furniture, and the style of the room.

Glossy

Mirrored

Photo printing
How to fit into the interior
The staircase to the attic or second floor, depending on the dimensions of the room, can be located along one of the walls, start in the central part of the room, have turns, roundings. The easiest way is to install the cabinet under the stairs located along the wall - you can mount a lightweight structure that complements the flights of stairs. The main advantage of using the space under the stairs is that interior elements can be made invisible or, on the contrary, focus on an interesting idea of \u200b\u200bdecorating a room. Depending on which room and building you need to equip the space under the stairs, you can choose several ways of how to harmoniously fit the cabinet:
- if the staircase to the attic, the second, third floors is located in the area of \u200b\u200bthe entrance doors, it is worthwhile to mount an entrance hall or dressing area with storage systems under the steps. The room does not have to be additionally completed with furniture with hangers for outerwear, shoe shelves, hooks for umbrellas, bags;
- when the stairs to the upper floors in the living room are located, the space under the stairs is convenient to use for arranging an open library rack with bookshelves, a wine cellar, a "souvenir" shop, a recreation area with a TV. Option - a combined cabinet with several closed sections;
- in a narrow space under the stairs, it is appropriate to install deep and high pull-out cabinets under the stairs, equipped with Cargo pull-out mechanisms, as an inconspicuous pantry for storing large things and items that are needed every day - children's toys, sports equipment, an ironing board;
- in modern duplex apartments, a staircase is a must. The first tier is traditionally used as a living room, kitchen, dining area, and the second level is used for sleeping and working space. Under the stairs, you can effectively fit into the interior a cupboard or furniture with a bar;
- at the dacha, the area of \u200b\u200bthe rooms is limited, the stairs to the attic (attic) or the second floor are small, have a simple design, and the interior is dominated by country, retro, provence, classic, less often loft, modern, minimalism. It is important to use the free space under the stairs for a cabinet with an antique entourage.
Furniture design depends on both the interior style and the house as a whole. For example, in a country villa, a staircase serves as a decoration for a building; it is better to fit under it a chic wardrobe, a rich library, furniture with glass showcases and shelves for a collection of expensive wine. In small country houses, small-sized cottages of standard architecture, the space under the stairs is used in order to optimize free space - more often inconspicuous cabinets, simple open shelves, secret storerooms, dressing rooms are installed.
When choosing the color of a single design, the closet stairs to the second floor are repelled by the design of the handrails and steps. In some cases, deep horizontal drawers are installed, which serve as a natural constructive continuation of the winder steps and do not stand out against the general background. You can competently fit a wardrobe in any interior style, while simultaneously solving two problems - the use of an empty space under the stairs, an effective decoration of the room.


![]()
![]()
The nuances of placement
An important advantage of equipping a room with a wardrobe under the stairs is the optimal roominess of the furniture, since the depth of the model corresponds to the width of the stair steps, and the height at the maximum point is at least 950 mm. These sizes are quite suitable for organizing storage systems for bulky items, clothes, shoes, household appliances or for the implementation of a decorative corner with an aquarium, souvenir shelves, TV, minibar, wine collection. To correctly design and place a cabinet under the stairs, you need to take into account several nuances:
- when using a sliding door opening system, there must be sufficient space to move the panel along the bottom or top rails. In some designs, it will not be possible to fully open the sashes, so unused zones will remain in the cabinet;
- when installing a built-in cabinet with hinged doors, the leaf width should not exceed 1000 mm. Under the weight of the heavy panel, the hinges are skewed and the leaf opening / closing mechanisms fail. It is inconvenient to use a wide swing door - it is better to install two small sashes;
- when placing drawers under the stairs, it is necessary to ensure their full extension for access to the back wall of the understairs space - it is especially important if communication systems pass under the stairs. Vertical drawers are equipped with Teflon-coated rollers - have a long service life;
- when installing an open rack cabinet, you need to combine shelves in height and width in order to place objects of various dimensions on them. The installation of the shelves is carried out into the wall and to the steps, so the base is made strong and finished. The weight of the shelves filled with things should moderately load the stairs;
- an alternative solution is the installation of a cabinet ladder of a compact size, suitable for arranging a small staircase in height and length. The steps at the same time serve as the roof of the furniture structure; for their manufacture, a durable material is used, for example, a shield, natural wood.
There are many interesting ideas for equipping the under-stair space. In addition to installing the cabinet, under the steps, you can design a separate room - a playroom for children, a study, a lounge for relaxation with a comfortable sofa.
Sometimes the space under the stairs is used to install washing machines inside the cabinet, but you should take care of the supply of communications and constant ventilation of the area under the stairs. A variety of design solutions allows you to rationally use the unused space under the stairs and add bright accents to the interior.
Video
Photo


![]()

![]()

