Lamps for the steam room. Lamp in the bath - factory and homemade products Scheme of making lampshades for a sauna
When arranging a bath, not everyone pays due attention to lighting devices. However, a do-it-yourself lamp for a bathhouse is not only a beautiful and original piece of furniture, but also protects against burns, as well as diffuses light, which plays a huge role, since this is a place where a person must rest both soul and body, and too strong illumination prevents this.
There are several options for creating lamps for the bath with your own hands, photos of which can be found below. Some of them are extremely simple and will not take much time to make. Especially worth noting are wooden structures that will perfectly fit into the interior of any bath.
There are a lot of requirements for lighting fixtures located in rooms with high humidity and sudden temperature changes. Devices can be dangerous, so when making such elements, you need to take into account all the nuances.
A special requirement for a bath lampshade is reliable protection from a heated light bulb, the ability to properly diffuse light and make it soft and pleasing to the eye.
Do you need a lampshade in the bath?
Traditionally, in all rooms of the bathhouse, including the steam room, the light sources are located in the corner. This allows you to get high-quality lighting with a small number of bulbs. Considering that there is very little free space in most steam rooms, it is very easy to touch a hot lamp. To avoid burns and other troubles, it is worth covering the light bulb with a lampshade. With your own hands, you can create a beautiful corner or regular wall option.
 Experts recommend installing several light sources in the steam room at once. You don't need to use them all at once, just one will be a spare in case the first bulb burns out. This lamp also needs to be covered with a lampshade.
Preparatory work
It is not at all necessary to have skills in carpentry in order to make a beautiful lamp for a bath from wood with your own hands. The most important thing is to choose the right material and determine the type of model. Bath lampshades can be wall and corner. In addition, it is important to determine the size of the product for the luminaire to perform well. To make the work easier and more accurate, it is worth drawing everything out on paper. According to these blanks, the drawings will be transferred to wood or other materials from which the bath lampshade will be made.

 Experts recommend that beginners take a closer look at wooden products, these materials are the easiest to work with. Lamps made of vine and birch bark are quite popular, but this is already a job for experienced craftsmen. All these materials have one thing in common: they are optimal for a steam room, that is, they can easily withstand high temperatures and high humidity.
When choosing a suitable material for making a lampshade for a bath lamp with your own hands, you need to pay attention to characteristics such as low thermal conductivity, safety, moisture and heat resistance, as well as durability. In addition, ease of processing, decorative qualities and compliance with the overall style of the interior play a huge role.
Professional craftsmen recommend choosing linden, aspen, cedar or larch. The last 2 types of wood are highly durable, but the price of such material is also quite high. If you have no experience with a bath lampshade, you can choose cheaper wood.
The use of pine and spruce is not recommended. When heated, they emit a strong coniferous aroma, which may not be to everyone's liking. Moreover, pine is very resinous, so you can burn yourself on it. If the master decided to opt for spruce or pine, they should be dried by about 15%.
The easiest and most convenient way to choose wood for a lampshade is to use the remains of finishing materials. Thus, the finished luminaire will perfectly match the overall decor and style.
In addition to the wood itself, you will need sandpaper, fasteners and glue to work. It is also important to process wooden parts with special solutions that will extend their shelf life.
Wooden lattice lampshade
It is very simple to make such a lamp with your own hands. At the same time, the design may be different, depending on the preferences of the master. The lattice rods can be installed vertically, horizontally or diagonally. It all depends on the overall design of the room.


If we are talking about a horizontal or vertical lattice, you need to cut wooden blocks of the same length, and then grind them well and cover with a special solution. After that, the slats are nailed to the frame, which can be C- or U-shaped. It is advisable to pre-apply the entire project on paper so that all details are accurate and fit in size.
You need to grind the wood with coarse-grained sandpaper, and then with fine-grained paper. How large the lampshade will be depends on the height of the rail. You need to nail it to the base at a distance of about 1 cm. This will allow you to get pleasant soft lighting in the steam room. It is best to install the lamp in the bath on galvanized self-tapping screws. They can also be used to attach the rails. In some cases, craftsmen recommend using good glue for this.
If the lamps in the steam room are located in the corners, you need to prepare the corresponding lamps. They are made according to the same principle as ordinary wall-mounted ones, but their base should be half the letter C. Beforehand, you need to carefully measure everything so that the lampshade fits perfectly for a particular angle. If the bath has been built correctly, the angle of the lamp will be 90 °.


To make a corner lamp for a bath with your own hands, it is better to choose a vertical option for attaching the rails. In addition, it will be much easier to work with and you will not have to cut and adjust something unnecessarily.
Vine lamp
If it is quite simple to make a lampshade for a steam room from wooden blocks or lining, then a vine is already a task for professionals. Here you need to be able not only to choose the right material, but also to know the basics of working with it.
Most often, experts work with willow twigs. They are quite flexible, but at the same time they are highly durable. First of all, the material must be steamed. This will make the twigs soft and pliable. Next, a few thick rods are taken for the rack. It is best if there are 3. The height of the racks will be equal to the height of the wicker lampshade. After fixing the twigs, weaving begins.

 An approximate view of wicker lamps can be seen in baskets and vine furniture. These options look very good and last a long time. It is important after finishing work on the manufacture of a wicker lampshade to treat the product with a special solution and varnish. This will extend the life of the luminaire. It is fastened, like the grille lampshade, to galvanized screws. It is not worth glueing the lamp to the wall, since problems may arise if it becomes necessary to replace the light bulb.
These are not all possible options for making wooden lampshades for a bath lamp with your own hands. If the owner of the steam room has the skills to work with wood, you can create more original options. Here everything will depend solely on the imagination of the master. For those who have no experience with wood, you can choose the first and simplest option.


Lighting design is perhaps the most important part of the overall impression of the sauna: how subdued and soft the light in the steam room is, how vacationers feel from bathing procedures, and how beautiful and stylish the lamps in the guest room are, an impression is created about the taste of the owners. But choosing a lamp for a steam room is not so easy - there are subtleties and nuances here.
General requirements for bath lamps
The high temperature and humidity of the baths impose their own requirements on lighting devices - you cannot hang any lamp there. And you should not even be guided by the opinion of a construction supermarket consultant alone - it is better to know in advance about all the requirements for lighting in a humid and hot Russian bath, and to protect yourself. And the requirements are simple: complete tightness, a certain voltage and marking of the luminaire itself. And it is important that water cannot accidentally enter the latter - this is dangerous even for those specially protected from this, because they also get very hot.
According to many bathhouse attendants, the best lamps for baths and saunas are German, with frosted glass and a ceramic body. You can mount it both on the wall and not on the ceiling - if not in the steam room, of course. In it, all parts of the ceramic cartridge are metal contacts only, and therefore it can easily withstand up to 125˚C, and the silicone gasket protects well against splashes, steam and dust.
Only those lamps for the bathhouse, which have too bright and direct light, should be covered with wooden gratings - this is necessary for its diffusion. But with frosted glass it is already soft, and therefore no additional lampshade is needed.


What type is better to take a lamp to the steam room?
This question cannot be answered unequivocally - each of the above has its own pros and cons. Choose the ones that are most suitable for your particular bath:
Halogen lamps - for the hottest areas
Halogen lamps with their built-in reflectors have gained immense popularity lately - they can be safely installed even in the steam room. They usually have a power of 20-35 W, are not afraid of high ambient temperatures, and have a constructive protection against splashes or accidental touch.
What is the plus of halogen lamps? Their continuous spectrum is closer to the natural one for the human body than standard incandescent lamps. And most importantly, they use an absolutely safe supply voltage. Bath attendants often joke that halogen lamps even like high temperatures - after all, they themselves are capable of heating up to 400˚С from the inside.
By the way, there are also halogen paws with a colored shade on sale, although it is not so easy to find them.
Fluorescent lamps - dimmable
You can also use fluorescent lamps in the bath - energy-saving and not integrated, but not those with an electromagnetic choke. They tolerate elevated temperatures well, but not frost. Such lamps can be dimmed, which gives them certain advantages.
Fiber optic lights - comfortable and stylish
Bright and stylish fiber-optic lamps for a bath are also not a bad option, but it is important to connect them correctly, strictly according to the instructions, in compliance with all fire regulations.
Fashionable LEDs - an outlet for designers
But LED lamps for the bath do not like heat - in the steam room they need to be placed as low as possible to the floor. Their brightness is high, but the color gamut is rich, which is why their bath attendants are most often placed behind the shelves and under them - such a mysterious illumination in the style of a space station that does not hit the eyes.
What kind of lamps cannot be put in the bath?
Ordinary incandescent lamps, which require special mechanical protection and threaten to explode with a drop of a thousand small fragments, and gas-discharge lamps with their high power and poor color rendering are not suitable for a bath.
And other lamps should also be protected from splashes, and so that “striped” shadows do not turn out because of the wooden crate, it is better to direct the lamps themselves in the opposite direction - to the previously installed reflective convex plates made of matt stainless steel.


Master class: stylish lamp in the bath with your own hands
In view of the fashion for individuality and exclusivity in the interior, many are looking for stylish and unusual lamps for baths and saunas - all kinds of lampshades and glass flowers are boring at home. And they find it - fortunately, a modern manufacturer only pleases with imagination and implementation of the idea. But he also asks for a considerable price for his work - from $ 400 to $ 800 for the most decent options. So why not make such lamps for a bath with your own hands without spending $ 10 on it? Moreover, there is nothing complicated about it. And let friends and acquaintances then wonder how much this light was bought and from which foreign manufacturer.
The main thing is that the savings in this regard are just what you need! Wood, for example, for such a lamp, you can take the one that went into the interior decoration of the bath. And you will also need such materials:
- Glass 4 mm
- Plywood
- Special PET film with a temperature range not less than 120˚С
- LEDs with an illumination angle of 120 ° C
- Getinax - electrical insulating material
- Aluminum tape
- Assembly glue and superglue
So, here's what you need to do:
Step 1. Templates of the main parts are made of fiberboard. To be correct, the same template must be applied to the corner where the lamp is located.
Step 2. The basic details of the frame are made according to the templates - preferably from linden. Vertical slats are also planed from it, the edges of which will need to be rounded:
- 4 pieces 750 x 35 x 15 cm
- 8 pieces 750 x 40 x 15 cm
- 4 pieces 750 x 45 x 15 cm
- 1 piece 550 x 50 x 20 cm - it is in this that the groove for the glass is made
Step 3. The main parts are fastened to the rails, and all joints are carefully coated with universal mounting glue, then tightened with self-tapping screws 70 mm long.
Step 4. For the glass stop, special strips are attached. The glass itself is cut from the prepared material and wrapped in PET foil. What kind of film is this? It is commonly used for rewinding motors as insulation.
Step 5. The slats are sawn, tried on and coated with assembly glue, after which they are pulled together with self-tapping screws.
Step 6. Now you need to take a rail with parameters 750x45x15 - and mark the points on it where the hole will be drilled. The glass will be fixed in place with two such slats. Moreover, the external vertical slats must be fixed with screws from the back side.
Step 7. In a regular Word, a table with 3x3 cm cells is made and printed. This sheet of paper must be glued to a sheet of getinax for the lamp and the intersections of the lines must be drilled. The diameter of the holes should be about 5 mm - for the diameter of the LED. Then - with a larger drill, you need to make conical grooves - so that the light from the LEDs is more directional. The paper can then be washed off with water.
Step 8 Now, on the back of the panel, you should glue the LEDs - with ordinary superglue. There will be 80 of them in total - they need to be soldered in 4 pieces. You get 20 LEDs of 4 at each point, and all of this is rated at 12 volts. The reflector for them will be aluminum tape.
Step 9. Install the power supply - it can be the same as for halogen bulbs. You only need to place it outside the steam room, passing only the cable through the wall to the lamp. The total consumption of this stylish and inexpensive luminaire will be some 250mA, which is equal to 3 W.
Step 10. And, finally, all the slats are attached with self-tapping screws to the frame - it is only important to pick them up to the length at which they will not come out from the front side. And the panel with LEDs is wrapped in PET foil and fixed.


That's all - a stylish, durable and beautiful steam room lamp is ready!
The operating conditions for electrical wiring in the bath are the most unfavorable. Accordingly, strict safety requirements are imposed on it, neglecting them can cause a fire in the premises or an electric shock to those who were washed.


- PUE Chapter 7.1. Electrical installations of residential buildings;
- SNiP 2.08.01–89;
- and GOST R 50571.11-96.
Files for download. Normative documents governing the installation of electrical wiring in buildings
SNiP 2.08.01-89
GOST R 50571.11-96
Do not start installing electrical wiring if you do not have enough knowledge, such experiments can end very sadly. First, we will give some practical advice on calculating the technical indicators of electrical wiring, the selection of cables and electrical fittings.


Where to start
Electrical wiring for bath lighting consists of several systems: an introductory panel with safety fittings, electrical cables and protective covers, wiring boxes (Berman boxes), switches, sockets and lighting devices. This is a classic "budget" set. For exclusive baths, this list can be significantly expanded due to the installation of electronic equipment for controlling decorative lighting, additional motion sensors, etc.


According to the accepted classification, baths are divided into four safety zones:
- limit zone 0. The zone touches the inner shower tray and the shelves of the steam room;
- restriction zone 1. Located at a distance of ≥ 60 centimeters from various types of water spray;
- boundary zone 2. Bounded by a horizontal plane at a distance of 2 m above the floor;
- boundary zone 3. Horizontal and vertical boundary conditional planes are located at a distance of 2.25 m.

Depending on the zone in which you plan to install electrical appliances, the degree of their protection is selected. Electrical equipment must have a degree of protection from IPX7 (in zone 0) and up to IPX1 (in zone 3). The degree of protection of electrical devices is indicated on the housing or in the instructions for use.


The cable brand should be selected for maximum peak power and operating temperature.
Practical advice. The size of the cross-section of Turkish and Chinese cables in practice does not correspond to the declared ones. Why? Copper is an expensive metal, in order to save it, manufacturers deliberately slightly reduce the cross-section of conductive conductors and do not indicate this in the instructions. In addition, the equipment for the production of cables is outdated, it cannot give the same cross-section along the entire length of the conductors. If, for example, a cross-section of 1 mm2 is indicated on a cable, this in practice means that this is the maximum diameter. And along its length there are sections with a section of 0.9, and with a section of 0.8, and with a section of 0.75 mm2. If you buy such cables, then immediately increase the power reserve by 25% of that specified by the manufacturer, if you need to have a cable with a cross section of 1 mm2, buy a cable from these manufacturers of at least 1.25 mm2.

But these are not all problems with unscrupulous companies. For the manufacture of insulation, they use low-quality plastics, in most cases after recycling. There is no certainty in their reliability. The reliability of the insulation largely depends on the ambient temperature; each brand of cable has its own permissible limits. In addition, the higher the cable temperature, the higher the conductor resistance. In turn, the higher the resistance of the wire, the more it heats up. And it turns out a vicious circle, which can cause cable burnout or fire.


Output. The desire to save money on cheap cables leads to very real losses and unjustified risks, do not get involved with them. It is much more profitable to immediately purchase expensive cables of well-known foreign or domestic brands. Check out the tables characterizing the technical parameters of cables of domestic and foreign production.

We will explain below how to check the insulation. Often it is impossible to make a check on your own; you will have to seek help from specialized companies. At the same time, they can draw up an act of compliance of the wiring with existing state regulations. They will also check the quality of the connection of the electrical wiring contacts.

This table applies only to products from bona fide manufacturers. For all others, increase the cable size by at least 25%.


Do not use these cables outdoors, they are afraid of harsh ultraviolet radiation and sudden temperature changes.


They are often versatile cables suitable for indoor installations. But the rather high price makes them economically unprofitable for indoor use, there are much cheaper options.


This table will help you understand each letter and number on the label. It will now be much easier to select brands exactly according to your needs. It should be noted that copper cables are not a cheap pleasure; due to special knowledge, quite impressive sums can be saved.
We have more or less figured out the theoretical section, you can proceed to the practical steps of installing lighting in the bath
Stages of installation of electric lighting in the bath
Very important. This is no longer theory, but practice. It so happened that in our country, grounding is still considered something superfluous. If in developed countries you will not find a single electrical device without grounding, then our compatriots are used to doing everything the old fashioned way. The European standard obliges manufacturers to produce plugs and sockets only with grounding, the special design of plugs and sockets does not allow the use of ordinary connectors. But we are redoing them and trying to "stuff" outdated plugs into modern sockets, or vice versa. We urge you to make grounding in the bathhouse and use only three-core cables when laying electrical networks. If you have a three-phase current in the bath, then the number of cores should increase to at least five.
It is not difficult to make grounding, for this you just need to drive a metal pin into the ground to a depth of at least one meter and connect a ground wire to it.


The specific depth depends on the physical characteristics of the soil and the total power of the instruments used.

The grounding is checked with a special megohmmeter. By the way, it is also used during the insulation test and the reliability of the cable connection in the distribution boxes. Such a device is quite expensive, but you do not need it. All the same, permission to connect the bath will be given by the official representative of the energy networks, ask him and he will ring the wiring and grounding.


Now you can directly deal with electrical wiring in the bath.
Step 1. Draw a floor plan of the bathhouse and the approximate location of lighting fixtures, sockets and switches in it. If you plan to use electric heaters, boilers, household appliances - consider their placement. Do not rush to make a final decision, consider several options. Keep in mind that the entrance shield should be located in the locker room, vestibule, or break room. It is strictly forbidden to place switches and sockets in the steam room. On the plan, mark not only sockets, switches and lighting fixtures, but also the location of the wiring.

Step 2. Indicate where the line transitions from one room to another. At the same time, keep in mind the safety zones and provide the necessary methods to protect the lines from mechanical damage.
Step 3. Calculate the total capacity of all consumers of electrical energy. We strongly recommend increasing the received power at least one and a half times, and based on this figure, make further calculations. No one can predict what devices you want to install in the bath in a year or two, the wiring must withstand an unexpected increase in power. It is much cheaper to immediately pay a little more for electrical cables than to redo all the wiring later. Cables and safety fittings are selected depending on the power.
How to choose the cross-section of cables and protective fittings
How is it done and why is it needed? The fact is that all cables are designated by the cross-section of the conductors, and sockets, switches and protective fittings are designated by the maximum current strength.
The power of electrical appliances is determined by the formula
P \u003d I × U,
where P - power, I - current, U - voltage.
Accordingly, the current flowing in the device that consumes the maximum power is determined by the formula
I \u003d P / U
The voltage in the bath is in most cases 220 V. Sum up the power of all devices and determine the maximum current. Further, according to the table, taking into account our recommendations, select the cable cross-section.
This will be the main cable, separate lines are diverted from it in different rooms, the cross-section of these cables is calculated in accordance with the maximum load in each of the bath rooms. The characteristics and nomenclature of protective devices depend on the total power. There are electronic, electromechanical and mechanical protective devices, we recommend using the latter. In terms of reliability, they fully meet the requirements of state standards, and at a price they are much cheaper. The device works simply: when the current rises above the set values, the bimetallic plate increases the linear dimensions and, through a system of levers, switches off the disconnector.


Criteria for choosing consumers of electric current and fittings
For each room of the bath, you need to select devices taking into account the operating conditions. According to international classification, the case is marked with the IPXX code. XX - two digits indicating the degree of protection against penetration of foreign objects (first) and moisture (second). Get acquainted with the proposed tables, they will help you choose the optimal devices for each room of the bath.

Protection class of the case against penetration of foreign objects and dust


Let's define, for example, which lamps you need to choose for the most "complex" room of a bath - a steam room. There is no dust there, it is enough that the housing protects against the penetration of objects ≥ 2.5 mm (the first number on the code must be "3"). In the steam room, they can not only take a steam bath, but also pour water over the body. This means that the housing must protect against such impact, according to the table, the number designation corresponds to "5". This means that the body of the luminaire in the steam room must have the designation IP35. We talk in such detail about the different classes of protection, not only because it directly affects safety, but also because the protection class of the case significantly changes the price of devices.
The same parameters should be used to select mounting boxes, sockets, etc.

On the network you can find recommendations to use energy-saving light bulbs for the steam room, they allow you to save electrical energy, create various designer lighting, etc. We do not argue with this, all this is true, only has nothing to do with the steam room. Why?
- All energy-saving light bulbs have electronics built into the base for voltage drop, impulse, and so on. The operating modes of the electronics prevent it from overheating; at high temperatures, it breaks down. What are the temperatures in the steam room?
- The burning time of lighting fixtures in a bath is limited to a few hours a week. How long does it take for the very high cost of energy saving appliances to pay off? According to our very optimistic calculations, with this operating mode, the price of bulbs can pay off in 70 years.
We advise installing ordinary incandescent lamps in the steam room. But if you really want to bathe in the multi-colored beams of LEDs, protect them as much as possible from overheating. Place as close to the floor as possible, use additional shades, covers, etc. for thermal protection.


How to connect electrical cables
And here there are standards that are prohibited to be violated. Each core of the cable has its own color, look at the table.


Simply put, for a single phase circuit, blue should be connected to zero, brown to phase, and green / yellow to ground. This is a very important rule, always follow it. Otherwise, you can not only get tangled in the wires, but also endanger the electrician repairing the wiring.

Currently, the use of aluminum conductive conductors for internal wiring is prohibited, but such cables exist in old baths.
Very important. Never directly connect copper and aluminum conductors, such a connection is quickly oxidized, conductivity is significantly reduced, the twist area heats up. In the best case, the connection will simply burn out, in the worst case, it will cause a fire. To connect copper and aluminum, you need to use steel adapters, on one side an aluminum cable is fixed, and on the other side a copper one. The current flows through the steel adapter from the aluminum to the copper cable.
It is advisable to use electrical fittings with special terminal blocks. If these are not found, then all the places of the twists must be reliably insulated and bred in different corners of the mounting boxes.

 Polyethylene terminal blocks
  Inside brass sleeve with two screws
  Insert the wires and tighten the screws


 Do not pinch aluminum. The aluminum conductor flows under constant pressure, and after a while the contact can easily disappear or deteriorate
  Self-clamping terminals
 Types of electrical wiring in the bath
The wiring in the bath can be open and closed, closed installation is carried out in Berman boxes, for open ones, ordinary external mounting boxes are used.


These boxes are available in various sizes, with lids, with additional fixing points in the walls. In Berman's boxes, not only are lighting wiring done, but switches and sockets are also installed with hidden wiring.


Concealed wiring is installed under the upholstery of walls and ceilings; cables must be protected by metal covers. These can be pipes or metal corrugated flexible hoses. It is not recommended to use plastic - there is a high probability of damage by rodents. The cabling for the lighting of the bathhouse for hidden wiring should begin to be done even before the finishing of the walls and ceilings. Simultaneously with the cladding, seats for lamps, sockets, switches and mounting boxes are cut out.


Open wiring is much easier to do, bath lighting is connected to cables laid along the walls. Cables must be protected with plastic tubes; you can additionally cover the wiring with decorative covers.
Very important. Before connecting the power, it is imperative to ring the leash for break, short circuit and grounding efficiency.
Options for placing lamps in the bath
If all of the above tips are mandatory, then the specific locations of the lamps are only advisory.
  |
One of the smallest rooms in the bathhouse, in most cases one lamp is enough. Place it in such places so as not to accidentally damage it while taking water treatments. It is forbidden to mount lamps close to a stove or chimney. We strongly recommend that you protect the luminaire with a decorative wooden fence - there is no risk of burns to the limbs. It goes without saying that the degree of protection of the enclosure must correspond to the operating conditions. The switch must be mounted at the entrance to the steam room from the outside, it is convenient to place it right at the door. |
  |
The lighting should be brighter, the lamp should be located at such a distance that they do not fall on the jets of water from the shower. |
 |
The placement is arbitrary, the main attention should be paid to the design of the room. As a rule, sockets are installed here for connecting various electrical heating devices. |
  |
There are no special security restrictions here. Where you like or where the designer suggests, install there. The sizes, types of light bulbs and their power depend only on the wishes of the owner of the bath. |
What voltage to choose for lamps
State standards do not prohibit connecting lamps in all rooms of the bath to a voltage of 220 V, but you can find recommendations to install 36 V or 12 V step-down transformers for them. The following can be said about this. If the wiring has high-quality RCDs (equipment protection devices), the grounding system meets the requirements of the PUE - safety is guaranteed. And if you still make a POS (potential equalization system), then none of the strictest examiners can find violations. 

Not convinced or are panicky afraid of high voltage? No problem, buy and install any step-down transformer for your lighting. Just keep in mind that it is quite difficult to find lamps designed for 12 V or 36 V on sale, and if they are, then their design characteristics are very far from perfect.
Bath Lighting Fashion Trends


Decorative lighting is often used to give the sauna individual exclusivity. For couples, fiber optic devices are used. The lighting device itself is located outside the steam room, the light is supplied to the room by optical fibers. The pleasure is very expensive, but the beauty is worth it. This lighting can be installed anywhere, from ceiling to floor. LEDs do not take up much space; they can be used to create various shapes and ornaments.
Video - Lighting in the bath
Installation of LED strip
LED lighting can completely change the interior of the bath, create a festive unusual atmosphere. And this is important for a quality rest. There is a large selection of different types of LED strips with different technical indicators, but it is sometimes quite difficult for an inexperienced consumer to understand them.


We are not talking about connection any more, especially since you can only connect what is familiar. Before considering the installation of a tape about LEDs, we will find out in more detail its technical characteristics.
Brief characteristics of LED strip


As you might guess, LED bulbs are used as lamps, supply voltage is 12 V or 24 V. The standard tape length is 5 m, but some manufacturers do not comply with these indicators. LED strips can be single-color (monochrome) or multi-color (polychrome). Polychrome are designated RGB and can glow in green, yellow, blue, red and white, or a combination of both.


The glow is changed by the controller, the voltage is reduced by the power supply. If you plan to install a monochrome LED strip, then the controller is not needed.

As far as light and lighting effects are concerned, now we will consider the issues of protection - a very important topic for a bath. All LED strips are divided into three groups according to the degree of protection against moisture.
LED strip groups
  |
The simplest in the device, are allowed for use only in rooms that exclude the risk of moisture ingress on all elements. |
  |
They can be used in rooms with high levels of humidity, but are not protected from direct splashes. The sauna can be used in all rooms, except for the shower and steam room. |
  |
They are not afraid of splashing water from different angles, can be used in showers and steam rooms. Although in a steam room, all LEDs are recommended to be used very carefully. Why? If you open the instructions for use, you will see that if you need to solder the contacts, you need to use the lowest-power soldering iron - the LEDs are afraid of overheating. A nearby LED will burn out from an increase in temperature, and so, since they work in three in relation to one resistor, then the next two will fail after the first. Another nuance for moisture-resistant LEDs - for sealing they are "packed" in a silicone tube, and it absorbs quite a lot of light flux. This must be borne in mind when calculating the illumination of the premises. |
The luminous flux depends on the number and individual characteristics of LEDs, in 12 V tapes there are no more than 120 pieces per linear meter, in 24 V tapes their number can increase to 240 pcs. We will describe below how to use these indicators during the installation of LED strips in a bath. In order to make it easier to navigate the technical characteristics of the LED strip, check out the table. These are universal designations, their knowledge allows you to select the optimal brands.


How is luminous flux calculated
In order for the LED strip light not only to look original, but also to fulfill its immediate task (illuminate the room), you need to be able to calculate its parameters. We will not delve into complex physical formulas, let's just say the main thing. Most tapes have LEDs with a luminous flux of 5 lm, multiply their power by the number per running meter and get the value of the flux per meter of tape. For example, there are 50 LEDs per running meter, the total luminous flux is 50 × 5 \u003d 250 lm. Then look at the table and determine the required tape length depending on the required room lighting.


Data on specific types of LED lamps. Current consumption by different types of lamps
According to the table, 1 meter of our calculated tape gives as much light as a 20 W incandescent light bulb. This means that if you want to replace a 100 W incandescent lamp in the room, then you need to take 5 meters of LED strip with 50 bulbs per meter.
The technical indicators of LED lamps of various types are given in the table.
We think that now you can independently calculate the strength of the luminous flux in each room of the bath, taking into account its purpose. This is clear? Let's move on.
How to complete an LED strip
If a standard five-meter tape is enough for you - no problem, the kit is already equipped with a corresponding power supply, and if there is a need to increase the power, then you need to calculate the tape for the amount of current consumed.
Important. For the power supply, not only the voltage value is important, but also the current value. If the LED strips require a large amount of current, then the power supply will quickly fail. Experienced electricians recommend that, in terms of current, the power supply has a margin of at least 25% of the maximum power of the tapes.
How to calculate this indicator? Conscientious manufacturers indicate the current parameter in the instructions, if not indicated, then you will have to do the calculations yourself. Count the number of LEDs on the strip, take from the table the current consumption of each of them, taking into account the type. In our example, there were 50 LED-CW-SMD5050 bulbs on the meter, there were 250 of them on five meters. One LED requires 0.02 A, all LEDs must use 250 × 0.02 \u003d 5 A. But, as can be seen from the tape diagram, three LEDs are connected to one resistor, therefore, the current decreases three times 5: 3 \u003d 1 , 7 A. We have a tape 10 m long - maximum current 17 A.

A compact power supply needs to be bought with an increase in power of at least 25%, which means in our example it is necessary that it withstand 17 + 3.75 \u003d 20.75 A. Now we find out its power - we multiply the voltage (12 V) by the amperage (20 , 75A) and we get a power of 249 W.
So, you have calculated the luminous flux of the tape, taking this indicator into account, you have selected the power supply and the controller, now you can start installing them. Check out the proposed schemes in advance.


We already mentioned that the controller is used to change the ribbon color, glow modes and create various effects.
Stages of connecting LED strip
Step 1. Considering our advice, complete all preliminary calculations, purchase accessories, including a controller with a remote control.


Step 2. Decide where to install the power supply and controller. It is better to mount them in inconspicuous places. Keep in mind that all electrical appliances, especially those with electronic circuits, have three main enemies: voltage fluctuations, high humidity and temperature. Accordingly, do not attempt to install them in a steam room or shower room.

Step 3. Measure the amount of flex cable from the power supply to the unit. It can be powered both from the central electrical panel and from the outlet. Make the decision yourself, taking into account the layout of the premises and the presence of sockets in them.
Step 4. Secure the power supply and controller by removing the housing cover and screwing screws or dowels into the mounting holes. Run a 220 V cable to the power supply.
Step 5. Install the LED strip in the desired place, fix it using standard Velcro strips or any other fixtures.
Step 6. Using connectors (they are sold as a set or separately) connect the wires.


If the LED strip is polychrome, then a controller is attached to it. Observe the color of the wires. For the power supply, be sure to look at the phase. Remember that the "neutral" wire is only blue, the color of the phase can vary depending on the cable brand and manufacturer.

Video - Connecting the controller to the LED strip. LED controller
At the output from the power supply, the phase is also important. However, if you mix up the wires, the tape will not burn, it simply will not work. Swap the wires at the outlet of the power supply and everything will work.
If you need to cut a piece from the tape, do it only according to the indicated marks using ordinary scissors. But we would not recommend cutting it, try to make bends, turns, etc.


Step 7. Call the connection tester, everything is fine - you can supply 220 V.
A few words should be said about Chinese products. All of them have very short wires in order to save expensive copper. In addition, the quality of the soldering is below any criticism. We strongly advise you to fix all the weak points before editing, then it will be quite difficult to deal with these matters.


Let's start with short wires, they are so small that even an ordinary connection is very difficult. The wires will have to be tightly pulled, and at this time they will be pulled out of the soldering or terminals. We strongly advise you to immediately re-solder them and replace them with longer ones. For soldering, use a low-power soldering iron, do not overheat the LEDs.

Instead, attach longer ones, this will expand the possibilities of mounting the tape, taking into account the specific characteristics of the premises. On the other end of the soldered wires, you can put on special tips or just tin them.


That's it, turn on the LED strips, set your favorite color and be happy. But you can rejoice for a long time only on one condition - all our recommendations have been exactly followed.


Video - Connecting LED strip
How to hang a lighting shade


There are so many lighting shades that it is unrealistic to consider connecting each of them. We will only talk about the general universal rules.
Step 1. Disconnect mains power. If the shield is far away, be sure to hang a warning sign on it. This is very important, the inclusion of power supply by third parties has been repeatedly.

Step 2. Study the instructions for the luminaire. If it is not there, disassemble the cover, find on the body the entry point for the power cables and the place for fixing the body. We hope that the breaker is connected correctly and a phase is connected through it.


Step 3. Mount the plafond on a wall or ceiling, before pushing the wires through the mounting holes on the case. Use a tester to check the correctness of the cartridge. Sometimes the fastening of the conclusions is done in bad faith, the contacts will warm up and burn out over time. Tighten all the clamps, if the leads are riveted - touch them, they should not wobble.
Step 4. Strip the ends of the wires to a length of about 5 mm, if the cable is stranded, tin the ends or at least twist them tightly. Insert into terminal blocks and tighten.
Practical advice. The stranded cable is not tightly clamped the first time; you need to repeat the operation several times on each clamp.
Step 5. Screw in the bulb, check the wiring for a short circuit. Everything is normal - put back the decorative cover and turn on the power.


Pay attention to the strength of the fixing of the plafond to the supporting surface. If the cover is plastic, be sure to observe the recommended maximum power of the incandescent light bulb. For energy-saving lamps, completely closed shades cannot be used - they must be constantly cooled with fresh air.


Bath lamps: features of choice

 On the modern market of electrical appliances, there is a wide range of lamps for baths. We suggest that you familiarize yourself with devices that can work in extremely difficult conditions and the rules for installing them in different rooms.
 - Luminaire types
- Manufacturers
The bathhouse is considered a room with an increased risk of electric shock. To avoid trouble, luminaires must meet safety standards and function reliably under extreme conditions.
Appointment of lamps for the bath
Before purchasing a lamp for a bath, check the degree of protection of the electrical appliance, the value of which is printed on the body or base in the form of alphanumeric markings. For example, luminaires for a steam room must have a protection higher than IP54. IP stands for international protection, the first number is the level of protection against solid objects entering the instrument cavity, the second is protection against liquid seepage.Lamps for washing in a bath


In the washing room, there are three sections in which lamps of different protection classes are installed:
- Zone 1 is located directly near the water - shower, pool, tap, where there is a high risk that splashes will fall on the luminaire from all directions. In such places, install devices operating from 12 V, the class of protection against moisture is at least 5 (IP 45, 46, 55, etc.).
- At a distance of 60 cm from the water, where splashes from the water can fly, there is a second safety zone. Use luminaires of at least 4 protection classes here.
- Next comes the third safety zone, in which you can install products with 1 class of protection.
Lamps for dressing rooms and rest rooms in the bath


The rest room is also considered to be a room with high humidity, therefore the protection class of the lamp in the rest room in the bath is not less than 1. It is necessary to provide good light in the room, so install a chandelier for several sockets, light bulbs, two switches.
Install the same lamps in the hallway as in ordinary rooms - sconces, ceiling lamps with 75-100 W bulbs.
Lamps for a steam room in a bath


The body of the lamp for the steam room must withstand temperatures of at least 100 degrees, if installed on walls, and 250 degrees, if attached to the ceiling. Cartridges and shades of products must be made of ceramics, porcelain and heat-resistant plastic. The body of such a luminaire is made sealed, with a silicone or rubber seal, so that water does not get inside. In addition, the lamps are produced with protective shades so as not to be injured by the fragments of an accidentally broken light bulb.
In the steam room, use 60-75 W bulbs. More powerful light bulbs heat the ceiling a lot. It is recommended to use 12 V bulbs. For such purposes, use a step-down transformer that is installed outside the steam room.
In the steam room, the main thing is not to hang the lamp where it is impossible, therefore, familiarize yourself with the following principles for placing and installing lighting devices in this room:
- It is forbidden to install devices near the oven. Even if they are heat-resistant, they are not designed for hot air from the heater.
- Lamps for a steam room in a bath should create soft, dim lighting. Too bright light interferes with rest.
- Install lamps in steam rooms on the walls at medium levels; it is not recommended to mount appliances on the ceiling because of the high temperature.
- If you do decide to use a ceiling lamp for a bath, choose a place where you cannot reach it with your head.
- The devices look good in corners, where they don't bother anyone.
- The luminaire should be placed behind your back and not blind your eyes.
Types of lamps for a bath


Not all lamps are suitable for installation in a bath, therefore, their choice should be approached very responsibly:
- Halogen lamps... In the hottest areas of the steam room, use 20-35W halogen lamps with their own reflector. They are not afraid of high temperatures (they can withstand up to 400 degrees), the contacts are protected from moisture, the voltage used is not dangerous for humans. Halogen lamps with a colored shade look beautiful.
- LED lights... LED lamps do not like heat and are very bright, so place them in the steam room as low as possible. They are often mounted behind or under shelves, so they create unusual lighting in the room. The pluses include a wide range of colors of products and economy. The devices emit a large amount of illumination at low volumes. You can find a corner decorative screen and glue the LED lamp in the corner where the ceiling and wall meet.
- Incandescent lamps... It is not recommended to screw bulbs more powerful than 60 W into the lamp holders, as they heat up the ceiling and the housing very much. In the steam room, install sealed lamps for a bath with a matte or translucent glass shade that allows diffused light to pass through. To dim the light, cover the plafond with a wooden grill.
- Fiber optic lights... They allow you to colorfully decorate the room, but they are expensive. Along with the lamps, you must purchase special attachments, lenses, light filters. Light is emitted from the end of the fiber and the side surfaces, creating visual effects - waves, flames, rainbows, etc. Fiber-optic heat-resistant lamps for a bath can withstand up to 300 degrees, retain their qualities for a long time, and are very reliable. They are considered the safest lighting fixtures, because optical fiber conducts light waves, not electricity. They can even be mounted on the bottom of the pool.
- Fluorescent lamps... Buyers are attracted to such products by the ability to adjust the brightness of the lighting using a dimmer. Luminaires are not afraid of high temperatures, but they do not tolerate cold well. Devices with electromagnetic chokes must not be installed in saunas.
Bath light manufacturers


Finnish companies Tylo and Harvia specialize in the production of waterproof lamps for baths. If possible, buy their products for steam rooms or saunas. They are expensive, but they stand out for their high quality and reliability.
Linder lamps are low-cost products, not intended for steam rooms, they are recommended to be installed in other rooms of the bath instead of Tylo and Harvia.
All other companies produce products of approximately equal quality, therefore, if you cannot decide which lamp to choose for a bath, focus on the characteristics of the lamps, and not on the manufacturers.
How to choose a lamp for a bath - watch the video:
If you take into account all the recommendations for choosing lamps for a bath and the rules for their installation, you can create a stunning interior in the room for a pleasant pastime. Author: editors TutKnow.ru
Lamps for a bath in a steam room - an overview of options with suitable characteristics
Carrying out lighting in the bath, special safety measures should be observed. In conditions of high humidity and temperature, not all cables and electrical equipment can stably perform their functions, including switches, sockets and lamps for a steam room in a bath.
They must meet certain requirements.


Requirements for luminaires and other equipment
The problem of proper lighting of all bath rooms should be solved even at the stage of their design. First of all, it is necessary to correctly place switches and sockets, which cannot be in the steam room or washing compartment.
They are taken out to a dressing room or other relatively dry room and installed at least 80 cm from the floor. In this case, the instructions only allow the use of equipment with a protection class of at least IP-44.
The safety requirements for the luminaires themselves are even higher (not lower than IP-54), since they will work in difficult conditions.


What other characteristics should they have?
- Thermal stability. All materials used in the manufacture of lamps for saunas and steam baths must withstand the effects of high temperatures (up to 120 degrees);
- Body tightness. This applies primarily to appliances with conventional incandescent lamps.
- The durability of the plafond - it must withstand not only accidental mechanical influences, but also sudden temperature changes (for example, when cold water splashes on its heated surface).
Attention!
With special care, you should select lamps for baths with a combined steam room and washing room.
- Low brightness. Bright light in a steam room is not only unnecessary, but can also irritate people who want to relax. Therefore, the lamps should be selected with a soft diffused light or matt shade.
Council. You can reduce the brightness, protect the lamp from impacts and support the natural interior design of the steam room with the help of overhead wooden lampshades attached to the walls or ceiling of the bath.


Types of lamps for the steam room
The above requirements are met by several types of lighting devices with classic incandescent lamps, LEDs and optical fibers.
Traditional lamps
Despite the emergence of many modern analogues, not everyone abandons the usual, simple, laconic and completely reliable lamps with incandescent lamps, consisting of a sealed body and a shade made of heat-resistant glass. Consumers are attracted by their functionality and low price.


When choosing such a luminaire, make sure that there are no parts in its structure that corrode from the effects of moisture, the plafond is attached through a special waterproof gasket, and the protection class is not lower than the established standard.
For reference. The best are the products of Tylo and Harvia.
They are distinguished by reliable quality and interesting design.
LEDs
LEDs have become part of our everyday life in recent years. The area of \u200b\u200btheir application is incredibly wide - these are residential and public buildings, and street lighting, and lighting of greenhouses.
Their main advantage is the ability to use at any temperature and humidity. There are LED luminaires that can even be installed in the walls or bottom of swimming pools.


Other advantages include cost-effectiveness and durability, as well as the ability to create various spatial and color combinations, embed small lamps and LED strips in special niches or furniture.
The disadvantages include high cost and excessively bright and harsh emitted light. Therefore, for a steam room, they usually use either small lamps scattered throughout the room, or LED strips for lighting.
Fiber optic lights
Surely many had or have a lamp in the form of a "panicle" made of fiberglass threads, fixed in a projector, in which a plate with multi-colored glasses rotates. Such a "whisk", which is a bundle of many fibers, can be used in a hot steam room, since fiberglass can easily withstand temperatures up to 200 degrees.
If desired, such lighting can be assembled by hand by installing the projector itself with a light source outside a hot and humid room. Light wires are not afraid of any extreme conditions, therefore they are absolutely safe, and at the same time durable, easy to install, create even and soft lighting.


An additional plus of such lighting is the ability to create a spectacular wall or ceiling design. One example you see in the picture above is a luminous panel on the wall. Another popular option is a “starry sky” on the ceiling of color-changing or flickering “stars” of different sizes, depending on the thickness of the beam.
Council. To save energy and for your own convenience, it is possible to recommend the owners of the baths to equip the steam room and the washing room with motion sensors.
Conclusion
It is not at all necessary to stop your choice on any one type of lamps - they can be used in any combination to support the interior solution and create a cozy, relaxing atmosphere.
The bathhouse, even in modern conditions, is in great demand, because it is there that a person can truly relax, improve health and rest. Given such a large number of its positive qualities, many people with different financial wealth, status, physical condition dream of having a real bath complex at home. Naturally, its size, design and cost depend directly exclusively on the owner. If a person has a well-developed imagination, he will be able to refine his bathhouse on his own. This article will discuss how to make a lamp in the bath with your own hands.
Features of self-creation of bath lamps
Before getting down to work, you need to consider the main points that are directly related to the creation of such useful devices. Now we will talk about the main directions in which this topic is developing. What questions do home craftsmen have more often?
According to the experience of specialists, they are divided into three blocks:
- Connecting lamps with your own hands. Here, of course, certain knowledge in the field of electrical engineering will not be superfluous. There are some rules for working with electricity in conditions of high humidity and temperature, which must be understood and followed.
- The choice of the safest lighting devices for the bath. Make sure they are not afraid of high temperature, humidity. Making the wrong choice can lead to serious problems.
- Production of decorative screens, original lampshades, decorations for the decoration of individual rooms. It must be remembered that the lamps are installed not only in the dressing room, but also in the steam room.
What should be the lighting system in the bath?
Even at the stage of developing a technical design for a bath, a special diagram should be drawn up, which clearly indicates the location of sockets, switches and lamps. Naturally, we will touch on the last point concerning lighting devices. It is very important to determine where and how to place them, what to pay maximum attention to when drawing up a diagram. When deciding to make a lamp for a bath with your own hands, you need to dwell on the rules of lighting in a steam room in more detail.
Here are the basic requirements that such devices must meet:
- Lighting should be soft, not directional, because no one will be pleased if the light hits the eyes.
- Excessively bright light does not allow you to relax normally, because the steam room is not a place for manicure, shaving or applying makeup.
- Lamps should be positioned so that they are not strongly affected by high temperatures. It is best to place them at middle or lower levels, as it is too hot under the ceiling.
- Each luminaire must be protected by a grate or screen so that in the event of accidental damage, fragments do not fall on people relaxing in the steam room. In addition, in a saturated, humid steam room, there is a high probability of electric shock.
- In addition to the main lighting, specific places should also be highlighted - a doorway, a font, shelves, a place for placing containers with water.
If you comply with all these requirements, then your home steam room will become the most comfortable place where people will not bump into each other, be afraid of getting hurt.
Waterproof lighting devices for the steam room
If you are going to make a lamp for a bath with your own hands from wood, first of all, figure out some of the little things that will undoubtedly help you make the right choice and create exactly what you need.
This information includes the following:
- The level of protection of an electrical appliance from moisture and solid particles, which, as a rule, are indicated on the case or packaging of the devices. It is the combination of several letters that indicates the degree of protection the lamps have.
- Thermal stability of materials, of which the body is made. Here, the temperature of the steam room is taken into account, which can range from 60 to 120 degrees. You should focus on the highest indicator.
Important! The body of the lighting device must be sealed, equipped with a rubber or silicone seal that does not allow moisture to penetrate inside. It is recommended to choose LED or fluorescent lamps for luminaires, since they do not heat up much when burning compared to ordinary incandescent lamps.
Homemade lamps for the steam room
Of course, it's better not to complicate your work and not make a device from scratch, so let's stop at making decorative grilles, unique lampshades and screens. Everyone decides for himself whether it will be fluorescent, fiber optic or LED devices. The main role is played by the cost of the limiter.
Wooden luminaire with decorative grille
Many baths, built with their own hands, have an incredibly beautiful and unique interior, decorated mostly with wood. Of course, it is more appropriate to equip rooms lined with clapboard with floor trays and shelves made of poplar or linden with wooden lamps.
Important! The wooden decorative grill will perfectly fit into the decoration of the steam room and will protect the device from accidental damage, the light will be able to diffuse gently, while creating a relaxing atmosphere of comfort.
The decorative grille includes the following elements:
- Upper and lower bases.
- Slats attached to the body.
Create a luminaire according to the scheme:
- Frame. This part may differ in shape, it all depends on where you want to place the device. If it is a wall light, then give it a semicircular or rectangular shape. If it is located in the corner, then its shape should be close to trapezoidal or triangular.
- Reiki. Calculate the length of the slats for each grate - it all depends on the dimensions of the device behind it. If you want to get a strict lattice, then take wide rectangular planks and connect them in parallel rows or cross them with the letter X.
Important! For lovers of everything elegant, curly slats are suitable. Round off all sharp edges, carefully grind the surface to give the grate an elegant look.
- Attach the strips to the frame with self-tapping screws from the inside so that they are hidden from the outside. The fact is that too high a temperature instantly heats up metal parts, and if you accidentally touch them, you can get a severe burn.
By analogy, create several lattices, and your do-it-yourself sauna lamps from wood are ready.

Diffusion shield for luminaire protection
The grille is considered the simplest option for finishing lighting devices, but, fortunately, not the only one. Another great option is a dedicated diffusion screen.
To make it yourself, prepare the following materials:
- Bark "birch bark" or tree.
- Thin but strong enough fabric.
- Clay.
- Plastic.
- Paper.
- Glass.
When creating a lamp for a steam room with your own hands, it is better to choose a tree for making a screen, because compliance with such requirements plays an incredibly important role here:
- Sufficient level of hardness. The screen should not only beautify but also protect the lamp from accidental impacts.
- Low level of heat capacity. This element should not be very hot, otherwise it will be difficult to avoid burns.
- Ease of processing. You yourself can shape the screen to the desired shape.
You will need to follow these steps to create the screen.
A lampshade for a bath is an important decoration element, which, along with a practical one, has a great aesthetic value. It protects the socket and lamp from moisture and mechanical stress, and also serves as an interior decoration.
Features:
Due to the use in extreme conditions, lampshades for baths and saunas must meet the following requirements:
- Strength. The lampshade or plafond must be strong enough so as not to burst from overheating and not injure people;
- Environmental Safety. Under the influence of high temperatures there is a risk of emission of harmful fumes from plastic and plastics into the environment, therefore, the lampshade must be made of natural or harmless artificial materials;
- Fire safety. The material from which the product is made must be non-combustible or treated with a special compound;
- Moisture resistance and durability. The use of fabric and paper options is not allowed

Varieties
Due to the special requirements for products for baths, there are not so many materials from which a lampshade for a bath can be made. The following types of lampshades are most suitable for work in conditions of high humidity and high temperatures:
- Glass... Made of thick frosted glass in the form of sealed wall-mounted lampshades. In such models, the use of incandescent lamps is allowed. Products can be different in shape and color of the shade lens. The lampshade of the lamp, made in the form of a kerosene lamp, looks very original. It is transparent and repeats the shape of the protective glass of the kerosene stove, and in combination with metal parts, the product with such a lampshade looks very impressive;
- Heat-resistant plastics, stainless steel and aluminum can also be used in the manufacture of lampshades for some rooms of baths and saunas. The main requirement for them is the ability to withstand temperatures up to 100 degrees;
- Wood. Environmentally friendly natural material that fits perfectly into the interior of the bath and is its decoration;
- Himalayan salt.Products with the use of Himalayan salt not only create a pleasant soft light, but also emit beneficial substances into the environment that have healing properties and a calming effect. When heated, the salt ionizes the room and creates the effect of a salt cave, the therapeutic microclimate of which is useful for bronchopulmonary pathologies, diseases of the central nervous system and problems with the skin. Thanks to the translucent structure and unusual textured pattern, Himalayan salt lampshades create a soft shimmering light flux and are able to create a unique atmosphere.
- Wood. Environmentally friendly natural material that fits perfectly into the interior of the bath and is its decoration.
Salt slabs can be built into the wall over the light source and serve as a diffusing screen, or they can be made in the form of lampshades and half-lamps.


For the manufacture of lampshades and lattices in industrial design, cedar, linden and abash are used, able to withstand extreme conditions and do not lose their original appearance for a long time:
- Linden- the most inexpensive material that exudes a pleasant aroma when heated and does not swell when exposed to high humidity.
- Cedar and abash - more expensive materials with a beautiful structure of wood fibers and heat resistance. It is impossible to burn your hands on products made from such tree species, they retain their aesthetic appearance for a long time, are moisture resistant and durable. Models made of such materials can be used in both the washing room and the steam room.
- Looks beautiful and rich lampshades made from several different types of wood. Due to the different fiber structure and shade, products with such a screen or grating look very decent.
- When making lampshades with their own hands, they are used vine, birch bark and bast. These materials lend themselves well to cutting and grinding, are not afraid of moisture, and are inexpensive.
- Conifers, such as pine and spruce, are not recommended for the production of lamps in the bathhouse due to the increased release of resin under the influence of high temperatures and the possibility of scalding on the surface of the product.


Wooden lampshades can be made in the form of a diffusing screen and a decorative grille. The screen is a flat or slightly curved thin sheet with one or more diffusing holes on it, through which light enters the room. By the type of mounting and design, screens are divided into corner and wall. For small rooms, it is better to choose the corner option. It takes up less space and reliably protects the lamp from accidental contact and damage.
Wall-mounted models require careful selection of lamps, due to the possibility of splashing and the likelihood of mechanical stress.

Lampshades in the form of a decorative lattice are in perfect harmony with all the elements of the sauna decor, made of wood of various species. The lattice can be made of flat rectangular slats, long cylindrical parts or rods, which can be either fastened together or have individual fastening, being installed in grooves.
Combining perfectly with wooden tubs, buckets and scoops, they add the finishing touch to a room's design.
When using a lampshade in the form of a wooden lattice, you need to take into account the properties of wood and choose species that are not prone to swelling. And placing the lamp in the opposite direction and directing it to a reflective convex stainless steel plate will help to avoid striped shadows from the grill. The place of its location depends on the shape of the decorative wooden lattices. If a lamp with such a lampshade hangs in the corner, then a trapezoidal or triangular shape will do. Wall-mounted models can be square or rectangular, and a semicircular grille that almost completely encloses the lamp will allow you to achieve diffusing light.

DIY making
The simplest option that you can make yourself is an angled diffusion screen, which can be made in the following way:
- take a thin wooden sheet and mark the height and width of the future screen on it;
- in the center of the resulting rectangle or square, draw a hole of any shape. These can be geometric shapes, the contours of a maple leaf, or any other shape;
- carefully cut out the scattering hole according to the drawing and carefully grind the workpiece;
- cut the screen along the contour outlined in advance and process the edges with sanding paper;
- using self-tapping screws, connect three bars in the shape of a triangle, where the hypotenuse will correspond to the width of the prepared part with a shaped hole for scattering and attach the lower part of the workpiece to the hypotenuse;
- make another triangle of exactly the same dimensions to fix the screen from above;
- install the finished structure in a corner using fasteners.

You can also make a grate-lampshade yourself:
- make a C-shaped drawing of a part on thick paper that will serve as a frame;
- attach the pattern to a wooden blank, outline and drunk two identical parts, then sand them with sandpaper;
- step back one centimeter from the edge and draw a line that exactly repeats the shape of the workpiece. From the resulting line, indent another 1 cm and also draw. The result is two parallel lines. Line up the second part in the same way;
- cut a groove along the drawn lines on both blanks with a depth of 5 mm;
- make slats from wood 1 centimeter wide and height corresponding to the height of the future lampshade and polish them;
- lay the bottom part on a flat surface and insert the slats into the groove by tapping with a hammer. The distance between the slats is previously marked on the workpiece using a pencil and a ruler;
- after all the slats are securely fixed in the lower part of the frame, carefully attach the second workpiece from above and directing each rail into the groove of the upper workpiece, carefully finish the assembly of the structure with a hammer;
- fix the lampshade to the wall using self-tapping screws and fasteners.
Correctly selected and installed bath lamps are not just a source of lighting. It is an important element of a comfortable stay and a pleasant pastime. At the same time, one should not forget that the bath has high humidity and temperature. Therefore, when choosing a lamp for a steam room, washing room, etc., you should also think about safety.
For the bath, you must choose lamps that can withstand high temperature and humidity
Safety rules
Lamps for saunas and baths will illuminate the room where the temperature is understood to be up to 100-120 ° C. Therefore, they must have sufficient thermal stability.
High humidity is another potential hazard when operating lighting fixtures. Therefore, a lamp for a steam room in a bath or washroom must be waterproof. Additional protection will be provided by sealed shades that are resistant to moisture and high temperatures.
 It is necessary to choose sealed plafonds for the bath
 It is better to install light sources under the ceiling or in the corners of the room. In this case, it will be possible to avoid accidental contacts and / or mechanical damage to lighting devices by negligence. When choosing plafonds, the main condition is tightness. To give additional aesthetic properties to a simple luminaire, you can use openwork wooden overlays in the form of lattices or carved screens.
 It is better to install lighting in the corners of the room under the ceiling.
  Wooden grilles are often used to refract lighting in the bath and as lampshades.
 How to choose lamps and lamps for a bath
Modern industry produces a wide range of lamps for rooms with high humidity - baths, saunas, bathrooms. These devices can use lamps such as:
- incandescent lamps;
- lED;
- fiber optic.

When choosing a specific luminaire, you need to pay attention not only to its design, but also to the degree of protection. The required safety class is IP 56. Such lamps are resistant to moisture.

The free space between the dome and the body is additionally protected by a special seal. Its integrity must be checked at the time of selection.
Nuanas! A properly selected lighting fixture will allow the use of conventional incandescent lamps in the steam room and / or washroom. Allowable power - no more than 60 W.
 For a bath, you need to choose low-power incandescent lamps, up to 60 W
 Incandescent lamps get very hot when they burn. The temperature in the bath room is usually high. Low lamp power will protect against fire. After all, the walls in the bath are often sheathed with wooden boards, clapboard, etc.
LED lamps for a bath
Many owners are interested in whether it is possible to put LED lamps in the bath. To resolve all doubts, you need to familiarize yourself in more detail with the basic technical characteristics of such light sources.
 The advantage of LED strip is that it is not afraid of moisture
 LED lamps for baths have such remarkable properties as:
- moisture resistance;
- fire safety;
- adjusting the direction and / or intensity of the luminous flux;
- acceptable price.
 With the help of LED strips, you can achieve an interesting lighting design in the bath
 The safety class of individual luminaires is up to IP65 and higher. You can achieve very interesting effects by installing LED lamps in the bath. Is it possible to light a steam room or washroom like this? Of course it is possible and even necessary. Bath LED lamps are one of the most successful options. They are not even afraid of direct water jets. The main disadvantage that LED lamps for baths and steam rooms have is their rapid deterioration under the influence of high temperatures.

It should be remembered that the remote control with which the LED lighting is regulated must be protected from moisture and dirt. To do this, you need to place it in a special plastic wrap case. Based on all of the above, each owner will be able to determine for himself whether it is possible to use LED lamps in the bath.

Fiber optic lamps
A great option is fiber optic lamps for a bath. With their help, lighting is obtained by means of a light wave, and not electricity. Therefore, such systems are absolutely not afraid of water.
Fiber optic lamps for steam rooms in a bath can be installed without fear. The material from which they are made is capable of withstanding temperatures up to 180-200 ° C.

With the help of fiber-optic lamps, you can create an atmosphere of calmness, coziness and peace of mind in the sauna. This promotes self-relaxation of the human body. The beneficial effects of bath procedures increase several times.

How to properly arrange light sources in a steam room
Before installing luminaires with one type or another of lighting lamps, you must carefully study the instructions and all the manufacturer's instructions. It is very important to choose the right location for the light source.
In a steam room, where the level of temperature and humidity is especially high, only heat-resistant lighting devices can be installed. In this case, the lamps should be located away from the stove. This is a prerequisite.
 It is better to place the lighting in the steam room away from the stove.
 The optimal location of the light source in the steam room is in the corner of the room and / or under the ceiling. In this case, the dimensions of the room and the size of the ceiling must be taken into account. The ceiling light should be taller than a person's height. The corner cover is installed so as to exclude the possibility of accidental contacts.
You can attach LED strip along the wall under the ceiling. Under it, you definitely need a base made of non-combustible heat-resistant material.
 LED strip can be placed under the shelves, but so that they do not interfere with visitors
 The base for the LED strip and / or any other lighting device located in the Russian bath must be made of a material such as:
- stainless steel;
- aluminum;
- heat-resistant plastic;
- ceramics (only for dry rooms).
 It is better to use warm shades of lighting for lighting the steam room.
 Important! For a lamp in a sauna, where the humidity level is much lower, you can make a base of ceramic materials.
The right lighting for your washroom
In a small washroom, 1 lamp will be enough. The plafond must be sealed to prevent water splashing on the lamp and / or socket.
The wiring for lighting fixtures in the bath must be insulated especially carefully. This will prevent accidental contact between moisture and electricity.
 The lighting in the washroom must also be waterproof.
 A large washroom requires several fixtures to be installed. Therefore, when choosing their location, you need to take into account the location of the bath, sink, bidet, shower. It is better to make preliminary zoning of the room.
As a rule, 3 zones are conditionally distinguished in the washing room:
- in the immediate vicinity of a source of moisture;
- at a distance of 0.6 m;
- in a relatively dry space.
The moisture level is highest near the water source. Therefore, in this area, you can install lamps and lamps for a 12 volt bath. IP rating for moisture protection - at least 45 units.
Moisture is considered to be an area located approximately 60 cm from a direct source of moisture. Here you can use luminaires and lamps with a medium protection level.
 LED lighting can be used even in the pool
 In a dry area away from faucets, showers, swimming pools, etc., the lighting fixtures and lamps with the lowest level of protection can be used.
Lighting of the rest room and other premises
There is no constant high humidity in the rest room. Therefore, lighting fixtures with a minimum level of protection can be used here.

Dressing room, billiard room, dressing room and other additional rooms can be illuminated as living rooms. However, shades are still better to use sealed, made of durable material.
It is possible to install energy-saving lamps in the bath only in rooms with low heat levels. Such light sources are capable of withstanding temperatures no higher than 60 ° C. Therefore, in a steam room that heats up to 100 ° C and above, it is dangerous to use such lamps. Energy-saving lamps can be used in other rooms of the bath - a washing room, a dressing room, a rest room, etc.
 Energy saving lamps can only be used in the dressing room and vestibule
 Infrared lamps
Recently, infrared lamps for baths or saunas have become increasingly popular. The average power of such light sources is from 250 to 300 W.
The frequency of infrared radiation is in the order of 1400-3000 nm. For technical connections when installing such devices, a silicone wire is used.
 Infrared radiation
 A special remote control allows you to vary the radiation intensity. This allows you to set the required temperature and creates all conditions for comfortable rest and recovery.
Infrared equipment is mounted - heaters, lamps, etc. without much difficulty. The main thing is to follow the manufacturer's recommendations exactly. The number of emitters is selected in accordance with the dimensions of the room.

Salt lamps
A wonderful option offered by modern industry is salt lamps for a bath. These are not just lighting fixtures. With their help, you can thoroughly improve your health and get much more pleasure from hygiene procedures and bathing.
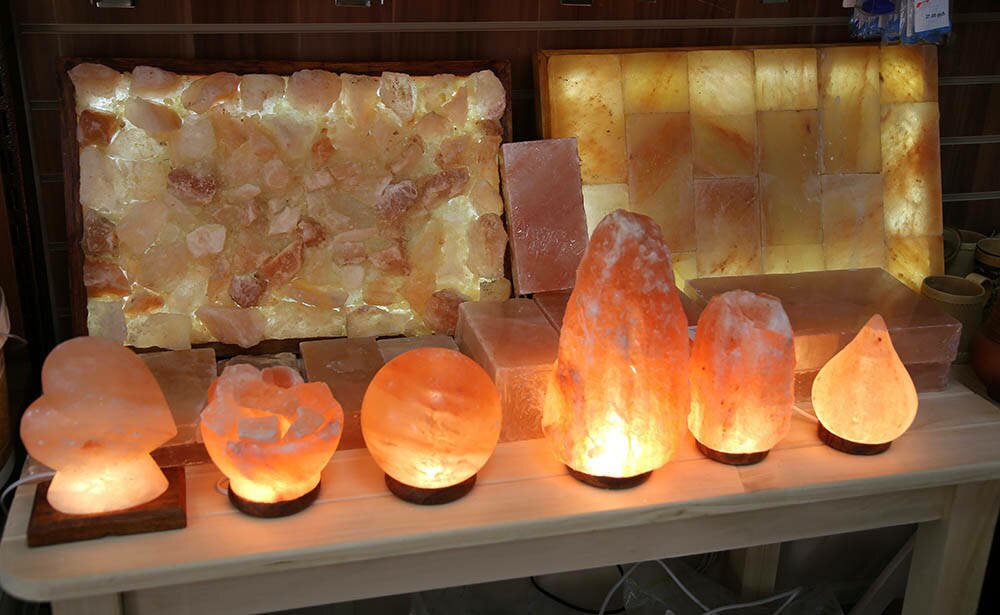 A variety of salt lamps can be used in the bath
 Modern bath salt lamps help to achieve such wonderful effects as:
- elimination of harmful microorganisms;
- destruction of allergens;
- effective ionization of indoor air;
- saturation of the body with healing vapors.
 Salt panels on the walls in the bath heal the body
 Salt lighting fixtures are manufactured industrially from hand-mined Himalayan salt. The main elements of the salt lamp are:
- stand;
- power cord;
- electric lamp;
- cartridge;
- plafond.
Special mention should be made of shades for salt lighting devices. They are made from crystals of Himalayan salt. These shades come in different sizes, shapes and colors. Therefore, they are easy to choose for any original interior.
 Salt lighting in the plafond can be positioned in the corner
 High quality salt lamps are durable, practical and quiet. The main care of such a device is keeping it clean and periodically changing the light bulb.
Note! The beneficial properties of the Himalayan salt, from which the shades are made, are preserved for many years. The intensity of the salt radiation remains at the original level.
Salt lamps create a favorable interior atmosphere in different areas of the bath. It helps relieve stress and fatigue, calm the nervous system and saturate the body with vital elements.
How to make a screen for a lamp
To obtain diffused light and the desired aesthetic effect, the moisture-resistant plafond used in the steam room and / or in the washroom is decorated with a special screen.
 For lamps in the steam room, grilles and screens are usually installed
 Making a decorative wood screen is not difficult. For work you will need:
- a piece of timber or board - for the base;
- wooden slats;
- saw-hacksaw;
- a hammer;
- electric drill;
- fastening material;
- sandpaper;
- ruler and / or tape measure;
- antiseptic.
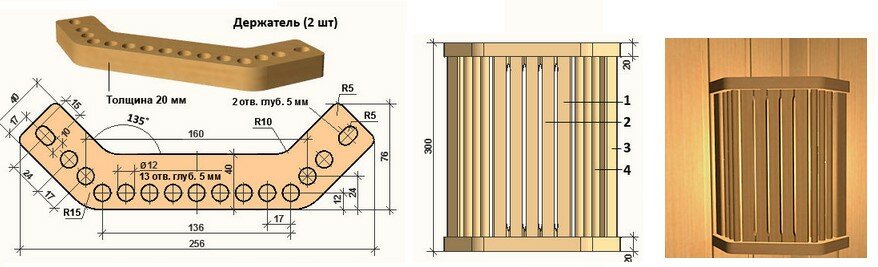
First you need to make a base from a board or timber. For example, cut out 2 pieces of the same shape. You need to attach "ears" to them in order to hang them on the wall later.
The base for the wall lamp can be made in the shape of a semicircle, square or rectangle. For a corner sconce, it is better to take a triangle or a trapezoid as a basis.
The size of the decorative screen is calculated according to the dimensions of the lighting fixture, which must fit freely inside.

All wooden elements must be carefully sanded with sandpaper before assembly. Sand ribs and sharp edges. It is advisable to hide the fasteners inside during assembly. This will protect against accidental contacts and give the finished product a stylish look.
On top of the base, wooden slats are attached to screws, screws and / or small nails. They can be positioned at an angle, vertically, etc. If you show your imagination, you get a stylish sconce that will decorate the interior of the bath room.
Small gaps should be left between the slats for the free passage of light. Instead of slats, you can use a piece of plywood. On it, you can cut out a drawing from simple components according to preliminary marking.
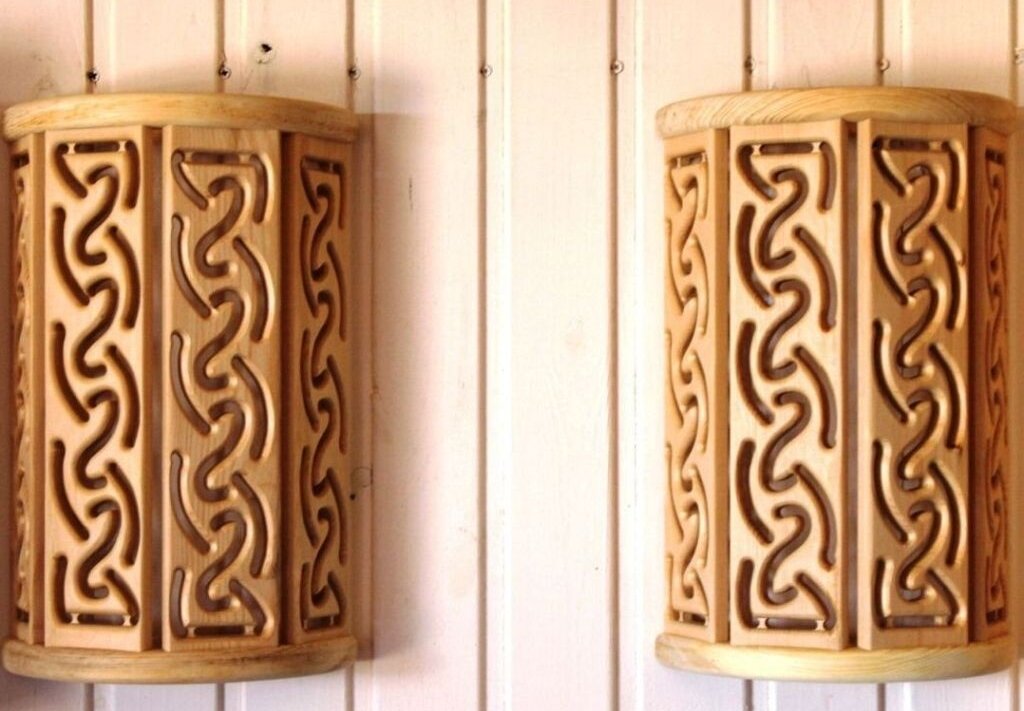 Screens can be of various designs, for example, carved screens
 All wooden materials for the manufacture of the screen must be pre-treated with an antiseptic and moisture-proof compounds. Fasteners are used only from stainless materials.
Better to make a removable screen. This will allow you to periodically remove it for thorough drying and minor repairs. For example, to replace accidentally damaged items. The removable screen will facilitate the maintenance of the lamp and the replacement of worn out lamps.
Do not use glue or paintwork. They will give off harmful vapors and unpleasant odors when exposed to temperature and moisture.
The question of which lamps to use in the bath, each owner decides independently. The main thing is to make the right choice. When installing and using various lighting devices, the attached instructions and safety rules should be strictly observed.
A lampshade for a lamp in a steam room is necessary in order to fit into the interior decoration of the bath and to protect the lamp from accidental blows. It will also help the light to diffuse gently, creating a relaxing atmosphere in the steam room.
Without special carpentry skills, you can make for yourself a lampshade for a lamp in a steam room yourself. The main thing is to choose the right wood material, preferably linden, aspen, cedar or larch. And decide on the size of the lampshade by making a template from cardboard.
TOOL:
1. Drawing accessories;
2. Board (preference for linden, aspen, cedar or larch);
3. Electric jigsaw;
4. Drills (1mm, 12mm);
5. Electric drill;
6. Woodworking machine with circular saw;
7. Grinding machine;
8. Sandpaper;
9. Screws, screwdriver, small nails;
10. Clamp.
First step:
First, I prepared two boards, and then I drew on one board the shape of the frame by eye, about 270 mm long.


Second step:
We drank the first workpiece along the contour, marked this workpiece and drank the second workpiece.


Third step:
Marked on one workpiece places for drilling holes.

Fourth step:
I put the blanks on top of each other and clamped them with clamps to the workbench, and drilled through holes with a diameter of 12 mm.

Fifth step:
The workpieces were sanded on a grinding machine and finished with sandpaper.
Sixth step:
On a woodworking machine, with a circular saw, I cut square billets 15 * 15mm with a length of 350 mm.

Seventh step:
On a grinding machine, on one side, on the workpieces, I made a rounding for insertion into the drill chuck, and on the other side I made a chamfer.


Eighth step:
A special, homemade device for making round sticks with a diameter of 12.5 mm, clamped it in a vice.


Ninth step:
He took the prepared sticks and, using a drill, passed them through the device.

Tenth step:
Then I sanded the round sticks with sandpaper.


Eleventh step:
Sawed sticks 300 mm long.

Twelfth step:
Assembling finished workpieces:
I passed the sticks, pre-lubricating the ends with PVA glue into the holes.

Then, fixing them with small nails, pre-drilling holes with a diameter of 1 mm for them, so that a crack does not occur in the product. And twisted the screws as shown in the photos.


Thirteenth step:
Made four holders for fixing the lampshade on the wall.


Fourteenth step:
Finished lampshade covered with a special varnish for saunas.

