How to properly insulate the ceiling and walls in a private house. The better to insulate the ceiling from the inside in a private house: the choice of material and the sequence of work Which insulation is better for the ceiling of the house
High-quality insulation of the ceiling in a house with a cold roof reduces heat costs, reduces heating costs and increases the comfort of living. Thermal insulation is carried out in different ways, using materials of various composition and form of release. How do you choose the best option?
We will tell you which methods are most effective in constructing a system that prevents heat leakage through the ceiling. We will show you what to look for when choosing a heater. In our proposed article, you will find valuable recommendations for improving the thermal insulation characteristics of a house.
A cold roof is a budget and practical option for organizing the roof of a house for seasonal living. This design significantly saves construction costs, but does not contribute to heat retention.
It is advisable to solve the issue of thermal insulation of the ceiling zone at the stage of building a house. However, insulation is often resorted to in an exploited room.
The warm air of the heated room rises and, in contact with the cold ceiling, quickly cools. Heat losses through the non-insulated roof and ceiling reach 25-40%
Ceiling thermal insulation solves a number of tasks:
- Reduces the intensity of cooling the heated air, helping to save heating costs for the home.
- Enhances indoor sound insulation by dampening hum from the wind or noise from heavy rain.
- In summer, the insulation material helps to keep the room cool, not letting in the heated air from the outside.
Ceiling insulation increases the comfort of a private house and optimizes the indoor microclimate. Subject to the installation technology, thermal insulation excludes the appearance of condensation on structural elements.
Floor insulation methods
Thinking about the right way under a cold roof, first of all, you need to decide on the method of thermal insulation.
There are two radically different approaches:
- insulation from the attic side;
- installation of thermal insulation material from inside the room.
The first method is more preferable for a number of reasons. So, the installation technology itself is greatly simplified - there is no need to build a suspension frame or fix the insulation with glue to the ceiling.

External insulation eliminates costly repairs inside the room and does not reduce the height of the ceilings. The latter is especially true if the distance to the ceiling in rooms does not exceed 2.5 m.
Also, with this approach, the risks of condensation are minimized. The same cannot be said about thermal insulation from the inside of the room.
If you choose the wrong insulation and do not exclude the contact of warm air with a cold stove, then water vapor from the room will accumulate - this is fraught with the appearance of dampness, fungus and the gradual destruction of the floor.
However, in some situations, internal ceiling insulation is a necessary measure, for example:
- lack of access to the attic;
- reconstruction of an old building with a ready-made attic floor;
- thermal insulation of the garage located in the basement.
If internal insulation is required, the installation technology should be followed to prevent condensation inside the building. It is important to comply with two requirements: block the flow of water vapor and use insulation of sufficient thickness.
Review of the best insulation for the ceiling
The choice of the installation method also determines the list of possible options for heat insulators. When insulating from the attic, the range of materials is much larger - from natural compounds to technologically advanced modern solutions. Installation from inside the room imposes a number of restrictions.
Regardless of the placement method, it must have a low thermal conductivity. The coefficient determines the ability of an insulator to transfer energy from heated elements to cold ones. The lower the thermal conductivity, the better the material retains heat.

An important parameter of choice is moisture resistance. The ability of the material to maintain its physical characteristics in a humid environment is especially important when insulating from the attic side, when the roofing is sufficiently worn out
Additional requirements include:
- durability;
- environmental friendliness and safety for humans;
- low flammability - it is better to use non-combustible insulators, compositions with minimal smoke generation;
- resistance to rodents - relevant for materials placed in the attic.
It is also important to take into account the vapor permeability index of the insulation. But there are nuances here. When insulating a concrete slab from the attic side, a material that allows steam to pass through should be used. For installation from inside the room, on the contrary, - a vapor-proof insulation.
Type # 1 - mineral wool insulation
The popular thermal insulator maintains its leadership position due to its affordability, ease of installation and good thermal efficiency.
For installation under a cold roof, mineral wool with a synthetic binder, basalt insulation and glass wool are used. The latter option provides maximum thermal efficiency. Thermal conductivity of glass wool - 0.044 W / (m ° C).
However, it should be used with caution - the particles irritate the skin and mucous membranes. Glass wool is not suitable for indoor use. Basalt insulation is devoid of these disadvantages. Additional advantages of the material: fire safety and plasticity.
Common cons of mineral wool materials:
- water absorption;
- low strength;
- tendency to shrinkage;
- the content of unsafe components - abrasive particles or formaldehyde resins.
To place layers of mineral wool, you will need to install wooden logs; it is advisable to waterproof the insulation itself from above.
Type # 2 - Bulk Cellulose Insulator
Bulk material made from waste paper and cellulose. To protect against decay and fire, synthetic components are added to ecowool.

The material is used with an external method of insulation - in the attic. Ecowool is sprayed dry over the floor or mixed with glue. Special equipment is required for work
The characteristics of cellulose insulation and the technology of its application have endowed the modern method of thermal insulation with a number of advantages:
- good thermal efficiency - a thermal conductivity of about 0.038 W / (m ° C);
- the material fills all voids and cracks, forming a solid canvas - cold bridges are not formed;
- due to its light weight, ecowool of any thickness can be laid;
- durability of service and preservation of original properties;
- environmental friendliness - ecowool does not emit toxic fumes;
- low flammability and the ability to self-extinguish;
- vapor permeability.
Despite the mass of dignity, ecowool has not gained much popularity. The main reasons for the low demand: high cost, inability to install with your own hands.
In addition, ecowool is prone to shrinkage and crushing - it is advisable to equip a rigid support from above for movement in the attic.
Type # 3 - slab polymer types
This group of heaters includes: foam and (EPS). Their thermal efficiency exceeds the performance of mineral wool insulation. The leader is EPS, the thermal conductivity coefficient is 0.038 W / m ° С.

Expanded polystyrene surpasses polystyrene in terms of strength, rigidity and fire safety. However, in the event of a fire, EPS boards also emit toxic fumes.
Polyfoam is cheaper than expanded polystyrene. Among the general advantages are:
- water resistance;
- low biological activity;
- wide range of geometric dimensions and thicknesses.
Both materials are vapor-tight, so they are used to insulate concrete and brick surfaces.
The material is suitable for. Penofol is placed with the foil side inside the room - the canvas not only retains heat, but also partially reflects it back.
It is advisable to use polyethylene foam as an independent material in areas with a mild climate. In regions with severe winters, the combination of penofol and penoplex shows a good effect.
Type # 4 - bulk heat insulator
Lightweight porous material in the form of rounded granules. In the composition - burnt clay. The natural origin of the insulation explains its environmental friendliness.
Additional advantages of expanded clay:
- fire resistance;
- providing a good degree of sound insulation;
- durability;
- chemical inertness;
- not of interest to rodents;
- the insulation does not produce dust.
The thermal efficiency of expanded clay depends on the density of the embankment, the size of the granules.
To ensure the preservation of heat, it will be necessary to use an embankment with a thickness of 20 cm or more, in cold regions the layer is increased to 40-50 cm. This leads to a rise in the cost of the insulation procedure and significantly increases the load on the floor.
Type # 5 - liquid polyurethane
Polyurethane foam is applied to the surface under pressure; a special technique is used for spraying. Polyurethane foam is an excellent solution for attic floors with complex relief and thermal insulation of hard-to-reach places.
The main advantages of foam ceiling insulation:
- the formation of a seamless sealed coating;
- high adhesion to materials - polyurethane foam fills all cracks and voids;
- low water absorption;
- excellent thermal efficiency due to the porous structure of the hardened foam - thermal conductivity of about 0.027 W / m ° С;
- preservation of qualities in humid conditions;
- the possibility of multilayer spraying - relevant for cold regions;
- providing acoustic insulation;
- durability of the coating - service life of about 25 years;
- speed of processing;
- resistance to microorganisms;
- lightness of the material - does not put pressure on the overlap.
Polyurethane foam is difficult to ignite, insulation does not spread combustion.

Spray-on insulation is considered one of the best solutions for the treatment of attic floors. The limited use of polyurethane foam is due to the high cost of the method
The total cost includes the price of the insulation itself and the cost of attracting craftsmen with equipment. Spraying foam must not be carried out if the air temperature in the attic is below +10 ° C.
View # 6 - natural materials
The main advantages of traditional methods: affordable cost and environmental friendliness. The use and effectiveness of natural materials such as sawdust and algae are different.
Features of insulation with sawdust
Bulk wood waste is often mixed with shavings and distributed over the ceiling from the attic side.
Warming methods:
- Dry backfill... Wooden logs are mounted on the floor, the cells are filled with sawdust. The material shrinks over time and requires periodic renewal.
- Wet method... Sawdust, cement and water are combined in a ratio of 10: 2: 1.5, respectively. This thermal layer is more durable.
Weaknesses of sawdust: flammability, fear of rodents and water absorption.
Characteristics and varieties of algae
In coastal areas, algae are widely used, the second name for insulation is damask. The material is distinguished by its naturalness, good thermal insulation characteristics. Rodents do not start in algae, and the insulation itself is not afraid of moisture and does not rot.
There are three types of damask:
- by weight - bales or loose bales collected from dried pressed seaweed;
- mats in nets - canvases 10 cm thick, tied with synthetic thread for ease of installation;
- dense slabs - the composition contains up to 85% of algae, the rest is a binder, for example, silicone.
In terms of thermal efficiency, damask is significantly inferior to many heaters, the heat capacity coefficient is 0.087 W / (m ° C).
Calculation of the thickness of the thermal insulation layer
The effectiveness of thermal insulation depends on the accuracy of determining the thickness of the insulation, which is a part. In addition, the indicator allows you to calculate the loads imposed on the ceiling structure. When calculating, the values \u200b\u200bof the permissible weight and the required thermal protection are compared.
The thickness of the insulation is determined by the formula
q \u003d R * k,
- q - thickness of heat-insulating material, m;
- R - thermal resistance, m 2 ° C / W;
- k - coefficient of thermal conductivity of the insulation, W / (m ° C).
The value of R is determined according to tabular data - the indicator is calculated for each region, taking into account the characteristics of the climate.

For example, the standardized thermal resistance of floors for Nizhny Novgorod is 4.26 m2 ° C / W. If you use penoplex for insulation of the ceiling, then you will need a layer of thermal insulation 12 cm thick
For the calculation, it is enough to multiply the indicators 4.26 and 0.038. The last value is the coefficient of thermal conductivity of extruded polystyrene foam. The weight of the ceiling is calculated based on the volume of the insulation and its density. The first indicator is determined by the product of the area and the thickness of the thermal insulation, the second is the tabular value.
The minimum load on the floor is provided by polyurethane foam and ecowool, their density is in the range of 25-60 kg / cu. m. One of the heaviest heaters is expanded clay - 180-330 kg / cu. m.
Features of mounting different materials
The tactics of action depend on the selected material and its location - from inside the room or from the side of the attic.
Laying mineral wool
Installation of insulation is carried out along the attic floor.
When making a thermal insulation cake, it is important to withstand two conditions:
- provide protection of mineral wool from water vapor coming from inside a warm room;
- equip ventilation of the outer surface to weather moisture from the insulation.
Mineral wool slabs are placed between the beams or slats of the prepared sheathing. Installation on the floor surface is possible.

Before starting work, it is necessary to check the boards for rot, treat the wooden elements with an antiseptic. Make sure the roof is not leaking
The surface is cleaned of debris, if necessary, a wooden frame is erected.
Next steps:
- Install vapor barrier membrane.
- Roll out rolls or place mats between beams.
- Mount a wooden base, maintaining a ventilation gap between the insulation and the hard floor.
The last step can be skipped. However, it will not be possible to walk or store things in the attic, since the mineral wool cannot be pressed.
Sheathing from the inside with expanded polystyrene
This insulation option is suitable for a concrete ceiling. Plates of expanded polystyrene are fixed to the surface with glue and fixed with "fungi".
Before installing the insulation, the ceiling is treated with an antifungal compound and a primer.
The procedure for fixing expanded polystyrene plates:
- Apply glue to the insulation, attach and press it to the ceiling.
- Cover the entire area with slabs, leaving no gaps between the elements.
- Drill holes for fasteners with a puncher.
- Kill the fungi.
- Foam joints and gaps between boards.
- Cut off the remaining foam, fix the reinforcing mesh with adhesive.
- Prime and plaster the surface.
After the layer has dried, clean the ceiling and apply a finishing decorative coating.
Backfilling the attic with expanded clay
The minimum layer of bulk insulation is 20 cm. To adjust the filling height, it is necessary to prepare a beacon - make the desired mark on the piece of reinforcement, fixing a piece of electrical tape.

If a wooden base is insulated with expanded clay, then the floor must first be covered with waterproofing with an approach to the walls. Plastic wrap will do
There is no need to lay a water barrier on a concrete base.
Sequence of work:
- Pour expanded clay and distribute the granules evenly.
- Check the thickness of the insulation layer. Its height should be 3-4 cm below the level of the flooring. If this norm is neglected, then when walking in the attic, the sound of friction of granules will be heard.
- Spread a layer of vapor barrier membrane, glue the joints of the canvases with tape.
- Mount a rigid base. Boards, fiberboard or OSB panels will do.
A floor on top of expanded clay makes it easier to move around the attic and increases the effectiveness of the thermal insulation cake.
Application of sprayed insulation
It will not be possible to perform the work on your own, since spraying will require expensive equipment - a high-pressure apparatus. In addition, technical skills are required to evenly distribute the polyurethane foam.
It is better to entrust the work to a specialized company and conclude an agreement with them for the provision of services. At the appointed time, a brigade arrives, extends a hose with a pistol into the house
- Mount wooden logs on the floor of the attic. They will be needed for the subsequent fastening of the flooring.
- Fill the device with components in the required proportions.
- Set the gun to minimum foam force.
- Apply an even layer of polyurethane foam between the logs.
- Wait for the composition to dry. If the thickness of one layer is not enough, then the processing must be repeated.
- Align the hardened coating by cutting off the excess to the level of the lag.
- Mount a rigid base on the boards.
To insulate a small ceiling with your own hands, you can use a disposable foam spraying kit.

The set contains everything you need: cylinders with components for the preparation of foam insulation, a spray gun, hoses, personal protective equipment
Assembly and preparation takes a couple of minutes, no power supplies are needed - the device works autonomously.
Conclusions and useful video on the topic
Floor insulation technology with mineral wool:
Thermal insulation of the ceiling of a private house with sawdust:
Ceiling insulation with a cold roof is one of the conditions for a comfortable and economical operation of a house. When arranging a heat-insulating layer, it is important to choose the right material. The method of installation is important, as well as the mandatory formation of a reliable cut-off of condensate.
When installing a good insulation of the ceiling in a residential building with a cold roof, heating costs are saved and heat loss is reduced. For this, heat-insulating construction products are used, different in the type of manufacture and composition. It is important to know which heaters are most effective and how to properly insulate the attic floor to increase the thermal efficiency of the building.
The need for insulation for the ceiling
Insulation of the ceiling of the house allows you to raise the room temperature in the premises, however, condensation may appear in the attic. When warm air rises upwards, it comes into contact with cold air, condensing moisture droplets. As a result of this process, the thermal insulation material is saturated with water and begins to actively rot with the formation of mold and mildew. To avoid this phenomenon, it is necessary to change the physical conditions in the attic floor.
Concrete ceiling
Since concrete has a high coefficient of thermal conductivity, it consumes heat, but remains cold. As a result, condensation forms, which can destroy the structure of the material during freezing. Therefore, the insulation of the attic floor on a reinforced concrete slab occurs with the obligatory use of a vapor-permeable insulation to remove moisture to the outside.
If it is not possible to insulate the ceiling from the outside, then you will have to lay the material from the inside, but then it must be impervious to steam in order to protect the concrete from moisture. You will also need a vapor barrier for extra protection.

Wooden ceiling
Wood is susceptible to decay and various bacteria. If the thermal regime is not properly organized, the overlap will get wet and intensively collapse. In this case, the insulation of the wooden ceiling can be carried out both from the inside and outside. With the external method, you can significantly save the space of the premises, and with the internal method, an impervious high-quality material is required. It is also recommended to install a vapor barrier between the ceiling and the insulation for greater protection.
Varieties of vapor barrier
When insulating the ceiling of a cold attic, the device of a vapor barrier layer is an important process, because due to its absence, the whole procedure will be impractical. After installing the insulation from the inside, the state of the ceiling will be unknown, and all possible influences on it will be hidden. In the future, this may be the reason for partial or complete restoration of the overlap. The most effective way to protect it is to install a vapor barrier.

Vapor barrier
It is a conventional plastic wrap as a sealed barrier to wet steam. To save money, you can use a simple polyethylene sleeve as it has the same properties as other polyethylene materials. Laying is carried out in overlapping strips of 15-20 cm and overlapping on wall structures up to 15 cm. The joints must be glued with tape to achieve tightness.
When installing from the inside of the room, the film is laid only on top of an impermeable insulation, the same applies for installation on a concrete floor. If the insulation is carried out in the attic, then the polyethylene is located between the wooden structure and the heat insulator.

Membrane
It is a film where only one side is permeable. It prevents moisture from penetrating, but does not prevent it from getting out. They are used to protect insulating material from getting wet and deoxidizing.
If the attic floor is insulated on wooden beams with mineral wool, then the vapor barrier membrane will provide free steam release, but will protect the insulation from external moisture, while maintaining its operational properties.

Features of cold roofs
To protect a residential building from external influences, a cold-type roof is installed. There are many thermal insulation products that can help reduce heat loss. The temperature inside and outside the attic should vary within 4 ° C, so the air through the ventilation ducts must enter the attic, and not into the space under the roof. Then the humidity and temperature indicators will correspond to the street ones. Otherwise, the imbalance of the modes will lead to the destruction of the rafter structure and roofing.

The advantages of a cold roof are:
- Ease of maintenance. The roof has free space for access to any point, so repair and preventive measures are carried out without difficulty.
- Good waterproofing. A warm attic involves the use of superstructures that violate the integrity of the waterproofing material. When installing a cold roof, no additional elements are required.
- Useful use. Despite the fact that the temperature in the attic is lower, it can be used as a temporary warehouse, and in the future it can be converted into an additional room.
- The minimum area of \u200b\u200bthe heat transfer surface. Heat loss is possible only through the ceiling.

The inlet and outlet vents work as efficiently as possible at a great distance from each other. When they are installed under the windboard along the entire length, a full air exchange of the entire attic space is ensured. The inlet holes are located at the places of the highest pressure, due to which the blowing intensity increases.
Read also: Stages of building a foundation with your own hands
A cold roof is installed on various types of buildings with a height of 1-5 floors. Therefore, the installation of thermal protection on the ceiling is carried out with a calculated thickness depending on the material and the region of location (climatic conditions). Often it is laid in a layer of 20-50 cm. It is equally important to take into account the sections of the exit of ventilation and chimneys through the attic floor. It is these zones that contribute to the maximum removal of heat outside.
The advantages of warming the ceiling area
Roof insulation should be calculated at the stage of building a house. But often this question arises with an already finished building, where thermal insulation was not provided earlier. When insulating a reinforced concrete or wooden ceiling in a house with a cold roof, you can get the following benefits:
- Maintaining a microclimate by preventing the penetration of heated air from the street in the summer season.
- In winter, it protects the room from serious heat loss through the ceiling.
- The insulation additionally has sound insulating properties. Therefore, there will be no discomfort during heavy rainfall, wind or extraneous noise outside.

Effective ways to insulate the ceiling
There are several types of attic floor insulation: from the inside by nailing the insulation to the ceiling, and from the outside, using a roll product and rolling it over the attic surface. Both methods are very practical, the main difference being the selection of the appropriate product and the installation method.
Indoor work
When insulating from the inside, you can use mineral wool due to its high heat-insulating and vapor-permeable properties. Often, it fits inside a suspended structure made of metal profiles and sheathed with plasterboard. However, it is forbidden to compress it, as it has air gaps. When compressed, they disappear, and the thermal performance drops sharply.
Important! Despite its effectiveness, it is recommended to use mineral and basalt wool only for external insulation. Due to the low strength of the microfibers, they separate and, if ingested, cause side effects and serious diseases.
Other materials can also be installed on the frame or screwed directly to the ceiling, taking into account the laying of the vapor barrier layer.

Outdoor work
From the side of the attic, it is recommended to lay rolled or slab material, since it does not require careful fixing or making a frame. This is a practical way, since the insulation does not take away the useful height of the room. Before carrying out work, the surface should be well cleaned of foreign debris. Installation can be carried out in one or two layers with a thickness of 30-50 cm using polyurethane foam to hold them together.
If the attic space is not used in the future, then additional coverings are not required. If it is equipped for storing things, then the insulation is covered with a boardwalk or sheet moisture-resistant plywood. When using bulk materials, coating is also not required, but this does not apply to dry leaves or sawdust.

- the thickness should be calculated according to the region of residence and the type of material;
- based on the selected products, you should know how to properly insulate the ceiling with a cold roof to ensure maximum effect;
- when stacking several materials on top of each other, vapor barrier indicators should increase from bottom to top (on the contrary, it is impossible);
- mineral wool should not be covered with expanded clay or vermiculite in order to avoid pushing through it;
- it is forbidden to lay vapor barrier on both sides of the heat insulator, so as not to trap moisture and spoil the material;
- all joints of the connection of steam and heat insulation materials must be sealed to eliminate cold bridges. For this, adhesive tapes, polyurethane foam, a special solution or glue are used.

Required tools
To carry out work on thermal insulation, you will need such tools as: fasteners (self-tapping screws, screws, dowels, anchors, liquid nails), construction brackets, a tape measure, a puncher for working with concrete, a screwdriver, a hammer, a construction knife for cutting sheet products.
The material is insulation, a vapor barrier film or membrane, metal profiles to create a frame, wooden bars 3x3 cm or 5x5 cm.

What insulation is better for the ceiling in a brick house
For effective insulation of the ceiling in a house with a cold roof, outside and inside, the following types of material are used:
- Monolithic - has a high density and waterproofness, while the dew point goes in any direction without deteriorating the properties of the insulation. These include extruded polystyrene foam.
- Fibrous or porous - produced in the form of roll material or mats. They are highly exposed to moisture saturation and lose their characteristics, therefore they are used only in conjunction with a vapor barrier. There are such types: mineral wool, plate and sheet polyurethane foam.
- Bulk or sprayed - the first option is laid manually, and the second only with the help of special equipment.
From the outside, insulation along the wooden beams of the attic floor is carried out using light roll or bulk materials (sawdust, leaves). For concrete slabs, a dense monolith, slabs or heavy bulk material (expanded clay) can be laid.

Features of insulation for outdoor use
Work from the attic side can be carried out with the following materials:
| Material | Description |
| Plate and roll | |
| Reed | It is a mats that are stacked in two layers. It is environmentally friendly with high heat engineering properties. Disadvantages: increased fire hazard, susceptibility to attack by rodents and insects, rotting at high humidity. |
| Seaweed | Popular material in seaside regions. Refers to environmentally friendly and efficient heat insulators. Stacked in one layer outside the attic and covered with boardwalk. Not affected by moisture, insects and rodents. |
| Penoplex | It is a type of extruded polystyrene foam (EPS) with high strength. Not used for wooden floors due to its complete vapor tightness. Before laying the insulation, the concrete base is leveled and covered with a vapor barrier film. After insulation, the material is filled with cement-sand mortar up to 50 mm thick. During operation, you can move along the surface. |
| Mineral wool | The most common material that is produced in plate and roll versions. Between wooden logs, it is recommended to lay mineral wool in the form of mats, and for a concrete floor - in a roll type. Plank decking is required to use the base as a floor. |
| Sprayed | |
| Polyurethane foam | It has a number of advantages, however, due to its absolute vapor permeability, it can disturb the microclimate in the premises. It is applied using a special technique under high pressure, so independent insulation is impossible. The foam layer with optimal thermal performance is up to 12 cm thick. |
| Ecowool | A modern heat-insulating material that is laid on a wooden and concrete base without the use of vapor barrier products. However, experts recommend still laying in order to avoid the penetration of the insulation into the room through the joints and cracks. It is also laid using an installation that provides a monolithic coating with filling of all ceiling defects. The layer thickness is 25-40 cm, depending on the region. Independent use and surface application is possible. |
| Bulk | |
| Sawdust | Most popular in conditions where you can get it for free or at an extremely low cost. For a ceiling with a cold roof, the layer thickness is 15-30 cm. The disadvantage is the increased flammability, therefore, they are additionally covered with a slag layer. Before laying, a layer of carbide and slaked lime is applied as protection against rodents and insects. Sawdust is often used in conjunction with cement or clay. |
| Expanded clay | Relatively lightweight, used for insulation of different fractions: 0-5 mm, 5-20 mm, 20-40 mm. In cold regions, the thickness of the embankment layer is 40-50 cm, for a temperate climate - no more than 20 cm.If the attic is not used, the material does not require additional coating, otherwise you can make a plank floor or fill it with a layer of cement-sand screed up to 5 cm ... |
Read also: Plastering the basement: features of various types of finishes, a step-by-step technique

Insulation for indoor use
It is not recommended to insulate the ceiling in the premises, but in the absence of other options it is possible. Since the house is warm and humid enough, the material can be attacked by mold and mildew. To avoid this, it is necessary to create a ventilation gap between it and the finish up to 3 cm thick, which will take even more room height.
The following products are used as insulation for the ceiling in a private house:
- Penofol is a double material made of foil and foamed polyethylene. It is used in regions with a temperate climate, as it has average thermal insulation values. It can be used as an independent layer, and combined with other types.
- Expanded polystyrene - practical for concrete floors. It fits into a crate with a depth of about 3 cm and is closed with a finishing material (lining, drywall, Armstrong, stretch ceiling).
- Plaster solutions - they are distinguished by high moisture resistance, fire resistance and decorative appearance. The mixture is used only for concrete substrates and includes thermal insulation components.
- Cork - cork material is moisture resistant, therefore it is used without vapor barrier. It is environmentally friendly, it can serve not only as a heater, but also as a finishing material in a certain room design.
When choosing a heat insulator, you should pay attention to the material of manufacture of the floor and financial possibilities. It is recommended to insulate wooden ones with dry products, and concrete ones with slabs or cover with special compounds.

Methods of internal insulation of a cold attic floor
Before carrying out external or internal insulation, it is necessary to calculate the thickness of the material according to the formula R \u003d δ / λ, where:
- R - resistance to heat transfer (according to the region of residence, for Moscow - 4.7 m² · ° С / W);
- δ is the thickness of the insulation layer;
- λ is the coefficient of thermal conductivity of the material (according to the GOST normative document).
Work begins with thoroughly cleaning the surface of debris, dust, cobwebs or moisture. When installing the product on the ceiling, be sure to leave a ventilation gap to protect against mold and moisture accumulation.

Penofol use
Penofol consists of foamed polyethylene and a foil layer; it is used for buildings with a low level of heat loss due to low thermal insulation performance. To install insulation on the ceiling, you need to create a crate. The product is rolled out over the surface of the frame and fixed with nails. At the same time, the foil layer should look into the room.
The creation of ventilation gaps on both sides provides for the presence of an additional lathing, which in the future will be closed with sheet finishing coatings or a stretch ceiling. The most effective use of penofol is possible together with penoplex to increase the thermal insulation properties.

The use of penoplex from the inside
The material is practical for both outdoor and indoor use for thermal insulation of a ceiling with a cold roof. Warming is carried out according to the following scheme:
- A crate is made of a wooden bar with a thickness exceeding the thickness of extruded polystyrene foam by 0.3-0.4 cm. The step between the slats is equal to the width of the insulation sheet minus 1-2 mm.
- The material is installed in the cells, and if the frame is correctly assembled, the slabs should fit tightly with little effort.
- The lathing is closed with plasterboard, suspended or stretch ceiling.
Attention! To increase the reliability, the penoplex can be fixed to the ceiling using umbrella-type dowel-nails. The wide head allows you to press it tightly without pushing the fasteners.

Polyurethane foam and plaster mixes
Polyurethane foam belongs to modern high-performance products and allows you to create an ideal thermal insulation layer to reduce the heat transfer coefficient. The advantages for use on ceilings are:
- resistance to insects, bacteria;
- fire resistance;
- high sound and waterproofing;
- high adhesion properties with various types of coatings;
- resistance to temperature extremes.
Any owner strives to create a comfortable living in his home. To do this, it periodically monitors possible heat losses, as a result of which the room temperature can drop and the energy use increase. Window and doorways are the main conductors of cold air.
As a rule, they are first of all replaced by home owners with quality products. Many rushed to insulate the walls and foundation. And for some reason, they don't always remember the ceiling. And in vain! According to the laws of physics, heat loss due to poor-quality ceilings can be over 20 percent. The barrier created at the top will prevent the escape of heat, and the heaters do not have to heat the environment.
Ceiling insulation methods in a private house include both interior work and in the attic. These works to strengthen the energy protection of the house are equivalent, so each owner can choose a convenient option for himself.
The difference between the methods lies in the installation technology and the materials used:
- Insulation of the ceiling from the inside is accompanied by subsequent surface finishing with plasterboard or other suspended structures. It should be noted that the height of the room after the completion of installation will decrease from 10 to 25 cm. The material used must have vapor-permeable properties. These can be: mineral or basalt wool, penofol.
- External ceiling insulation is performed in the attic. A more economical and profitable option, since it does not require further finishing work, if the use of the attic room is not provided. It is recommended to use a vapor barrier to prevent moisture from entering the floor. Most often used: polystyrene, penoizol, mineral wool, expanded clay.

The choice of insulation
The modern construction market offers a huge amount of materials for ceiling insulation. Even expanded clay, sawdust, hay, clay and slag are used, which have a number of significant disadvantages among the advantages. The choice must match the requirements of the technology.
The main requirements that the insulation must meet:
- do not emit toxic substances;
- be resistant to moisture;
- have a low degree of flammability.
Popular materials for work on energy saving at home

Mineral wool in the form of sheets or rolls is widely used in construction work. The characteristics of the insulation meet the technical requirements of thermal insulation. The use in residential premises is dictated by the absence of toxic substances in the composition and excellent thermal insulation properties. Mineral wool has constituents of limestone, basalt, diabase and dolomite.
Rocks endow the material with valuable qualities:
- low degree of thermal conductivity;
- resistance to temperature extremes;
- lack of flammability;
- ecological characteristics.
And yet the material has disadvantages:
- the ability to absorb moisture;
- during installation, be sure to use a waterproofing film;
- additionally treat the seams of the joints with polyurethane foam for better sealing;
- for fastening the insulation, a crate is made of wooden beams or profiles;
- relatively short service life (10-15 years).

Penofol consists of foamed polyethylene and aluminum foil interlayers. It combines the properties of several insulation materials with a fairly wide range of applications. It represents the basis for innovative finishing of balconies and loggias.
It has low thermal conductivity, which will provide energy savings. Protective qualities will prevent cold air, draft and radon from entering the room. In the summer, penofol will help keep the house cool, create a comfortable microclimate.
The light weight of the material makes installation convenient, and the structure of the building does not become heavier. To work with penofol, you will need a minimum amount of available tools: a construction knife, scotch tape and liquid nails.
Along with the advantages, there are also disadvantages:
- flexible surface means finishing the ceiling with a suspended structure with a frame;
- to fix the material on some surfaces is problematic;
- to increase thermal protection it is recommended to use mineral wool.

Expanded polystyrene is known to many more as polystyrene. The easy-to-use material creates strong heat protection in the room without harming the health of the household. With the correct installation, it fully justifies the costs and retains its qualities for a long time.
The advantages are:
- moisture resistance;
- a good indicator of thermal conductivity;
- light weight, excluding reinforcement of the structure;
- simple installation.
The disadvantages include:
- easy flammability;
- instability to ultraviolet rays and solvents;
- low resistance to mechanical damage.

Penoizol is a liquid foamed foam. For thermal insulation of the ceiling from the outside, it is necessary to use special equipment for applying an astringent substance to the surface.
Material advantages:
- affordable price;
- thermal insulation qualities;
- fire resistance;
- easily fills in hard-to-reach places;
- safe operation.
Disadvantages:
- lack of special equipment excludes self-assembly;
- weak resistance to mechanical stress;
- the first 2-3 weeks after installation, a small amount of toxic substance evaporates;
- ability to nourish moisture.
Do-it-yourself insulation
If you adhere to the technological process and make the right choice of material, you can easily perform the installation yourself.
Thermal insulation of the ceiling inside the room using mineral wool
To complete the work, you will need material:
- mineral wool;
- metal profiles or wooden bars 150x30 mm;
- hardware;
- vapor barrier film;
- staples;
- polyurethane foam;
- dowels with a wide head;
- drywall.
Set of tools:
- puncher;
- roulette;
- a hammer;
- screwdriver;
- scissors;
- construction knife.
Installation steps
- On the ceiling, make a crate of their wooden bars or a metal profile with a step of 50 cm.
- Cut the insulation to the size of the lathing cell with an increase of 2 cm on the sides.
- Lay the mineral wool in the cells without tamping it.
- Treat the joints of the insulation with polyurethane foam for sealing. The foam will also serve as a resistance for the shrinkage of the insulation.
- Cover the surface with a vapor barrier film. The joints of the material should overlap by 10 cm. Using staples, fix the film to the crate.
- Finish the ceiling using plasterboard sheets.
Insulation of the ceiling in the attic using foam
To complete the installation, materials are required:
- foam sheets 40 mm thick;
- polyurethane foam;
- oSB sheets 15-18 mm;
- hardware.
Instruments:
- drill;
- hacksaw;
- a hammer;
- locksmith knife;
- screwdriver.

Installation steps
- Clear debris from the attic. If there are any damaged spots or holes, repair them with a cement or plaster mixture.
- Lay out the foam on the surface, docking tightly together.
- Apply polyurethane foam to the connecting seams.
- Cover the top with OSB sheets (15-18 mm) or boards.
If you plan to use the attic as an attic, the insulated surface must be filled with a cement screed, at least 5 cm thick. The use of a reinforcing mesh is mandatory.

- Insulation in the attic using foam sheets must be supplemented with screed trim or wooden boards. Unprotected foam is susceptible to mechanical damage that will affect its functionality.
- Thermal insulation from the outside is easier and more economical.
- It is forbidden to compress mineral wool. Losing its structure, it loses its valuable properties.
- Built-in lamps in the insulated ceiling should be mounted with a fence from the material with plasterboard inserts at a distance of 2-3 cm.
- To increase thermal protection, you can lay the attic in a complex: foam and mineral wool. Insulation layers should resemble brickwork.
- Use marked foil for vapor barrier. It is not allowed to use ordinary polyethylene.
- When using penofol for insulation in the attic, lay the foil down.
How to insulate the ceiling in a private house
Any owner strives to create a comfortable living in his home. To do this, it periodically monitors possible heat losses, as a result of which the room temperature can drop and the energy use increase. Window and doorways are the main conductors of cold air.
As a rule, they are first of all replaced by home owners with quality products. Many rushed to insulate the walls and foundation. And for some reason, they don't always remember the ceiling. And in vain! According to the laws of physics, heat loss due to poor-quality ceilings can be over 20 percent. The barrier created at the top will prevent the escape of heat, and the heaters do not have to heat the environment.
Ceiling insulation methods in a private house include both interior work and in the attic. These works to strengthen the energy protection of the house are equivalent, so each owner can choose a convenient option for himself.
The difference between the methods lies in the installation technology and the materials used:
- Insulation of the ceiling from the inside is accompanied by subsequent surface finishing with plasterboard or other suspended structures. It should be noted that the height of the room after the completion of installation will decrease from 10 to 25 cm. The material used must have vapor-permeable properties. These can be: mineral or basalt wool, penofol.
- External ceiling insulation is performed in the attic. A more economical and profitable option, since it does not require further finishing work, if the use of the attic space is not provided. It is recommended to use a vapor barrier to prevent moisture from entering the floor. Most often used: polystyrene, penoizol, mineral wool, expanded clay.
The choice of insulation
The modern construction market offers a huge amount of materials for ceiling insulation. Even expanded clay, sawdust, hay, clay and slag are used, which have a number of significant disadvantages among the advantages. The choice must match the requirements of the technology.
The main requirements that the insulation must meet:
- do not emit toxic substances;
- be resistant to moisture;
- have a low degree of flammability.
Popular materials for work on energy saving at home
Mineral wool in the form of sheets or rolls is widely used in construction work. The characteristics of the insulation meet the technical requirements of thermal insulation. The use in residential premises is dictated by the absence of toxic substances in the composition and excellent thermal insulation properties. Mineral wool has constituents of limestone, basalt, diabase and dolomite.
Rocks endow the material with valuable qualities:
- low degree of thermal conductivity;
- resistance to temperature extremes;
- lack of flammability;
- ecological characteristics.
And yet the material has disadvantages:
- the ability to absorb moisture;
- during installation, be sure to use a waterproofing film;
- additionally treat the seams of the joints with polyurethane foam for better sealing;
- for fastening the insulation, a crate is made of wooden beams or profiles;
- relatively short service life (10-15 years).

Penofol consists of foamed polyethylene and aluminum foil interlayers. It combines the properties of several insulation materials with a fairly wide range of applications. It represents the basis for innovative finishing of balconies and loggias.
It has low thermal conductivity, which will provide energy savings. Protective qualities will prevent cold air, draft and radon from entering the room. In the summer, penofol will help keep the house cool, create a comfortable microclimate.
The light weight of the material makes installation convenient, and the structure of the building does not become heavier. To work with penofol, you will need a minimum amount of available tools: a construction knife, scotch tape and liquid nails.
Along with the advantages, there are also disadvantages:
- flexible surface means finishing the ceiling with a suspended structure with a frame;
- to fix the material on some surfaces is problematic;
- to increase thermal protection it is recommended to use mineral wool.

Expanded polystyrene is known to many more as polystyrene. The easy-to-use material creates strong heat protection in the room without harming the health of the household. With the correct installation, it fully justifies the costs and retains its qualities for a long time.
The advantages are:
- moisture resistance;
- a good indicator of thermal conductivity;
- light weight, excluding reinforcement of the structure;
- simple installation.
The disadvantages include:
- easy flammability;
- instability to ultraviolet rays and solvents;
- low resistance to mechanical damage.

Penoizol is a liquid foamed foam. For thermal insulation of the ceiling from the outside, it is necessary to use special equipment for applying an astringent substance to the surface.
Material advantages:
- affordable price;
- thermal insulation qualities;
- fire resistance;
- easily fills in hard-to-reach places;
- safe operation.
Disadvantages:
- lack of special equipment excludes self-assembly;
- weak resistance to mechanical stress;
- the first 2-3 weeks after installation, a small amount of toxic substance evaporates;
- ability to nourish moisture.
Do-it-yourself insulation
If you adhere to the technological process and make the right choice of material, you can easily perform the installation yourself.
Thermal insulation of the ceiling inside the room using mineral wool
To complete the work, you will need material:
- mineral wool;
- metal profiles or wooden bars 150x30 mm;
- hardware;
- vapor barrier film;
- staples;
- dowels with a wide head;
- drywall.
Set of tools:
- puncher;
- roulette;
- a hammer;
- screwdriver;
- scissors;
- construction knife.
Installation steps
- On the ceiling, make a crate of their wooden bars or a metal profile with a step of 50 cm.
- Cut the insulation to the size of the lathing cell with an increase of 2 cm on the sides.
- Lay the mineral wool in the cells without tamping it.
- Treat the joints of the insulation with polyurethane foam for sealing. The foam will also serve as a resistance for the shrinkage of the insulation.
- Cover the surface with a vapor barrier film. The joints of the material should overlap by 10 cm. Using staples, fix the film to the crate.
- Finish the ceiling using plasterboard sheets.
Insulation of the ceiling in the attic using foam
To complete the installation, materials are required:
- foam sheets 40 mm thick;
- polyurethane foam;
- oSB sheets 15-18 mm;
- hardware.
Instruments:
- drill;
- hacksaw;
- a hammer;
- locksmith knife;
- screwdriver.

Installation steps
- Clear debris from the attic. If there are any damaged spots or holes, repair them with a cement or plaster mixture.
- Lay out the foam on the surface, docking tightly together.
- Apply polyurethane foam to the connecting seams.
- Cover the top with OSB sheets (15-18 mm) or boards.
If you plan to use the attic as an attic, the insulated surface must be filled with a cement screed, at least 5 cm thick. The use of a reinforcing mesh is mandatory.

- Insulation in the attic using foam sheets must be supplemented with screed trim or wooden boards. Unprotected foam is susceptible to mechanical damage that will affect its functionality.
- Thermal insulation from the outside is easier and more economical.
- It is forbidden to compress mineral wool. Losing its structure, it loses its valuable properties.
- Built-in lamps in the insulated ceiling should be mounted with a fence from the material with plasterboard inserts at a distance of 2-3 cm.
- To increase thermal protection, you can lay the attic in a complex: foam and mineral wool. Insulation layers should resemble brickwork.
- Use marked foil for vapor barrier. It is not allowed to use ordinary polyethylene.
- When using penofol for insulation in the attic, lay the foil down.
Any area of \u200b\u200ba private house, be it walls, floor or ceiling, must be properly insulated. Depending on the quality of the work performed, the cost of energy resources for heating will decrease or increase accordingly. Insulation is performed with accompanying insulating layers - the residential object will release moisture, steam.
Do-it-yourself methods for insulating the ceiling in a private house, the criteria for choosing the best insulation and a detailed installation guide for home craftsmen - independent work will significantly save the family budget.
Why the ceiling is insulated
The concept - heat loss at home - is especially relevant for private facilities, in contrast to multi-apartment municipal housing. A separate house must be insulated from all sides, since there are no “neighbors” and there is no constant maintenance of an acceptable climate. If you only insulate the walls and floor, and at the same time ignore the ceiling, then the owners will not get the proper comfort, but astronomical resource bills - please. Why?

From radiators, warm air rises, mixing with cold air and the reverse process. If the streams linger at the ceiling for a long time, heating it, then it will take much more time to reach a comfortable temperature, hence an increase in the amount of firewood, gas, electricity. The costs are correspondingly.
The insulated ceiling, on the other hand, does not need heating, since the space of the room is reliably separated from the attic by insulating layers. Consequently, the exchange of temperatures will take place faster. So, the importance of ceiling space insulation is clear and not discussed.
How to insulate the ceiling efficiently and inexpensively
The construction industry proposed a lot of insulation options. The price aspect should not be at the forefront of the question - how to insulate the ceiling, because we are talking about your own comfort.
Let's analyze some of the materials traditionally used for ceiling insulation:
Mineral or basalt wool. Unlike its predecessor - glass wool - it is convenient to work with it. It does not inject, does not emit any odors. Its thickness is sufficient for one insulation circuit. It is produced in convenient forms - mats, rolls. For a private house, it has the main advantage of incombustibility - it does not even smolder. The price is perfectly acceptable.

Nevertheless, this type of insulation has a serious drawback in the form of hygroscopicity and caking. Even a small amount of moisture trapped inside the insulation mat can expose large spaces, which is why the idea of \u200b\u200binsulation with cotton wool is lost.
If, nevertheless, the owners choose this option, it is necessary to reliably insulate, waterproof the roof and cover the cotton with multilayer protective layers, since the resulting condensation can form in a cold attic room, colliding with warm streams from the insulated ceiling.
Expanded clay... Mineral building material is successful for insulation, however, it is worth knowing that in a cold region at least 50 mm of a layer will be required, and given the additional insulation, the weight of the insulation will affect the bearing capacity of wooden floors. It is better to use a mineral for floor insulation.

Sawdust and clay... In the old days, just such materials were used, there were no others. However, they have proven themselves well. Parts of sawdust and dry crushed or powdered clay were mixed and poured into wooden floor boxes. There are some disadvantages of this method - sawdust attracts mice and absorbs moisture. Therefore, before backfilling, insulation work is performed, the raw material is dried or even calcined in the sun, mixed with slaked lime or carbide.
In addition to biological threats, exposure to mold and mildew, sawdust is combustible. They are sprinkled with a layer of waste slag and reliably protect the boxes from direct proximity to the chimney - its hot bricks can make it smolder, and then ignite the entire mass. Many craftsmen use sawdust in combination with cement, however, as in the case of expanded clay, the layer is heavy - the use is impractical.

It is important to remember that the materials are not flammable, but smoldering and emitting hazardous gases into the atmosphere.
Sprayed materials - ecowool, expanded polystyrene... The first option is absolutely environmentally friendly, as it is cellulose. The second is an analogue of styrene boards. Self-spraying is possible, but expensive - the cylinders are not very large. It is better to order the service to professionals. The advantage of sprayed insulation is that not a single centimeter of area will be missed. In addition, the materials are non-flammable and have good adhesion to surfaces. Arranging sprayed insulation means completely eliminating cold bridges in the house.

But there is also a drawback - vapor impermeability. We'll have to create high-quality ventilation, otherwise the microclimate at home will become uncomfortable, and in some cases unsuitable for living. Consequences of condensate settling on the walls are known - mold, dampness.
Insulation plaster mixes... They are not popular in private houses, as they require a large preparatory base. However, for non-wooden objects, such an application is advisable - the application of the plaster composition immediately takes on a decorative finish or becomes the basis for another coating.
Bung... Decorative environmentally friendly material. Dear. Wood, as you know, is a warm raw material, but, nevertheless, capricious - it burns, becomes moldy, is a treat for a beetle. Warming can take place without the obligatory hydro and vapor barrier for all materials, since the raw material itself has sufficient throughput. The decorative look allows you to combine practicality with design.
The list is incomplete, however, it includes popular materials for insulation. All others are made on their basis. Prices vary, but it's not worth chasing cheapness. It is better to consider the possibility of self-styling for each type - the savings on the invited teams are significant.
Methods for insulating ceilings in a private house
There are only two of them - insulation of the ceiling from the outside and from the inside.
Consider the advantages and disadvantages of each.
Insulation of the ceiling outside
When laying the insulation from the side of the attic, the home craftsman leaves the height of the room unchanged, which, of course, will have a positive effect on the number of useful meters. In addition, it is always convenient to work from above rather than from below - pour expanded clay, tightly lay mats and slabs. However, this method of insulation always involves the mandatory protection of the roof, otherwise the occurrence of condensation from temperature drops is inevitable.
Insulation of the ceiling from the inside
Internal insulation allows you to extend the durability of the material - dryness, ventilation of the space, no temperature extremes. However, you have to steal meters of height.
It is logical to assume that it is best to use the first option for ceiling insulation. In addition, then the attic becomes suitable for residential use. It is important to remember that the cake to be stacked must have a good vapor barrier.
We insulate the ceiling of a frame house with our own hands
The principles of laying any insulation are the same. Let's consider the whole process on the example of using basalt wool according to the first method - outside.
What you need:
- Vapor barrier... This is a foil membrane. It is laid with the metallized side out.
- Waterproofing... In this capacity, PVC film or rolled rubber acts.
- Drywall... It is laid from the inside. It will become the base for subsequent finishing.
- Accordingly acquired aluminum profiles and movable brackets - we must not forget about the shrinkage processes.
- Insulation... The selected mineral wool is purchased immediately in mats for easy installation.
- Edged board.
From tools: stapler, screwdriver, fasteners, circular saws or jigsaws. A stepladder will be required, even if the installation is from above - a rigid frame is attached from below.
Where to start insulation of the ceiling
The work begins by assessing the timber floors, even if the house is newly built. Found foci of damage are destroyed, and then all the wood is impregnated with protective compounds - this will no longer be possible.
Insulation frame
From below, an edged board is stuffed onto the ceiling beams to form boxes. You cannot use an unskinned croaker - this is a bait for a beetle.
Ceiling vapor barrier
A steam membrane is laid on the board. It is fixed with a stapler, the joints will overlap. The seams must be glued with tape to exclude even the possibility of moisture ingress.
Sheathing the frame and laying insulation
Then the brackets are installed, and the metal frame for the drywall is fixed on them. The necessary communications are laid through it - electrical wires, lighting cartridges - and then the space of the gypsum board is sewn up. The work from the inside is finished.
Cotton mats are placed in boxes made of beams and edged boards. It is important to avoid getting too tight or bumpy.

Waterproofing
Fasten waterproofing. You should also glue the seams and joints with construction tape.
Install floors. This is usually a grooved board. If the attic space is to be used for residential purposes, multilayer plywood is placed on the subfloor and decorated with a top coat - linoleum, laminate. Even looped boards are beautiful in themselves.
This is the whole process. An easy, safe and, most importantly, effective way to reduce the amount of heat loss and create living comfort for yourself and your household. The benefit from ceiling insulation can be calculated in advance - it will pleasantly surprise the owners of a private house.
27 December, 2016Specialization: Capital construction works (foundation laying, wall construction, roof construction, etc.). Internal construction work (laying of internal communications, rough and final finishing). Hobbies: mobile communications, high technology, computer technology, programming.
No matter what efforts we make to insulate the walls and floors of the dwelling, a huge part of the heat energy loss occurs in the upper part of the room. Therefore, it's time to talk about how to insulate the ceiling in a private house.
Today I will tell you the best way to insulate an attic beam floor in a wooden house, and also describe in detail the technology of laying heat-insulating material inside the house in the country. The article shows the most effective, in my opinion, scheme, when a vapor barrier membrane is installed from the inside, and the main insulation is installed outside. But about everything in due time.
The choice of material for work
To begin with, I want to figure out with you how you can insulate the ceiling, designed on the floor beams. If you study the advice of heating professionals, you can see that each of them offers different materials: expanded clay, foam, perlite, polyurethane foam, and so on.

But out of all the variety of thermal insulation materials for insulating a wooden ceiling, I suggest using basalt wool. In my opinion, this is the best choice if you are deciding how to insulate the ceiling from the outside along the logs. In support of the above, I cite the most important technical characteristics of this material.
| Characteristic | Description |
| Low thermal conductivity | The thermal conductivity coefficient of basalt wool is approximately 0.035 W / (m * K). Therefore, for effective thermal insulation, it is enough to use a layer 10 cm thick. That is, the insulation plates will just fit into the gaps between the support beams. |
| High vapor permeability | The vapor permeability coefficient of the described insulation with a density of 50 kg per m3 is 0.6 mg / (m * h * Pa), which is higher than that of wood. Consequently, the layer of thermal insulation will not prevent air infiltration through the walls, moisture will evaporate from the floor beams. This will have a beneficial effect on the microclimate in the house and on the integrity of the enclosing structures. |
| Low hygroscopicity | In direct contact with liquid, the material absorbs no more than 2% of moisture from its own volume. That is, if water gets on the ceiling (ceiling on the back side) due to a leaking roof, the liquid will not reduce the performance of the heat-shielding layer. |
| High fire safety | According to the current classification of building materials, basalt mats are classified as NG. The insulation does not ignite under the influence of an open flame, does not promote the spread of fire and does not emit toxic smoke. This is very important especially for a dwelling built of wood. |
| High sound insulation | The open structure of mineral mats (as opposed to foam) facilitates very effective absorption of structural and airborne sound waves. When using basalt insulation for thermal insulation of the ceiling, the inhabitants of the upper and lower floors will not hear each other's conversation, and the people below will not suffer from the rumble of furniture being moved above and careless steps. |
| Biological neutrality | The insulation has antiseptic properties, mold, fungus and other microorganisms do not form on its surface and inside. As a result, wooden floor beams will be reliably protected from rot, which will extend their service life. |
| Ease | Insulation is a porous material, therefore it is lightweight. The heat-insulating layer on the ceiling (even taking into account additional waterproof and vapor barrier membranes) will not exert a large load on the floor beams, load-bearing walls and foundation. |
| Ease of installation | All work on the installation of basalt insulation is done manually. For this, you do not need compressors and other mechanisms (as is the case with PPU). In addition, its use excludes the use of "wet" construction processes, so you can carry out the work even at negative air temperatures. |
| Long service life | Basalt mats will retain their original technical characteristics as long as the ceiling beams themselves. At the same time, the insulation does not shrink, forming islands of cold and reducing the efficiency of the heat-insulating layer. |
A small fly in the ointment in this barrel of honey is the high price of insulation. However, taking into account all the performance characteristics listed above, I believe that this is the best material for thermal insulation of the ceiling in a frame or log house outside.
For work, I will use basalt wool slabs manufactured by Knauf Insulation TeploKrovlya Expert.They are cut into pieces measuring 1200 by 610 mm, that is, with a distance between the beams of 600 mm, the insulation will fit end-to-end, without forming gaps. The thickness of the material is 50 mm, as I will lay it in two layers with alternating joints. One package is enough for 18.3 m2 of surface (but keep in mind that you will have to put it in two layers).

Now you know how to insulate the ceiling. However, in addition to mineral mats, you will need other materials with tools. I will list them in the next section.
Required tools and materials
In addition to the insulation itself, you will need to stock up on other materials:
- Vapor barrier membrane... This polymer film does not allow water vapor, formed in the room as a result of human activity, to penetrate into the insulation, causing the latter to get wet. It is best not to use impervious films, as all the benefits of breathable mineral wool are lost. An excellent manufacturer of vapor barrier membranes is Juta.

- Waterproofing film... A waterproof membrane that protects the insulating layer from moisture as a result of water getting inside the insulating cake due to a leaky roof or other subjective reasons.

- Plywood... I will use it to hem the floor beams from below, that is, the glued veneer sheets will support the mineral mats between the rafters. Instead of plywood, you can use a board, gypsum board, gypsum plasterboard, lining and other similar materials. The thickness of the sheets is 10 mm, the grade is ordinary FC (you can use a moisture-resistant FSF, but it has a higher level of formaldehyde emission).
- Polyurethane adhesive for insulation... Sold in cylinders, applied with an assembly gun. It is needed only in order to, if necessary, seal the joints of the thermal insulation sheets. Since everything is calculated accurately for me, and mineral wool is laid in two layers, you practically won't have to use foam.
- Wooden bars with a cross section of 5 by 5 cm. They are useful for installing counter-lattice from the outer part of the ceiling, since a ventilation gap must be left between the insulation and the decorative material located on top to remove moisture. Choose high-quality lumber, the dimensions of which are the same along the entire length, otherwise you will not be able to make a flat floor.
- Grooved board.The attic space above the ceiling in my case will be used as a living attic. Therefore, I will make the floor (that is, the ceiling on the back side) strong and reliable from a grooved board. If you just have an attic there, you can limit yourself to plywood.
- Fire retardant impregnation for wood.This substance will need to process floor beams and bars used for mounting the battens. The liquid will increase the fire safety of a wooden structure, destroy microorganisms and protect the enclosing structures from biocorrosion. You can use, for example, Bastion fluid, which, among other things, has hydrophobic properties.

As for the tools, the main ones are a screwdriver for screwing self-tapping screws, a stapler for fixing films and a saw for cutting plywood and foam. Everything else is the usual set of plumbing fixtures available in the arsenal of even a novice specialist.
Well, now is the time to move on to the story of how to properly insulate the ceiling in a wooden dwelling.
Insulation technology
Do-it-yourself ceiling insulation in a private house is carried out in several steps. All of them are reflected in the diagram below.

I will try to describe each of them in as much detail as possible.
Floor preparation
Ceiling insulation in a wooden house begins with the preparation of the floor, which in my case is a set of load-bearing beams (made of bars with a section of 50 by 100 mm), installed at a distance of 60 cm from each other.
The sequence of actions is as follows:
- Carrying out processing of load-bearing beams.It is necessary to solve several important tasks at once:
- Check the integrity of structural elements, remove damaged areas and replace defective fragments. If the beams are not new, they need to be cleaned of mold and mildew with sandpaper and a sander. The damaged areas are cut out and replaced with new fragments, and I advise you to completely replace the heavily worn beams with new ones. Otherwise, the service life of the insulated ceiling will not be very long.

- Treat the beams with fire protection. To do this, the antiseptic primer of your choice is diluted with water in the proportions indicated on the package, after which the load-bearing ceiling beams are covered with it. It is best to work with a brush, carefully rubbing the fire retardant into the wooden surface (it should be well saturated).
- I carry out installation of utilities in the ceiling.Most often (as in my case) these are three separate systems - ventilation, electricity and chimney passage. Each has small features:
- I recommend insulating ventilation pipes (made of thin-walled metal or plastic) with polyethylene foam cylinders or mineral mats. This will improve the efficiency of the system and reduce the noise generated by the air flow.

- Electrical wires in the ceiling of a wooden house (if you prefer hidden wiring) must be routed in special metal or plastic fire-retardant channels. The latter prevent the floor from igniting and further spreading fire in the event of a short circuit.
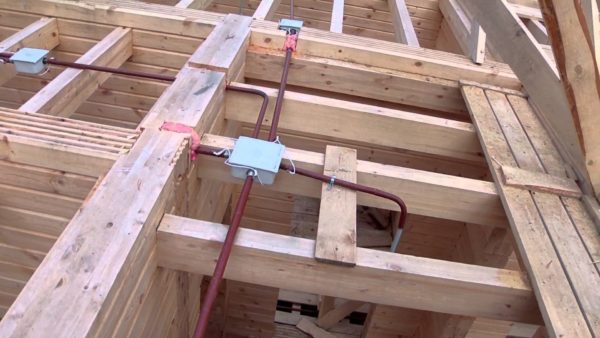
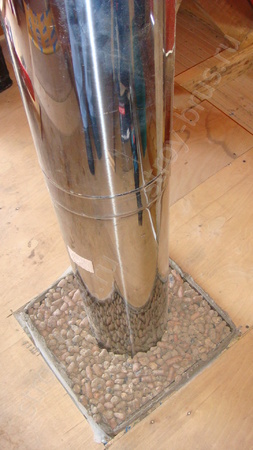
- The intersection of the chimney and the ceiling of a wooden house must be carefully protected with a non-combustible, fire-safe material. I made a square box out of tin, which I installed in the ceiling. Then the inner part of the box was covered with expanded clay, which excluded the contact of the hot pipe with the boards and plywood of the ceiling.
Having completed the preparation of the wooden ceiling supports, you can go down to the living rooms, since further work will be carried out from inside the house.
Indoor work
From the lower part of the ceiling, we need to solve two problems - to exclude the humidification of mineral mats by water vapor dissolved in the air and to provide reliable support for the basalt fiber slabs (the order of their installation is described in the next section).
Therefore, the scheme of work will be as follows:
- I fix the vapor barrier membrane on the floor bars.For this, as you already know, Juta vapor barrier film is used. The sequence of actions is as follows:
- I roll out the first roll of the insulating membrane, and then fix it to the bottom of the beams using a construction stapler and staples. It is not necessary to tighten it strongly, especially if the work is carried out in the warm season. The film should hang 1 cm every meter. In this case, after cooling down (in winter), it will not break.

- The second and subsequent rolls of the vapor barrier layer must be fixed in such a way that their edges form an overlap 10 cm wide. This is necessary to ensure the tightness of the joints.
- After processing the entire ceiling, the joints of individual sheets must be glued with adhesive tape. As a result, you should get a picture similar to that shown in this photo.

- I install the counter bars.With their help, a ventilation gap is formed between the film and the decorative material (in my case -), which will help to remove the moisture concentrated there.
- The lumber that I will use for work is pre-treated with a fire retardant and antiseptic (in one bottle). It is better to do this outdoors and bring it inside after the protective compound is completely absorbed into the surface and dries.

- Directly through the vapor barrier membrane, using self-tapping screws, I screw the bars to the supporting slabs so that the parts are perpendicular to each other. The distance between adjacent elements is about 40 cm. Thus, the beams will form a gap and serve as a support for the mineral wool insulation plates to be laid in the sphere.

- Between the individual bars, as well as near the walls, you need to make gaps 3-5 mm wide, which are necessary to compensate for the possible thermal expansion of the bars.
- I hem the ceiling from below with sheets of birch plywood.I use this material because of the nature of the subsequent decorative finish. However, you can replace it with other suitable sheet or rack products. The plywood installation scheme is as follows:
- I cut the sheets of material into parts of the required dimensions so that after fixing the counter-lattice on the beams, a gap remains between the wall and the plywood. Through it, condensable moisture will be removed from the air gap.

- I fix the plywood on the sheathing bars. For this, black self-tapping screws are perfect, which are protected from corrosion. The distance between the screws is 20 cm. They should be screwed along the edge of the plywood sheets and in the middle, pulling the material to the supporting elements. There should be a few millimeters between the plywood sheets to compensate for thermal expansion.

After that, you can finish work inside the dwelling and go to the attic, where the insulation will be laid.
Works in the attic
It is much easier to work from the outside of the attic floor than from the inside. The fact is that in this case you will not have to come up with various tricks for fixing mineral mats. They are easy and simple to lay on a horizontal surface and not sag.
A detailed scheme of work looks like this:
- I put mineral mats between the floor joists.This is done like this:
- Basalt fiber slabs are cut to size. My distance between the lags is exactly equal to the width of the slab minus 1 cm (the slab is 61 cm, the beams are located at a distance of 60 cm from each other). That is, thermal insulation will become an open source without the formation of cold bridges. If you need to customize the dimensions, then I recommend using a fine-toothed file or a sharp utility knife with replaceable blades.

- The first layer of insulation is laid on a vapor barrier film and counter-lattice bars fixed on the lower plane of the ceiling. It is necessary to fit the thermal insulation mats to each other as closely as possible so that cold bridges do not form at the seams. Then a second layer is placed on top in such a way that the intervals are alternated with an offset of 15-20 cm relative to each other.

- Seams between mineral wool slabs can be foamed with polyurethane foam adhesive. It glues the fibers of the insulation together and forms a homogeneous heat-insulating layer, eliminating unproductive losses of thermal energy.
- Installing a waterproofing membrane.You need to use a special plastic film, not ordinary polyethylene. The latter stops air infiltration through the ceiling, which negates all the advantages of using wood, mineral wool and other "breathable" materials. The scheme is as follows:
- The membrane is rolled out over the insulation so that the edges of one roll are located at the edges of the other, forming an overlap 10 cm wide.

- After that, the film is fixed to the wooden parts with staples and a construction stapler. It is not necessary to pull the material too much so that it does not break in winter. But there is no need to leave a lot of slack, otherwise the polymer film will rustle during operation.
- The joints of adjacent elements of the waterproof layer are sealed with adhesive tape. The film should form an impermeable layer to prevent water from entering the surface of the basalt mats.
- The film should lie on the surface of the basalt insulation. If its thickness is not enough to fill the space between the beams vertically, then the membrane must be lowered down and fixed on the lateral surfaces of the supporting elements using wooden blocks.

- I screw the counter-lattice bars to the beams.It is necessary when you are going to lay decorative material on top (in my case, a tiled floorboard in the attic). This is done like this:
- Wooden sections of 5 by 5 cm are screwed onto the beams over the waterproofing. They must be positioned perpendicular to the direction in which the boards will be laid. You can fix the crate with self-tapping screws.
- To avoid warping the coating, I recommend not to install the bars close to the walls of the attic and to each other. Small seams a few millimeters wide will help compensate for the thermal expansion of the material.
- I lay a grooved board on top.I took this particular material

On this, the process of insulating the ceiling can be considered complete.
Summary
Now you know how to insulate the ceiling in a wooden house using mineral wool. But there are other, cheaper ways of insulation. Instructions on how to use expanded clay for this purpose are set out in the video in this article. And you can read about how to insulate a wooden ceiling from the inside (if there is no access to it from the attic) in my other articles on this site.
You can leave your opinion on the information contained in the material in the comments below.
In the conditions of the Russian winter, ceiling insulation in a private house is far from the last question. To save on heating costs, it is important to minimize the heat losses that occur through all the building envelopes - windows, walls, doors, ceiling. Homeowners are trying to install high-quality windows and doors, walls are insulated, but the ceiling is often forgotten. Meanwhile, up to 20% of the heat can go through this enclosing structure!
Everyone who remembers school physics lessons and knows that warm air, according to natural laws, rises up, and then it comes into contact with the cold surface of an uninsulated ceiling. As a result, condensation forms, that is, the air humidity in the upper part of the room increases. Of course, this does not benefit the health of the household, because dampness can provoke the formation of mold. Therefore, each owner of a private house should be puzzled by the issue of insulation.
General rules for insulation
Ceiling insulation with mineral wool
When looking for materials that can be used to insulate the ceiling in a private house, several effective solutions are possible:
- Expanded clay... This is a loose insulation, lightweight, absolutely non-combustible material, which is made on the basis of clay. The material is environmentally safe, is not afraid of moisture, has good thermal insulation characteristics, rodents and pests do not start in it.
- Mineral wool... This is perhaps the most popular insulation option, it has excellent thermal insulation qualities. The disadvantages include hygroscopicity, this material should be carefully protected from moisture.
- Ecowool... Cellulose-based material, environmentally friendly, has excellent thermal insulation properties.
- Styrofoam... Lightweight polymer material. Fireproof, easy to use, not afraid of moisture.
- Penoizol... It is a porous polymer material for insulation with an unlimited service life.
Ceiling insulation methods in the house
The choice of material is also associated with the method that will be used for insulation. There are two ways to insulate:
- From inside the room.
- From the attic side.
It should be noted that both methods are capable of providing a decent level of insulation, so you need to choose the one that will be more convenient to perform.
Techniques differ in technology and types of materials used. In order not to be mistaken when answering the question, how is it better to insulate the ceiling , it is worth remembering an immutable rule: if insulation is made from the inside, then you should choose a vapor-permeable insulation... In the event that the insulation is carried out from the side of the attic or outside a private house, then you should purchase a material with vapor-proof properties.
How to insulate the inside of the room?
As a rule, insulation of the ceiling from the inside of the room is combined with the construction of suspended or stretch ceilings. In this case, the insulation is placed in the space between the ceiling plate and the covering to be installed.
When insulating the ceiling of a house from within the room, most homeowners choose mineral insulation, which is available in rolls or mats.
- If you plan to arrange it in the house, then first a frame is assembled from a metal profile for attaching drywall (or other material with which it is planned to sheathe the ceiling). Then, layers of insulation are glued in the space between the profiles.
Advice! It is convenient to use tile adhesive for gluing mineral insulation, it quickly sets and holds the material well.
- In the event that they are installed, the frame will have to be assembled specifically for laying the insulation. It is convenient to do this from a bar.
Advice! In no case should mineral wool be compacted during installation, since its heat-insulating properties depend on the presence of air spaces between the fibers.
- A separate issue is the installation of lamps. The fact is that even modern lamps heat up a little during operation, and the presence of insulation on the ceiling prevents the heat from leaving freely. As a result, the lamps quickly burn out. Therefore, you should either cut out the insulation in the area where the lamp is located, or leave an air gap between the insulation layer and the ceiling sheathing material. The first method reduces the effectiveness of insulation, and the second requires a significant lowering of the ceiling level.
Advice! There is another way to solve the problem with lamps - do not use built-in ones, but install the most ordinary chandeliers and sconces.
Insulation of the ceiling from the attic
Insulation of the ceiling from the attic
This option is the most effective. Consider how you can insulate the ceiling from the outside of the room? Almost any type of insulation is perfect here. However, if it is decided to use mineral wool, then a layer of vapor barrier film should be laid in front of it.
When using layers of mineral wool or foam, the material is placed in the spaces between the timber frame bars. When using polystyrene, the joints should be sealed with polyurethane foam.
If the attic is planned to be used, then the floor should be made on top of the installed insulation by screed or by arranging the floor on the logs.
conclusions
So, taking up the insulation of the ceiling in a private house with your own hands , first of all, it is necessary to decide on which side of the ceiling the insulation will be made. Then you can choose a heater from the options above.
In cold climates, it is very important to insulate the house well. Usually attention is paid to the floor, walls, windows, but not to the ceiling - and after all, up to 15% of the heat can go through it.
How to choose a material for insulation
The question often arises as to how to insulate the ceiling of the house. The choice of material depends primarily on the climate of the region. The most common insulation is mineral wool, which has excellent thermal insulation properties. If the air temperature outside does not drop below -35 degrees, then this material will be the best choice.
Mineral wool (see photo) is made from artificial fibers of mineral origin. Limestone, basalt, dolomite, diabase are used for its production. The highest quality insulation is obtained if only rocks are used in the manufacturing process. The advantages of mineral wool include fire resistance, durability, low hygroscopicity.
Ecowool - cellulose insulation, installed using special equipment. The composition of the material includes fine wood fibers formed during the processing of waste paper, and special antiseptics. Ecowool has only been used for a couple of decades, but thanks to its ability to fill empty spaces, it is gaining in popularity. Its disadvantages include the impossibility of independent use - it is necessary to call specialists to carry out the work, as well as a significant amount of dust in the case of dry installation. The advantages of the material are excellent thermal insulation properties, environmental friendliness and affordable price.
When choosing how to insulate the ceiling of a house, one should not forget about other widespread heaters - polystyrene, penoizol (in more detail: "").
Foam is made by creating foam from different types of plastics. It contains a large amount of air, making it a lightweight material that is convenient for installation and transportation. It has excellent thermal insulation and sound absorption properties. In addition, foam is convenient to work with - it is easy to cut and can be attached to any surface.

Penoizol is a liquid foam, the advantage of which is its low price. He also fills any space, thereby reliably protecting the home from the cold. But to use it, you need to have special equipment, so you have to trust specialists to work with this material. Penoizol is recommended to be used for thermal insulation of premises of a large area.
As for what can be used to insulate the ceiling in cold regions, where the temperature in winter can be less than -35 degrees, then this is expanded clay. It is made from clay by firing, is resistant to low temperatures and protects well against heat loss.
Tools for work
To carry out work on the insulation of a small house (for example, a summer residence), you will need the following tools:
- locksmith knife;
- hacksaw;
- jigsaw;
- a hammer.
![]()
If the insulation of a private house, cottage is carried out, then it is better to purchase the following power tools:
You also need to think about the fasteners. The most affordable and easy to use are ordinary nails, but if you need to insulate the ceiling of a large area, it will be more convenient to use self-tapping screws or screws. Using a screwdriver or an electric drill to tighten them can save time and effort.
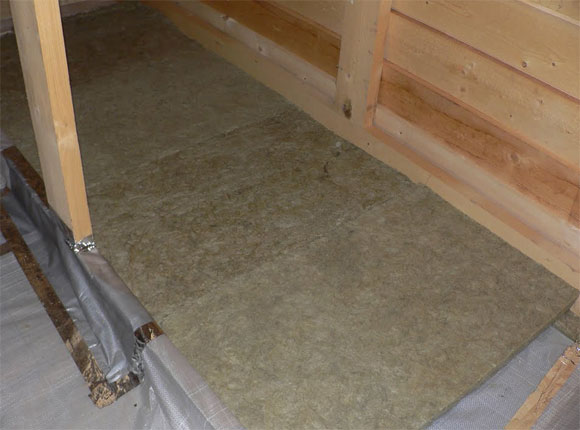
During work, you will also need polyurethane foam and double-sided tape. The joints between the insulation plates and other cavities are filled with foam, which rapidly increases in volume.
For fastening the waterproofing layer, wooden slats are used. It is recommended to prepare them in advance. Their size should be 10x20 (25) millimeters. After the ceiling is insulated, the floor is usually laid in the attic. The simplest floor covering is made from boards 120-150 centimeters long and 25-30 centimeters wide. If the attic will be used as a living space, then a more expensive coating can be made.
How to insulate the ceiling in a house, detailed video:
Work process
Having chosen the best way to insulate the ceiling and having prepared everything necessary, they begin to create thermal insulation.

Mineral wool can be replaced with ecowool, and foam plastic - with penoizol. But in this case it will be necessary to involve specialists in the work. It is difficult to say the better to insulate the ceiling in the country - it depends on the design features of the ceiling, financial capabilities and the required degree of thermal insulation.
Insulation of the ceiling in a private house can significantly reduce the amount of heat loss in the cold period and significantly improve the indoor microclimate in the summer. In addition to increasing comfort, high-quality thermal insulation will give you tangible savings in the family budget for heating. The costs associated with the purchase of insulation will pay off in 2-3 years.
In addition to reducing the cost of heating a house, floor insulation solves a number of other problems. By preventing warm air from entering the attic, the insulating structure prevents the accumulation of water vapor and moisture in the roof space, which damage the rafters and floor joists. In addition, insulation allows you to avoid melting snow on the roof and the formation of large icicles, which are very dangerous during thaws. When organizing a living space in the attic, the soundproofing function is very useful. In any case, ceiling insulation is a necessary measure for a private house.
Carrying out work on ceiling insulation is quite within the power of any home craftsman. Installation requires a minimum level of initial training of the performer. The tips below will help you avoid common mistakes and get your planned work done quickly and effortlessly. By carefully planning the workflow and by timely procurement of the necessary materials in the right quantity, you save your time, hassle and transportation costs. Let's consider in detail how to properly insulate the ceiling in a private house.
Where to insulate the ceiling: inside or outside
Ceiling insulation in a private house can be carried out both from the inside and outside. Both options give pretty good results. They differ in the materials used and the methods of their installation, therefore, each master chooses the option that is convenient for himself under specific living conditions, taking into account economic feasibility.
Attic floor insulation options
With an external version of insulation, thermal insulation is placed in the attic. If the attic space is not used, then the insulation does not need decorative finishing, which favorably distinguishes this option from the previous one. In addition, it is much more convenient to work with external insulation.
Internal insulation provides for the fastening of heat-insulating materials to the inner surface of the ceiling and the installation of suspended structures made of plasterboard, plastic, wood, etc. It should be borne in mind that with internal insulation, 15-20 cm of the height of the room is lost. Therefore, if your ceiling is at the level of 2.5 m or lower, then you should give preference to insulation from the attic side.
Internal insulation should be chosen if you are going to make repairs and plan to install a suspended ceiling. In all other cases, preference should be given to external insulation.
The choice of material for thermal insulation
The following thermal insulation materials are popular for the insulation of private houses:
- Styrofoam;
- Expanded polystyrene;
- Penoizol;
- Polyurethane foam;
- Penofol;
- Mineral wool;
- Basalt wool;
- Ecowool;
- Expanded clay;
- Sawdust;
- Vermiculite;
- Dry grass, needles, reeds.
External insulation with foam or expanded polystyrene is perhaps one of the cheapest and most affordable ways. This task is fairly easy to accomplish on your own. The materials are resistant to moisture, do not rot, do not burn, but melt in case of fire, emitting caustic poisonous smoke. Expanded polystyrene essentially consists of the same material as foam, only it is made a little differently. The main disadvantages are the release of poisonous phosgene gas during combustion and a relatively short service life (up to 10 years). When using them, it is necessary to pay increased attention to fire safety.
Penoizol is a liquid foam. Does not burn, is vapor-permeable, biologically stable, surpasses foam plastic in terms of thermal insulation properties. Manufacturers declare complete safety for humans after hardening. It is produced directly on site and installed using a special expensive installation, so the work is carried out only by specialized teams. Convenient and cost effective for large volumes.
Similarly, work is carried out with polyurethane foam, which is synthesized from two liquid components. Depending on the proportion used, a polymer foam with different properties is obtained. The surface is covered with a continuous layer without joints, excluding the possibility of blowing through the cracks. Disadvantage - poisonous substances are released during combustion.

Penoizol pouring process
Penofol - polyethylene foam covered with aluminum foil. Prevents penetration of cold air, drafts and radon, reflects radiant heat into the room. The material is very light, does not create additional loads, works very well in combination with mineral wool. Due to its small thickness, it hardly affects the height of the room.
Mineral wool contains mainly natural materials: sand, rocks or melts. Available in rolls and sheets of various sizes. It has good heat and sound insulation characteristics and an affordable price. It needs protection from moisture, since when wet it completely loses its insulating properties. Resistant to temperature extremes, restores its shape after loading, but over time it cakes. The material, unlike glass wool, almost does not prick, but still requires protective equipment during operation. The main disadvantage is the content of phenol, which can easily penetrate the human skin.
Basalt wool is made from rock melts. Available in mats and slabs. It is characterized by resistance to stress and high temperatures, hydrophobicity, elasticity. The material is able to pass water vapor and does not allow them to accumulate inside, does not shrink and can withstand operation for up to 70 years without loss of quality. Just like mineral wool, it contains phenolic binders, and fibers can irritate the skin and mucous membranes.
When working indoors, cotton wool is usually used - mineral or basalt. it vapor permeable materials allowing the ceiling to "breathe".
Ecowool is a free-flowing material of natural origin; it consists of 80% cellulose with additives of borates, which protect it from easy inflammation and decay. Installation work can be carried out wet using a special installation and dry by hand. The manual method is extremely simple. It is enough to pour the cotton wool between the lags on the previously laid glassine and slightly loosen it. Ecowool increases in volume by 2-3 times. The recommended layer thickness is 30 cm. Thermal conductivity is the same as that of mineral wool, while ecowool is not afraid of moisture, prevents the development of fungi and mold. Serves over 100 years.
It is possible to use cheap local materials for insulating the attic floor, such as expanded clay, sawdust, hay, needles, reeds, clay and slag. Their cost is often only equal to the cost of delivery, but the thermal insulation properties are noticeably lower and it is more difficult to lay them. Sawdust needs special protective treatment before laying. Otherwise, they can be damaged by rodents, rot and be very flammable. Hay is a tempting place to settle for various small bugs and insects. For a tangible thermal insulation effect, all bulk insulation requires a significant thickness - from 30 cm, which leads to a strong load on the floors.
The combination of sawdust with vermiculite gives good results. Both materials are of natural origin, easily absorb moisture and easily release it, maintaining optimal humidity. Vermiculite is made from hydromica and is considered an ideal bulk insulation with environmental properties. In terms of thermal conductivity, it is comparable to mineral wool. The only drawback of vermiculite is the price.
Laying loose insulation provides for backfilling them between the logs or beams of a specially made sheathing.

If environmental friendliness of materials is fundamental for you, then you should opt for expanded clay or sawdust with vermiculite. If high thermal insulation properties and ease of installation are important, basalt wool is your choice.
Thermal insulation with basalt wool: step by step
Let us consider in detail how to do external insulation with your own hands using one of the most effective insulation materials - basalt wool.
Necessary materials:
- Basalt wool slabs 100 mm thick;
- Vapor barrier film;
- Waterproofing film;
- Foil tape;
- Wooden beam;
- Hardware.
Instruments:
- Stapler;
- Roulette;
- Hacksaw or jigsaw;
- A hammer;
- Locksmith knife;
- Screwdriver.
- Step 1. First of all, you need to thoroughly clean the attic and create a flat surface for laying basalt wool.
- Step 2. If the attic is planned to be residential, then a wooden frame is laid for the future floor. The step between the lags is determined in accordance with the width of the insulation plates in order to ensure the most snug fit.
In the presence of wooden floor beams, the insulation is placed in the space between them. In case of insufficient height, additional bars are attached from above.
If the attic will not be used, then this item can be skipped.
The height of the insulation depends on the climatic features of the area and the roof structure. In most cases, it is optimal to use two layers of basalt wool 100 mm thick.
- Step 3. A vapor barrier film is laid. If the floor is reinforced concrete, then this item can be skipped, since it has a low vapor permeability.
Fastening to floor beams or joists is carried out using a construction stapler with wrapping edges. In new construction, the film is placed under the beams. The sheets are overlapped by 150-200 mm, fastened with moisture-resistant tape and must be installed on the walls by at least 200 mm to ensure the prevention of moisture penetration. The best option is the use of foil-clad material. In this case, the sheets are placed end-to-end with the foil down and glued with a special tape.
Beams and logs are not covered with a vapor barrier film in order to avoid the accumulation of moisture in them and rapid decay.

- Step 4. Sheets of basalt wool are laid on the vapor barrier film, avoiding gaps at the joints if possible. Gaps of 2-3 cm are left near the walls, which do not close to ventilate the cotton wool.

- Step 5. The second layer is laid with the maximum displacement of the seams. In cold climates, the third layer will not be superfluous. It fits across the previous ones and eliminates all potential cold bridges.

For an attic floor that will not be used, you can stop at this (unless, of course, the roof is leaking), or you can play it safe by following the recommendations of the next paragraph.

- Step 6. A waterproofing film is laid to protect the cotton wool from moisture ingress from above during operation.
- Step 7. A structure for moving around the attic is being mounted.
For a residential attic, boards and, if necessary, a finishing coating are laid; for a non-residential attic, it is enough to provide bridges for walking during technical inspection and maintenance of the roof.
It is better to carry out work in the warm season - in summer or early autumn.
For external insulation, it is better to take vapor-proof materials to protect the floor from moisture, for internal - vapor permeable.
The more air the insulation contains, the more effective it is; therefore, we must strive to provide maximum "fluffiness" to materials such as mineral wool, ecowool, sawdust.
External insulation will always be cheaper and easier to perform.
With internal insulation of the ceiling and the use of some models of built-in ceiling lamps, frequent burnout of light bulbs is possible due to the lack of heat dissipation. In this case, it is better to hang a regular traditional chandelier.
For vapor barrier, you can use only a special film with the appropriate marking or glassine, you cannot use ordinary polyethylene.
Penofol is always laid with foil down.
You can perform complex insulation by combining different insulation materials.
When insulating with basalt wool, you must use a mask and protective clothing that completely covers the body.
Before starting work, you should carefully study the advantages and disadvantages of all available thermal insulation materials, analyze their operational capabilities, assess the costs and complexity of installation. Taking a carefully considered decision and installing thermal insulation, taking into account the above recommendations, guarantees a safe and efficiently insulated ceiling in a private house.

