A cat made of plastic corks. Crafts from corks from plastic bottles: bright and original decor
Crafts from plastic corks have recently gained recognition among lovers of original things due to their ease of execution. After all, there are plastic bottles in every home. Therefore, do not rush to part with them, but turn on your imagination and start ennobling your home or garden plot.
As you know, children have a very well-developed fantasy. They can create anything from any materials that are at hand. The thing is that from early childhood, parents and kindergarten teachers develop their interest in crafts.
For children's creativity, a material such as plastic corks is perfect. They are good because they stick to any surface, which means that you can create all kinds of pictures and shapes. Children really like crafts made from plastic corks, and they are happy to make voluminous and interesting products.
Usually from d With this material, they carry out 3 types of crafts: appliqués, toys and figures.

The simplest application to perform is a caterpillar. It can be of any size and color. It can be supplemented with a beautiful background and various small details. For example, make a sun and a flower as a background, gluing together the corks according to the pattern.
Another interesting applique is birds. This will require 2 head and body covers, as well as cardboard, cloth, or real feathers for the wings.
You can make a variety of crafts from corks from plastic bottles, trusting your imagination or displaying them in stages in the pictures.
So, you can make an applique, for example, in the form of a rabbit. It is made in the same way as a bird, with two lids of different diameters, cardboard for the ears and a small pom-pom for the tail. In this way, you can create any animals that your child likes.
Voluminous crafts are also easy to make, which look more interesting than appliqués. Try making a turtle.

To do this, you need a large shell lid, cotton swabs for the limbs, and an ice cream stick for the calf. They need to be painted green or in any other color, glue the lid on an ice cream stick and crossed cotton swabs, paint spots on top, attach eyes - and the funny turtle is ready.
The same principle is applied in the manufacture of spiders, only pieces of chenille wire can be used instead of cotton swabs.
A child can easily make crafts in the form of ladybirds or bees, which are performed by painting the covers with the corresponding colors. The antennae can be made from black fishing line, and the wings can be made from cardboard.
With the help of fishing line and wire, by stringing plugs on them, you can get a snake.

Mosaic panels made of plastic corks
Mosaic compositions made from bottle caps are also very popular. To create such paintings, many different colored covers are required. It is absolutely easy to carry out the work - by gluing the plugs together.
Important! The glue should have increased tenacity, as an option, you can use a glue gun.
Parts are attached to the base. If fastened with the back side, then in this case it is advisable to screw them to the base with screws.
If you have a lot of plastic plugs of the same color, say, yellow, then you can make a craft out of them in the form of the sun. It will look interesting if you take lids of different diameters and fold them one into one.
From a large number of multi-colored corks from plastic bottles, you can make a cockerel craft. True, some skills will be needed here, and such work will take much more time, but you will get an original picture that will delight you for a long time.

A piece of plywood is suitable as a base, which must first be opened with a primer, then a contour is applied and the plugs themselves are glued according to the drawing scheme.
Magnets from plastic bottle caps
If you have just decided to try your hand at this exciting activity, then the simplest crafts made from corks from plastic bottles look like ordinary magnets that can be found on the refrigerator of every housewife. After all, we need them not only for beauty or for fixing lists, but also for masking possible defects formed on the surface of technology. It won't take you too long to craft them.
Materials that will be required in the manufacture of magnets:
- multi-colored plugs;
- magnets (available at a craft store);
- glue;
- alcohol;
- paints and colored paper;
- colored markers or pencils.

First of all, you must completely degrease the cork with alcohol. Then put the magnet on the glue inside. Cut out circles of colored paper of exactly the same diameter as the cork itself. Write letters on the blanks obtained and fix them at the bottom of the cork. You can additionally decorate the magnet with a small bow. The result is a bright and fun alphabet. Using this method, you can also assemble a picture by cutting out circles of the required diameter and various shades. The description of this craft made of plastic corks can be found in more detail from the master class on specialized sites on the Internet.
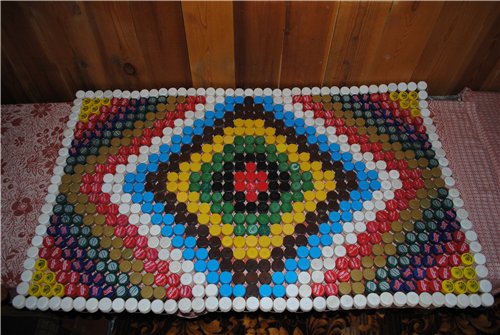
Cork mat as a foot massage
Some of the most popular DIY plastic cork crafts include a massage mat. To make it, you don't need to make any special efforts, but it looks very unusual and attractive, especially from multi-colored corks. There are certain benefits to this product. Even doctors are advised to walk on these rugs every day for 15 minutes to improve health. Because massage has a relaxing effect. The principle of its action lies in the fact that when walking on it, the nerve endings located on the feet are involved, which are responsible for certain organs. This massage is a kind of exercise for the whole body.
To make it you will need:
- plastic plugs;
- awl;
- strong line.
Each side of the hexagonal rug has 10-15 plugs. In order to make the correct calculation, it is necessary to multiply the number of plugs on one side by the number of sides of the product and subtract the number of repeating plugs. After you have the required amount ready, you should make 6 holes in each part using an awl. Extreme plugs need to be collected on one line. Next, you should firmly braid the covers with fishing line, forming a hexagon. And to make the rug pleasing to the eye, you can use covers of different shades, from which you get the whole picture. The pattern of crafts made from corks from plastic bottles can be selected from a photo on the Internet, focusing on the selected image, you can lay it out in advance, and then proceed directly to the assembly itself.

Corridor mat made of plastic corks
Among the original and at the same time practical handicrafts from plastic bottle corks, made by hand, includes a rug in the corridor. It is made by gluing the lids with silicone glue in a glue gun. You can make any pattern, for this you need to take only corks of various shades to make the product colorful.
Attention! The main advantage of the material taken for the rug is its ability to easily and quickly be cleaned of various kinds of dirt.
However, in a room where linoleum is lying, it can be harmful, since the edges of the lids are quite sharp and can scratch the coating. It is recommended to lay such a rug on a tile, which means that it is suitable for a bathroom.
Plastic is characterized by such a property as wear resistance, so it will withstand any temperature and humidity conditions. The only thing that can get hurt is the color. However, if desired, it can also be restored by painting with special paints, or made another one from new covers, because, as mentioned above, this material is very cheap. Therefore, crafts from plastic corks can be made very often and are different all the time, experimenting with colors and shapes.

Filament curtains - decoration of a country house
Crafts made from plastic corks can be very diverse. It all depends on the richness of your imagination. However, one of the most interesting and original ideas that can be found on the Internet is filament curtains from covers, which is especially important for those who have a summer cottage. Such a product will save your budget, since it does not require special costs, and besides, they are easy to manufacture. The result is unusual filament curtains.
All you need to make them is a large number of covers, you can use one-color or different shades if you are planning some kind of pattern. It is important to note that its scheme should be selected with an elongated shape. You also need: fishing line, a hammer, nails, an awl, and if the need arises, also a needle.

Cork curtains are made in the following sequence:
- Make holes in the covers on both sides with an awl.
- Lay out the details according to the figure, you can keep it near you when stringing the corks.
- String 2 vertical rows on a long line, starting from the bottom of the 1st, going to the 2nd.
- Fasten the knots obtained on both sides, you can singe the ends of the fishing line.
- String the third-fourth row, fifth-sixth and seventh-eighth according to the same principle.
- To make it easier to assemble the curtain, it is advisable to make some mark when you move to the next row.
- If the door frame is wooden, then the product can be attached to it by nailing in separate fixing plugs.
- Before fixing the plugs, it is necessary to make a markup, having determined the same distance between them.
- Take the first thread with the first or second rows of caps. Find the midpoint mark that marks the transition from row to row.
- Nail the additional cover to the door frame, while the nail head should protrude from the wood, and the 1st thread should be hung on it in the middle. Then hammer it to the end.
This design will look good in a summer shower in the country, because of its density.
The creation of original crafts from plastic bottle corks allows you to solve the problem of recycling PVC in the most harmless way. Due to the fact that these details are often painted in bright colors, household items made from them do not need additional decoration. The unconventional use of plastic bottle caps makes it possible to acquire things that are necessary for the household.
The unconventional use of plastic bottle caps makes it possible to acquire things that are necessary for the household
First you need to stock up on material. It can be plastic corks from 0.5-3-liter bottles, from large containers, from containers for dairy products, cans, shampoos and other PVC packaging. Some crafts made from plastic bottle corks can only be assembled from the same elements, but for others, using materials of different sizes is even preferable.
You can use thin wire and fishing line to attach the elements to each other. In some cases, instant glue or a heat gun will work. The caps can be glued to the base made of cardboard or wood or fastened with nails and screws. For large-scale design work, cement and sand are also useful.
In addition to these materials, to work on creating products from corks from plastic bottles, you will need:
- awl;
- hacksaw for metal;
- candle or lighter;
- hammer or screwdriver;
- pliers.
When decorating surfaces with plastic mosaics, a construction rubber trowel for grouting can also be useful.

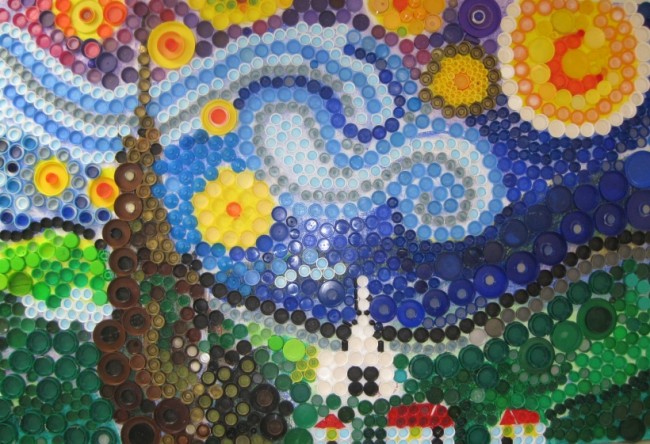
Bottle Cap Mosaic
This is a very simple but fun activity. Even children are able to lay out mosaic pictures and cork panels. For them, it can be a game where bottle caps are used instead of colored chips. You can draw the schemes yourself, according to your taste.
When adults get down to business, the game becomes even more interesting. The result is richly decorated mosaic walls and fences made of plastic covers. They can be fixed in different ways, depending on the surface material.
On a wooden wall of a house, a fence or a sheet of plywood, you need to draw a contour image, which is then gradually filled with covers of the desired color. If the drawing is complex (reproduction of a painting, for example), then it is possible to sketch on the wall with colored crayons. When creating a mosaic pattern, you can use elements of different sizes. For a graphic ornament, it is better to prefer parts of the same diameter, so that you can use cross stitch patterns or samples of knitting patterns.
It is best to attach the covers to the wall with the top side out. This will require nails or screws 1-2 cm longer than the height of the lid rim. Fasteners must be hammered into the center of each tile.
To create a smooth transition of shades when making an artistic picture from corks, you can attach the details with the open part outward. In this case, several lids of similar colors are usually used, nested inside each other. Internal details can be shifted to one of the largest sides, accentuating a darker or lighter shade in this place.
On a concrete wall, mosaic elements are easier to attach to tile glue, liquid nails or a simple cement-sand mortar (1: 3, respectively). When fastened to mortar, the mosaic should be created gradually. The wall will need to be marked out into small squares (about 0.5-1 m2). Apply the mortar like a regular plaster mixture, draw parts of the drawing on a wet surface, and then press the covers into the soft mass, filling in the contours. After the end of the entire art canvas, the gaps between the covers can be filled with grout, applying the solution with a rubber spatula and rubbing it into the gaps. After the cement has set, rinse the mosaic surface with water.
 This is a very simple but fun activity.
 By the same principle, you can make a mosaic pattern on a tabletop or windowsill, on garden paths or benches. The small size of the mosaic elements allows you to decorate surfaces of any curvature with it. This makes it possible to design flower pots and vases, posts and columns.
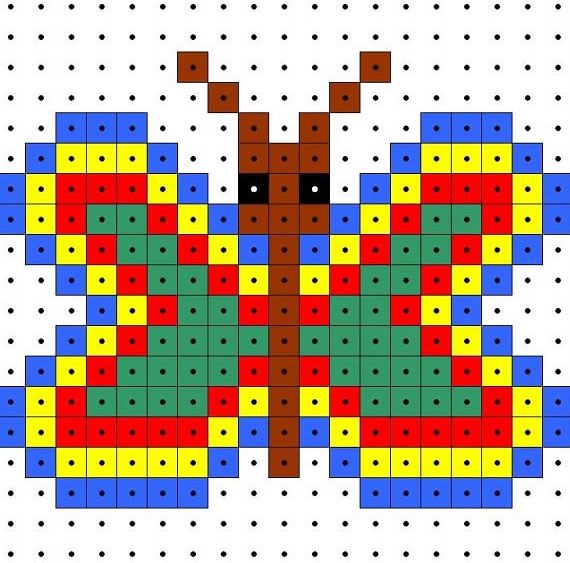
Gallery: crafts from plastic corks (25 photos)


What can be made from plastic bottle caps (video)
How to make a massage mat?
A variant of the mosaic, but on a flexible basis, can be considered cork panels, which are used in a variety of qualities. It couldn't be easier than making a mat out of plastic corks or a foot massage surface. Flexible and durable mosaic panels can be transformed into other crafts from plastic covers: lampshade, beach bag, seat for a chair or folding chair.
To make a rectangular cork rug, you need an awl and thick line for the base. It is more convenient to use covers of approximately the same diameter, but the use of elements of a different size is also permissible. In the side edges of each cover, you need to pierce 4 holes with a heated tip of the tool, placing them crosswise. According to the prepared scheme, collect 1 row of plugs, stringing them on the fishing line through opposite holes. In the last element of the row, pass the warp thread inside the lid, and bring it out through the adjacent (side) hole.
In a similar way, string the initial element of the 2nd row. Then lead the line straight through the opposite holes to the end, where you turn again. Having finished the rug, do not tear off the fishing line, but transfer it to one of the holes, which is located near the penultimate row. Next, perform the actions already described, but now the direction of the thread will be perpendicular to what it was before. This will give the rug the necessary strength.

The finished cloth can be spread on the floor. If you fix it on the frame of the chair, you get a comfortable, soft and springy seat. If we weave narrow stripes for the sides of a beach bag and connect the edges of them and the panels with a bright ribbon, cord or braid, then all that remains is to make strong handles. For a lampshade, you only need to sew the edges of the rug so that you get a pipe of the required diameter. It is pulled over a solid wire frame and fixed to the lamp holder.
What can be made from plastic lids (video)
Games and toys from waste material
Didactic games with plastic bottle caps have long found their admirers among teachers. Bright and comfortable material makes it easy to make beautiful educational toys. When unscrewing or tilting the lids, the child develops fine motor skills, and the selection of game elements in size and color serves for the child's mental work.
On plywood or cardboard, you need to draw your favorite cartoon characters, clowns, fairy-tale characters, teremok, etc. Having picked up the color of the nose plugs, buttons, specks on the animal's fur, the windows of the house and other elements of the pattern, saw off the neck of the container to which this lid fits with a hacksaw. You need to cut below the ribs at the neck. Grind the cut with sandpaper and glue the threaded part of the toy to the desired place. After removing the covers, invite the child to choose them by size and color and screw them where they should be.

In the teremka, a child can sequentially open round windows, inside which the faces of the characters are glued, and in a clearing with flowers - look for where the bee Maya has hidden. You can use caps of different sizes, with hinged valves. This will diversify the options for games.
Games with plastic bottle caps can also involve composing words and arithmetic examples if the child already knows letters and numbers. To do this, you just need to stick the necessary symbols on the surface of the cork, and insert a small magnet inside it. On the refrigerator door or just on a sheet of tin, the child will be able to collect small messages to parents, and solve homework in a playful way. Covers with numbers can be arranged in the form of a calendar, removing the past dates every day.
Toy clocks are another example of what can be made from bottle caps. If there is a working mechanism of a suitable size, then the watch will be the most real. The mechanism will need to be attached on the inside of the large cover, and the pin for attaching the arrows to the front side. On the wire segments, place the divisions with numbers along the circle.

A plastic robot made by hand from colored corks and wire will surely please any boy. To make it, you need to make 4 flexible limbs, stringing the caps in random order. The torso and head can be of suitable shape from empty containers. The soles of the feet must be made large, providing stability to the toy.
There are many options for crafts from plastic bottle caps. Small containers and boxes for various little things, a palette for a young artist, Christmas tree decorations - the possibilities of waste material are very extensive. They often complement what can be made from plastic bottles. The fantasy of the master helps them to materialize.
Attention, only TODAY!
Craftsmanship of folk craftsmen knows no bounds. Some create masterpieces from plastic containers, the creativity of others is based on the manufacture of paintings from corks from plastic bottles. Places of application of original crafts are different: walls of houses, fences and even paths. Various technologies for forming funny images will help you choose the right option for your own needlework from corks.
Mosaic art
The everyday use of plastic bottles in everyday life serves as a source of ideas for their subsequent use. But collecting empty containers for crafts is much easier than finding the right amount of corks. The process can take a long time, so most craftsmen connect all their closest entourage, including relatives, friends, colleagues and neighbors, to collecting plastic bottle caps.

Comment! It is better to choose a drawing for the panel in advance, so that before the collection begins, determine the need for the color scheme of corks and their quantity.
For beginners, it is better to start with simple schemes, where a low level of complexity is combined with a small size of the picture. Having mastered one technology, you can try to arrange the next picture in a different way.

Mosaic making has several directions. Depending on the placement of the picture, the methods of forming pictures from traffic jams also differ. Carefulness and dexterity will require the creation of an independent mosaic, not tied to a specific surface.

The main steps for creating a mosaic based on plastic bottle caps are as follows:
- As a sample, a pattern of the picture is applied on cardboard of appropriate dimensions. For these purposes, a ready-made cross-stitch pattern can be useful.
- Corks are pre-sorted by color.
- Based on the sketch, the lids of plastic bottles are connected together with glue designed for plastic.
This technology has not become widespread. It is much more practical to attach the plugs to the surface. Various simple pictures are demonstrated by the following photos:


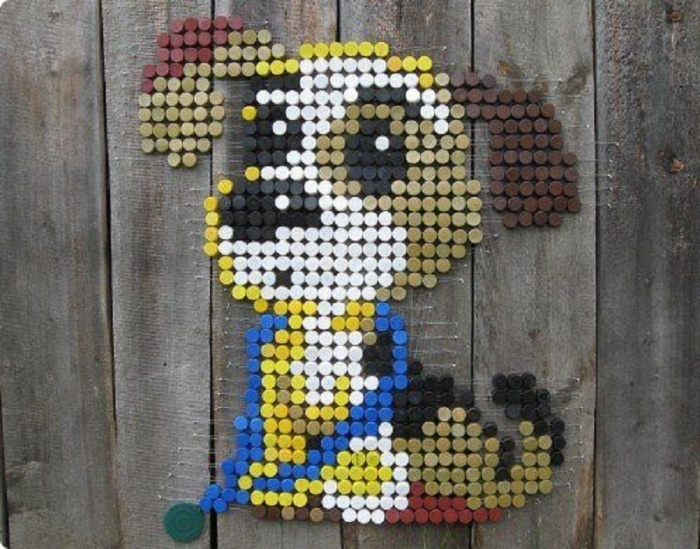
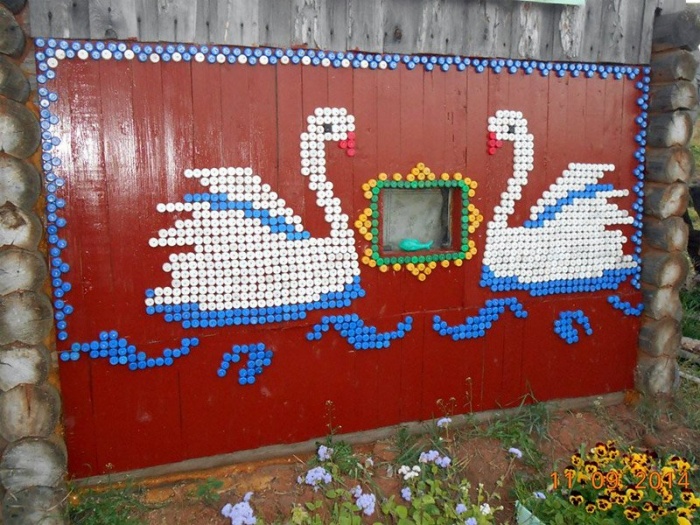
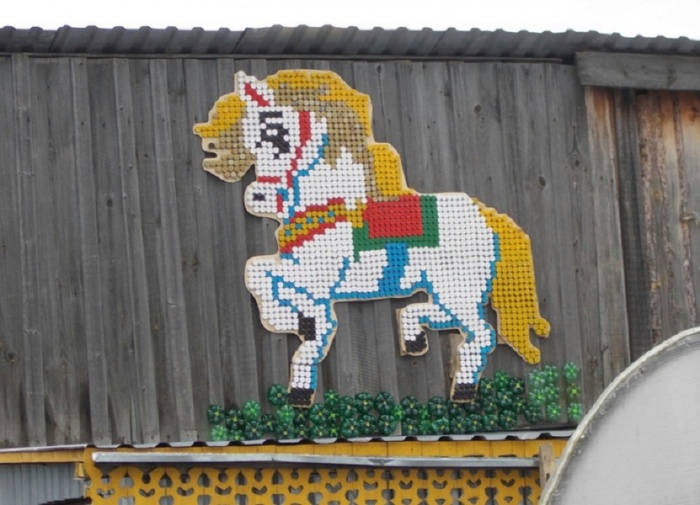
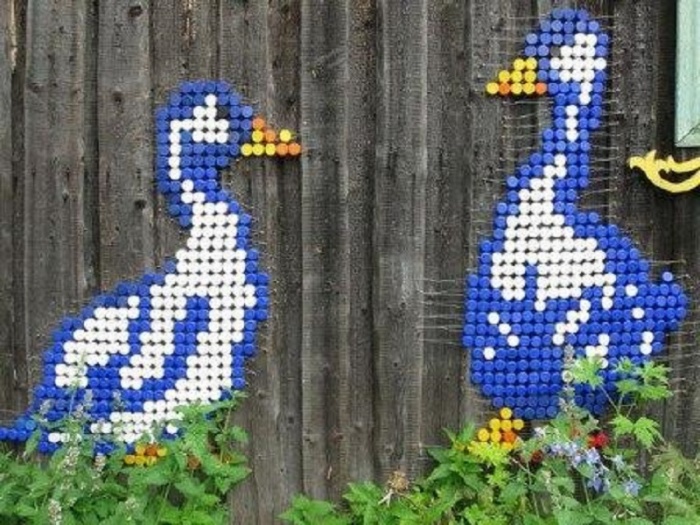
Wall or fence decoration
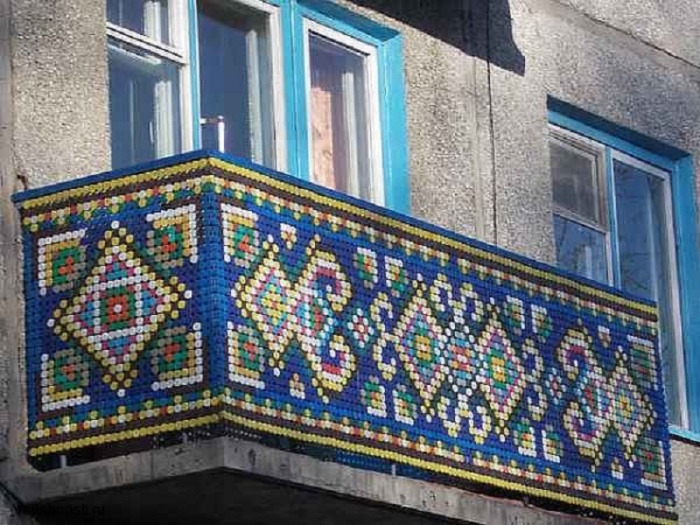
A wooden house or fence is the perfect surface for a lid painting. If access to the place where it is planned to place the panel is difficult, the mosaic is made out on plywood, and then fixed in the desired area. A striking example is the design of a balcony railing.
The most popular for decorating with pictures from corks are summer cottages. All images can be conditionally divided into two groups: an ornament repeating at a certain interval or full-fledged drawings. The process consists of the following steps:
- Depending on the size and complexity of the image, the scheme is drawn on cardboard or a sketch is applied immediately on the surface to be decorated. Outlines are made with colored paints that match the palette of the picture.
- Fastening is carried out with studs, the length of which corresponds to the height of the plugs and the thickness of the plywood or boards.
- Plastic bottle caps can be fixed to the wall from the outside or inside.
Attention! If the corks are nailed down, the grooves will quickly clog up and spoil the attractiveness of the painting. The solution to this problem may be regular cleaning of the surface, but it is much more practical to fix the caps from plastic bottles upside down.

There are several other reasons why plugs are fixed upside down:
- In the case of reverse fixation, you will need to pick up a miniature hammer that can fit inside the lid, or the nails will stick out, which will not add aesthetics to the picture.
- A correctly laid out picture can be additionally decorated by covering the seams and voids with a tinted solution. The appearance of the mosaic will be greatly improved.

You can decorate with a picture of corks not only a wooden surface. If you want to decorate a brick wall, turn to another fixing technology. The most common option is to use an adhesive mixture to fix the tiles. A cement composition identical to plaster will help save money. The solution is applied to a small section of the wall, after which the plugs are fixed in accordance with the existing sketch. It is important to observe the proportions and make the composition of the correct consistency, otherwise the corks from the plastic bottles will shift before the solidification process begins.

If there is a big picture in the design plans, it will take an extremely long time to wait for the collection of a complete set of plugs, so it is better to order new caps of the desired color based on the base. Pictures of corks from plastic bottles of the scheme are presented below:

Useful rugs
You can build an original picture not only on the surface of the wall. Practical are rugs woven from plastic bottle caps. Such a craft perfectly massages a tired back, successfully relieving muscle tension. Yes, and stomping on a rug made of plastic bottle corks with your feet will be good for your health. After all, the feet contain nerve endings leading to all internal organs. To work you will need:
- A simple diagram of the picture. Usually a geometric pattern is chosen.
- Caps from plastic bottles of the desired color.
- Awl and fishing line.

Algorithm of actions:
- All caps are pierced at four points in a cross pattern.
- The pattern of the picture is laid out from the corks.
- Each row is strung on two rows of fishing line.
- You can collect the rows separately or string them all sequentially on the fishing line with a snake.
- Then the rows of plugs are pulled together, the excess ends of the line are cut off.

Original tracks
Another unconventional area of application of plastic corks is the design of garden paths.
Attention! The tracks made of bottle caps are characterized by sliding in winter. Therefore, it is better to decorate with original paintings those places of the summer cottage where movement in the cold is not expected.
Materials for creating floor paintings:
- multi-colored corks of plastic bottles;
- sand and cement;
- construction glue;
- formwork boards.
Design technology:
- On the site, markings are applied to the future path with the picture.
- If grass grows on the surface, the soil layer is removed. A trench 10 cm deep is being prepared.
- A formwork is installed along the perimeter of the trench, which is fixed with pegs from the outside.
- As a drainage cushion, gravel or coarse sand is poured over half the height of the trench.
- In addition to sand and cement, glue is added to concrete. The resulting consistency of the solution under the picture of corks from plastic bottles should be easily poured out of the container.
- After filling a small section of the trench, the covers are pressed in a specific order to form the selected pattern of the picture. Plugs are recessed almost to the very bottom, their height should be the same.
- It remains to wait until the solution is completely dry. The duration depends on the weather conditions. Residual cement is removed from the lids with a hard bristle brush.
At the final stage of the design of the path from the corks, the formwork is removed. The photo will help you to admire the results of other people's labors:


As you can see, there are many options for decorating pictures from parts of a plastic bottle. By choosing the appropriate method, you can transform the design of the suburban area with minimal cost.
Nowadays it is quite popular to do needlework. Thanks to imagination, available materials and skillful hands, craftsmen create amazing things. At the same time, you can make a thing that will decorate the decor or make it special from the most ordinary and unpredictable option. Take plastic bottles, for example. These are simply excellent raw materials, from which you can create a variety of crafts and useful things for the household. Furniture items, garden products, pots, feeders, decor items - this list can be continued for a very long time. And the main thing is that such production is waste-free. The whole bottle is used entirely. After all, with unnecessary, at first glance, traffic jams, you can create beautiful pictures.
Pictures made of corks from plastic bottles look original and beautiful. And the main thing is that everyone can create such a product from corks. How to do it? What do you need for work? What examples of paintings are on the web? This article will provide answers to these questions, and will also help you do everything yourself.
Benefits of plastic plugs
We can say that this is just the perfect raw material for the job. This method has been popular for many years and has decorated the homes and gardens of many residents. What are the advantages of using plastic plugs?

Indeed, the material has a lot of advantages. This is why corks are so popular in the arts. The good news is that everyone can start creating. All you need is desire, a clear pattern of the drawing and a large number of multi-colored corks. Let's take a look at some of the techniques for creating pictures from cork.
Cork mosaic
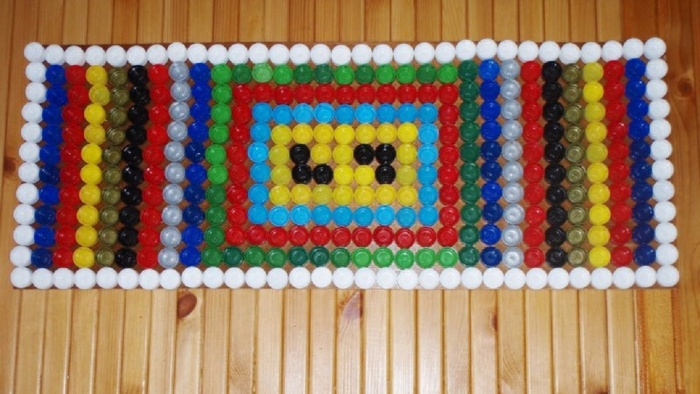
The main hitch in creating cork art is finding the right amount of material. Sometimes it is possible to collect a lot of traffic jams within a few months. That is why it is recommended to connect your friends and acquaintances to the search. Then everything will be much faster. This is especially important when it comes to a large mosaic. Often, compositions are made precisely as a decor for premises. It can be an old hut or an agricultural building. You will rarely find such a finish, but everything looks very beautiful. You can see this in the photo below.
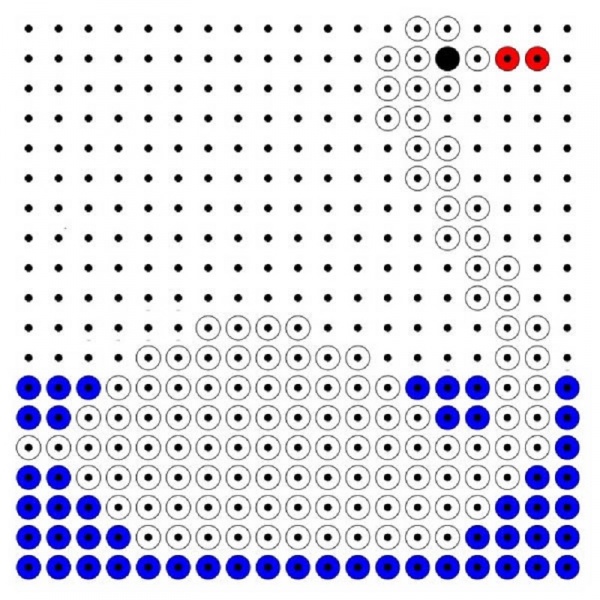
To create a similar picture on the walls, you cannot do without a detailed diagram. After all, you just can't create an image by eye. If we are talking about beginners, then it is recommended for them to first choose simple schemes in order to master the technique and "get their hands on". In this case, you do not need to immediately take on large sizes. It is enough to start with a small mosaic that is easy to make. Here is an example of such a simple scheme.
Having made it, you can start creating new drawings. If you have a printer, then just print one of the diagrams and get to work. It is clear that there are not many such schemes for paintings on the Internet. But you can print any other to create a semblance of a picture. After learning one technique, you can proceed to another. After creating a simple mosaic of bottle corks, you can tackle a new, more complex and larger one.

There are several directions for making mosaics. It all depends on the location of the pattern and the method of its formation. A cork mosaic is made as a panel or as an independent drawing that does not stick to the surface. To create a mosaic of traffic jams, there are several main stages of work, which can be divided as follows:
- To begin with, a detailed diagram is applied to cardboard or paper, which they are guided by in work. By the way, there is one trick, as a scheme you can take ready-made options for cross-stitching.
- After that, the corks begin to shape according to their colors, preparing them for work.
- That's all, it remains only to place the plugs in their places, fixing them to each other with glue, which is intended for this purpose.
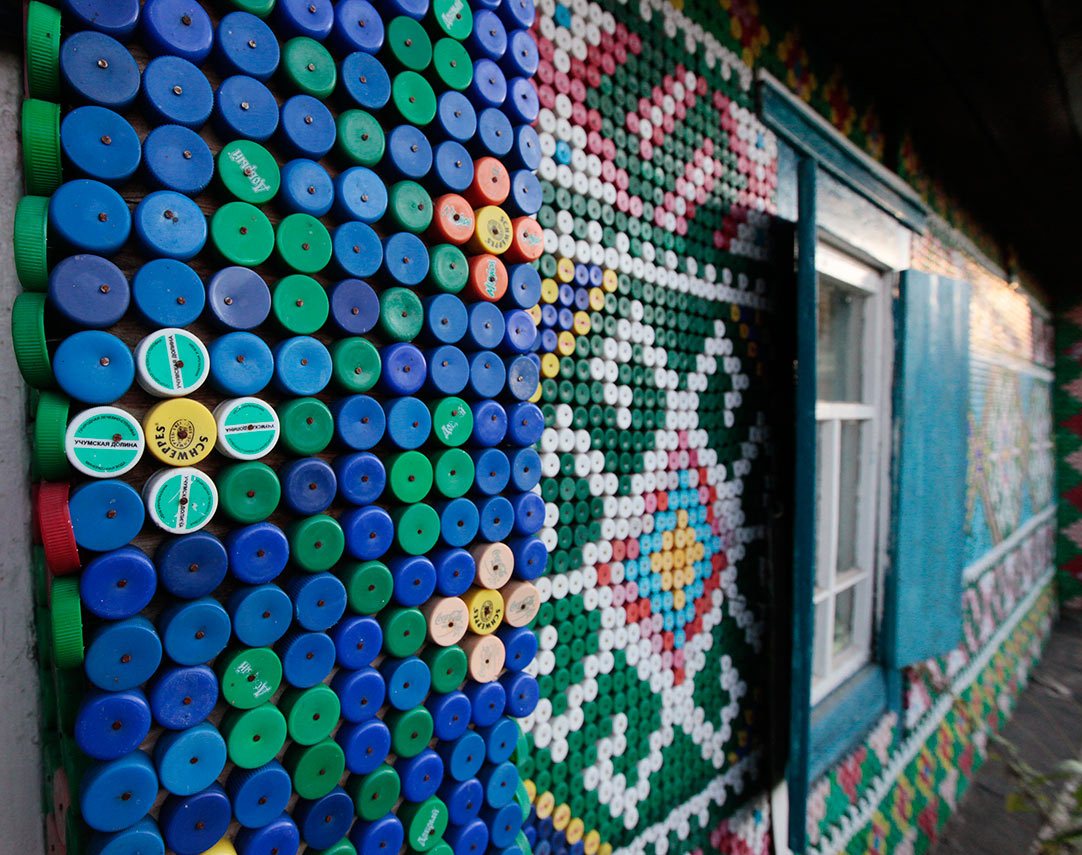
Interestingly, this technique is rarely used. Many people think that it is much more practical to fix the plugs immediately on the surface to be treated. One of the options for implementing a mosaic is to make it on a wooden fence. It is considered an ideal surface for such tasks. You can work directly on the fence, or you can first make a picture on wooden plywood, and then place it on the fence. Alternatively, simply install a picture with a picture on the site.

Note! Residents of apartments from multi-storey buildings often take such tricks into service, thereby decorating their balconies. Quite a good method to make it original and make it stand out against the general gray background.

However, the most popular mosaic of corks has found for decorating a summer cottage. The decorating method is very simple, fast, cheap, original and beautiful. For giving - just right. Drawings are made differently. Some can serve as an ornament and be repeated at intervals, while others are full-fledged drawings. If we talk about the fence, then there is another option for fixing the mosaic:
- pictures from corks from plastic bottles, namely schemes, can be made on cardboard or immediately transferred to the fence. To give the picture a deeper look and brightness, the outlines are applied with colored paint, which will match the palette of the image;
- the corks are sorted by color and fixed with nails. Their length is chosen taking into account the height of the plugs and the thickness of the fence or plywood;
- parts can be fixed both with the inside and with the outside. It all depends on the desired result.

Advice! If the option of fixing the plugs with the bottom to the surface was chosen, then you need to be prepared for the fact that the grooves between them and inside them can become clogged. And this will ruin the whole entourage. Therefore, from time to time you will need to clean the surface with water from a hose. Otherwise, it is better to fix them upside down.
Cork mats
Another popular use of corks is to create rugs with different images or patterns. This invention is not only practical, as it can be used in the household, but also useful. They can massage tired legs or back, release muscle tension and relax the body. Few know that the feet contain unequal endings that are associated with all internal organs.

If you are interested in this idea of creation, then it will take very little material, time and effort to work. The process is as follows:

How exactly to do all the work, a visual video will help. It clearly shows how exactly to implement the idea with a cork rug with a specific pattern.
Note! Garden paths made of cork can be similar to this. Look at the photo, how original it looks.

Let's summarize
As you can see, corks from plastic bottles are a versatile material that can be used to decorate your summer cottage, apartment or house. There are a lot of options for using the roof. It can be a mosaic on the walls or a fence, beautiful paths from plastic bottle caps leading to the garden or to the gazebo, rugs for the legs, back or hallway. But that's not all. Some even create incredible paintings from the lids, which are simply hung on the wall. The technology of creation is practically the same. The same scheme is taken as a basis, and the plugs are fixed in place. You can see similar products in these photos.
Crafts from corks from plastic bottles. Lids of different sizes and colors can even make a kind of reproduction of your favorite famous canvas.
Why throw away what else comes in handy? You can make excellent crafts from bottle caps for a summer residence and at home with your own hands. There are many options for using old household items in everyday life. And it is said not only about ordinary, but also seemingly completely unnecessary items. For example, you can make interesting crafts using old tires, unnecessary bottles, or even create a whole creative idea with bottle caps.


Bottle cap craft ideas
Since there are a wealth of different lids in terms of color and sometimes shape, different use cases can be considered. Here are a few of them.

There are also all sorts of ideas, and in fact there are a lot of them. The lids can be used in any decor of almost all items. And if you have already collected a bunch of caps, you probably still have the bottles themselves.
Read also:
1. Crafts from plastic bottles for summer cottages.
2. Do-it-yourself greenhouse from plastic bottles.
3. Birds and animals from plastic bottles - craft ideas.
How to make craft bottle caps
There are several important points that you should know before proceeding directly to the crafts themselves from the lids.

Use material to decorate wood and brick items. Remember that you can post any drawing you like. And it will look quite intriguing and beautiful.
Bottle cap decor options
An interesting fact is that the crafts from the lids can be not only flat, but also voluminous. Ask how? It's very simple! With their help, you can lay out any animal or, for example, a cartoon character in a three-dimensional form.
You can also use the following options for decorating your home and garden:

Panel, mosaic, picture of plastic bottle caps
One of the largest projects that can be done using lids is mosaics and paintings. They are usually used to decorate the walls of a building or fence. The most important point will be the correct pattern and color of the lids.


Progress:

Following the rules for drawing a picture, you will need to go through everything in stages.
Read also: what else can you make a mosaic with your own hands and a mosaic in landscape design - there are also ideas for crafts from lids and corks.
Rules for creating a painting from covers
There are some unspoken rules that must be adhered to if we want to get the corresponding result.

Master class "Mat made of lids for relaxation"
With the help of bottle caps, you can not only create interesting designs for your home and garden, but also quite useful things directly for health and relaxation. It will be about a rug, when walking on which there is a benefit and relaxation of the whole organism. This is due to the fact that a large number of nerve endings are located on a person's feet, which need to be relaxed from time to time.


Materials that will be needed in the work:
- Covers.
- Fishing line.
- Awl.
Progress:

Photo of crafts from plastic bottle caps


Here is our unique thing and ready. Use it every day for at least a few minutes and very soon you will get results that everyone will envy.

