Manufacturing apron for a kitchen headset with their own hands. MDF panels for apron into the kitchen - inexpensive and practical solution
In order for the readers, there were no multi-cams about the word apron, the authors consider to tell their duty to the respected visitors of our portal that the article will go on the surface of the wall between the desktop and mounted cabinets, and not about the subject of clothing. Although without one, and no other modern kitchen and no modern mistress do without anything.
When repairing in the apartment or construction of the house, the greatest experiences are not experiencing the fact that it is necessary to part with significant amounts, but from incredible chime flour. The number of suggestions of materials, color and design solutions, various services - is so huge that their choice occupies much longer than, actually, the repair itself. This applies to the kitchen apron. But the authors can immediately answer the main question of readers, - What apron is the best? The answer is unambiguous: the best apron is a hand Made apron, regardless of what material. On how to make a apron in the kitchen with your own hands, and there will be our article. And, of course, attention will be paid to "insignificant little things" in the form of a review of materials and technologies for their installation.
Requirements for kitchen aprons in matters of combination of functionality and beauty
If we consider the etymology of the word apron (in translations from Polish and German, it means an apron or a hemp), then it will become clear that it was originally conceived as a workwear, which was necessary to protect against pollution, which inevitably accompany food cooking. Polish and German linguists are still arguing who else by right belongs to this word although this convenient thing used not only they, but most of the peoples in the world. Therefore, etymological battles let them pass by the world of reasonable people, that is us with you. The main thing is to understand the fact that the first and most importantly purpose of the apron is a defense.
However, who said that defense should be rude and ugly? She can be beautiful, can please their owners, not forgetting about the main function. And the current variety of materials and technologies allows harmoniously getting ready and functionality, and beauty. But if you suddenly get a choice than to sacrifice, the unequivocal answer is as possible - you can sacrifice a little beauty in favor of functionality, but you can not do on the contrary.
What do you need a kitchen apron
Kitchen Aprons of glass
Most people have a subconscious fear to the glass. It is associated with something extremely fragile, brittle and sharp. However, the glass is a glass. Now there are countertops, chairs and even steps of stairs. It did not go around this wonderful material and kitchen aprons.
The glass for the aprons is not used, and tempered, 6-8 mm thick, which is more stronger and withstands the heating to 300 ° C. Also used glass type "Triplex", where two layers are glued with a special film or laminating fluid. Glass can be both glossy and matte, both painted in any color and colorless, as with a pattern, and without it.

Best of all, of course, use all the possibilities of the kitchen apron of glass and order it with a pattern. Such aprons are also called skinali. But it should be noted that it can be performed in different ways:
- First, transparent glass can be used, which is fixed on the wall marked with photo wallpapers. This is the most fiscal option, but it should be noted that moisture can penetrate the gap between wallpaper and glass, which will spoil the wallpaper or pollut the glass than the whole look will spoil.
- Secondly, the image can be printed on a vinyl film that is glued from the back. This solution is better, but the film over time can also be peeling.
- Thirdly, the image can be printed on the glass itself with the back of the apron using UV technologies (ultraviolet) printing.
- Fourth, the image can be printed by UV ink inside the glass - triplex. This is the best, but also the most expensive option.
- And finally, modern technologies allow typing 3D images and on kitchen aprons including. Watching such aprons is very unusual, it is very expensive.

Glass aprons can be "revived" competently applying backlight from LEDs mounted both outside and inside the glass. The backlight can be both monochrome and color. You can organize various light scenarios for a different mood. The modern market for repair and design of premises offers as many options that can be embodied both a beautiful and competent solution and any designer madness. If only money was enough.
The advantages of glass aprons are obvious, this is moisture resistance, chemical inertness, strength, ease of cleaning, beautiful and original appearance. Of the disadvantages, it is worth noting a high price and the fact that it is still a glass that can be collapsed with an impact load. The aprons from tempered glass or triplex during breaking do not form sharp traumatic fragments. But it will still not return spent a lot of money.
Glass kitchen aprons can also be attached to both through fasteners and with special elements. When removing the size and planning of the workspace of the kitchen, it is always worth considering all that will be installed on the apron. It can be a few sockets, switches, holes for attaching rails - a mounted system for accommodating any kitchen utensils. Just like with the panels from the MDF, the whole range of services for measurements, manufacturing and installation is better to trust the one who did it many times, that is, professionals.
Metal kitchen aprons
For those who intend to create a truly, metal aprons are specially offered. They look very unusual and in some cases even beautiful. Fans of the style of "techno" or "loft" it is possible to use metal in the kitchen, but for this you need to really possess a subtle artistic taste or invite a designer with such qualities that is rare. The line between harmony, beauty and madness at metal aprons is very thin, about the same as the mirrored aprons.

Metal aprons can be performed as large stainless steel sheets and tiles and even a mosaic. The functional quality of the metal is doubtful. With good hygienicness, the metal has excellent adhesiveness with all kinds of kitchen pollution and very capricious in choosing tools for cleaning. He does not tolerate abrasive.
Previously, it was noted that the installation of apron from the MDF or glass panels is better to fully endure those who, in fact, will make them. Therefore, consider other options that you can make the owner with your own hands. But before installation, you need to decide on what stage you need to make apron, and what requirements should be the room.
Requirements for the room and to surfaces
Installation of aprons from MDF, glass or plastic panels can already be done when the kitchen set is installed. Not only can I need, as it is necessary, since it takes a very high accuracy of measurements, which will allow you to perfectly enter apron into the workspace. The only thing that when installing will need to simply move away the furniture from the wall, and with the end-to-end installation it will not even have to do.
If the apron will be made from ceramic tiles, porcelain stoneware, mosaic, natural or artificial stone, then no wet processes do not do. Therefore, furniture should not be next to those walls where the apron will be, but the exact dimensions of the furniture should be known and how it will be installed (the height of the table top, the height of the cabinets, the distance between the working surface and the lower plane of the cabinets).
What requirements are presented to the kitchen for the installation of apron.
- The kitchen should be inserted windows.
- Must be mounted, all the submersers are installed.
- Walls should be plastered and leveled. On the wall where the apron will be mounted, it is unacceptable to use gypsum-based putty, only polymer cement mixtures can be used.
- The floor must be aligned with an already determined finish coating. Naturally, it should be smooth and horizontal.
- The kitchen should have a temperature not lower than + 5 ° C and no more than + 30 ° C, humidity no more than 60%.
In other words, the room should be fully prepared for the finishing finish - shook wallpapers, applying the finish decorative plaster or painting. The surface on which the apron will be mounted should be dry and perfectly smooth. If a glass, mosaic of glass or smalt will be used for apron, the surface must be covered with polymer cement-based polymer cement mixtures.
Marking of kitchen apron
On the wall completely ready for facing the wall, it is necessary to mark the position of the position of the future apron. But for this there should be a clear idea of \u200b\u200bthe placement of the kitchen headset. Best of all, if it is already purchased and the scheme of its placement will be compiled. What you need to take into account when marking a kitchen apron.
- First of all, the apron should be located in the space between the tabletop and the lower plane of the hinged cabinets, and it is desirable that the apron can go beyond the table top and cabinets at least 2 cm. Most often the distance between the tabletop make 60 cm, but it is permissible to do in the range of 45 -70 cm, it all depends on the growth of people who will enjoy the kitchen.
- The height of the kitchen headset also depends on the growth of people, but in one family there may be people of different growth, and in the headset often embed household appliances: washing and dishwashers, freezers. Therefore, in most cases, 88-90 cm make height, and people with "outstanding growth" (more than 200 cm and less than 150 cm) do not have to bend or bounce, it will simply be a little inconvenience, to which they get used very quickly.
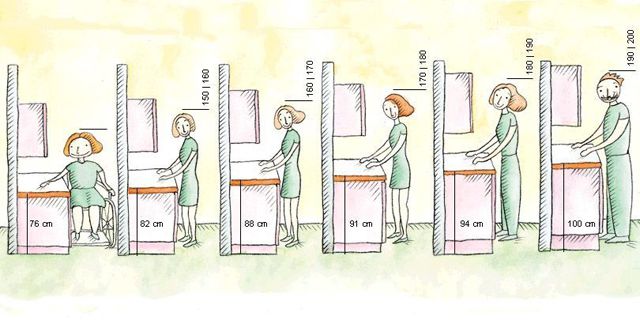 Most of the well-made kitchen heads are made for the convenience of medium-sized people.
 - If the standard domestic type extract is used, the apron must continue to height over its entire width and reach it to its lower edge, and better if it goes to the hood at a distance of at least 5 cm or, even better, reach the ceiling. At the same time, for the side surfaces of the cabinets, it is recommended to start the apron as much as a distance of 5 cm.
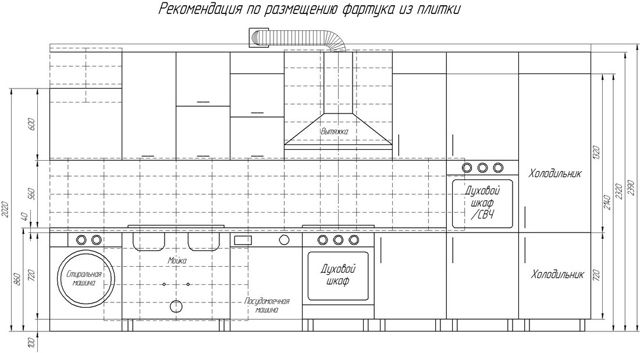
- The height of the lower edge of the hood domes over the table top should be at least 65 cm for electric stoves, and 75 cm - for gas plates.
- The standard width of gas or electrical kitchen plates or cooking surfaces can be 30 cm, 45 cm, 50 cm or 60 cm. There are dimensions and more, but it already refers to professional-use plates. The most frequently used stoves are 60 cm wide. The size of the hood domes should not be less than the width of the plate, and better if they are greater than one step. For example, for a plate or a cooking surface, 60 cm wide should be selected with an exhaust of at least 80 cm. The distance between the hollow cabinets should allow free to fit the hood.
- An apron in the kitchen does not have to be located only between the tabletop and the upper mounted cabinets. Sometimes it needs to be done with the side of the side walls, especially this is relevant in the area of \u200b\u200bthe washing or plates, if they are located at the edges. Also, the influence on it can be provided nearby window or doorway.
To mark the position of the apron on the wall, you will need a laser, or hydraulic level. Laser, of course, it is more convenient to work, but the hydraulic also gives very high accuracy. It is desirable that the kitchen set is already purchased, but not yet installed on the spot. In the extreme case, you can measure the future cuisine in the store, where it will be purchased or have documentation indicating all sizes. For markup it is necessary:
- On the wall where the kitchen set will be installed, from one of the edges there is a mark of the position of the upper plane of the table top.
- The level of the mark is transferred to another edge of the wall.
- Using the painting cord, the horizontal line of the tabletop position is fed.
- If necessary, if the kitchen is an angular or apron will go to other walls, then a similar markup is made on other walls.
- The position of the lower edge of the hinged cabinets is made based on the size of a particular kitchen headset, which will be subsequently installed in the kitchen.
- The positions of the position of the lower edge of the hinged cabinets are transferred to all the walls where the kitchen apron will be installed.
- On the placed parallel lines, the location of the kitchen plate or hob surface is noted.
- The position of the lower edge of the hood domes is noted (at least 65 cm for electric stoves, 75 cm - for gas stoves from the tabletop).
- It is noted the position of the side surfaces of mounted cabinets at the location of the exhaust dome, it should freely enter the space between the cabinets, better if there is a gap of 1-3 cm with each of the sides.
- It is noted the top edge of the apron located in the area of \u200b\u200bthe hood. The apron must go minimally 5 cm under the hood, and it is better to do it to the ceiling.
After these actions on the wall, the lines of the future kitchen headset will be marked. But, as noted earlier, the apron is advisable to make it, so that its surface has come to the table top or headset. For the tabletop and the lower edge of the hinged closets, the apron is desirable to shut up at a distance of at least 20 mm, and in the area of \u200b\u200bthe arrangement of the exhaust and on the right, the apron must be opened under the cabinets at a distance of at least 50 mm. Therefore, in parallel horizontal and vertical lines of position of kitchen furniture, the position lines of the apron are fought off
When planning and markup, the apron should also take into account the size of the tile or mosaic, which will be used. For example, if the tile is 20 cm in height, it is completely logical that it is advantageous to make three rows of tiles of 20 cm, and the lumen between the tabletop and the lower edge of the mounted cabinets make 56 cm, given the fact that 2 cm on top and bottom will go under furniture. If the tile of other sizes is applied, then it is also necessary to take into account. If decorative elements are applied - friezes and borders, then it is necessary to achieve that they are visible. What is the point of using expensive elements that will be hidden from a look under furniture. Each case is individual and requires its differentiated approach.
After applying all the lines of marking indicating the position of kitchen furniture and apron, you need to calculate the area of \u200b\u200bthe apron. The authors of the article recommend using the calculator, in which it is necessary to specify only the lumen between the tabletop and the lower edge of the hinged cabinets, as well as the distance between the vertical surfaces of the cabinets and the height of the apron over the lower surface of the cabinets in the hood area. All attachments of the apron under the furniture (2 cm on the horizontal portion of the apron and 5 cm in the area of \u200b\u200bthe hood) calculator already automatically takes into account.
The kitchen has a zone delivering the hostess most of all hassle: this is part of the wall, adjacent to the work equipment - the plate, washing, the desktop. Usually, kitchen cabinets are hung on the same wall.
And the open plot of a long-suffering wall seeks fat, it leaves unpleasant traces of water splashes.
To protect and facilitate the cleaning procedure, a "apron" is arranged "Apron" - decorative finishing of increasing materials: tiles, natural and artificial stone, MDF.
MDF is a fiberboard made from crushed waste of the woodworking industry. The role of binder material in the product is played by Lignin - the substance contained in the wood. Such a composition makes MDF an environmentally friendly product that does not emit harmful substances into the surrounding space.
MDF plates are available for operation:
- in dry conditions;
- in wet conditions.
Each of these groups is divided into two subgroups:
- main purpose;
- for the manufacture of heavily loaded structural elements.
Benefits

Why do many choose MDF for the apron device in the kitchen?
- Panels are inexpensive and there is always on sale.
- The kitchen apron device from MDF does not require professional tools and special skills.
- The design is easy to dismantle, so in case of damage to some panels, they can be replaced.
- Under the apron from MDF, mounted on the frame, you can hide engineering communications.
Do not miss your chance to buy the Kitchen MDF on the promotion - https://fkm-anons.ru/catalog/kuhni/mdf/ Tread
Choosing the main material
For the manufacture of apron for the kitchen, you can take MDF sheets thick from three to ten millimeters. They must have a special coating that protects the basis of moisture, steam and other sighting effects. The above requirements correspond to the MDF wall panel - furniture shield. Its thickness varies in the range of 6-10 mm, and the overall dimensions of the MDF panels used for the kitchen apron are 3000x600 mm.
The furniture shield successfully replaces: thanks to a special facing, it is not afraid of food acids, there are no traces of coffee, wine and even ink.
A high pressure plastic, polymer films applied to several layers are used as the MDF panel coating. The color range of MDF panels is very diverse: "gray stone", "white oak", "oak cappuccino" and others.

Manufacturers offer products with a glossy or matte surface. Facing can be monophonic or patterned. Many firms produce aprons for the kitchen and one color countertops. This makes it possible to make a harmonious composition or, on the contrary, a combination of contrasting colors and patterns.
Some manufacturers produce MDF panels for apron into a kitchen with photo printing. This technology opens up wide opportunities for your kitchen design.

Mounting order
To install an apron from MDF in the kitchen, no special skills will be required if you properly prepare for work and carefully perform each operation. Sometimes apron is mounted before the installation of kitchen furniture. So that you did not have to redo the work, when laying the wall under apron, follow the following recommendations:
- the lower edge of the apron must defend the distance of 85 centimeters from the floor level - this value corresponds to the standard height of the desktop of the desktop;
- the height of the apron can be done any, but it must cavity to close the space between the floor and wall-mounted objects of kitchen furniture. Therefore, you will have to pre-place the location of their location;
- the height of the apron with depends on the type of cooking panel:
- If it is, this size is from 60 to 75 cm.
- In the presence, the height of the kitchen apron from the MDF should be no less than 70 or even 80 cm.
- For - height is installed from 65 cm
Preparation of the Wall
From the surface of the wall, all old finishing materials are removed - wallpapers, ceramic tile opened paint, etc. If there are protruding nails in the working area, they should also be removed.
The purified surface is treated with an antiseptic to avoid the development of columns of microorganisms under the MDF panel. Wooden mounting planks can also be treated with the same composition.
 If the wall is smooth, the apron can be attached directly to it. If the wall surface is far from the ideal, then preliminarily satisfied.
It can be wooden or metal. The wooden cutture is attached to the wall of a dowel-nail or self-drawing with a diameter of 6 mm.
Fastening apron
How to fix the apron from MDF? There are several ways:
- By means of fasteners.
Ears are attached to the invalid side of the panel (such elements are used in suspended cabinets). The panel equipped with suspended parts is simply hanging on the wall.
- With the help of glue composition "Liquid nails".
 On the perimeter of the sheet (not allowing passes) and throughout its area of \u200b\u200bthe Invented side, liquid nails are applied with a pitch from 5 to 15 mm.
The panel treated in this way is pressed to the prepared wall surface with the strut.
With this method of attachment, the apron requires the installation of a temporary support for the MDF panel: at the level of the lower edge of the panel to the wall, a profile of wood or metal is screwed to the wall. It serves to control the position of the panel and facilitate the gluing operation. At the end of the installation of the apron, the profile can be deleted.
- With the help of screws.
 Through the upper and lower edges of the panel holes are drilled through which it is attached to the wall.
Holes with self-drawing spoil the appearance of the apron, so they are closed with decorative plugs.
If the edge of the apron is flashed with kitchen furniture, you can not apply the plugs - they will not be available.
- By means of aluminum profiles.
For this, the connecting profile is attached to the wall, and the MDF is inserted into it - the panel. This method is suitable for a kitchen decorated in the style of "techno": an aluminum profile, in addition to the function of the fastener, plays the role of decorative trim.
Finishing touch
 After completion of the work, replace the kitchen furniture and carefully sew the jack between the panel and the tabletop. Silicone sealant is suitable for this purpose.
First, at a distance of 1-2 mm from the joint of both surfaces, cross the construction scotch. Now apply the sealant, spend on the seam with a wet finger, and then remove the scotch.
As a result, you will get a neat strip of sealant, and you do not have to consider it from the surface of the apron and countertops.
You can close the joints between furniture and apron with special plinths made of plastic. Fix them either with the help of glue, or fasten on the self-tapping screw. Forest the apron can be decorated with end rails.
What to do if the outlet falls into the installation zone
Over the working countertop, milking or triple outlets are usually mounted. To output them on the front surface of the apron, you must perform the following steps:
- Remove plastic housing from the socket block.
- With the help of the ruler, the kitchen and pencil to be transferred on the tabletop border of the block with a 2 mm allowance to the side. As a result, the distance between the labels will be larger than the size of the rosette block by 4 mm.
- Measure the distance from the table top to the Niza of the metal case of sockets and from it - to its top. The first size increases a couple of millimeters, the second, on the contrary, decrease - this is necessary so that the case of the socket is subsequently lay down on the panel. Write the resulting dimensions.
- Attach the MDF panel to the place and move risks from the table top.
- Remove the panel and with the help of a square to place a rectangle of the future window under the outlet.
- In the corners of the drawn rectangle, drill holes.
- In the holes insert a pet with a fine tooth from the jigsaw and gently cut the window.
- Attach the apron to the place of installation and, weakening the fasteners of the metal housings of the sockets, pull them out of the boxes through the window. Now you can relax fasteners to fix - the parts of the sockets slightly plunge into the apron.
- Install the plastic housing of the sockets in place.
If you make a comparison between different cladding materials, the MDF panels are the most economical. But the quality of the kitchen apron's finishes does not get worse. High-quality coating makes MDF panels invulnerable to cleaning products, they are resistant to scratches.
In the apron there are mechanisms that convert the rotational movement of the running screw and the chassis shaft into the applied movement of the caliper.
Kinematic scheme Apron
Fig. 241. Kinematic diagram of the apron of turning and rope machine 1A62
Rots the worm wheel z \u003d 30, sitting on the VII shaft. On the spline of this shaft, you can move the gear wheel z \u003d 24, hovering it either with the wheel z \u003d 50 shaft Vi to obtain a mechanical longitudinal feed, or with a wheel 2 \u003d 65 of the shaft VIII to obtain a mechanical transverse feed.
With the clutch of the gear wheel z \u003d 24 with the wheel z \u003d 50, the wheel is also rotated wheels 2 \u003d 23. The wheel is rotated z \u003d 69 and z \u003d 12, sitting on the shaft V. The gear wheel 2 \u003d 12 rolls along a rail attached to the bed, And thus tells the mechanical longitudinal submission to the caliper.
In the longitudinal direction, the caliper can also be moved manually, rotating the handwheel, sitting at the end of the shaft IV. This handwheel through the wheels Z \u003d 15 and Z \u003d 69 rotates the V shaft V with the rubber wheels Z \u003d 12.
If the wheel 2 \u003d 24, sitting on a slotted shaft VII, with a wheel 2 \u003d 65 on the shaft VIII will be rotated the wheel 2 \u003d 20 and the screw IX transverse feed, as a result of which the caliper will receive a mechanical transverse feed.
It is also possible to cross the caliper in manually, rotating the handle attached at the end of the IX screw. In this case, it is pre-removed from the engagement of the wheel z \u003d 65 and z \u003d 24.
To turn on the longitudinal flow when cutting the thread, you need to close the plug-in nut on the running screw I, and during its rotation, this nut along with the apron will move along the axis of the machine.
The feature of the apron device in Machine 1A62 is that its four-pass worm is automatically turned off when the resistance to the caliper movement is overly increasing, for example, at the time of its contact with longitudinal or transverse stops, due to the sudden overload of the cutter, from random obstacles, etc. This device is called With a falling worm, because when overloading the worm is discharged (falls out of the tooth worm wheel) and the further movement of the caliper stops.
The device of the falling worm is shown in Fig. 242. The worm 2 freely sits on the shaft 9, which is connected to the shaft III with the help of a hinge coupling (see Fig. 241). At the end of the worm is the left half of the 3 cam clutch, which is connected with the right half of the 5 gun fists. The right half of the coupling can move along the slots of the shaft 9. Spring 7 presses the right half of the coupling to the left half, so that the worm 2 is driven from the rotating shaft 9 and the right half of 5 couplings.

When the caliper meets any obstacle on its path, the load on the worm wheel 2 \u003d 30 increases greatly. In accordance with this, the resistance of the worm rotation will increase 2. When this resistance goes beyond the permissible, the right half of the cam coupling 5, continuing to rotate, will start turning relative to the left half 3. At the same time, it moves to the right, squeezing the spring 7 (see Fig. 242 , b). Moving to the right, the coupling 5 will move the bracket 8, which using a plank 6 supports the worm in engagement with a worm wheel 2 \u003d 30 (Fig. 242, a). When moving the bracket 8 to the right (Fig. 242, b), a worm that is not supported by the larger 6, under the action of its own weight drops down, comes out of engagement with a worm wheel, and the feed stops.
To turn on the worm use the handle 4, with which the bracket 8 is raised with it and the bar 6.
Lock
To prevent incorrect inclusions,
which can lead to a breakdown of the machine, tool or the wielding of the worker, in the mechanisms of turning and rigging machines, there are usually blocking devices. For example, it is impossible to include the feeding mechanism, driven from the chassis, and at the same time connect half of the split nut on the running screw, as this can lead to the machine breakage; It is also impossible to simultaneously include longitudinal and transverse caliper feeds.
The design of locking devices of turning and screwing machines is very diverse. In fig. 243 shows the mechanical locking diagram in the apron of turning and screwing machine 1A62. The locking mechanism is arranged as follows. The handle A, fixed on the screw 1 with a large thread pitch, serves to move the nut in with a fork B. This plug, moving the gear Z \u003d 24 along the VII shaft (see Fig. 241), grips it either with the wheel z \u003d 50 On the inclusion of the longitudinal feed, or with the wheel Z \u003d 65 shaft VIII when the transverse feed is turned on.
With the middle position of the wheel z \u003d 24, as shown in Fig. 245, nor longitudinal, nor transverse filing is included. In this case, the nut at is in this position, in which the protrusion of the sleeve g freely passes through the roset of nuts in
and thus, the shaft 2 can be rotated in any direction. The rotation of the shaft 2 using the handle d is the on and off of the plug-in nut. When the feed is turned off from the undercarriage, you can rotate the handle of D shaft 2, turn on and disable the lock of the plug-in nut. When locked the lock, the protrusion of the sleeve g enters the neck cutout in and does not allow

Fig. 243. Blocking mechanism of turning and rope machine 1A62
to move it into any direction, i.e., do not include the feed from the undercoming shaft. When the lock is open, the ledge of the sleeve g leaves the nut of the nut in and allows, moving it, turn it on the feed from the chassis. At the same time, the protrusions of the nailed nut in do not allow to turn the handle to the left and closer the castle of the driving screw.
The apron in the kitchen is, above all, the quality protection of the walls of the room in the installation zone of the plate and sink. It can be glass, from MDF or from tile, but its main purpose is to protect the wall from burning spots, steam, boiling oil. Of course, the kitchen apron plays a decorative role, and therefore it can be carried out from any materials - durable, extreme impacts and pleasant eye resistant. And if the designers are not limited in the choice of finishing method, the dimensions of this working surface are strictly normalized.
Distance from floor to Apron
The height of the kitchen apron is dependent on factors:
- Plate size;
- Type of cooking surface;
- Furniture height in the kitchen;
- Exhaust design;
- The size of the top of the furniture headset;
- The growth of people most often using the worktop and stove.
It is important that the protective coating (whether or out of the tile) came under.
And here much depends on what principle kitchen furniture is selected:
- Tables are selected based on the growth of the person who most often prepares and uses the kitchen. With the right furniture selected, the mistress will not have discomfort in the back or in hand, and all cooking actions will occur in a natural pose.
- The height of the tables corresponds to the size of the slab installed in the kitchen.
- The sizes of the countertops are selected in such a way that the washing machine placed under them.
- Whether the kitchen set of standard height is purchased.

The standard height of the furniture corresponds to the dimensions of the plate in the kitchen - 85 cm, it means that the apron should begin at least 84 cm from the floor.
Determination of width
It has the meaning and width of the kitchen apron, that is, the distance between its upper and lower edge (often this parameter is called the apron height).

What are the maximum dimensions? If the washing machine is built under the table top, the height of the lower Tumb Headset together with the tabletop is no more than 90 cm. In this case, the distance from the table to the bottom of the mounted cabinets should not exceed 110 cm, respectively, the maximum width of the apron should be within 112 cm (with Accounting 2 cm for the adoption). This option is suitable for rooms with high ceilings and for sufficiently high owners.
For the kitchen of standard size, the lower modules of which are 85 cm, the apron should not exceed 117 cm.
Thus, the width of the apron should be in the limit of 47 cm to 117 cm (consequently, the distance from the table top to the upper cabinets is 45-115 cm).
There is another important point that must necessarily take into account when designing and manufacturing kitchen facing is.
A little about the nuances of installation and materials
The apron in the kitchen is necessarily satisfied with the preliminary markup.
Tip! It is important to check the marking line in the level, measuring the distance to it from the floor level at several points. In the event that the kitchen floor is not even, the beginning of the working surface can "dispeach" with the level of installed furniture. So thoroughly need to check the surface of the tile, and the glass apron - after all, a lot of strength and means will subsequently go to correct similar flaws.

It also matters from what material the kitchen apron will be made. Thus, the apron from the tile easily stacked in the event that its height is 60 cm. Under this design, it is easy to choose the size of the tile (as a rule, most of the offers in modern collections - 30 or 60 cm).

But glass is often a solid canvas manufactured by order. And from the MDF, you can perform any working surface - the main thing is that the MDF corresponds to the color of the main interior concept and was distinguished by an increased resistance to moisture.
Wall protection under extract
The area of \u200b\u200bkitchen facing in the area of \u200b\u200bthe hood needs high attention. It is not necessary to do without a preliminary project here, which will take into account the size of the equipment, the method and place of its location.
The maximum height of the apron depends on the type of exhaust design and from the location of the furniture in this area:
- The dome (fireplace, mounted) extract is mounted without an additional top cabinet and then the apron can be installed to the top edge of the headset, exhaust and even to the ceiling.
- A built-in device with a retractable surface necessarily provides a wardrobe - here the height of the kitchen apron is 70-75 cm.
- Suspended structures can be installed in conjunction with or without furniture.

It is important that the surface of the tile or MDF exceeds the operating part of the exhaust 5-10 cm on each side. Such a prudent approach will save you from the shortcomings due to the errors in the process of mounting the mounted part of the headset.
-
Each homeowner seeks his house to be distinguished from others with his beauty and originality. Then how to look out on the house sometimes depends on such parts that at first glance will not notice. But they are precisely they form the uniqueness of the appearance of the housing.
Parapet for flat and pitched roofs
One of the apparent first-seeming details at first glance, on which the reliability and aesthetics of your home depends - Parapet on the roof. This is not a very high element resembling a small wall, it serves to protect and protect the roof. This design is suitable for roofs of any type - and flat, and scanty. In the latter case, it starts from the eaves, closing it part, and at this time the other part towers on the cornice and is perfectly visible, but the roof of a flat type of parapet hides completely. The shape of such a fence in the upper part - and may be horizontal or scope. In any case, it should be borne in mind that the parapet on the roof may have a non-standard form.

To protect the fencing from the devastating effects of atmospheric phenomena on top of it, the so-called apron is installed on it, which is made of metal profile, galvanized or copper. In its design, it is necessary to have special drippers for which water is removed from the structure. Thanks to the drippers, the injection of water on the construction of the fence is practically excluded.
Often for concrete or brick fences, the metal apron is replaced with concrete slabs or a decorative stone laid on top of them.

In any roofing construction there are areas that are particular danger from the point of view of water and corroding. For example, the installation of the apron of steel is carried out through the fasteners of the crutch, so all the places of attachment should be treated, the roof adjoining unit to the parapet, as a particularly subject to waterproof, is definitely sealed. Sealing requires and docking seams between concrete plates laid on top of a fencing border.
Roof adjoining to parapet

Such an adjunct is performed by joking the roof and parapet side or frontal compound.
Along the fence, there are niches and storms intended for the installation of aprons, for example, from galvanized roofing sheets, followed by fastening. These deposits are created by the upper part of the metal sheets. You can use black roofing steel for these purposes, but only if it is twice in color on both sides, using a hot olive. The need for niches and storms during the adjustment device arises due to the fact that, as a rule, one roofing sheet of the other type to ensure reliable and dense adjustment is not enough. For example, due to its not quite smooth vertical part or due to the destructive effects of atmospheric precipitation, temperature drops and the other, the material may be lagging behind the border.
Adjustment device

The technology of the device of these sites, depending on the presence of a storm or niche, is somewhat different.
When the upper part of the galvanized or a black sheet for coating roofs is installed in a niche, its height should be at least 10 cm.
In the case of an installation in a bar, it is closed with a solution from cement and sand, which serves as a reliable protection against precipitation, for example, protects the storm from the snow.
The poor is usually closed using a roof material.
At a distance of 100 cm from each other by the enclosing structure, antiseptic tubes made of wood are installed, and the apron is placed on them. Tightly pressing the edges of the apron will help bars from wood having a triangular cross section pre-fixed to traffic jams
The styling of the elements of the apron is carried out to which the flow of atmospheric precipitates is directed with a minimal adhesive in 0.10 m. The reliability of the node increases, if the seals of the folds of the conjugation sections of the fences and flat roofs are necessarily addingly hydroizing, and in several layers. The main waterproofing made of mastic is covered with reinforcing glass. It is mounted in 15 cm peaks, pressing through an intermediate side to a vertically directional plane. Then, on the whole layer, the bottom is covered with mastic or emulsion. By giving mastic or emulsion to cool, the surface of the first layer is covered by the second. To eliminate the location of the layers of mastic, they are fixed and protected from the effects of moisture using a metal apron.

To fix the assaying layer of mastic, they use the clamping bar from the metal, which is nourished with a dowel. Prior to that, the upper edge of the protective apron is crushed under it, the elements of which are connected by a single fold.
The adjoining to the parapet is equipped on the roof with skates, forming Endov. First of all, the base is cooked and spread rolled fiberglass on it. Put the rolled cloth in the following sequence: the top of the scanty side, part of the Endow horizontally. A layer of mastic either emulsion is applied to the inclined skate of the EMDOV.
Adjunction on the example of a soft roof

In the pairing places needed reinforced. Between the fence and the roof at the angle of inclination in 45⁰, an additional side of the concrete is arranged. It greatly facilitates the laying of rolled materials for waterproofing. The simple rubberoid is glued to the required areas using hot mastic from bitumen. After soaring the first layer, the second is applied to it. At the same time, the outer is fixed using a metal plank, a special apron is fixed to it.
For its attachment, dowels are used, and after processing with sealants, the paint is applied, which should be atmospheric resistant, providing protection of the node.

Modern technologies allow not to use rolled materials for waterproofing. Special masses form after applying a seamless surface, performing at the same time waterproofing and roofing coating.