Installing a sectional fence with your own hands. Sectional metal fence: do-it-yourself installation features
Sectional fences are becoming more and more popular literally every year. They are perfect both in the case of the fencing of summer cottages and plots with households, and when it comes to fencing the territories of industrial enterprises. Of course, such fences are used in many other cases. Such a great demand is not accidental. The reason is the many advantages of this fence.
Here we must start with durability, they really serve for a very long time. It is impossible not to mention aesthetics and even beauty. And of course, ease of installation and transparency are of great importance. By the way, the cost of a sectional fence is relatively low. You can verify this by visiting the site http://sitka.com.ua/ru/page-29/, where you can buy everything you need to install it.
What needs to be prepared for the installation of a sectional fence
First of all, you need to buy fence sections. Moreover, we advise you to take products covered with a polymer protective coating. It not only protects, but also decorates, a colored fence, for example, green is always better than rusty.
You will also need concrete, and, accordingly, everything you need to knead it, a building level, a hammer, a tape measure and some other tools, it all depends on each specific case.
Do-it-yourself fence
At the initial stage, you need to mark the territory for the installation of supports, which in most cases are square steel pipes. So, these pipes must be concreted, and at a certain distance from each other, it must correspond to the size of the sections.
The concrete must be kneaded at the rate of 1: 4. It is best to use a mixture of gravel and sand as filler. As for cement, in any case, it should not be older than three months.
The pipes must be concreted vertically, for which, in fact, you need a building level.
You can start fixing the sections only after complete hardening of the concrete mass. These sections are fastened without the use of welding, all thanks to a special fastening system. Fixation is carried out by means of clips and bolts. By the way, it will be much easier to put the sections right away, when you can still change the position of the pillars, because it will be impossible to do this with already hardened concrete.
As you can see, installing a sectional fence is not very difficult. Absolutely everyone can cope with this.
My home is my castle. It is there that we feel safe and do not have to worry about ourselves. But, such a guarantee is given to us not only by the walls of the house, but also by the fence around it. It is he who shows the boundaries of private property, protecting the territory from outside intrusion. In addition, the fence serves as a decorative element, bringing some zest to the home improvement.
Fences are made in a variety of configurations and are made of metal, wood or stone. Among all types of fences, I would like to note a sectional fence. It is he who can most often be seen in summer cottages and private plots. They can be of any size, strength and configuration. We will learn the features of sectional fences, from the advantages and disadvantages, varieties, as well as the principle of creating a structure with our own hands.

Features of the sectional fence
It got its name for a reason. This is a vertical-type enclosing structure, which consists of ready-made sections. They are created, assembled and installed in place, creating a fence. Sectional type of fencing is the most optimal in terms of cost, simplicity and reliability. Installation is quick, the fence does not require a lot of space, and it is in no way inferior to conventional fence options.

The structure can be made of different materials, which characterize the sectional fence. Sectional fencing consists of the following elements:
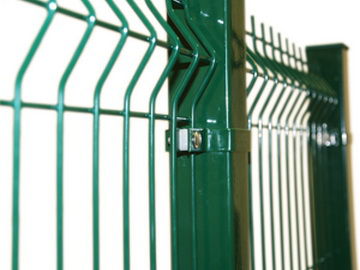
- Support pillars. Their choice should be treated with special care, since the supports play a major role. The fence posts are concreted or dug into the ground to a certain depth at the same distance along one line. The posts can be made of metal, concrete, or wood (rare).
- Fence section installed between two support posts. This is a kind of canvas from which the entire fence consists. It is the section that serves as a barrier against penetration. It is made from metal, concrete or wood.
- Fence frame in which the section will be located.
- Fasteners. To keep the fence sections on the support posts, these very structural elements are used.

As you can see, the device of such fences for the house is very simple. Does this mean that they are not doing their job well? Not at all. Sectional fences have many advantages that have made them so popular.

Advantages and disadvantages of a sectional fence
The scope of use of the sectional structure is not limited only to private or suburban housing construction. The fence separates and protects public and administrative buildings, shops, educational and medical institutions. And this is not the whole list. But why are they so widespread? Because they have a lot of advantages over other analogues.

To understand the beauty of sectional fences, consider these positive aspects of structures:

Although attractiveness and design solutions are not the main advantage of a sectional fence, it has a lot of other useful characteristics. Those who installed such fences from the sections do not regret their choice.
Varieties of sectional fences and characteristics
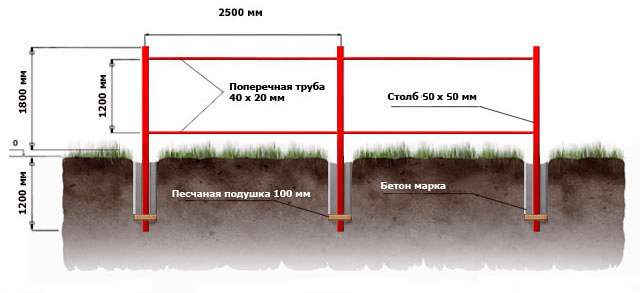
All varieties are reduced to the use of materials to create a structure. Let's start with the support posts of the fence. Most often they are made of metal. It can be either a round pipe or a square profile. It all depends on the desire. Pipes of a sectional structure are concreted or dug in to a depth of 1.2 m for reliability. The distance between the support posts can also be different. Usually choose a size of 2.5 m.

Some people make concrete fence posts. Concrete is a very durable material that allows you to diversify the design of a sectional fence. The choice of this or that material depends on the desire and the general concept of the house.

Note! Pillars can also be removed from bricks. However, the cost of concrete and brick structures is slightly higher. Therefore, most people prefer to make metal posts.
Now for the fence section. There is a huge choice here. Some people make their own mesh. For these purposes, a wire and a spot welding machine are used. The creation process is quite lengthy and tedious. But this way you can get your own design size, as well as a specific shape of the cells. To protect the do-it-yourself fence mesh, it is treated with an anti-corrosion compound. This is how you get the perfect home protective sheet.

But, there is also a simpler option for creating a sectional fence. Buy a ready-made mesh and assemble the structure. Depending on the coverage, the following types of mesh are distinguished:
- Polyvinyl chloride welded mesh.Its peculiarity is in bright green color. An ordinary metal mesh is made, which is protected by applying a protective coating to the surface. The product is placed in liquid or processed with powder in a suitable chamber.
- Galvanized steel mesh. In this case, there are two options for products that differ in manufacturing. The first option - the mesh is welded after the galvanized coating has been applied to it. The second option is that the wire is first welded into cells, after which a galvanized layer is applied. It turns out that the second design option is more efficient, and the products will be able to last a little longer.
- Mesh, without galvanizing.Since it is not protected by anything, it is the cheapest and at the same time will last less. Over time, moisture will corrode the metal and deteriorate.

So, the materials for creating the fence sections are as follows:
Sectional mesh fence made of chain-link mesh.Unlike the previous options, the chain-link is made with a weaving method. It is she who can most often be found as a sectional fence. The option is the simplest, the work on creating the structure can take only one day. The advantages are low cost, ease of use and maintenance. The fence will perfectly cope with the protection of the territory, and if necessary, it is easy to repair it. Due to the large gaps, it will not block the space, but rodents or vegetation will not penetrate beyond its limits.
Note! Some people specially plant climbing plants near the fence to make a hedge.

Wood construction. It is a beautiful, environmentally friendly and time-tested material. It has several advantages, including an affordable price, ease of processing, a variety of configurations and shapes, and excellent appearance. On the other hand, wood needs proper protection, and yet it will last 2-3 times less than metal. The fence will constantly need to be painted, and caring for it is somewhat more difficult. And it will take more time to create the structure.

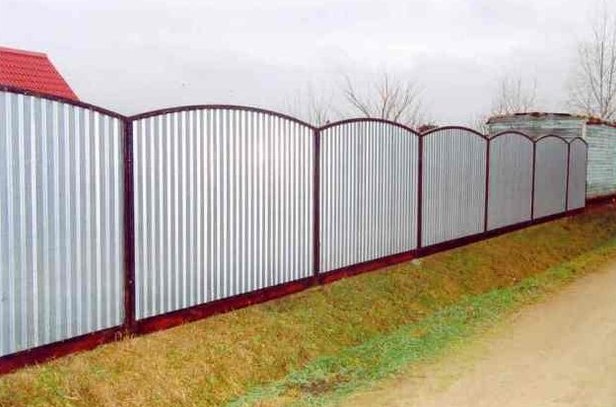
Sectional construction made of corrugated board. Quite a good option, which will allow not only to reliably protect the territory, but also to hide everything that happens in the yard from prying eyes. The material has a number of positive characteristics, including light weight, ease of processing, excellent appearance, affordable cost, durability. However, since the corrugated sheet is solid, it does not cope so well with the wind load. In this case, you need to build a high-quality foundation for the sectional fence.

Welded sectional fence.Very popular and in demand. The fence section is made of shaped pipes, angles, fittings, steel pipes and other metal elements. It is easy to work with them, the design is simple, durable, reliable and beautiful. The size can be very different, depending on the needs.

Brick or concrete buildings. They are distinguished by an impressive load on the base, reliability and durability. The cost price is very high. Not only are the materials themselves expensive, but also a solid concrete base must be built under this structure. It will take more than one day to create such a fence. The work is complex and lengthy.
There is a choice, and it is really great. This allows you to stay at the optimal option.
Materials for mesh sectional fence
We will consider the construction of the simplest design option. It is with him that it is better for beginners to start. The choice of material in this matter is very important. So, the fence mesh can be galvanized, non-galvanized and plasticized (coated with a polymer substance for protection).
One of the cheapest is a chain-link mesh made of black wire. It is not recommended to use it as a permanent fence for the house, since the material begins to rust during intense rains. Such materials will last a maximum of 3-4 years. To increase this period, you can treat the chain-link with paint or a protective anti-corrosion compound. Thanks to him, the wire will have a water-repellent property and will last much longer. True, it is better to immediately buy quality products and not spend a lot of time, effort and additional funds on processing them. For the money, it turns out the same.

Advice! The choice of galvanized products is also supported by the fact that non-galvanized mesh must be processed regularly. This is the only way to extend its service life.
The galvanized chain-link is another matter. Moisture and rust are not afraid of it, it does not need to be additionally processed. The appearance of the products is much better. You don't have to re-stain every year or two, and the service life is much longer. Therefore, from the practical point of view, it is better to dwell on this option.
And to make your sectional fence attractive and more fun, you can resort to using a special chain-link with a polymer coating. The peculiarity is that it is not only protected from corrosion, but has a variety of colors. It can be matched to the color of the facade or roof. The colors green, blue, red and yellow are very common.

Separately, I would like to dwell on the support pillars. Some use round tubes, others square. The main requirement: they must be strong, corrosion-resistant and durable. It is recommended to use square profiles for sectional construction. They are comfortable and practical. In addition, some manufacturers sell products that already have special hooks to which the chain-link is attached. It turns out that you don't even need to know welding.
Note!To make the arrangement of a sectional fence cheaper, some use used pipes, welding hooks on them.
We calculate the amount of materials for creating a sectional fence
Before you start creating a sectional structure with your own hands, you need to calculate how much material to buy for work. For example, let's take a chain-link, the width of which is 1.5 m, and the size of the cells is 4x5 cm. This is one of the most popular materials that is used to create a sectional fence.
A standard roll contains 10 meters of chain-link. The technology for creating a structure says that the support pillars should be at a distance of 2-2.5 m from each other. Then the fence mesh will not sag. Having carried out some simple calculations, it becomes clear that one roll should be enough for 5 columns. The posts themselves should be 10 cm larger than the width of the chain-link. They dig into the ground at a third of their height.
Now you can move on to specific numbers. For example, you need to create a fence, the length of which is 30 m, and the height is 1.5 m. If we take the distance between the support posts at 2 m, then 15-16 posts are required for the sectional structure. Since one roll of the chain-link falls on 5 pillars, then for a 30 m fence, 3 rolls of mesh are needed (exactly 30 m).
Also, do not forget about the fixing elements of the sectional structure - hooks. One support should have 3 pieces: top, bottom, middle. If the number of supports is 15, then 45 hooks are needed. For a sectional fence, you will need to calculate the metal corners for the frame. We recommend using corners 5 mm thick and 4x4 cm in size.
Preparation of appropriate instruments
The photo below shows a visual diagram of the future design. The sizes can be different, as they are chosen individually, depending on the desire. By the way, here is shown a way to create a tension fence structure. We'll look at both options. Although this one is simpler, the main points are done according to the same principle.
The whole process can be divided into the same steps: marking, creating pits for pillars, laying supports and sheathing the structure with canvas. For this work, you need the appropriate tools and materials:
- Selected mesh in the right amount.
- Metal pipes or profiles with a diameter of 6-8 mm.
- Metal hooks for fixing the stretch fence, and the plates are needed for the sectional fence.
- Roulette, level, plumb line.
- Manual drill, which will be used to make holes on the site.
- Anti-corrosion primer.
- Bulgarian.
- Welding machine.
- Crushed stone, sand, cement.
- Pliers.
- A hammer.
- Rope and pegs for marking.
You are now ready to create a sectional fence.
Fence marking
This is an important step, thanks to which the evenness of the sectional structure can be ensured. Before you start marking and installing the sectional fence, you need to clear the area. There should be nothing superfluous around the perimeter of the fence. Stones, trees, vegetation or debris should all be removed. Thanks to this, the comfort of further work can be ensured.
Twine stretched between wooden pegs will serve as a guide. So, the first step is to locate the extreme pillars of the future sectional structure along one line: the first and the last. When it is selected, pegs are driven into it with a hammer. They will become the beginning and end of the structure in the same plane. A string is pulled between the pegs. Pulling height - 10 cm from the ground. In this case, you need to use a level and a tape measure to install the posts along one straight line. If you want to make a line with kinks, then each of them is marked with a peg and rope.

Note!The marking twine for the future sectional structure should not sag. The tension is medium so that the wind does not change the position of the twine.
The rest of the pegs are driven in those places where you will later need to dig in the support pillars. At the same time, it is important to carefully approach this work and correctly install the pegs, at the distance at which the pillars will be. If required, the entire perimeter is marked in the same way: the sidewalls of the house and the opposite part. Usually, sectional fences for a summer residence do not need a perimeter fence, but only from the front, since there are neighbors on the sides, and a vegetable garden on the inside. The sectional structure is marked.
Creating pits for sectional fence
Land work is the most time consuming process. It is necessary in the marked places with pegs to make holes for the pillars of the selected depth. An ideal option is a garden drill. But if this is not the case, then you can get by with a shovel, however, this is not very convenient.

To speed up the process, it is better to ask for help from family or friends. An auxiliary in this case will not hurt, since the work will be done faster, and it is easier to install the support posts together. Moreover, it is important to achieve their ideally even position.
So, the first peg is removed, and a hole is made in its place with a drill or a shovel, ranging in size from 80 to 120 cm. It all depends on the size of the support post for the sectional fence. In addition, the soil on the site plays an important role. The denser it is, the less you can make the depth of the pit under the sectional structure post. The bottom and sides do not have to be brought to the ideal. As for the diameter of the holes, it is made larger than the diameter of the pillar itself. 5-10 cm is enough.

For the stability of the structure in the dug hole, a sand cushion is arranged at the bottom. It is made from a layer of sand, 5 to 10 cm thick. It must be carefully compacted. It is recommended to pour water over the mass and compact it with a manual rammer. When one pit is made, you can proceed to the second. So until everything is dug up.
Advice! It is important to make the pits the same size.
Otherwise, after installing the pillars, it turns out that the horizontal line is a curve and all the pillars will need to be adjusted along the same line. And this is not a very pleasant and fast process. It is better to do everything right at once, controlling it with a tape measure and a level.
Installation of supporting supports for a sectional fence
To extend the service life of pipes or profiles, they need to be cleaned of oil stains and corrosion. Then they are sanded. If a tension fence is made from a mesh, then hooks are welded onto the posts of the structure. But as for the sectional fence, then in this case you need to weld the plates.

The scale is removed from the welding places, after which they are protected with a primer and painted in the same color as before. The pillars are now fully prepared to form the basis for the structure. They should be lowered in turn into the pit. Since we want to have an even and beautiful sectional fence, it is important to achieve perfect evenness of the posts relative to the ground. To do this, they should be leveled and then fixed with spacers. This will keep them in the selected position.
The correctness of the installation of the structure is checked by the level. Now you can proceed to the next step - concreting. The photo below shows what exactly needs to be done.
First you need to prepare a concrete solution. It is best to use a concrete mixer. It can be rented. Concreting is important to increase the strength and stability of the future sectional fence. To prepare a concrete solution, you will need cement, water, sand and crushed stone. The proportions are the same as for creating a foundation: 1 part of cement will require 3 parts of sand and 3 parts of crushed stone. When the solution is ready, it is poured into the pits with the fence supports installed.
So far, the mixture is not compacted and not as strong. Air is expelled from it. It is not necessary to use a vibrator here, it is enough to pierce the concrete with reinforcement. When all the pits of the fence are filled with mortar, you need to protect it while drying. It is enough to cover everything with plastic wrap. Concrete will harden after two weeks, and will fully gain its strength after a month. However, work on the creation of the sectional structure can be continued after a few days or a week after pouring.
There is another way to create supports for our sectional fence. They are not concreted, but driven into the ground. For this, a small hole is made in the ground, corresponding to the diameter of the support post. After that, one person must hold it, and the other must hammer them with force using a sledgehammer or a special device to the selected depth. In order not to damage the upper edge, it is recommended to put a piece of steel pipe with a welded bottom on the supports.
And how to determine how far to drive the pole? It's even easier. On each of them, a mark is made below with the selected size. For example, if you want to hammer pillars to a depth of 70 cm, then measure this distance from the bottom and put a mark. The pillar of the structure should be driven up to this mark. Then all the elements of the fence will be even.

The method is good in that it allows you to save money on creating a sectional structure. It is recommended for use on dense rocky ground. If the soil is sandy and not completely stable on the territory, then the clogged pillars can eventually be taken to one side. The integrity of the sectional fence will be compromised.
Fixing the netting
Now the process depends on the selected fence option. It is clear that it is easier to make it stretch, since less material will be needed, and there will be less worries. However, the advantages of a sectional fence indicate the use of this particular option.
Stretch mesh fence
Nevertheless, we will additionally consider the option of creating a tension fence, since it is very simple. It is not necessary to unwind the entire 10 m roll to fix the net to the supports. The sequence of work is as follows:


As you can see, the process is not as complicated as it might seem. But the installation of a sectional fence is somewhat more difficult, since it consists in creating separate sections. Although, the principle is very similar.
We make a sectional fence from a mesh
The photo below shows a diagram of exactly how a sectional mesh fence looks like. Here are indicated not only the dimensions, but also the main structural elements.
Preparing and creating supports for a structure is no different. Everything is done according to the same principle. The only caveat is that it is not hooks that need to be welded onto the structure supports, but metal plates. The ideal thickness of the elements is 5 mm, with dimensions of 15x5 cm. They need to be welded at the top and bottom of the supports. Distance from the top and bottom edges is 20 cm.
Now you can start assembling the frame of the future sectional structure. For this, the distance between the supports is measured. You need to subtract 10-15 cm from it. So you can find the width of the structure frame, which will be made of metal corners. The height of the frame is identical to the width of the mesh used for the sectional fence. The main task is to make a frame from a corner, sheathe it with a mesh and weld the structure between the supports. And so along the entire perimeter.
Metal corners (4x4 cm) are cut to size. This will require a grinder. Then 4 corners are welded together to form a rectangle (our section). As usual, the scale is removed, and the inner and outer surfaces of the frame are cleaned. It remains to insert the mesh into the finished section. For this, the roll is laid on the ground and the required size of the web is unwound from it. Pruning is done with the same grinder.

As for attaching the mesh to the frame, this can be done in several ways. The first - the extreme rows of cells are equipped with reinforcing rods (threaded along the entire perimeter). In this case, they do not need to be welded together. Then the mesh is laid on the frame of the fence section. The upper reinforcement is welded to the inside of the corner. It needs to be pulled down well, welded on the lower rod and secured to the sides. The second method is similar, only it consists in welding hooks onto the inside of the corners, onto which the mesh is stretched with the same reinforcement threaded along the perimeter. The advantage of this method is that, if required, the section can be removed and quickly replaced.

It remains to lift the self-made section and weld it between the support posts to the pre-made metal plates. The first element is ready. The following sections of the fence are made according to the same principle. In this case, it is important to control the evenness of the fence, the edges of the adjacent frame should be exactly horizontally. Only 1 to 2 cm of drop will be visible and make the fence less presentable. This is how you can create a sectional structure of any size, it does not matter if it is a sectional fence made of a profile pipe, wood or mesh, as in our case.
Note! Welding points are thoroughly cleaned and treated with anti-corrosion compounds or paint.
Conclusion
Sectional fences have many advantages. The designs are reliable, simple, inexpensive, and can be created from a wide variety of materials. Making a sectional fence with your own hands is not so difficult. The only problem that many novice builders face is welding. Not everyone has a welding machine, let alone the skills to work with it. In this case, you can ask a friend for help. He will help you create the design. Thanks to the detailed instructions, the sectional fence is done quite quickly. And in order to extend the operational life of the fence, you need to take care of it and cover it with an anti-corrosion compound during creation.
Photos of metal sectional fences:
Decorative fence made of profiled sheet.  Wrought iron fence
  Fence Fence
  Mesh fence
  Profiled sheet lattice fence
  Decorative wrought iron fence
  Fence Fence
  Chain-link fence
There are 4 main types of metal sectional fences:
- From a chain-link mesh.
- Fansis (and variations thereof).
- Forged.
- From the professional sheet.
First type is a sectional panel made of a chain-link mesh and a metal corner, which serves as a frame for the mesh. The mesh can be made both at the factory and by hand.

Second option metal sectional fencing - made of welded mesh, it is also called Fensys fence. It is similar to a chain-link fence, but it is considered more durable due to the fact that the installed mesh has a rigid structure.
Its design differs in that some sections of the cast sections take the shape of the letter V, that is, they bend and, due to this, look volumetric.
Forged fences are distinguished by spectacular graceful lines of construction. Decorative options for such fences are made to order and are expensive. A sectional forged fence primarily has protective functions and does not differ in high cost.

And one more option for a metal sectional fence is made of a metal profile.
The design differs from the previous types in that this fence is "deaf", it blocks the visibility.
You can combine a metal profile and a netting, and as an option, there are metal sectional fences of the type of blinds. The position of the metal strips can be adjusted as desired.
Benefits of fencing
One of the main advantages of such fences is the material of their manufacture. Metal is always strength, stability, reliability, and various options for fences: air and light permeable, deaf and combined, allow you to choose a suitable fence for any type of site.
Advantages of sectional fences:
- Ease of installation.
- Affordability.
- Aesthetic appearance.
- Strength.
- A wide range of.
- Easy repair or dismantling.
- Durability.
All these qualities are equally inherent in fences made of profiled sheet and sectional fences made of metal mesh.
Of the shortcomings, it is worth noting that the metal heats up quickly and strongly during the hot season.
Areas of use
Each type of sectional fence will fully function if you choose the right type of fence.
For example, it would be inappropriate to look at a decorative wrought-iron fence when protecting the territories of warehouse premises.
Sectional fences made of welded metal meshes are used for fencing:
- Private property.
- Houses and summer cottages.
- Industrial complexes.
- Territories of sports complexes.
- Railway stations and airports.
- Sanatoriums and hospitals.
- Areas that should not be limited in access to light, air and have visibility, landscape observability.
The mesh fence can be easily decorated with decorative elements or live plants.

A deaf or closed fence made of a metal profile is suitable for protecting the site:
- From prying eyes.
- From exposure to strong wind, dust.
- From extraneous sounds, noises.
- They are as durable as mesh fencing, but all options require proper installation and some maintenance.
Installation of the structure
Sectional fence installation video:
Installation work will practically not differ from the type of fencing made of metal sections.
Installation includes:
- Preparatory work (marking the territory and installing temporary devices at the site of the future installation of poles).
- Preparation of the foundation, taking into account the characteristics of the soil.
- Installation of pillars and filling them with mortar.
- Correct placement of the first section between the posts.
- Installation of the remaining sections.
- Before marking and determining the locations for the fence posts, you need to know the size of the section. Given its width, the distance between the posts is marked and wooden pegs are inserted into the ground in their place.
- Then, with the help of a rope, which is attached to pegs along the perimeter of the site, the place of the future fence is indicated. Further, depending on the type of soil, climatic conditions, the method of installing the pillars is selected.
- If the soil is loose, then the pillars should go underground at least one and a half meters, while they are driven into the ground.
- If the soil is too wet, a strip foundation is prepared: a trench is dug, which is equipped with formwork and, after installing all the supports, is poured with concrete. The heavier the metal sections for the fence, the wider and deeper the foundation tape should be.

Strip foundation preparation scheme
- With dense soil, each pillar is concreted in a separate pit. To do this, a hole is drilled in the ground up to 1.3 m and sand with rubble is poured another 5-10 cm, which are tamped.
- The supports are aligned so that they are located strictly vertically, complemented with a reinforcement frame and completely filled with concrete.
- After the strip foundation or individual concrete pits have completely hardened, they begin to install the sections.
- Fasteners are used depending on the type of fence. These can be special clamps or the section is installed by a welded method.

If metal sectional fences are purchased in a store, it is necessary to check their completeness, the manufacturer supplies high-quality fences with all the necessary types of fastening and support posts, a passport for the section of the metal fence is also attached.
The installation of the fence can be ordered by specialists who will carry out the necessary measurements and, taking into account all wishes, the quality of the soil, the features of the relief, will competently install the metal sectional fence.
Wire mesh is ideal for lightweight fencing. It does not obscure the light, and therefore it is widely used for fencing beds, gardens, marking the boundaries of neighboring areas. To put a chain-link fence with your own hands, you do not need to be an experienced craftsman, you just need to familiarize yourself with and choose the right materials.
Fence materials
The appearance, durability and cost of a chain-link fence directly depends on the quality of the mesh. The metal mesh is available in three versions:
- non-galvanized;
- galvanized;
- plasticized.
The cheapest of all. It is not suitable for permanent fences as it starts to rust after the first rain. Usually, an untreated black mesh lasts no more than 3-4 years. To extend the service life, the non-galvanized chain-link should be coated with either paint or special compounds, which, after application, form a water-repellent coating on the mesh. Periodically, such processing needs to be repeated, which as a result is more expensive than purchasing a galvanized mesh.
It is not afraid of moisture and does not require protective treatment. Her appearance is much more attractive, such a mesh looks especially good in sectional fences. The cost of galvanized mesh is higher than regular black mesh, but since it lasts longer and does not need to be painted every 2-3 years, this option is more practical.
Plasticized mesh has a special corrosion-resistant polymer coating. The coating differs not only in strength, but also in a variety of colors, so you can choose a mesh to match the main fence or roof of the house. The most popular is a blue and green chain-link, less often you can see a white, red or yellow mesh fence.
Special attention should be paid to the support posts of the fence. The netting can be fixed on metal pipes, steel profiles, concrete posts and even wooden posts.
The most convenient and practical supports are square metal pipes. Manufacturers offer pipes with pre-welded hooks, especially for installing mesh fences. To reduce the cost of installing the fence, used pipes are also used, and the hooks are welded on their own. In addition, hook fastening is not the only option, you can fix the mesh with steel wire.
How to calculate the amount of materials
The most popular for the manufacture of fences is considered to be a chain-link mesh with a width of 1.5 m and a mesh size of 40-50 mm. A standard roll of netting has a length of 10 m. To prevent the net from sagging, the support posts must be installed in increments of 2-2.5 m. This means that no more than 5 posts are required per roll. The above-ground part of the supports should be 10 cm larger than the width of the grid, and the posts should be dug into the ground by 1/3 of their height.
So, if you need to install a chain-link fence 30 m long and 1.5 m high, you will need 3 rolls of mesh and 16 posts 2.3-2.5 m long to work.Each post should have 3 hooks attached - top, bottom and middle ... Multiplying the number of supports by 3, they find out how many hooks are needed. If the fence is sectional, the number of metal corners for the frame is additionally calculated. The height of each section is equal to the width of the mesh, and the length of the run is 2-2.5 m. The most convenient corner for the frame is 40x40 mm with a thickness of 5 mm.
Prices for mesh netting
Rabitz
Making a tension fence
A chain-link tension fence is faster than a sectional fence and is cheaper. The installation process includes marking, preparing pits for pillars, installing pillars and fence sheets.
For work you will need:
Step 1. Site marking
They take wooden pegs and a long string and start marking. First you need to determine the location of the extreme pillars. In these places, pegs are driven in, a string is pulled between them at a height of 10 cm above the ground. If the line of the fence has kinks, a beacon is also placed on each of them and the rope is fixed. Further along the marking line, it is necessary to drive in the pegs where the intermediate supports will stand. The distance between the pegs must be the same and correspond to the width of the purlin.
Step 2. Preparing pits for pillars
In the places marked with pegs, holes are made with a garden drill with a depth of 80 to 120 cm. The denser the soil, the shallower the depth. The diameter of the holes should be slightly larger than the diameter of the posts. At the bottom of each pit, a sand cushion 10 cm thick is arranged.
Step 3. Installation of bearing pillars
Prepare pipes: clean their surface from oil stains and rust, grind, weld hooks. Welding points are cleaned, descaled, and then the pipes are primed and painted. After that, the posts are lowered into the pits, set in level, and reinforced with spacers. If all the supports have the same height and are located strictly along the same line, you can pour. During the pouring process, the mortar is pierced several times with a steel bar to remove air bubbles from the concrete.
Step 4. Fastening the mesh-netting
There is no need to unwind the roll to secure the net to the posts. It is lifted vertically, attached to the first support and hooked. If there are no hooks, the mesh is screwed with steel wire in three to four places. It is recommended to leave 10-15 cm between the surface of the ground and the bottom edge of the mesh. You can also fix it close to the soil, but then the grass will quickly entangle the cells, debris, branches, fallen leaves will accumulate under the fence.

Having fixed the chain-link on the first pillar, they move on to the second. The roll is unwound by 2-2.5 m, placed on the support and the net is pulled. To make the tension uniform, a steel rod 1.5 m long is threaded into the cells along the height of the roll. It is best to carry out this process with an assistant: one person pulls the mesh, the other screws it with wire or hooks it onto hooks.
Even a tightly stretched chain-link sags over time, especially in the upper part. Reinforcing wire or long steel rods threaded into cells along the perimeter of the fence at a distance of 5-7 cm from the top and welded to the posts will help to avoid this. Sometimes the wire is threaded both from above and along the lower edge, stepping back from the ground 20 cm.At the end, the ends of the wire and the hooks are bent inward, plugs are put on all the support posts.
Sectional fence manufacturing
The layout and installation of support posts for the sectional fence is carried out according to the technology described above. The only difference is that the posts should not be with hooks, but with welded metal plates. These plates have dimensions of 15x5 cm and a thickness of 5 mm; weld them from above and below onto the racks, stepping back from the edges by 20 cm.
To assemble the sections you will need:
- rabitz;
- steel corners 40x40 mm;
- bulgarian;
- roulette;
- reinforcement rods.
Step 1. Assembling the frame
Measure the distance between the supporting posts and subtract 15-20 cm from it - this will be the width of the frame from the corners. The height of the section is equal to the width of the grid or the height of the post minus 20 cm. Steel corners are cut to the size of the section and into a rectangle. Then the scale is removed, the inner and outer surfaces of the frame are ground.
Step 2. Preparing the mesh
A roll of chain-link is laid on the ground, unwound 2-2.5 m and carefully cut with a grinder in width. Now, reinforcing rods are threaded into the extreme rows of cells on each side. There is no need to connect the rods to each other.
Step 3. Section installation
The mesh is laid on the frame and the upper reinforcement is welded to the inside of the corner. Next, the mesh is pulled down well and the lower rod is welded, after which the sides are fixed. The finished section is lifted vertically to the posts and welded to the metal plates. You can also fix the section with bolts by drilling a hole of the required diameter in the protruding part of the plate.
When installing the next section, make sure that the edges of the adjacent frames are in line. Even a 1-2 cm drop will be noticeable and give the fence a sloppy look. At the end, the sections are primed and painted. Thus, you can make a fence of any size without much hassle.
Video - Do-it-yourself fence from a chain-link

